
Avalonia桌面如何自定义边框
001 Avalonia 桌面如何自定义窗口边框
版本 Avalonia 11.0.0
0. 资料来源
- AvaloniaUI(二、无边框窗口) https://www.cnblogs.com/wuyaxiansheng/p/17584413.html
1. 前言
我在进行桌面开发的时候总是很在意如何进行桌面的边框自定义,以及在使用其他软件的时候,也会留意这件事,我没有接触UWP的原因之一也是因为UWP似乎始终用的是那种风格的边框,毕竟这也是曾经给Surface等等触摸设备做的嘛,也没有什么办法。
总之这篇文章将会提供自定义边框的各种API,以及边框效果的对比。
文章会在最后有省流无脑示例代码
本文有两种推荐的方法,推荐标识有写在文中,这两种比较总之我非常滴喜欢。
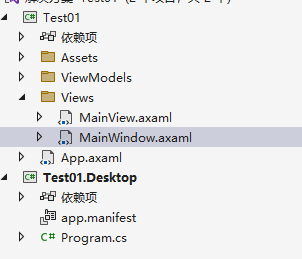
2. 在 Avalonia 中的 Window 对象
WPF中的一些经验在 Avalonia 中不太适用。自定义窗口边框的主要操作对象是 Avalonia 的 Window 对象,我的项目叫做 Test01, 请在 Test01/Views/MainWindow.axaml 的地方找到对应的 axaml 文件吧,注意它不在 Test01.Desktop 这个项目里面。
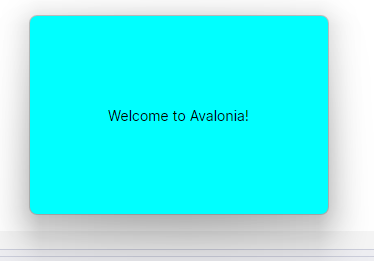
为了方便教程里面的截图,我刻意的改了尺寸和背景颜色,具体代码如下,对于各位来说没有什么影响。
<Window x:Class="Test01.Views.MainWindow"
        xmlns="https://github.com/avaloniaui"
        xmlns:x="http://schemas.microsoft.com/winfx/2006/xaml"
        xmlns:d="http://schemas.microsoft.com/expression/blend/2008"
        xmlns:mc="http://schemas.openxmlformats.org/markup-compatibility/2006"
        xmlns:views="clr-namespace:Test01.Views"
        xmlns:vm="using:Test01.ViewModels"
        Title="Test01"
        Width="300"
        Height="200"
        Background="Aqua"
        Icon="/Assets/avalonia-logo.ico"
        mc:Ignorable="d">
    <views:MainView />
</Window>

3. API 介绍
注意:Avalonia 将自定义窗口边框成为 ClientArea 的 Extended 拓展,为了容易理解,本文姑且将这种概念笼统且不准确地称之为大家更容易理解的边框。
当然,我会保留英文原文。
1. Window.ExtendClientAreaToDecorationsHint 属性(强烈推荐之一)
class Window
{
    // 读取或设置用户内容区是否可以挤到标题栏(虽然翻译的看起来不对,但是粗暴的理解的话,这会更好懂一些hh)。
    // Gets or sets if the ClientArea is Extended into the Window Decorations (chrome or border).
    public bool ExtendClientAreaToDecorationsHint {get;set;}
}
这个属性居然不是 Is 开头,这让我一时半会还不太相信这个属性的功能。
这个属性是用来控制用户内容是否能挤到标题栏的,如果换一种视角的话,也就是让标题栏的那些内容被下放到用户内容区似乎。
默认的情况下 ExtendClientAreaToDecorationsHint = false。
当 ExtendClientAreaToDecorationsHint = true 的时候是下面这样的。

你可以和上一张图做对比,可以肉眼发现,标题栏和内容融为一体了,但是注意,标题内容和 Icon 被吃掉了呢。
2. Window.ExtendClientAreaChromeHints 属性
// 对于边框样式的类型的描述
// Hint for Window Chrome when ClientArea is Extended.
[Flags]
public enum ExtendClientAreaChromeHints
{
    // 没有边框
    // The will be no chrome at all.
    NoChrome = 0,

    // 使用系统边框
    // Use SystemChrome
    SystemChrome = 1,

    // 平台默认
    // The default for the platform.
    Default = 2,

    // 优先尝试使用系统边框,在 OSX 中使用 OSX 的边框样式,在 Windows 中使用 Windows 的边框样式。
    // 这是因为 Windows 的边框样式无法显示在用户内容上面(我读不懂原文是什么意思)。
    // Use system chrome where possible. OSX system chrome is used, Windows managed
    // chrome is used. This is because Windows Chrome can not be shown on top of user
    // content.
    PreferSystemChrome = 2,

    // 在 OSX 上,标题框将会是一个更细的工具栏标题框,
    // 标题栏三色的按钮的位置会比普通样式的要肉眼可见的低一点。
    // On OSX the titlebar is the thicker toolbar kind.
    // Causes traffic lights to be positioned slightly lower than normal.
    OSXThickTitleBar = 8
}

class Window
{
    // 可设置或读取 Avalonia.Platform.ExtendClientAreaChromeHints 来设置边框到底长什么样。
    // Gets or Sets the Avalonia.Platform.ExtendClientAreaChromeHints that control how the chrome looks when the client area is extended.
    public ExtendClientAreaChromeHints ExtendClientAreaChromeHints {get;set;}
}
Avalonia 中的 Window 具有 ExtendClientAreaChromeHints 属性,值类型是枚举 ExtendClientAreaChromeHints ,这个枚举类型具有 [Flag] 特性,说明可能其中的一些特性可以叠加使用。
注意:只使用 ExtendClientAreaChromeHints 是没有什么用的,这需要别的属性参与使用,也就是需要开启 ExtendClientAreaToDecorationsHint = true。
2.1 无边框(强烈推荐之二)
        ExtendClientAreaChromeHints="NoChrome"
        ExtendClientAreaToDecorationsHint="True"
在讨论窗口有无边框的时候,窗口是否拖拽也是值得纳入的参考。在设置为 NoChrome 时,这个窗口是可以拖动的。
2.2 默认
        ExtendClientAreaChromeHints="Default"
        ExtendClientAreaToDecorationsHint="True"
这就是仅 ExtendClientAreaToDecorationsHint = true 开启时候的样子了,也很好看。
3. Window.ExtendClientAreaTitleBarHeightHint
描述标题栏的高度属性,标题栏的高度决定标题栏可拖动的地方的多寡。
class Window
{
    // 设置标题栏高度。
    // -1 的话表示系统默认。
    // 其它正数可以影响标题栏的高度。
    // Gets or Sets the TitlebarHeightHint for when the client area is extended.
    // A value of -1 will cause the titlebar to be auto sized to the OS default.
    // Any other positive value will cause the titlebar to assume that height.
    public double Window.ExtendClientAreaTitleBarHeightHint { get; set; )
}
如果不希望它能拖拽,那就设成 0 吧。
4. Window.SystemDecorations
    // 系统边框的样子
    // Determines system decorations (title bar, border, etc) for a Avalonia.Controls.Window
    public enum SystemDecorations
    {
        // 没有边框
        // No decorations
        None = 0,

        // 没有标题栏
        // Window border without titlebar
        BorderOnly = 1,

        // 全部都有
        // Fully decorated (default)
        Full = 2
    }
4.1 没有标题栏
这个窗口很大,而且 Window 的 Width 和 Height 也失效了,我本来是设置的很小的一个。
SystemDecorations="BorderOnly"

4.2 空样式
这个东西非常理想。但是拖拽无效,但是也很合理,这种就很标准了。
SystemDecorations="None"

3. 如何背景透明
直接将背景 Background 设置成 Transparent 是一种非常不错的选择。
    Background="Transparent"
    SystemDecorations="None"

4. 省流示例
<Window x:Class="Test01.Views.MainWindow"
        xmlns="https://github.com/avaloniaui"
        xmlns:x="http://schemas.microsoft.com/winfx/2006/xaml"
        xmlns:d="http://schemas.microsoft.com/expression/blend/2008"
        xmlns:mc="http://schemas.openxmlformats.org/markup-compatibility/2006"
        xmlns:views="clr-namespace:Test01.Views"
        xmlns:vm="using:Test01.ViewModels"
        Title="Test01"
        Width="300"
        Height="200"

        Background="Transparent"
        SystemDecorations="None"

        Icon="/Assets/avalonia-logo.ico"
        mc:Ignorable="d">
    <Grid>
        <Border Margin="20"
                Background="White"
                BoxShadow="0 5 20 4 #33000000"
                CornerRadius="10" />
        <views:MainView />
    </Grid>

</Window>


 浙公网安备 33010602011771号