
目录
一.声明式资源管理
声明式资源管理方法:声明式资源管理方法依赖于一资源配置清单(yaml/json)文件对资源进行管理,对资源的管理,是通过事先定义在统一资源配置清单内,再通过陈述式命令应用到K8s集群里。
语法格式:kubectl create/apply/delete/edit -f /path/to/yaml
1.1 查看资源配置清单的方法
kubectl get svc nginx-dp -o yaml -n kube-public
1.2 解释资源配置清单
kubectl explain service
1.3 创建资源配置清单
vi /root/nginx-ds-svc.yaml
1.4 修改资源配置清单
# 离线修改
vi nginx-ds-svc.yaml文件,并用kubectl apply -f nginx-ds-svc.yaml文件使之生效
# 在线修改
kubectl edit service nginx-ds
1.5 应用资源配置清单
kubectl apply -f nginx-ds-svc.yaml
1.6 删除资源配置清单
# 陈述式删除
kubectl delete service nginx-ds -n kube-public
# 声明式删除
kubectl delete -f nginx-ds-svc.yaml
1.7 YAML文件创建讲解
资源类型与apiVersion对照表
| kind | apiVersion |
|---|---|
| ClusterRoleBinding | rbac.authorization.k8s.io/v1 |
| ClusterRole | rbac.authorization.k8s.io/v1 |
| ConfigMap | v1 |
| CronJob | batch/v1beta1 |
| DaemonSet | extensions/v1beta1 |
| Node | v1 |
| Namespace | v1 |
| Secret | v1 |
| PersistentVolume | v1 |
| PersistentVolumeClaim | v1 |
| Pod | v1 |
| Deployment | v1、apps/v1、apps/v1beta1、apps/v1beta2 |
| Service | v1 |
| Ingress | extensions/v1beta1 |
| ReplicaSet | apps/v1、apps/v1beta2 |
| Job | batch/v1 |
| StatefulSet | apps/v1、apps/v1beta1、apps/v1beta2 |
cat create_namespace.yml
# 必选,api版本号
apiVersion: v1
# 必选,类型为pod
kind: pod
# 必选,定义元数据
metadata:
  # 必选,pod名称
  name: string
  # pod所属的命名空间,默认在default的namespace
  namespace: string
  # 自定义标签
  lables:
    # 自定义标签名字
    - name: string
  # 自定义注释列表
  annotations:
    - name: string
# pod中容器的详细定义(期望)
spec:
  # 通过nodeName调度到node1节点
  nodeName: node1
  # nodeSelector节点选择器
  nodeSelector:
    # 指定调度到标签为bussiness=game的节点
    bussiness: game
  # 必选,pod中容器列表
  containers:
  # 必选,容器名称
  - name: string
    # 必选,容器的镜像名称
    image: string
    # 获取镜像的策略,Alawys表示下载镜像,IfNotPresent表示优先使用本地镜像,否则下载镜像,Never表示仅使用本地镜像
    imagePullPolicy: [Always | Never | IfNotPresent]
    # 容器的启动命令列表,如不指定,使用打包时使用的启动命令
    command: [string]
    # 容器的启动命令参数列表
    args: [string]
    # 容器的工作目录
    workingDir: string
    # 挂载到容器内部的存储卷位置
    volumeMounts:
    # 引用pod定义的共享存储卷的名称,需用volumes[]部分定义的卷名
    - name: string
      # 存储卷在容器内mount的绝对路径,应少于512字符
      mountPath: string
      # 是否为只读模式
      readOnly: boolean
    # 需要暴露的端口号列表
    Ports:
    # 端口号名称
    - name: string
      # 容器需要监听的端口号
      containerPort: int
      # 容器所在宿主机需要监听的端口号,默认与Container相同
      hostPort: int
      # 端口协议,支持TCP和UDP,默认TCP
      protocol: string
    # 容器运行前需设置的环境变量列表
    env:
    # 环境变量名称
    - name: string
      # 环境变量的值
      value: string
    # 资源限制和请求的设置
    resources:
      # 资源限制的设置
      limits:
        # cpu的限制,单位为core数,将用于docker run --cpu-shares参数
        cpu: string
        # 内存限制,单位可以为Mib/Gib,将用于docker run --memory参数
        memory: string
      # 资源请求的限制
      requests:
        # cpu请求,容器启动的初始可用数量
        cpu: string
        # 内存请求,容器启动的初始可用数量
        memory: string
    # 对Pod内个容器健康检查的设置,当探测无响应几次后将自动重启该容器,检查方法有exec、httpGet和tcpSocket,对一个容器只需设置其中一种方法即可
    livenessProbe:
      # 对Pod容器内检查方式设置为exec方式
      exec:
        # exec方式需要制定的命令或脚本
        command:
          - cat
          - /tmp/healthy
      # 对Pod内个容器健康检查方法设置为HttpGet,需要制定path、port
      httpGet:
        path: string
        port: number
        host: string
        scheme: string
        HttpHeaders:
        - name: string
          value: string
      # 对Pod内个容器健康检查方式设置为tcpSocket方式
      tcpSocket:
        port: number
        # 容器启动完成后首次探测的时间,单位为秒,pod启动延迟5秒后探测
        initialDelaySeconds: 0
        # 对容器健康检查探测等待响应的超时时间,单位秒,默认1秒
        timeoutSeconds: 0
        # 对容器监控检查的定期探测时间设置,单位秒,默认10秒一次
        periodSeconds: 0
        successThreshold: 0
        failureThreshold: 0
        securityContext:
          privileged: false
    # Pod的重启策略,Always表示一旦不管以何种方式终止运行,kubelet都将重启,OnFailure表示只有Pod以非0退出码退出才重启,Never表示不再重启该Pod
    restartPolicy: [Always | Never | OnFailure]
    # 设置NodeSelector表示将该Pod调度到包含这个label的node上,以key:value的格式指定
    nodeSelector: obeject
    # pull镜像时使用的secret名称,以key:secretkey格式指定
    imagePullSecrets:
    - name: string
    # 是否使用主机网络模式,默认为false,如果设置为true,表示使用宿主机网络
    hostNetwork: false
    # 在该pod上定义共享存储卷列表
    volumes:
    # 共享存储卷名称 (volumes类型有很多种)
    - name: string
      # 类型为emtyDir的存储卷,与Pod同生命周期的一个临时目录,为空值
      emptyDir: {}
      # 类型为hostPath的存储卷,表示挂载Pod所在宿主机的目录
      hostPath: string
        # Pod所在宿主机的目录,将被用于同期中mount的目录
        path: string
      # 类型为secret的存储卷,挂载集群与定义的secret对象到容器内部
      secret:
        scretname: string
        items:
        - key: string
          path: string
      # 类型为configMap的存储卷,挂载预定义的configMap对象到容器内部
      configMap:
        name: string
        items:
        - key: string
          path: string
1.7.1 HealthCheck健康检查
当Pod启动时,容器可能会因为某种错误(服务未启动或端口不正确)而无法访问等。
kubelet拥有两个检测器,它们分别对应不同的触发器(根据触发器的结构执行进一步的动作)
1.7.1.1 Health Check方式
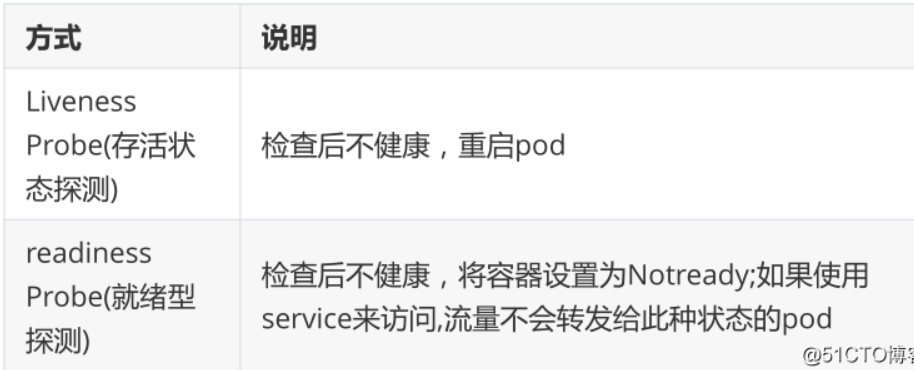
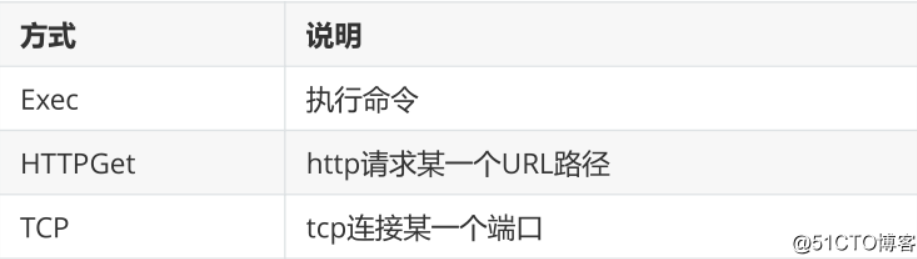
1.7.1.2 Probe探测方式
1.7.1.3 案例1: liveness-exec
vim pod-liveness-exec.yml
apiVersion: v1
kind: Pod
metadata:
  name: liveness-exec
  namespace: default
spec:
  containers:
  - name: liveness
    image: busybox
    imagePullPolicy: IfNotPresent
    args:
    - /bin/sh
    - -c
    - touch /tmp/healthy; sleep 30; rm -rf /tmp/healthy;
    sleep 600
  livenessProbe:
    exec:
      command:
      - cat
      - /tmp/healthy
      # pod启动延迟5秒后探测
      initialDelaySeconds: 5
      # 每5秒探测1次
      periodSeconds: 5

kubectl apply -f pod-liveness-exec.yml
kubectl describe pod liveness-exec
1.7.1.4 案例2: liveness-httpget
vim pod-liveness-httpget.yml
apiVersion: v1
kind: Pod
metadata:
  name: liveness-httpget
  namespace: default
spec:
  containers:
  - name: liveness
    image: nginx:1.15-alpine
    imagePullPolicy: IfNotPresent
  # 指定容器端口,这一段不写也行,端口由镜像决定
  ports:
  # 自定义名称,不需要与下面的port: http对应
  - name: http
    # 类似dockerfile里的expose 80
    containerPort: 80
  livenessProbe:
    # 使用httpGet方式
    httpGet:
      # http协议,也可以直接写80端口
      port: http
      # 探测家目录下的index.html
      path: /index.html
      # 延迟3秒开始探测
      initialDelaySeconds: 3
      # 每隔5s钟探测一次
      periodSeconds: 5
kubectl apply -f pod-liveness-httpget.yml
kubectl get pods
kubectl exec -it liveness-httpget -- rm -rf /usr/share/nginx/html/index.html
kubectl describe pod liveness-http | tail
1.7.1.5 案例3: liveness-tcp
vim pod-liveness-tcp.yml
apiVersion: v1
kind: Pod
metadata:
  name: liveness-tcp
  namespace: default
spec:
  containers:
  - name: liveness
    image: nginx:1.15-alpine
    imagePullPolicy: IfNotPresent
   ports:
   - name: http
     containerPort: 80
  livenessProbe:
    # 使用tcp连接方式
    tcpSocket:
    # 连接80端口进行探测
    port: 80
    initialDelaySeconds: 3
    periodSeconds: 5
kubectl apply -f pod-liveness-tcp.yml
kubectl get pod
kubectl exec -it liveness-tcp --/usr/sbin/nginx -s stop
kubectl describe pod liveness-http | tail -8
1.7.1.6 案例4: readiness
vim pod-readiness-httpget.yml
apiVersion: v1
kind: Pod
metadata:
  name: readiness-httpget
  namespace: default
spec:
  containers:
  - name: readiness
    image: nginx:1.15-alpine
    imagePullPolicy: IfNotPresent
    ports:
  - name: http
    containerPort: 80
    # 这里由liveness换成了readiness
    readinessProbe:
    httpGet:
      port: http
      path: /index.html
     initialDelaySeconds: 3
     periodSeconds: 5
kubectl apply -f pod-readiness-httpget.yml
kubectl get pod
kubectl exec -it readiness-httpget -- rm-rf /usr/share/nginx/html/index.html
kubectl get pod
kubectl exec -it readiness-httpget --touch /usr/share/nginx/html/index.html
1.7.1.7 案例5: readiness+liveness综合
vim pod-readiness-liveiness.yml
apiVersion: v1
kind: Pod
metadata:
  name: readiness-liveness-httpget
  namespace: default
spec:
  containers:
  - name: readiness-liveness
    image: nginx:1.15-alpine
    imagePullPolicy: IfNotPresent
    ports:
  - name: http
    containerPort: 80
  livenessProbe:
    httpGet:
      port: http
      path: /index.html
      initialDelaySeconds: 1
      periodSeconds: 3
  readinessProbe:
    httpGet:
      port: http
      path: /index.html
      initialDelaySeconds: 5
      periodSeconds: 5
kubectl apply -f pod-readiness-liveiness.yml
kubectl get pod # 十秒前执行
kubectl get pod # 十秒后执行

 浙公网安备 33010602011771号