主动信息收集-发现
相比人畜无害的被动信息收集,主动信息收集的动作有点攻击性的暗示。
因为被动信息收集我们收集的是网络上目标的有关信息并不会直接访问目标,而主动信息收集是直接与目标系统进行交互通信的额,无法避免留下访问的痕迹。
作为渗透测试者可以用一下几点做好保护工作:
- 使用代理或者已被控制的靶机
- 使用噪声迷惑目标,淹没真实的探测流量
- 做好被封杀的准备
所谓主动信息收集,重要一笔就是扫描:发送不同的探测,根据返回结果判断目标状态
steps:
ip主机----端口-----服务---
二层发现(ARP扫描)----ARPING
只能发现本网段的,不能路由
root@kali:~# arping -h
Usage: arping [-fqbDUAV] [-c count] [-w timeout] [-I device] [-s source] destination
  -f : quit on first reply
  -q : be quiet
  -b : keep broadcasting, don't go unicast
  -D : duplicate address detection mode
  -U : Unsolicited ARP mode, update your neighbours
  -A : ARP answer mode, update your neighbours
  -V : print version and exit
  -c count : how many packets to send
  -w timeout : how long to wait for a reply
  -I device : which ethernet device to use
  -s source : source ip address
  destination : ask for what ip address
-d : 发现重复回应
arping -c 1 1.1.1.1
arping -d 1.1.1.1      #用于探测网络是否存在伪造路由 中间人,在网络中从同一地址发包有两个不同MAC有同一IP
arping -c 1 192.168.56.1 |grep "reply from" |cut -d " " -f 4 #|cut -d 分割符 -f 第几片
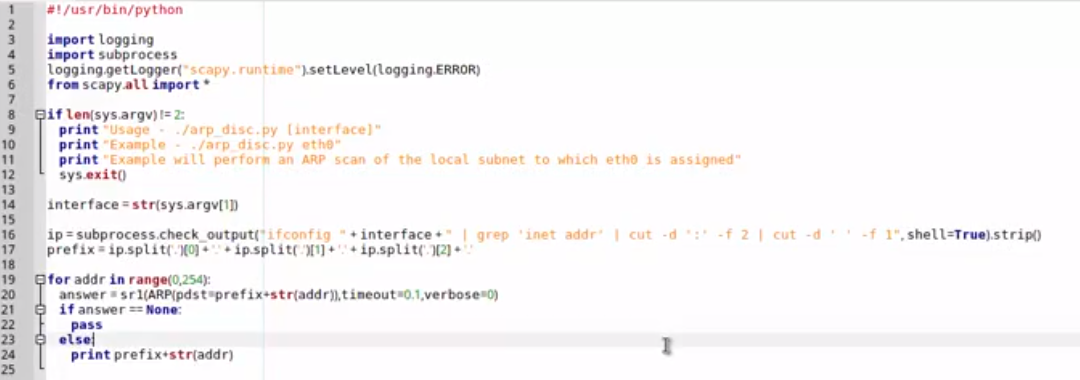
插入一个小脚本学习:


#!/bin/bash
if [ "$#" -ne 1 ];then
        #echo的都是废话,忽略可
    echo "Usage: ./arping.sh [interface]"
    echo "Example: ./arping.sh eth0"
    echo " Example will perform an arp scan of the local subnet to which is assigned"
    exit
fi

interface=$1
prefix=$(ifconfig $interface |grep "inet addr" |cut -d ":" -f 2 |cut -d "" -f 1 |cut -d "." -f 1-3)
for addr in $(seq 1 254);do
    arping -I $interface -c 1 $prefix.$addr |grep "reply from" |cut -d " " -f 4
done
其实,最牛掰的还是数nmap,后面会单独介绍。
这里用二层扫描,参数sn: ping scan
nmap -sn 10.0.4.0/24
#速度快、还可以探测主机设备信息
#还支持对文本文件传入扫描
nmap -iL addr.text -sn
-iL <inputfilename>: Input from list of hosts/networks
二层发现还有一个工具:netdiscover
- 专用于二层发现
- 可用于无线和交换网络环境
- 主动和被动发现
主动:(主动的容易引发报警)
netdiscover -i eth0 -r 1.1.1.0/24
netdiscover -l iplist.txt
被动:(混杂模式)
netdiscover -p
二层发现还有一个工具:scapy
(当然也可以用在三层发现)
- 可作为python库进行调用
- 也可作为单独的工具使用
- 抓包、分析、创建修改、注入网络流量
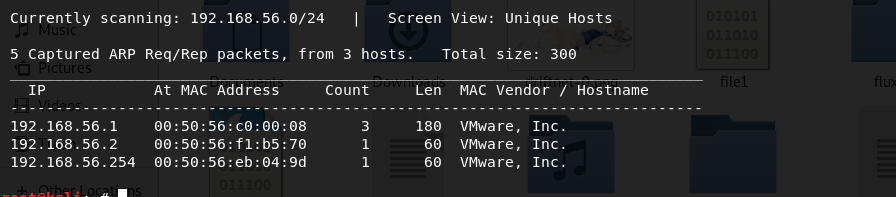
INFO: Can't import matplotlib. Won't be able to plot.
WARNING: No route found for IPv6 destination :: (no default route?)
#如果首次启用会有这个警告,可以安装gnuplot
apt-get install python3-gnuplot

scapy

ARP().display()
sr1()   //发包
root@kali:~# scapy
INFO: Can't import matplotlib. Won't be able to plot.
WARNING: No route found for IPv6 destination :: (no default route?)

                     aSPY//YASa
             apyyyyCY//////////YCa       |
            sY//////YSpcs  scpCY//Pp     | Welcome to Scapy
 ayp ayyyyyyySCP//Pp           syY//C    | Version 2.4.0
 AYAsAYYYYYYYY///Ps              cY//S   |
         pCCCCY//p          cSSps y//Y   | https://github.com/secdev/scapy
         SPPPP///a          pP///AC//Y   |
              A//A            cyP////C   | Have fun!
              p///Ac            sC///a   |
              P////YCpc           A//A   | Craft packets like it is your last
       scccccp///pSP///p          p//Y   | day on earth.
      sY/////////y  caa           S//P   |                      -- Lao-Tze
       cayCyayP//Ya              pY/Ya   |
        sY/PsY////YCc          aC//Yp
         sc  sccaCY//PCypaapyCP//YSs
                  spCPY//////YPSps
                       ccaacs
                                       using IPython 5.5.0
>>> ARP().display
<bound method ARP.display of <ARP  |>>
>>> ARP().display()
###[ ARP ]###
  hwtype= 0x1
  ptype= 0x800
  hwlen= 6
  plen= 4
  op= who-has
  hwsrc= 00:0c:29:f0:7b:6e
  psrc= 192.168.56.134
  hwdst= 00:00:00:00:00:00
  pdst= 0.0.0.0

>>> arp=ARP()
>>> arp.pdst="192.168.56.1"
>>> arp.display()
###[ ARP ]###
  hwtype= 0x1
  ptype= 0x800
  hwlen= 6
  plen= 4
  op= who-has
  hwsrc= 00:0c:29:f0:7b:6e
  psrc= 192.168.56.134
  hwdst= 00:00:00:00:00:00
  pdst= 192.168.56.1

>>> sr1(arp)
Begin emission:
*Finished sending 1 packets.

Received 1 packets, got 1 answers, remaining 0 packets
<ARP  hwtype=0x1 ptype=0x800 hwlen=6 plen=4 op=is-at hwsrc=00:50:56:c0:00:08 psrc=192.168.56.1 hwdst=00:0c:29:f0:7b:6e pdst=192.168.56.134 |<Padding  load='\x00\x00\x00\x00\x00\x00\x00\x00\x00\x00\x00\x00\x00\x00\x00\x00\x00\x00' |>>
>>> anwser=sr1(arp)
Begin emission:
*Finished sending 1 packets.

Received 1 packets, got 1 answers, remaining 0 packets
>>> anwser.display()
###[ ARP ]###
  hwtype= 0x1
  ptype= 0x800
  hwlen= 6
  plen= 4
  op= is-at
  hwsrc= 00:50:56:c0:00:08
  psrc= 192.168.56.1
  hwdst= 00:0c:29:f0:7b:6e
  pdst= 192.168.56.134
###[ Padding ]###
     load= '\x00\x00\x00\x00\x00\x00\x00\x00\x00\x00\x00\x00\x00\x00\x00\x00\x00\x00'

>>>
脚本示例:你看 len(sys.argv)!=2 也就是命令和参数一共2个;相比shell不同,那是1个
发现:三层发现
ICMP
ping
traceroute中的***是人家没回你 人家墙ping了
nmap 1.1.1.1 -sn
fping 192.168.1.1
    fping 是一个将  ICMP echo 探测器发送到网络主机的程序,类似于 ping,可以看作是 ping 的增强版。但是 fping 在 ping多个主机时性能更好。

Usage: fping [options] [targets...]
   -a         显示存活目标,即可ping通的目标
   -A         将目标以ip地址的形式显示
   -b n       ping 数据包的大小。(默认为56)
   -B f       set exponential backoff factor to f
   -c n       ping每个目标的次数 (默认为1)
   -C n       同-c, 返回的结果为冗长格式
   -D         每个输出行打印时间戳
   -e         显示返回数据包所费时间
   -f file    从文件获取目标列表( - 表示从标准输入)(不能与 -g 同时使用)
   -g         生成目标列表(不能与 -f 同时使用)
                (可指定目标的开始和结束IP, 或者提供ip的子网掩码)
                (例:fping -g 192.168.1.0 192.168.1.255 或 fping -g 192.168.1.0/24)
   -H n       设置ip的TTL值 (生存时间)
   -i n       ping包之间的间隔(单位:毫秒)(默认25)
   -I if      绑定到特定的接口
   -l         循环发送ping
   -m         ping目标主机的多个网口
   -M         设置不分段标记
   -n         将目标以主机名或域名显示(等价于 -d )
   -N         输出兼容netdata (-l -Q are required)
   -o         显示累计中断时间 (lost packets * packet interval)
   -O n       在ICMP包中设置服务的类型(tos)标志
   -p n       对同一个目标的ping包间隔(毫秒)
                 (在循环和统计模式中,默认为1000)
   -q         安静模式(不显示每个目标或每个ping的结果)
   -Q n       同-q, 但是每n秒显示信息概要
   -r n       当ping失败时,最大重试次数(默认为3次)
   -R         random packet data (to foil link data compression)
   -s         打印最后的统计数据
   -S addr    设置源ip地址
   -t n       单个目标的超时时间(毫秒)(默认500)
   -T n       请忽略(为兼容fping 2.4)
   -u         显示不可到达的目标
   -v         显示版本号
   targets    需要ping的目标列表(不能和 -f 同时使用)
fping可以对地址段进行ping
fping -g 192.168.1.100 192.168.1.200 -c 1
hping3 1.1.1.1 --icmp -c 2
- 功能强大但每次只能一个目标
- 能发送几乎TCP\IP的任意包
hping3使用详解
可参考:https://boke.wsfnk.com/archives/695.html
https://blog.csdn.net/X_namexi/article/details/98053818
[05:12:28][root@ubuntu]~# hping3 -h
usage: hping3 host [options]
  -h  --help      show this help
  -v  --version   show version
  -c  --count     packet count
  -i  --interval  wait (uX for X microseconds, for example -i u1000)
      --fast      alias for -i u10000 (10 packets for second)
      --faster    alias for -i u1000 (100 packets for second)
      --flood       sent packets as fast as possible. Don't show replies.
  -n  --numeric   numeric output
  -q  --quiet     quiet
  -I  --interface interface name (otherwise default routing interface)
  -V  --verbose   verbose mode
  -D  --debug     debugging info
  -z  --bind      bind ctrl+z to ttl           (default to dst port)
  -Z  --unbind    unbind ctrl+z
      --beep      beep for every matching packet received
Mode
  default mode     TCP
  -0  --rawip      RAW IP mode
  -1  --icmp       ICMP mode
  -2  --udp        UDP mode
  -8  --scan       SCAN mode.
                   Example: hping --scan 1-30,70-90 -S www.target.host
  -9  --listen     listen mode
IP
  -a  --spoof      spoof source address
  --rand-dest      random destionation address mode. see the man.
  --rand-source    random source address mode. see the man.
  -t  --ttl        ttl (default 64)
  -N  --id         id (default random)
  -W  --winid      use win* id byte ordering
  -r  --rel        relativize id field          (to estimate host traffic)
  -f  --frag       split packets in more frag.  (may pass weak acl)
  -x  --morefrag   set more fragments flag
  -y  --dontfrag   set don't fragment flag
  -g  --fragoff    set the fragment offset
  -m  --mtu        set virtual mtu, implies --frag if packet size > mtu
  -o  --tos        type of service (default 0x00), try --tos help
  -G  --rroute     includes RECORD_ROUTE option and display the route buffer
  --lsrr           loose source routing and record route
  --ssrr           strict source routing and record route
  -H  --ipproto    set the IP protocol field, only in RAW IP mode
ICMP
  -C  --icmptype   icmp type (default echo request)
  -K  --icmpcode   icmp code (default 0)
      --force-icmp send all icmp types (default send only supported types)
      --icmp-gw    set gateway address for ICMP redirect (default 0.0.0.0)
      --icmp-ts    Alias for --icmp --icmptype 13 (ICMP timestamp)
      --icmp-addr  Alias for --icmp --icmptype 17 (ICMP address subnet mask)
      --icmp-help  display help for others icmp options
UDP/TCP
  -s  --baseport   base source port             (default random)
  -p  --destport   [+][+]<port> destination port(default 0) ctrl+z inc/dec
  -k  --keep       keep still source port
  -w  --win        winsize (default 64)
  -O  --tcpoff     set fake tcp data offset     (instead of tcphdrlen / 4)
  -Q  --seqnum     shows only tcp sequence number
  -b  --badcksum   (try to) send packets with a bad IP checksum
                   many systems will fix the IP checksum sending the packet
                   so you'll get bad UDP/TCP checksum instead.
  -M  --setseq     set TCP sequence number
  -L  --setack     set TCP ack
  -F  --fin        set FIN flag
  -S  --syn        set SYN flag
  -R  --rst        set RST flag
  -P  --push       set PUSH flag
  -A  --ack        set ACK flag
  -U  --urg        set URG flag
  -X  --xmas       set X unused flag (0x40)
  -Y  --ymas       set Y unused flag (0x80)
  --tcpexitcode    use last tcp->th_flags as exit code
  --tcp-mss        enable the TCP MSS option with the given value
  --tcp-timestamp  enable the TCP timestamp option to guess the HZ/uptime
Common
  -d  --data       data size                    (default is 0)
  -E  --file       data from file
  -e  --sign       add 'signature'
  -j  --dump       dump packets in hex
  -J  --print      dump printable characters
  -B  --safe       enable 'safe' protocol
  -u  --end        tell you when --file reached EOF and prevent rewind
  -T  --traceroute traceroute mode              (implies --bind and --ttl 1)
  --tr-stop        Exit when receive the first not ICMP in traceroute mode
  --tr-keep-ttl    Keep the source TTL fixed, useful to monitor just one hop
  --tr-no-rtt        Don't calculate/show RTT information in traceroute mode
ARS packet description (new, unstable)
  --apd-send       Send the packet described with APD (see docs/APD.txt)
[05:12:45][root@ubuntu]~#
hping 是 面向命令行的用于生成和解析TCP/IP协议数据包汇编/分析的开源工具。作者是Salvatore Sanfilippo,界面灵感来自ping(8)unix命令,目前最新版是 hping3,它支持TCP,UDP,ICMP和RAW-IP协议,具有跟踪路由模式,能够在覆盖的信道之间发送文件以及许多其他功能,支持使用tcl脚本自动化地调用其API。hping是安全审计、防火墙测试等工作的标配工具。hping 优势在于能够定制数据包的各个部分,因此用户可以灵活对目标机进行细致地探测。
虽然 hping 以前主要用作安全工具,但它可以在许多方面被不太关心安全性的人员用于测试网络和主机,您可以使用hping的一小部分内容:
- 防火墙测试
- 高级端口扫描
- 网络测试,使用不同的协议,TOS,分片
- 手动路径MTU发现
- 在所有支持的协议下,高级traceroute
- 远程操作系统指纹
- 远程正常运行时间猜测
- TCP/IP协议栈审计
- hping也可以用于学习TCP/IP的学生
用法: hping3 host [options]
  -h  --help      显示帮助
  -v  --version   显示版本
  -c  --count     发送数据包的数目
  -i  --interval  发送数据包间隔的时间 (uX即X微秒, 例如: -i u1000)
      --fast      等同 -i u10000 (每秒10个包)
      --faster    等同 -i u1000 (每秒100个包)
      --flood      尽最快发送数据包,不显示回复。
  -n  --numeric   数字化输出,象征性输出主机地址。
  -q  --quiet     安静模式
  -I  --interface 网卡接口 (默认路由接口)
  -V  --verbose   详细模式
  -D  --debug     调试信息
  -z  --bind      绑定ctrl+z到ttl(默认为目的端口)
  -Z  --unbind    取消绑定ctrl+z键
      --beep      对于接收到的每个匹配数据包蜂鸣声提示
模式选择
  default mode     TCP   // 默认模式是 TCP
  -0  --rawip      RAWIP模式,原始IP模式。在此模式下HPING会发送带数据的IP头。即裸IP方式。使用RAWSOCKET方式。
  -1  --icmp       ICMP模式,此模式下HPING会发送IGMP应答报,你可以用--ICMPTYPE --ICMPCODE选项发送其他类型/模式的ICMP报文。
  -2  --udp        UDP 模式,缺省下,HPING会发送UDP报文到主机的0端口,你可以用--baseport --destport --keep选项指定其模式。
  -8  --scan       SCAN mode. //扫描模式 指定扫描对应的端口。
                   Example: hping --scan 1-30,70-90 -S www.target.host    // 扫描
  -9  --listen     listen mode  // 监听模式
IP 模式
  -a  --spoof      spoof source address  //源地址欺骗。伪造IP攻击,防火墙就不会记录你的真实IP了,当然回应的包你也接收不到了。
  --rand-dest      random destionation address mode. see the man. // 随机目的地址模式。详细使用 man 命令
  --rand-source    random source address mode. see the man.       // 随机源地址模式。详细使用 man 命令
  -t  --ttl        ttl (默认 64)  //修改 ttl 值
  -N  --id         id (默认 随机)  // hping 中的 ID 值,缺省为随机值
  -W  --winid      使用win* id字节顺序  //使用winid模式,针对不同的操作系统。UNIX ,WINDIWS的id回应不同的,这选项可以让你的ID回应和WINDOWS一样。
  -r  --rel        相对id字段(估计主机流量)  //更改ID的,可以让ID曾递减输出,详见HPING-HOWTO。
  -f  --frag       拆分数据包更多的frag.  (may pass weak acl)   //分段,可以测试对方或者交换机碎片处理能力,缺省16字节。
  -x  --morefrag   设置更多的分段标志    // 大量碎片,泪滴攻击。
  -y  --dontfrag   设置不分段标志    // 发送不可恢复的IP碎片,这可以让你了解更多的MTU PATH DISCOVERY。
  -g  --fragoff    set the fragment offset    // 设置断偏移。
  -m  --mtu        设置虚拟最大传输单元, implies --frag if packet size > mtu    // 设置虚拟MTU值,当大于mtu的时候分段。
  -o  --tos        type of service (default 0x00), try --tos help          // tos字段,缺省0x00,尽力而为?
  -G  --rroute     includes RECORD_ROUTE option and display the route buffer    // 记录IP路由,并显示路由缓冲。
  --lsrr           松散源路由并记录路由        // 松散源路由
  --ssrr           严格源路由并记录路由      // 严格源路由
  -H  --ipproto    设置IP协议字段,仅在RAW IP模式下使用   //在RAW IP模式里选择IP协议。设置ip协议域,仅在RAW ip模式使用。
ICMP 模式
  -C  --icmptype   icmp类型(默认echo请求)    // ICMP类型,缺省回显请求。
  -K  --icmpcode   icmp代号(默认0)     // ICMP代码。
      --force-icmp 发送所有icmp类型(默认仅发送支持的类型)    // 强制ICMP类型。
      --icmp-gw    设置ICMP重定向网关地址(默认0.0.0.0)    // ICMP重定向
      --icmp-ts    等同 --icmp --icmptype 13 (ICMP 时间戳)            // icmp时间戳
      --icmp-addr  等同 --icmp --icmptype 17 (ICMP 地址子网掩码)  // icmp子网地址
      --icmp-help  显示其他icmp选项帮助      // ICMP帮助
UDP/TCP 模式
  -s  --baseport   base source port             (default random)              // 缺省随机源端口
  -p  --destport   [+][+]<port> destination port(default 0) ctrl+z inc/dec    // 缺省随机源端口
  -k  --keep       keep still source port      // 保持源端口
  -w  --win        winsize (default 64)        // win的滑动窗口。windows发送字节(默认64)
  -O  --tcpoff     set fake tcp data offset     (instead of tcphdrlen / 4)    // 设置伪造tcp数据偏移量(取代tcp地址长度除4)
  -Q  --seqnum     shows only tcp sequence number        // 仅显示tcp序列号
  -b  --badcksum   (尝试)发送具有错误IP校验和数据包。许多系统将修复发送数据包的IP校验和。所以你会得到错误UDP/TCP校验和。
  -M  --setseq     设置TCP序列号
  -L  --setack     设置TCP的ack   ------------------------------------- (不是 TCP 的 ACK 标志位)
  -F  --fin        set FIN flag
  -S  --syn        set SYN flag
  -R  --rst        set RST flag
  -P  --push       set PUSH flag
  -A  --ack        set ACK flag   ------------------------------------- (设置 TCP 的 ACK 标志 位)
  -U  --urg        set URG flag      // 一大堆IP包头的设置。
  -X  --xmas       set X unused flag (0x40)
  -Y  --ymas       set Y unused flag (0x80)
  --tcpexitcode    使用last tcp-> th_flags作为退出码
  --tcp-mss        启用具有给定值的TCP MSS选项
  --tcp-timestamp  启用TCP时间戳选项来猜测HZ/uptime
Common //通用设置
  -d  --data       data size    (default is 0)    // 发送数据包大小,缺省是0。
  -E  --file       文件数据
  -e  --sign       添加“签名”
  -j  --dump       转储为十六进制数据包
  -J  --print      转储为可打印字符
  -B  --safe       启用“安全”协议
  -u  --end        告诉你什么时候--file达到EOF并防止倒回
  -T  --traceroute traceroute模式(等同使用 --bind 且--ttl 1)
  --tr-stop        在traceroute模式下收到第一个不是ICMP时退出
  --tr-keep-ttl    保持源TTL固定,仅用于监视一跳
  --tr-no-rtt       不要在跟踪路由模式下计算/显示RTT信息 ARS包描述(新增功能,不稳定)
ARS packet description (new, unstable)
  --apd-send       发送APD描述数据包(参见docs / APD.txt)
应用实例:
#DOS攻击(Syn Flood攻击)
-c 指定连接数 -p 目标端口
-d 指定数据部分的大小 -S 攻击类型是Syn flood
--flood 以泛洪的方式攻击 --rand-source 随机产生伪造源地址
  hping3 -c 1000 -d 120 -S -p 80 --flood --rand-source 192.168.100.1

#-P flag置为Push -U flag置为Urge紧急(加这两参数可以提高效率)
  hping3 -S -P -U -p 80 --flood --rand-source 192.168.100.1


#TCP Flood攻击(使用以下命令建立全连接,经过测试把自己搞死了)
  hping3 -SARUPF -p 80 --flood --rand-source 192.168.100.1

#ICMP Flood攻击
  -q安静模式 -n不解析域名 -a指定伪造IP
  hping3 -q -n -d 200 --icmp --flood -a 11.11.11.11 192.168.100.1

#UDP Flood 攻击
  hping3 --udp -s 6666 -p 53 -a 8.8.8.8 --flood 192.168.100.1

#LAND攻击(大部分系统已经不会响应该种报文了,例如centos7,也就是说不会占用半连接)
  hping3 -n -S -p 80 -a 192.168.100.1 --flood 192.168.100.1
  应对措施:
  可以通过防火墙、路由设备,建立规则,丢掉源地址和目标地址相同的 SYN、SYN+ACK 和 TCP。
Ddos攻击:
hping3 -c 1000 -d 120 -S -p 80 --flood --rand-source 192.168.100.1
#Hping3也可以对目标端口进行扫描。Hping3支持指定TCP各个标志位、长度等信息。以下示例可用于探测目标机的80端口是否开放:
hping3 -I eth0 -S 192.168.10.1 -p 80
#其中-I eth0指定使用eth0端口,-S指定TCP包的标志位SYN,-p 80指定探测的目的端口。
四层发现:TCP UDP扫描
端口扫描
隐蔽扫描——syn 不建立完整连接应用日志不记录扫描行为-隐蔽
僵尸扫描
- 极度隐蔽
- 实施条件苛刻
- 可伪造源地址
- 选择僵尸机
- 闲置系统系统
- 使用递增的IPID
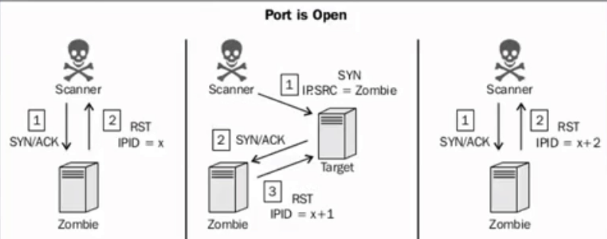

僵尸扫描
前提是要找到一个合格的僵尸机。几乎闲置,没有3层的通信。IPID是递增的
就是实现源地址伪造。
实现的工具有两种:
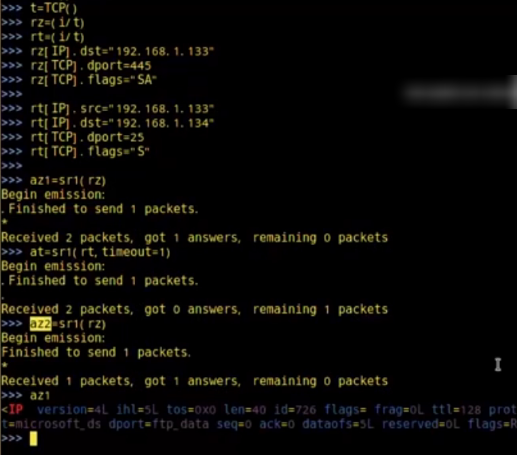
1.Scapy
2.namp
发现僵尸机
nmap -p445 192.168.1.133 --script=ipidseq.nse
扫描目标
nmap 172.16.36.135 -sI 172.16.36.133 -Pn -p 0-100
服务扫描
识别开放端口上运行的应用
识别目标操作系统
提高攻击效率
- Banner捕获
- 服务识别
- 操作系统识别
- SNMP分析
- 防火墙识别
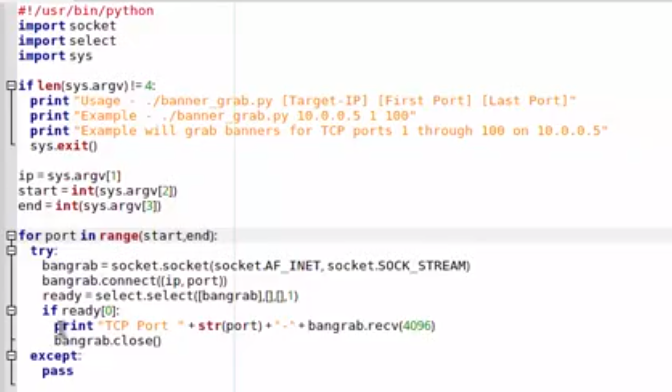
1.基于pyhton socket的链接:
>>> import socket
>>> banner=socket.socket(socket.AF_INET,socket.SOCK_STREAM)
>>> banner.connect(("10.0.47.3",21))
>>> banner.recv(4096)
‘220 (vsFTPd 2.3.4)\r\n’
>>> banner.close()
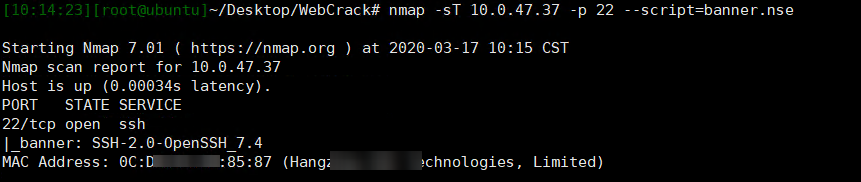
2.基于nmap
nmap -sT 1.1.1.1 -p 22 --script=banner.nse // 端口也可以是 -p1-100
3.基于amap
amap就是专门一个针对发现开放端口开放什么服务的工具
amap -B 172.16.36.135 21
amap -B 172.16.36.135 1-65535

amap 192.168.1.1 1-100 -qb    //详细服务识别
4.基于nc
- Bannert信息抓取能力有限
- nmap响应特征分析识别服务
- 发送系列复杂的探测
- 依据响应特征 signature
- nc -nv 1.1.1.1 80
- nmap 1.1.1.1 -p80 -sV //不是基于banner,而是基于指纹特征值
操作系统识别
- TTL起始值Windows:128(65-128)
- Linux/Unix:64 (1-64)
- 某些Unix:255
每经过一个路由,TTL值就减一
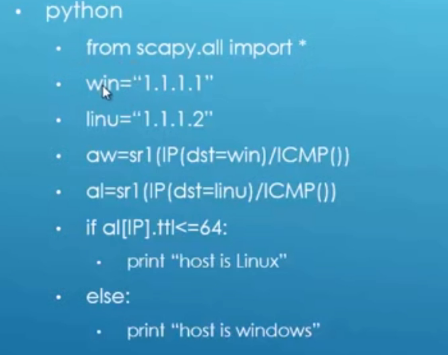
使用nmap
nmap 1.1.1.1 -O
SNMP扫描
- snmp信息的金矿
- 经常被错误配置
- public prtvate /manager
MIB Tree
SNMP Management Information Base (MIB)
树形的网络设备管理功能数据库
1.3.6.1.4.1.77.1.2.25
onesixtyone 1 1. 1.1 public
onesixtyone-c dict txt -i hosts -o my.log -w 100
SNMP扫描
snmpwalk 192. 168.20 199-c public -v 2C
用户
snmpwalk -c public -v 2c 1.1.1.1 1.3.6.1.4.1.77.1.2.25
sumcheck -t 192.168.20.199
snmpcheck -t 192.168.20.199 -c private - 2
sumpcheck -t 192.168.20.199 -w
公众号:ethtool

 浙公网安备 33010602011771号