Vue基础(二)
- 组件
- vue脚手架
render函数- 修改脚手架默认配置
ref属性props属性用于接收父组件传递的数据mixin属性: 相同逻辑抽离,方便复用- 插件
- scoped 样式: 作用域样式
- Todo-List 案例
- 组件自定义事件
- 父组件通过
v-on指令为子组件绑定(指令形式绑定) - 父组件通过
$refs为组件实例绑定(方法形式绑定) - 组件自定义事件只触发一次
- 方法形式和指令形式绑定自定义事件区别
- 组件解绑自定义事件
- 为什么要解绑自定义事件
$off()解绑自定义事件- 组件自定义事件没有冒泡机制
- 使孙子组件触发祖先组件的事件
- 总结
- 1.为某个组件绑定事件时,可以直接写回调函数,且回调函数应该是箭头函数,否则 this 指向的不是父组件实例对象,而是子组件实例对象
- 2.如果使用了方法函数,其this指向绑定了事件的组件实例对象
- 3.为组件绑定事件可以绑定多次,每次触发后都会执行
- 4.组件使用
@事件名.native修饰符为组件绑定原生事件 - 5.使用系统事件时只能对组件绑定,不能对组件的子元素进行绑定,否则会报错
- 6.为组件绑定系统事件,其实就是为组件的根元素绑定事件,这也是
template中必须只有一个根元素的原因之一 - 7.组件的系统事件具有冒泡性质,即子组件的点击事件会冒泡到父组件,会执行父组件回调函数
- 8.组件绑定自定义事件方式
- 9.触发事件
- 10.解绑事件
- 父组件通过
- 全局事件总线
- 消息订阅与发布
$nextTick执行回调- 动画效果
- 过渡效果
- 多个元素具有相同过渡效果应使用
transition-group标签 - 集成第三方动画库
Animate.css - 总结vue封装动画与过渡
- 代理
vue-resource库发起网络请求(不推荐)- 插槽
- Vuex
- 简介
- 核心概念
- 使用场景
- 原理
- 流程总结
- 搭建
Vuex环境 $store.dispatch()触发actions对应的方法actions对应的方法中通过上下文对象context调用commit方法mutations中的对应方法被调用- 组件中通过
$store.属性读取共享数据 actions中处理业务逻辑,如没有业务逻辑可直接调用commitactions中方法名小写,mutations中方法名大写,在view代码时便于区分vue开发者工具中始终监听mutations中方法执行actions中可以通过调用dispatch方法来执行actions其他方法以便处理业务- 规范
getters对象对state数据的获取进行封装业务逻辑mapState函数简化组件中获取state数据mapGetters函数简化组件中获取getters数据mapMutations函数简化组件中调用mutations方法mapActions函数简化组件中调用actions方法Vuex模块化和命名空间
- 路由
- 概念
- 基本使用
vue-router插件库 - 注意
- 嵌套路由
- 路由传参
- 命名路由
- 路由组件的
props配置 - 总结
router-link标签记录浏览历史地址- 编程式路由导航
- 缓存路由组件
- 注意
- 1.
<keep-alive>标签必须包裹<router-link>标签 - 2.缓存路由组件时,路由组件必须有
name属性,否则不生效 - 3.
<keep-alive>标签的include属性的值为路由组件的名称,依据路由组件的name属性,不是配置的路由name - 4.
<keep-alive>标签的include属性值的范围必须是当前组件可以路由的组件名称,也就是组件的子路由组件名称,不能是孙子路由组件名 - 5.当缓存路由组件的父组件销毁且未配置缓存时,该缓存路由组件的数据也会被销毁
- 6.
<keep-alive>没有include属性时,则缓存所有路由组件 - 7.配置多个缓存路由组件是使用
,紧紧隔开,不能有空格,或者:include="['组件名','组件名']"
- 1.
- 注意
- 路由组件中的生命周期钩子
- 路由守卫
- UI组件库
组件
组件定义: 实现应用中局部功能代码和资源集合
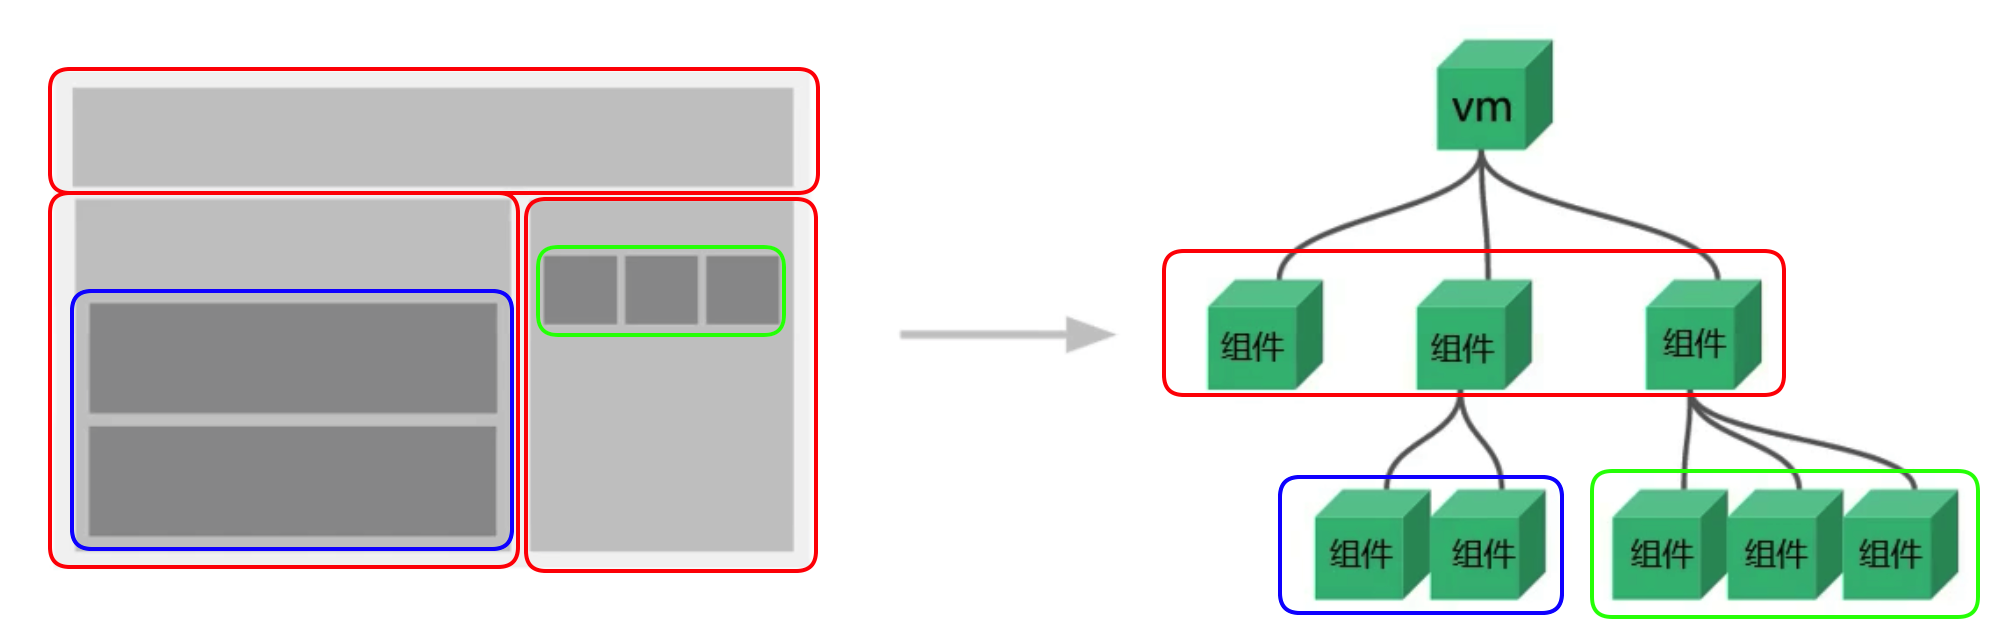
非单文件组件
组件的使用分为 3 个步骤
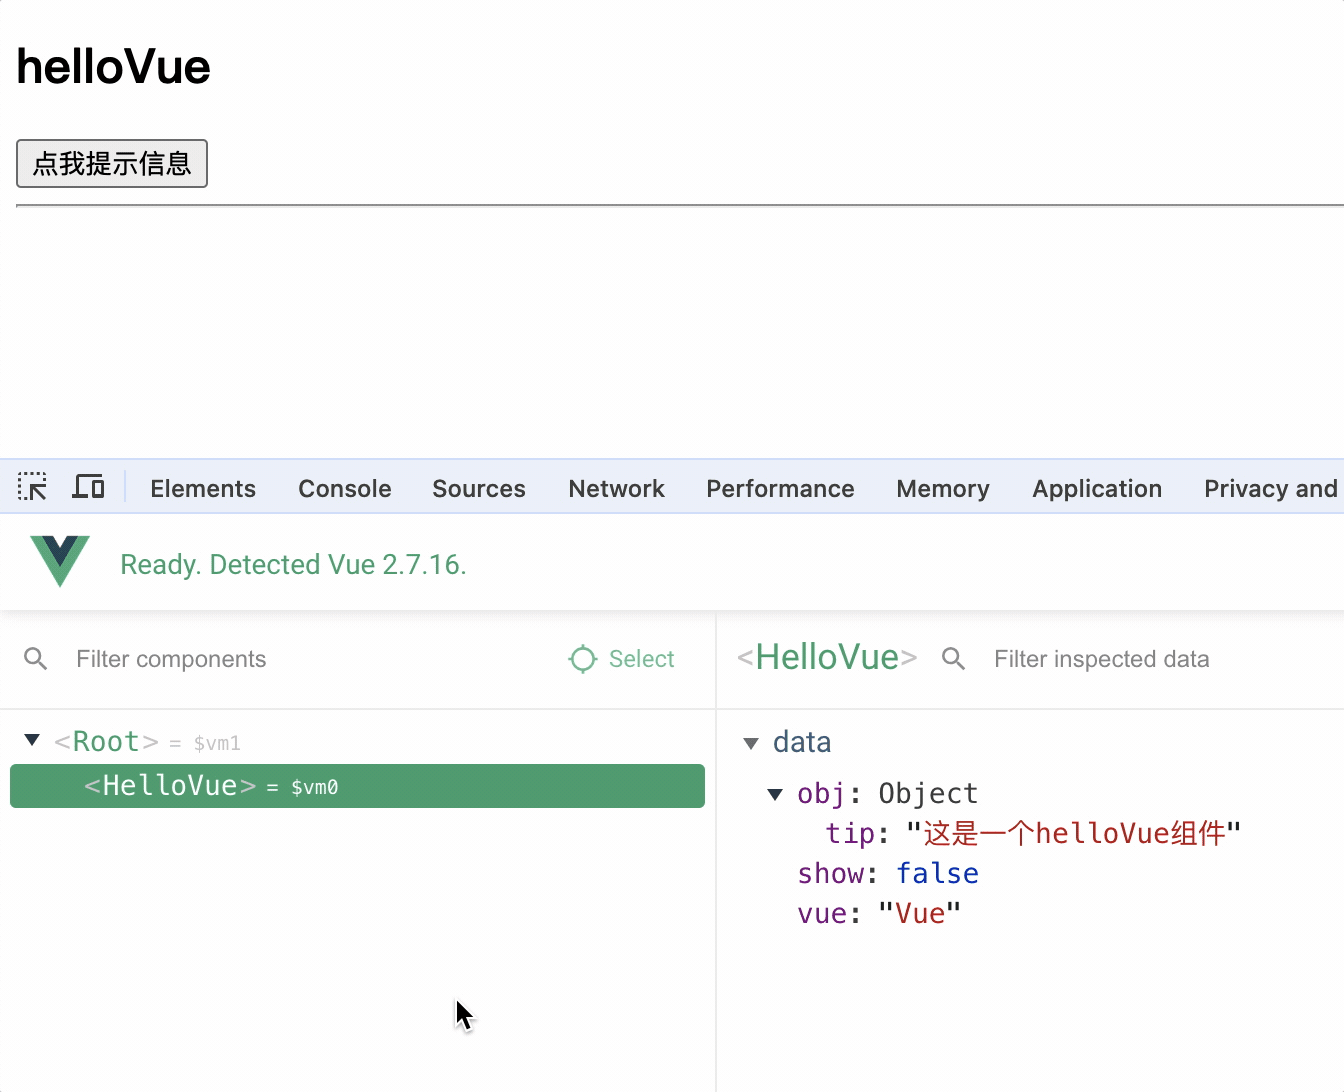
<div id="root">
  <!-- 3.使用组件 -->
  <hello-vue></hello-vue>
</div>
<script type="text/javascript">
  // 1.定义组件
  const helloVue = Vue.extend({
    template: `
            <div>
                <h2>hello{{vue}}</h2>
                <button @click="showInfo">点我提示信息</button>
                <span v-if="show">{{obj.tip}}</span>
                <hr>
            </div>
        `,
    data() {
      return {
        vue: "Vue",
        obj: {
          tip: "这是一个helloVue组件",
        },
        show: false,
      };
    },
    methods: {
      showInfo() {
        this.show = !this.show;
      },
    },
  });
  // 2.注册组件
  new Vue({
    el: "#root",
    components: {
      helloVue,
    },
  });
</script>
1.定义组件
定义组件 extend(options)方法和 new Vue(options)方法的配置对象属性几乎一样,区别在于
1.extend 中不能写 el 属性,因为组件可能被很多 vue 实例使用,因此组件只能属于某个 vue 实例,由 vue 实例中的el决定服务于哪个容器
2.定义组件,data 一定是方法,方法中返回数据对象,因为组件是复用的,如果 data 是对象,则多个组件实例会共享同一个 data,从而造成数据污染
3.组件对象中使用 template 可以配置组件 DOM 结构,template 的 DOM 结构中必须只有一个根节点
const helloVue = Vue.extend({
  template: `
        <div>
            <h2>hello{{vue}}</h2>
            <button @click="showInfo">点我提示信息</button>
            <span v-if="show">{{obj.tip}}</span>
            <hr>
        </div>
    `,
  data() {
    return {
      vue: "Vue",
      obj: {
        tip: "这是一个helloVue组件",
      },
      show: false,
    };
  },
  methods: {
    showInfo() {
      this.show = !this.show;
    },
  },
});
2.vm 实例中注册组件
使用 componets 对象注册组件,key: 组件名,value: 组件对象
new Vue({
  el: "#root",
  components: {
    helloVue,
  },
});
3.使用组件
<hello-vue></hello-vue>
如果组件名是小驼峰形式,则使用时需要将小驼峰改为小写,并且使用-连接,例如<hello-vue></hello-vue>
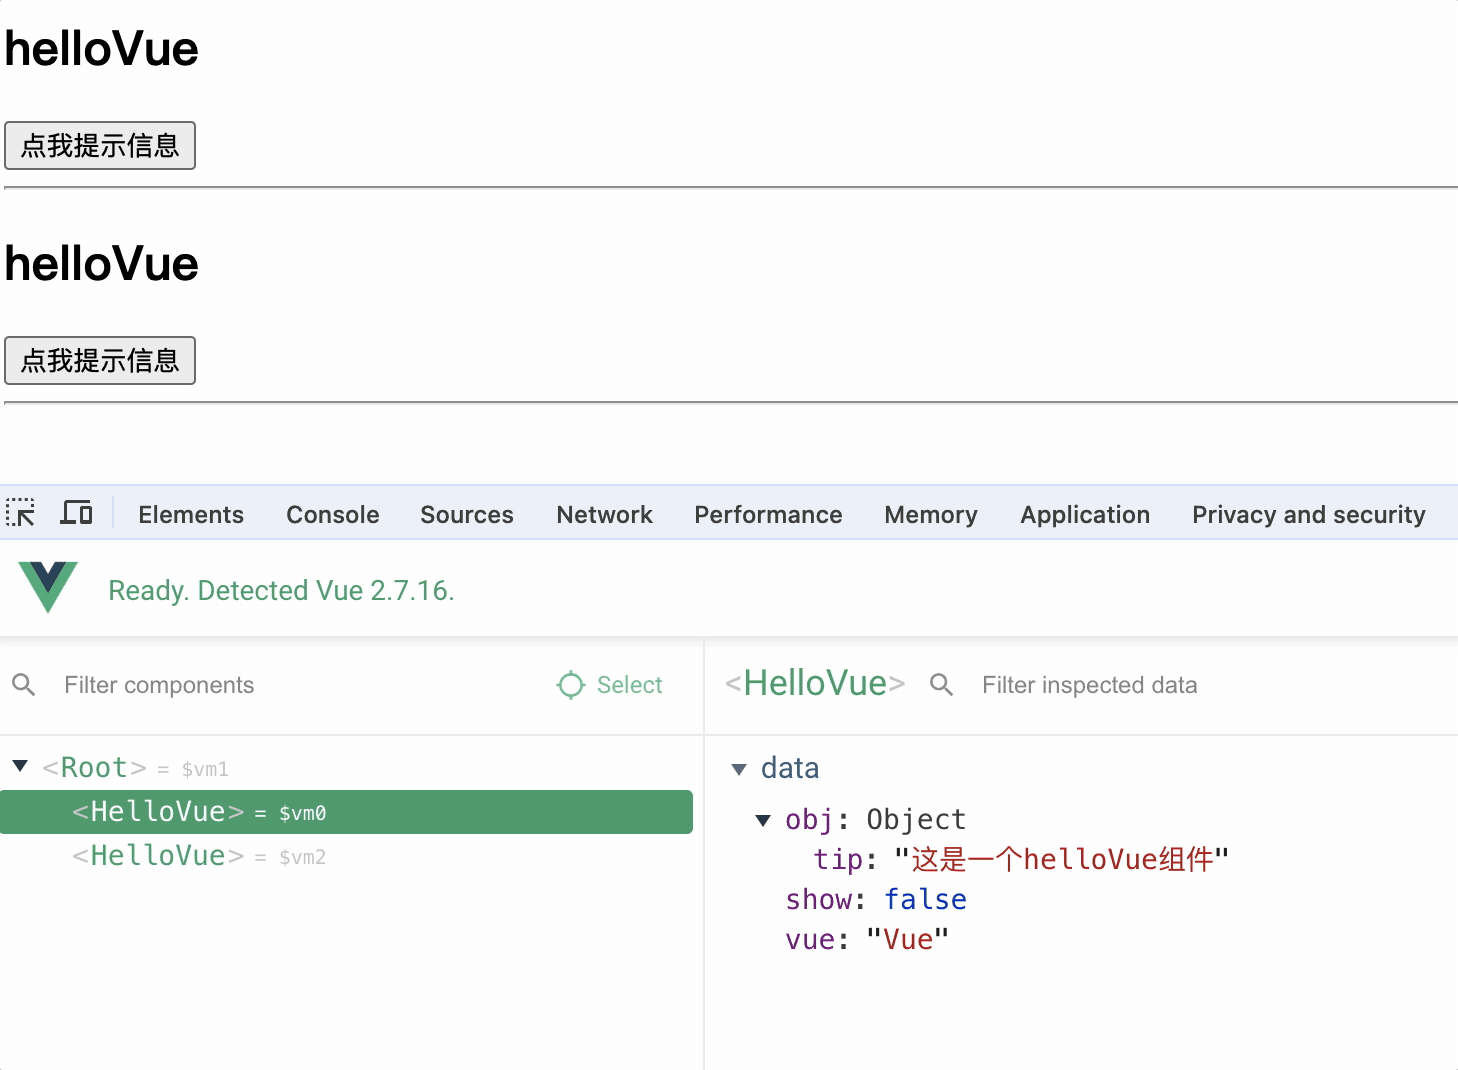
注意:
同一个 vue 实例使用多个相同组件时,组件之间相互独立,互不影响
<hello-vue></hello-vue> <hello-vue></hello-vue>
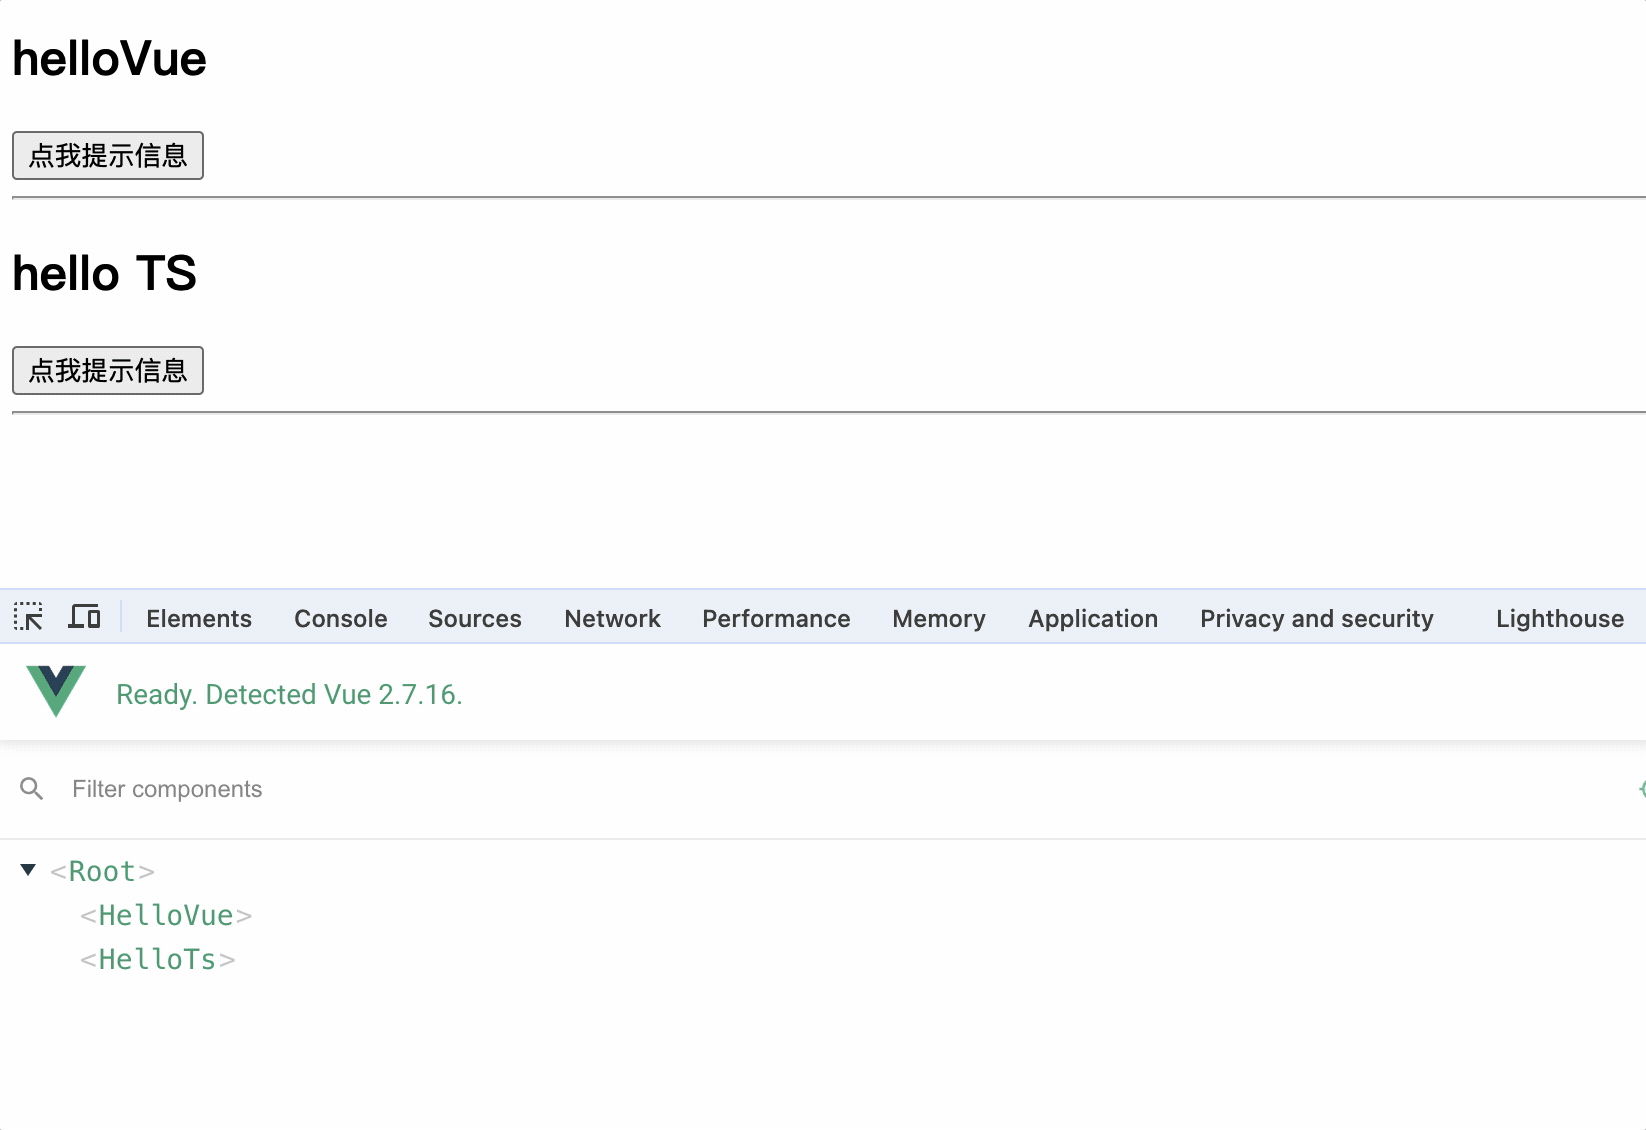
全局组件
定义全局组件
// 全局组件定义
const helloTs = Vue.extend({
  template: `
        <div>
            <h2>hello {{ts}}</h2>
            <button @click="showInfo">点我提示信息</button>
            <span v-if="show">{{obj.tip}}</span>
            <hr>
        </div>

    `,
  data() {
    return {
      ts: "TS",
      obj: {
        tip: "这是一个全局helloTs组件",
      },
      show: false,
    };
  },
  methods: {
    showInfo() {
      this.show = !this.show;
    },
  },
});
使用 Vue.component()方法注册组件,组件名可以是小驼峰形式,也可以是短横线形式
Vue.component("hello-ts", helloTs);
// 或者 Vue.component('helloTs', helloTs)
使用时直接使用组件名即可
<hello-ts></hello-ts>
注意事项
1.组件名多个单词写法
kebab-case(短横线命名): hello-vue
PascalCase(大驼峰命名): HelloVue(这种写法需要 vue脚手架支持)
2.组件名应避免使用 html 标签名,如<h2>,<div>等,因为 html 标签名是 vue 内置组件,容易冲突
3.组件定义中可以使用name属性,指定在开发者工具中呈现的组件名称
定义组件名字:
Vue.extend({
  name: "Hello",
  template: ``,
});
注册时自定义组件名:
components: {
  helloVue;
}
使用:
<hello-vue></hello-vue>
开发者工具中则会显示定义时的组件名
 4.组件可以使用自闭合标签写法,如
<hell-vue/>(这种写法多个组件时需要 vue脚手架支持)
5.定义组件的简写形式:
let helloVue = Vue.extend(options)简写为: let helloVue = options
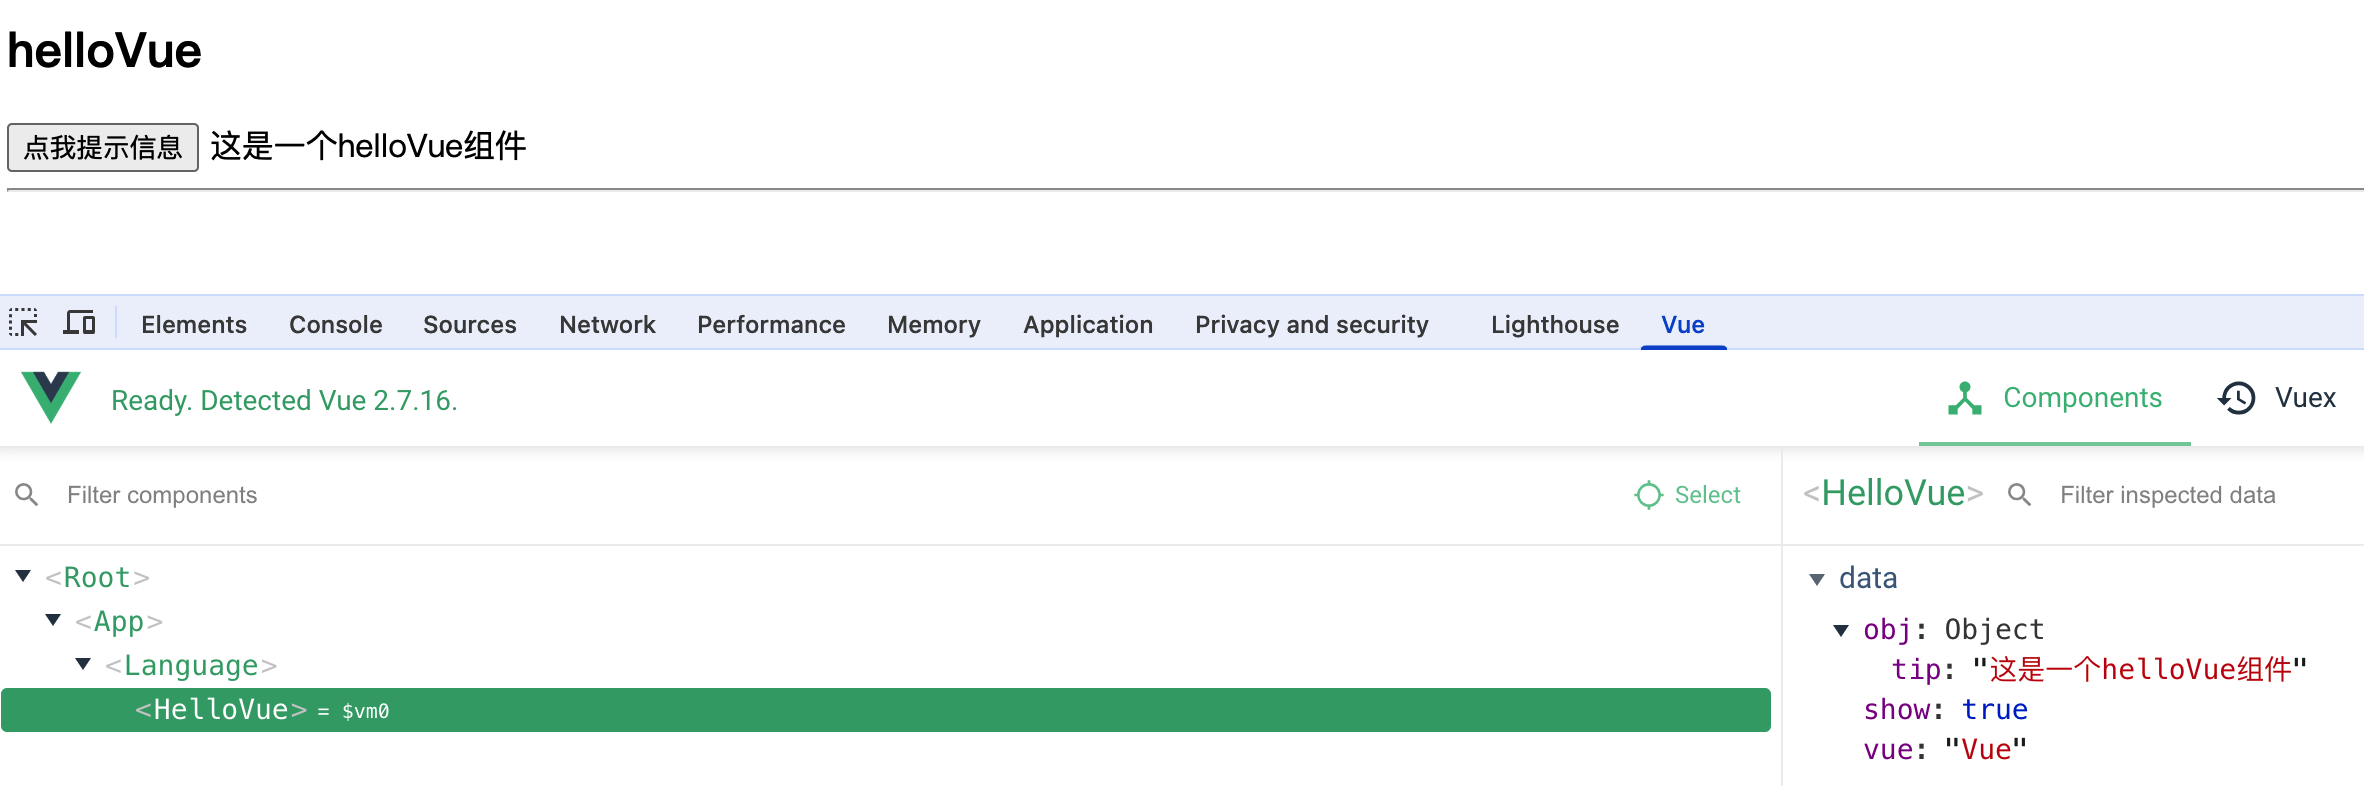
组件的嵌套
<div id="root"></div>
<script type="text/javascript">
  const helloVue = {
    template: `
            <div>
                <h2>hello{{vue}}</h2>
                <button @click="showInfo">点我提示信息</button>
                <span v-if="show">{{obj.tip}}</span>
                <hr>
            </div>

        `,
    data() {
      return {
        vue: "Vue",
        obj: {
          tip: "这是一个helloVue组件",
        },
        show: false,
      };
    },
    methods: {
      showInfo() {
        this.show = !this.show;
      },
    },
  };
  const language = {
    template: `
            <div>
                <hello-vue></hello-vue>
            </div>
        `,
    components: { helloVue },
  };
  const app = {
    template: `
            <div>
                <language></language>
            </div>
        `,
    components: { language },
  };
  // 2.注册组件
  new Vue({
    el: "#root",
    template: `
            <app></app>
        `,
    components: { app },
  });
</script>
VueComponent构造函数
1.组件本质是一个VueComponent的构造函数,且不是程序员定义的,而是Vue.extend()生成的
const helloVue = Vue.extend(optins);
console.log(helloVue);

2.当使用组件时,例如<hello-vue</hello-vue>,Vue 就会调用new VueComponent(options)创建组件实例
3.每次使用 Vue.extend()定义组件时,都会返回一个全新的 VueComponent 构造函数
查看 Vue 源码,可以发现 Vue.extend 函数中在每次调用时,都会重新声明Sub属性,Sub的值就是函数,因此每次调用 Vue.extend()都会返回一个新的 VueComponent 构造函数
Vue.extend = function (extendOptions) {
  // ...
  var Sub = function VueComponent(options) {
    this._init(options);
  };
  // ...
  return Sub;
};
4.this指向
定义的组件配置项中的data函数,methods中函数,watch中函数,computed中函数,它们中的 this 都指向组件的VueComponent实例对象,这是通过 Vue 调用new VueComponent()实现的,就像new Vue()创建 vue 的实例对象一样,方法,监听属性,计算属性它们中的 this 都指向 vm 实例对象,因此组件中的 this 指向组件的VueComponent实例对象,而且 VueComponent 的实例对象也代理了数据,和 vm 很像
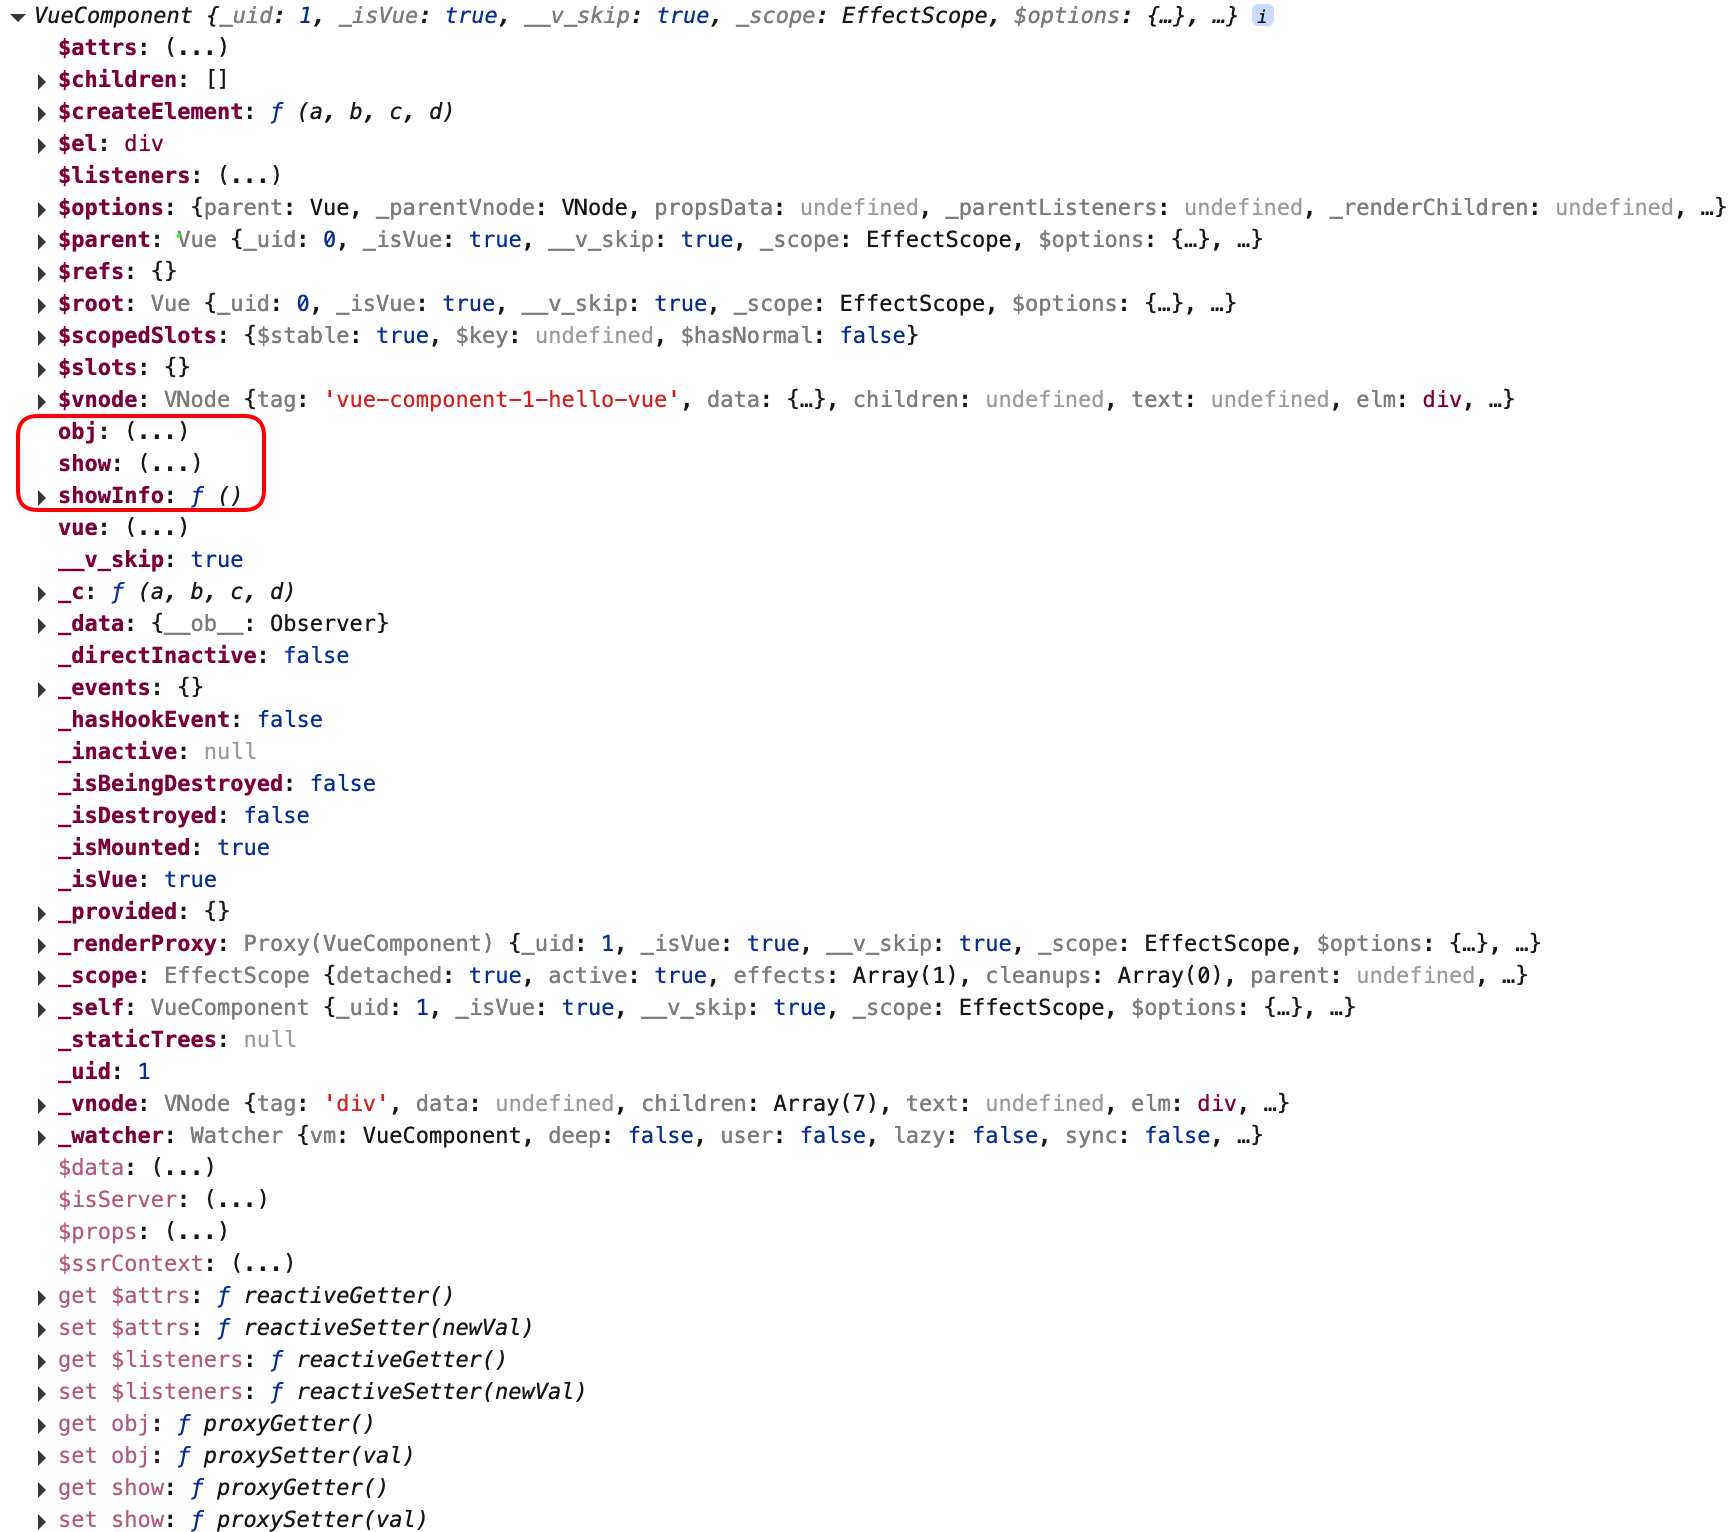
5.通过组件实例对象中的$children数组查看包含了哪些子组件
VueComponet和Vue的原型关系
实例的隐式原型属性指向其缔造者的显示原型对象
Vue 的原型对象有重要的属性和方法,如$set,$watch,$mount等
vue的实例对象的隐式原型__proto__指向Vue.prototype,Vue.prototype.__proto__指向Object.prototype
VueComponent的实例对象的隐式原型__proto__指向VueComponent.prototype,一般情况下,VueComponent.prototype对象的隐式原型也应该指向其缔造者的原型,也就是Object.prototype
而vue将VueComponent.prototype对象的隐式原型__proto__指向Vue的原型对象,因此 VueComponent 的实例对象也能访问到 Vue 的原型对象中的属性和方法
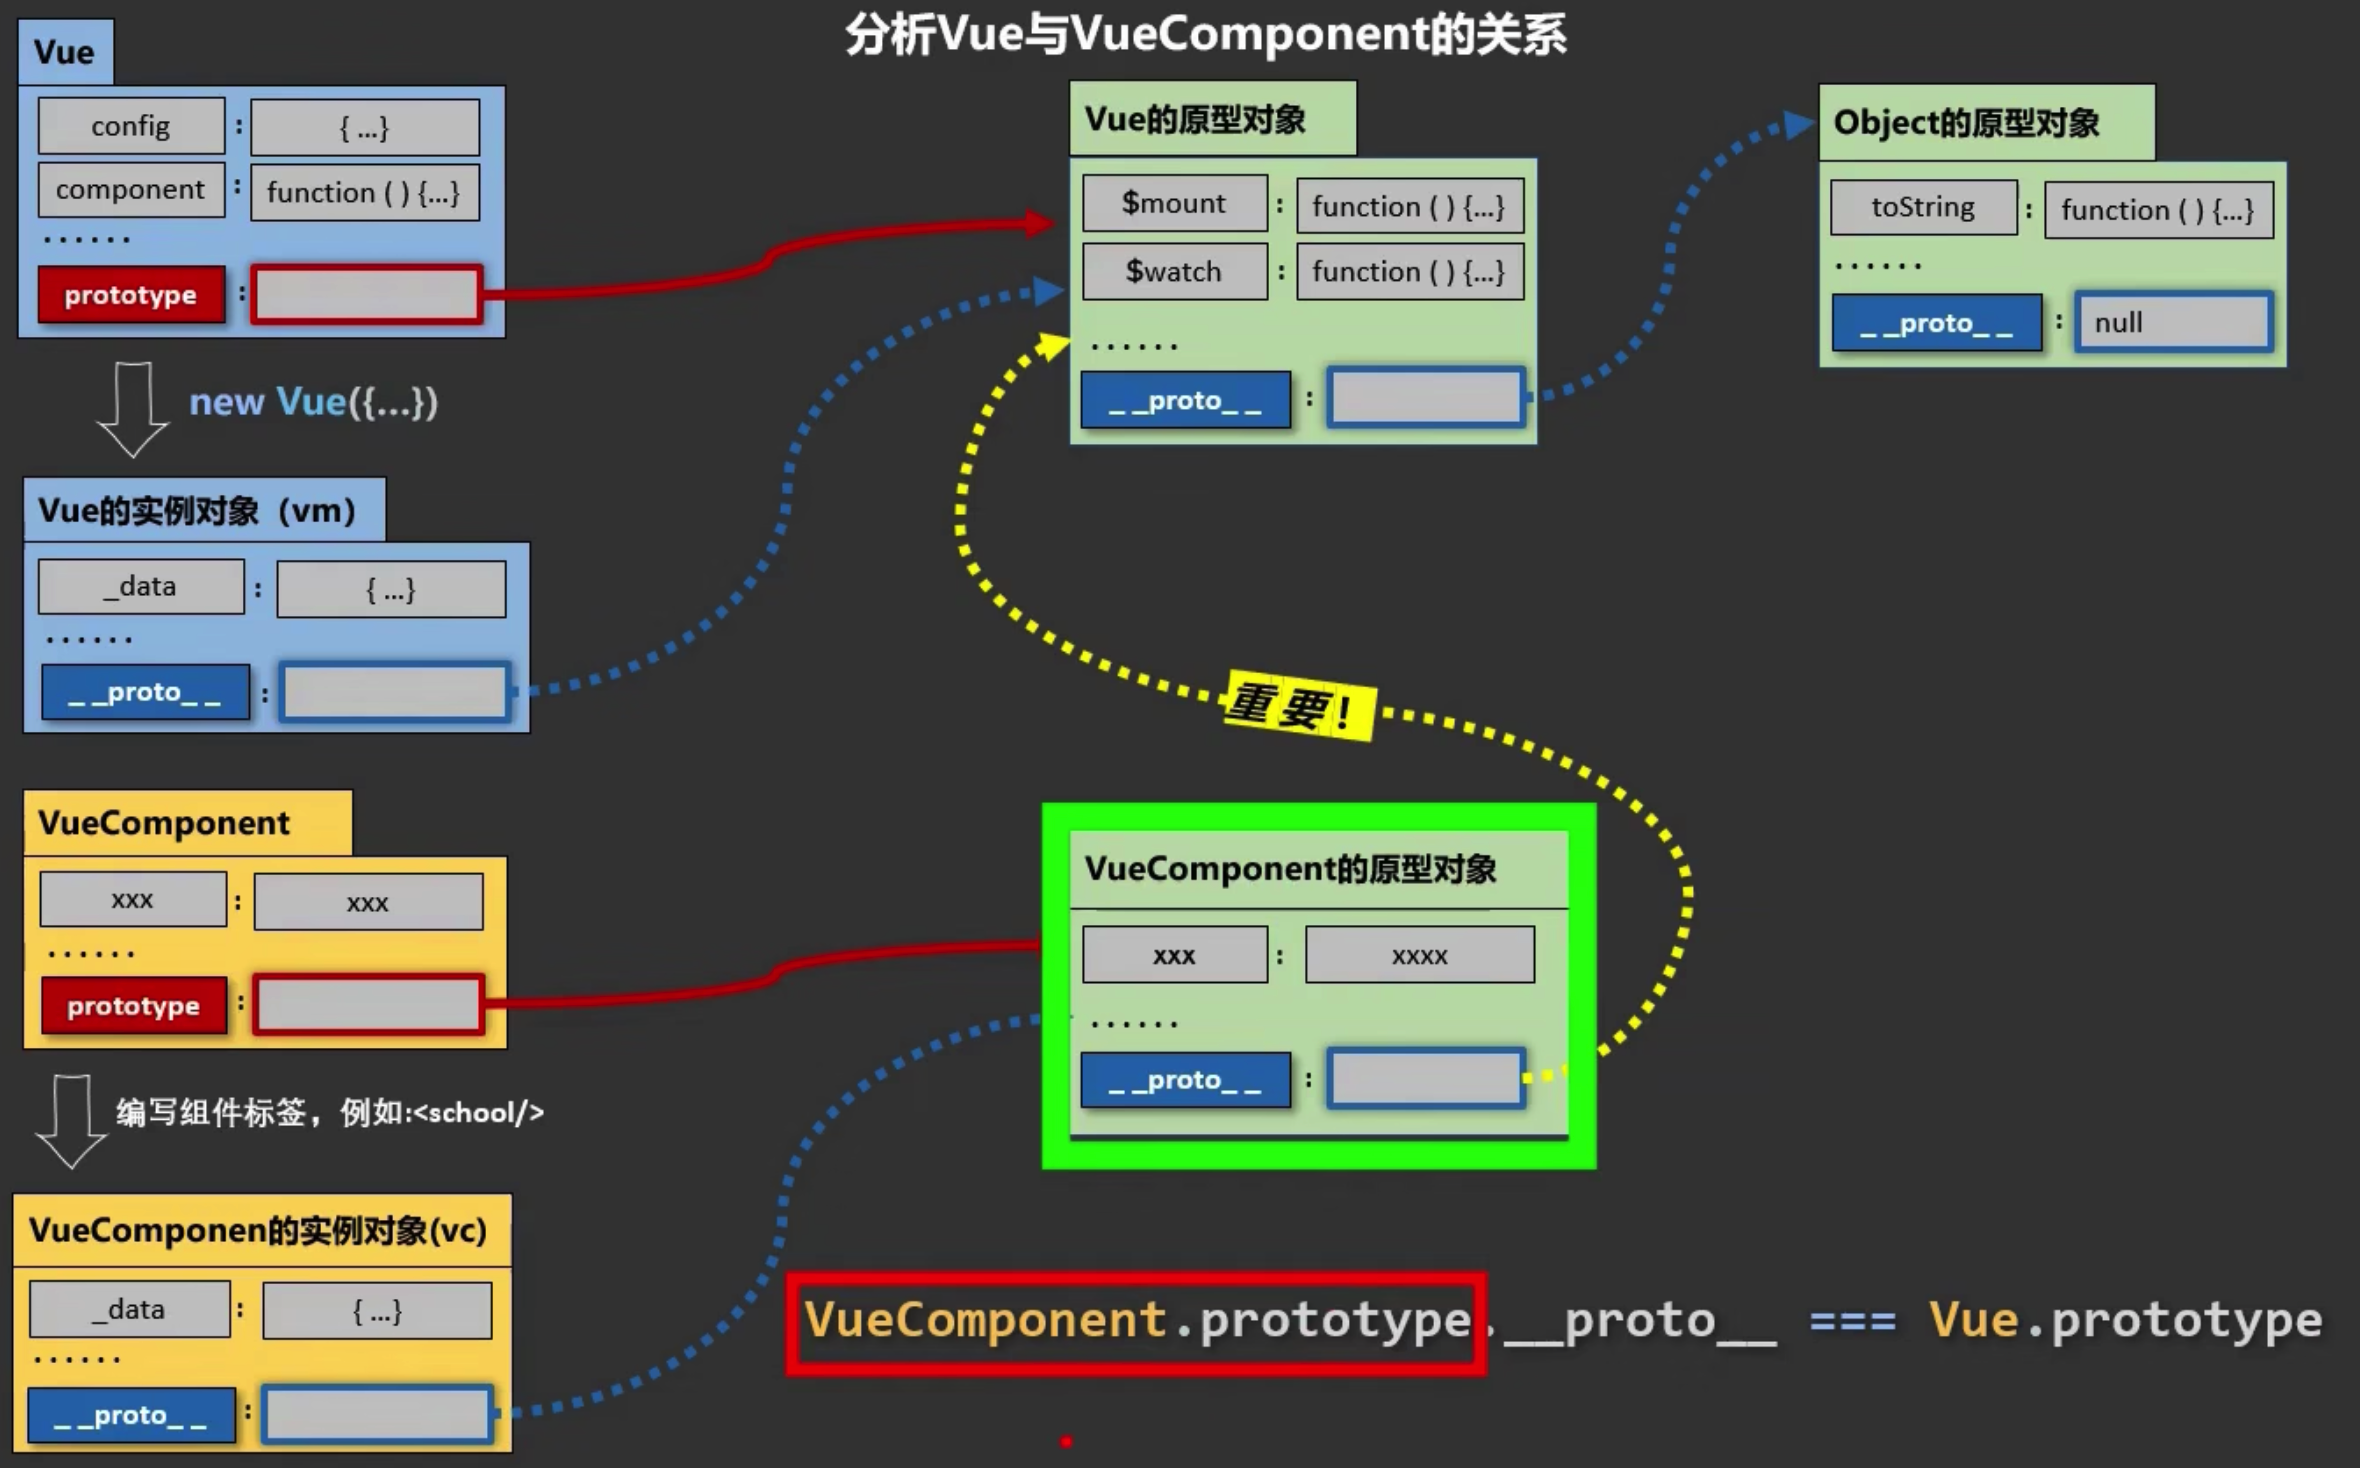
重要关系
1.VueComponent.prototype.__proto__ == Vue.prototype
2.每个vc的隐式原型都指向了Vue.prototype
3.原因: 让组件实例对象可以访问到 Vue 原型对象中的属性和方法
4.可以理解为组件(构造函数)的父类为 Vue
单文件组件书写流程
单文件组件: .vue文件,就是一个组件,该组件将模板、逻辑与样式封装在单个文件中
文件名称一般都用大驼峰命名格式,例如HelloWorld.vue
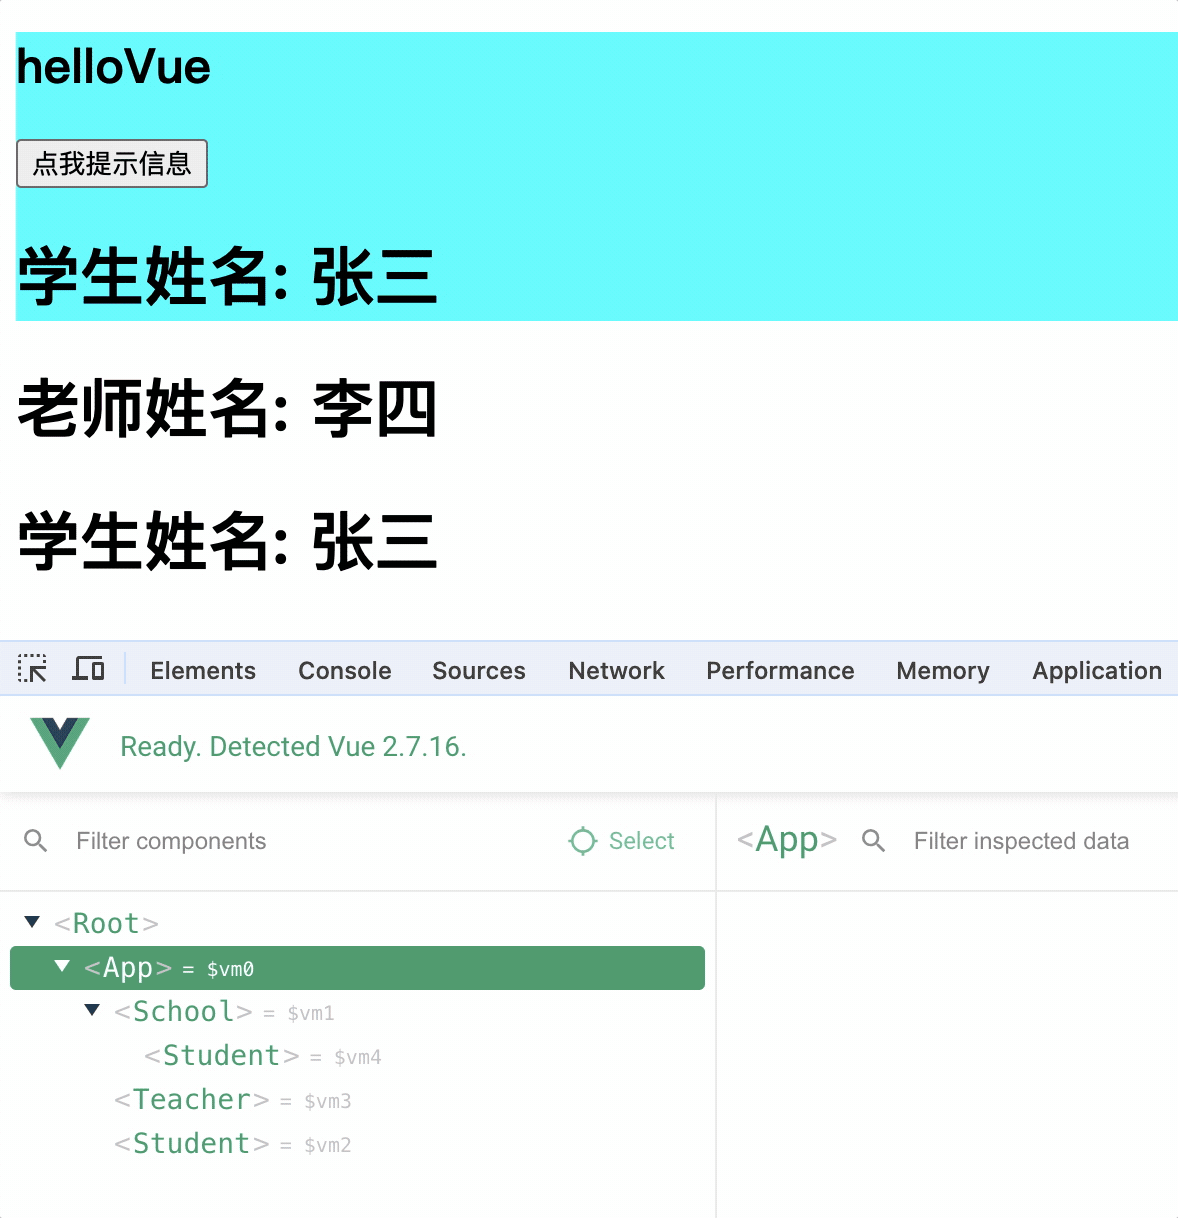
1.子组件 Student.vue
<template>
  <div>
    <h1>学生姓名: {{ name }}</h1>
  </div>
</template>
<script>
  export default {
    data() {
      return {
        name: "张三",
      };
    },
  };
</script>
2.父组件 School.vue
父组件中使用子组件,并有自己的样式
<template>
  <div class="school">
    <h2>hello{{ vue }}</h2>
    <button @click="showInfo">点我提示信息</button>
    <span v-if="show">{{ obj.tip }}</span>
    <Student></Student>
  </div>
</template>
<script>
  import Student from "./Student.vue";
  export default {
    data() {
      return {
        vue: "Vue",
        obj: {
          tip: "这是一个School组件",
        },
        show: false,
      };
    },
    methods: {
      showInfo() {
        this.show = !this.show;
      },
    },
    components: { Student },
  };
</script>
<style>
  .school {
    background-color: aqua;
  }
</style>
3.其他组件 Teacher.vue
<template>
  <div>
    <h1>老师姓名: {{ name }}</h1>
  </div>
</template>
<script>
  export default {
    data() {
      return {
        name: "李四",
      };
    },
  };
</script>
4.所有组件的管理组件 App.vue
作用: App.vue 组件将管理所有组件
<template>
  <div>
    <School></School>
    <Teacher></Teacher>
    <Student></Student>
  </div>
</template>
<script>
  import School from "./School.vue";
  import Teacher from "./Teacher.vue";
  import Student from "./Student.vue";
  export default {
    components: { School, Teacher, Student },
  };
</script>
5.应用入口文件 main.js
main.js: 创建 Vue 实例对象,指定 vue 实例服务的容器,是项目运行的入口文件,该文件中的 vue 实例对象只和 App.vue 组件进行关联
import App from "./App.vue";
new Vue({
  el: "#app",
  template: `
    <App></App>
    `,
  components: { App },
});
6.容器文件index.html
<body>
  <!-- 容器 -->
  <div id="app"></div>
  <script type="text/javascript" src="../js/vue.js"></script>
  <script type="text/javascript" src="./main.js"></script>
</body>
在浏览器打开 index.html 文件,报错
浏览器不能直接支持 ES6 模块语法,因此需要脚手架支持

vue脚手架
vue脚手架: Vue CLI是一个官方提供的标准化开发工具(命令行工具),用于快速搭建 Vue 开发环境以及管理项目的依赖。基于 webpack 构建
CLI: Command Line Interface 命令行接口工具(vue 的脚手架)
使用
1.安装 vue脚手架工具: npm install -g @vue/cli
2.使用脚手架创建初始化项目:
➜ code vue create -m 打包工具 项目名
打包工具可选择: yarn npm 等,使用包管理工具可以下载项目依赖的插件和项目打包
项目名: 单词之间使用-,例如: hello-world
➜  code vue create -m npm vue-test
...
🎉  Successfully created project vue-test.
👉  Get started with the following commands:

 $ cd vue-test
 $ npm run serve
3.启动项目:
➜  code cd vue-test
➜  vue-test git:(master) npm run serve
4.访问项目:
DONE  Compiled successfully in 2510ms                                                                                    9:46:03 AM

App running at:
- Local:   http://localhost:8080/
- Network: http://172.21.3.176:8080/

Note that the development build is not optimized.
To create a production build, run npm run build.
脚手架创建的项目结构
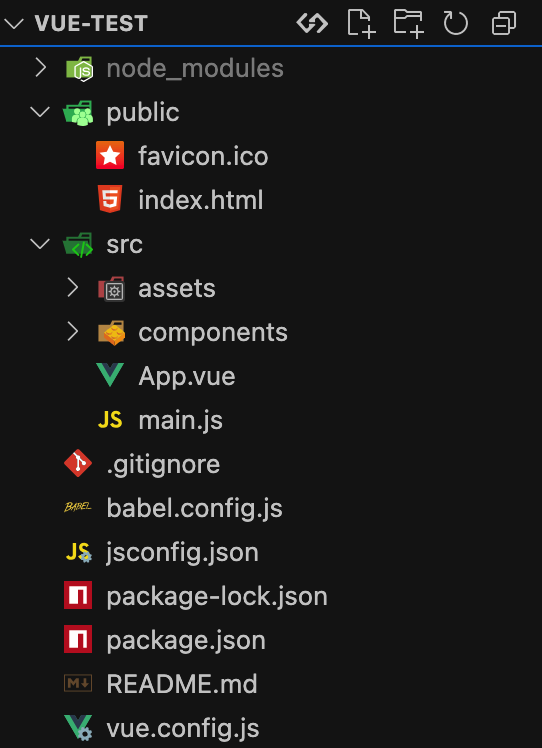
vue-test
├─ .gitignore
├─ README.md
├─ babel.config.js
├─ jsconfig.json
├─ package-lock.json
├─ package.json
├─ public
│ ├─ favicon.ico
│ └─ index.html
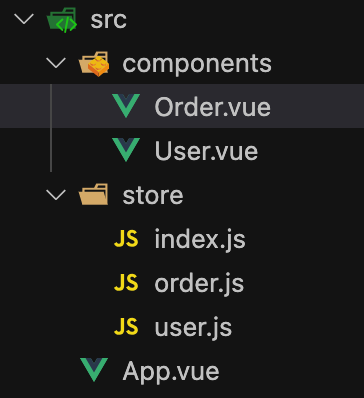
├─ src
│ ├─ App.vue
│ ├─ assets
│ │ └─ logo.png
│ ├─ components
│ │ ├─ HelloWorld.vue
│ │ ├─ School.vue
│ │ ├─ Student.vue
│ │ └─ Teacher.vue
│ └─ main.js
└─ vue.config.js
babel.config.js
babel 配置文件,用于将 ES6 语法转换为 ES5 语法
package.json
项目配置文件,记录了项目版本,依赖的插件版本,和项目常用命令和打包信息
package-lock.json
锁定依赖的版本,防止依赖版本不一致,导致项目运行异常
vue.config.js
vue 配置文件,用于配置 vue脚手架的配置信息,关闭语法检测等
src目录
源代码文件夹
main.js: 整个应用的入口文件,用于创建 Vue 实例对象,并指定 vue 实例服务的容器
App.vue: 根组件,是所有组件的父组件,是整个应用的根组件,是所有组件的容器
assets: 静态资源文件夹,存放静态资源文件,例如css、js、图片等
components: 组件文件夹,存放组件文件,例如School.vue、Student.vue等
public目录
静态文件,例如index.html
favicon.ico: 网站图标文件,用于设置网站图标
index.html: 整个应用的界面,容器定义
<link rel="icon" href="<%= BASE_URL %>favicon.ico">中BASE_URL指的是public/路径
后续引入 public 目录下的资源时应该使用<%= BASE_URL %>
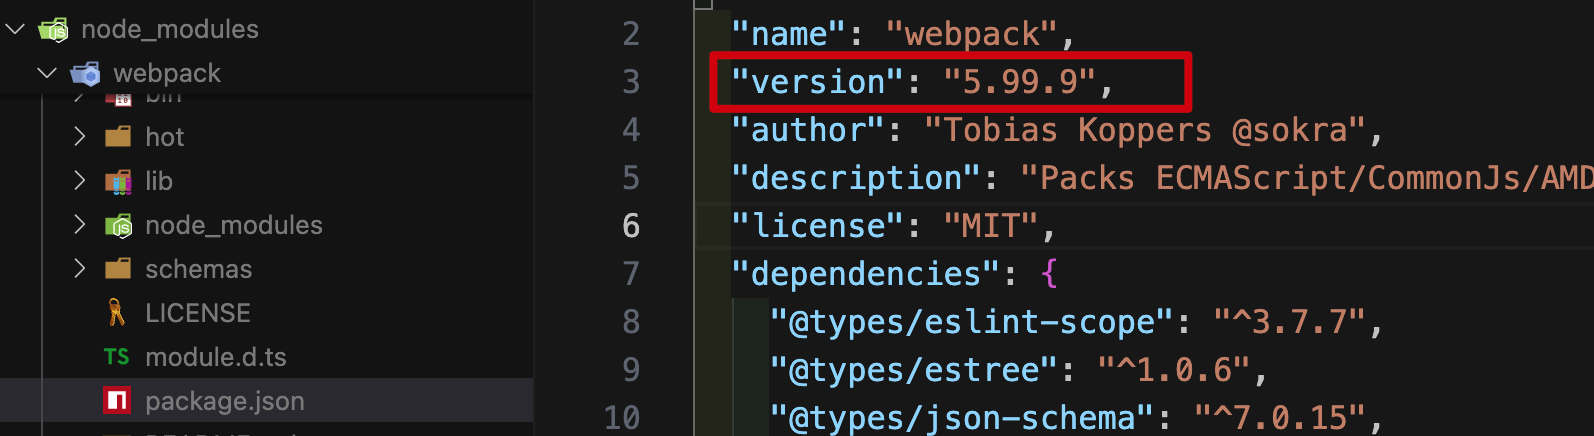
<title><%= htmlWebpackPlugin.options.title %></title>: 通过 webpack 插件读取 package.json 中的name字段作为标题
将单文件组件书写流程中的代码放置项目指定位置,并启动项目
报错: Component name “School“ should always be multi-word
由于组件命名不符合大驼峰或横线命名规范,导致编译报错,只需在 vue.config.js 中关闭语法检测,而后重新启动项目
const { defineConfig } = require("@vue/cli-service");
module.exports = defineConfig({
  transpileDependencies: true,
  // 关闭语法检查
  lintOnSave: false,
});
启动成功:
render函数
使用template属性指定容器存在的问题
修改 main.js 文件
new Vue({
  el: "#app",
  template: ``,
});
出现如下错误:

意思是: 你正在使用仅运行构建的 vue,模板编译器不可用的 vue。要么将预编译的模板放到 render 函数中,要么使用包含编译器的 vue 版本
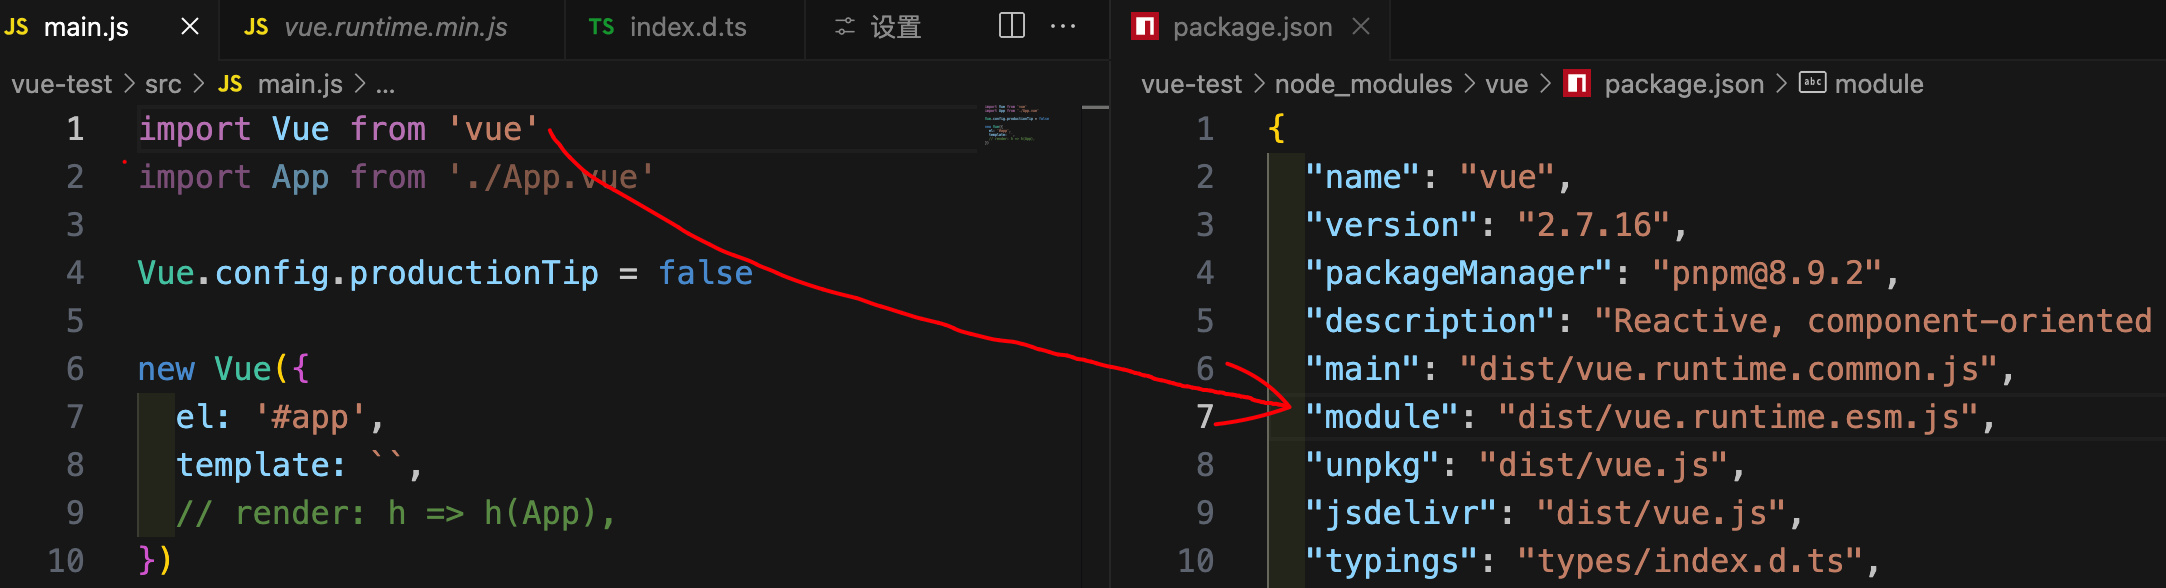
通过跳转引入的 vue 文件,可以找到使用插件
脚手架生成的 main.js 引入的 vue.js 为 package.json 中 module 对应的 vue.runtime.esm.js,该 vue 没有编译模块
这时就需要 render 函数: 字符串模板的代替方案
render函数入参: createElement方法
render函数返参: 虚拟节点 VNode,就是 template 属性的代替方案
createElement: 是一个方法,通过该方法来创建虚拟节点 VNode
该方法有两个参数:
1.html 标签名或组件对象
2.文本节点内容或数组(第二个参数可选)
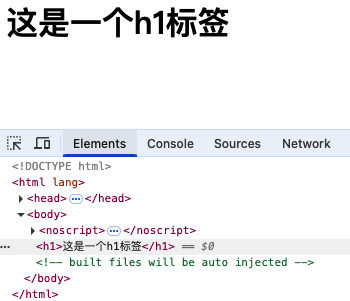
如传入标签名:
new Vue({
  el: "#app",
  render(createElement) {
    return createElement("h1", "这是一个h1标签");
  },
});
会完全替换el元素包括根元素和 template 属性一样
如传入组件:
App 为组件
new Vue({
  el: "#app",
  render: (h) => h(App),
});
总结
1.vue.js 和 vue.runtime.esm.js 的区别:
vue.js: 完整版的 vue,包含核心功能,包含模板编译器,可以解析 template 属性
vue.runtime.esm.js: 运行版的 vue,包含核心功能,不包含模板编译器,不能解析 template 属性,需要使用 render 函数
2.由于vue.runtime.esm.js没有模板编译器,因此需要render函数需要接收createElement函数创建 VNode
3.组件中的template标签的模板是由模板插件完成解析,package.json->devDependencies->vue-template-compiler
修改脚手架默认配置
脚手架的 webpack 默认配置文件不会暴露,但是可以通过vue inspect > output.js查看默认配置
打包配置文件中指定了项目路径,项目入口文件路径和名称等,以便 webpack 打包工具对项目进行打包
同时 vue 也暴露了可配置的打包属性,自定义的打包属性需配置在vue.config.js文件中,和 package.json 同级
vue.config.js文件
const { defineConfig } = require("@vue/cli-service");
module.exports = defineConfig({
  transpileDependencies: true,
  // 关闭语法检查
  lintOnSave: false,
  pages: {
    index: {
      // page 的入口
      entry: "src/main.js",
      // 模板来源
      template: "public/index.html",
    },
  },
});
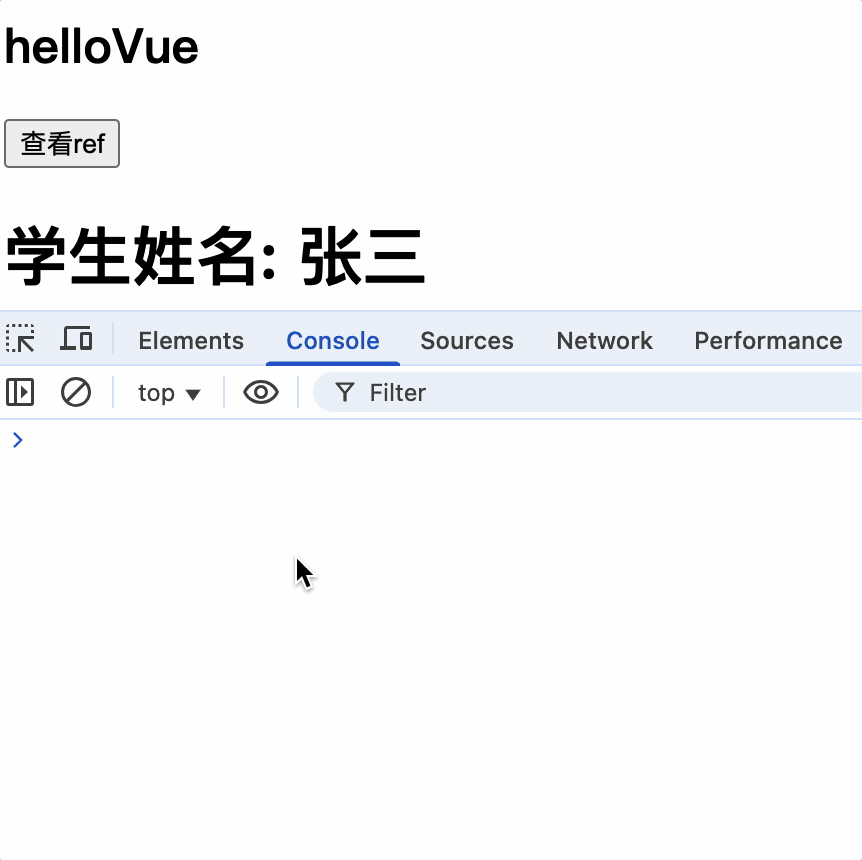
ref属性
ref: dom 或组件的属性,用于获取 dom 或组件的引用,可以理解为普通 dom 的 id 属性用于获取元素或组件
子组件:
<h1 ref="h1">学生姓名: {{ name }}</h1>
父组件:
<h2 ref="h2">hello{{ name }}</h2>
<button @click="show">查看ref</button>
<Student ref="student"></Student>
输出组件实例对象的$refs 属性,其中包含该组件的 DOM 和子组件的实例
show() {
  console.log(this.$refs);
}
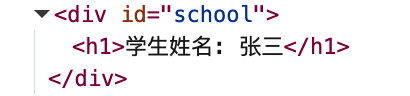
组件上的 id 属性
为组件添加 id,其实就是为组件模板中根元素 div 添加 id
<Student id="school" ref="student"></Student>
School 组件:
<template>
  <div>
    <h1 ref="h1">学生姓名: {{ name }}</h1>
  </div>
</template>
console.log(document.querySelector("#school")): 输出 School 模板中的 div
总结
1.ref: 被用来给元素或子组件注册引用信息(id 属性的代替者)
2.ref作用于 DOM 上: key 为 ref 的值,value 为 DOM 元素对象
例如: <h2 ref="h2">hello{{ name }}</h2>
3.ref作用于组件上: key 为 ref 的值,value 为组件实例对象
例如: <Student ref="student"></Student>
4.获取方式: this.$refs.ref属性值
props属性用于接收父组件传递的数据
props: 组件的属性,用于接收父组件使用该子组件视,在其标签上定义的属性
父组件向子组件传递数据
在子组件标签上使用使用自定义属性,也可以使用v-bind指令绑定属性值,属性值可以是字符串或表达式,使属性进行动态赋值
<Student sex="男" :age="18+1"></Student>
子组件 props 属性接收父组件形式
数组形式
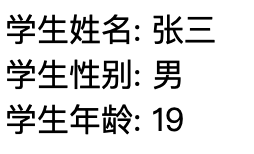
父组件使用子组件 Student 中定义了 sex 和 age 属性
<Student sex="男" :age="18+1"></Student>
子组件
<template>
  <div>
    <h1>学生姓名: {{ name }}</h1>
    <h1>学生性别: {{ sex }}</h1>
    <h1>学生年龄: {{ age }}</h1>
  </div>
</template>
<script>
export default {
  data() {
    return {
      name: "张三",
    };
  },
  props: ["sex", "age"],
};
</script>
对象形式限制属性类型
props: {
  sex: String,
  age: Number,
}
作用: 可以对组件传入的属性进行类型限制,如果类型不匹配,则报错
<Student sex="男" age="18"></Student>,由于父组件 age 属性值是字符串,所以会报错,因此需要使用v-bind指令绑定属性值,属性值可以是字符串或表达式

对象形式限制属性类型和必传限制,并设置默认值
默认值为非函数值
props: {
  sex: {
    type: String,
    required: true, // 必须传入
  },
  age: {
    type: Number,
    default: 18, // 默认值
  },
}
默认值也可以是一个函数,函数返回值作为默认值,函数中 this 指向当前子组件实例
  props: {
    sex: {
      type: String,
      default() {
        console.log('默认值');
        console.log(this);
        return "男";
      },
    },
    age: {
      type: Number,
      required: true,
    },
  },

作用:
1.对父组件传入的属性值进行类型限制
2.对父组件传入的属性值进行默认值设置
3.对父组件传入的属性值进行必传限制
4.默认值可以是函数,该函数中 this 指向当前 mc 实例,以便处理默认值逻辑
定义在 props 中的属性不能再定义到 data 中
props 中的属性优先级高于 data 中的属性,导致 data 中相同属性会被覆盖

因此可以在 data 中直接使用 props 中的属性
避免在子组件中直接修改 prop 中的数据
<button @click="age++">修改props中的数据</button>,直接修改 props 中的 age 属性,虽然没有报错,但是 vue 不建议直接修改
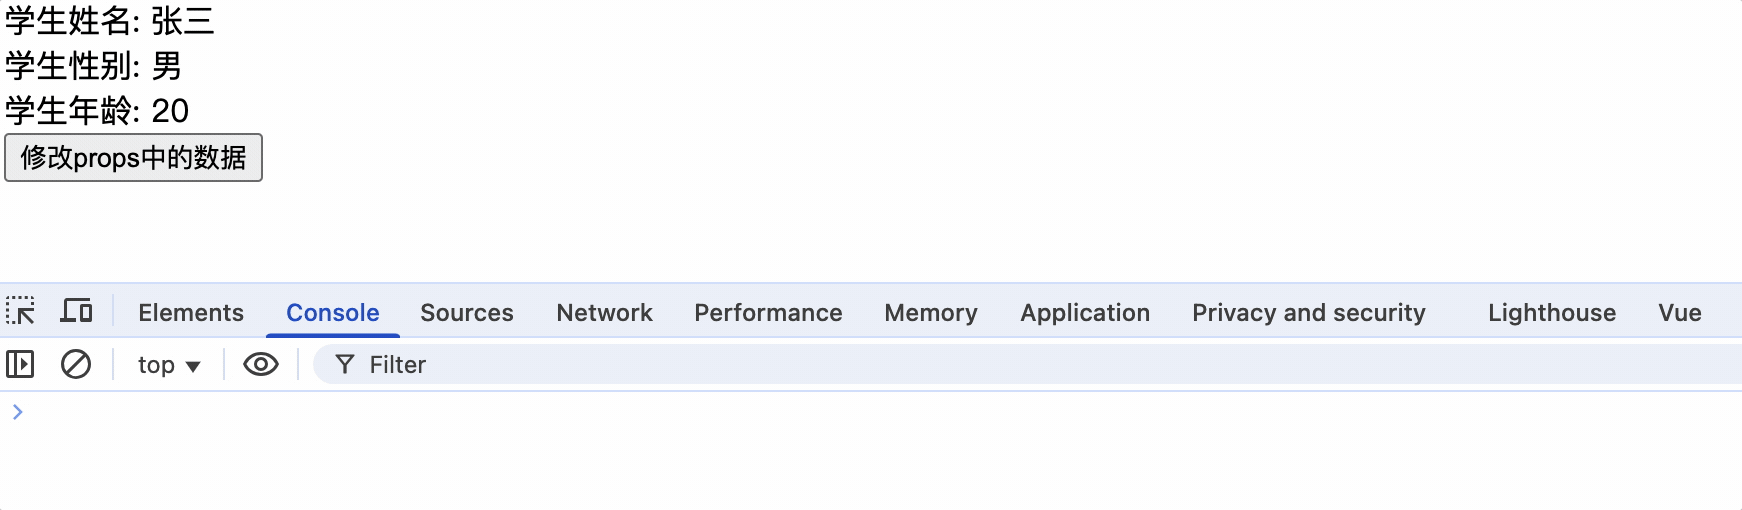
避免直接改变 prop,因为每当父组件重新渲染时,该值就会被覆盖。相反,使用基于 prop 值的 data 或 computed 属性,来创建子组件本地副本

原因: 每当父组件更新属性值时就会覆盖掉 props 中的属性值,将使子组件更新毫无意义
子组件
<template>
<div>
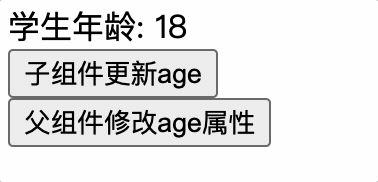
<span>学生年龄: {{ age }}</span><br />
<button @click="age++">子组件更新age</button>
</div>
</template>
<script>
export default {
props: ["age"],
data() {
return {
name: "张三",
};
},
};
</script>
父组件
<template>
  <div>
    <Student :age="age"></Student>
    <button @click="age++">父组件修改age属性</button>
  </div>
</template>
<script>
  import Student from "./components/Student.vue";
  export default {
    data() {
      return {
        age: 18,
      };
    },
    components: { Student },
  };
</script>
子组件更新 props 属性,此时父组件也更新 props,子组件的 value 属性值会被覆盖掉,导致子组件更新毫无意义
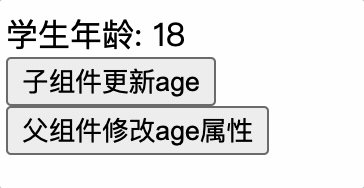
子组件应使用 data 来确保属性值不被父组件覆盖
<span>学生年龄: {{ ageSelf }}</span><br />
<button @click="ageSelf++">子组件更新age</button>
<script>
  export default {
    props: ["age"],
    data() {
      return {
        name: "张三",
        ageSelf: this.age,
      };
    },
  };
</script>
子组件使用 computed 来处理父组件修改了 props 属性值的情况
<template>
  <div><span>学生年龄: {{ ageSelf }}</span><br /></div>
</template>
<script>
  export default {
    props: ["age"],
    data() {
      return {
        name: "张三",
      };
    },
    computed: {
      ageSelf() {
        // 父组件年龄改变了需要处理子组件逻辑...
        return this.age * 10;
      },
    },
  };
</script>
父组件无法向子组件传递 key 属性
<Student key="1"></Student>
key 属性是 vue 中用于标识组件的唯一标识,用于优化渲染性能,key 属性不能被传递给子组件
总结
1.父组件传递动态数据给子组件时,使用v-bind指令
2.props属性用于接收父组件传递的数据
3.接收方式:
数组形式: 只接收
对象形式: 限制类型、必传限制、默认值、默认值可以是函数,在函数中处理默认值逻辑,该函数中 this 指向当前子组件实例对象
4.避免子组件直接修改 props 中属性,因为父组件会覆盖使子组件修改毫无意义
5.子组件接收到的 props 属性早于 data 初始化属性,因此可以在 data 中直接使用 props 中的属性
6.data 中不能定义与 props 中同名的属性,否则会被覆盖
7.父组件无法向子组件传递key、ref属性等,因为这些属性为内置属性,不能被传递给子组件
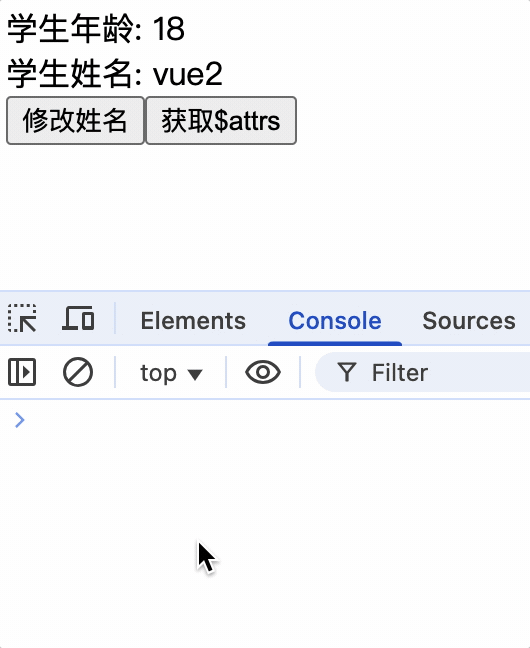
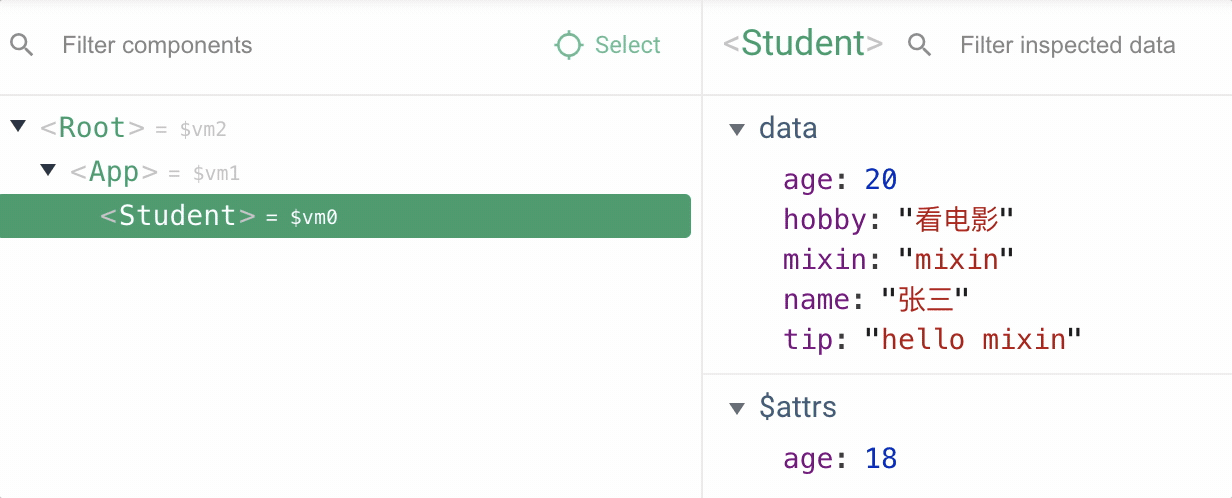
vc中的$attrs属性
$attrs属性: 当父组件传递数据给子组件时,子组件通过props属性进行接收,没有使用props属性接收的参数,将会放到$attrs属性中
<template>
  <div>
    <span>学生年龄: {{ age }}</span><br>
    <span>学生姓名: {{ $attrs.name }}</span><br>
  </div>
</template>
<script>
export default {
  props: ['age'],
  mounted(){
    console.log(this)
  },
};
</script>
$attrs属性对子组件使用props接收父组件数据进行兜底,如果子组件没有使用props接收父组件数据,那么父组件传递的数据将会放到$attrs属性中,子组件可以通过$attrs属性获取父组件传递的数据

$attrs属性并不是响应式式数据
mixin属性: 相同逻辑抽离,方便复用
Mixin: 混入,将组件中相同的逻辑提取出来,封装成一个混入对象,在需要使用的地方引入混入对象,组件就具有混入对象的功能
局部混入
组件:
<template>
<div>
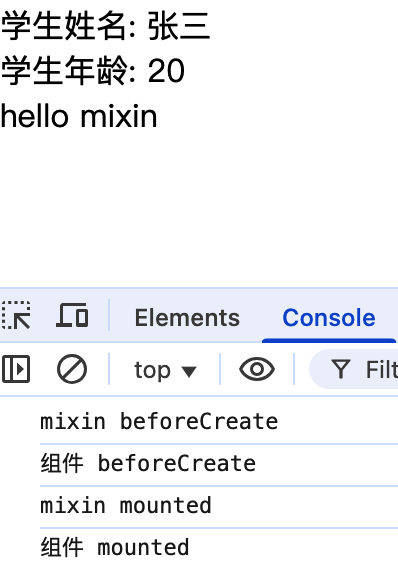
<span>学生姓名: {{ name }}</span><br />
<span>学生年龄: {{ age }}</span><br />
{{show()}}
<span>{{tip}}</span>
</div>
</template>
<script>
import { myMixin } from "../mixin.js";
export default {
data() {
return {
name: "张三",
};
},
mixins: [myMixin],
beforeCreate() {
console.log("组件 beforeCreate");
},
mounted() {
console.log("组件 mounted");
},
};
</script>
混入数据: 把部分 data 数据和方法进行抽离,方便复用
export const myMixin = {
  data() {
    return {
      age: 20,
      name: "李四",
      tip: "",
      mixin: "mixin",
    };
  },
  methods: {
    show() {
      this.tip = "hello mixin";
    },
  },
  beforeCreate() {
    console.log("mixin beforeCreate");
  },
  mounted() {
    console.log("mixin mounted");
  },
};
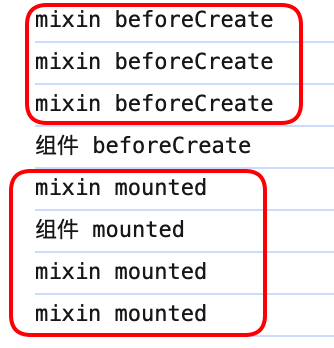
组件中 data 覆盖混入中相同属性值,生命周期函数不会覆盖,并且 mixin 中的生命周期函数优于组件中生命周期函数执行
全局混入
在全局 Vue 中添加混入
1.在 main.js 中 import 混入 js
2.Vue.mixin(xxx)
3.子组件中无需再引入混入数据
main.js 全局 Vue 引入混入数据
import { myMixin } from "./mixin";
Vue.mixin(myMixin);
new Vue({
  el: "#app",
  render: (h) => h(App),
});
由于将混入数据配置为全局属性,那么 vm,及其子组件实例对象 vc 在创建时就已经具备了myMixin属性,因此不需要在子组件中再次引入混入数据
由于 vm,app,student 实例都引入了混入属性,都会执行生命周期回调函函数
总结
1.混入: 使用组件重复功能或配置的方式
(1)把组件相同options配置数据,抽离出一个 js 文件,并在 js 中暴露这个配置对象
(2)其他组件 import 混入 js 文件,并使用mixins属性以数组形式引入,例如: mixins:[xxx]
2.组件中的 data 数据或方法会覆盖混入中相同的属性或方法
3.组件中的生命周期函数不会覆盖混入中的生命周期函数,并且混入中的生命周期函数会先执行
4.使用全局混入后其他子组件就不需要再次引入了,需要注意的是全局引入的混入声明周期函数,所有组件工作过程中都会执行,应该避免业务代码逻辑写在全局混入中
插件
插件: 用于扩展Vue功能的 js 文件,该 js 文件中暴露一个对象,对象中通常是一个包含install方法
定义插件
export default {
  install(Vue) {
    console.log("Vue", Vue);
  },
};
使用插件
在 main.js 入口文件中,vm 创建前引入插件
import plugin from "./plugins.js";
Vue.use(plugin);
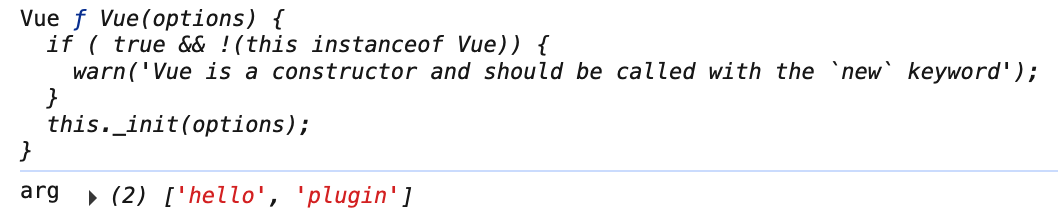
插件中的install方法参数
1.Vue 构造函数: 为Vue函数添加options,或直接为Vue的原型对象中添加属性或方法,使vm和所有vc实例对象都具有该功能
2.可选的扩展参数: 插件接收使用者传入的自定义参数,以便插件实现不同功能
Vue.use(plugin, 'hello', 'plugin');
export default {
  install(Vue, ...arg) {
    console.log("Vue", Vue);
    console.log("arg", arg);
  },
};
插件中可以做哪些事
1.插件中为Vue构造函数的原型对象中添加属性或方法,使 vm 和所有 vc 实例对象都具有该属性或方法
2.通过 Vue 函数的静态方法添加全局指令、过滤器、混入等
1.添加全局属性和方法
export default {
  install(Vue) {
    Vue.prototype.$myMethod = function () {
      console.log("myMethod");
    };
    Vue.prototype.$myProperty = "myProperty";
  },
};
2.添加全局指令
export default {
  install(Vue) {
    Vue.directive("focus", {
      inserted: function (el) {
        el.focus();
      },
    });
  },
};
3.添加全局过滤器
export default {
  install(Vue) {
    Vue.filter("myFilter", function (value) {
      return value + "myFilter";
    });
  },
};
4.添加全局混入
export default {
  install(Vue) {
    Vue.mixin({
      data() {
        return {
          mixin: "mixin",
        };
      },
    });
  },
};
总结
1.插件: 用于扩展 Vue 功能的 js 文件,该 js 文件中暴露一个对象,对象中通常是一个包含install方法,install 方法会在Vue.use(plugin)时调用
2.install 接收参数: Vue 构造函数,和可选的扩展参数
3.插件的初始化: 在 main.js 应用入口文件中引入,并使用 Vue.use(plugin)方法进行初始化
4.插件中可以添加全局属性、方法、指令、过滤器、混入等
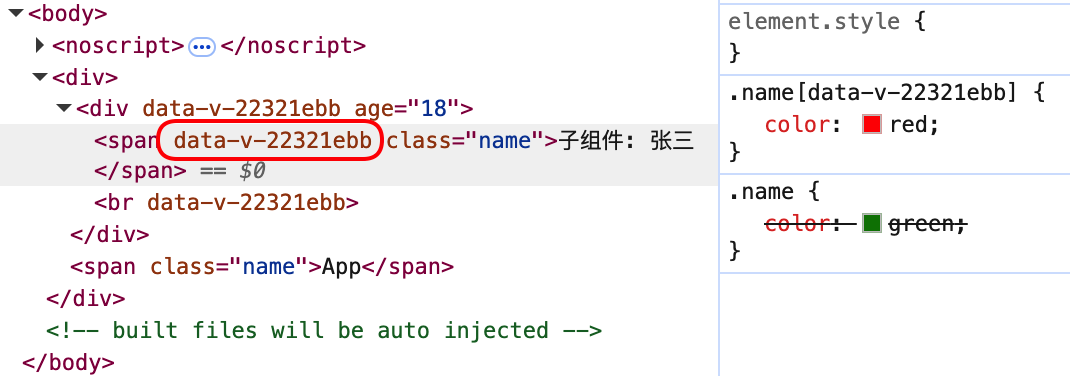
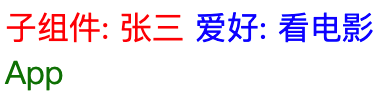
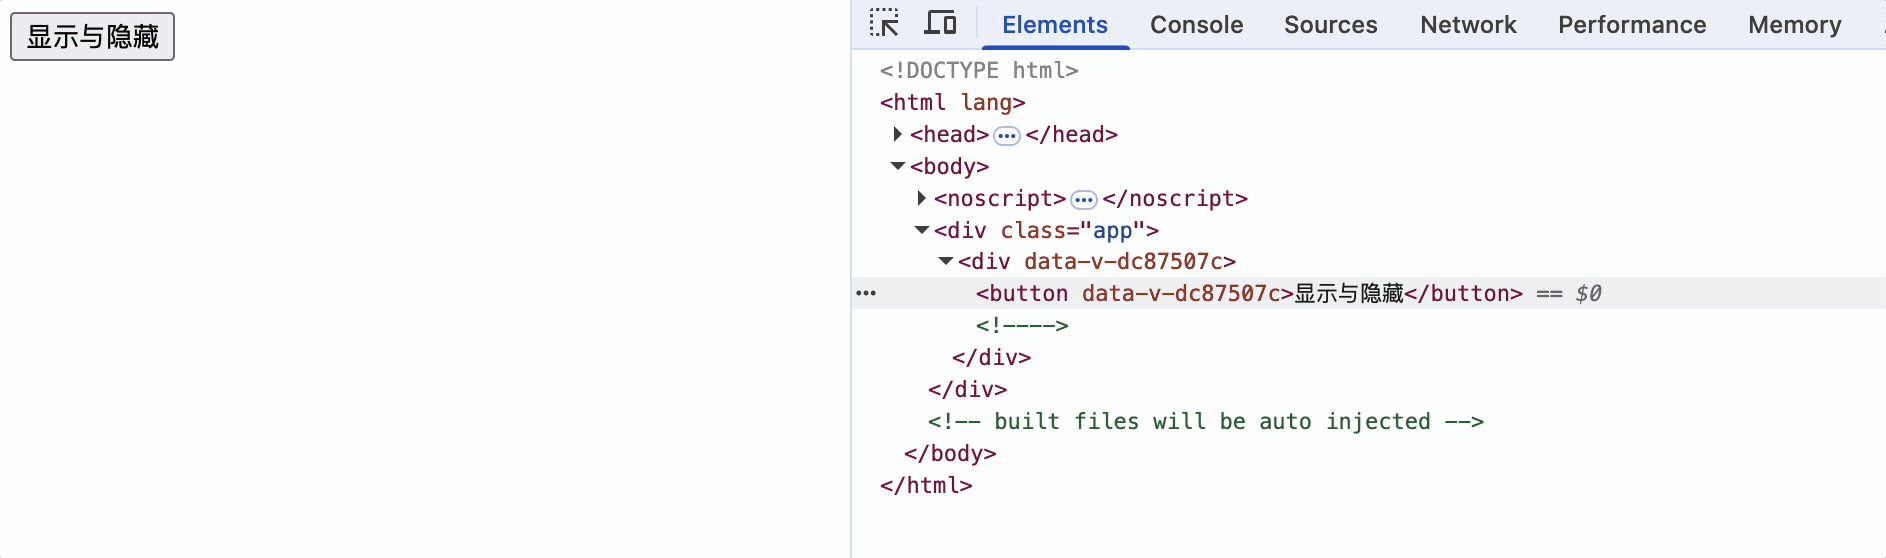
scoped 样式: 作用域样式
没有样式作用域产生的问题
1.父组件样式受子组件样式影响
子组件样式
<style>
  .name {
    color: red;
  }
</style>
父组件无自定义样式
父组件仍然可以使用子组件的 name 样式,这样就会导致父组件的样式不可控,有可能受子组件样式决定
2.父组件和子组件的样式冲突
父组件和子组件同时具有相同样式
<style>
  .name {
    color: green;
  }
</style>
父组件和子组件同时具有相同样式,父组件的样式会覆盖子组件的样式,导致子组件样式不可控
scoped 样式
在样式中添加scoped属性,使样式具有作用域,只作用于当前组件
<style scoped>
  .name {
    color: red;
  }
</style>
scoped 的作用原理: 给当前组件的元素添加一个data-v-xxxx属性,并给样式添加data-v-xxxx属性选择器,使样式只作用于当前组件的元素
xxxx: 由 vue 随机生成的唯一 ID
lang="less": 使用 less 预处理器
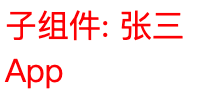
<template>
  <div>
    <span class="name">
      子组件: {{ name }}
      <span class="hobby"> 爱好: {{ hobby }} </span> </span
    ><br />
  </div>
</template>
<style scoped lang="less">
  .name {
    color: red;
    .hobby {
      color: blue;
    }
  }
</style>
控制台报错:
Failed to resolve loader: less-loader
You may need to install it.
解决办法: 安装和 webpack 版本对应的 less-loader 模块
查看脚手架中 webpack 的版本:
查看可选的 less-loader 版本:
➜  vue-test git:(master) ✗ npm view less-loader versions
[
  '0.1.0',  '0.1.1',  '0.1.2',  '0.1.3',  '0.2.0',
  '0.2.1',  '0.2.2',  '0.5.0',  '0.5.1',  '0.6.0',
  '0.6.1',  '0.6.2',  '0.7.0',  '0.7.1',  '0.7.2',
  '0.7.3',  '0.7.4',  '0.7.5',  '0.7.6',  '0.7.7',
  '0.7.8',  '2.0.0',  '2.1.0',  '2.2.0',  '2.2.1',
  '2.2.2',  '2.2.3',  '3.0.0',  '4.0.0',  '4.0.1',
  '4.0.2',  '4.0.3',  '4.0.4',  '4.0.5',  '4.0.6',
  '4.1.0',  '5.0.0',  '6.0.0',  '6.1.0',  '6.1.1',
  '6.1.2',  '6.1.3',  '6.2.0',  '7.0.0',  '7.0.1',
  '7.0.2',  '7.1.0',  '7.2.0',  '7.2.1',  '7.3.0',
  '8.0.0',  '8.1.0',  '8.1.1',  '9.0.0',  '9.1.0',
  '10.0.0', '10.0.1', '10.1.0', '10.2.0', '11.0.0',
  '11.1.0', '11.1.1', '11.1.2', '11.1.3', '11.1.4',
  '12.0.0', '12.1.0', '12.2.0', '12.3.0'
]
选择一个次新版本安装:
➜ vue-test git:(master) ✗ npm i less-loader@11.1.4
此时项目就支持了 less 语法了
父组件添加scoped后影响了子组件样式
父组件:
<template>
  <div class="parent">
    APP
    <Student></Student>
  </div>
</template>

<script>
import Student from "./components/Student.vue";
export default {
  components: { Student },
};
</script>
<style scoped>
.parent {
  color: red;
}
</style>
子组件:
<template>
  <div class="parent">
    子组件
  </div>
</template>
<script>
export default {
};
</script>
<style scoped>
.parent {
  color: green;
}
</style>
按照scoped的作用: 当前组件样式作用域只对当前组件有效,而实际上子组件和父组件都是红色
原因: vue将会由内向外渲染组件,渲染过程中先生成样式,子组件生成.parent[ebb]绿色,而后生成父组件.parent[d90]红色,且子组件标签属性中会保留父组件的标记d90,因此.parent[d90]样式会覆盖.parent[ebb]样式,作用到子组件。
总结
1.scoped并不能完全隔离组件之间的样式互不影响
2.当前子组件样式影响到父组件时,应该在子组件添加scoped属性
3.scoped只能保证子不影响父,而不能保证父不影响子
4.当带有scoped的父组件影响到子组件时,应该检查父子组件的class样式名是否重名
Todo-List 案例
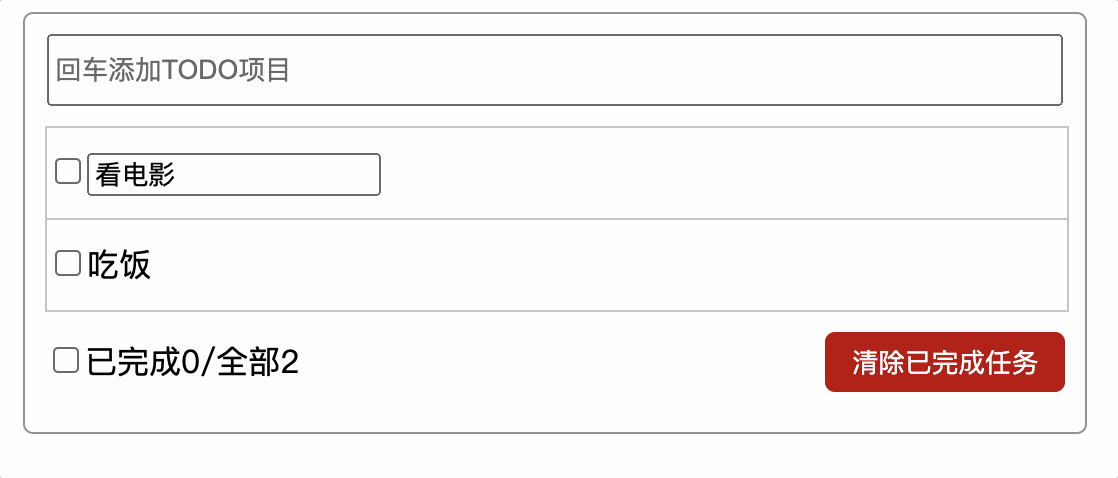
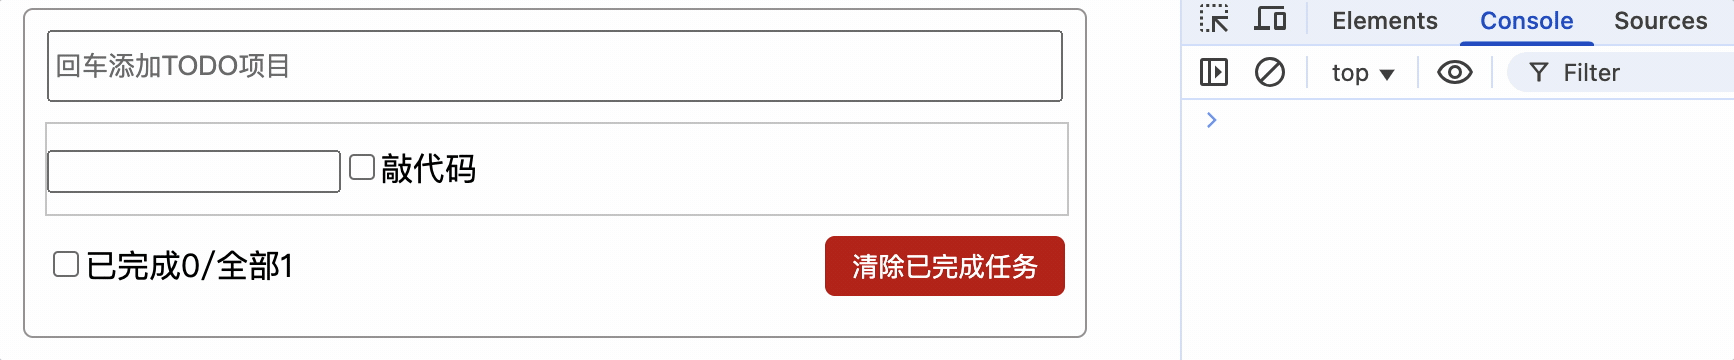
需求: 创建一个 Todo-List 应用,实现以下功能:
1.输入框输入内容,按下回车键,将输入的内容添加到列表中,默认为待完成事项
2.每个事项都有删除按钮,删除后总事项个数减一
3.勾选某个事项后,表示该事项已完成,并统计已完成事项个数
4.全选功能,并展示已完成事项个数和全部事项个数

nanoid库生成随机id
安装nanoid库:
➜ vue-test git:(master) ✗ npm i nanoid
使用 nanoid 插件生成随机 id:
import { nanoid } from "nanoid";
使用:
const id = nanoid(); // jn5zU5quWVMXekPjBvg_V
后代组件向父祖先组件传递数据
实现原理:
1.props 属性用于接收父组件动态数据
2.引用传递
实现流程:
1.父组件向子组件传递一个函数
<AddTodo :addTodo="addTodo"></AddTodo> methods: { addTodo(todo) {
this.todos.unshift(todo); }, }
2.子组件接收父组件函数
props: ['addTodo'],
3.子组件调用父组件函数
this.addTodo(参数);
后代组件修改祖先组件中的数据
双向绑定实现(不推荐)
双向绑定作用在<input type=checkbox v-model="属性" >复选框上时,会将属性值作用在标签的checked属性上,可实现勾选取消勾选
后代组件,双向绑定了祖先组件传过来的 todo 对象中的属性值
<input type="checkbox" v-model="todo.checked" /> props: ['todo']
vue 中原则是不能修改 props 中的数据的,但是由于 vue 监听 props 中的数据方式属于浅层次监听,因此修改对象中的属性值并没有提示如下警告
使用双向绑定方式违反原则: 单向数据流
修改 props 中的数据,同时也修改了父组件的数据,破坏了数据流的单向传递性,使数据流向变的复杂且难以调试
祖父组件向后代组件传递函数引用实现
祖父组件中定义函数,将函数一层层传递给后代组件中,以便调用
总结
组件化编码流程
1.拆分静态组件: 组件要按照功能点拆分,组件名称不要与 html 标签名重名
2.考虑好功能数据应该存放在哪个组件中
(1)一个组件在用: 放到自身组件中
(2)两个组件在用: 放到共同的父组件中(状态提升)
3.实现功能
通过事件绑定、props、v-model 实现组件间通信
组件间数据传递
1.祖先组件向后代组件传递数据: props
2.后代组件向祖先组件传递数据: 祖先组件传递一个函数,后代组件调用这个函数,把数据当作参数传递给这个函数
使用 v-model 切记
v-model 不能绑定 props 中的数据,原因 vue 规范中推荐组件之间数据流的单向性,应该避免后代组件直接修改 props 数据
vue 只能浅层监听 props 数据是否修改了,如果修改了 props 中对象的属性,vue 则不会提示警告,但是也应该避免修改 props 中的数据
组件自定义事件
组件自定义事件: 子组件向父组件传递数据,通过事件的方式
实现原理: 父组件中使用了子组件,在父组件中就可以为该子组件绑定自定义事件,事件的回调函数处理逻辑在父组件中,在子组件触发事件时,就会执行父组件的回调函数
vue 在创建 vc 实例时,并解析该组件的标签中是否有自定义事件,如果有就为 vc 绑定事件,而后通过子组件通过this.$emit方法触发事件,父组件的回调函数就会执行
$emit方法:
作用: 触发组件事件执行
语法: $emit('事件名', 参数)
参数: 如果参数较多,回调函数可以使用扩展运算符接收,或者传递对象结构
父组件通过v-on指令为子组件绑定(指令形式绑定)
1.父组件通过v-on或@绑定showName事件,并指定回调函数为showNameCallback
<Student @showName="showNameCallback" :age="age"></Student>
methods: {
  showNameCallback(name, ...args) {
    this.studentName = name;
    console.log('子组件调用父组件方法');
  },
}
2.子组件使用$emit 方法触发事件
methods: {
  showName() {
    console.log(this);
    this.$emit('showName', this.name, this.hobby);
  },
}
父组件通过$refs为组件实例绑定(方法形式绑定)
1.vue 挂载完成后,可以使用$refs获取组件实例,使用$on为组件实例绑定自定义事件
$on: 作用: 为组件实例绑定自定义事件
语法: $on('事件名', 回调函数)
<Student ref="student"></Student>
methods: { showNameCallback(name, ...args) {
  this.studentName = name; console.log('子组件调用父组件方法', name, args);
  },
},
mounted() {
  this.$refs.student.$on('showName', this.showNameCallback);
},
2.子组件使用$emit 方法触发事件
methods: {
  showName() {
    console.log(this);
    this.$emit('showName', this.name, this.hobby);
  },
}
组件自定义事件只触发一次
方法形式绑定:
$once: 作用: 为组件实例绑定自定义事件,只触发一次
语法: $once('事件名', 回调函数)
mounted() {
  this.$refs.student.$once('showName', this.showNameCallback);
},
指令形式绑定:
v-on指令绑定事件时,可以添加.once修饰符,表示只触发一次
<Student @showName.once="showNameCallback" :age="age"></Student>
方法形式和指令形式绑定自定义事件区别
1.指令形式绑定自定义事件,在组件实例销毁时,会自动解绑事件
2.方法形式可以在指定时机绑定事件,如请求接口响应后绑定事件等,更加灵活
组件解绑自定义事件
为什么要解绑自定义事件
防止内存泄漏:
当组件销毁时,如果事件监听器未被移除,父组件会继续持有对已销毁组件的回调函数引用
结果:垃圾回收器无法释放该组件占用的内存,随着组件频繁创建/销毁,内存占用持续上升,最终导致页面卡顿甚至崩溃
通过显式解绑事件,既能避免内存泄漏,又能确保组件销毁后不会产生残留操作,这是 Vue 组件生命周期管理的重要环节
$off()解绑自定义事件
通过 vc 实例销毁时,使用$off方法解绑事件
销毁一个组件事件:
this.$off('事件名')
销毁多个组件事件:
this.$off(['事件名 1', '事件名 2'])
销毁所有组件事件:
this.$off()
methods: {
  unbind() {
    this.$off('showName');
  },
}

组件自定义事件没有冒泡机制
系统事件冒泡: 当一个元素接收到事件对象的时候(触发事件),会把他接收到的事件对象传给自己的父级,如果父级监听了该事件就会执行父级的回调函数,一直向上传播,直到window对象,这种传播过程称为事件冒泡,事件冒泡是默认存在的,和当前元素有无绑定事件无关,即使没有绑定事件,事件对象也会向上传播。
在vue中父组件通过$on为子组件vc实例对象绑定了事件并添加了回调函数,因此只有vc通过$emit触发事件
而vc引用的子组件的实例对象并没有绑定事件,因此孙子组件使用$emit并不会触发事件
methods: {
  sendScore() {
    console.log('score');
    this.$emit('showName', this.score);
  },
},
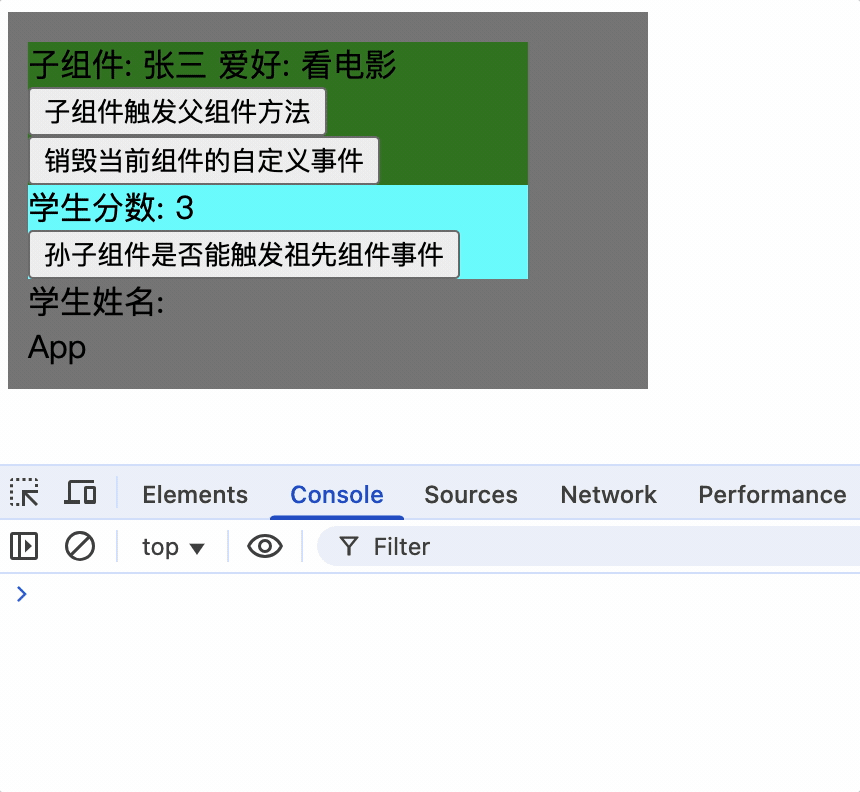
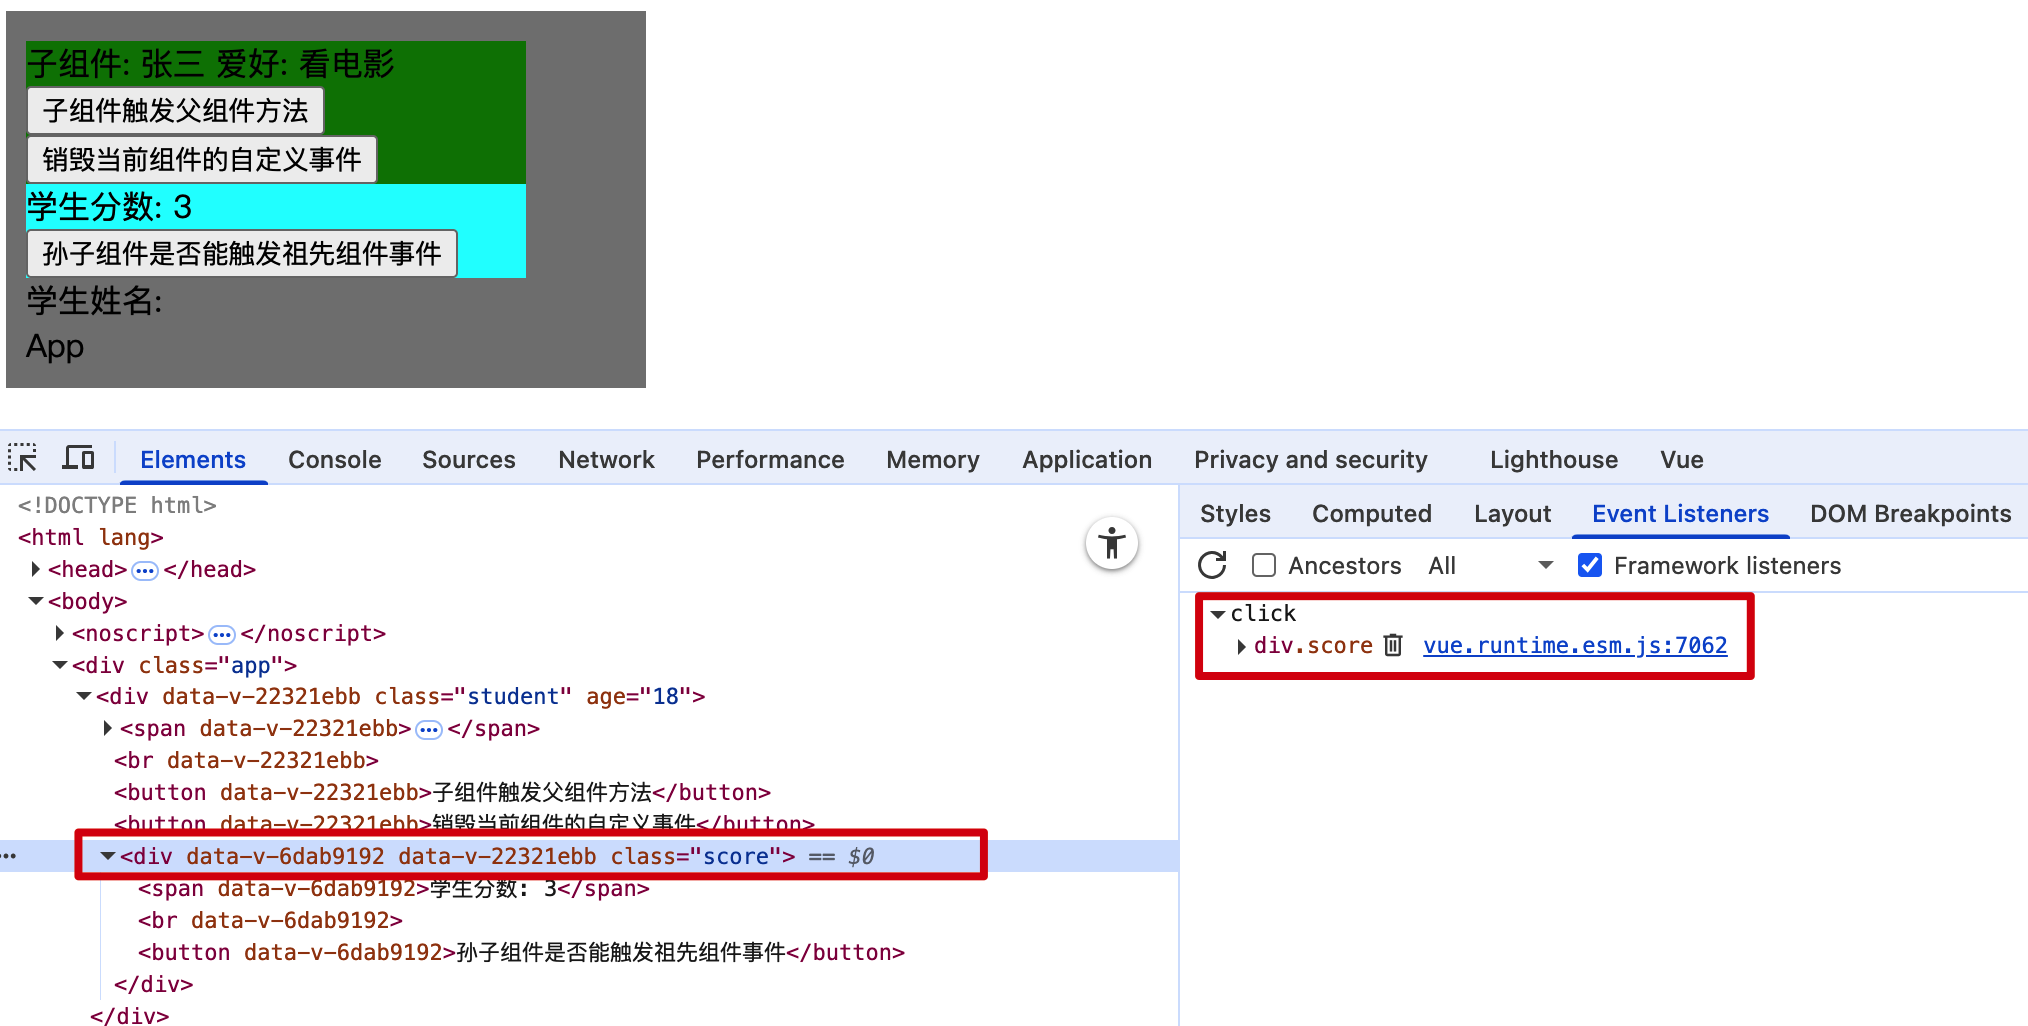
使孙子组件触发祖先组件的事件
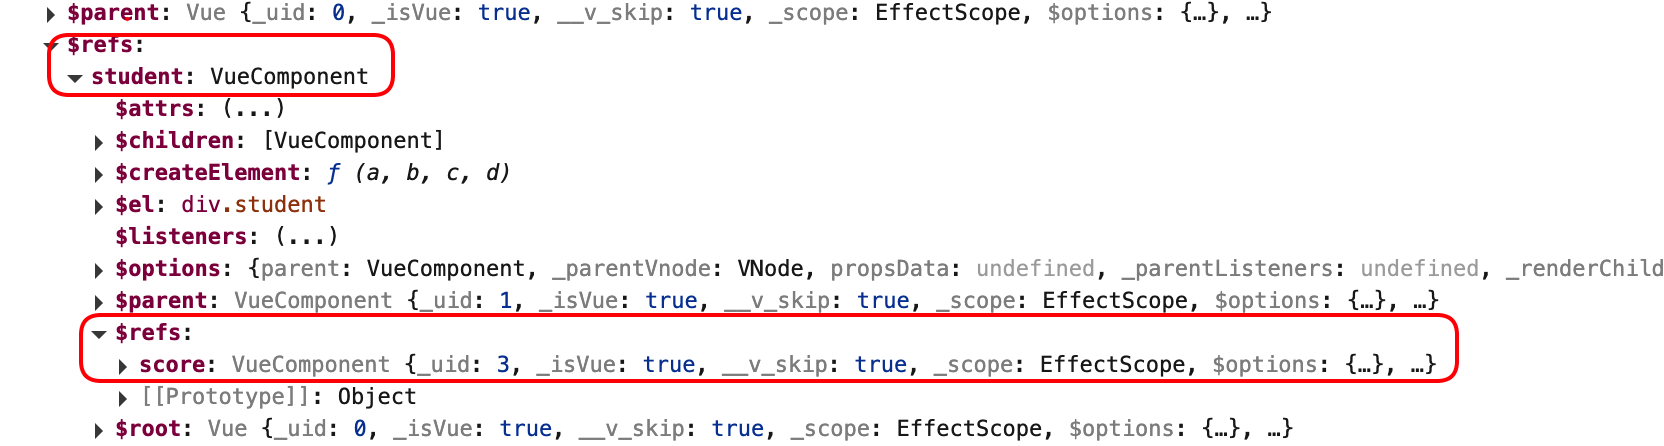
孙子组件使用ref属性,通过祖先组件就可以获取到孙子组件实例对象,而后为其绑定事件
孙子组件
<Score ref="score"></Score>
祖先组件为其绑定事件
mounted() {
  console.log(this);
  // 子组件绑定事件
  this.$refs.student.$on('showName', this.showNameCallback);
  // 孙子组件绑定事件
  this.$refs.student.$refs.score.$on('showName', this.showNameCallback);
},
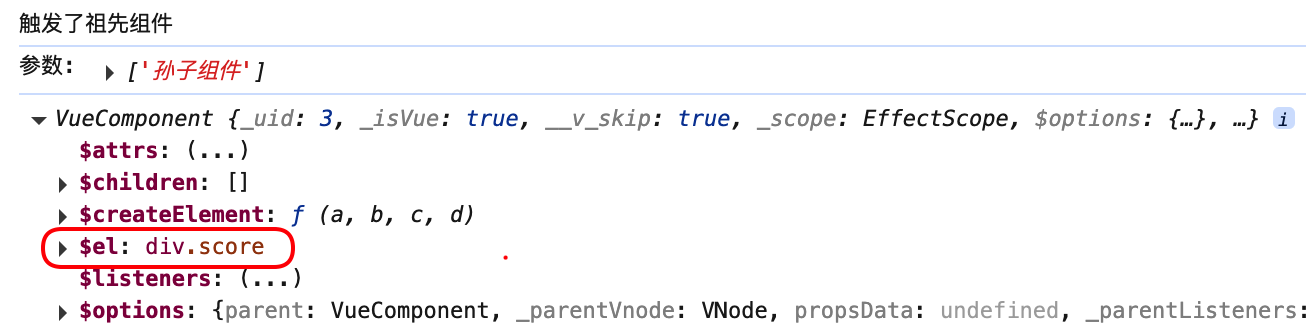
只有为孙子组件实例绑定事件后,才能触发祖先组件的事件

总结
1.为某个组件绑定事件时,可以直接写回调函数,且回调函数应该是箭头函数,否则 this 指向的不是父组件实例对象,而是子组件实例对象
mounted(){
  this.$refs.student.$refs.score.$on('showName', (...args)=>{
      console.log('触发了祖先组件');
      console.log('参数:', args);
    });
}
组件自定义事件回调函数中this和原生js中系统事件回调函数中this具有相同含义:
原生js系统事件回调函数中this指向的是触发事件的元素对象
组件自定义事件回调函数中this指向的是绑定了事件的组件对象(哪个组件具有事件,那么this就指向哪个组件对象)
vue在设计时就确定了,哪个实例组件对象触发了事件,那么无论该事件的回调函数在哪里,可能在父组件也能在祖先组件中
那么方法形式的回调函数中this就指向触发了事件的组件实例,因此应该使用箭头函数将其中的this和外层方法中this保持一致,外层方法可以是methods中的方法
也可能是生命周期的方法,它们的this都是当前的组件实例对象,便于操作当前实例数据,如,为data赋值,调用当前实例方法等
2.如果使用了方法函数,其this指向绑定了事件的组件实例对象
this.$refs.student.$refs.score.$on('showName', function (...args) {
    console.log('触发了祖先组件');
    console.log('参数:', args);
    console.log(this);
  });
3.为组件绑定事件可以绑定多次,每次触发后都会执行
mounted() {
  this.$refs.student.$refs.score.$on('showName', (...args) => {
    console.log('触发了祖先组件');
    console.log('参数:', args);
  });
  this.$refs.student.$refs.score.$on('showName', function (...args) {
    console.log('触发了祖先组件');
    console.log('参数:', args);
  });
},
4.组件使用@事件名.native修饰符为组件绑定原生事件
<Score @click.native="systemEvent"></Score>
5.使用系统事件时只能对组件绑定,不能对组件的子元素进行绑定,否则会报错
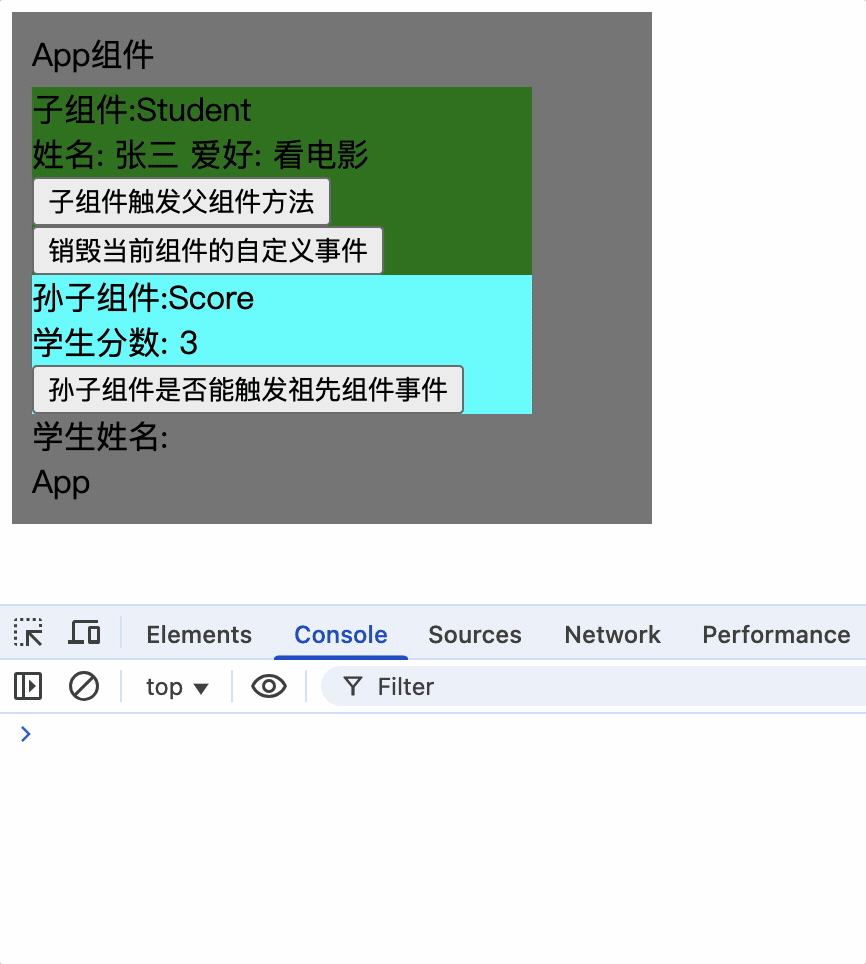
<template>
  <div class="student" @click.native="systemEvent">
    <span>
      子组件: {{ name }}
      <span>爱好: {{ hobby }}</span>
    </span>
    <br />
    <button @click="showName">子组件触发父组件方法</button>
    <button @click="unbind">销毁当前组件的自定义事件</button>
    <Score ref="score"></Score>
  </div>
</template>

6.为组件绑定系统事件,其实就是为组件的根元素绑定事件,这也是template中必须只有一个根元素的原因之一
<Score @click.native="systemEvent"></Score>
7.组件的系统事件具有冒泡性质,即子组件的点击事件会冒泡到父组件,会执行父组件回调函数
只对Student绑定系统事件,那么点击Score组件时会把事件对象冒泡给Student组件,Student组件会执行回调函数
8.组件绑定自定义事件方式
1.父组件中在子组件标签中添加@事件名="回调函数"
<Student @showName="showNameCallback"></Student>
2.父组件中通过$on为子组件实例对象绑定事件
this.$refs.student.$on('showName', this.showNameCallback);
3.组件自定义事件只触发一次
this.$refs.student.$once('showName', this.showNameCallback);
9.触发事件
绑定了事件的组件实例中使用: this.$emit('事件名', 参数)
10.解绑事件
this.$refs.student.$off('showName');
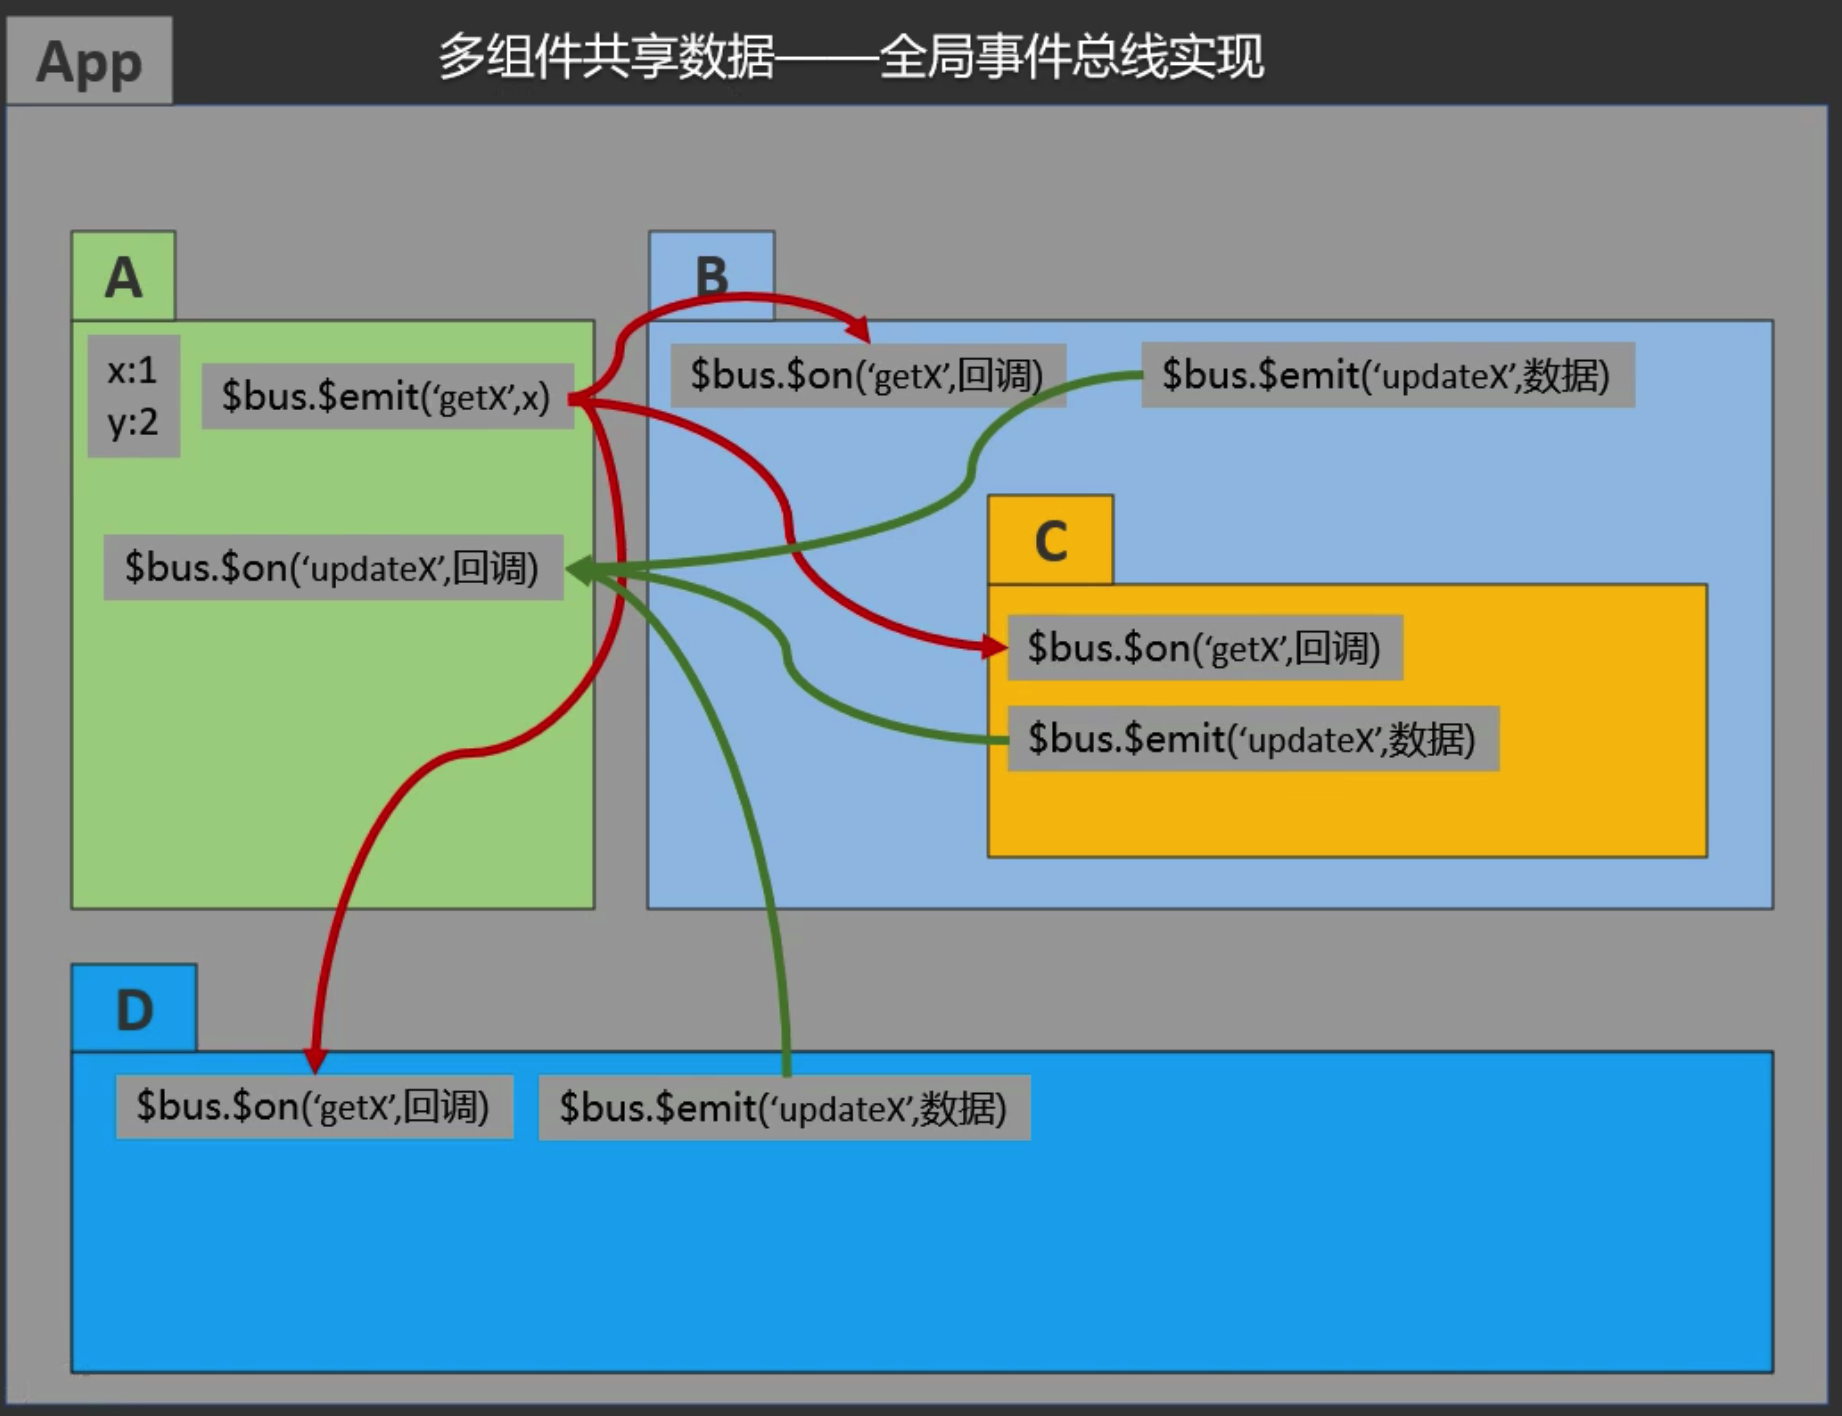
全局事件总线
全局事件总线(Global Event Bus): 实现任意组件间相互通信
在组件的自定义事件中分为两个关键点
1.为vc实例绑定事件,通过$on('事件名', 箭头函数)绑定事件
2.vc实例通过this.$emit('事件名')触发事件
在当前组件中为子组件的实例对象绑定事件,同时回调函数也在此定义,便于服务于当前组件
子组件通过实例对象触发事件,从而回调了当前组件的回调函数。
通过相同的实现原理,我们可以定义一个全局的vc实例对象,该对象可以使用$on、$emit、$off等方法,
各个组件都可以使用该vc对象,并为其绑定事件,而回调函数留在各个组件中,服务于各个组件,
由于vc是全局实例,那么各个组件可以获取到全局vc,并触发指定的事件,从而执行了各个组件中回调函数,实现了组件间通信
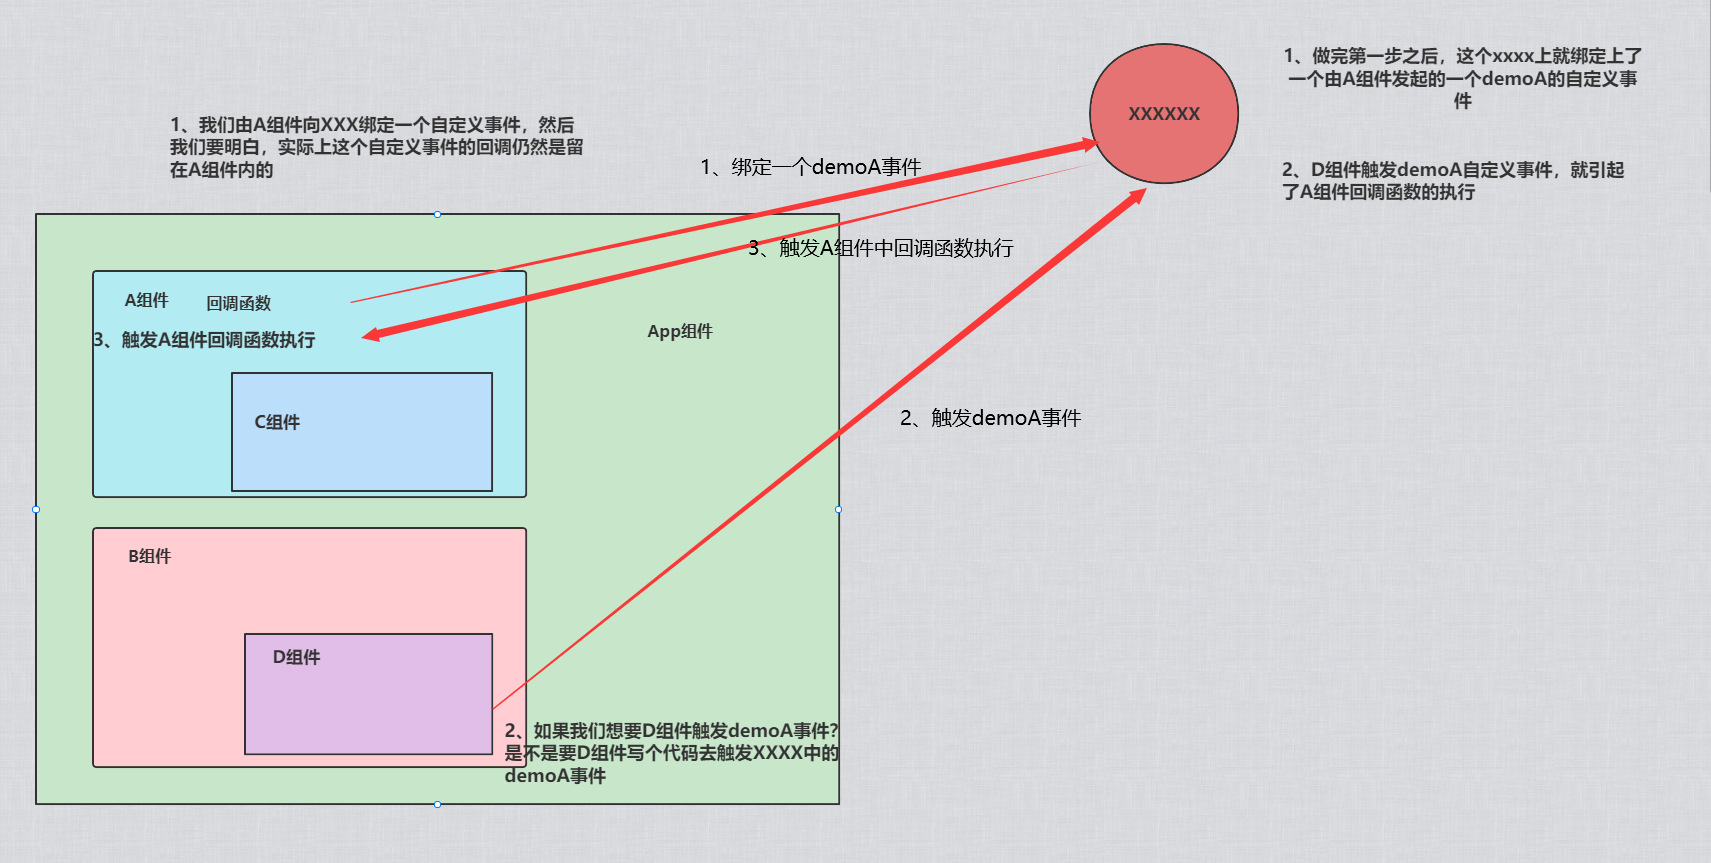
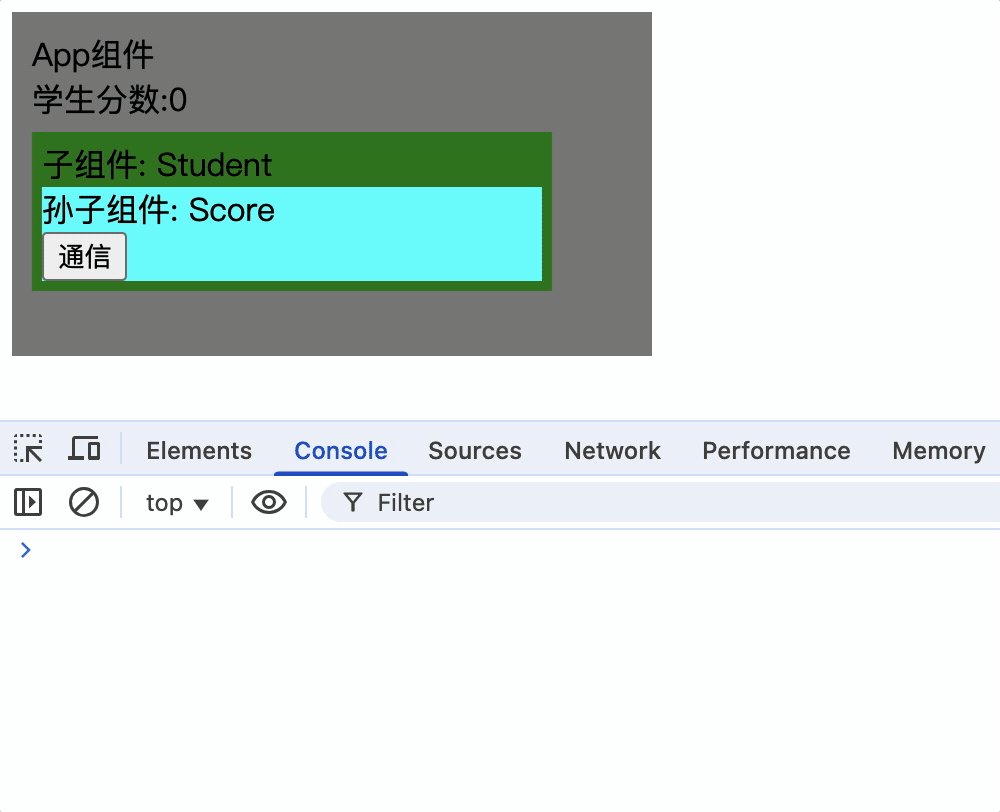
实现全局事件总线
1.在Vue初始化实例前,创建一个vc实例,并把这个vc实例作为Vue的原型对象中一个xxx属性,因此该xxx属性也就具有了$on、$emit、$off等方法
const VcFn = Vue.extend({});
Vue.prototype.xxx = new VcFn(); // 全局vc实例

new Vue({
  el: '#app',
  render: h => h(App),
});
2.App组件挂载后通过this.xxx.$on('事件名', 箭头函数)为xxx绑定事件
mounted() {
  this.xxx.$on('score', newScore => {
    console.log('App组件接收其他组件参数', newScore);
    this.score = newScore;
  });
},
App组件:
3.Score组 件通过this.xxx.$emit('事件名', 参数)触发事件
<button @click="xxx.$emit('score', score++)">通信</button>
vue推荐使用beforeCreate钩子中使用当前vm实例作为全局事件总线
new Vue({
  // 在初始化事件和响应数据前,为Vue的原型安装全局事件总线对象
  beforeCreate() {
    Vue.prototype.$bus = this; // 安装全局事件总线,$bus就是当前应用的vm
  },
  render: h => h(App),
}).$mount('#app');
总结
1.全局事件总线本质就是一个具有Vue原型对象中$on、$once、$off、$emit等方法的对象,该对象可以是vc实例也可以vm实例,更像是一个傀儡对象,当前组件中用它绑定事件,其他组件使用它来触发事件,而回调函数的执行却在当前组件中
2.vue的最佳实践是把当前项目的vm实例作为全局事件总线
$bus: 为了迎合vue的命名规范($xxx给开发员使用的方法),全局事件总线一般命名为$bus,
new Vue({
  beforeCreate() {
    Vue.prototype.$bus = this; // 安装全局事件总线,$bus就是当前应用的vm
})
3.由于全局事件总线为vm实例,因此vm实例绑定的事件不会自动销毁,当某一个组件销毁时,应该在该组件中手动销毁已绑定的事件
this.$bus.$off('事件名');
4.组件销毁时不能使用this.$bus.$off(),否则会销毁全局事件总线中所有事件,导致其他组件无法使用全局事件总线
5.全局事件总线中的事件只能服务于单个业务场景,不能在其他组件中复用相同的事件,原因是组件销毁,该事件也会销毁,因此不能在其他组件中复用
6.多个组件绑定相同事件时,都会执行各自的回调函数,和原生js绑定多个事件相同
消息订阅与发布
消息订阅与发布: 实现任意组件间通信
通过pubsub-js库实现
安装pubsub-js库:
➜ vue-test git:(master) ✗ npm i pubsub-js
App组件订阅消息:
import pubsub from 'pubsub-js';
mounted() {
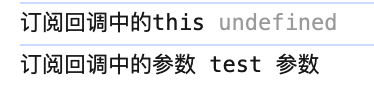
this.msgId = pubsub.subscribe('test', function (name, args) {
console.log('订阅回调中的this', this);
console.log('订阅回调中的参数', name, args);
});
},
beforeDestroy() {
pubsub.unsubscribe(this.msgId);
},
其他组件发布消息:
import pubsub from 'pubsub-js';
methods: {
  del() {
    if (confirm('确定删除吗?')) {
      pubsub.publish('test', '参数');
    }
  },
},
总结
1.消息订阅与发布和全局事件总线类似,都是实现组件间通信,通过安装pubsub-js库实现
2.订阅回调函数接收两个参数,第一个参数始终为消息名称,第二个参数为传递的参数对象,因此多个数据应放在对象中传递
3.订阅回调函数为普通函数时,this为undefined,为箭头函数时,this为当前组件实例对象
4.和全局事件总线一样,需要在组件销毁时取消订阅,unsubscribe(消息ID),消息ID由订阅时返回
$nextTick执行回调
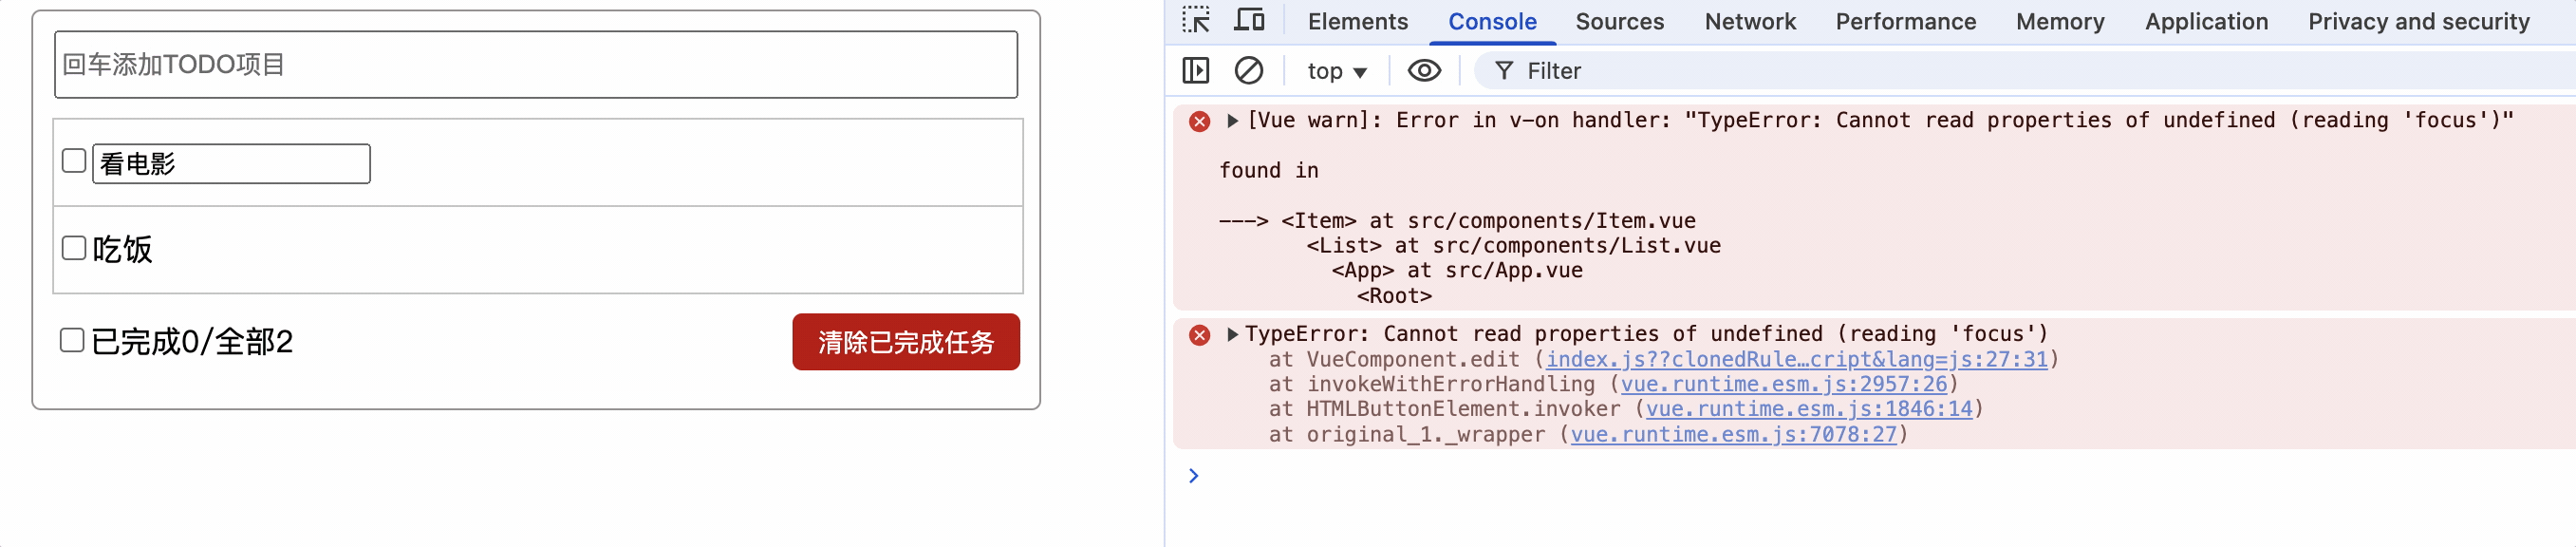
edit() {
  if (!this.editType) {
    this.show = !this.show;
    this.editType = 1;
    // input获取焦点
    this.$refs.inputTitle.focus();
  }
}
如上代码,在编辑后展示输入框并获取焦点,由于vue在方法执行完毕后才能解析模板,此时input框并不存在,因此报错
使用$nextTick
$nextTick(回调函数): 将回调延迟到下次DOM更新循环之后执行,例如,在methods方法执行后,vue进行重新解析模板,解析成功后,会执行$nextTick中的回调函数
edit() {
  if (!this.editType) {
    this.show = !this.show;
    this.editType = 1;
    // input获取焦点
    this.$nextTick(() => {
      console.log('执行了nextTick');
      this.$refs.inputTitle.focus();
    });
  }
}
使用指定0秒定时器实现(不推荐)
edit() {
  if (!this.editType) {
    this.show = !this.show;
    this.editType = 1;
    // input获取焦点
    setTimeout(() => {
      this.$refs.inputTitle.focus();
    });
  }
}
$nextTick、指令的inserted、updated生命周期函数、mounted生命周期函数、setTimeout执行顺序
如上需求,使input框显示并自动获取焦点,可以使用$nextTick、指令的inserted、updated生命周期函数、mounted声明周期函、setTimeout定时器实现
mothods: {
  edit() {
    if (!this.editType) {
      this.show = !this.show;
      this.editType = 1;
      // input获取焦点
      this.$nextTick(() => {
        console.log('执行了nextTick');
      });
      setTimeout(() => {
        console.log('执行了setTimeout');
      });
    }
  }
},
directives: {
  focus: {
    inserted: function (el) {
      console.log('执行了指令inserted');
    },
  },
},
updated() {
  console.log('执行了updated');
},
mounted() {
  console.log('执行了mounted');
},
mounted和当前vc组件挂载有关,如果Item组件有多个,mounted就会执行多次,由于看电影Item已经挂载完毕,因此mounted不再执行
指令inserted>updated>nextTick>setTimeout
当在Item组件添加一个<input type="text" v-focus>时,v-focus指令中的inserted和mounted都会执行,且inserted优于mounted执行

由此可见它们的执行顺序:
指令inserted>mounted>updated>nextTick>setTimeout
总结
1.mounted只能保证当前组件挂载完毕后执行
2.mounted不会保证所有的子组件也都被挂载完成。如果你希望等到整个视图都渲染完毕再执行某些操作,可以在mounted内部使用vm.$nextTick
mounted: function () {
  this.$nextTick(function () {
    // 仅在整个视图都被渲染之后才会运行的代码
  })
}
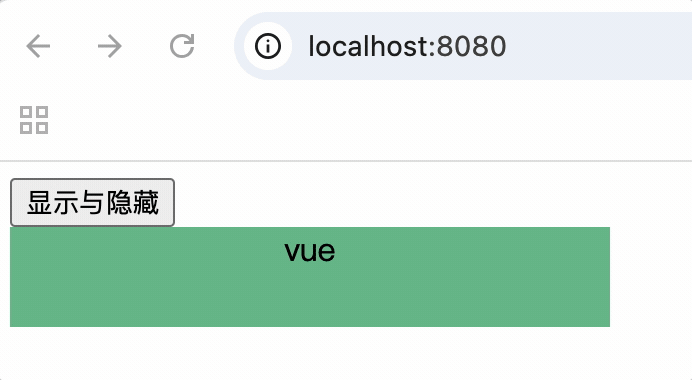
动画效果
Test组件:
<template>
<div>
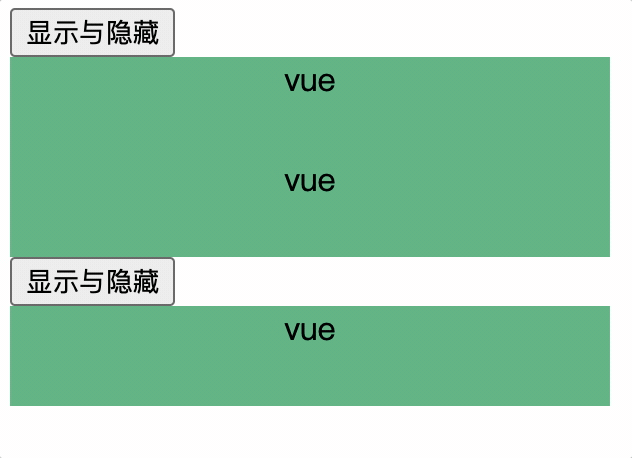
<button @click="show = !show">显示与隐藏</button>
<div v-if="show" class="test enter">vue</div>
</div>
</template>
<script>
export default {
data() {
return {
show: true,
};
},
};
</script>
<style scoped lang="less">
.test {
height: 50px;
width: 300px;
background-color: #4fc08d;
text-align: center;
}
// 定义动画
@keyframes slide {
from {
transform: translateX(-300px);
}
to {
transform: translateX(0px);
}
}
// 应用动画
.enter {
animation: slide 1s;
}
.leave {
animation: slide 1s reverse;
}
</style>
通过指定css样式添加动画
为Test组件中指定的元素添加从左向右动画效果,那么该元素应有enter样式

使用transition标签实现
1.定义动画
@keyframes slide {
  from {
    transform: translateX(-300px);
  }
  to {
    transform: translateX(0px);
  }
}
2.使用vue固定的样式名.v-enter-active(显示样式)和.v-leave-active(隐藏样式)应用动画
.v-enter-active {
  animation: slide 1s;
}
.v-leave-active {
  animation: slide 1s reverse;
}
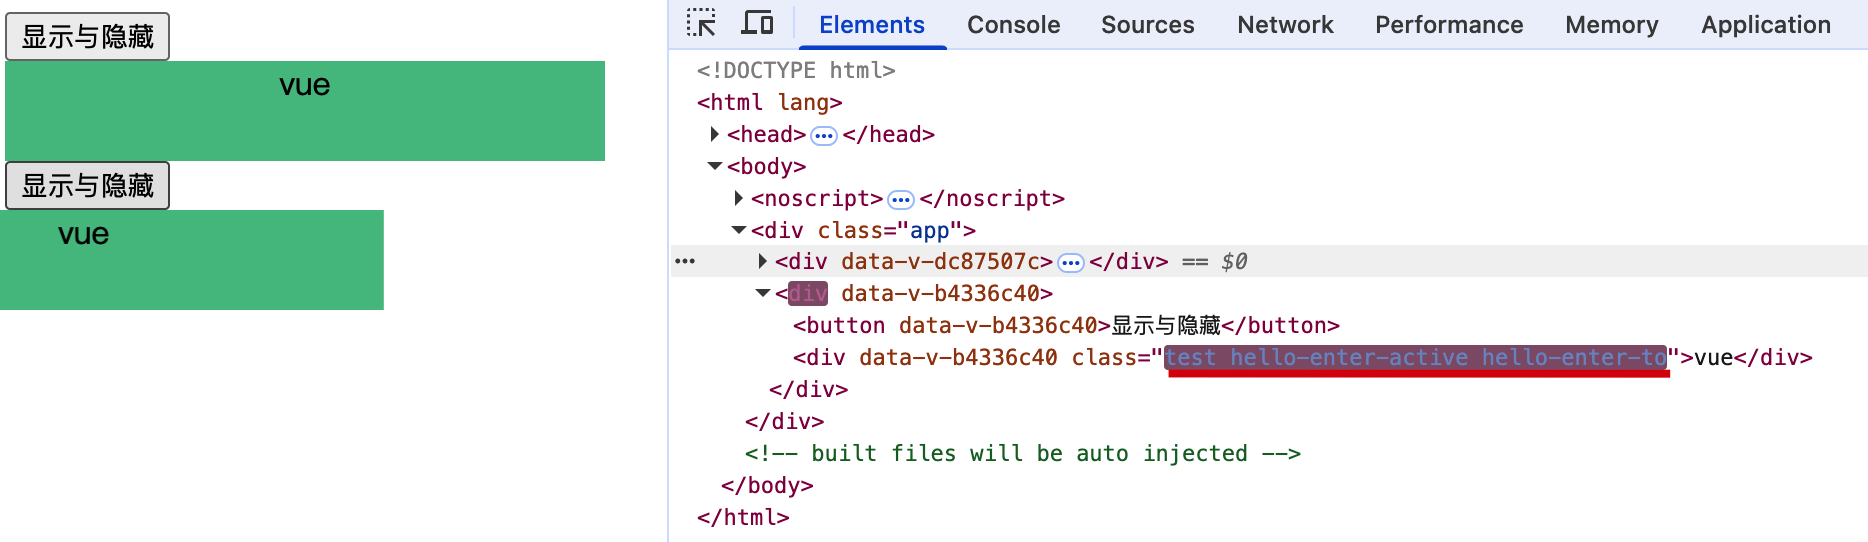
3.使用transition(过渡动画)标签包裹需要添加动画的元素
<template>
  <div>
    <button @click="show = !show">显示与隐藏</button>
    <transition>
      <div v-if="show" class="test">vue</div>
    </transition>
  </div>
</template>
当transition包裹的元素显示时,添加.v-enter-active样式,隐藏时添加.v-leave-active样式
在transition标签上自定义name属性样式名前缀
作用: 用于区分在相同组件中不同的元素使用不同的动画效果
name属性: 可以自定义动画样式名前缀,默认为v,<transition name="前缀名"></transition>
样式:
.前缀名-enter-active {
  animation: slide 1s;
}
.前缀名-leave-active {
  animation: slide 1s reverse;
}
<template>
  <div>
    <button @click="show = !show">显示与隐藏</button>
    <transition name="hello">
      <div v-if="show" class="test">vue</div>
    </transition>
  </div>
</template>
<style scoped lang="less">
.hello-enter-active {
  animation: slide 1s;
}
.hello-leave-active {
  animation: slide 1s reverse;
}
</style>
在transition标签上添加appear属性实现初次渲染动画
刷新页面时没有动画
<transition name="hello" :appear="true">简写: <transition name="hello" appear>
总结
vue的过渡动画不和定义的动画有直接关系,而是和应用的样式有直接关系
过渡效果
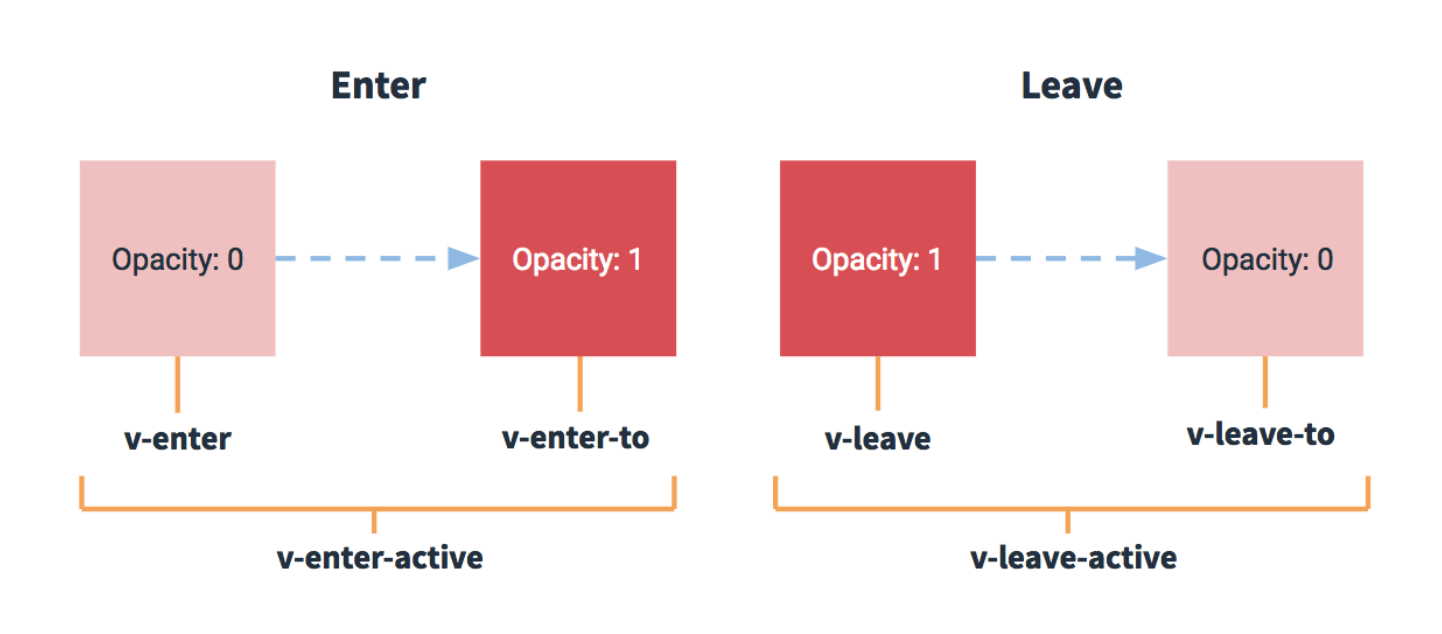
使用transition标签包裹的元素,当元素显示和隐藏时,会触发过渡效果,和动画效果实现方式相同,vue会自动为元素添加响应的样式
前缀-enter: 进入过渡的开始状态
前缀-enter-to: 进入过渡的结束状态
前缀-leave: 离开过渡的开始状态
前缀-leave-to: 离开过渡的结束状态
前缀-enter-active: 进入过渡效果
前缀-leave-active: 离开过渡效果
每组动画都会有: 起始状态样式,结束状态样式,过渡效果样式
// 进入起点
.hello-enter {
  transform: translateX(-100%);
}
// 进入终点
.hello-enter-to {
  transform: translateX(0);
}
// 离开起点
.hello-leave {
  transform: translateX(0);
}
// 离开终点
.hello-leave-to {
  transform: translateX(-100%);
}
// 进入和离开过渡效果
.hello-enter-active,
.hello-leave-active {
  transition: all 1s;
}
简写:
// 进入起点和离开终点
.hello-enter,.hello-leave-to {
  transform: translateX(-100%);
}
// 进入终点和离开起点
.hello-enter-to,.hello-leave {
  transform: translateX(0);
}
// 进入和离开过渡效果
.hello-enter-active,
.hello-leave-active {
  transition: all 1s;
}
为什么看不到.hello-enter和.hello-leave样式应用
.hello-enter和.hello-leave分别是进入起点和离开起点
当元素开始进入时添加.hello-enter样式,还没走到下一帧时,vue自动移除了.hello-enter样式
当元素开始离开时添加.hello-leave样式,还没走到下一帧时,vue自动移除了.hello-leave样式
它们添加和移除样式速度极快,因此看不到元素应用该样式
多个元素具有相同过渡效果应使用transition-group标签
transition标签: 针对单元素过渡效果
transition-group标签: 针对多个元素具有相同过渡效果
多个元素过渡和单个元素过渡实现方式相同,只是多个元素过渡需要使用transition-group标签包裹元素,而不是transition标签
<transition name="hello" :appear="true">
  <div v-if="show" class="test">vue</div>
  <div v-if="show" class="test">vue</div>
</transition>
当多个元素具有相同过渡效果时,不能使用transition标签,而应该使用transition-group标签,否则报错

并且transition-group标签的元素必须具有key属性
当有相同标签名的元素切换时,需要通过key设置唯一的值来标记以让 Vue 区分它们,否则 Vue 为了效率只会替换相同标签内部的内容。即使在技术上没有必要,给在 <transition>组件中的多个元素设置key是一个更好的实践
不使用transition-group需要分别包裹
<transition name="hello" :appear="true">
  <div v-if="show" class="test">vue</div>
</transition>
<transition name="hello" :appear="true">
  <div v-if="show" class="test">vue</div>
</transition>
使用transition-group:
<transition-group name="hello" :appear="true">
  <div v-if="show" class="test" key="1">vue</div>
  <div v-if="show" class="test" key="2">vue</div>
</transition-group>
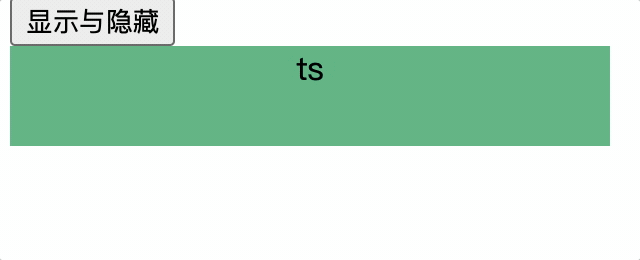
使用transition-group,应对相同标签的互斥元素的显示隐藏
<transition-group name="hello" :appear="true">
  <div v-if="show" class="test" key="1">vue</div>
  <div v-if="!show" class="test" key="2">ts</div>
</transition-group>
总结
transition标签: 针对单元素过渡效果
transition-group标签: 针对多个元素具有相同过渡效果
transition-group标签作用:
1.针对多个元素具有相同过渡效果,减少重复的transition标签
2.针对互斥元素的显示隐藏
3.transition-group标签中的key属性,用于区分相同标签的不同元素,提高vue渲染效率
集成第三方动画库Animate.css
1.安装
➜ vue-test git:(master) ✗ npm install animate.css --save
2.引用并使用
<transition-group appear
  name="animate__animated animate__bounce"
  enter-active-class="animate__zoomIn"
  leave-active-class="animate__zoomOut"
>
  <div v-if="show" class="test" key="1">vue</div>
  <div v-if="!show" class="test" key="2">ts</div>
</transition-group>

<script>
// 引用animate.css
import 'animate.css';
</script>
name属性值: animate__animated animate__bounce
enter-active-class属性值: 选择动画样式
leave-active-class属性值: 选择动画样式
选择动画样式:

总结vue封装动画与过渡
使用动画与过渡的前提: 必须先使用transition或transition-group标签包裹
动画元素必须先包裹在transition或transition-group标签,组件和transition或transition-group标签不能同时被vue解析,否则动画效果不生效
作用
在对元素进行交互时,插入、删除、更新DOM元素时,在合适的时候给元素添加样式类名
vue封装的transition和transition-group标签只是在合适的时机为元素添加样式,至于使用动画还是过渡,由程序员自主决定
v-enter: 进入起点样式
v-enter-to: 进入终点样式
v-leave: 离开起点样式
v-leave-to: 离开终点样式
v-enter-active: 进入过渡效果
v-leave-active: 离开过渡效果
动画方式实现应用
1.定义动画关键帧 2.v-enter-active和v-leave-active设置过渡效果
过渡方式实现应用
v-enter和v-enter-to设置进入起点和终点样式
v-leave和v-leave-to设置离开起点和终点样式
v-enter-active和v-leave-active设置过渡效果
集成第三方动画库应用
不同第三方库集成方式不同
使用transition或transition-group应该包裹整个组件,不能包裹组件中的根元素,否则新增组件动画不生效
Item组件
<template>
  <transition>
    <li class="item">
      <div>
        <input type="checkbox" :checked="todo.checked" @change="$bus.$emit('updateDone', todo.id)" />
        <span v-if="show">{{todo.name}}</span>
        <input ref="inputTitle" v-if="!show" type="text" v-model="changeTodo" @change="changeEdit" />
      </div>
      <div class="d-btn">
        <button @click="edit" class="btn-edit">{{editType === 0 ? "编辑" : '保存'}}</button>
        <button @click="del" class="btn">删除</button>
      </div>
    </li>
  </transition>
</template>
<style scoped>
@keyframes slide {
from {
  transform: translateX(-300px);
}
to {
  transform: translateX(0px);
}
}
.v-enter-active {
  animation: slide 1s;
}
.v-leave-active {
  animation: slide 1s reverse;
}
</style>
由于新增Item时,<transition>标签并不存在,因此vue不会将动画应用于新增动画,只能用于删除
而是应该将<transition>标签包裹整个组件,而不是组件中的根元素
<transition-group>
  <Item v-for="t in todos" :key="t.id" :todo="t"></Item>
</transition-group>
使用Animate.css第三方动画库,也应该将<transition-group>标签包裹整个组件,而不是组件中的根元素
<transition-group
  name="animate__animated animate__bounce"
  enter-active-class="animate__bounceInRight"
  eave-active-class="animate__bounceOutRight"
>
  <Item v-for="t in todos" :key="t.id" :todo="t"></Item>
</transition-group>
代理
正向代理与反向代理
正向代理: 代理的是客户端,代表客户端访问,客户端隐藏了对目标服务器的身份,目标服务器不知道请求是由代理服务器发起的
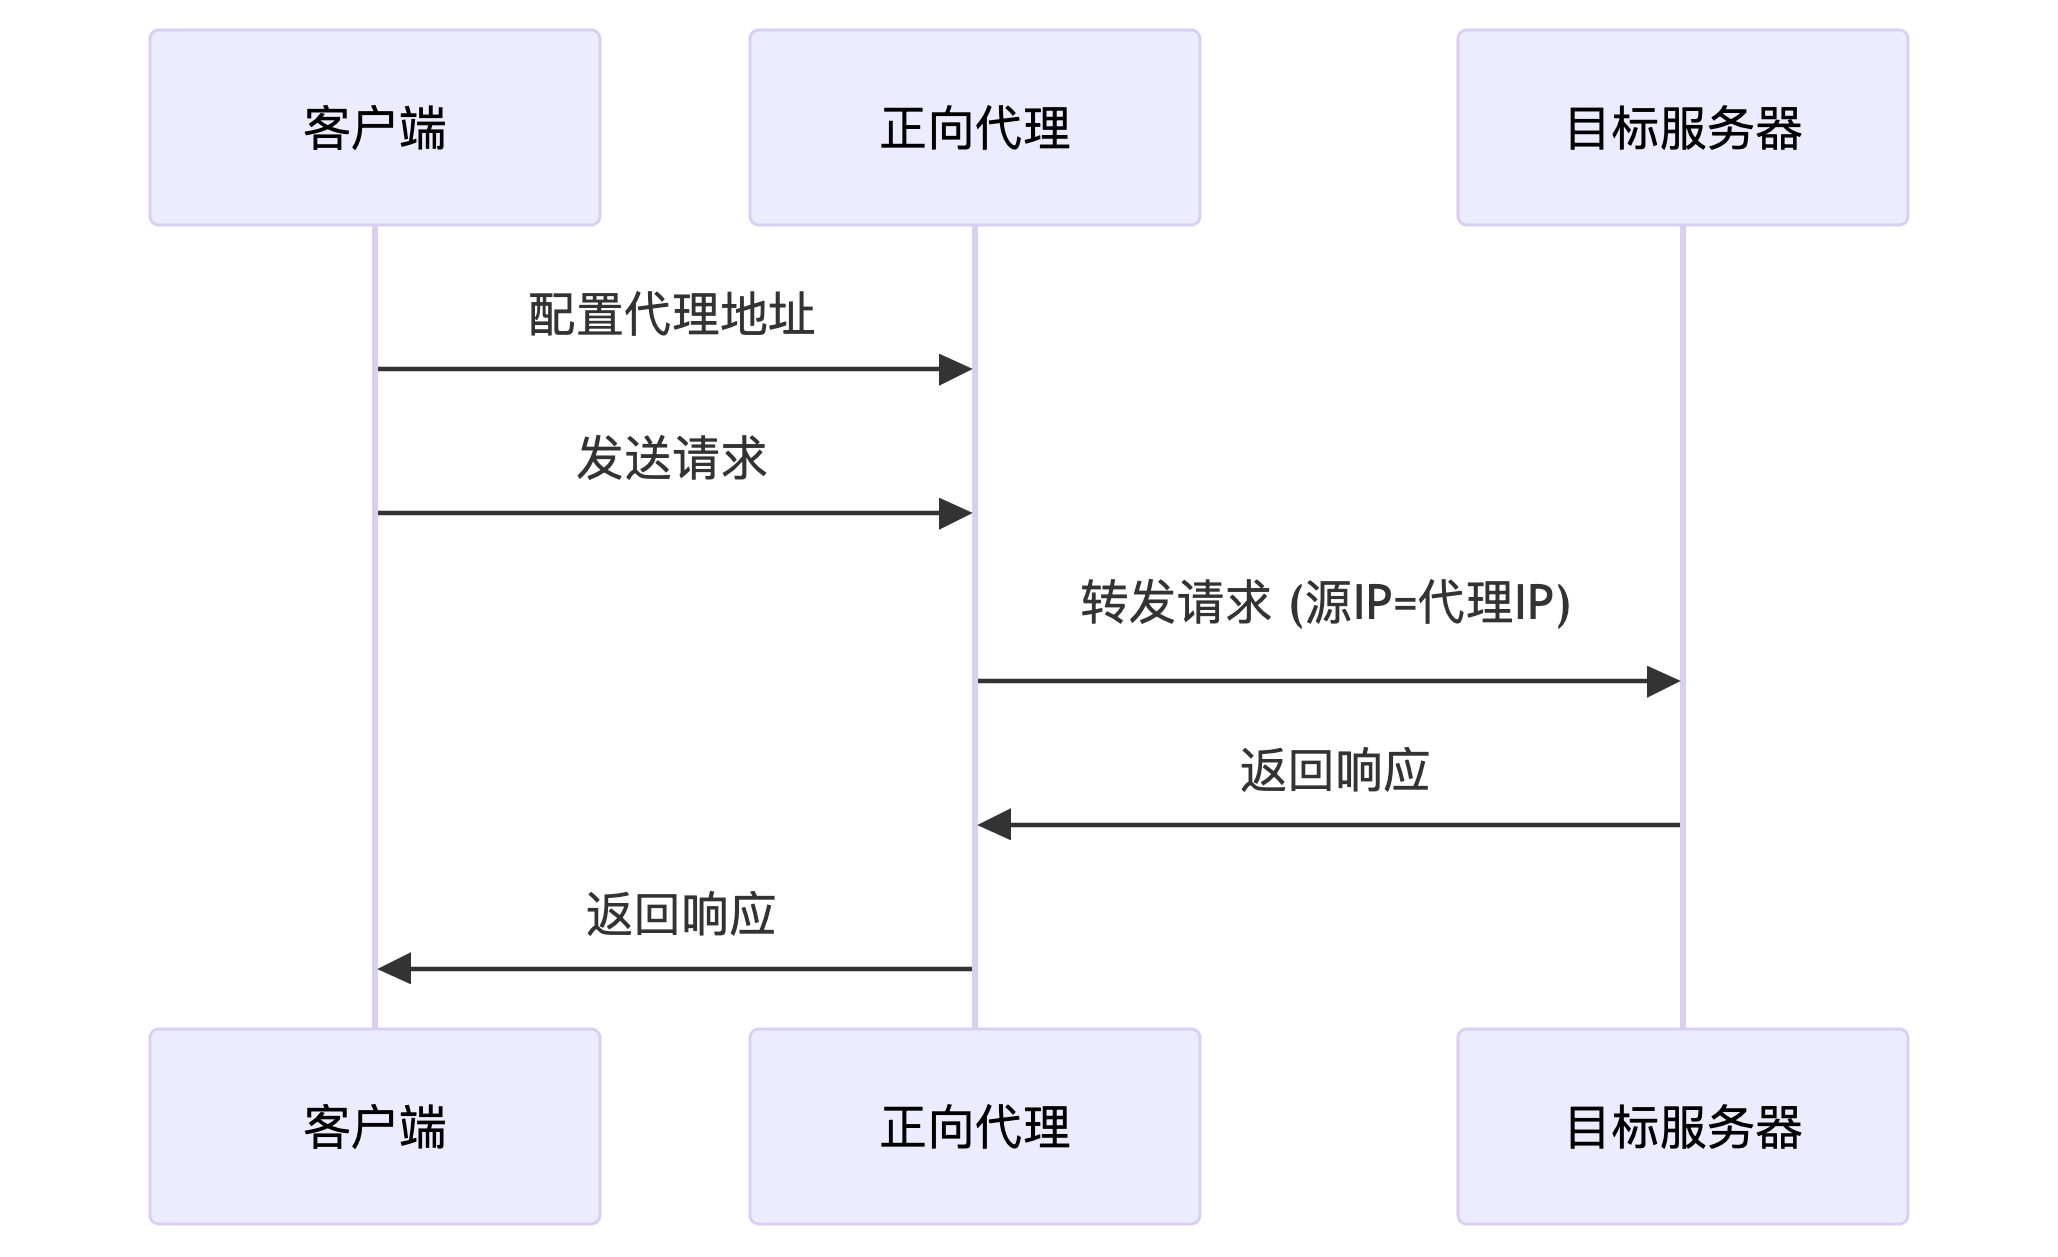
反向代理: 代理的是服务器,代表服务端响应,服务器隐藏了对客户端的身份,客户端不知道请求是由代理服务器处理的,仍然认为是直接访问目标服务器

正向代理帮客户端请求,反向代理绑定服务端响应
什么是跨域
什么是跨域: 前端静态资源交给浏览器渲染显示,用户在浏览器交互时,浏览器执行javascript代码,例如查看数据详情时,浏览器执行了javascript代码,并触发了浏览器发起网络请求,浏览器浏览器为了安全,不允许跨域请求,因此当请求的origin信息和响应的origin信息不同,就会产生跨域问题
origin: 协议+域名+端口号,例如: http://localhost:8080
任意三点之一不同则会跨域: 1. 协议不同 2. 域名不同 3. 端口号不同
跨域过程中,服务器接收了请求并正常返回结果,但由于浏览器限制,浏览器会拒绝接收结果,从而产生跨域问题
解决跨域方式
CORS方式
CORS: 服务端解决,在响应头中通添加请求头,使是浏览器允许接收跨域结果
  HttpServletResponse response = (HttpServletResponse) servletResponse;
  response.setHeader("Access-Control-Allow-Origin", "*");
  response.setHeader("Access-Control-Allow-Methods", "GET, POST, PUT, DELETE, OPTIONS");
  response.setHeader("Access-Control-Allow-Headers", "Origin, X-Requested-With, Content-Type, Accept");
  response.setHeader("Access-Control-Allow-Credentials", "true");
nginx服务端反向代理
核心原理和CORS方式相同,都是通过设置 Access-Control-Allow-* 系列 HTTP 响应头实现跨域控制。
前端请求接口域名必须指向nginx所在服务器,而后nginx进行反向代理请求,添加cors,转发请求到后端服务,nginx拿到后端数据,而后返回给浏览器,浏览器拿到数据,进行渲染。
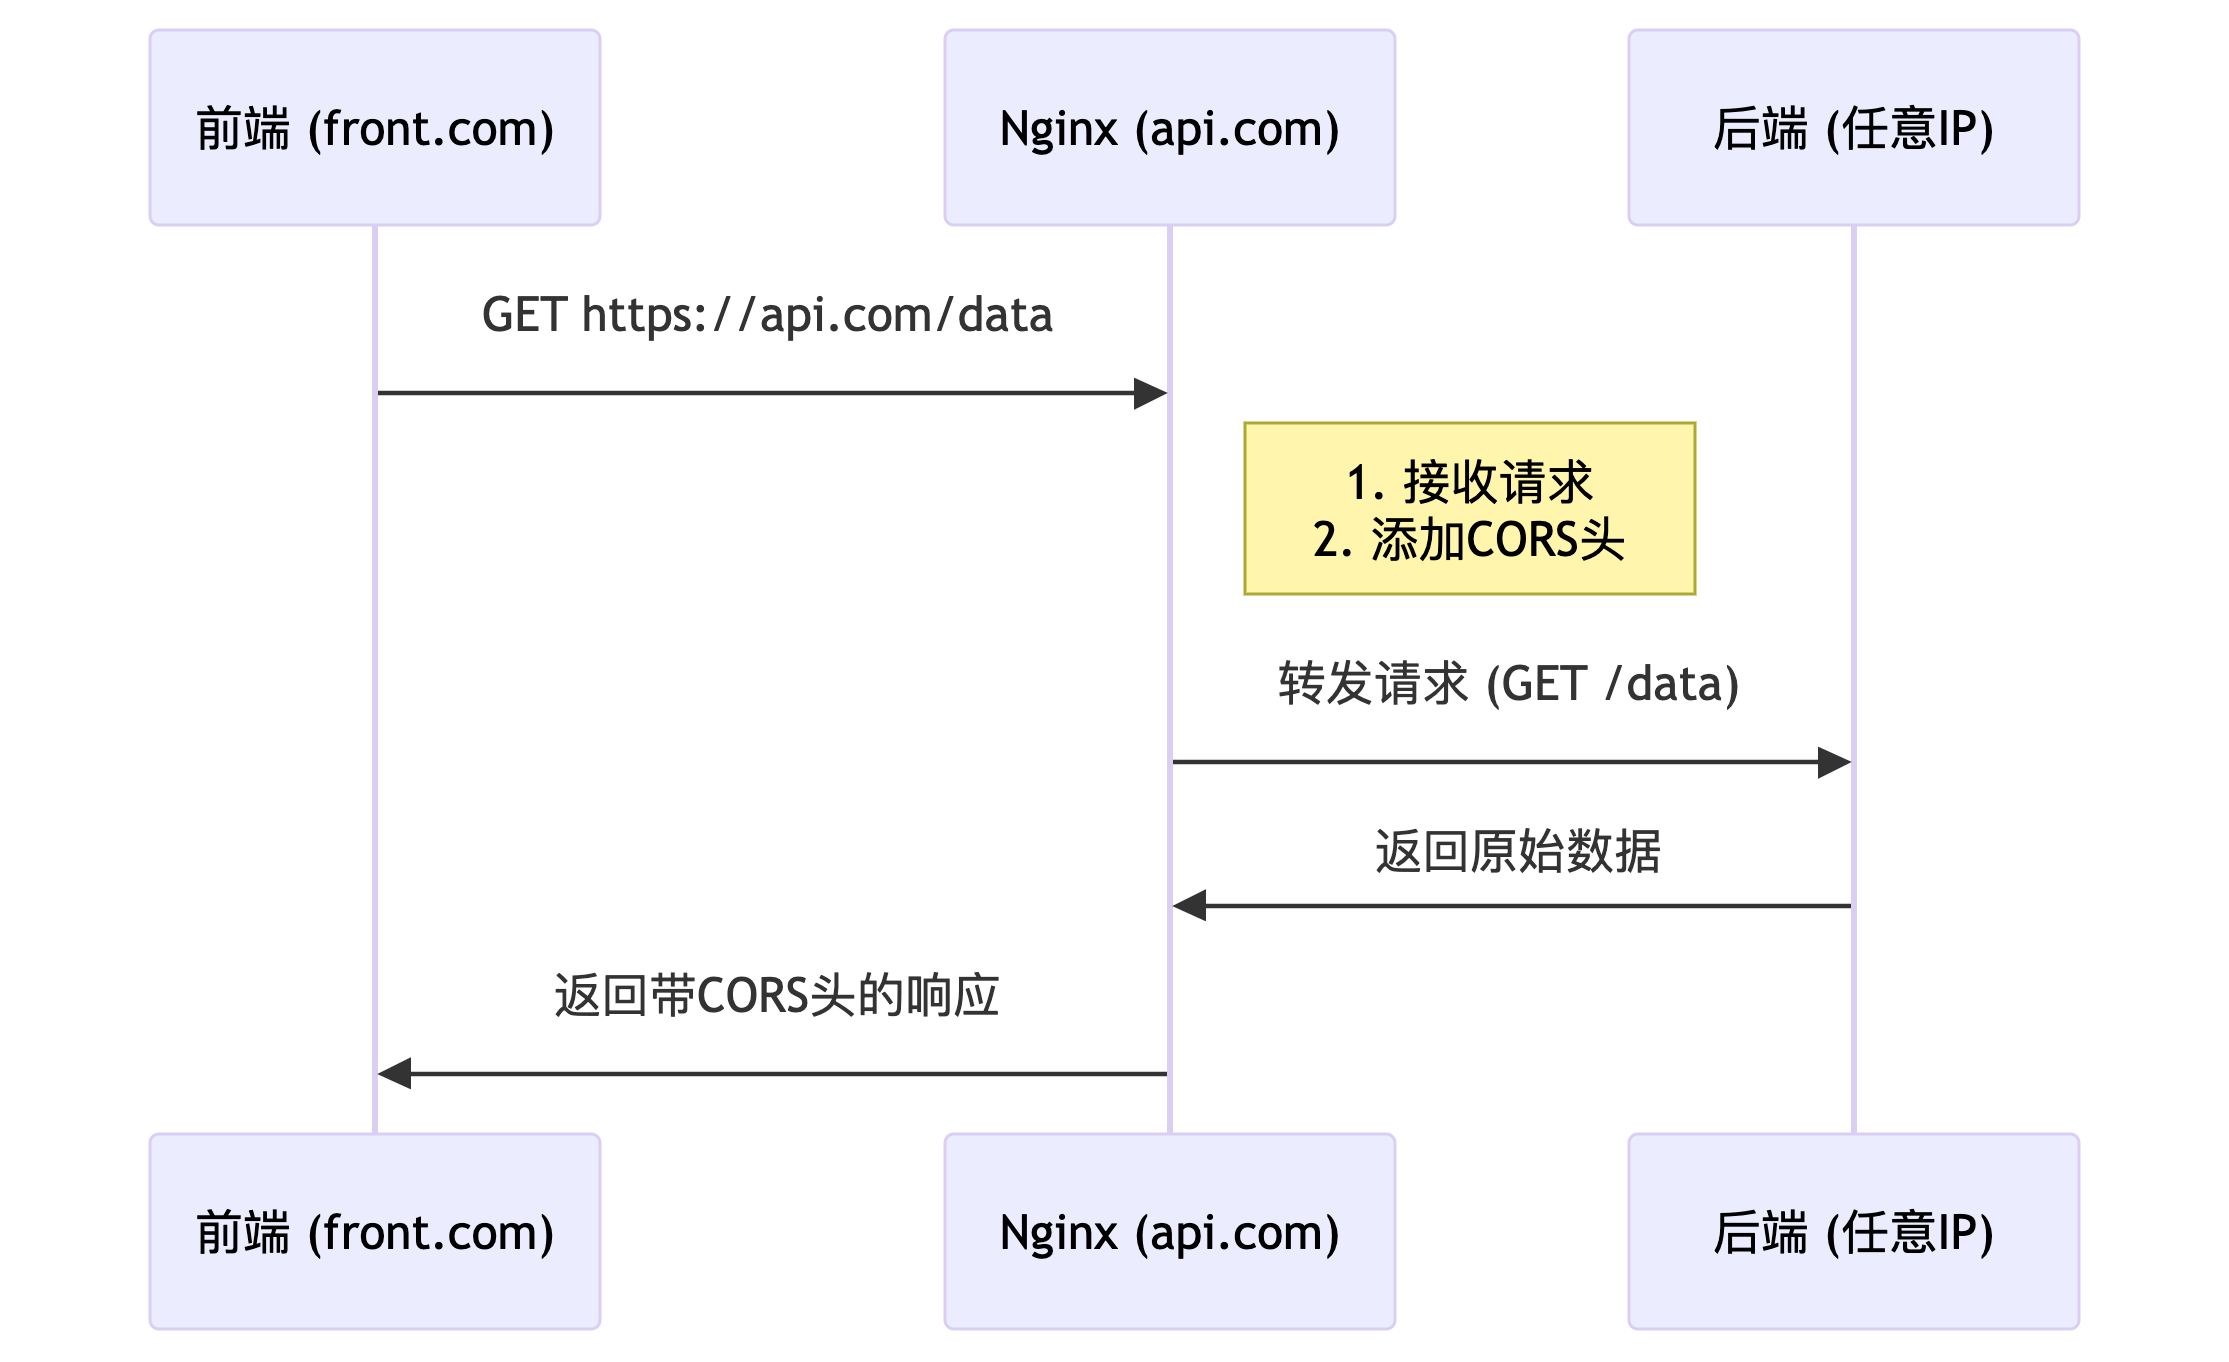
vue-cli本地反向代理
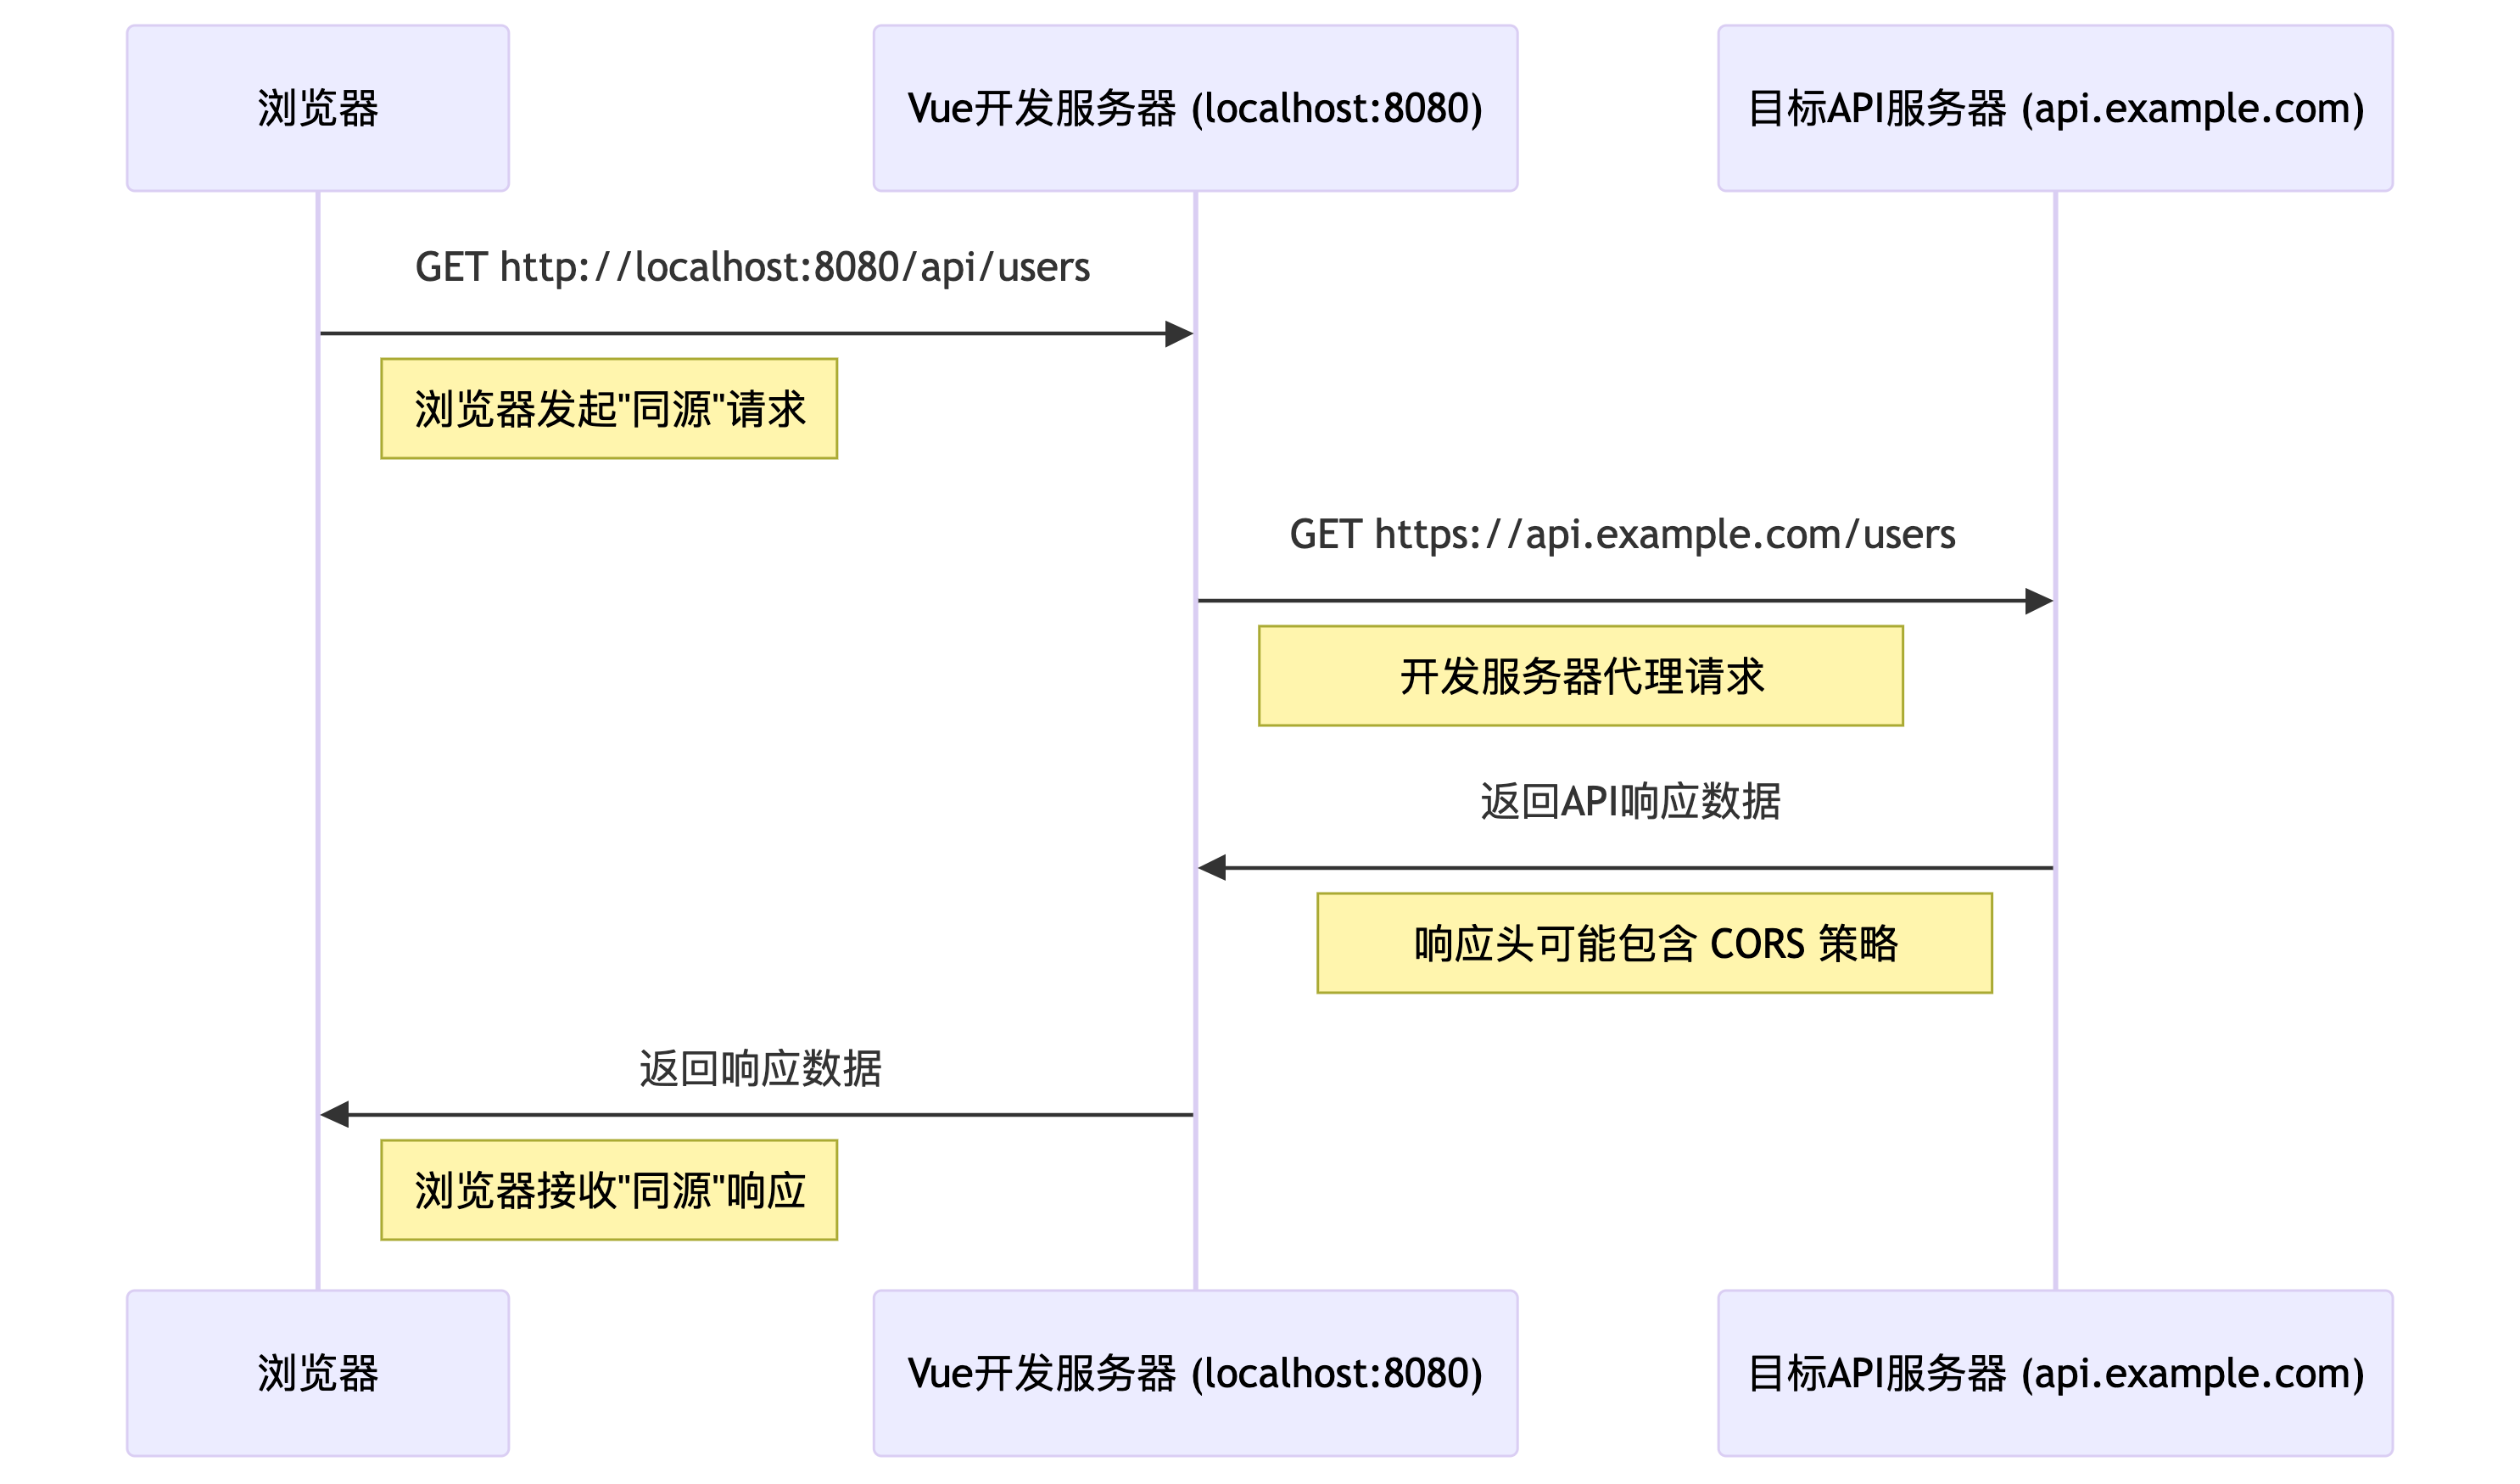
vue-cli脚手架解决跨域仅限于本地开发,会在本机开启代理服务,因此本地前端项目域名为http://localhost:8080,那么本地的代理服务代理了http://localhost:8080/api发起请求,通过代理服务请求目标服务,目标服务返回结果给代理服务,代理服服务再把数据返回给浏览器,因此浏览器不直接和目标服务交互,而是和代理服务交互,因此浏览器不会产生跨域问题。
vue-cli解决跨域的原理:
使用axios库发起网络请求
1.安装
➜ vue-test git:(master) ✗ npm i axios
2.引入
import axios from 'axios';
axios.get('http://localhost:8080/student').then(res => {
  console.log(res)
})
vue-cli代理
方式一配置
vue.config.js配置
module.exports = {
  devServer: {
    // 目标接口地址
    proxy: 'http://localhost:4000'
  }
}
请求本地同源url资源代理服务会转发到目标接口地址:
axios.get('http://localhost:8080/student').then(res => {
  console.log(res)
})
弊端:
1.不能配置多个代理地址
2.不能由开发者决定相应的资源是否需要代理
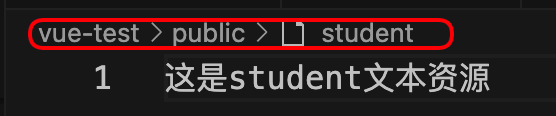
例如,本地项目public目录下有student文件,那么在访问http://localhost:8080/student时
代理服务不会将请求转发给http://localhost:4000/student
原因: 代理服务先在本地寻找资源,如果找到,则不会转发请求,会直接访问本地文件,而不是代理到目标服务器
配置代理:
const { defineConfig } = require('@vue/cli-service');
module.exports = defineConfig({
  devServer: {
    proxy: 'http://localhost:4000',
  },
});
请求资源:
methods: {
  getNetMsg() {
    axios.get('http://localhost:8080/student').then(res => {
      console.log(res);
    });
  },
}
代理服务现在public目录下寻找资源,如果找到了,则不会转发请求到http://localhost:4000/student

方式二完整对象配置
const { defineConfig } = require('@vue/cli-service');
module.exports = defineConfig({
  devServer: {
    proxy: {
      '/api': {
        target: 'http://localhost:4000',
        pathRewrite: {
          '^/api': ''
        }
      }
    }
  },
});
target: 代理服务器地址
/api: 匹配规则前缀
匹配以/api开头的请求,将请求转发到http://localhost:4000
例如发起请求: http://localhost:8080/api/student
代理服务匹配到了/api,将请求转发到http://localhost:4000/api/student
pathRewrite: 重写path路径
path路径: 域名后面路径部分,例如: http://localhost:8080/api/student,path路径为: /api/student
pathRewrite: {}: 重写路径配置对象
使用正则表达式对原始路径进行匹配和修改
pathRewrite: {
  '^/api': ''
}
例如发起请求: http://localhost:8080/api/student
通过pathRewrite重写路径,将/api替换为空字符串,因此最终请求地址为: http://localhost:4000/student
changeOrigin: true: 用于控制请求头中host的值
host: 请求头的host字段,用于标识请求的源地址
默认值为true: 代理服务修改请求头host为目标域名,服务端获取的host始终和服务端域名保持一致
例如: http://localhost:8080/api/student
那么转发后请求的域名为: http://localhost:9900/student,服务端接收请求获取请求源域名为http://localhost:9900/student
浏览器请求头中host始终为http://localhost:8080
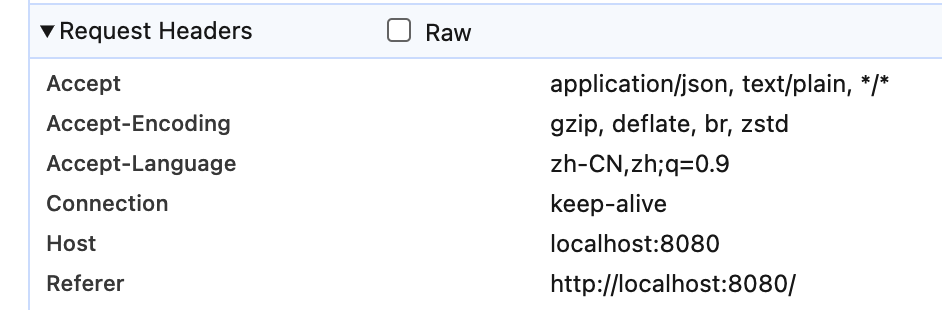
changeOrigin: true: 修改了请求头中host的值为代理服务器的域名,后端接口中获取host请求头不再是本地域名,而是代理服务器的域名
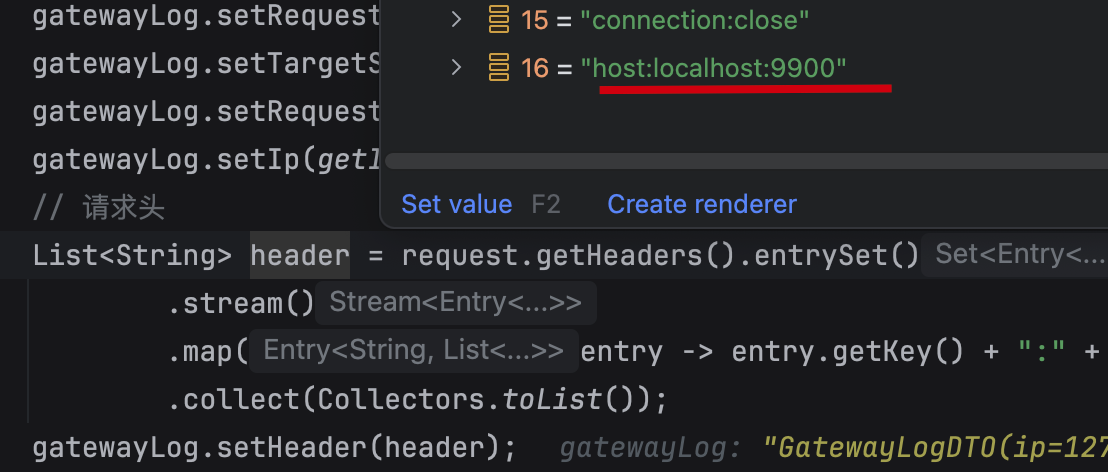
改为false: 代理服务告诉服务端真实的请求域名
例如: http://localhost:8080/api/student
那么转发后请求的域名为: http://localhost:9900/student,服务端接收请求获取请求源域名为http://localhost:8080/student
总结
1.简单代理配置:
module.exports = defineConfig({
  devServer: {
    proxy: 'http://localhost:4000',
  },
});
(1)只能配置一个代理地址
(2)优先访问本地资源,如果访问不到才转发到目标地址
2.完整代理配置:
module.exports = defineConfig({
  devServer: {
    proxy: {
      '/api': {
        target: 'http://localhost:4000',
        pathRewrite: {
          '^/api': ''
        }
      }
    }
  },
});
(1)自定义匹配pathName,配置多个代理地址
(2)灵活控制请求是否走代理
(3)转发时可修改pathName路径
(4)修改请求头中Host值,是否为代理地址的域名,默认为true,避免服务端拒绝非本地请求
vue-resource库发起网络请求(不推荐)
vue-resource库发起网络请求,需要引入vue-resource库,并安装该插件
1.安装vue-resource库:
➜ vue-test git:(master) ✗ npm i vue-resource
2.vue安装插件:
import Vue from 'vue';
import VueResource from 'vue-resource';
Vue.use(VueResource);
3.发起网络请求
this.$http.get('http://localhost:3000/api/getnewslist').then(function(res){})
vue-resource和axios的基本用法和返回值基本一致
插槽
插槽: 在某组件中定义一个占位符,其他组件在使用该组件时可动态填充该组件中的占位符,其中作用域插槽也是子组件向父组件通信的方式
默认插槽
Category组件中定义一个插槽
<div class="category">
  <div class="title">{{title}}</div>
  <!-- 插槽: 动态插入组件中内容 -->
  <slot></slot>
</div>
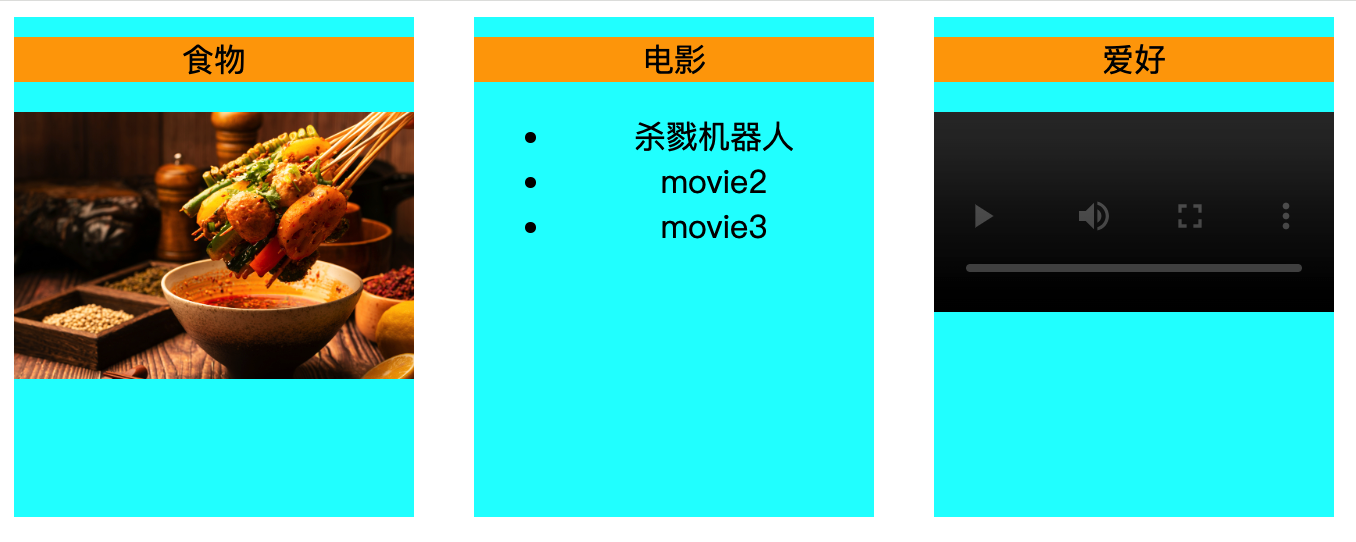
App组件使用Category组件并自定义插槽模板内容
<div class="category-all">
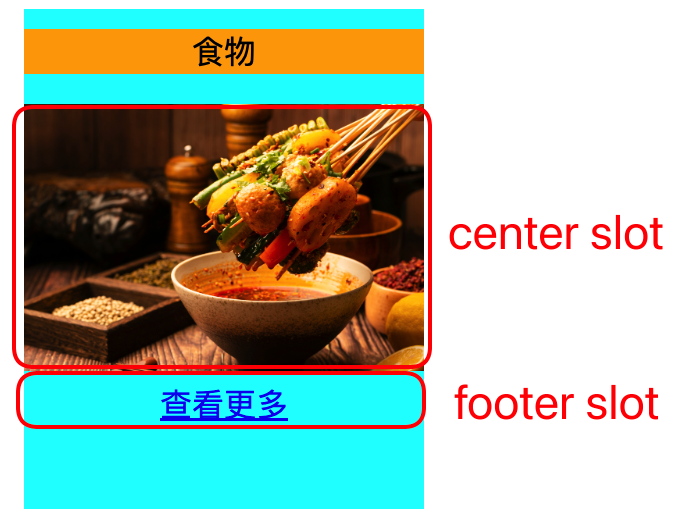
<Category title="食物">
<img :src="footPic" />
</Category>
<Category title="电影">
<ul>
<li v-for="(movie, index) in movies" :key="index">{{ movie }}</li>
</ul>
</Category>
<Category title="爱好">
<video src="http://clips.vorwaerts-gmbh.de/big_buck_bunny.mp4" controls></video>
</Category>
</div>
<style>
.category-all {
display: flex;
flex-wrap: wrap;
}
img {
width: 100%;
}
video {
width: 100%;
}
</style>
注意
1.插槽模板内容对应的css样式,可以写在填充插槽的父组件中,也可以写在插槽所在的子组件中
区别在于:
写在父组件中: vue先解析模板并添加样式,而后替换掉子组件的插槽
写在子组件: vue先解析模板,而后替换掉子组件的插槽,追后添加插槽内容的样式
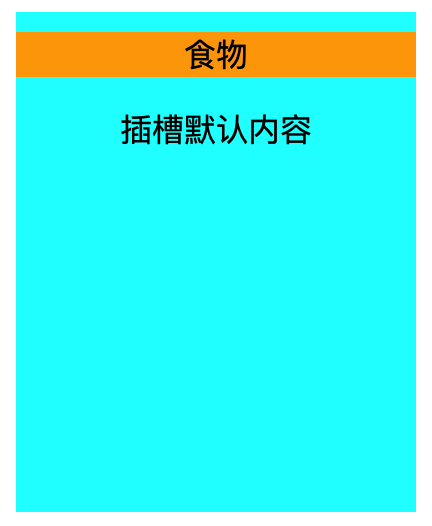
2.当父组件没有填充子组件的插槽时,则会显示子组件插槽中的默认内容
<Category title="食物">
  <!-- <img :src="footPic" /> -->
</Category>
<div class="category">
  <div class="title">{{title}}</div>
  <!-- 插槽: 动态插入组件中内容 -->
  <slot>插槽默认内容</slot>
</div>
具名插槽
具名插槽: 通过name属性指定插槽名称,在父组件中使用slot属性指定插槽名称,将内容填充到对应的插槽中
子组件定义多个插槽使用name属性区分:
<div class="category">
  <div class="title">{{title}}</div>
  <!-- 插槽: 动态插入组件中内容 -->
  <slot name="center"></slot>
  <slot name="footer"></slot>
</div>
父组件根据slot属性指定插槽名称,填充不同的内容:
<Category title="食物">
  <img slot="center" :src="footPic" />
  <a slot="footer" href="https://www.baidu.com">查看更多</a>
</Category>
注意
父组件中如果将多个元素填充到指定的插槽中,应该使用teamplate标签,而且必须使用v-slot:插槽名指令来指定插槽
优点:
1.减少一层div节点的包裹
2.减少每个元素添加slot属性
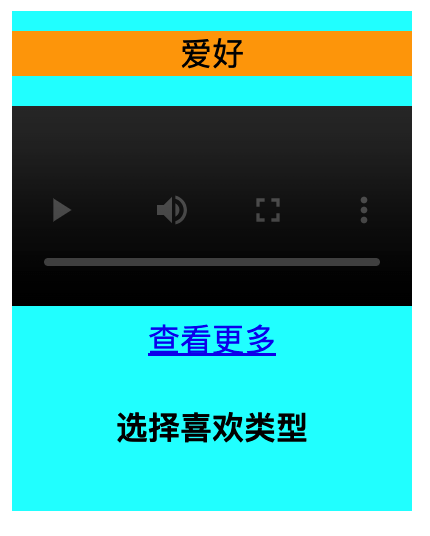
<Category title="爱好">
  <video slot="center" src="http://clips.vorwaerts-gmbh.de/big_buck_bunny.mp4" controls></video>
  <template v-slot:footer>
    <a href="#">查看更多</a>
    <h4>选择喜欢类型</h4>
  </template>
</Category>
作用域插槽
作用域插槽: 子组件的插槽向使用者(父组件)传递数据,父组件根据数据动态渲染样式内容
使用场景: 子组件只负责输出数据,使用者负责填充插槽内容,即父组件只使用子组件的数据,而插槽内容样式由父组件决定
子组件插槽向父组件传递一个具有gamesAttr属性值的对象,gamesAttr的值为子组件中games的值
<div class="category">
  <div class="title">{{title}}</div>
  <!-- 插槽: 动态插入组件中内容 -->
  <slot :gamesAttr="games"></slot>
</div>
<script>
  export default {
  name: 'Category',
  props: ['title'],
  data() {
    return {
      games: ['红色警戒', '穿越火线', '英雄联盟', '地下城与勇士'],
  }
}
</script>
使用者必须在template标签中使用scope属性,用来定义一个属性,接收插槽传递的数据。指定scope的值为slotProps,那么slotProps就是用于接收子组件插槽传递过来的对象的变量:
<Category title="游戏">
  <template scope="slotProps">
    <ul>
      <li v-for="(game, index) in slotProps.gamesAttr" :key="index">{{ game }}</li>
    </ul>
  </template>
</Category>
<Category title="爱好">
  <template scope="{gamesAttr}">
      <h4 v-for="(item, index) in gamesAttr" :key="index">{{ item }}</h4>
  </template>
</Category>
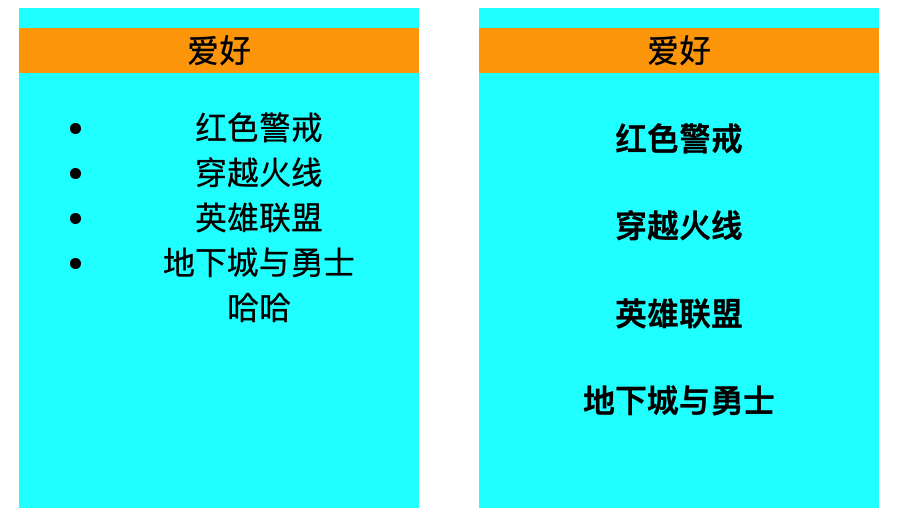
注意
作用域插槽的作用:
使子组件只关注数据的处理,而插槽的内容及样式由使用者自己定义
1.子组件向使用者传递包含指定属性的对象类型数据
2.使用者必须使用template标签的scope属性定义变量,来接收插槽传递过来的对象
3.插槽传递的对象中可包含多个属性
<slot :gamesAttr="games" hh="哈哈"></slot>
4.父组件scope可以使用结构赋值来获取对象中的属性
<template scope="{gamesAttr, hh}">
5.scope属性也可以使用新版本的属性slot-scope代替
<template slot-scope="{gamesAttr, hh}">
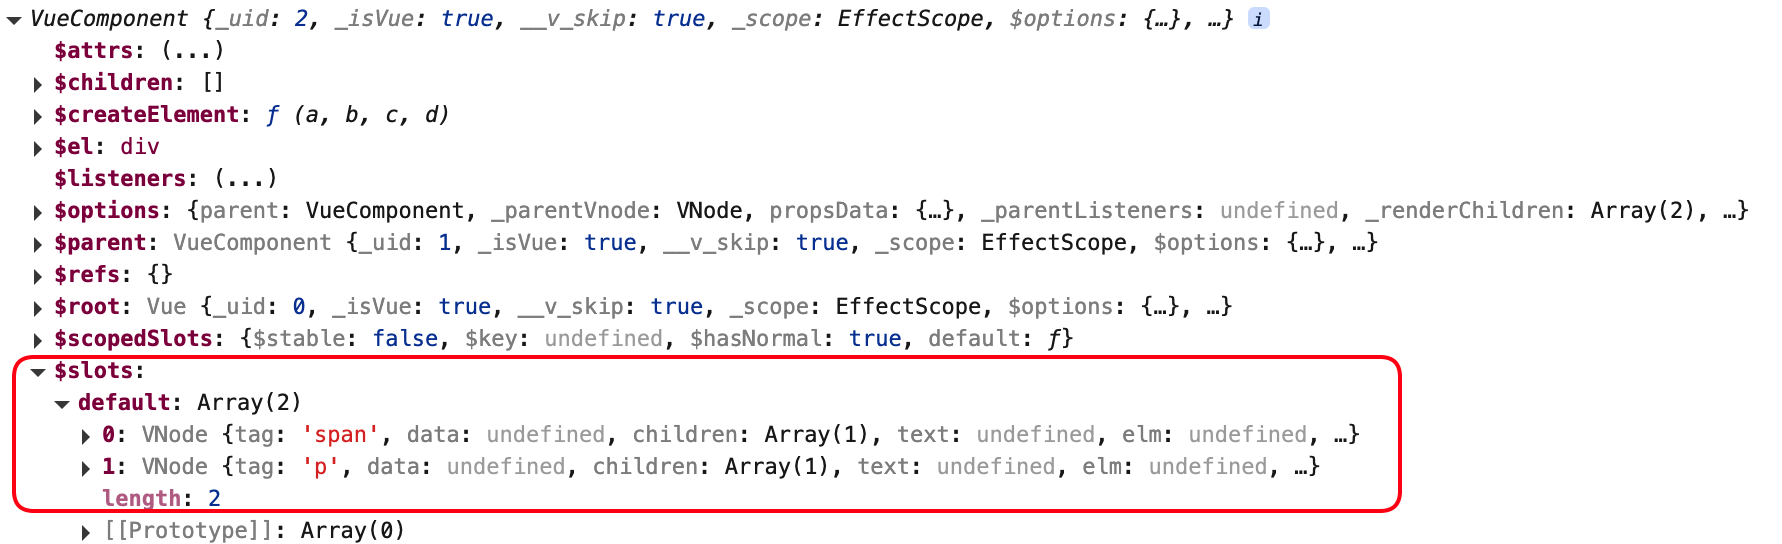
$slot属性
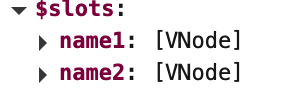
$slot属性: vue2.6.0版本之后新增,$slot对象有一个default属性,其值为数组,每一个元素是插槽中的虚拟元素节点
$slot属性值是否有虚拟节点,和子组件是否使用了<slot>无关,子组件即使没有定义插槽,也会把插槽内容作为虚拟节点放到数组中
<Student>
  <span>你好</span>
  <p>vue</p>
</Student>
当插槽内无任何节点时,$slot为空对象{}

如果是具名插槽,$slot对象中key: 插槽名称,value: 虚拟节点数组
<Student>
  <template slot="name1">
    <h1>Slot1</h1>
  </template>
  <template slot="name2">
    <h1>Slot2</h1>
  </template>
</Student>
Vuex
简介
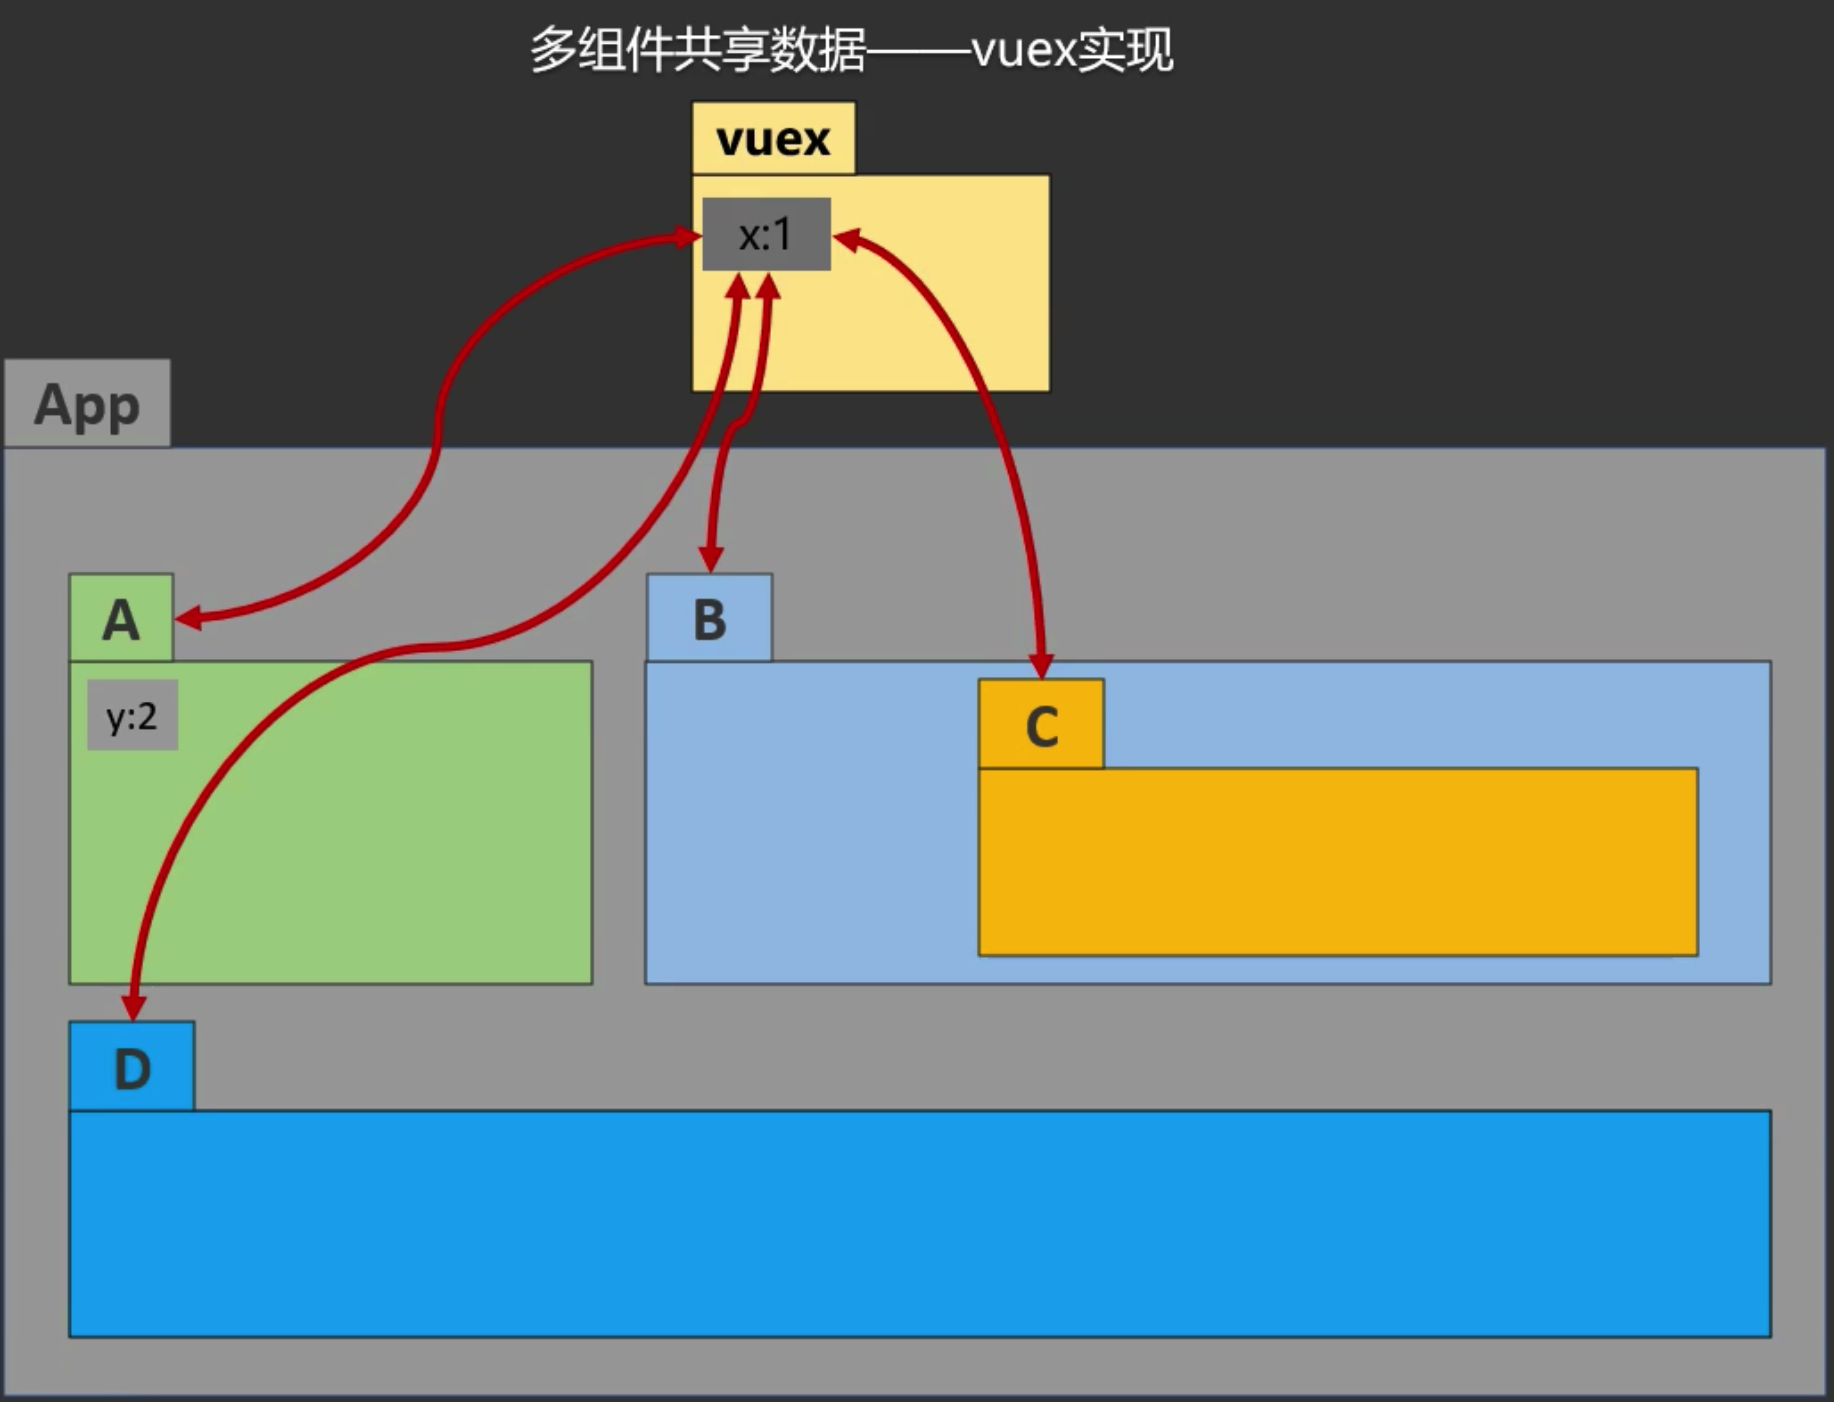
Vuex是专门为Vue应用程序开发的状态(数据)管理插件,它采用集中式存储管理(读/写)使多个组件可预测的操作方式共享数据,也是一种任意组件间相互通信的方式
核心概念
1.状态: 数据
2.状态管理: 对数据进行增删改查
3.状态管理库: 对数据进行增删改查的库
4.集中式存储: 将数据存储在一个地方,方便管理
5.可预测的方式: 对数据的操作是可预测的,即对数据的操作是可追踪的,可回溯的
传统多组件数据共享(读/写)操作,使用全局事件总线,例如想实现各个组件之间数据x的数据同步,
每个组件中必须维护一个x属性,使用$on读取其他组件改变x的动作,使用$emit同步给其他组件修改x的动作,
如果项目中组件较多引用关系复杂,那么所有组件中都必须实现$on和$emit,那么就会产生大量重复代码,且维护同步比较繁琐
状态管理库Vuex:
Vuex中的数据对于每个组件都具有可见性,某个组件修改了x,Vuex将通知各组件重新渲染数据,因此可以立即同步给各组件
使用场景
1.多个组件依赖同一数据
2.来自不同组件的行为需要变更同一数据
3.封装复杂通用逻辑
原理
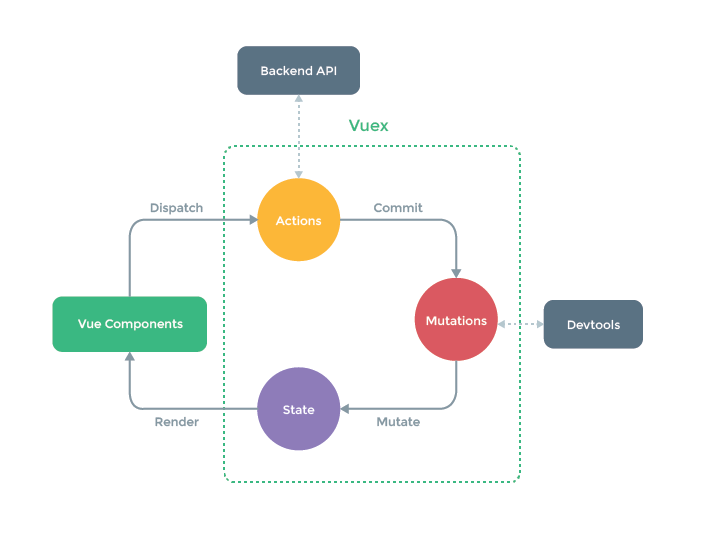
1.VC
各个组件使用Vuex插件,共享数据
2.Dispatch调用动作
组件调用Store提供的接口
3.Actions对象
Actions对象处理组件请求
作用:
1.组织提交信息,把具体的处理逻辑提交给Mutations对象,提交信息包括运算逻辑、运算值、运算对象
2.调用外部的后端API获取数据,组织最终的提交信息
3.Actions对象的方法中处理业务逻辑
4.Commit提交动作
Actions组织好提交信息后,提交给Mutations对象
5.Mutations对象
Mutations对象执行对应的处理逻辑
6.Mutate转换动作
Mutations对象执行完处理逻辑后,将数据提交给State对象
7.State对象
State对象保存数据,并通知各组件重新渲染数据
8.Render渲染动作
通知各组件重新渲染数据
9.store对象
store对象是Vuex的核心对象,用于存储数据,并管理Actions、Mutations、State对象,并提供接口给组件使用
流程总结
1.整个Vuex工作流程中可以看做客人到餐厅用餐的流程
客人: Vue Components
服务员: Actions
厨师: Mutations
菜: State
客户来到了餐厅经过服务员的接待后,客户等待菜做好(`Actions`)
  - 客人点好菜后,又加菜(`Backend API`)
服务员告诉告诉厨师做什么菜,厨师开始做菜(`Mutations`)
厨师做好菜后,把菜盛好,端给客户(`State`)
客户拿到菜开始用餐(`Render`)
2.组件通过store对象可以直接调用commit,跳过Dispatch交给Mutations对象处理
搭建Vuex环境
1.下载Vuex依赖库
vue2使用vuex3版本,vue3使用vuex4版本
➜ vue-test git:(master) npm i vuex@3
2.vue安装Vuex插件
import Vue from 'vue'
import Vuex from 'vuex'

Vue.use(Vuex)
3.创建index.js,并创建store对象
官方推荐使用vuex插件时,项目中使用store作为目录名管理数据,而不vuex作为目录名
├── index.html
├── main.js
├── api
│   └── ... # 抽取出API请求
├── components
│   ├── App.vue
│   └── ...
└── store
    ├── index.js          # 我们组装模块并导出 store 的地方
    ├── actions.js        # 根级别的 action
    ├── mutations.js      # 根级别的 mutation
    └── modules
        ├── cart.js       # 购物车模块
        └── products.js   # 产品模块
只有vue安装了Vuex插件后才能使用store对象,vm和vc对象则都会具有store对象
index.js暴露出store对象
store对象中包含state、mutations、actions对象
index.js:
import Vuex from 'vuex'
Vue.use(Vuex)
export default new vuex.Store({
  // 共享数据
  state: {
    count: 0,
  },
  // 执行修改逻辑
  mutations: {
    increment(state) {
      state.count++;
    },
  },
  // 响应组件中用户动作
  actions: {
    increment: function (context) {
      context.commit('increment');
    },
  },
});
4.将store对象挂载到vm对象
main.js:
import vuex from 'vuex';
import store from './store';

Vue.config.productionTip = false;

Vue.use(vuex);

new Vue({
  el: '#app',
  render: h => h(App),
  store,
});
5.项目报错: 提示在vue创建store对象前,vue应该先引入vuex插件
提示在vue创建store对象前,vue应该先引入vuex插件

原因: vue-cli会自动将import语句放到main.js的上方执行
解决办法:
在index.js中引入vue,并安装vuex插件
index.js:
import Vue from 'vue';
import vuex from 'vuex';
Vue.use(vuex);
export default new vuex.Store({
  // 共享数据
  state: {
    count: 0,
  },
  // 执行修改逻辑
  mutations: {
    increment(state) {
      state.count++;
    },
  },
  // 响应组件中用户动作
  actions: {
    increment: function (context) {
      context.commit('increment');
    },
  },
});
main.js无需引入vuex插件,只需vue挂载store对象:
import store from './store';

Vue.config.productionTip = false;
new Vue({
  el: '#app',
  render: h => h(App),
  store,
});
vuex插件安装成功,vc中store对象就可以使用了
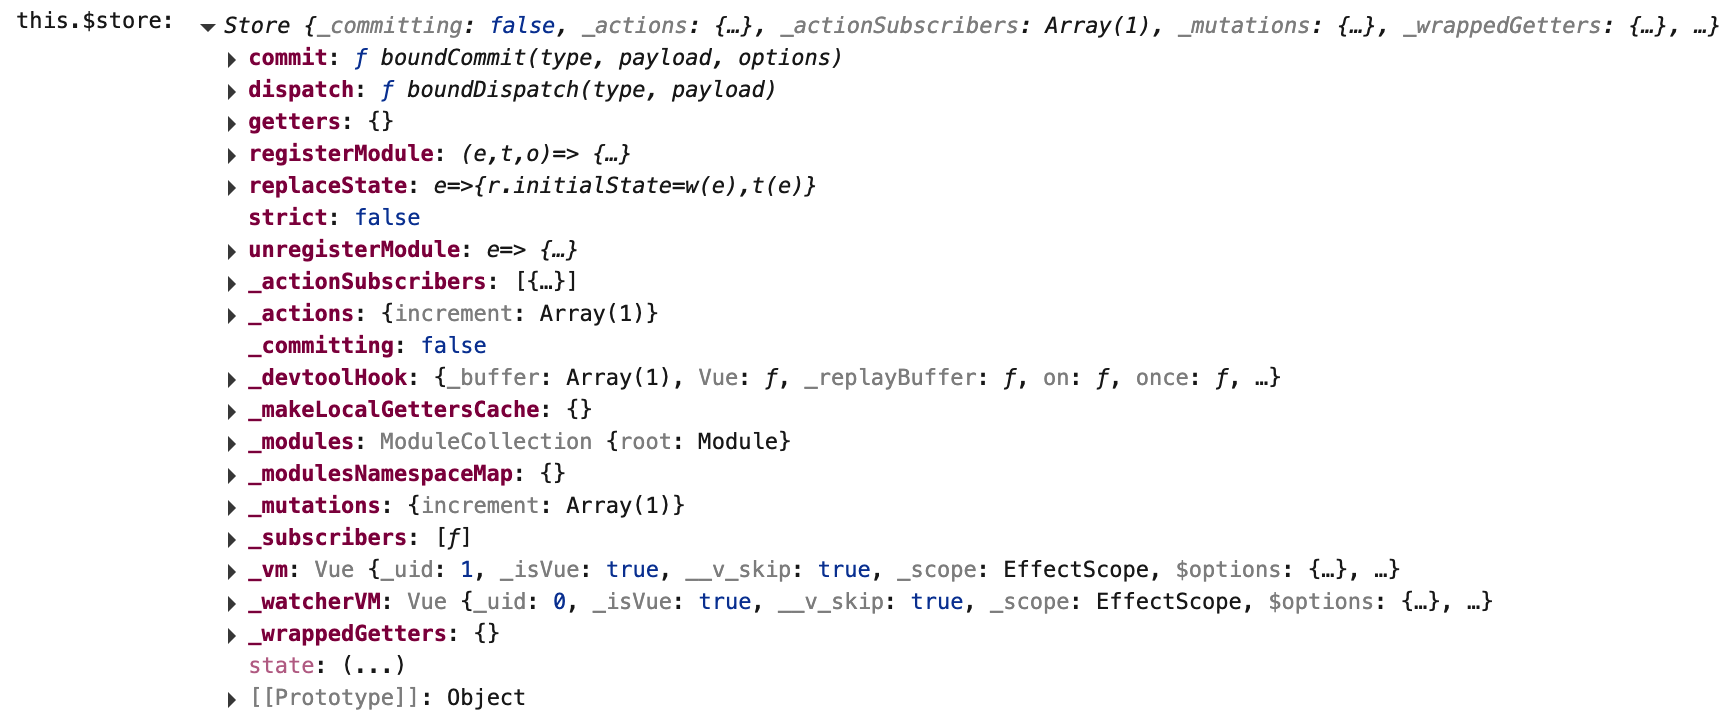
注意
使用import语句就会执行其中js代码
main.js:
import './test1.js';
console.log('main.js');
import './test2.js';
输出:
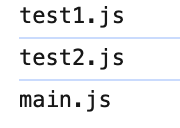
import某个目录会自动导入其目录下的index.js
例如:
main.js:
import store from './store';
// 实际导入的是store/index.js
vue-cli会把import语句按照书写顺序整理到main.js的上方
main.js:
import './test1.js';
console.log('main.js');
import './test2.js';
即使./test2.js在最后,vue-cli会统一调整import语句放到main.js的上方
$store.dispatch()触发actions对应的方法
dispatch(): 触发actions对象中对应的方法
参数:
1.actions中的方法名
2.数据
组件中调用dispatch方法,传入actions中方法名increment和参数3
<button @click="$store.dispatch('increment',3)">+</button>
index.js:
const actions = {
  increment(a, b) {
    console.log(a, b);
  },
};
const mutations = {
};
const state = {
  count: 0,
};
export default new Vuex.Store({
  // 共享数据
  state,
  // 执行修改逻辑
  mutations,
  // 响应组件中用户动作
  actions,
});
actions中的increment函数接收两个参数,第一个参数是store的上下文对象context,第二个参数是dispatch函数传过来的数据
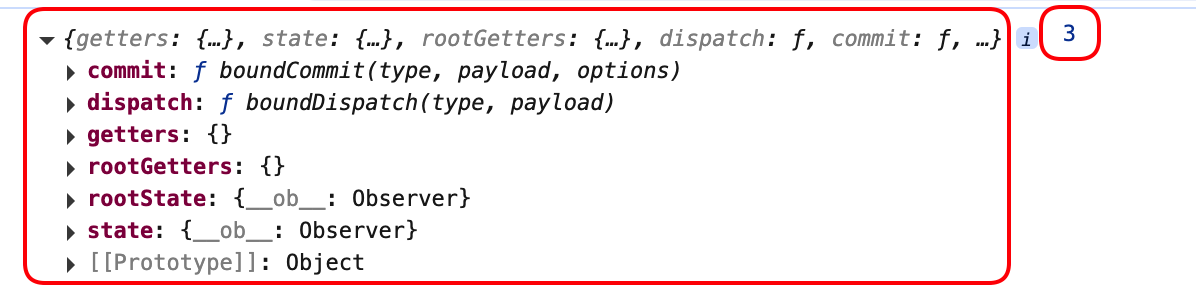
context: vuex并没有把store对象传入actions中,而是精简了必要的方法后赋给context对象,以便在actions中调用store中的方法
actions对应的方法中通过上下文对象context调用commit方法
context.commit(): 触发调用mutations对象中对应的方法
参数:
1.mutation中的方法名
2.数据
const actions = {
  increment(context, value) {
    context.commit('increment', value);
  },
};
const mutations = {
  increment(state, value) {
    state.count += value;
  },
};
mutations中的对应方法被调用
mutations中的方法: 用于执行具体处理逻辑,改变state中属性值
mutations中方法参数:
1.state对象
2.数据
const mutations = {
  increment(state, value) {
    console.log(state, value);
    state.count += value;
  },
};

组件中通过$store.属性读取共享数据
<div>
  <span>{{ $store.state.count }}</span>
  <button @click="$store.dispatch('increment',3)">+</button>
</div>
actions中处理业务逻辑,如没有业务逻辑可直接调用commit
<div>
<span>{{ $store.state.count }}</span>
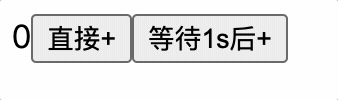
<button @click="$store.commit('INCREMENT',3)">直接+</button>
<button @click="$store.dispatch('incrementWait',3)">等待1s后+</button>
</div>
const actions = {
  incrementWait(context, value) {
    setTimeout(() => {
      context.commit('INCREMENT', value);
    }, 1000);
  },
};
const mutations = {
  INCREMENT(state, value) {
    state.count += value;
  },
};
actions中方法名小写,mutations中方法名大写,在view代码时便于区分
const actions = {
  incrementWait(context, value) {
    setTimeout(() => {
      context.commit('INCREMENT', value);
    }, 1000);
  },
};
const mutations = {
  INCREMENT(state, value) {
    state.count += value;
  },
};
vue开发者工具中始终监听mutations中方法执行
对应了如下关系:

actions中可以通过调用dispatch方法来执行actions其他方法以便处理业务
const actions = {
  incrementWait(context, value) {
    setTimeout(() => {
      context.dispatch('increment', value);
    }, 1000);
  },
  increment(context, value) {
    context.commit('INCREMENT', value);
  },
};
规范
1.通用的业务处理逻辑应该封装在action中,提高代码复用性和可维护性
2.actions中方法名小写,mutations中方法名大写,在view代码时便于区分
3.如果没有网络请求或业务逻辑处理,直接调用commit方法修改state
getters对象对state数据的获取进行封装业务逻辑
getters对象: 对state数据的获取进行封装业务逻辑,便于在各个组件中调用,和computed计算属性类似,但computed只能在某个组件中使用
1.定义getters对象中的属性
const getters = {
  bigCount(state) {
    return state.count * 10;
  }
}
2.在store对象中注册getters对象
export default new Vuex.Store({
  state,
  mutations,
  actions,
  getters,
});
3.在组件中获取数据,通过$store.getters.属性获取数据
<div>
  <span>数值乘以10: {{ $store.getters.bigCount }}</span>
</div>

mapState函数简化组件中获取state数据
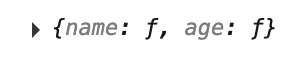
当state数据复杂,组件中使用state属性较多时,会出现很多重复的$store.state.属性,使插值语法中表达式比较繁琐,例如:
<div>
  <span>{{ $store.state.count }}</span><br>
  <span>数值乘以10: {{ $store.getters.bigCount }}</span><br>
  <span>姓名: {{$store.state.name}}</span><br>
  <span>年龄: {{$store.state.age}}</span><br>
  <span>性别: {{$store.state.sex}}</span><br>
  <button @click="$store.commit('INCREMENT',3)">直接+</button><br>
  <button @click="$store.dispatch('incrementWait',3)">等待1s后+</button>
</div>
那么mapState函数可以简化组件中获取state数据,使代码更简洁,mapState函数可以帮助生成计算属性来获取对应的状态属性,那么插值语法中可以直接使用计算属性获取state的属性值。
组件中使用mapState函数帮助生成计算属性读取state数据
1.组件中导入mapState函数
2.配置生成计算属性对象 key: 计算属性名,value: state中属性名
3.mapState函数返回一个对象,对象中每个属性都是计算属性,并使用...展开运算符合并到计算属性对象中
import { mapState } from 'vuex';
mounted(){
  let mapStateResult = mapState({name: 'name', age: 'age'});
  console.log(mapStateResult);
}
mapState通过配置计算属性,返回一个对象,对象中每个属性都是一个函数,而且函数中逻辑就是获取state的属性,因此可以通过...展开运算符合并到计算属性对象中,这样在组件中就可以直接使用计算属性获取state的属性值
插值语法中可以直接使用mapState生成的计算属性:
<div>
  <span>{{count}}</span><br />
  <span>数值乘以10: {{$store.getters.bigCount}}</span><br />
  <span>姓名: {{name}}</span><br />
  <span>年龄: {{age}}</span><br />
  <span>性别: {{sex}}</span><br />
  <button @click="$store.commit('INCREMENT',3)">直接+</button><br />
  <button @click="$store.dispatch('incrementWait',3)">等待1s后+</button>
</div>
// 导入mapState函数
import { mapState } from 'vuex';
export default {
  computed: {
    // 通过计算属性来获取state状态,组件中直接使用count即可
    count() {
      return this.$store.state.count;
    },
    ...mapState({
      // 配置mapState生成哪些计算属性,指定计算属性名称和源状态名称
      name: 'name'
      age: 'age',
      sex: 'sex'
    }),
  },
};
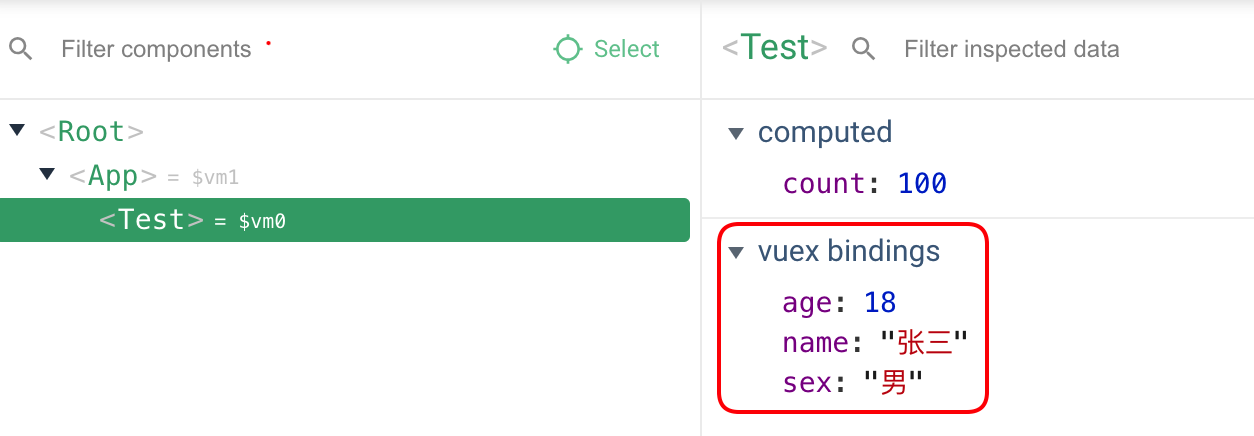
正常获取state属性:
开发者工具中将mapState生成计算属性归类到vuex bingdings中:
对象写法
computed: {
  ...mapState({
    // 配置mapState生成哪些计算属性,指定计算属性名称和源状态名称
    name: 'name'
    age: 'age',
    sex: 'sex'
  }),
}
数组写法
computed: {
  ...mapState(['name', 'age', 'sex']),
}
数组的写法更能体现出mapState的作用:
1.减少开发者定义众多的计算属性
2.插值语法直接使用计算属性获取state属性,减少$store.state.属性代码
mapGetters函数简化组件中获取getters数据
mapGetters函数和mapState函数一样,也是将getters中的数据映射到局部计算属性中
对象写法
import { mapGetters } from 'vuex';
computed: {
  ...mapGetters({bigCount: 'bigCount'}),
}
数组写法
import { mapGetters } from 'vuex';
computed: {
  ...mapGetters(['bigCount']),
}
mapMutations函数简化组件中调用mutations方法
借助mapMutations函数生成对应的方法,简写了this.$store.commit('xxx', value)的写法
<button @click="add">直接+</button>

import { mapMutations } from 'vuex';
methods: {
  // add() {
  //   this.$store.commit('INCREMENT', 3);
  // },
  ...mapMutations({add: 'INCREMENT'}),
},
mapMutations会生成一个方法,该方法接收一个参数,该参数就是参与运算的数据
add(value) {
  this.$store.commit('INCREMENT', value);
},
由于直接调用add方法,不传值的情况下会vue默认会把event事件对象传入,因此mapMutations生成的add方法中value值就是event对象
因此在使用mapMutations生成的方法时,应该传入参数,作为计算的value值
<button @click="add(3)">直接+</button>
对象写法
methods: {
  ...mapMutations({add: 'INCREMENT'}),
},
数组写法
methods: {
  ...mapMutations(['INCREMENT']),
},
mapActions函数简化组件中调用actions方法
借助mapActions函数生成对应的方法,简写了this.$store.dispatch('xxx', value)的写法
<button @click="add">等待1s后+</button>

import { mapActions } from 'vuex';
methods: {
  // addWait() {
  //   this.$store.dispatch('incrementWait', 3);
  // },
  ...mapActions({addWait: 'incrementWait'}),
},
mapActions会生成一个方法,该方法接受一个参数,该参数就是参与运算的数据
addWait(value) {
  this.$store.dispatch('incrementWait', value);
},
对象写法
methods: {
  ...mapActions({addWait: 'incrementWait'}),
}
数组写法
methods: {
  ...mapActions(['incrementWait']),
}
Vuex模块化和命名空间
目的: 模块化管理数据,避免数据混乱,更好的维护共享数据。命名空间可以解决模块之间的命名冲突,每个模块都有自己独立的命名空间,不同模块中的方法名称可以相同,但命名空间不同,不会冲突
没有模块前的store包含: state、getters、mutations、actions
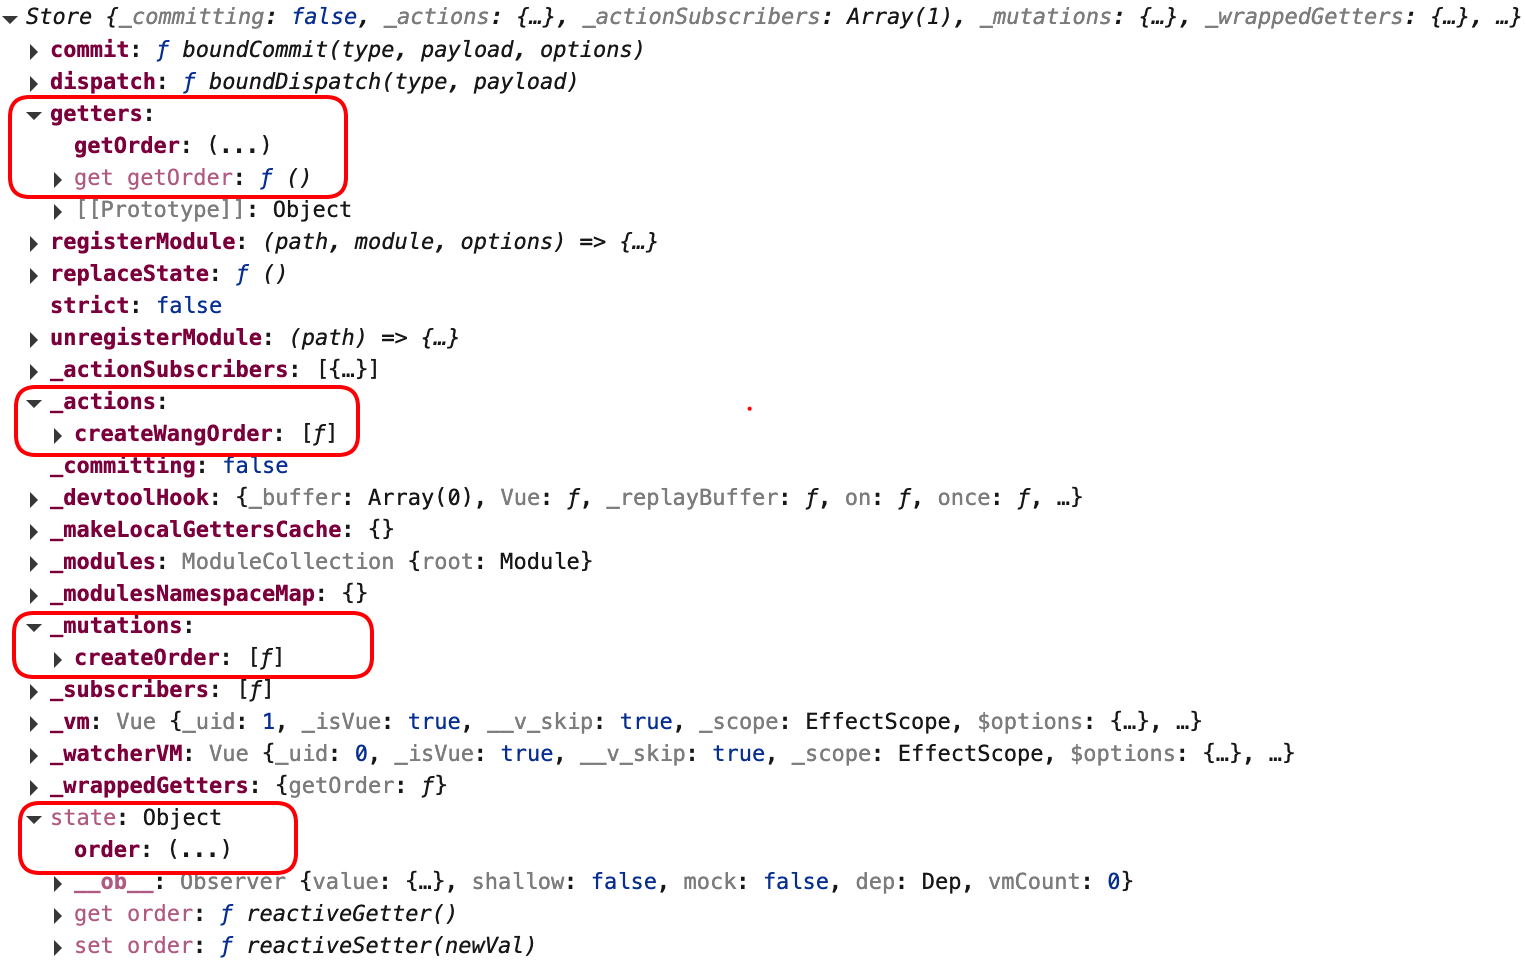
模块后的store包含了命名空间的state、getters、mutations、actions
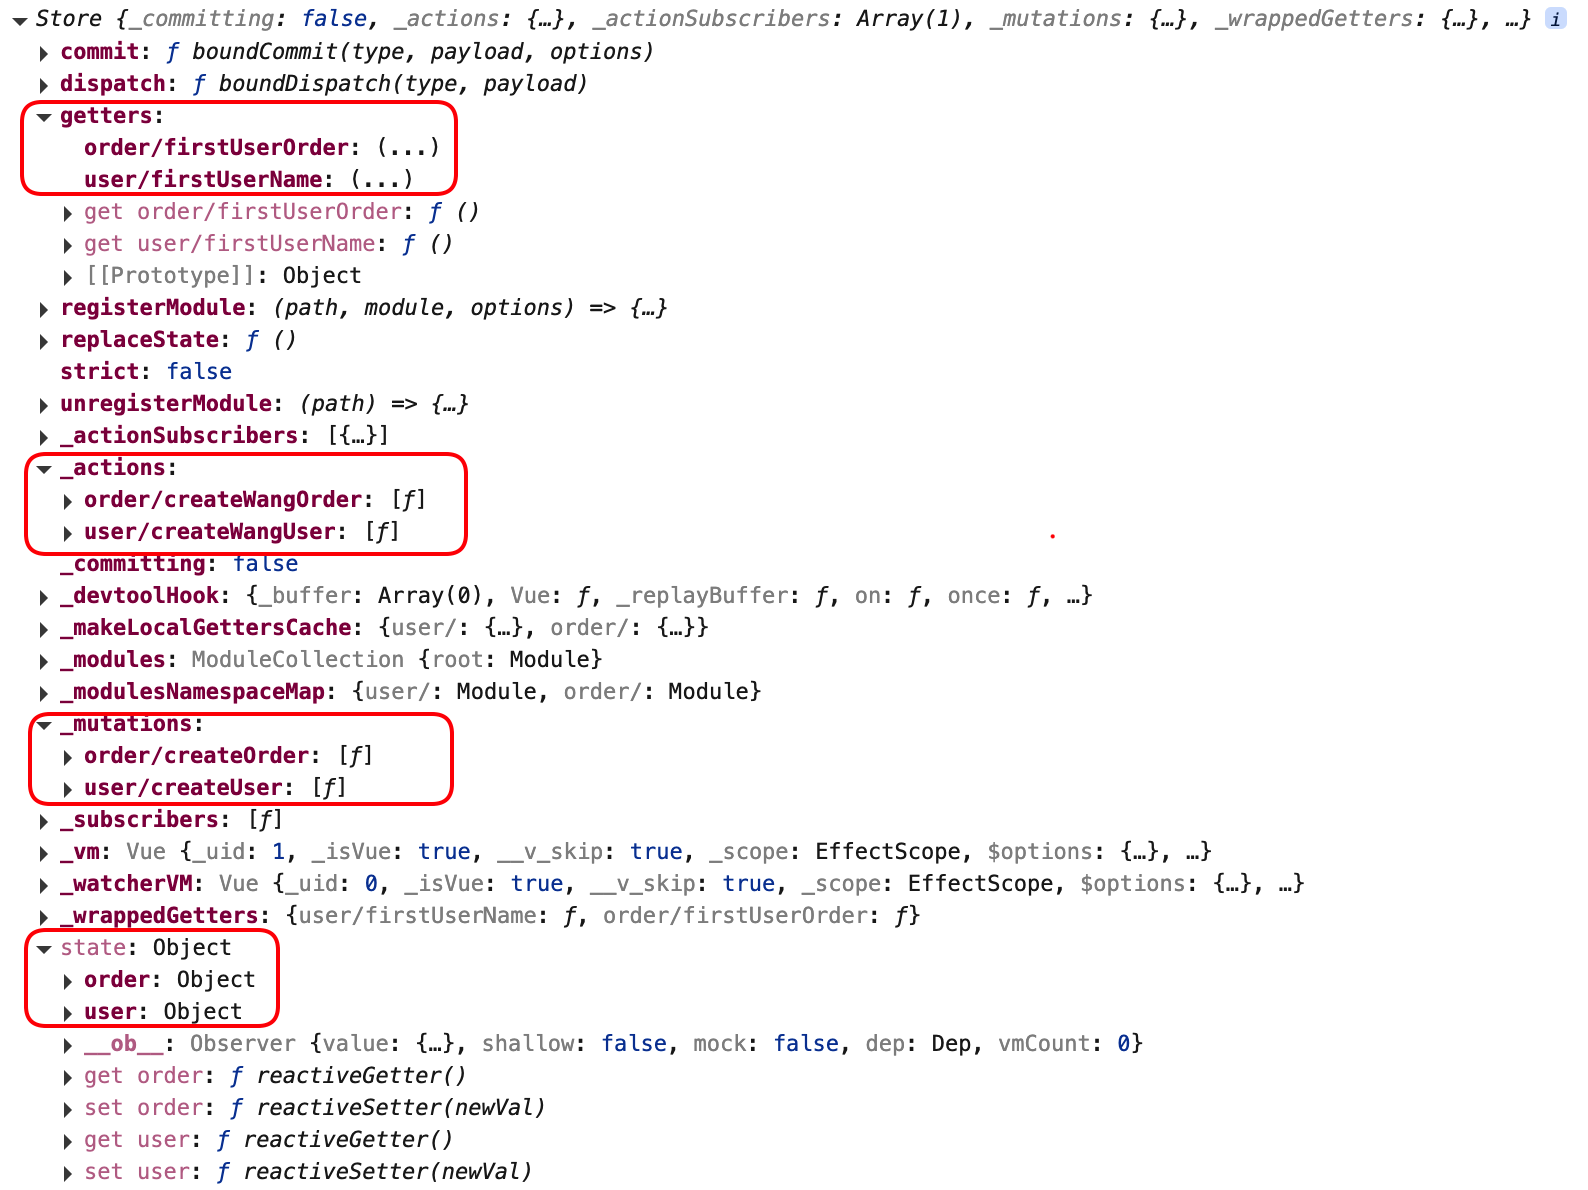
store的模块配置
每个模块都是一个对象,都包含各自的state、getters、mutations、actions
index.js引入模块
import user from './user.js';
import order from './order.js';
Vue.use(Vuex);

export default new Vuex.Store({
  modules: {
    user,
    order,
  },
});
user.js模块
import axios from 'axios';

export default {
  // 开启命名空间
  namespaced: true,
  state: {
    users: [
      {
        name: '张三',
        age: 18,
        sex: '男',
      },
    ],
  },
  mutations: {
    createUser(state, value) {
      state.users.unshift(value);
    },
  },
  actions: {
    createRandomUser(context) {
      axios.get('https://api.apiopen.top/api/sentences').then(res => {
        context.commit('createUser', {
          name: res.data.result.name,
          age: 20,
          sex: '男',
        });
      });
    },
  },
  getters: {
    firstUserName(state) {
      return state.users[0].name;
    },
  },
};
order.js模块
export default {
  // 开启命名空间
  namespaced: true,
  state: {
    orders: [
      {
        id: '1',
        product: '手机',
        price: 1000,
        userName: '张三',
      },
    ],
  },
  mutations: {
    createOrder(state, value) {
      state.orders.unshift(value);
    },
  },
  actions: {
    createFirstUserOrder(context, value) {
      context.commit('createOrder', value);
    },
  },
  getters: {
    firstOrder(state) {
      return state.orders[0];
    },
  },
};
$store对象的模块化访问
computed: {
  users() {
    // user模块的state
    return this.$store.state.user.users;
  },
  firstUserName() {
    // user模块的getters
    return this.$store.getters['user/firstUserName'];
  },
},
methods: {
  createUser() {
    // user模块的mutations
    this.$store.commit('user/createUser', { name: this.name, sex: '女', age: 18 });
  },
  createRandomUser() {
    // user模块的actions
    this.$store.dispatch('user/createRandomUser');
  },
},
mapState、mapGetters、mapMutations、mapActions的模块化访问
<button @click="createOrder({id:orderId(),product,userName,price})">新增用户订单</button>
<button @click="createFirstUserOrder({id:orderId(),product,userName:users[0].name,price})">新增第一个用户订单</button>
import { nanoid } from 'nanoid';
import { mapState, mapGetters, mapMutations, mapActions } from 'vuex';
export default {
  computed: {
    // order模块的state
    ...mapState('order', ['orders']),
    // user模块的state
    ...mapState('user', ['users']),
    // order模块的getters
    ...mapGetters('order', ['firstOrder']),
  },
  methods: {
    // order模块的actions
    ...mapActions('order', ['createFirstUserOrder']),
    // order模块的mutations
    ...mapMutations('order', ['createOrder']),
    orderId(){
      return nanoid();
    }
  },
};
路由
概念
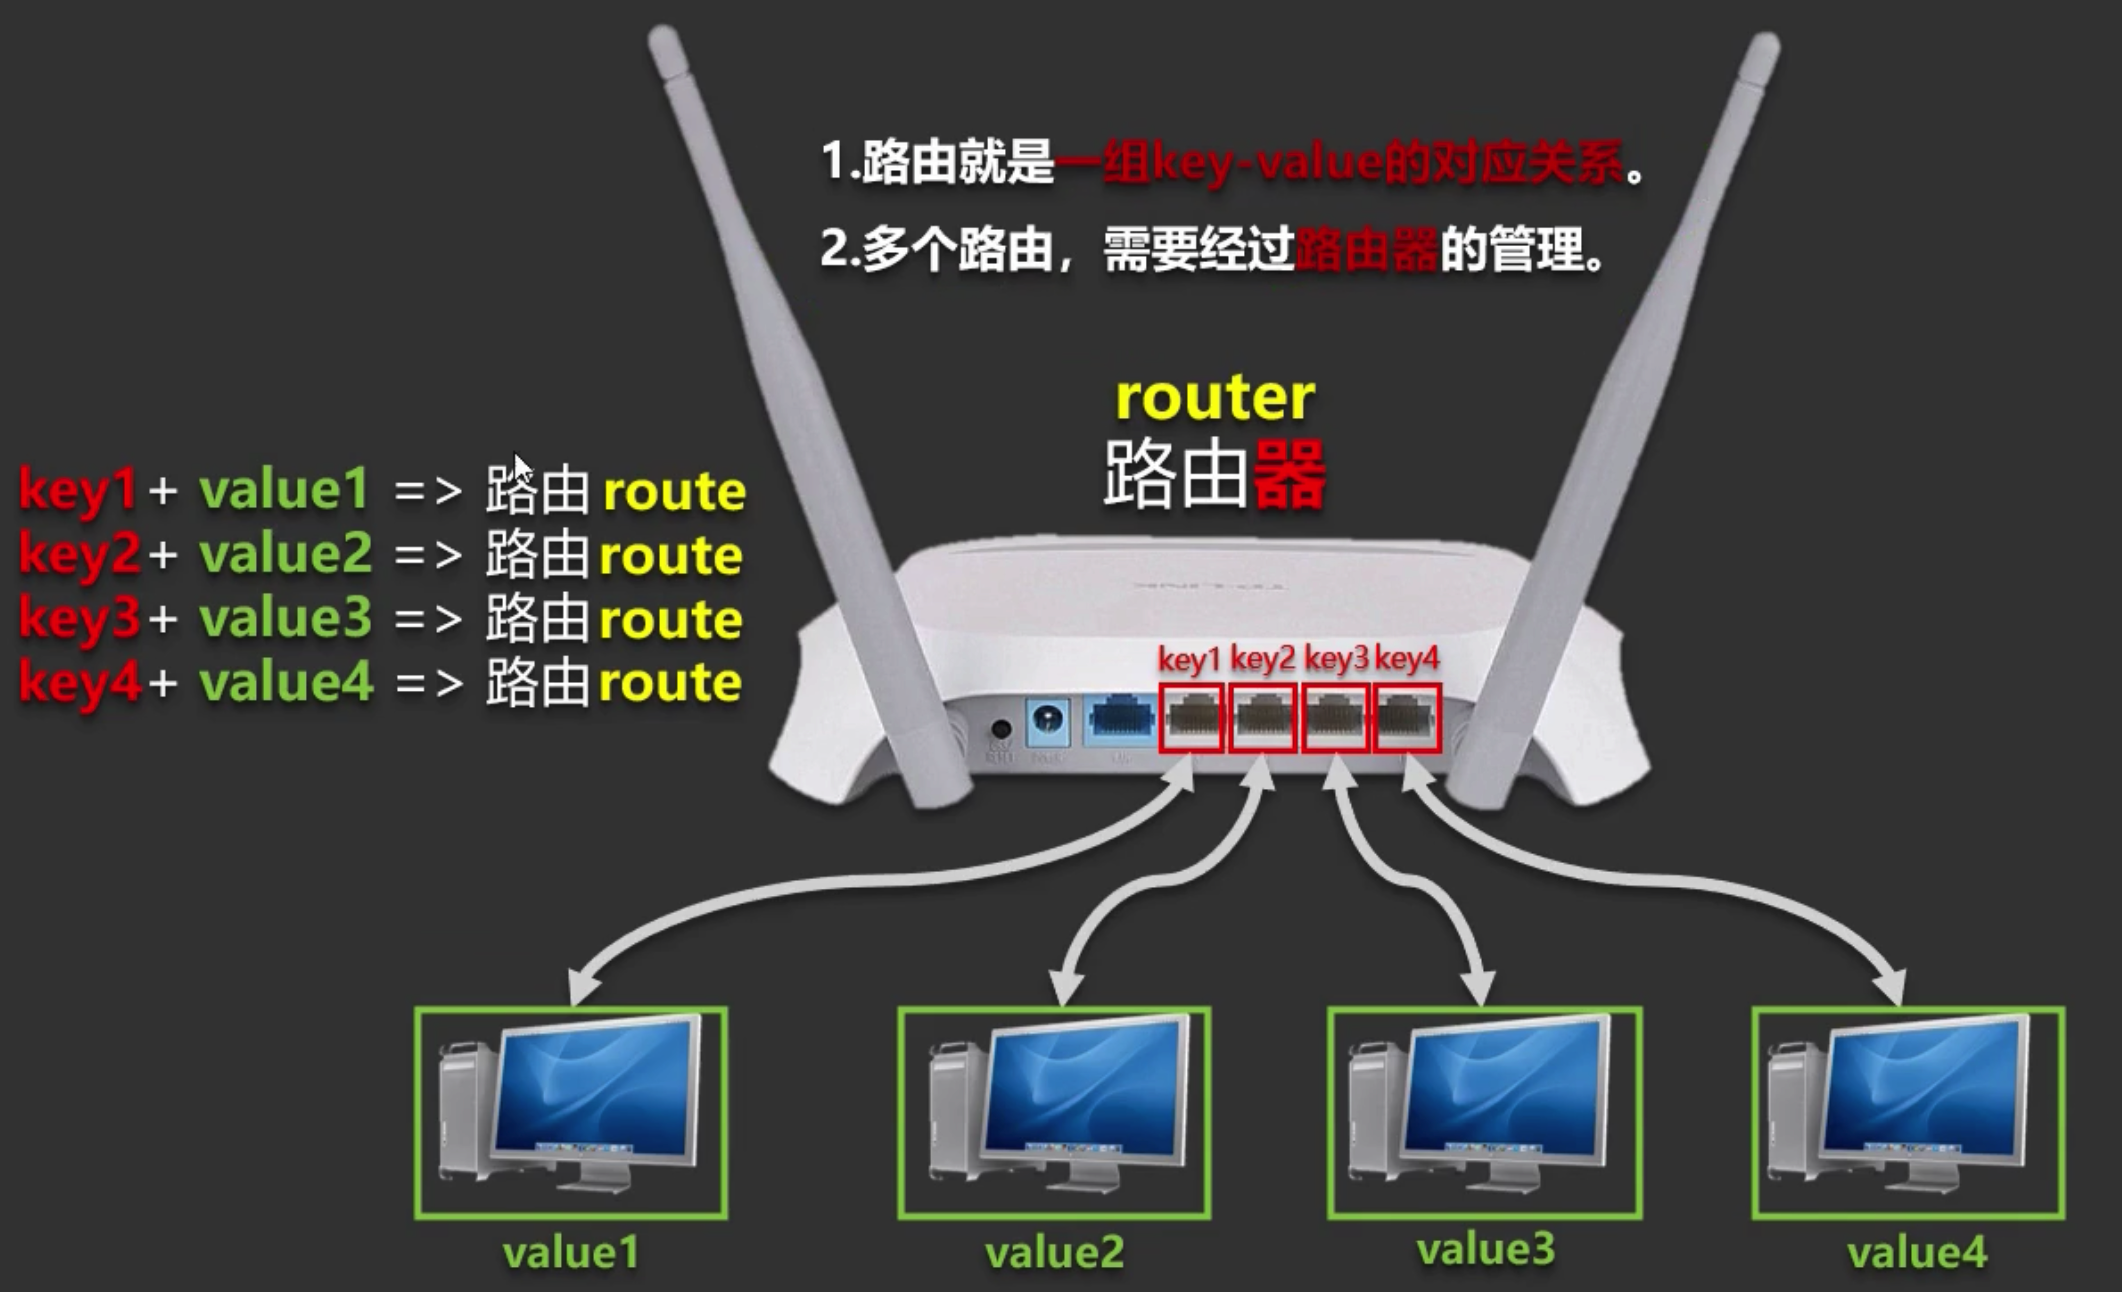
路由器(router): 多个路由的管理器
路由(route): 定义一组key-value的对应关系,多个路由需要经过路由器的管理
多页面与单页面应用
单页面应用SPA(Single Page Application): 整个项目只有一个html功能页面,通过js动态切换页面内容,页面不会刷新(Vue框架应用)
多页面应用MPA(Multiple Page Application): 每个功能页面都有一个html页面,页面之间切换会刷新页面(传统的web应用)
SPA:
优点:
1.页面切换速度快
2.用户体验好
缺点: SEO搜索引擎优化差
MPA:
优点:
1.SEO搜索引擎优化好
2.开发难度小
缺点:
1.页面切换速度慢
2.用户体验差
vue中route的原理
vue-router插件库,监听页面url中的path变化,根据自身维护的route关系,找到path对应的组件,渲染到页面中,实现了单页面应用的功能渲染
route路由: key: url-path, value: 组件
基本使用vue-router插件库
1.下载依赖库
vue2: vue-router@3
vue3: vue-router@4
➜ vue-test git:(master) npm i vue-router@3
2.vue安装vue-router插件库
main.js
import VueRouter from 'vue-router';

Vue.config.productionTip = false;
Vue.use(VueRouter);
3.创建路由器并配置路由
src目录中创建router/index.js文件,index.js文件用于创建路由器和路由规则
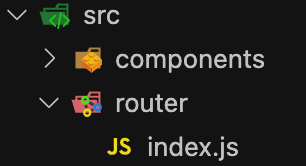
index.js
import VueRouter from 'vue-router';
import Home from '../components/Home.vue';
import About from '../components/About.vue';
export default new VueRouter({
  routes: [
    {
      path: '/home',
      component: Home,
    },
    {
      path: '/about',
      component: About,
    },
  ],
});
每个路由规则包含: path和component属性,即key: path value: component
4.在vue中注册路由器
import VueRouter from 'vue-router';
import router from './router';

Vue.config.productionTip = false;
Vue.use(VueRouter);

new Vue({
  el: '#app',
  render: h => h(App),
  router: router
});
vue实例对象中配置router属性,值为router/index.js中导出的router对象
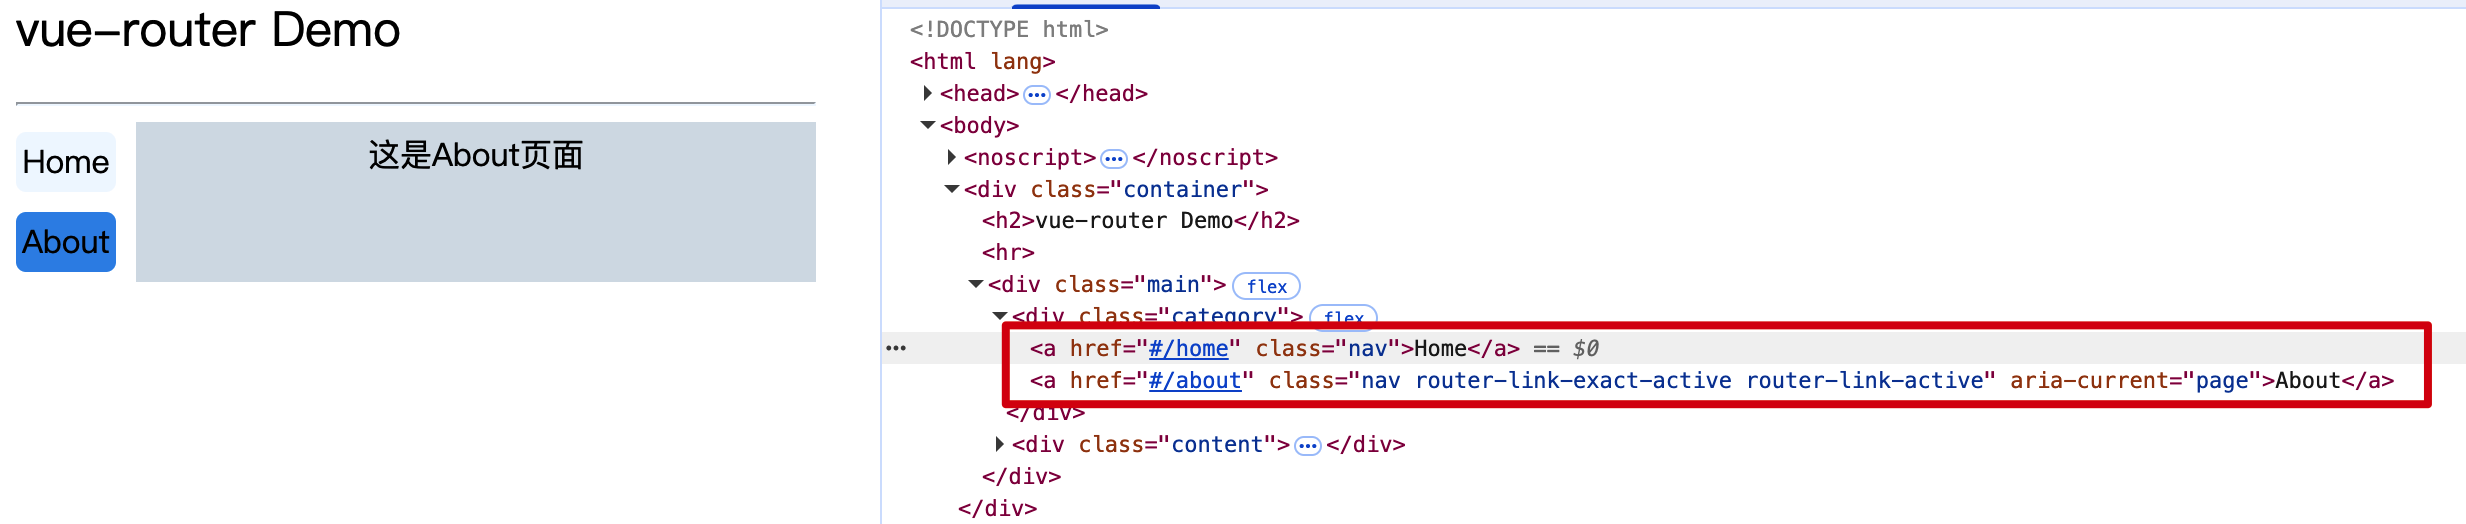
5.导航栏使用router-link标签来路由组件
<div class="category">
  <router-link class="nav" active-class="active" to="/home">Home</router-link>
  <router-link class="nav" active-class="active" to="/about">About</router-link>
</div>
router-link属性:
to: 路由路径,对应router对象中的path属性
active-class: 激活路由时添加的类名,默认类名为router-link-active,当激活的类名为默认类名时,可以不写active-class属性
6.使用router-view标签渲染路由到的组件
<div class="content">
  <router-view></router-view>
</div>
示例
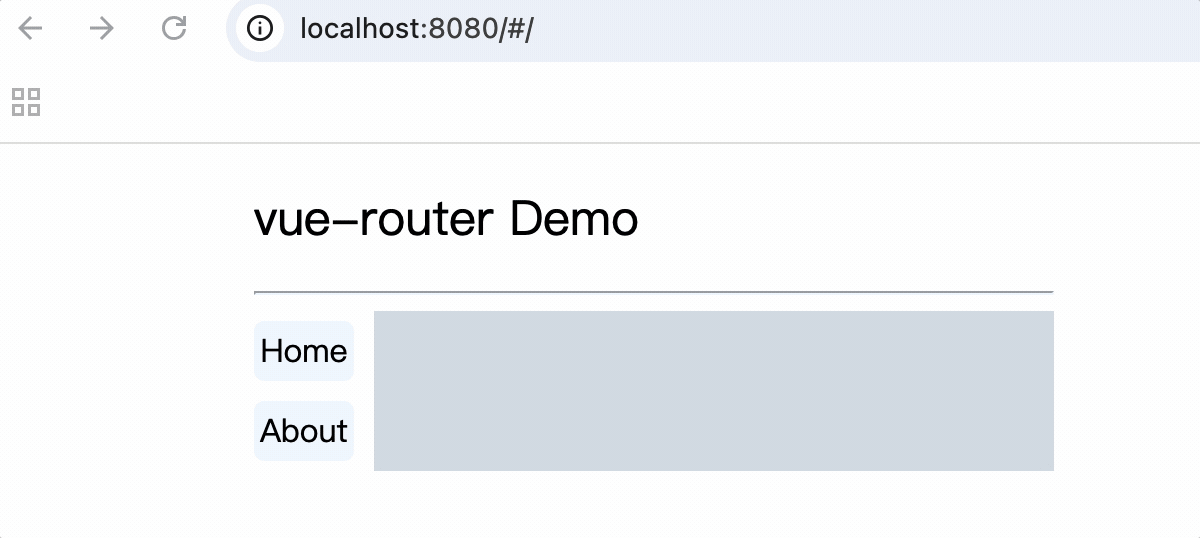
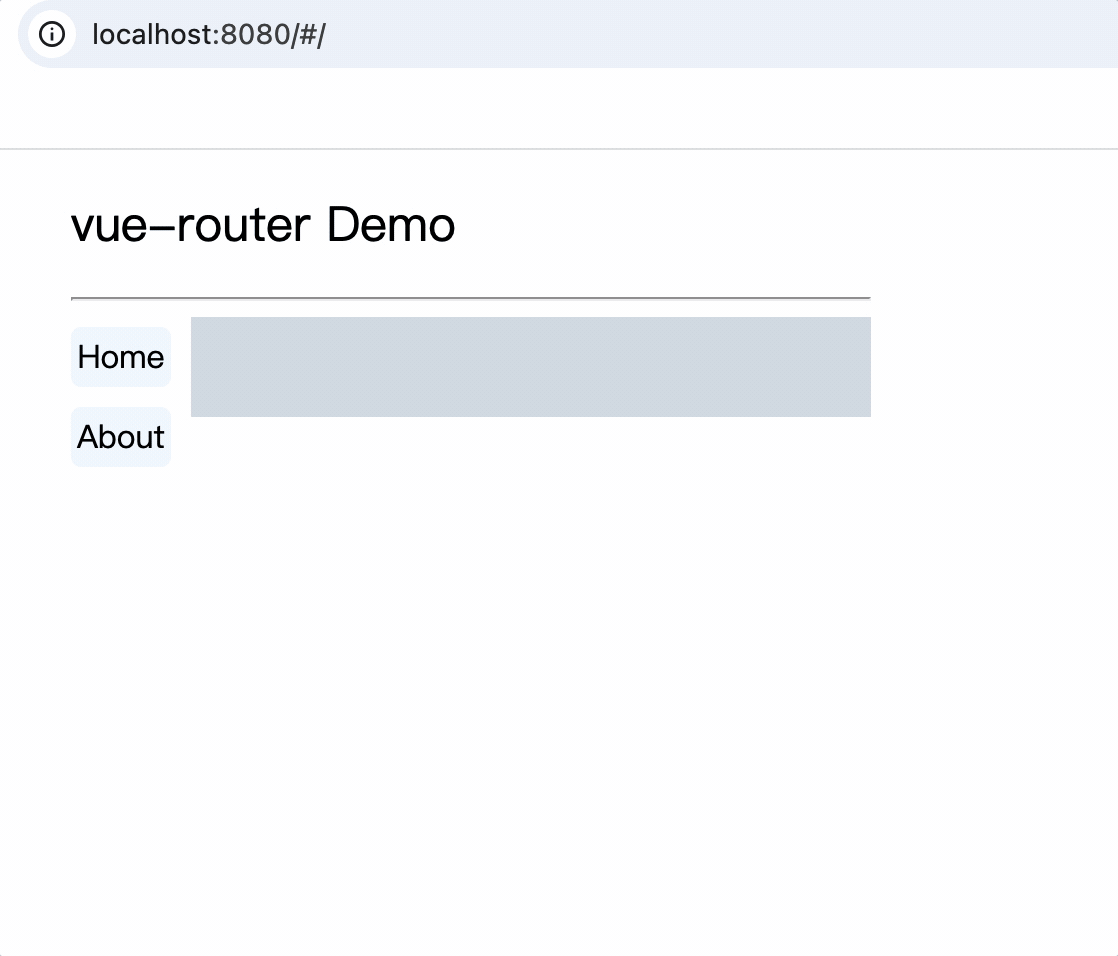
<template>
  <div class="container">
    <h2>vue-router Demo</h2>
    <hr />
    <div class="main">
      <div class="category">
        <router-link class="nav"  to="/home">Home</router-link>
        <router-link class="nav"  to="/about">About</router-link>
      </div>
      <div class="content">
        <router-view></router-view>
      </div>
    </div>
  </div>
</template>

<script>
export default {};
</script>
<style>
.container {
  width: 400px;
  margin: 0 auto;
}
h2 {
  border: 1px;
  font-weight: 350;
}
hr {
  border-color: aliceblue;
}
.nav {
  text-decoration: none;
  color: black;
  background-color: aliceblue;
  display: inline-block;
  width: 50px;
  height: 30px;
  line-height: 30px;
  text-align: center;
  border-radius: 5px;
  margin: 5px;
  margin-left: 0px;
  display: block;
}
.nav:hover {
  background-color: rgb(207, 231, 253);
}
.router-link-active {
  background-color: rgb(53, 145, 231);
}
.active:hover {
  background-color: rgb(53, 145, 231);
}
.main {
  display: flex;
}
.content {
  margin-left: 5px;
  padding: 5px;
  width: 100%;
  background-color: rgb(213, 223, 231);
  text-align: center;
}
.category {
  display: flex;
  flex-direction: column;
  justify-content: space-between;
}
</style>
router-link标签实际上被vue渲染成a标签
注意
1.一般组件和路由组件通过目录区分
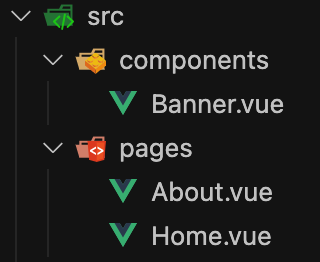
一般组件: 通过组件标签引用的组件称之为一般组件,放到components目录中
路由组件: 通过vue-router路由到的组件称之为路由组件,放到views或pages目录中
2.切换路由时,默认情况下组件会不断的挂载和销毁
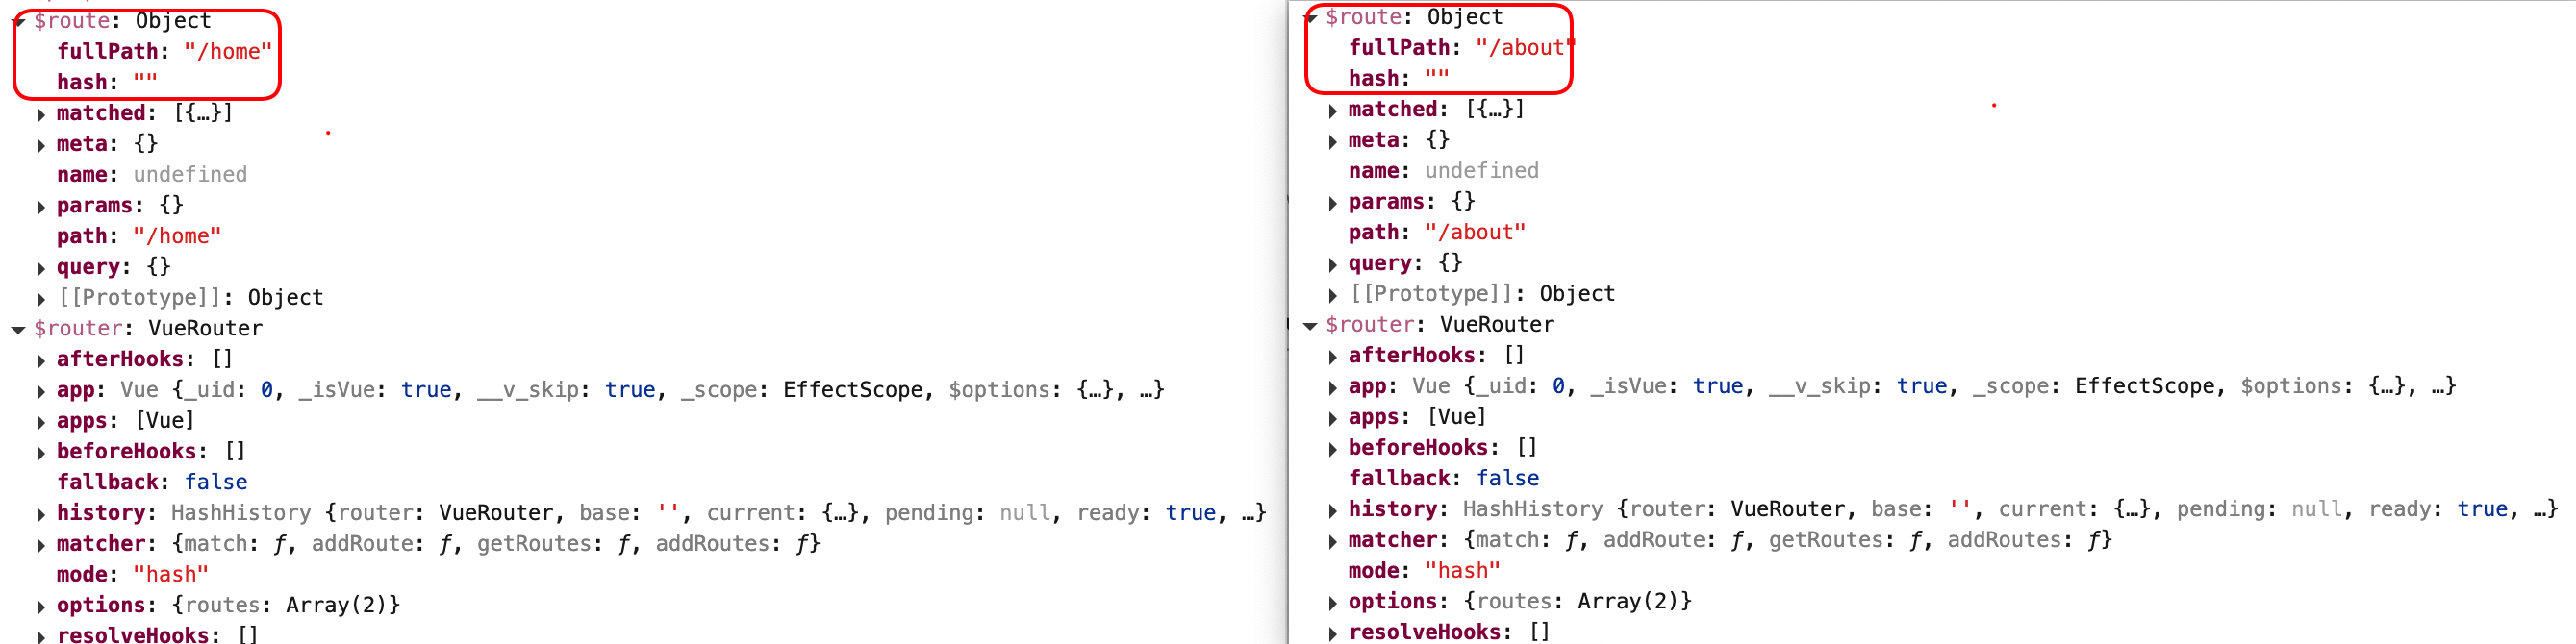
3.每个组件都有自己的$route属性,存储自己的路由信息
4.整个应用只有一个$router对象,可以通过this.$router访问
嵌套路由
1.在router/index.js中配置路由规则,在children属性中配置子路由规则
注意: 嵌套组件的配置必须写在父组件配置中的children属性中,
且嵌套组件的path值不需要带/
import VueRouter from 'vue-router';
import Home from '../pages/Home.vue';
import About from '../pages/About.vue';
import Message from '../pages/Message.vue';
import News from '../pages/News.vue';
export default new VueRouter({
  routes: [
    {
      path: '/home',
      component: Home,
    },
    {
      path: '/about',
      component: About,
      children: [
        {
          path: 'message',
          component: Message,
        },
        {
          path: 'news',
          component: News,
        },
      ],
    },
  ],
});
2.父组件中使用router-link和router-view标签来渲染嵌套组件
注意: router-link标签的to属性值必须是完整路径,包含了父组件路径
<div>
  <div>这是About页面</div>
  <div class="category">
    <router-link class="nav" to="/about/message">message</router-link>
    <router-link class="nav" to="/about/news">news</router-link>
  </div>
  <div>
    <router-view></router-view>
  </div>
</div>

路由传参
query传参
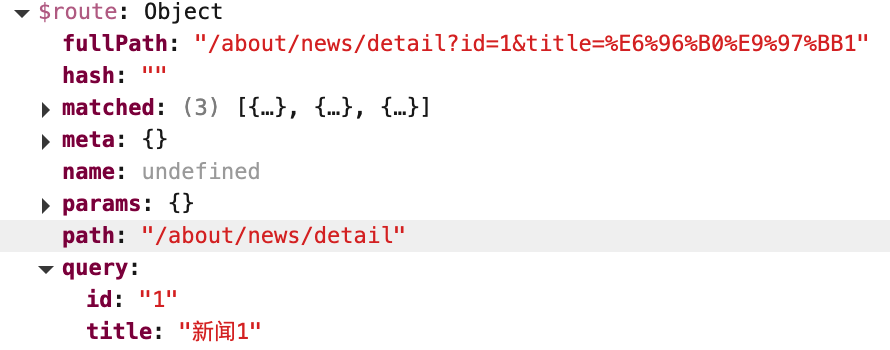
1.to的字符串写法
组件中router-link标签的to属性值中添加query参数
<div>
  <div>这是News页面</div>
  <ul>
    <li v-for="(item, index) in newsList" :key="index">
      <router-link :to="`/about/news/detail?id=${item.id}&title=${item.title}`">{{item.title}}</router-link>
    </li>
  </ul>
  <hr>
  <router-view></router-view>
</div>
<div>
  消息编号: {{$route.query.id}} 消息标题: {{$route.query.title}}
</div>
路由组件使用this.$route.query.参数名来获取query参数
2.to的对象写法
<router-link :to="{
  path: '/about/news/detail',
  query: {
    id: item.id,
    title: item.title,
  }
}">
{{item.title}}
</router-link>
命名路由
作用: 简化path配置完整路径的写法
前提: 使用命名路由,to属性必须配置对象形式,而且对象中使用name属性指定路由
缺点: 跳转路由组件可读性差
路由对象配置name属性:
{
  path: '/about',
  component: About,
  children: [
    {
      path: 'news',
      component: News,
      children: [
        {
          name: 'newsDetail',
          path: 'detail',
          component: NewsDetail,
        },
      ],
    },
  ],
}
组件中to对象使用name属性指定某个路由:
<router-link :to="{
  name: 'newsDetail',
  query: {
    id: item.id,
    title: item.title,
  }
}">
{{item.title}}
</router-link>
注意: to对象中的name优先于path属性,如果同时存在,path属性会被忽略
params传参
1.to字符串写法
路由对象配置path路径时使用:属性名进行占位:
{
  path: '/about',
  component: About,
  children: [
    {
      path: 'message',
      component: Message,
    },
    {
      path: 'news',
      component: News,
      children: [
        {
          path: 'detail/:id/:title',
          component: NewsDetail,
        },
      ],
    },
  ],
},
router-link标签使用:to属性进行跳转:
<router-link :to="`/about/news/detail/${item.id}/${item.title}`">
{{item.title}}
</router-link>
组件中使用$route.params.属性名获取路由参数:
<div>
  消息编号: {{$route.params.id}} 消息标题: {{$route.params.title}}
</div>
2.to对象写法
to对象写法必须使用name属性指定路由名称
children: [
  {
    name: 'newsDetail',
    path: 'detail/:id/:title',
    component: NewsDetail,
  },
],
<router-link :to="{
  name: 'newsDetail',
  params: {
    id: item.id,
    title: item.title,
  },
}">
{{item.title}}
</router-link>
注意
1.使用params传参路由中path属性必须带:属性名占位符
2.使用params传参to对象中必须使用name属性指定路由,不能使用path属性
3.:to="{}" 双引号必须紧紧包裹对象,"和{之间不能换行,否则报错
4.:to对象中的name属性优于path属性来确定路径
query和params区别
1.参数位置不同
query: path后面?后拼接参数
params: 参数作为path的一部分
2.使用场景
query: 可定义非必填参数
params: 定义参数必须使用:属性占位,而且属性为必填,因此path中不能为''或null或undefined
例如:
path: 'about/news/detail/:id/:title'
:to="{
  name: 'newsDetail',
  params: {
    id: null,
    title: item.title,
  },
}"
由于id为必填项,不能为''或null或undefined,否则报错

路由组件的props配置
路由组件的props配置: 在目标路由中配置props属性,值以key-value形式配置,那么组件向路由组件传参时,路由组件可以使用props属性接收组件传递的参数
作用: 简化目标组件使用{{$route.query.属性}}或{{$route.params.属性}}的写法,使目标组件直接使用{{属性}}写法使用参数
值为对象形式
特点: 只能传递静态数据,由于是固定值,因此和query或params传参无关
目标路由中配置props属性:
children: [
  {
    name: 'newsDetail',
    path: 'detail/:id/:title',
    component: NewsDetail,
    props: {
      id: 111,
      title: '标题',
    }
  },
],
目标组件使用props接收数据:
<div>
  消息编号: {{id}} 消息标题: {{title}}
</div>
props: ['id', 'title'],
值为true形式
特点: 可以传递动态params数据,目标组件可直接使用props属性接收路由传递的params参数
目标路由中配置props属性:
children: [
  {
    name: 'newsDetail',
    path: 'detail/:id/:title',
    component: NewsDetail,
    props: true,
  },
],
目标组件使用props接收数据:
<span>ID:{{id}} 标题:{{title}}</span>
props: ['id', 'title'],
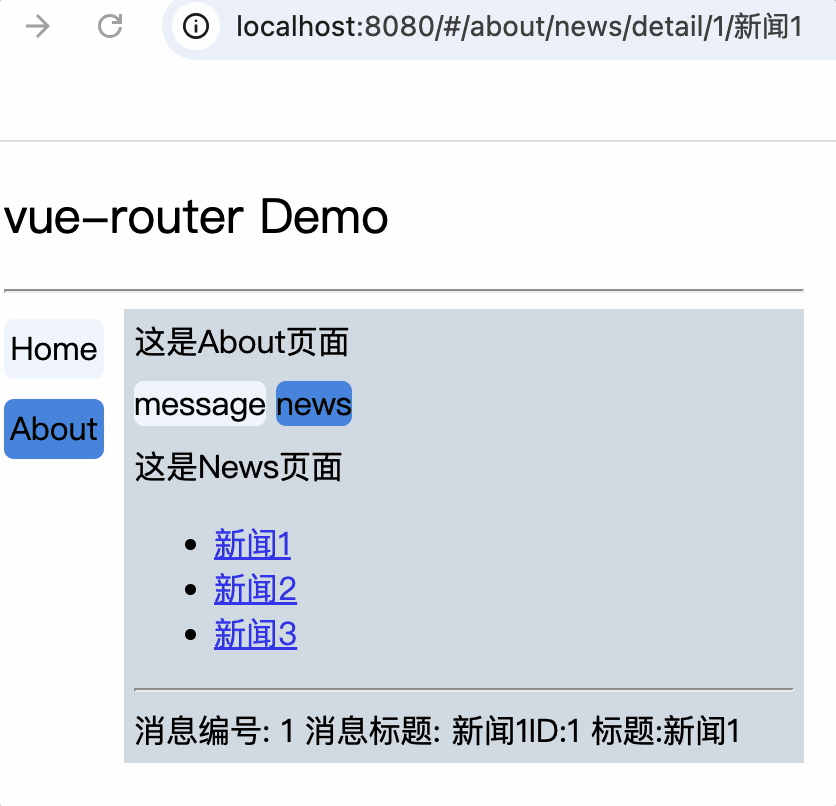
值为函数形式
特点: 可以动态接收query或params数据,让路由组件直接使用props接收路由参数
目标路由中配置props属性为回调函数,该回调函数默认传入$route对象,可以使用解构赋值的连续写法获取参数:
{
  name: 'newsDetail',
  path: 'detail',
  component: NewsDetail,
  props: ({ query: { id, title } }) => {
    return { id, title };
  },
},
目标组件:
<span>props: ID:{{id}} 标题:{{title}}</span>
props: ['id', 'title'],
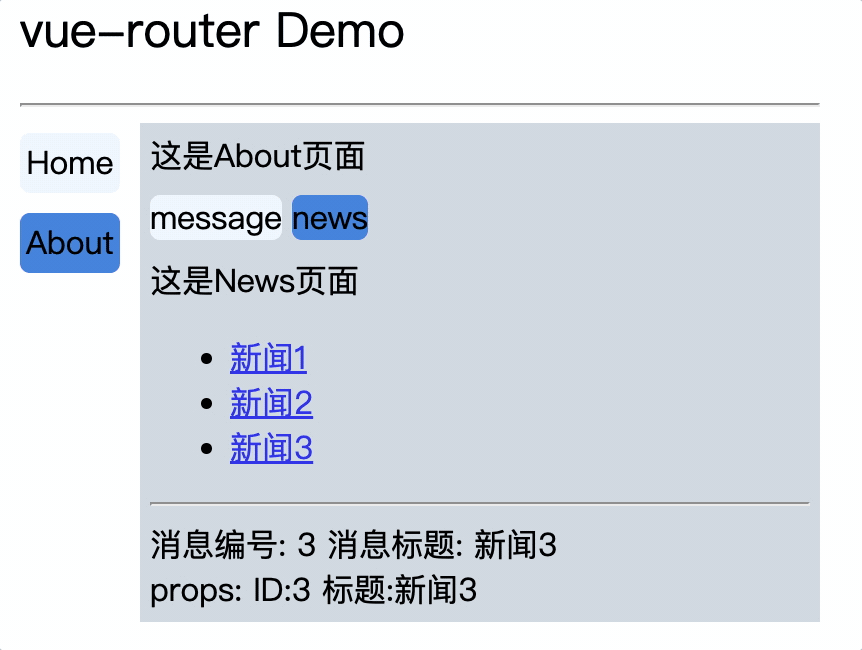
总结
路由中配置props属性,可以简化目标组件使用路由参数的写法,省去了$route.query或者$route.params
总体配置步骤分为:
1.router-link标签配置to属性,确定跳转路由和传参形式,query或params
2.目标路由配置props回调函数,将参数以props属性的方式传递给目标组件
3.目标组件使用props属性接收路由参数
router-link标签记录浏览历史地址
默认为push模式
记录每次跳转访问过的地址,通过浏览器回退按钮回退
replace模式
不记录每次跳转访问过的地址,点击后当前浏览记录会把上一次浏览记录替换掉
router-link标签配置replace属性
配置主导航栏replace属性: 不记录每次跳转访问过的地址,而是替换掉上一次浏览记录
<div class="category">
  <router-link replace class="nav"  to="/home">Home</router-link>
  <router-link replace class="nav"  to="/about">About</router-link>
</div>
对route-link标签添加replace属性后,由于在主目录设置replace,因此不会记录该项目任何地址,在点击浏览器回退时则退出了项目地址

例如:
对三级路由设置replace属性时,就会替换掉上一个路由地址,上一个路由地址是二级路由localhost://8080/#/about/news,因此点击浏览器回退时,会退回到一级路由localhost://8080/#/about
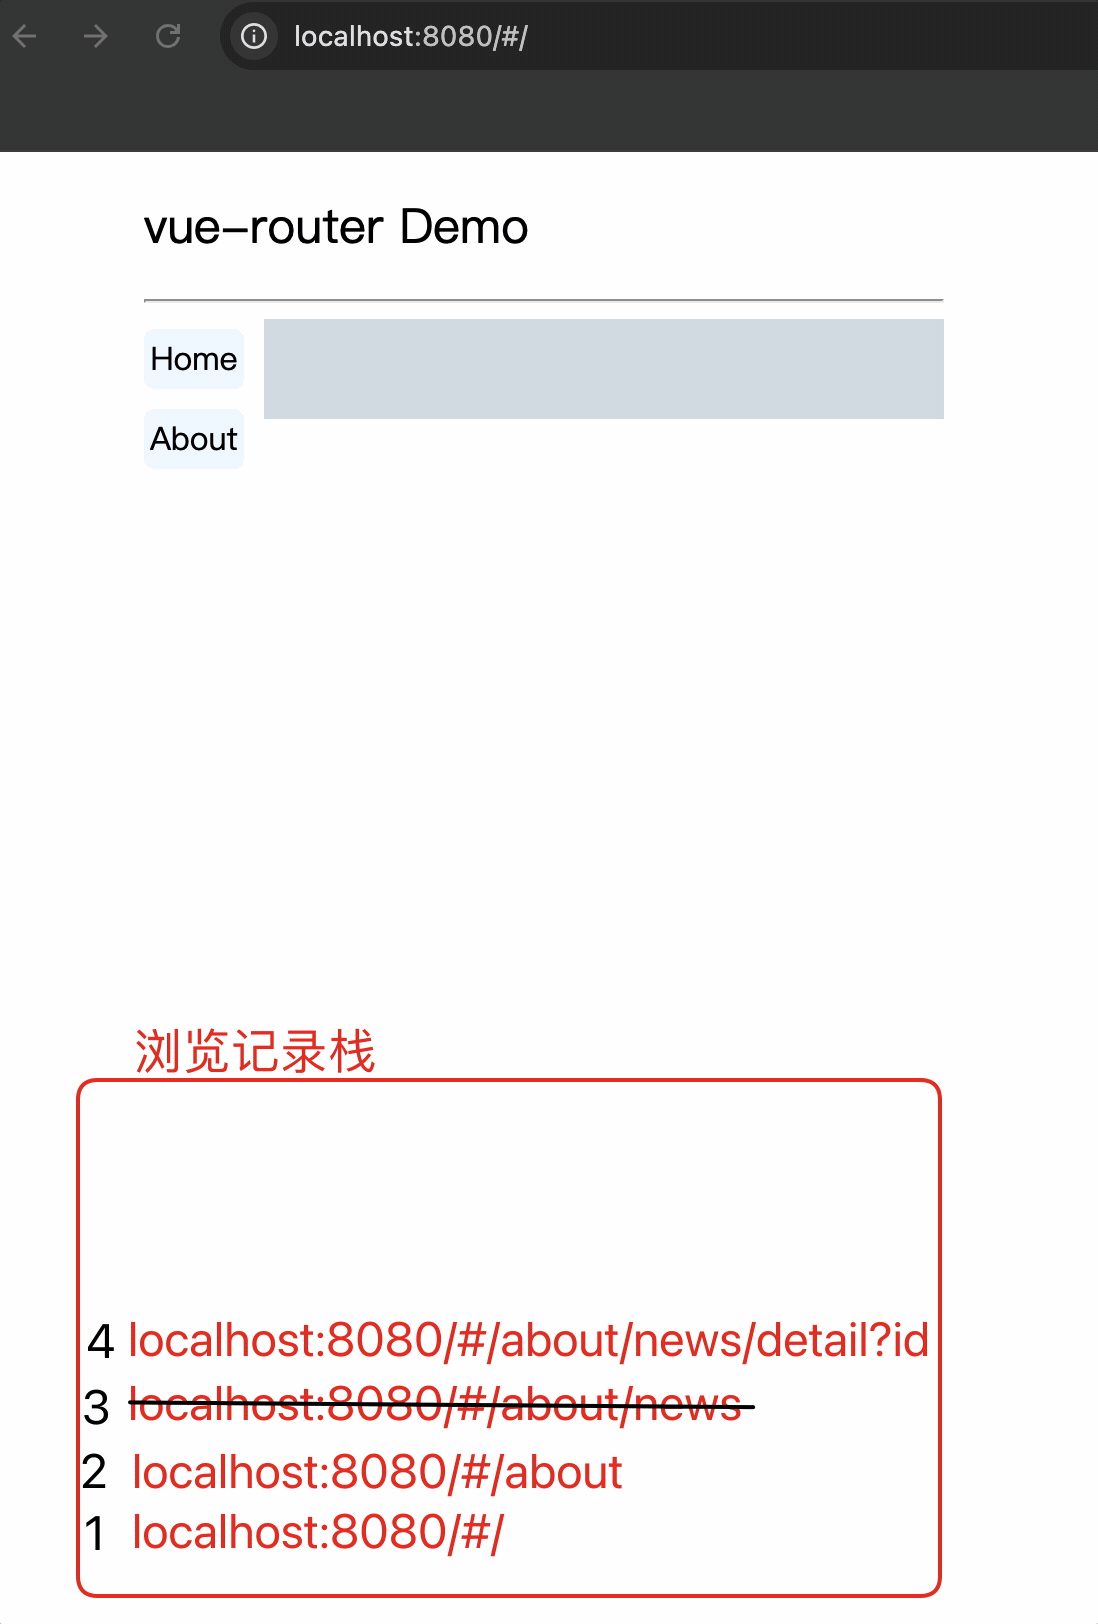
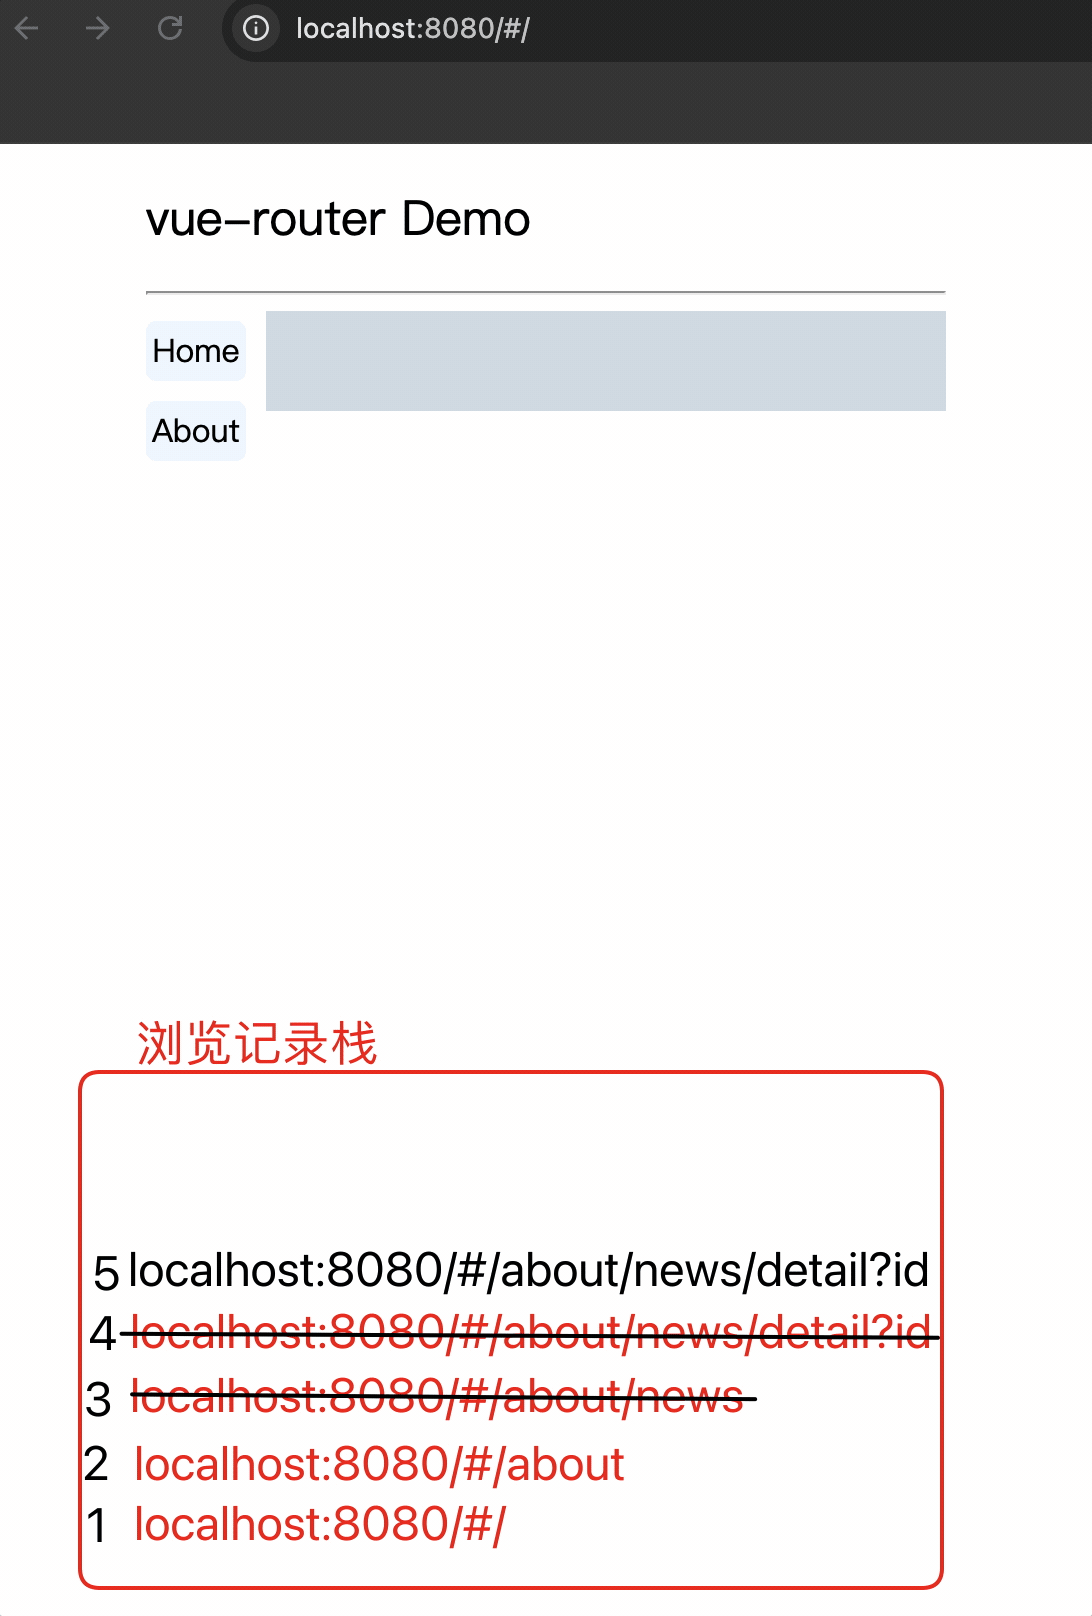
编程式路由导航
router-link依赖于标签进行导航,由用户进行触发,编程式路由导航不依赖标签由程序员控制导航,更加灵活
$router.push跳转路由
push方法传入的对象和:to属性对象配置内容相同
pushShow(item) {
  this.$router.push({
    name: 'newsDetail',
    query: {
      id: item.id,
      title: item.title,
    },
  });
},
$router.replace跳转路由
replace方法传入的对象和:to属性对象配置内容相同
replaceShow(item) {
  this.$router.replace({
    name: 'newsDetail',
    query: {
      id: item.id,
      title: item.title,
    },
  });
},
$router.back()和$router.forward(): 返回上一级路由和下一级路由
back() {
  this.$router.back();
},
forward() {
  this.$router.forward();
},
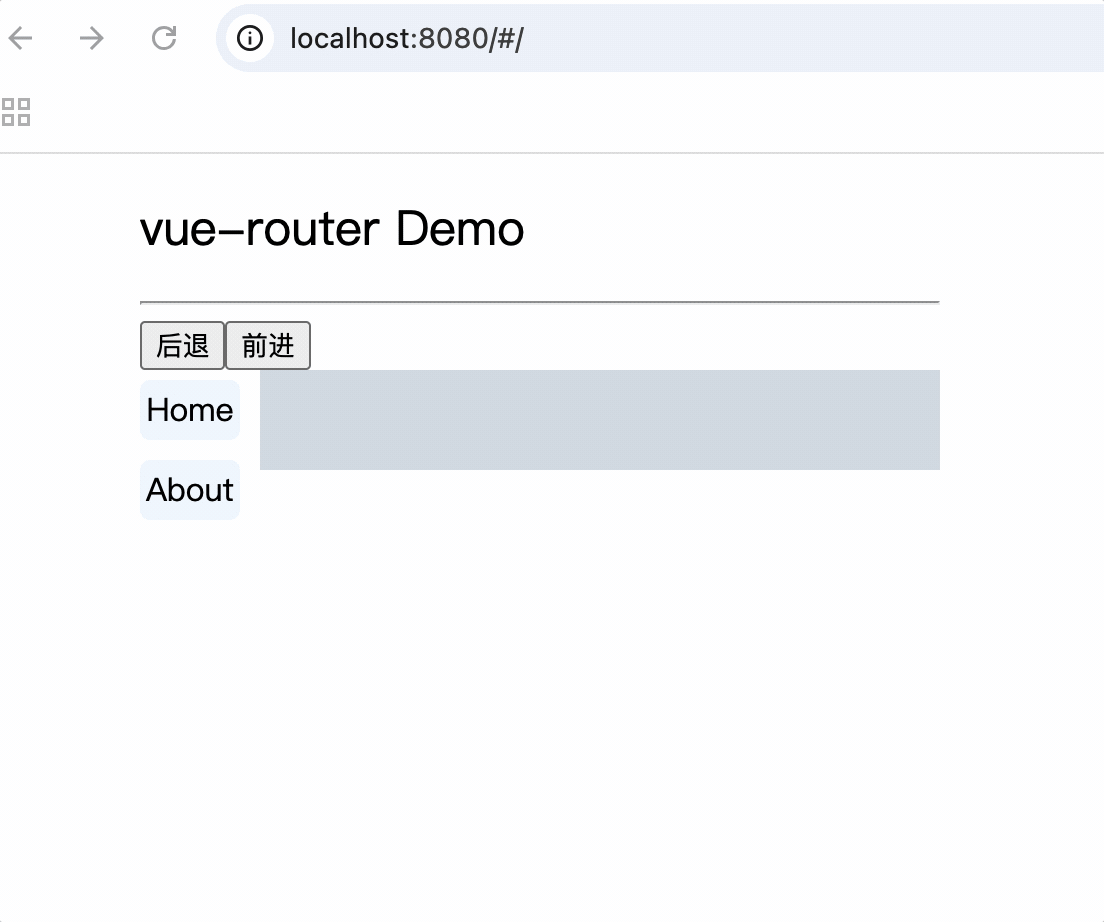
$router.go(): 前进或后退指定步数
go(整数): 正数前进指定步数,负数后退指定步数
go() {
  this.$router.go(3);
},
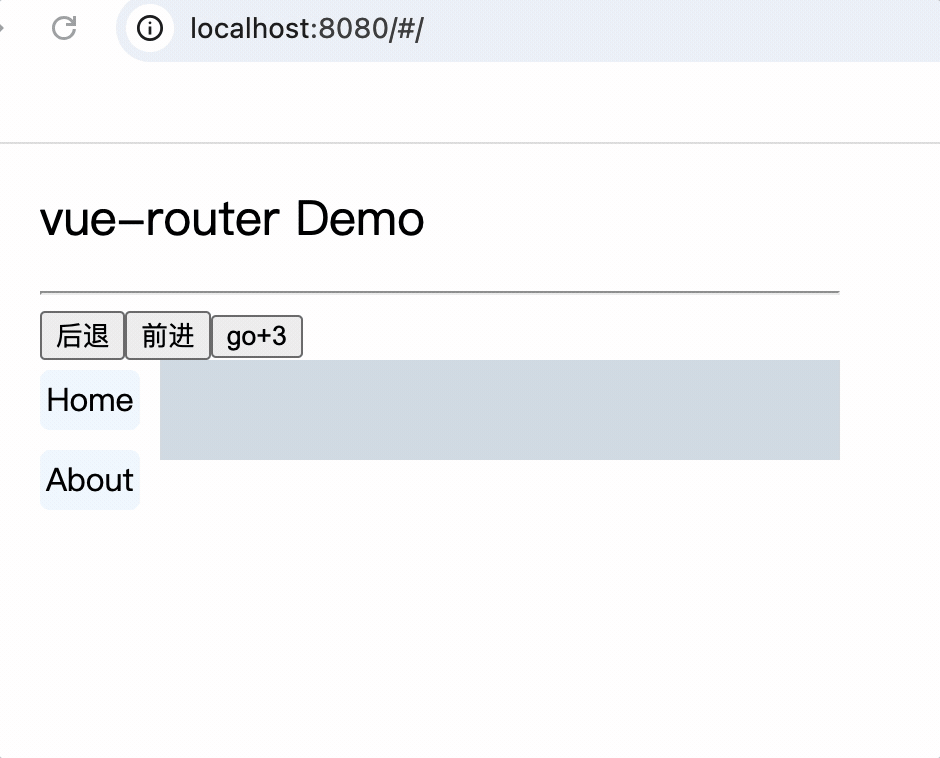
注意
避免重复上一次导航,如果当前导航和上一次记录的导航相同,就会报错
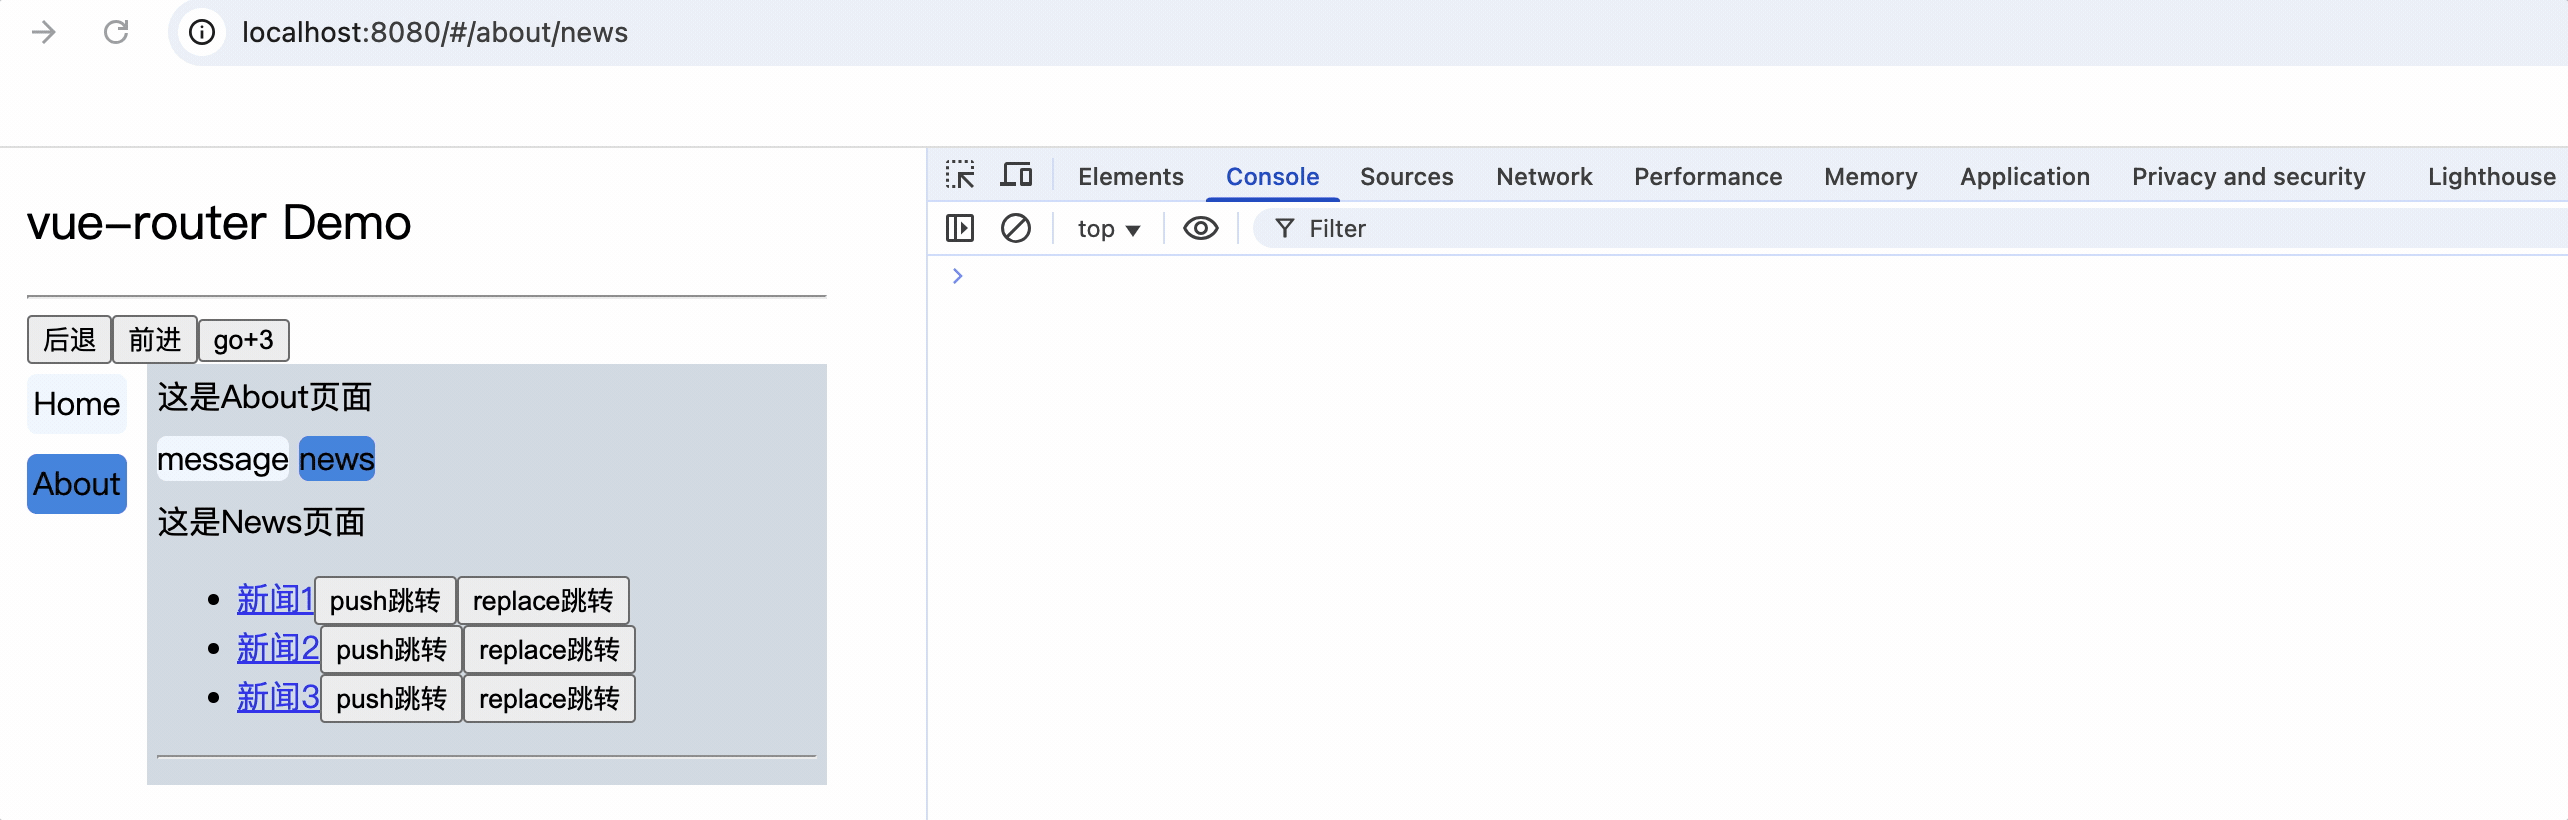
缓存路由组件
作用: 将路由组件中的数据保存起来,再次切换回该路由的时候,数据还在,也就是说路由组件不会被销毁
<div class="category">
  <router-link class="nav" to="/about/message">message</router-link>
  <router-link class="nav" to="/about/news">news</router-link>
</div>
<div>
  <keep-alive include="News">
    <router-view></router-view>
  </keep-alive>
</div>
缓存了News组件,那么<router-view>展示Message组件后,再切换到News组件,Message组件将会被销毁,而News组件中的数据则保留
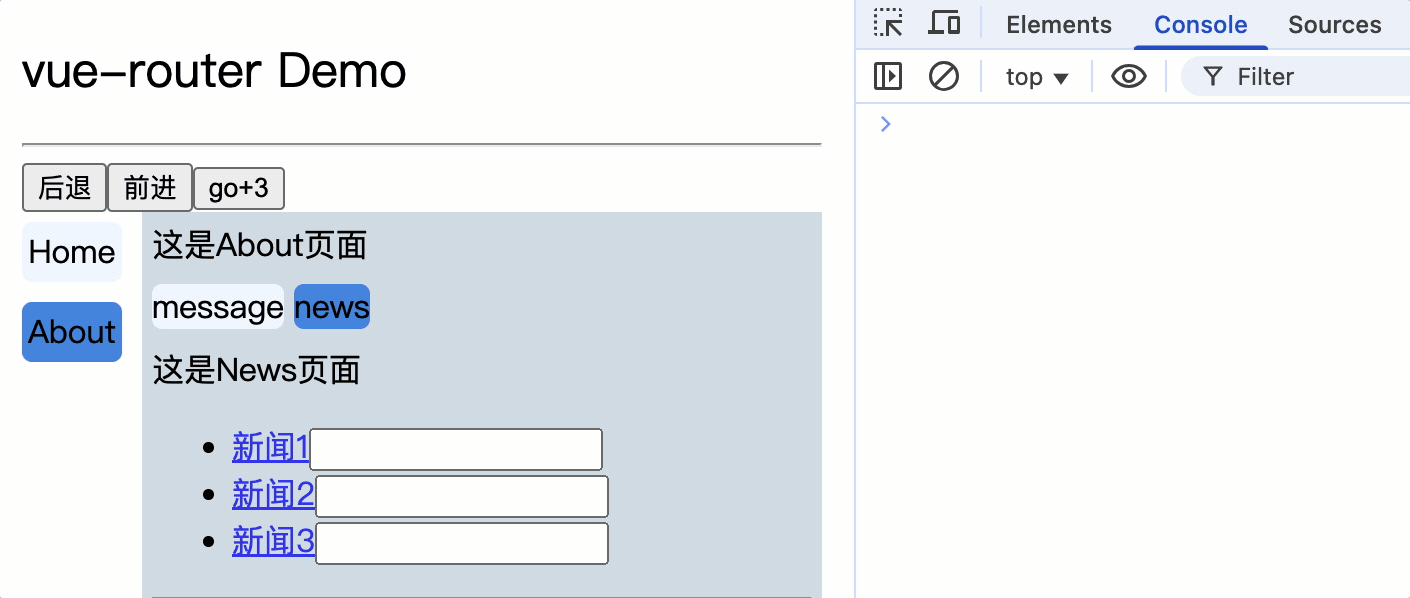
注意
1.<keep-alive>标签必须包裹<router-link>标签
2.缓存路由组件时,路由组件必须有name属性,否则不生效
3.<keep-alive>标签的include属性的值为路由组件的名称,依据路由组件的name属性,不是配置的路由name
4.<keep-alive>标签的include属性值的范围必须是当前组件可以路由的组件名称,也就是组件的子路由组件名称,不能是孙子路由组件名
5.当缓存路由组件的父组件销毁且未配置缓存时,该缓存路由组件的数据也会被销毁
About组件中路由News组件,对News组件进行了缓存
<div>这是About页面</div>
<div class="category">
  <router-link class="nav" to="/about/message">message</router-link>
  <router-link class="nav" to="/about/news">news</router-link>
</div>
<div>
  <keep-alive include="News">
    <router-view></router-view>
  </keep-alive>
</div>
App组件中可以路由About组件,而About组件没有缓存
<div class="main">
  <div class="category">
    <router-link class="nav" to="/home">Home</router-link>
    <router-link class="nav" to="/about">About</router-link>
  </div>
  <div class="content">
    <router-view></router-view>
  </div>
</div>
App(组件)
|_Home组件(无缓存)
|_About组件(无缓存)
  |_News组件(缓存)
  |_Message组件(无缓存)
News和Message组件之间切换,News缓存生效,由于News的父组件About无缓存,当切换了About组件时,About组件将被销毁,其子路由组件News将被销毁,因此缓失效
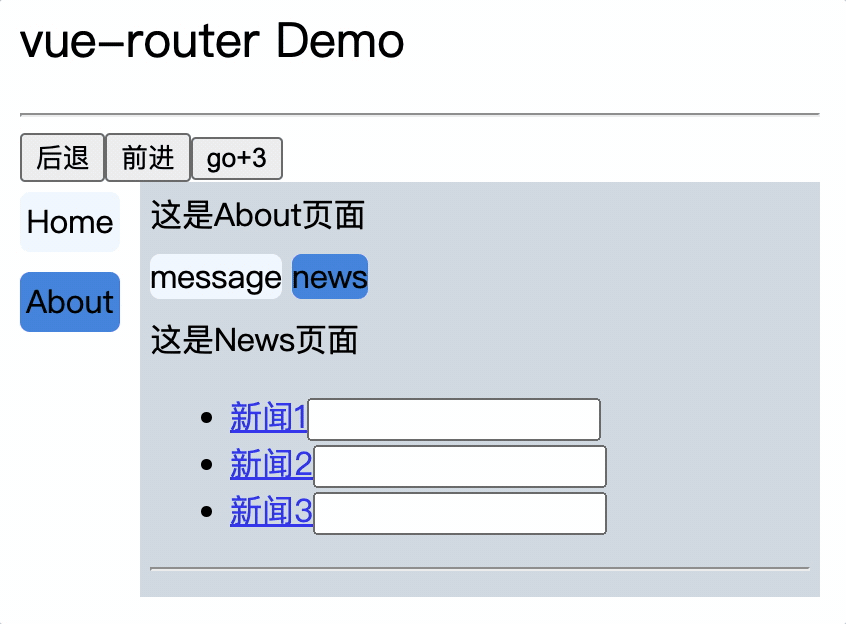
当About组件也进行缓存时,其子路由组件News缓存生效
App组件配置Home和About组件缓存
<div class="category">
  <router-link class="nav" to="/home">Home</router-link>
  <router-link class="nav" to="/about">About</router-link>
</div>
<div class="content">
<keep-alive>
  <router-view></router-view>
</keep-alive>

6.<keep-alive>没有include属性时,则缓存所有路由组件
7.配置多个缓存路由组件是使用,紧紧隔开,不能有空格,或者:include="['组件名','组件名']"
<keep-alive include="Message,News">
  <router-view></router-view>
</keep-alive>
<keep-alive :include="['News','Message']">
  <router-view></router-view>
</keep-alive>
路由组件中的生命周期钩子
在News组件中添加一个定时器,由于News组件通过<keep-alive>缓存了,因此切换tab时,News组件不会销毁,beforeDestroy不会执行
久而久之项目占用内存和CPU资源,导致项目性能下降
mounted() {
  this.timer = setInterval(() => {
    this.opacity -= 0.1;
    if (this.opacity <= 0) {
      this.opacity = 1;
    }
    console.log(this.timer);
  }, 160);
},
beforeDestroy() {
  clearInterval(this.timer);
},
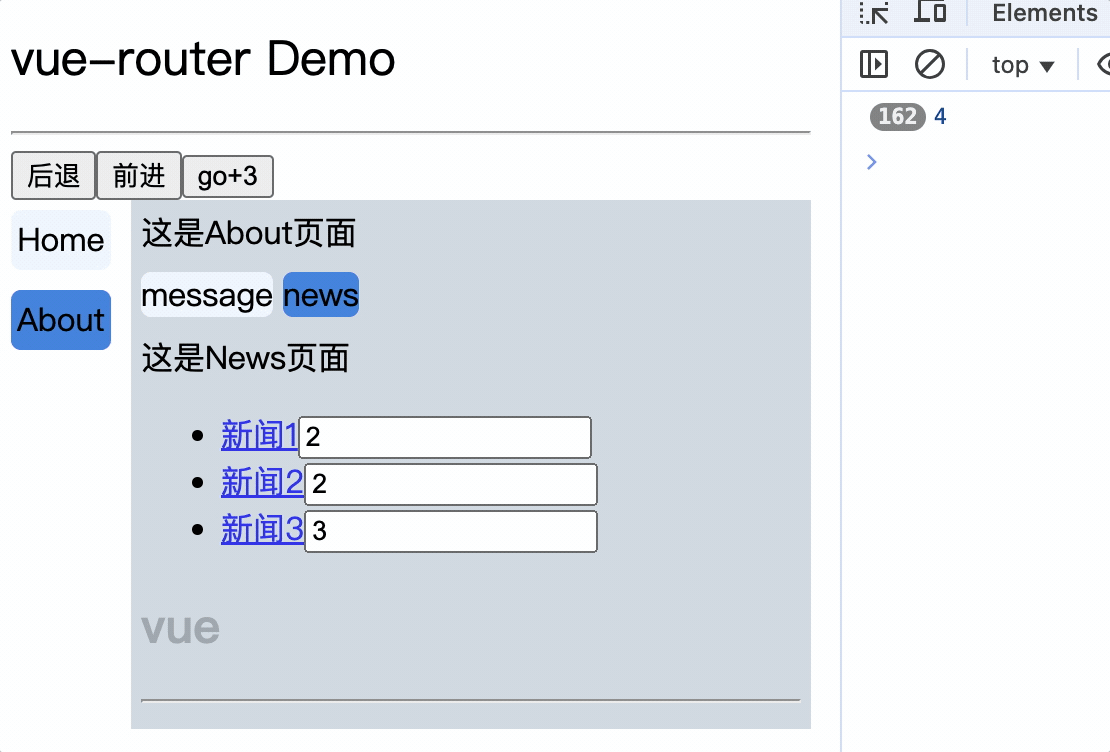
那么想实现,既能缓存组件,又想在组件切换后,释放没必要运行的资源时,就需要使用只有路由组件才有的声明周期钩子
activated和deactivated钩子
activated(): 路由组件被激活时调用
deactivated(): 路由组件失活时调用
methods: {
  changeOpacity() {
    this.timer = setInterval(() => {
      this.opacity -= 0.1;
      if (this.opacity <= 0) {
        this.opacity = 1;
      }
      console.log(this.timer);
    }, 160);
  },
},
activated() {
  console.log('News.vue被激活了');
  this.changeOpacity();
},
deactivated() {
  console.log('News.vue被失活了');
  clearInterval(this.timer);
},
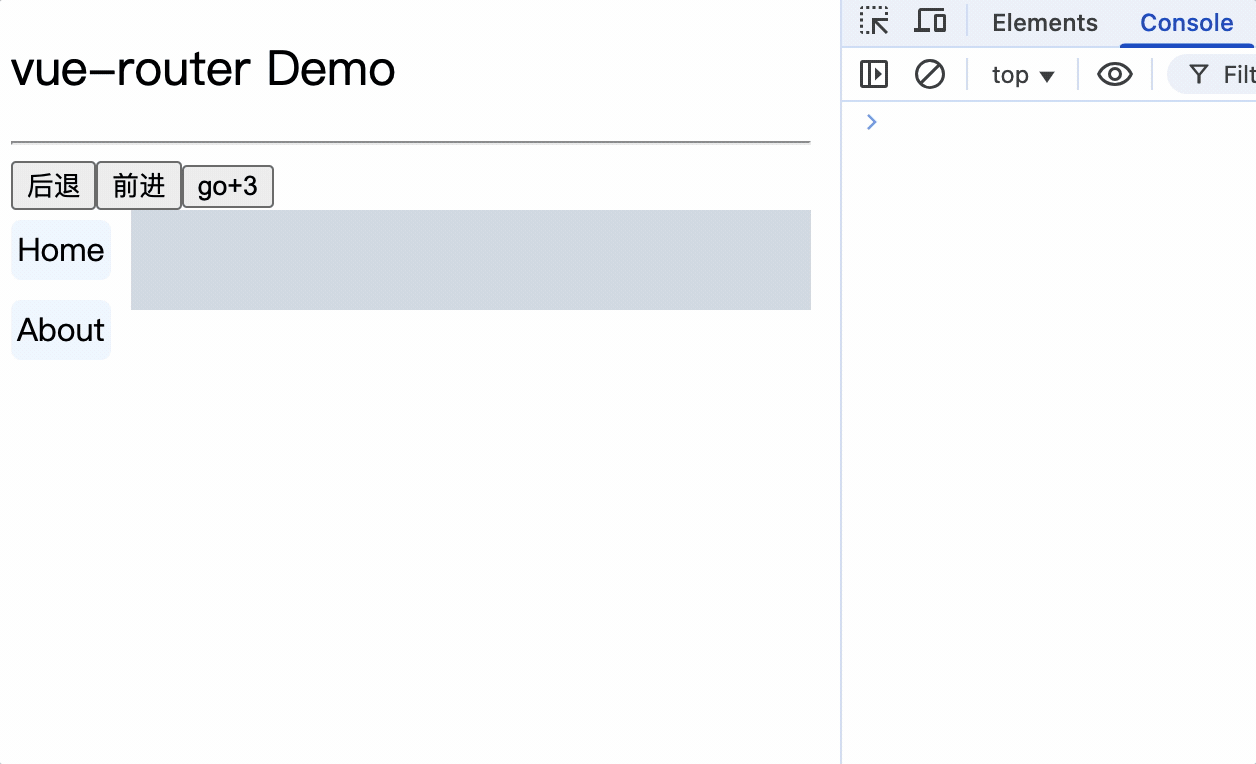
路由守卫
路由守卫是路由跳转过程中的一些钩子函数,路由守卫可以控制路由的访问权限,比如用户是否登录,通过路由守卫,可以控制用户访问某些页面的时候,必须登录才能访问
每次切换路由时回调用这些钩子函数,因此路由守卫也被称为导航守卫
全局前置路由守卫
调用时机:
1.初始化页面时
2.每次路由切换时
router/index.js
在路由器暴露前添加全局前置路由守卫
router.beforeEach((to, from, next) => {
  console.log('to:', to);
  console.log('from:', from);
  next();
});
export default router;
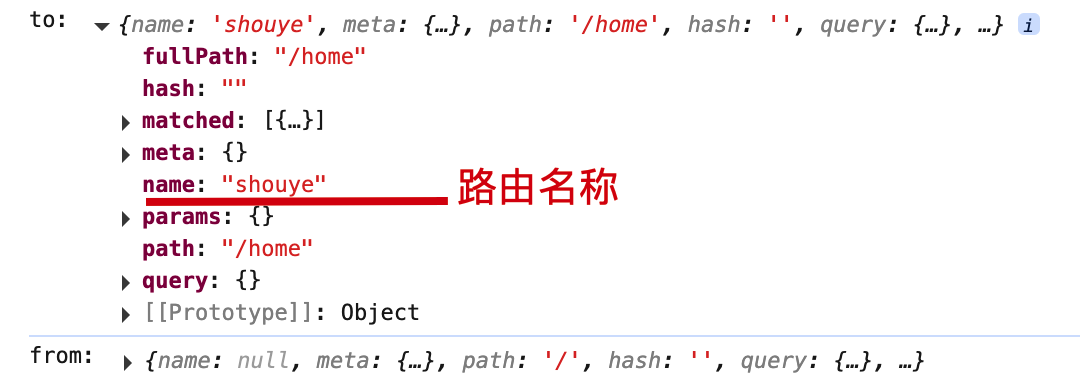
初始化页面或每次路由切换时调用:
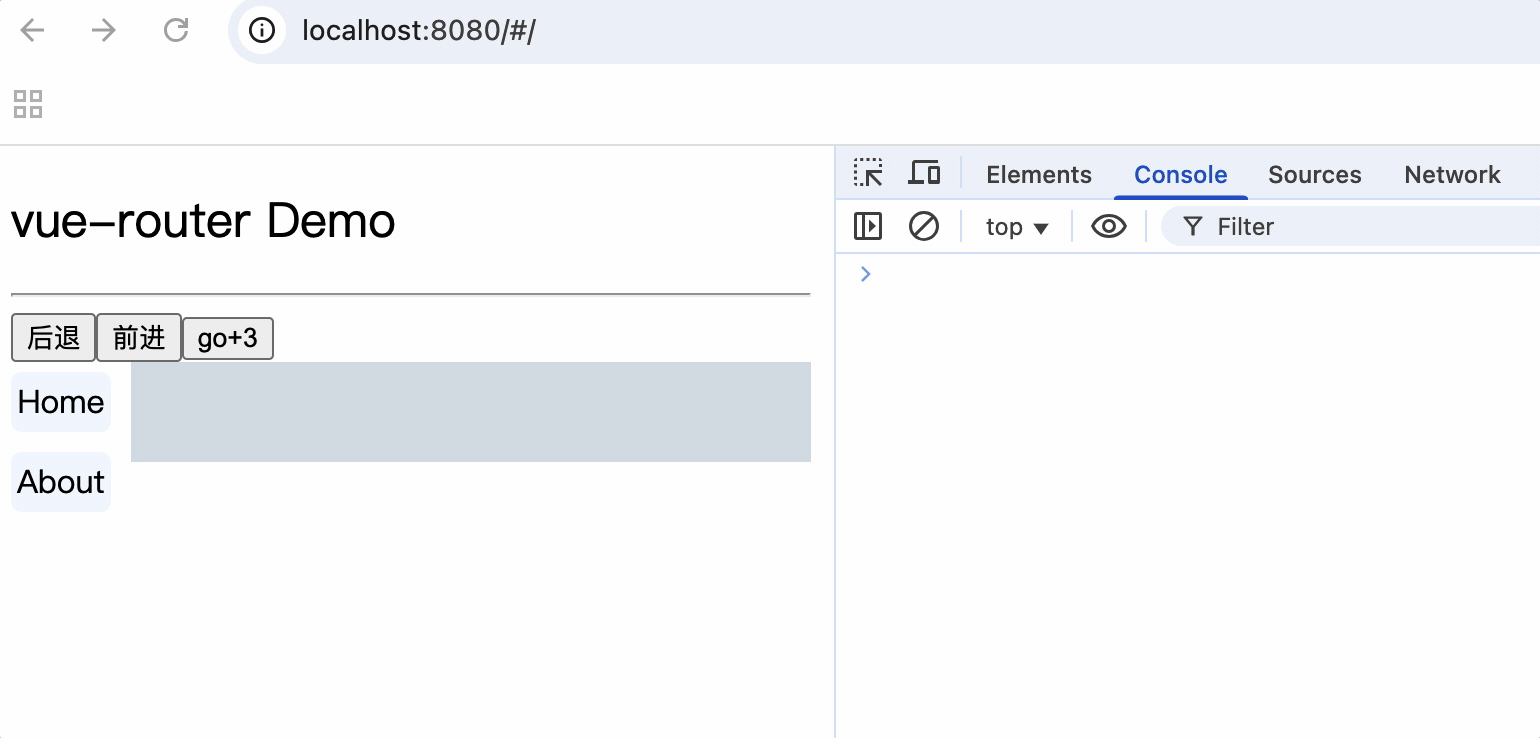
参数:
to: 目标路由
from: 当前路由
next(): 放行,通过逻辑判断后,允许用户访问to时,则调用next()
meta: 路由元信息,由开发者自定义配置信息,用于标记该路由是否需要鉴权等作用
示例:
router.beforeEach((to, from, next) => {
  let permissArr = JSON.parse(localStorage.getItem('permisses'));
  if (permissArr.includes(to.path)) {
    alert('无权限访问');
  } else {
    next();
  }
});

路由的meta元信息配置项
let router = new VueRouter({
  routes: [
    {
      name: 'shouye',
      path: '/home',
      component: Home,
      meta: {
        isAuth: false,
      },
    },
    {
      name: 'about',
      path: '/about',
      component: About,
      meta: {
        isAuth: false,
      }
    },
  ],
});

router.beforeEach((to, from, next) => {
  let permissArr = JSON.parse(localStorage.getItem('permisses'));
  // 当前路由需要鉴权时,判断是否有权限
  if (to.meta.isAuth) {
    if (!permissArr.includes(to.path)) {
      alert('无权限访问');
    } else {
      next();
    }
  } else {
    next();
  }
});
export default router;
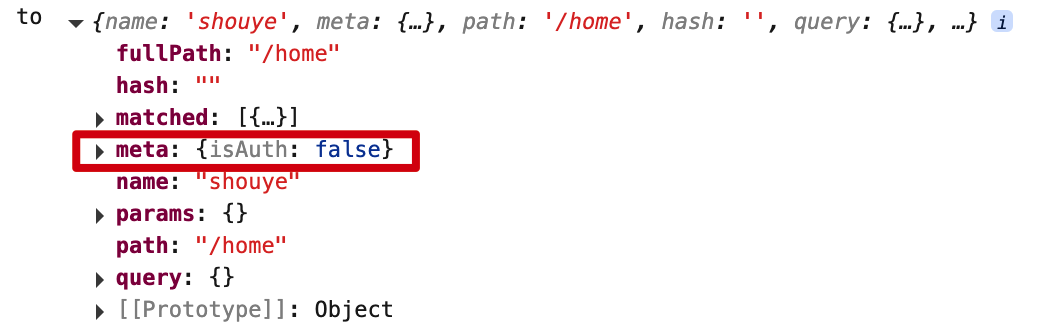
全局后置路由守卫
调用时机:
1.初始化页面时
2.每次成功切换路由之后
回调函数中没有next参数
router.afterEach((to, from) => {
// 修改页面标题
document.title = to.meta.title || '默认标题';
});
在每一个路由的meta属性中配置title值,当成功切换路由时,修改页面标题
刷新页面时展示页面标题展示了项目名称,配置项目的主标题,默认读取package.json文件中的name属性,直接修改index.html的<title>标签
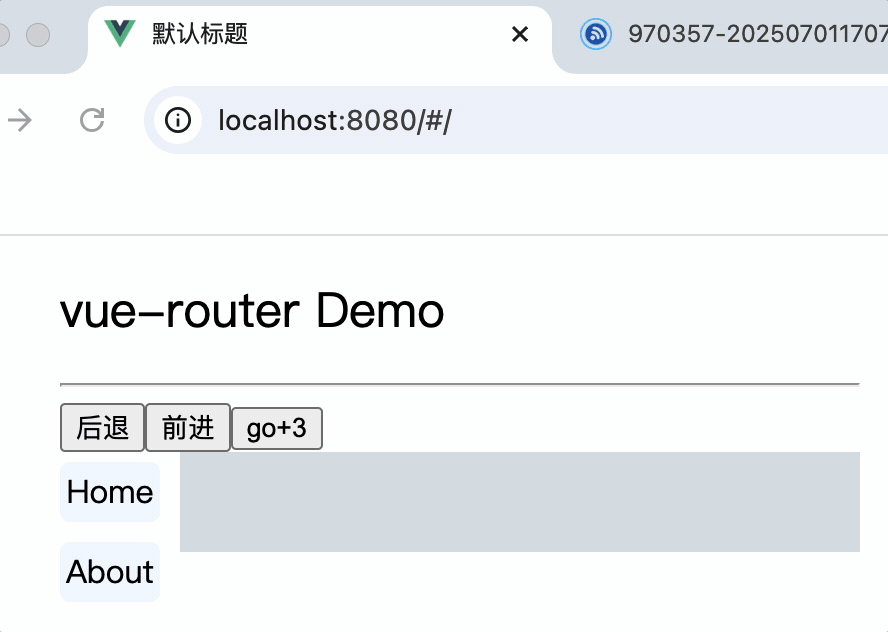
<title>
<!-- <%= htmlWebpackPlugin.options.title %> -->
欢迎使用该系统
</title>
独享路由守卫
独享路由守卫: 只对具体的路由配置生效
路由的配置中添加beforeEnter属性,值为回调函数,函数参数与全局前置路由守卫相同
{
name: 'news',
path: 'news',
component: News,
meta: {
isAuth: true,
title: '新闻',
},
beforeEnter: (to, from, next) => {
let permissArr = JSON.parse(localStorage.getItem('permisses'));
// 当前路由需要鉴权时,判断是否有权限
if (to.meta.isAuth) {
if (!permissArr.includes(to.path)) {
alert('无权限访问');
} else {
next();
}
} else {
next();
}
}
},
注意:
1.独享路由守卫只有beforeEnter回调函数,路由前进行守卫,没有afterEnter
2.独享路由守卫可以配合后置全局路由守卫($router.afterEach)一起使用,弥补没有afterEnter的缺陷
组件内路由守卫
组件内路由守卫: 在组件中定义组件进入前和离开组件前的守卫
beforeRouteEnter和beforeRouteLeave都需要next进行放行
beforeRouteEnter:进入组件前调用
beforeRouteLeave:离开组件前调用
export default {
beforeRouteEnter(to, from, next) {
console.log('组件内路由守卫beforeRouteEnter');
next();
},
beforeRouteLeave(to, from, next) {
console.log('组件内路由守卫beforeRouteLeave');
next();
},
};
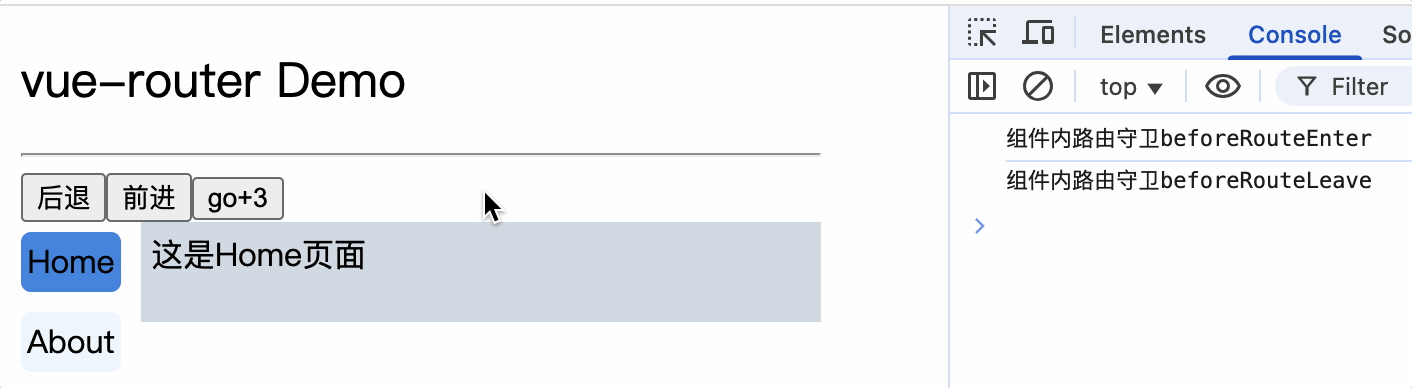
使用场景: 对组件独有的进入和离开逻辑进行封装
路由模式
hash模式(默认模式)
hash模式: 浏览器地址栏中会显示#,hash模式下,路由地址中会带有#,如http://localhost:8080/#/home
let router = new VueRouter({
mode: 'hash',
})
hash模式下刷新页面,浏览器发起请求,不会提交hash部分,也是说发起请求的资源不会改变,例如,localhost:8080/#/home,刷新后,请求的资源为localhost:8080/,而不是localhost:8080/#/home

缺点:
1.地址栏中会显示#,不美观
2.若通过app分享页面,由于app分享url校验严格,会把地址标记为不合法
history模式
history模式: 浏览器地址栏中不会显示#,如http://localhost:8080/home
let router = new VueRouter({
mode: 'history',
})
vue是单页应用,当点击导航栏时会改变浏览器地址栏url,但并不会请求url,例如,单击home,由于配置的模式为history,地址栏中的url不携带#,
而是localhost/home。如果浏览器刷新页面,而由于后端没有/home资源导致404
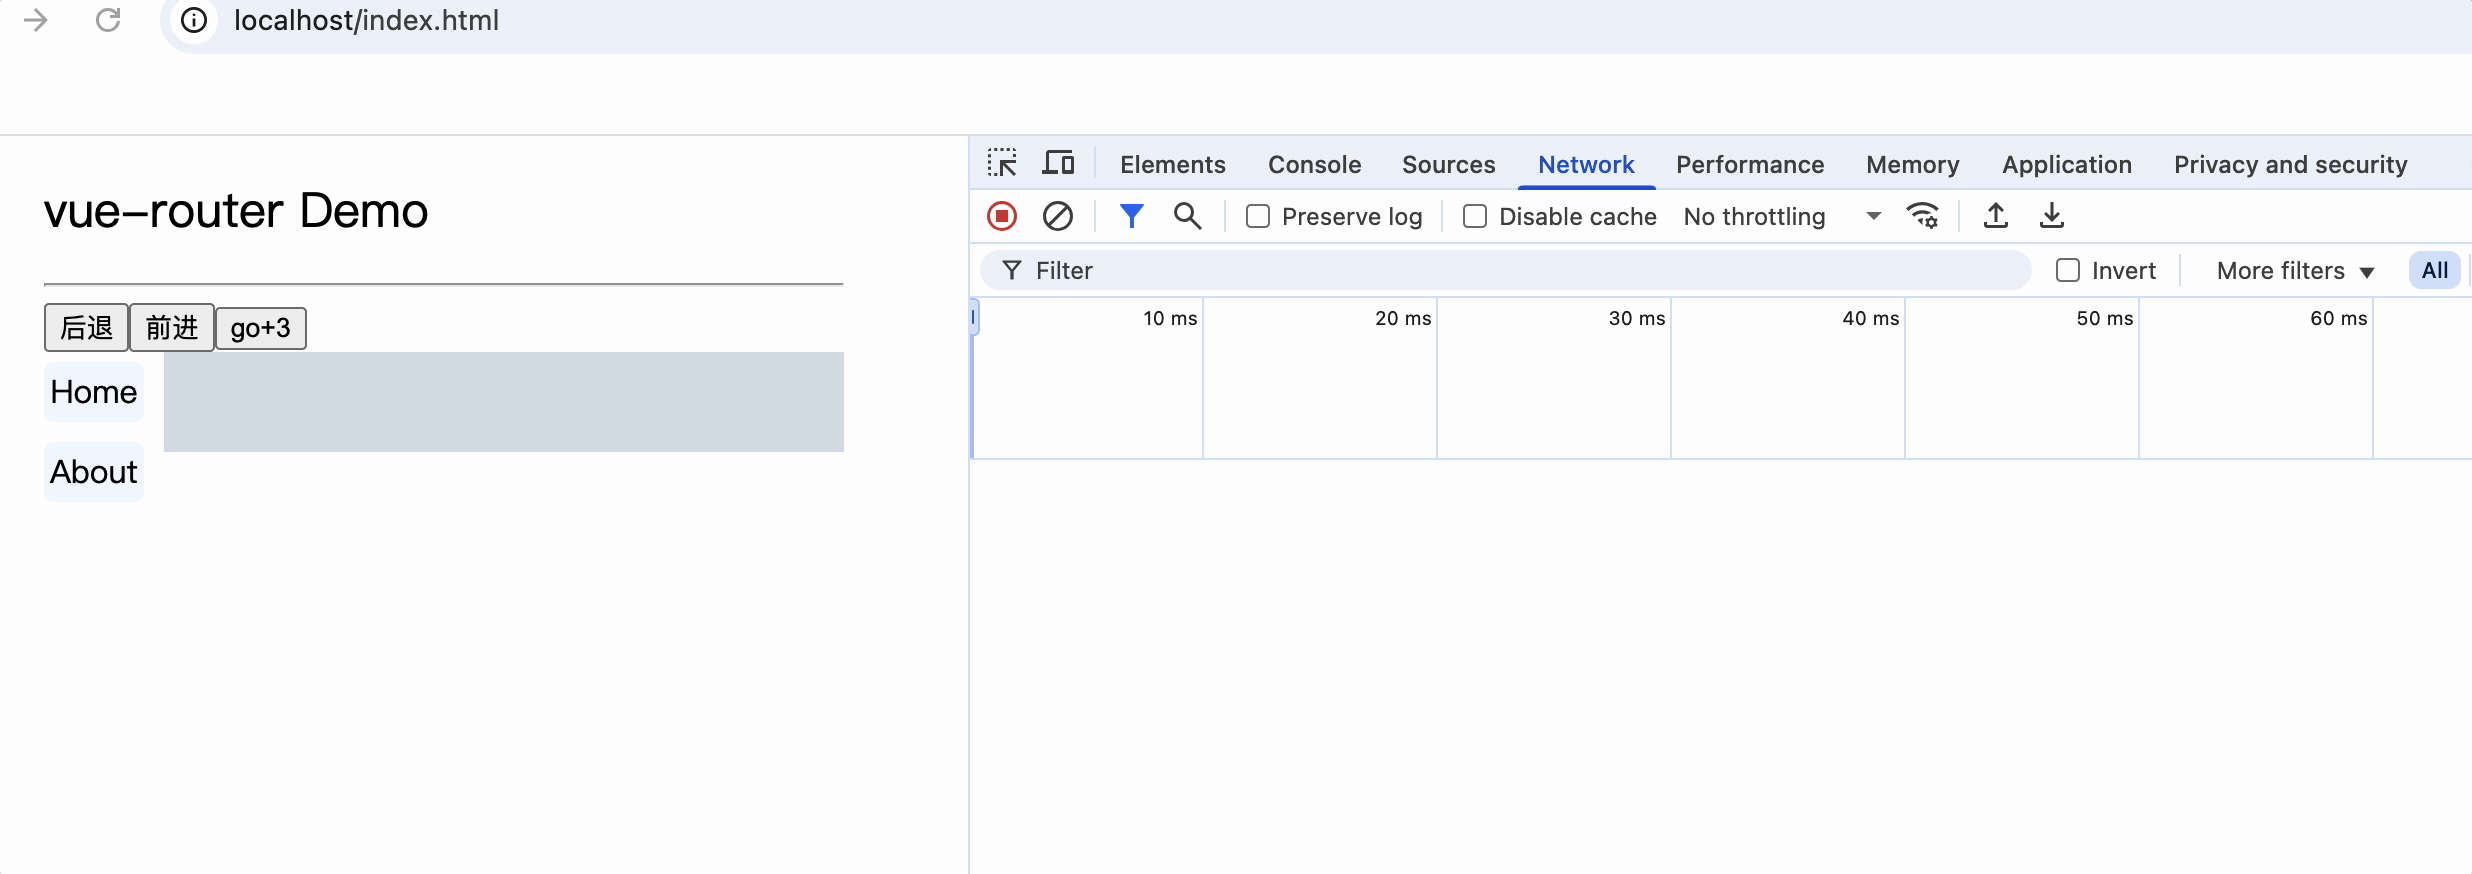
因此history模式下,需要服务端配合过滤掉是页面的路径,需要区分api资源和前端页面资源
使用nginx解决资源找不到的问题
将打包好的静态资源放到nginx中
nginx监听80端口
try_files $uri $uri/ /index.html;: 关键配置,尝试按顺序查找文件,如果找不到则重定向到index.html
server {
listen 80;
listen [::]:80;
server_name localhost;
access_log /var/log/nginx/host.access.log main;
location / {
root /usr/share/nginx/html;
index index.html index.htm;
# 关键配置:尝试按顺序查找文件,如果找不到则重定向到index.html
try_files $uri $uri/ /index.html;
}
error_page 500 502 503 504 /50x.html;
location = /50x.html {
root /usr/share/nginx/html;
}
}
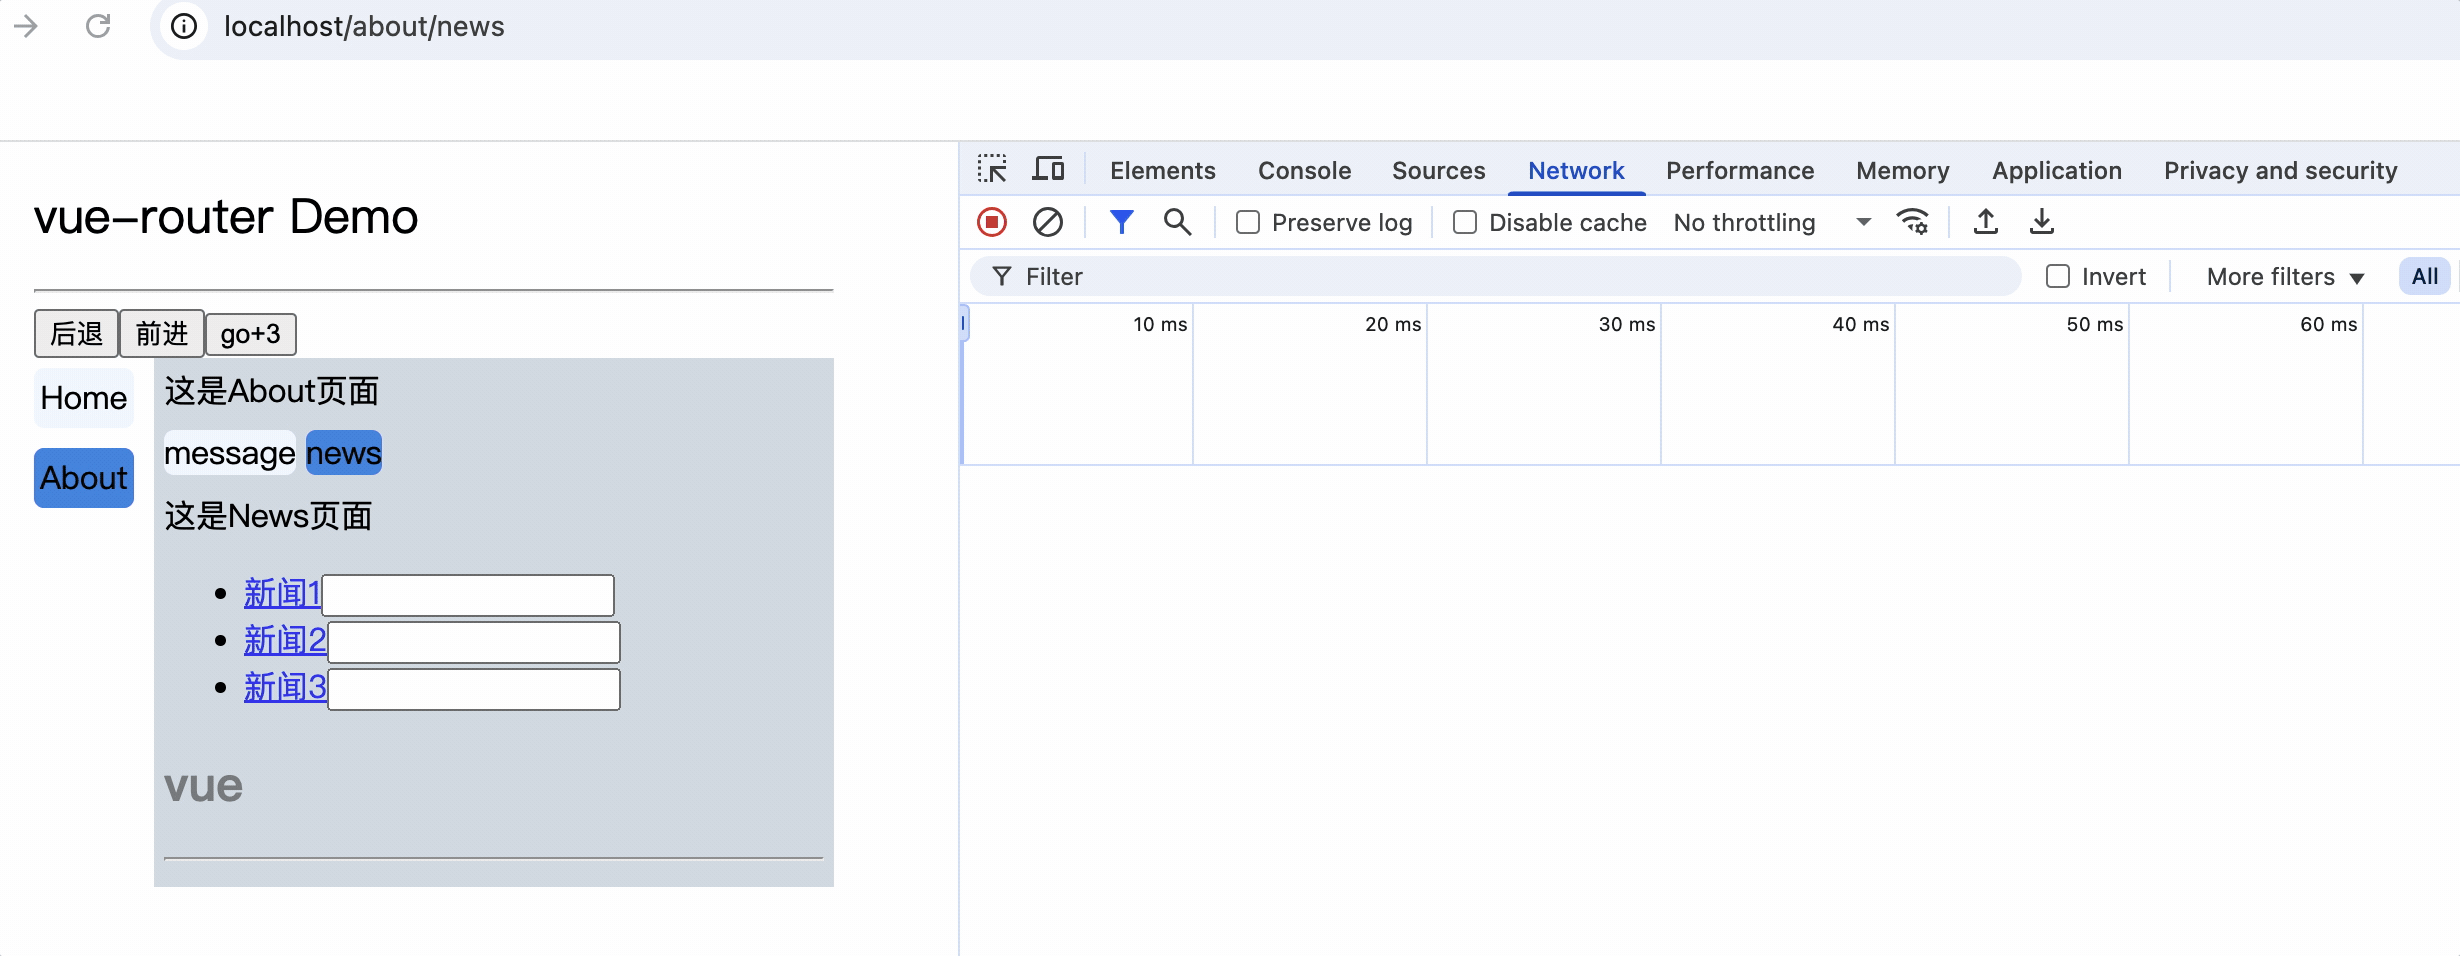
总结
1.hash模式: 浏览器地址栏中会显示#,hash模式下,路由地址中会带有#,如http://localhost:8080/#/home
2.history模式: 浏览器地址栏中不会显示#,如http://localhost:8080/home
3.history模式地址栏干净美观,生产会环境应使用history模式,且需要解服务端解决刷新浏览器导致的404问题
UI组件库
移动端:
1.Vant
2.Mint UI
3.CubeUI
PC端:
1.Element UI
2.IView UI
Element UI
1.安装
npm i element-ui -s
-s: --save 的缩写,表示将安装的包添加到 package.json 文件的 dependencies 部分
2.引入
import Vue from 'vue';
import ElementUI from 'element-ui';
import 'element-ui/lib/theme-chalk/index.css';
Vue.use(ElementUI);
3.使用
<el-button type="primary">主要按钮</el-button>
按需引入
按需引入: 只引入需要的组件,减少打包体积,提高加载速度
1.安装babel-plugin-component
npm i babel-plugin-component -D
2.配置babel.config.js
module.exports = {
presets: [
['@babel/preset-env', { modules: false }],
],
plugins: [
[
'component',
{
libraryName: 'element-ui',
styleLibraryName: 'theme-chalk',
},
],
],
};
3.引入需要的组件
import Vue from 'vue';
import { Button, Select, Option } from 'element-ui';
Vue.component(Button.name, Button);
Vue.component(Select.name, Select);
Vue.component(Option.name, Option);
4.使用
<template>
<div>
<el-button type="primary">主要按钮</el-button>
<el-select v-model="value" placeholder="请选择">
<el-option v-for="item in options" :key="item.value" :label="item.label" :value="item.value"></el-option>
</el-select>
</div>
</template>
<script>
export default {
data() {
return {
options: [
{
value: '选项1',
label: '黄金糕',
},
{
value: '选项2',
label: '双皮奶',
},
{
value: '选项3',
label: '蚵仔煎',
},
{
value: '选项4',
label: '龙须面',
},
{
value: '选项5',
label: '北京烤鸭',
},
],
value: '',
};
},
};
</script>

 浙公网安备 33010602011771号