049_jQuery 操作标签
一,jQuery操作标签
1,操作 class 类
1.1,操作 class 类
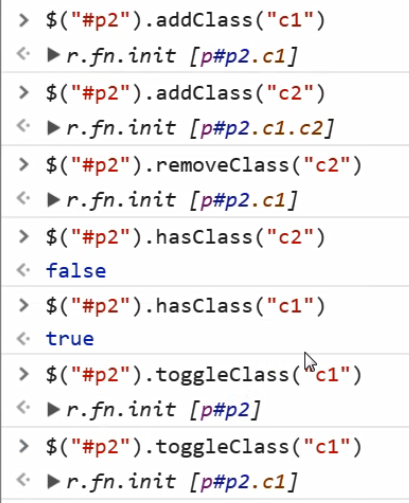
addClass("c1")		// 添加指定的CSS类名。
removeClass("c1")	// 移除指定的CSS类名。
hasClass("c1")		// 判断样式存不存在
toggleClass("c1")	// 切换CSS类名,如果有就移除,如果没有就添加。


<!DOCTYPE html>
<html lang="zh-CN">
<head>
    <meta charset="UTF-8">
    <title>样式操作示例</title>
    <style>
        .c1 {
            height: 200px;
            width: 200px;
            border-radius: 50%;
            background-color: red;
        }
        .c2 {
            background-color: green;
        }
    </style>
</head>
<body>

<div class="c1"></div>

<script src="jquery-3.2.1.min.js"></script>
<script>
    // 找标签
    $("div.c1").click(function () {
        // console.log(this);  // this是DOM对象
        $(this).toggleClass("c2"); // 有就删掉 没有就加上
    })
</script>
</body>
</html>
<!DOCTYPE html>
<html lang="zh-CN">
<head>
    <meta charset="UTF-8">
    <title>自定义模态框示例</title>
    <style>
        .cover {
            position: absolute;
            top: 0;
            right: 0;
            bottom: 0;
            left: 0;
            background-color: rgba(0,0,0,0.4);
            z-index: 998;
        }

        .modal {
            height: 400px;
            width: 600px;
            background-color: white;
            position: absolute;
            top: 50%;
            left: 50%;
            margin-left: -300px;
            margin-top: -200px;
            z-index: 1000;
        }
        .hide {
            display: none;
        }
    </style>
</head>
<body>
<button id="b1">屠龙宝刀,点击就送!</button>
<div class="cover hide"></div>
<div class="modal hide">
    <form>
        <p>
            <label>用户名:
                <input type="text">
            </label>
        </p>
        <p>
            <label>密码:
                <input type="password">
            </label>
        </p>
        <p>
            <input type="submit" value="登录">
            <input id="cancel" type="button" value="取消">
        </p>
    </form>
</div>
<script src="jquery-3.2.1.min.js"></script>
<script>
    // 找到点击弹出模态框的按钮
    $("#b1").click(function () {
        // 把.cover和.modal显示出来(去除掉.hide)
        $(".cover").removeClass("hide");  // 显示背景
        $(".modal").removeClass("hide"); // 显示模态框
    });

    // 找到取消按钮,绑定事件
    $("#cancel").click(function () {
        // 给背景和模态框都加上hide类
        $(".cover").addClass("hide");
        $(".modal").addClass("hide");
    })
</script>
</body>
</html>
1.2,通过 CSS
css("color","red")//DOM操作:tag.style.color="red"
示例
$("p").css("color", "red"); //将所有p标签的字体设置为红色
2,位置操作
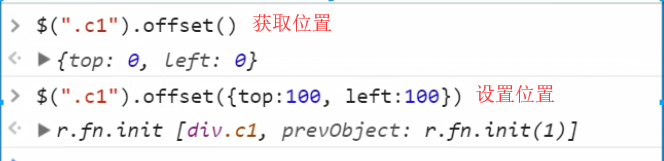
offset()	// 获取匹配元素在当前窗口的相对偏移或设置元素位置
position()	// 获取匹配元素相对父元素的偏移
scrollTop()	// 获取匹配元素相对滚动条顶部的偏移
scrollLeft()// 获取匹配元素相对滚动条左侧的偏移
.offset()方法允许我们检索一个元素相对于文档(document)的当前位置。和 .position()的差别在于: .position()是相对于相对于父级元素的位移。
实例:
<1>
<2>
<!DOCTYPE html>
<html lang="zh-CN">
<head>
    <meta charset="UTF-8">
    <title>位置相关方法</title>
    <style>
        * {
            margin: 0;
            padding: 0;
        }
        .c1,
        .c2,
        .c3{
            height: 100px;
            width: 100px;
            background-color: red;
        }

        .c2 {
            position: relative;
            left: 200px;
            top: 200px;
            background-color: green;
        }
        .c3 {
            position: absolute;
            left: 100px;
            top: 100px;
            background-color: blue;
        }
    </style>
</head>
<body>

<div class="c1">我是div</div>
<div class="c2">
    <div class="c3">我是c3</div>
</div>

<script src="jquery-3.2.1.min.js"></script>
</body>
</html>

<3>
<!DOCTYPE html>
<html lang="zh-CN">
<head>
  <meta charset="UTF-8">
  <meta http-equiv="x-ua-compatible" content="IE=edge">
  <meta name="viewport" content="width=device-width, initial-scale=1">
  <title>位置相关示例之返回顶部</title>
  <style>
       * {
           margin: 0;
       }
    .c1 {
      width: 100px;
      height: 200px;
      background-color: red;
    }

    .c2 {
      height: 50px;
      width: 50px;

      position: fixed;
      bottom: 15px;
      right: 15px;
      background-color: #2b669a;
    }
    .hide {
      display: none;
    }
    .c3 {
      height: 100px;
    }
  </style>
</head>
<body>
<button id="b1" class="btn btn-default">点我</button>
<div class="c1"></div>
<div class="c3">1</div>
<div class="c3">2</div>
<div class="c3">3</div>
<div class="c3">4</div>
<div class="c3">5</div>
<div class="c3">6</div>
<div class="c3">7</div>
<div class="c3">8</div>
<div class="c3">9</div>
<div class="c3">10</div>
<div class="c3">11</div>
<div class="c3">12</div>
<div class="c3">13</div>
<div class="c3">14</div>
<div class="c3">15</div>
<div class="c3">16</div>
<div class="c3">17</div>
<div class="c3">18</div>
<div class="c3">19</div>
<div class="c3">20</div>
<div class="c3">21</div>
<div class="c3">22</div>
<div class="c3">23</div>
<div class="c3">24</div>
<div class="c3">25</div>
<div class="c3">26</div>
<div class="c3">27</div>
<div class="c3">28</div>
<div class="c3">29</div>
<div class="c3">30</div>
<div class="c3">31</div>
<div class="c3">32</div>
<div class="c3">33</div>
<div class="c3">34</div>
<div class="c3">35</div>
<div class="c3">36</div>
<div class="c3">37</div>
<div class="c3">38</div>
<div class="c3">39</div>
<div class="c3">40</div>
<div class="c3">41</div>
<div class="c3">42</div>
<div class="c3">43</div>
<div class="c3">44</div>
<div class="c3">45</div>
<div class="c3">46</div>
<div class="c3">47</div>
<div class="c3">48</div>
<div class="c3">49</div>
<div class="c3">50</div>
<div class="c3">51</div>
<div class="c3">52</div>
<div class="c3">53</div>
<div class="c3">54</div>
<div class="c3">55</div>
<div class="c3">56</div>
<div class="c3">57</div>
<div class="c3">58</div>
<div class="c3">59</div>
<div class="c3">60</div>
<div class="c3">61</div>
<div class="c3">62</div>
<div class="c3">63</div>
<div class="c3">64</div>
<div class="c3">65</div>
<div class="c3">66</div>
<div class="c3">67</div>
<div class="c3">68</div>
<div class="c3">69</div>
<div class="c3">70</div>
<div class="c3">71</div>
<div class="c3">72</div>
<div class="c3">73</div>
<div class="c3">74</div>
<div class="c3">75</div>
<div class="c3">76</div>
<div class="c3">77</div>
<div class="c3">78</div>
<div class="c3">79</div>
<div class="c3">80</div>
<div class="c3">81</div>
<div class="c3">82</div>
<div class="c3">83</div>
<div class="c3">84</div>
<div class="c3">85</div>
<div class="c3">86</div>
<div class="c3">87</div>
<div class="c3">88</div>
<div class="c3">89</div>
<div class="c3">90</div>
<div class="c3">91</div>
<div class="c3">92</div>
<div class="c3">93</div>
<div class="c3">94</div>
<div class="c3">95</div>
<div class="c3">96</div>
<div class="c3">97</div>
<div class="c3">98</div>
<div class="c3">99</div>
<div class="c3">100</div>

<button id="b2" class="btn btn-default c2 hide">返回顶部</button>
<script src="jquery-3.2.1.min.js"></script>
<script>
  $(window).scroll(function () {
    if ($(window).scrollTop() > 100) {
      $("#b2").removeClass("hide");
    }else {
      $("#b2").addClass("hide");
    }
  });
  $("#b2").click(function () {
    $(window).scrollTop(0);
  })
</script>
</body>
</html>
3,尺寸
height()	//内容区域的高和宽
width()
innerHeight()	//内容区域加padding(内边距)
innerWidth()
outerHeight()	//内容区域+padding+border(边框)
outerWidth()
实例:
<!DOCTYPE html>
<html lang="zh-CN">
<head>
    <meta charset="UTF-8">
    <title>尺寸示例</title>
    <style>
        .c1 {
            height: 100px;
            width: 200px;
            padding: 10px;
            margin: 20px;
            background-color: red;
            border: 5px solid green;
        }
    </style>
</head>
<body>

<div>
    <div class="c1">div</div>
</div>
<script src="jquery-3.2.1.min.js"></script>
</body>
</html>

4,文本操作
4.1,HTML代码
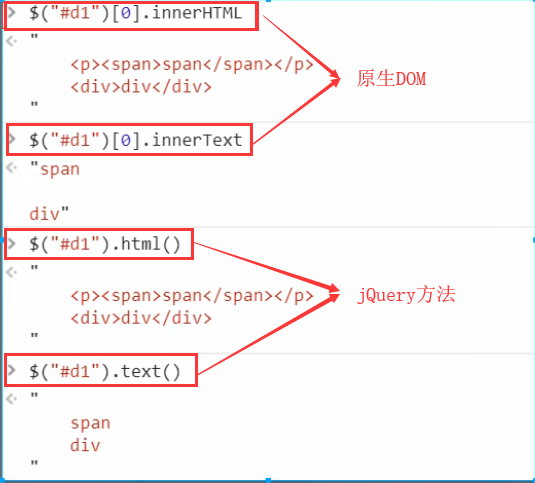
html() // 取得第一个匹配元素的html内容
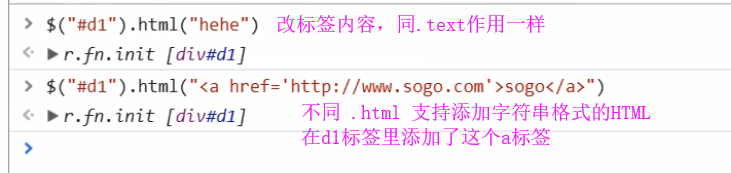
html(val)// 设置所有匹配元素的html内容
4.2,文本值
text()		// 取得所有匹配元素的文本内容
text(val)	// 设置所有匹配元素的文本内容
4.3,值
val()		// 取得第一个匹配元素的当前值
val(val)	// 设置所有匹配元素的值
val([val1, val2])// 设置多选的checkbox、多选select的值
4.3.1,获取输入框中填写的内容:

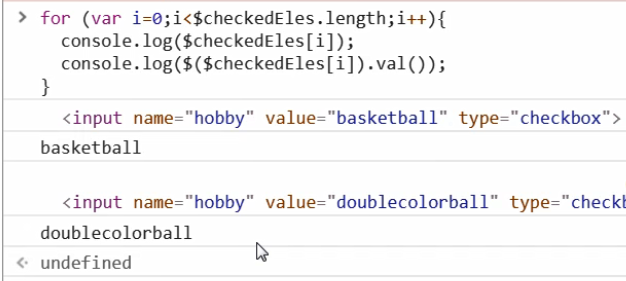
4.3.2,获取符合条件的所有值
将获取到的所有符合条件的通过for循环在分贝 .var()
![]()
4.3.3,设置值 checkbox select 的值
<input type="checkbox" value="basketball" name="hobby">篮球
<input type="checkbox" value="football" name="hobby">足球

<select multiple id="s1">
    <option value="1">1</option>
    <option value="2">2</option>
    <option value="3">3</option>
</select>
设置
$("[name='hobby']").val(['basketball', 'football']);
$("#s1").val(["1", "2"])
4.3.4,自定义登录校验示例
<!DOCTYPE html>
<html lang="zh-CN">
<head>
  <meta charset="UTF-8">
  <meta http-equiv="x-ua-compatible" content="IE=edge">
  <meta name="viewport" content="width=device-width, initial-scale=1">
  <title>文本操作之登录验证</title>
  <style>
    .error {
      color: red;
    }
  </style>
</head>
<body>

<form action="">
  <div>
    <label for="input-name">用户名</label>
    <input type="text" id="input-name" name="name">
    <span class="error"></span>
  </div>
  <div>
    <label for="input-password">密码</label>
    <input type="password" id="input-password" name="password">
    <span class="error"></span>
  </div>
  <div>
    <input type="button" id="btn" value="提交">
  </div>
</form>
<script src="https://cdn.bootcss.com/jquery/3.2.1/jquery.min.js"></script>
<script>
  $("#btn").click(function () {
    var username = $("#input-name").val();
    var password = $("#input-password").val();

    if (username.length === 0) {
      $("#input-name").siblings(".error").text("用户名不能为空");
    }
    if (password.length === 0) {
      $("#input-password").siblings(".error").text("密码不能为空");
    }
  })
</script>
</body>
</html>
5,属性操作
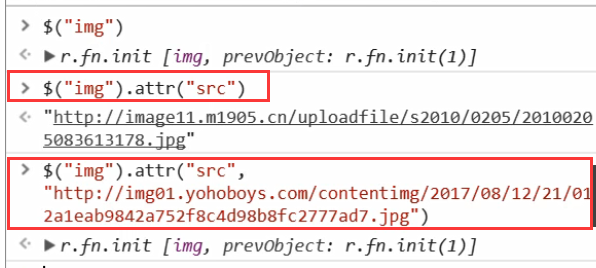
5.1,用于ID等或自定义属性:
.attr("attrName") // 返回第一个匹配元素的属性值
.attr("attrName", "attrValue")// 为所有匹配元素设置一个属性值
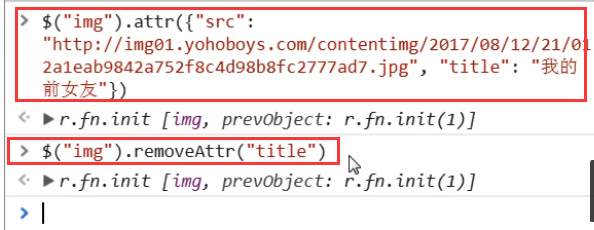
.attr({"k1": "v1", "k2":"v2"}) // 为所有匹配元素设置多个属性值
.removeAttr("attrName") // 从每一个匹配的元素中删除一个属性
// attrName 是标签属性名
<!DOCTYPE html>
<html lang="zh-CN">
<head>
    <meta charset="UTF-8">
    <title>属性操作</title>
</head>
<body>

<img src="http://image11.m1905.cn/uploadfile/s2010/0205/20100205083613178.jpg" alt="">
<input type="button" id="b1" value="下一个">


<input checked type="checkbox" id="c1">
<input type="checkbox" id="c2">

<script src="jquery-3.2.1.min.js"></script>
<script>
    var oldURL;
    var newURL = "http://img01.yohoboys.com/contentimg/2017/08/12/21/012a1eab9842a752f8c4d98b8fc2777ad7.jpg"
    $("#b1").click(function () {
        var $imgEles = $("img");
        // 修改img标签的src属性
        oldURL = $imgEles.attr("src");
        $imgEles.attr("src", newURL);
        newURL = oldURL;
    });

</script>
</body>
</html>
5.2,用于 checkbox 和 radio 的属性操作
.prop("属性") 	// 获取属性
.prop("属性", 布尔值)// 设置值
.removeProp("属性") // 移除属性

特别注意:
在1.x及2.x版本的 jQuery 中使用 attr 对 checkbox 进行赋值操作时会出bug,在3.x版本的 jQuery 中则没有这个问题。为了兼容性,我们在处理 checkbox 和 radio 的时候尽量使用特定的 prop(),不要使用 attr("checked", "checked")。
<input type="checkbox" value="1">
<input type="radio" value="2">
<script>
  $(":checkbox[value='1']").prop("checked", true);
  $(":radio[value='2']").prop("checked", true);
</script>
5.3,prop和attr的区别:
attr 全称 attribute(属性)
prop 全称 property(属性)
虽然都是属性,但他们所指的属性并不相同,attr 所指的属性是 HTML 标签属性,而 prop 所指的是 DOM 对象属性,可以认为 attr 是显式的,而 prop 是隐式的。
举个例子
<input type="checkbox" id="i1" value="1">
针对上面的代码
$("#i1").attr("checked")  // undefined
$("#i1").prop("checked")  // false
可以看到attr获取一个标签内没有的东西会得到undefined,而prop获取的是这个DOM对象的属性,因此checked为false。
如果换成下面的代码:
<input type="checkbox" checked id="i1" value="1">
再执行:
$("#i1").attr("checked")   // checked
$("#i1").prop("checked")  // true
这已经可以证明attr的局限性,它的作用范围只限于HTML标签内的属性,而prop获取的是这个DOM对象的属性,选中返回true,没选中返回false。
接下来再看一下针对自定义属性,attr和prop又有什么区别:
<input type="checkbox" checked id="i1" value="1" me="自定义属性">
执行以下代码:
$("#i1").attr("me")   // "自定义属性"
$("#i1").prop("me")  // undefined
可以看到prop不支持获取标签的自定义属性。
总结一下:
- 对于标签上有的能看到的属性和自定义属性都用attr
- 对于返回布尔值的比如checkbox、radio和option的是否被选中都用prop。
<!DOCTYPE html>
<html lang="zh-CN">
<head>
    <meta charset="UTF-8">
    <title>作业需求分析</title>
</head>
<body>

<table border="1">
    <thead>
    <tr>
        <th>#</th>
        <th>姓名</th>
        <th>职位</th>
    </tr>
    </thead>
    <tbody>
    <tr>
        <td><input type="checkbox"></td>
        <td>小东北</td>
        <td>二人转演员</td>
    </tr>
    <tr>
        <td><input type="checkbox"></td>
        <td>乔小强</td>
        <td>xx演员</td>
    </tr>
    <tr>
        <td><input type="checkbox"></td>
        <td>韩涉</td>
        <td>导演</td>
    </tr>
    </tbody>
</table>

<input type="button" id="b1" value="全选">
<input type="button" id="b2" value="反选">
<input type="button" id="b3" value="取消">

<script src="jquery-3.2.1.min.js"></script>
<script>
    // 点击全选,表格中所有的checkbox都选中
    // 1. 找checkbox
    // 2. 全部选中  --> prop("checked", true);

    // 点击取消
    // 1. 找checkbox
    // 2. 全部取消选中  --> prop("checked", false);


    // 反选
    // 1. 找到所有的checkbox
    // 2. 判断
    // 2.1 原来没选中的,要选中
    // 2.2 原来选中的,要取消选中
</script>
</body>
</html>
<!DOCTYPE html>
<html lang="zh-CN">
<head>
    <meta charset="UTF-8">
    <title>作业需求分析</title>
</head>
<body>

<table border="1">
    <thead>
    <tr>
        <th>#</th>
        <th>姓名</th>
        <th>职位</th>
    </tr>
    </thead>
    <tbody>
    <tr>
        <td><input type="checkbox"></td>
        <td>小东北</td>
        <td>二人转演员</td>
    </tr>
    <tr>
        <td><input type="checkbox"></td>
        <td>乔小强</td>
        <td>xx演员</td>
    </tr>
    <tr>
        <td><input type="checkbox"></td>
        <td>韩涉</td>
        <td>导演</td>
    </tr>
    </tbody>
</table>

<input type="button" id="b1" value="全选">
<input type="button" id="b2" value="反选">
<input type="button" id="b3" value="取消">

<script src="jquery-3.2.1.min.js"></script>
<script>
    // 点击全选,表格中所有的checkbox都选中
    // 1. 找checkbox
    // 2. 全部选中  --> prop("checked", true);
    $("#b1").click(function () {
        $(":checkbox").prop("checked", true);
    });

    // 点击取消
    // 1. 找checkbox
    // 2. 全部取消选中  --> prop("checked", false);
   $("#b3").click(function () {
        $(":checkbox").prop("checked", false);
    });

    // 反选
    // 1. 找到所有的checkbox
    // 2. 判断
    // 2.1 原来没选中的,要选中
    // 2.2 原来选中的,要取消选中
       $("#b2").click(function () {
           // 找到所有的checkbox,把它们保存在一个名叫 $checkboxEles 的变量中,方便后面使用
           var $checkboxEles = $(":checkbox");
           // 遍历所有的checkbox,根据每一个checkbox的状态做不同的操作
           for (var i=0;i<$checkboxEles.length;i++){
               // 把每一个checkbox包成jQuery对象
               var $tmp = $($checkboxEles[i]);
               // 如果 checkbox是选中的
               if ($tmp.prop("checked")){
                   // 取消选中
                   $tmp.prop("checked", false);
               }else {
                   // 否则就选中
                   $tmp.prop("checked", true);
               }
           }
    });

</script>
</body>
</html>
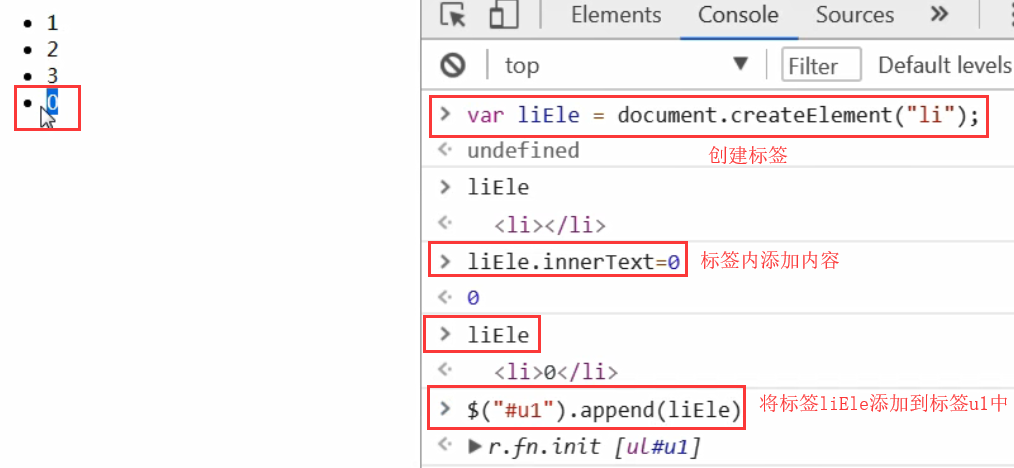
6,文档操作
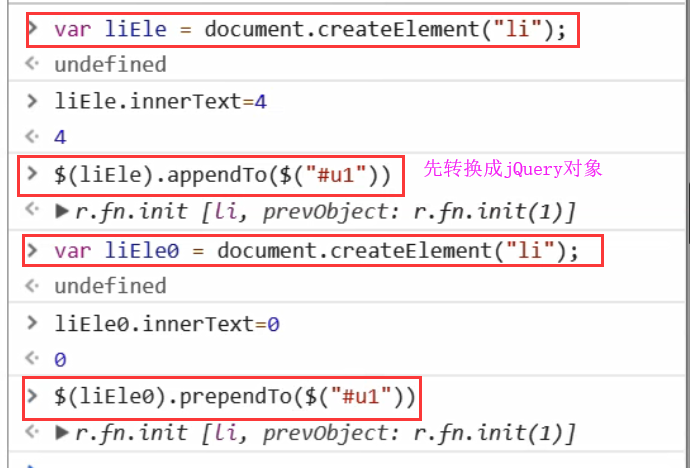
6.1,添加到指定元素 内部 的后面
$(A).append(B)// 把B追加到A
$(A).appendTo(B)// 把A追加到B
6.2,添加到指定元素 内部 的前面
$(A).prepend(B)// 把B前置到A
$(A).prependTo(B)// 把A前置到B
6.3,添加到指定元素 外部 的后面
$(A).after(B)// 把B放到A的后面
$(A).insertAfter(B)// 把A放到B的后面
6.4,添加到指定元素 外部 的前面
$(A).before(B)// 把B放到A的前面
$(A).insertBefore(B)// 把A放到B的前面
6.5,移除 和 清空元素
$(A).remove()// 从DOM中删除所有匹配的元素。
$(A).empty()// 删除匹配的元素集合中所有内容。
例子:
点击按钮在表格添加一行数据
点击每一行的删除按钮删除当前行数据
<!DOCTYPE html>
<html lang="zh-CN">
<head>
    <meta charset="UTF-8">
    <title>点击在表格最后添加一条记录</title>
</head>
<body>
<table border="1" id="t1">
    <thead>
    <tr>
        <th>#</th>
        <th>姓名</th>
        <th>爱好</th>
        <th>操作</th>
    </tr>
    </thead>
    <tbody>
    <tr>
        <td>1</td>
        <td>小强</td>
        <td>吃冰激凌</td>
        <td>
            <button class="delete">删除</button>
        </td>
    </tr>
    <tr>
        <td>2</td>
        <td>二哥</td>
        <td>Girl</td>
        <td>
            <button class="delete">删除</button>
        </td>
    </tr>

    </tbody>
</table>

<button id="b1">添加一行数据</button>
<script src="jquery-3.2.1.min.js"></script>
<script>
    // 绑定事件
    $("#b1").click(function () {
        // 生成要添加的tr标签及数据
        var trEle = document.createElement("tr");
        $(trEle).html("<td>3</td>" +
            "<td>小东北</td>" +
            "<td>社会摇</td>" +
            "<td><button class='delete'>删除</button></td>");
        // 把生成的tr插入到表格中
        $("#t1").find("tbody").append(trEle);
    });

    // 每一行的=删除按钮绑定事件
    $(".delete").click(function () {
        $(this).parent().parent().remove();
    });

</script>
</body>
</html>
6.6,替换
var imgEle = document.createElement("img")
$("a").replaceWith(imgEle)	//用 imgEle 替换所有的a标签
$(imgEle).replaceAll("a")	//用 imgEle 替换所有的a标签
6.7,克隆
$(A).clone() //克隆标签本身
$(A).clone(true) //克隆标签本身 和 绑定的事件
注意:克隆的时候如果标签设置的有 id 克隆的标签也是同样的,所以克隆时尽量不要加 id 而是设置一个类
示例:
<!DOCTYPE html>
<html lang="zh-CN">
<head>
  <meta charset="UTF-8">
  <meta http-equiv="x-ua-compatible" content="IE=edge">
  <meta name="viewport" content="width=device-width, initial-scale=1">
  <title>克隆</title>
  <style>
    #b1 {
      background-color: deeppink;
      padding: 5px;
      color: white;
      margin: 5px;
    }
    #b2 {
      background-color: dodgerblue;
      padding: 5px;
      color: white;
      margin: 5px;
    }
  </style>
</head>
<body>

<button id="b1">屠龙宝刀,点击就送</button>
<hr>
<button id="b2">屠龙宝刀,点击就送</button>

<script src="jquery-3.2.1.min.js"></script>
<script>
  // clone方法不加参数true,克隆标签但不克隆标签带的事件
  $("#b1").on("click", function () {
    $(this).clone().insertAfter(this);
  });
  // clone方法加参数true,克隆标签并且克隆标签带的事件
  $("#b2").on("click", function () {
    $(this).clone(true).insertAfter(this);
  });
</script>
</body>
</html>

 浙公网安备 33010602011771号