Istio微服务架构初试
感谢
http://blog.csdn.net/qq_34463875/article/details/77866072
看了一些文档,有些半懂不懂,所以还是需要helloworld一下。因为istio需要kubernetes 1.7的环境,所以又把环境重新安装了一边,详情看随笔。
文章比较少,我也遇到不少问题,基本还是出于对一些东西的理解不够深刻,踩坑下来也算是学习啦。
重要事情先说一次
1.Kube-apiserver需要打开ServiceAccount配置
2.Kube-apiserver需要配置ServiceAccount
3.集群需要配置DNS
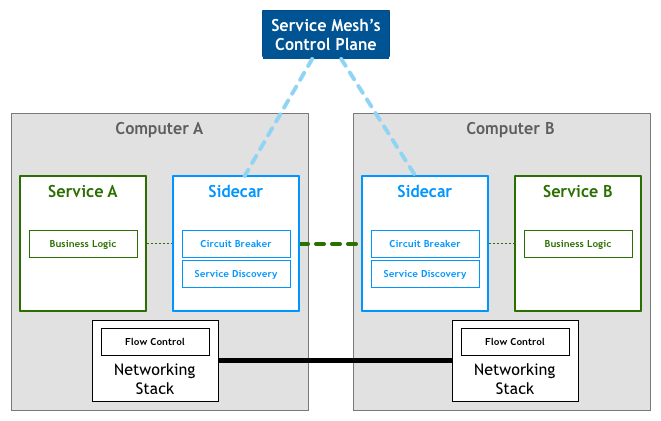
架构
理解微服务架构,就不得不提目前很火热的一个概念,服务网络。
Service Mesh是专用的基础设施层。
轻量级高性能网络代理。
提供安全的、快速的、可靠地服务间通讯。
与实际应用部署一起,但对应用透明。
应用作为服务的发起方,只需要用最简单的方式将请求发送给本地的服务网格代理,然后网格代理会进行后续的操作,如服务发现,负载均衡,最后将请求转发给目标服务。
先看一张Service Mesh的架构图
Istio 首先是一个服务网络,但是Istio又不仅仅是服务网格: 在 Linkerd, Envoy 这样的典型服务网格之上,Istio提供了一个完整的解决方案,为整个服务网格提供行为洞察和操作控制,以满足微服务应用程序的多样化需求。
Istio在服务网络中统一提供了许多关键功能(以下内容来自官方文档):
-
流量管理:控制服务之间的流量和API调用的流向,使得调用更可靠,并使网络在恶劣情况下更加健壮。
-
可观察性:了解服务之间的依赖关系,以及它们之间流量的本质和流向,从而提供快速识别问题的能力。
-
策略执行:将组织策略应用于服务之间的互动,确保访问策略得以执行,资源在消费者之间良好分配。策略的更改是通过配置网格而不是修改应用程序代码。
-
服务身份和安全:为网格中的服务提供可验证身份,并提供保护服务流量的能力,使其可以在不同可信度的网络上流转。
除此之外,Istio针对可扩展性进行了设计,以满足不同的部署需要:
-
平台支持:Istio旨在在各种环境中运行,包括跨云, 预置,Kubernetes,Mesos等。最初专注于Kubernetes,但很快将支持其他环境。
-
集成和定制:策略执行组件可以扩展和定制,以便与现有的ACL,日志,监控,配额,审核等解决方案集成。
这些功能极大的减少了应用程序代码,底层平台和策略之间的耦合,使微服务更容易实现。
istio架构图
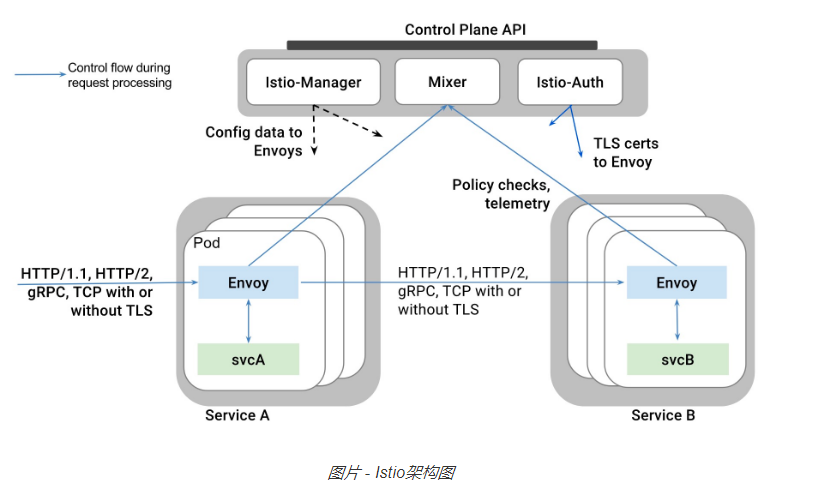
Istio的关键功能包括:
- HTTP/1.1,HTTP/2,gRPC和TCP流量的自动区域感知负载平衡和故障切换。
- 通过丰富的路由规则,容错和故障注入,对流行为的细粒度控制。
- 支持访问控制,速率限制和配额的可插拔策略层和配置API。
- 集群内所有流量的自动量度,日志和跟踪,包括集群入口和出口。
- 安全的服务到服务身份验证,在集群中的服务之间具有强大的身份标识。
安装
下载地址 https://github.com/istio/istio/releases
我下载的是0.1.6版本。 https://github.com/istio/istio/releases/download/0.1.6/istio-0.1.6-linux.tar.gz
解压,然后下载镜像,涉及镜像包括
- istio/mixer:0.1.6
- pilot:0.1.6
- proxy_debug:0.1.6
- istio-ca:0.1.6
[root@node1 ~]# docker images
REPOSITORY                                                               TAG                  IMAGE ID            CREATED             SIZE
docker.io/tomcat                                                         9.0-jre8             e882239f2a28        2 weeks ago         557.3 MB
docker.io/alpine                                                         latest               053cde6e8953        3 weeks ago         3.962 MB
registry.cn-hangzhou.aliyuncs.com/szss_k8s/k8s-dns-sidecar-amd64         1.14.5               fed89e8b4248        8 weeks ago         41.81 MB
registry.cn-hangzhou.aliyuncs.com/szss_k8s/k8s-dns-kube-dns-amd64        1.14.5               512cd7425a73        8 weeks ago         49.38 MB
registry.cn-hangzhou.aliyuncs.com/szss_k8s/k8s-dns-dnsmasq-nanny-amd64   1.14.5               459944ce8cc4        8 weeks ago         41.42 MB
gcr.io/google_containers/exechealthz                                     1.0                  82a141f5d06d        20 months ago       7.116 MB
gcr.io/google_containers/kube2sky                                        1.14                 a4892326f8cf        21 months ago       27.8 MB
gcr.io/google_containers/etcd-amd64                                      2.2.1                3ae398308ded        22 months ago       28.19 MB
gcr.io/google_containers/skydns                                          2015-10-13-8c72f8c   718809956625        2 years ago         40.55 MB
docker.io/kubernetes/pause                                               latest               f9d5de079539        3 years ago         239.8 kB
docker.io/istio/istio-ca                                                 0.1.6                c25b02aba82d        292 years ago       153.6 MB
docker.io/istio/mixer                                                    0.1.6                1f4a2ce90af6        292 years ago       158.9 MB
docker.io/istio/proxy_debug                                              0.1                  5623de9317ff        292 years ago       825 MB
docker.io/istio/proxy_debug                                              0.1.6                5623de9317ff        292 years ago       825 MB
docker.io/istio/pilot                                                    0.1.6                e0c24bd68c04        292 years ago       144.4 MB
docker.io/istio/init                                                     0.1                  0cbd83e9df59        292 years ago       119.3 MB
进入istio.yaml后先把pullPolicy给修改了
imagePullPolicy: IfNotPresent
然后运行
kubectl create     -f istio-rbac-beta.yaml

kubectl create     -f istio.yaml
此处遇到无数问题,都和环境不ready相关
1.Kube-apiserver需要打开ServiceAccount配置
2.Kube-apiserver需要配置ServiceAccount
3.集群需要配置DNS
运行起来后一看service
[root@k8s-master kubernetes]# kubectl get services
NAME            CLUSTER-IP       EXTERNAL-IP   PORT(S)                       AGE
helloworldsvc   10.254.145.112   <none>        8080/TCP                      47m
istio-egress    10.254.164.118   <none>        80/TCP                        14h
istio-ingress   10.254.234.8     <pending>     80:32031/TCP,443:32559/TCP    14h
istio-mixer     10.254.227.198   <none>        9091/TCP,9094/TCP,42422/TCP   14h
istio-pilot     10.254.15.121    <none>        8080/TCP,8081/TCP             14h
kubernetes      10.254.0.1       <none>        443/TCP                       1d
tool            10.254.87.52     <none>        8080/TCP                      44m
这个ingress服务一直处于pending状态,后来查了半天说和是否支持外部负载均衡有关,暂时不理。
准备测试应用
建立PV和PVC,初步设想是准备一个tomcat镜像,然后放上HelloWorld应用
[root@k8s-master ~]# cat pv.yaml
apiVersion: v1
kind: PersistentVolume
metadata:
    name: pv0003
spec:
    capacity:
      storage: 1Gi
    accessModes:
      - ReadWriteOnce
    persistentVolumeReclaimPolicy: Recycle
    hostPath:
      path: /webapps
[root@k8s-master ~]# cat pvc.yaml
kind: PersistentVolumeClaim
apiVersion: v1
metadata:
  name: tomcatwebapp
spec:
  accessModes:
    - ReadWriteOnce
  resources:
    requests:
      storage: 1Gi
关于HelloWorld应用
index.jsp
<%@ page language="java" contentType="text/html; charset=utf-8"  import="java.net.InetAddress"   pageEncoding="utf-8"%>
<html>
 <body> This is a Helloworld test</body>
<%
    System.out.println("this is a session test!");

                     InetAddress addr = InetAddress.getLocalHost();
         out.println("HostAddress="+addr.getHostAddress());
         out.println("HostName="+addr.getHostName());

         String version = System.getenv("SERVICE_VERSION");
         out.println("SERVICE_VERSION="+version);

    %>
</html>
建立第一个版本的rc-v1.yaml文件
[root@k8s-master ~]# cat rc-v1.yaml
apiVersion: extensions/v1beta1
kind: Deployment
metadata:
  name: helloworld-service
spec:
  replicas: 1
  template:
    metadata:
      labels:
        tomcat-app: "helloworld"
        version: "1"
    spec:
      containers:
      - name: tomcathelloworld
        image: docker.io/tomcat:9.0-jre8
        volumeMounts:
        - mountPath: "/usr/local/tomcat/webapps"
          name: mypd
        ports:
        - containerPort: 8080
        env:
        - name: "SERVICE_VERSION"
          value: "1"
      volumes:
      - name: mypd
        persistentVolumeClaim:
          claimName: tomcatwebapp
rc-service文件
[root@k8s-master ~]# cat rc-service.yaml
apiVersion: v1
kind: Service
metadata:
  name: helloworldsvc
  labels:
    tomcat-app: helloworld
spec:
  ports:
  - port: 8080
    protocol: TCP
    targetPort: 8080
    name: http
  selector:
    tomcat-app: helloworld
然后通过istioctl kube-inject注入
istioctl kube-inject -f rc-v1.yaml > rc-v1-istio.yaml
注入后发现,多了一个Sidecar Container
[root@k8s-master ~]# cat rc-v1-istio.yaml
apiVersion: extensions/v1beta1
kind: Deployment
metadata:
  creationTimestamp: null
  name: helloworld-service
spec:
  replicas: 1
  strategy: {}
  template:
    metadata:
      annotations:
        alpha.istio.io/sidecar: injected
        alpha.istio.io/version: jenkins@ubuntu-16-04-build-12ac793f80be71-0.1.6-dab2033
        pod.beta.kubernetes.io/init-containers: '[{"args":["-p","15001","-u","1337"],"image":"docker.io/istio/init:0.1","imagePullPolicy":"IfNotPresent","name":"init","securityContext":{"capabilities":{"add":["NET_ADMIN"]}}},{"args":["-c","sysctl
          -w kernel.core_pattern=/tmp/core.%e.%p.%t \u0026\u0026 ulimit -c unlimited"],"command":["/bin/sh"],"image":"alpine","imagePullPolicy":"IfNotPresent","name":"enable-core-dump","securityContext":{"privileged":true}}]'
      creationTimestamp: null
      labels:
        tomcat-app: helloworld
        version: "1"
    spec:
      containers:
      - env:
        - name: SERVICE_VERSION
          value: "1"
        image: docker.io/tomcat:9.0-jre8
        name: tomcathelloworld
        ports:
        - containerPort: 8080
        resources: {}
        volumeMounts:
        - mountPath: /usr/local/tomcat/webapps
          name: mypd
      - args:
        - proxy
        - sidecar
        - -v
        - "2"
        env:
        - name: POD_NAME
          valueFrom:
            fieldRef:
              fieldPath: metadata.name
        - name: POD_NAMESPACE
          valueFrom:
            fieldRef:
              fieldPath: metadata.namespace
        - name: POD_IP
          valueFrom:
            fieldRef:
              fieldPath: status.podIP
        image: docker.io/istio/proxy_debug:0.1
        imagePullPolicy: IfNotPresent
        name: proxy
        resources: {}
        securityContext:
          runAsUser: 1337
      volumes:
      - name: mypd
        persistentVolumeClaim:
          claimName: tomcatwebapp
status: {}
---
inject之后又要下载几个镜像 :(
- docker.io/istio/proxy_debug:0.1
- docker.io/istio/init:0.1
- alpine
同时注意把imagePullPolicy改掉。。。。
再运行
kubectl create -f rc-v1-istio.yaml
此处又遇到无数坑
1.权限问题,需要在/etc/kubernetes/config下打开--allow-privileged,master和节点都需要打开
[root@k8s-master ~]# cat /etc/kubernetes/config
###
# kubernetes system config
#
# The following values are used to configure various aspects of all
# kubernetes services, including
#
#   kube-apiserver.service
#   kube-controller-manager.service
#   kube-scheduler.service
#   kubelet.service
#   kube-proxy.service
# logging to stderr means we get it in the systemd journal
KUBE_LOGTOSTDERR="--logtostderr=true"

# journal message level, 0 is debug
KUBE_LOG_LEVEL="--v=0"

# Should this cluster be allowed to run privileged docker containers
KUBE_ALLOW_PRIV="--allow-privileged=true"

# How the controller-manager, scheduler, and proxy find the apiserver
KUBE_MASTER="--master=http://192.168.44.108:8080"
2.发现只要一加上 securityContext: runAsUser: 1337 POD无论如何都不启动,去掉至少可以启动,一直在desired阶段,因为提示信息有限,比较烧脑,后发现需要修改APIServer中的配置,去掉--admission-control=NamespaceLifecycle,LimitRanger,SecurityContextDeny,ResourceQuota,ServiceAccount中的SecurityContextDeny
最后kube-apiserver配置为
[root@k8s-master ~]# cat /etc/kubernetes/apiserver
###
# kubernetes system config
#
# The following values are used to configure the kube-apiserver
#

# The address on the local server to listen to.
KUBE_API_ADDRESS="--insecure-bind-address=192.168.44.108"

# The port on the local server to listen on.
# KUBE_API_PORT="--port=8080"

# Port minions listen on
# KUBELET_PORT="--kubelet-port=10250"

# Comma separated list of nodes in the etcd cluster
KUBE_ETCD_SERVERS="--etcd-servers=http://192.168.44.108:2379"

# Address range to use for services
KUBE_SERVICE_ADDRESSES="--service-cluster-ip-range=10.254.0.0/16"

# default admission control policies
#KUBE_ADMISSION_CONTROL="--admission-control=NamespaceLifecycle,NamespaceExists,LimitRanger,ServiceAccount,SecurityContextDeny,ResourceQuota"
KUBE_ADMISSION_CONTROL="--admission-control=NamespaceLifecycle,NamespaceExists,LimitRanger,ServiceAccount,ResourceQuota"

# Add your own!
KUBE_API_ARGS="--secure-port=443 --client-ca-file=/srv/kubernetes/ca.crt --tls-cert-file=/srv/kubernetes/server.cert --tls-private-key-file=/srv/kubernetes/server.key"
好了,搞完能顺利启动。
再建立一个rc-v2.yaml
[root@k8s-master ~]# cat rc-v2.yaml
apiVersion: extensions/v1beta1
kind: Deployment
metadata:
  name: helloworld-service-v2
spec:
  replicas: 1
  template:
    metadata:
      labels:
        tomcat-app: "helloworld"
        version: "2"
    spec:
      containers:
      - name: tomcathelloworld
        image: docker.io/tomcat:9.0-jre8
        volumeMounts:
        - mountPath: "/usr/local/tomcat/webapps"
          name: mypd
        ports:
        - containerPort: 8080
        env:
        - name: "SERVICE_VERSION"
          value: "2"
      volumes:
      - name: mypd
        persistentVolumeClaim:
          claimName: tomcatwebapp
tool.yaml,用于在服务网络中进行测试用.其实就是一个shell
[root@k8s-master ~]# cat tool.yaml
apiVersion: extensions/v1beta1
kind: Deployment
metadata:
  name: tool
spec:
  replicas: 1
  template:
    metadata:
      labels:
        name: tool
        version: "1"
    spec:
      containers:
      - name: tool
        image: docker.io/tomcat:9.0-jre8
        volumeMounts:
        - mountPath: "/usr/local/tomcat/webapps"
          name: mypd
        ports:
        - containerPort: 8080
      volumes:
      - name: mypd
        persistentVolumeClaim:
          claimName: tomcatwebapp
---
apiVersion: v1
kind: Service
metadata:
  name: tool
  labels:
    name: tool
spec:
  ports:
  - port: 8080
    protocol: TCP
    targetPort: 8080
    name: http
  selector:
    name: tool
两个都需要kube-inject并且通过apply进行部署。
最后结果
[root@k8s-master ~]# kubectl get pods
NAME                                     READY     STATUS    RESTARTS   AGE
helloworld-service-2437162702-x8w05      2/2       Running   0          1h
helloworld-service-v2-2637126738-s7l4s   2/2       Running   0          1h
istio-egress-2869428605-2ftgl            1/1       Running   2          14h
istio-ingress-1286550044-6g3vj           1/1       Running   2          14h
istio-mixer-765485573-23wc6              1/1       Running   2          14h
istio-pilot-1495912787-g5r9s             2/2       Running   4          14h
tool-185907110-fsr04                     2/2       Running   0          1h
流量分配
建立一个路由规则
istioctl create -f default.yaml
[root@k8s-master ~]# cat default.yaml
type: route-rule
name: helloworld-default
spec:
  destination: helloworldsvc.default.svc.cluster.local
  precedence: 1
  route:
  - tags:
      version: "2"
    weight: 10
  - tags:
      version: "1"
    weight: 90
也就是访问helloworldsvc,有90%的流量会访问到version 1的pod,而10%的流量会访问到version 2的节点
如何判断这个helloworldsvc确实是指到后端两个pod呢,可以通过下面命令确认
[root@k8s-master ~]# kubectl describe service helloworldsvc
Name:            helloworldsvc
Namespace:        default
Labels:            tomcat-app=helloworld
Annotations:        <none>
Selector:        tomcat-app=helloworld
Type:            ClusterIP
IP:            10.254.145.112
Port:            http    8080/TCP
Endpoints:        10.1.40.3:8080,10.1.40.7:8080
Session Affinity:    None
Events:            <none>
说明service和deployment的配置没有问题
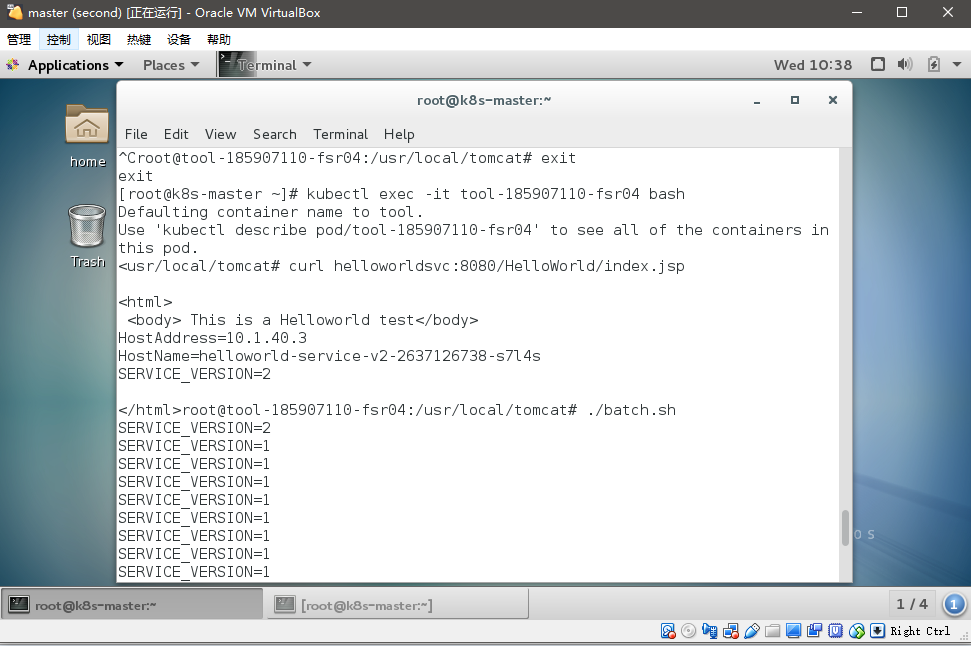
进入到tools
[root@k8s-master ~]# kubectl exec -it tool-185907110-fsr04 bash
Defaulting container name to tool.
Use 'kubectl describe pod/tool-185907110-fsr04' to see all of the containers in this pod.
root@tool-185907110-fsr04:/usr/local/tomcat#
运行
<usr/local/tomcat# curl helloworldsvc:8080/HelloWorld/index.jsp

<html>
 <body> This is a Helloworld test</body>
HostAddress=10.1.40.3
HostName=helloworld-service-v2-2637126738-s7l4s
SERVICE_VERSION=2
这里又折腾很久,开始怎么都返回connection refuse,在pod中访问localhost通但curl ip不通,后来尝试采用不注入的tool发现没有问题,但并不进行流量控制,最后又切换会inject后的pod后居然发现能够联通了,解决方法是: 把inject的重新create一遍,同时把service又create一遍。
写个shell脚本
echo "for i in {1..100}
do
curl -s helloworldsvc:8080/HelloWorld/index.jsp | grep SERVICE_VERSION
done" > batch.sh
然后运行
然后通过grep统计验证流量分布
root@tool-185907110-fsr04:/usr/local/tomcat# ./batch.sh | grep 2 | wc -l
10
root@tool-185907110-fsr04:/usr/local/tomcat# ./batch.sh | grep 1 | wc -l
90
超时策略
[root@k8s-master ~]# cat delay.yaml
type: route-rule
name: helloworld-timeout
spec:
  destination: helloworldsvc.default.svc.cluster.local
  precedence: 9
  route:
  - tags:
      version: "1"
  httpReqTimeout:
    simpleTimeout:
      timeout: 2s
设置2秒超时,然后继续Curl
root@tool-185907110-nrn9l:/usr/local/tomcat# curl  -s helloworldsvc:8080/HelloWorld/delay.jsp
upstream request timeout
需要注意的是开始怎么也不生效,后来把tool工具的pod删除再重新建立就可以了
重试策略
需要先把之前的timeout去掉
[root@k8s-master ~]# cat retry.yaml
type: route-rule
name: helloworld-timeout
spec:
  destination: helloworldsvc.default.svc.cluster.local
  precedence: 9
  route:
  - tags:
      version: "1"
  httpReqRetries:
    simpleRetry:
      attempts: 2
      perTryTimeout: 2s
访问结果
root@tool-185907110-ms991:/usr/local/tomcat# curl -s helloworldsvc:8080/HelloWorld/delay.jsp
upstream request timeout

root@tool-185907110-ms991:/usr/local/tomcat# curl -s helloworldsvc:8080/HelloWorld<transfer}:%{time_total}\n' 'helloworldsvc:8080/HelloWorld/delay.jsp '

0.004545:6.087113:6.087190
超时后每次两秒都没出来,重试了2次
未完待续。。。

 浙公网安备 33010602011771号