
MyBatis总结
MyBatis 简介
1. Mybatis 开源免费框架.原名叫iBatis,2010在google code,2013年迁移到 github
2. 作用: 数据访问层框架.
2.1 底层是对 JDBC 的封装.
3. mybatis 优点之一:
3.1 使用mybatis 时不需要编写实现类,只需要写需要执行的 sql 命令
一. 环境搭建
1. 导入 jar


2. 在 src 下新建全局配置文件(编写 JDBC 四个变量)
2.1 没有名称和地址要求
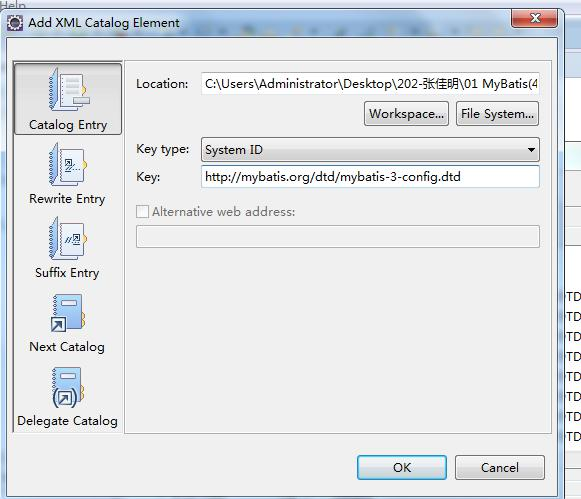
2.2 在全局配置文件中引入 DTD 或 schema
2.2.1 如果导入 dtd 后没有提示 Window--> preference --> XML --> XMl catalog --> add 按钮
2.3 全局配置文件内容


 1 <?xml version="1.0" encoding="UTF-8"?>
 2 <!DOCTYPE configuration
 3 PUBLIC "-//mybatis.org//DTD Config 3.0//EN"
 4 "http://mybatis.org/dtd/mybatis-3-config.dtd">
 5 <configuration>
 6 <!-- default 引用 environment 的 id,当前所使用的环境 -->
 7 <environments default="default">
 8 <!-- 声明可以使用的环境 -->
 9 <environment id="default">
10 <!-- 使用原生 JDBC 事务 -->
11 <transactionManager type="JDBC"></transactionManager>
12 <dataSource type="POOLED">
13 <property name="driver" value="com.mysql.jdbc.Driver"/>
14 <property name="url" value="jdbc:mysql://localhost:3306/ssm"/>
15 <property name="username" value="root"/>
16 <property name="password" value="smallming"/>
17 </dataSource>
18 </environment>
19 </environments>
20 <mappers>
21 <mapper resource="com/bjsxt/mapper/FlowerMapper.xml"/>
22 </mappers>
23 </configuration>
3. 新建以 mapper 结尾的包,在包下新建:实体类名+Mapper.xml
3.1 文件作用:编写需要执行的 SQL 命令
3.2 把 xml 文件理解成实现类.
3.3 xml 文件内容
 1 <?xml version="1.0" encoding="UTF-8"?>
 2 <!DOCTYPE mapper
 3 PUBLIC "-//mybatis.org//DTD Mapper 3.0//EN"
 4 "http://mybatis.org/dtd/mybatis-3-mapper.dtd">
 5 <!-- namesapce:理解成实现类的全路径(包名+类名) -->
 6 <mapper namespace="a.b" >
 7 <!-- id:方法名
 8 parameterType:定义参数类型
 9 resultType:返回值类型.
10 如果方法返回值是 list,在 resultType 中写 List 的泛型,
11 因为 mybatis
12 对 jdbc 封装,一行一行读取数据
13 -->
14 <select id="selAll"
15 resultType="com.bjsxt.pojo.Flower">
16 select * from flower
17 </select>
18 </mapper>
4. 测试结果(只有在单独使用 mybatis 时使用,最后 ssm 整合时下面代码不需要编写.)
InputStream is =
Resources.getResourceAsStream("myabtis.xml");
//使用工厂设计模式
SqlSessionFactory factory = new
SqlSessionFactoryBuilder().build(is);
//生产 SqlSession
SqlSession session=factory.openSession();
List<Flower> list =
session.selectList("a.b.selAll");
for (Flower flower : list) {
System.out.println(flower.toString());
}
session.close();
二. 环境搭建详解
1.全局配置文件中内容
1.1 <transactionManager/> type 属性可取值
1.1.1 JDBC,事务管理使用 JDBC 原生事务管理方式
1.1.2 MANAGED 把事务管理转交给其他容器.原生 JDBC 事务 setAutoMapping(false);
1.2 <dataSouce/>type 属性
1.2.1 POOLED 使用数据库连接池
1.2.2 UNPOOLED 不实用数据库连接池,和直接使用 JDBC 一样
1.2.3 JNDI :java 命名目录接口技术.
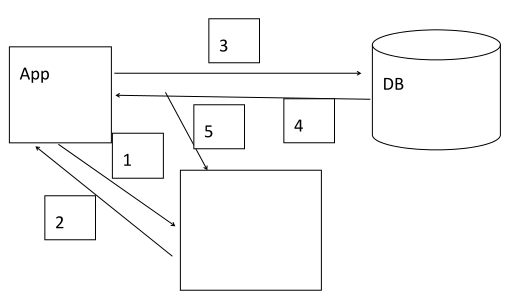
三. 数据库连接池
1.在内存中开辟一块空间,存放多个数据库连接对象.
2.JDBC Tomcat Pool,直接由 tomcat 产生数据库连接池.
3.图示
3.1 active 状态:当前连接对象被应用程序使用中
3.2 Idle 空闲状态:等待应用程序使用
4.使用数据库连接池的目的
4.1 在高频率访问数据库时,使用数据库连接池可以降低服务器系统压力,提升程序运行效率.
4.1.1 小型项目不适用数据库连接池.
5.实现 JDBC tomcat Pool 的步骤.
5.1 在 web 项目的 META-INF 中存放 context.xml,在 context.xml 编写数据库连接池相关属性
 1 <?xml version="1.0" encoding="UTF-8"?>
 2 <Context>
 3 <Resource
 4 driverClassName="com.mysql.jdbc.Driver"
 5 url="jdbc:mysql://localhost:3306/ssm"
 6 username="root"
 7 password="smallming"
 8 maxActive="50"
 9 maxIdle="20"
10 name="test"
11 auth="Container"
12 maxWait="10000"
13 type="javax.sql.DataSource"
14 />
15 </Context>
5.2 把项目发布到 tomcat 中,数据库连接池产生了
6.可以在 java 中使用 jndi 获取数据库连接池中对象
6.1 Context:上下文接口.context.xml 文件对象类型
6.2 代码:
Context cxt = new InitialContext();
    DataSource ds = (DataSource)
cxt.lookup("java:comp/env/test");
    Connection conn = ds.getConnection();
6.3 当关闭连接对象时,把连接对象归还给数据库连接池,把状态改变成 Idle
四. 三种查询方式
1.selectList() 返回值为 List<resultType 属性控制>
1.1 适用于查询结果都需要遍历的需求
List<Flower> list = session.selectList("a.b.selAll");
    for (Flower flower : list) {
        System.out.println(flower.toString());
    }
2.selectOne() 返回值 Object,
2.1 适用于返回结果只是变量或一行数据时
int count = session.selectOne("a.b.selById");
System.out.println(count);
3.selectMap() 返回值 Map
3.1 适用于需要在查询结果中通过某列的值取到这行数据的需求.
3.2 Map<key,resultType 控制>
Map<Object, Object> map = session.selectMap("a.b.c",
"name123");
System.out.println(map);
五. <settings> 标签
1.在 mybatis 全局配置文件中通过<settings>标签控制 mybatis 全局开关
2.在 mybatis.xml 中开启 log4j
2.1 必须保证有 log4j.jar
2.2 在 src 下有 log4j.properties
<settings>
    <setting name="logImpl" value="LOG4J"/>
</settings>
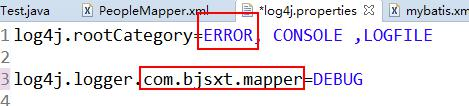
3.log4j 中可以输出指定内容的日志(控制某个局部内容的日志级别)
3.1 命名级别(包级别): <mapper>namespace 属性中除了最后一个类名
例如 namespace=”com.bjsxt.mapper.PeopleMapper” 其中包级别为com.bjsxt.mapper ,需要在 log4j.propeties 中
3.1.1 先在总体级别调成 Error 不输出无用信息
3.1.2 在设置某个指定位置级别为 DEBUG
3.2 类级别
3.2.1 namespace 属性值 ,namespace 类名
3.3 方法级别
3.3.2 使用 namespace 属性值+标签 id 属性值
六 parameterType 属性
1. 在 XXXMapper.xml 中<select><delete>等标签的 parameterType 可以控制参数类型
2. SqlSession 的 selectList()和 selectOne()的第二个参数和 selectMap()的第三个参数都表示方法的参数.
2.1 示例,
People p = session.selectOne("a.b.selById",1);
System.out.println(p);
2.2 在 Mapper.xml 中可以通过#{}获取参数
2.2.1 parameterType 控制参数类型
2.2.2 #{}获取参数内容
2.2.2.1 使用索引,从 0 开始 #{0}表示第一个参数
2.2.2.2 也可以使用#{param1}第一个参数
2.2.2.3 如果只有一个参数(基本数据类型或 String),mybatis对#{}里面内容没有要求只要写内容即可.
2.2.2.4 如果参数是对象#{属性名}
2.2.2.5 如果参数是 map 写成#{key}
<select id="selById" resultType="com.bjsxt.pojo.People" parameterType="int">
    select * from people where id=#{0}
</select>
3. #{} 和 ${} 的区别
3.1 #{} 获取参数的内容支持 索引获取,param1获取指定位置参数,并且 SQL 使用?占位符
3.2 ${} 字符串拼接不使用?,默认找${内容}内容的 get/set 方法,如果写数字,就是一个数字
4. 如果在 xml 文件中出现 “<” , “>” ,双引号 等特殊字符时可以使用XML 文件转义标签(XML 自身的)
4.1 <![CDATA[ 内容 ]]>
5. mybatis 中实现 mysql 分页写法
5.1 ?不允许在关键字前后进行数学运算,需要在代码中计算完成后传递到 mapper.xml 中
5.2 在 java 代码中计算
//显示几个
int pageSize = 2;
//第几页
int pageNumber = 2;
//如果希望传递多个参数,可以使用对象或 map
Map<String,Object> map = new HashMap<>();
map.put("pageSize", pageSize);
map.put("pageStart", pageSize*(pageNumber-1));
List<People> p =
session.selectList("a.b.page",map);
5.3 在 mapper.xml 中代码
<select id="page" resultType="com.bjsxt.pojo.People" parameterType="map">
    select * from people limit #{pageStart},#{pageSize}
</select>
七. typeAliases 别名
1.系统内置别名: 把类型全小写
2.给某个类起别名
2.1 alias=”自定义”
<typeAliases>
<typeAlias type="com.bjsxt.pojo.People" alias="peo"/>
</typeAliases>
2.2 mapper.xml 中 peo 引用 People 类
<select id="page" resultType="peo" parameterType="map">
    select * from people limit #{pageStart},#{pageSize}
</select>
3.直接给某个包下所有类起别名,别名为类名, 不区分大小写
3.1 mybatis.xml 中配置
<typeAliases>
    <package name="com.bjsxt.pojo" />
</typeAliases>
3.2 mapper.xml 中通过类名引用
<select id="page" resultType="People" parameterType="map">
    select * from people limit #{pageStart},#{pageSize}
</select>
八.MyBatis 实现新增
1. 概念复习
1.1 功能:从应用程序角度出发,软件具有哪些功能.
1.2 业务:完成功能时的逻辑.对应 Service 中一个方法
1.3 事务:从数据库角度出发,完成业务时需要执行的 SQL 集合,统称一个事务.
1.3.1 事务回滚.如果在一个事务中某个 SQL 执行事务,希望回归到事务的原点,保证数据库数据的完整性.
2. 在 mybatis 中默认是关闭了 JDBC 的自动提交功能
2.1 每一个 SqlSession 默认都是不自动提交事务.
2.2 session.commit()提交事务.
2.3 openSession(true);自动提交.setAutoCommit(true);
3. mybatis 底层是对 JDBC 的封装.
3.1 JDBC 中 executeUpdate()执行新增,删除,修改的 SQL.返回值 int,表示受影响的行数.
3.2 mybatis 中<insert> <delete> <update>标签没有 resultType 属性,认为返回值都是 int
4. 在 openSession()时 Mybatis 会创建 SqlSession 时同时创建一个Transaction(事务对象),同时 autoCommit 都为 false
4.1 如果出现异常,应该 session.rollback()回滚事务.
5. 实现新增的步骤
5.1 在 mapper.xml 中提供<insert>标签,标签没有返回值类型
<insert id="ins" parameterType="People">
    insert into people values(default,#{name},#{age})
</insert>
5.2 通过 session.insert()调用新增方法
int index1 = session.insert("a.b.ins", p);
if(index1>0){
  System.out.println("成功");
}else{
  System.out.println("失败");
}
九.MyBatis 实现修改
1. 在 mapper.xml 中提供<update>标签
<update id="upd" parameterType="People">
    update people set name = #{name} where id = #{id}
</update>
2. 编写代码
People peo = new People();
peo.setId(3);
peo.setName("王五");
int index = session.update("a.b.upd", peo);
if(index>0){
    System.out.println("成功");
}else{
    System.out.println("失败");
}
session.commit();
十.mybatis 实现删除
1. 在 mapper.xml 提供<delete>标签
<delete id="del" parameterType="int">
    delete from people where id = #{0}
</delete>
2. 编写代码
int del = session.delete("a.b.del",3);
if(del>0){
    System.out.println("成功");
}else{
    System.out.println("失败");
}
session.commit();
十一.MyBatis 接口绑定方案及多参数传递
1.作用:实现创建一个接口后把mapper.xml由mybatis生成接口的实现类,通过调用接口对象就可以获取 mapper.xml 中编写的 sql.
2.后面 mybatis 和 spring 整合时使用的是这个方案.
3.实现步骤:
3.1 创建一个接口
3.1.1 接口包名和接口名与 mapper.xml 中<mapper>namespace相同
3.1.2 接口中方法名和 mapper.xml 标签的 id 属性相同
3.2 在 mybatis.xml 中使用<package>进行扫描接口和 mapper.xml
4.代码实现步骤:
4.1 在 mybatis.xml 中<mappers>下使用<package>
<mappers>
    <package name="com.bjsxt.mapper"/>
</mappers>
4.2 在 com.bjsxt.mapper 下新建接口
public interface LogMapper {
    List<Log> selAll();
}
4.3 在 com.bjsxt.mapper 新建一个 LogMapper.xml
4.3.1 namespace 必须和接口全限定路径(包名+类名)一致
4.3.2 id 值必须和接口中方法名相同
4.3.3 如果接口中方法为多个参数,可以省略 parameterType
<mapper namespace="com.bjsxt.mapper.LogMapper">
    <select id="selAll" resultType="log">
      select * from log
    </select>
</mapper>
5.多参数实现办法
5.1 在接口中声明方法
List<Log> selByAccInAccout(String accin,String accout);
5.2 在 mapper.xml 中添加
5.2.1 #{}中使用 0,1,2 或 param1,param2
<!-- 当多参数时,不需要写 parameterType -->
<select id="selByAccInAccout" resultType="log" >
    select * from log where accin=#{0} and accout=#{1}
</select>
6,可以使用注解方式
6.1 在接口中声明方法
/**
* mybatis 把参数转换为 map 了,其中@Param("key") 参数内容就是 map的 value
* @param accin123
* @param accout3454235
* @return
*/
List<Log> selByAccInAccout(@Param("accin") String
accin123,@Param("accout") String accout3454235);
6.2 在 mapper.xml 中添加
6.2.1 #{} 里面写@Param(“内容”)参数中内容
<!-- 当多参数时,不需要写 parameterType -->
<select id="selByAccInAccout" resultType="log" >
    select * from log where accin=#{accin} and accout=#{accout}
</select>
十二. 动态 SQL
1. 根据不同的条件需要执行不同的 SQL 命令.称为动态 SQL
2. MyBatis 中动态 SQL 在 mapper.xml 中添加逻辑判断等.
3. If 使用
<select id="selByAccinAccout" resultType="log">
    select * from log where 1=1
    <!-- OGNL 表达式,直接写 key 或对象的属性.不需要添加任何特字符号 -->
    <if test="accin!=null and accin!=''">
        and accin=#{accin}
    </if>
    <if test="accout!=null and accout!=''">
        and accout=#{accout}
    </if>
</select>
4. <where>
4.1 当编写 where 标签时,如果内容中第一个是 and 去掉第一个and
4.2 如果<where>中有内容会生成 where 关键字,如果没有内容不生成 where 关键
4.3 使用示例
4.3.1 比直接使用<if>少写 where 1=1
<select id="selByAccinAccout" resultType="log">
    select * from log
    <where>
        <if test="accin!=null and accin!=''">
            and accin=#{accin}
        </if>
        <if test="accout!=null and accout!=''">
            and accout=#{accout}
        </if>
    </where>
</select>
5. <choose> <when> <otherwise>
5.1 只有有一个成立,其他都不执行.
5.2 代码示例
5.2.1 如果 accin 和 accout 都不是 null 或不是””生成的 sql 中只有 where accin=?
<select id="selByAccinAccout" resultType="log">
    select * from log
    <where>
        <choose>
            <when test="accin!=null and accin!=''">
                and accin=#{accin}
            </when>
            <when test="accout!=null and accout!=''">
                and accout=#{accout}
            </when>
        </choose>
    </where>
</select>
6. <set>用在修改 SQL 中 set 从句
6.1 作用:去掉最后一个逗号
6.2 作用:如果<set>里面有内容生成 set 关键字,没有就不生成
6.3 示例
6.3.1 id=#{id} 目的防止<set>中没有内容,mybatis 不生成 set 关键字,如果修改中没有 set 从句 SQL 语法错误.
<update id="upd" parameterType="log" >
    update log
       <set>
           id=#{id},
           <if test="accIn!=null and accIn!=''">
               accin=#{accIn},
            </if>
            <if test="accOut!=null and accOut!=''">
                accout=#{accOut},
           </if>
       </set>
    where id=#{id}
</update>
7. Trim
7.1 prefix 在前面添加内容
7.2 prefixOverrides 去掉前面内容
7.3 suffix 在后面添加内容
7.4 suffixOverrieds 去掉后面内容
7.5 执行顺序去掉内容后添加内容
7.6 代码示例
<update id="upd" parameterType="log">
    update log
    <trim prefix="set" suffixOverrides=",">
        a=a,
    </trim>
    where id=100
</update>
8. <bind>
8.1 作用:给参数重新赋值
8.2 场景:
8.2.1 模糊查询
8.2.2 在原内容前或后添加内容
8.3 示例
<select id="selByLog" parameterType="log" resultType="log">
    <bind name="accin" value="'%'+accin+'%'"/>
    #{money}
</select>
9. <foreach>标签
9.1 循环参数内容,还具备在内容的前后添加内容,还具备添加分隔符功能.
9.2 适用场景:in 查询中.批量新增中(mybatis 中 foreach 效率比较低)
9.2.1 如果希望批量新增,SQL 命令
insert into log VALUES
(default,1,2,3),(default,2,3,4),(default,3,4,5)
9.2.2 openSession()必须指定
9.2.2.1 底层 JDBC 的 PreparedStatement.addBatch();
factory.openSession(ExecutorType.BATCH);
9.3 示例
9.3.1 collectino=”” 要遍历的集合
9.3.2 item 迭代变量, #{迭代变量名}获取内容
9.3.3 open 循环后左侧添加的内容
9.3.4 close 循环后右侧添加的内容
9.3.5 separator 每次循环时,元素之间的分隔符
<select id="selIn" parameterType="list" resultType="log">
    select * from log where id in
    <foreach collection="list" item="abc" open="(" close=")" separator=",">
        #{abc}
    </foreach>
</select>
10. <sql> 和<include>
10.1 某些 SQL 片段如果希望复用,可以使用<sql>定义这个片段
<sql id="mysql">
    id,accin,accout,money
</sql>
10.2 在<select>或<delete>或<update>或<insert>中使用<include>引用
<select id="">
    select <include refid="mysql"></include>
    from log
</select>
十三 ThreadLocal
1. 线程容器,给线程绑定一个 Object 内容,后只要线程不变,可以随时取出.
1.1 改变线程,无法取出内容.
2. 语法示例
final ThreadLocal<String> threadLocal = new ThreadLocal<>();
    threadLocal.set("测试");
    new Thread(){
        public void run() {
        String result = threadLocal.get();
        System.out.println("结果:"+result);
    };
}.start();
十四. 缓存
1. 应用程序和数据库交互的过程是一个相对比较耗时的过程
2. 缓存存在的意义:让应用程序减少对数据库的访问,提升程序运行效率
3. MyBatis 中默认 SqlSession 缓存开启
3.1 同一个 SqlSession 对象调用同一个<select>时,只有第一次访问数据库,第一次之后把查询结果缓存到 SqlSession 缓存区(内存)中
3.2 缓存的是 statement 对象.(简单记忆必须是用一个<select>)
3.2.1 在 myabtis 时一个<select>对应一个 statement 对象
3.3 有效范围必须是同一个 SqlSession 对象
4. 缓存流程
4.1 步骤一: 先去缓存区中找是否存在 statement
4.2 步骤二:返回结果
4.3 步骤三:如果没有缓存 statement 对象,去数据库获取数据
4.4 步骤四:数据库返回查询结果
4.5 步骤五:把查询结果放到对应的缓存区中
5. SqlSessionFactory 缓存
5.1 又叫:二级缓存
5.2 有效范围:同一个 factory 内哪个 SqlSession 都可以获取
5.3 什么时候使用二级缓存:
5.3.1 当数据频繁被使用,很少被修改
5.4 使用二级缓存步骤
5.4.1 在 mapper.xml 中添加
5.4.2 如果不写 readOnly=”true”需要把实体类序列化
<cache readOnly="true"></cache>
5.5 当 SqlSession 对象 close()时或 commit()时会把 SqlSession 缓存的数据刷(flush)到 SqlSessionFactory 缓存区中
十五.MyBatis 实现多表查询
1.Mybatis 实现多表查询方式
1.1 业务装配.对两个表编写单表查询语句,在业务(Service)把的两个结果进行关联.
1.2 使用Auto Mapping特性,在实现两表联合查询时通过别名完成映射.
1.3 使用 MyBatis 的<resultMap>标签进行实现.
2.多表查询时,类中包含另一个类的对象的分类
2.1 单个对象 2.2 集合对象.
十六.resultMap 标签
1. <resultMap>标签写在mapper.xml中,由程序员控制SQL查询结果与实体类的映射关系.
1.1 默认 MyBatis 使用 Auto Mapping 特性.
2. 使用<resultMap>标签时,<select>标签不写 resultType 属性,而是使用 resultMap 属性引用<resultMap>标签.
3. 使用 resultMap 实现单表映射关系
3.1 数据库设计
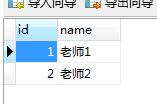
3.2 实体类设计
public class Teacher{
    private int id1;
    private String name1;
}
3.3 mapper.xml 代码
<resultMap type="teacher" id="mymap">
    <!-- 主键使用 id 标签配置映射关系 -->
    <id column="id" property="id1" />
    <!-- 其他列使用 result 标签配置映射关系 -->
    <result column="name" property="name1"/>
</resultMap>
<select id="selAll" resultMap="mymap">
    select * from teacher
</select>
4. 使用 resultMap 实现关联单个对象(N+1 方式)
4.1 N+1 查询方式,先查询出某个表的全部信息,根据这个表的信息查询另一个表的信息.
4.2 与业务装配的区别:
4.3.1 在 service 里面写的代码,由 mybatis 完成装配
4.3 实现步骤:
4.3.1 在 Student 实现类中包含了一个 Teacher 对象
public class Student {
private int id;
private String name;
private int age;
private int tid;
private Teacher teacher;
4.3.2 在 TeacherMapper 中提供一个查询
<select id="selById" resultType="teacher" parameterType="int">
    select * from teacher where id=#{0}
</select>
4.3.3 在 StudentMapper 中
4.3.3.1 <association> 装配一个对象时使用
4.3.3.2 property: 对象在类中的属性名
4.3.3.3 select:通过哪个查询查询出这个对象的信息
4.3.3.4 column: 把当前表的哪个列的值做为参数传递给另一个查询
4.3.3.5 大前提使用 N+1 方式.时如果列名和属性名相同可以不配置,使用 Auto mapping 特性.但是 mybatis 默认只会给列专配一次
<resultMap type="student" id="stuMap">
    <id property="id" column="id"/>
    <result property="name" column="name"/>
    <result property="age" column="age"/>
    <result property="tid" column="tid"/>
    <!-- 如果关联一个对象 -->
    <association property="teacher" select="com.bjsxt.mapper.TeacherMapper.selById" column="tid">
    </association>
</resultMap>
<select id="selAll" resultMap="stuMap">
    select * from student
</select>
4.3.3.6 把上面代码简化成
<resultMap type="student" id="stuMap">
    <result column="tid" property="tid"/>
    <!-- 如果关联一个对象 -->
    <association property="teacher" select="com.bjsxt.mapper.TeacherMapper.selById" column="tid">
    </association>
</resultMap>
<select id="selAll" resultMap="stuMap">
    select * from student
</select>
5. 使用 resultMap 实现关联单个对象(联合查询方式)
5.1 只需要编写一个 SQL,在 StudentMapper 中添加下面效果
5.1.1 <association/>只要专配一个对象就用这个标签
5.1.2 此时把<association/>小的<resultMap>看待
5.1.3 javaType 属性:<association/>专配完后返回一个什么类型的对象.取值是一个类(或类的别名)
<resultMap type="Student" id="stuMap1">
    <id column="sid" property="id"/>
    <result column="sname" property="name"/>
    <result column="age" property="age"/>
    <result column="tid" property="tid"/>
    <association property="teacher" javaType="Teacher" >
        <id column="tid" property="id"/>
        <result column="tname" property="name"/>
    </association>
</resultMap>
<select id="selAll1" resultMap="stuMap1">
    select s.id sid,s.name sname,age age,t.id
tid,t.name tname FROM student s left outer join teacher
t on s.tid=t.id
</select>
6. N+1 方式和联合查询方式对比
6.1 N+1:需求不确定时.
6.2 联合查询:需求中确定查询时两个表一定都查询.
7. N+1 名称由来
7.1 举例:学生中有 3 条数据
7.2 需求:查询所有学生信息级授课老师信息
7.3 需要执行的 SQL 命令
7.3.1 查询全部学生信息:select * from 学生
7.3.2 执行 3 遍 select * from 老师 where id=学生的外键
7.4 使用多条 SQl 命令查询两表数据时,如果希望把需要的数据都查询出来,需要执行 N+1 条 SQl 才能把所有数据库查询出来.
7.5 缺点:
7.5.1 效率低
7.6 优点:
7.6.1 如果有的时候不需要查询学生是同时查询老师.只需要执行一个 select * from student;
7.7 适用场景: 有的时候需要查询学生同时查询老师,有的时候只需要查询学生.
7.8 如果解决 N+1 查询带来的效率低的问题
7.8.1 默认带的前提: 每次都是两个都查询.
7.8.2 使用两表联合查询.
十七. 使用<resultMap> 查询关联集合对象(N+1)
1. 在 Teacher 中添加 List<Student>
public class Teacher {
private int id;
private String name;
private List<Student> list;
2. 在 StudentMapper.xml 中添加通过 tid 查询
<select id="selByTid" parameterType="int" resultType="student">
    select * from student where tid=#{0}
</select>
3. 在 TeacherMapper.xml 中添加查询全部
3.1 <collection/> 当属性是集合类型时使用的标签.
<resultMap type="teacher" id="mymap">
    <id column="id" property="id"/>
    <result column="name" property="name"/>
    <collection property="list" select="com.bjsxt.mapper.StudentMapper.selByTid" column="id"></collection>
</resultMap>
<select id="selAll" resultMap="mymap">
    select * from teacher
</select>
十八. 使用<resultMap> 实现加载集合数据( 联合查询方式)
1.在 teacherMapper.xml 中添加
1.1 mybatis 可以通过主键判断对象是否被加载过.
1.2 不需要担心创建重复 Teacher
<resultMap type="teacher" id="mymap1">
    <id column="tid" property="id"/>
    <result column="tname" property="name"/>
    <collection property="list" ofType="student" >
        <id column="sid" property="id"/>
        <result column="sname" property="name"/>
        <result column="age" property="age"/>
        <result column="tid" property="tid"/>
    </collection>
</resultMap>
<select id="selAll1" resultMap="mymap1">
    select t.id tid,t.name tname,s.id sid,s.name sname,age,tid from teacher t LEFT JOIN student s on t.id=s.tid;
</select>
十九. 使用 Auto Mapping 结合别名实现多表查询.
1.1 只能使用多表联合查询方式.
1.2 要求:查询出的列别和属性名相同.
1.3 实现方式
1.3.1 .在 SQL 是关键字符,两侧添加反单引号
<select id="selAll" resultType="student">
select t.id `teacher.id`,t.name
`teacher.name`,s.id id,s.name name,age,tid
from student s LEFT JOIN teacher t on t.id=s.tid
</select>
二十.MyBatis 注解
1. 注解:为了简化配置文件.
2. Mybatis 的注解简化 mapper.xml 文件.
2.1 如果涉及动态 SQL 依然使用 mapper.xml
3. mapper.xml 和注解可以共存.
4. 使用注解时 mybatis.xml 中<mappers>使用
4.1 <package/>
4.2 <mapper class=””/>
5. 实现查询
@Select("select * from teacher")
List<Teacher> selAll();
6. 实现新增
@Insert("insert into teacher
values(default,#{name})")
int insTeacher(Teacher teacher);
7. 实现修改
@Update("update teacher set name=#{name} where
id=#{id}")
int updTeacher(Teacher teacher);
8. 实现删除
@Delete("delete from teacher where id=#{0}")
int delById(int id);
9. 使用注解实现<resultMap>功能
9.1 以 N+1 举例
9.2 在 StudentMapper 接口添加查询
@Select("select * from student where tid=#{0}")
List<Student> selByTid(int tid);
9.3 在 TeacherMapper 接口添加
9.3.1 @Results() 相当于<resultMap>
9.3.2 @Result() 相当于<id/>或<result/>
9.3.2.1 @Result(id=true) 相当与<id/>
9.3.3 @Many() 相当于<collection/>
9.3.4 @One() 相当于<association/>
@Results(value={
@Result(id=true,property="id",column="id"),
@Result(property="name",column="name"),
@Result(property="list",column="id",many=@Many(sele
ct="com.bjsxt.mapper.StudentMapper.selByTid"))
})
@Select("select * from teacher")
List<Teacher> selTeacher();
二一. 运行原理
1. 运行过程中涉及到的类
1.1 Resources MyBatis 中 IO 流的工具类
1.1.1 加载配置文件
1.2 SqlSessionFactoryBuilder() 构建器
1.2.1 作用:创建 SqlSessionFactory 接口的实现类
1.3 XMLConfigBuilder MyBatis 全局配置文件内容构建器类
1.3.1 作用负责读取流内容并转换为 JAVA 代码.
1.4 Configuration 封装了全局配置文件所有配置信息.
1.4.1 全局配置文件内容存放在 Configuration 中
1.5 DefaultSqlSessionFactory 是SqlSessionFactory接口的实现类
1.6 Transaction 事务类
1.6.1 每一个 SqlSession 会带有一个 Transaction 对象.
1.7 TransactionFactory 事务工厂
1.7.1 负责生产 Transaction
1.8 Executor MyBatis 执行器
1.8.1 作用:负责执行 SQL 命令
1.8.2 相当于 JDBC 中 statement 对象(或 PreparedStatement或 CallableStatement)
1.8.3 默认的执行器 SimpleExcutor
1.8.4 批量操作 BatchExcutor
1.8.5 通过 openSession(参数控制)
1.9 DefaultSqlSession 是 SqlSession 接口的实现类
1.10 ExceptionFactory MyBatis 中异常工厂
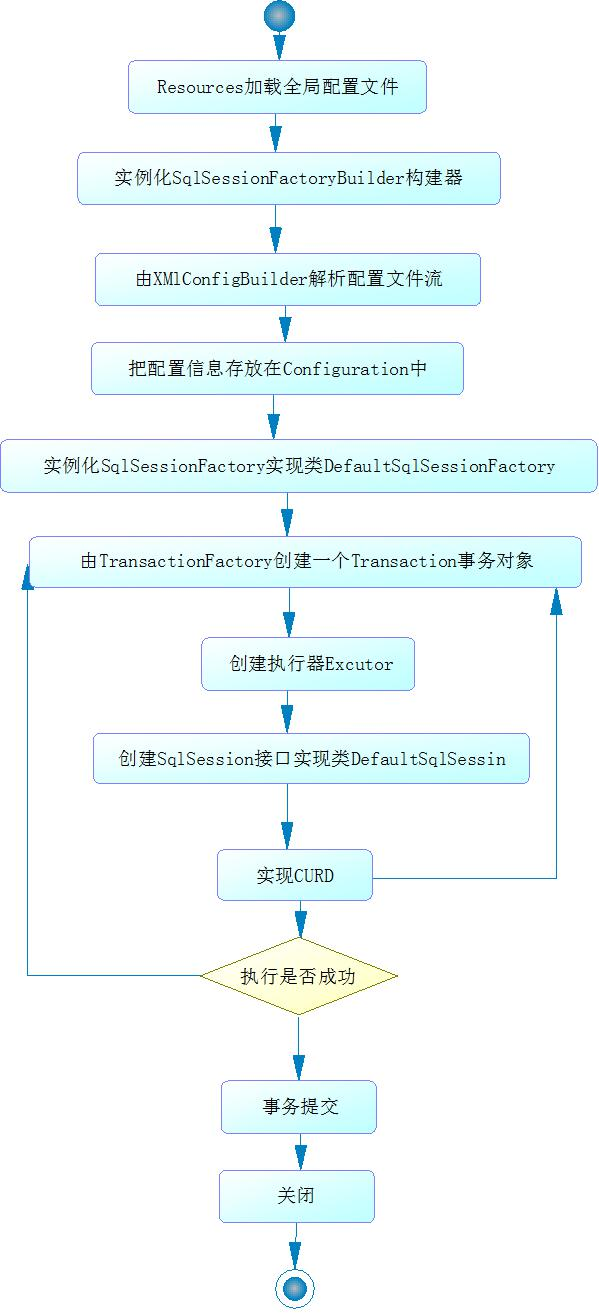
2. 流程图
3.文字解释
在 MyBatis 运行开始时需要先通过 Resources 加载全局配置文件.下面需要实例化 SqlSessionFactoryBuilder 构建器.
帮助 SqlSessionFactory 接口实现类 DefaultSqlSessionFactory.
在实例化 DefaultSqlSessionFactory 之前需要先创建 XmlConfigBuilder解析全局配置文件流,
并把解析结果存放在 Configuration 中.之后把Configuratin 传递给 DefaultSqlSessionFactory.到此 SqlSessionFactory 工厂创建成功.由 SqlSessionFactory 工厂创建 SqlSession.每次创建 SqlSession 时,都需要由 TransactionFactory 创建 Transaction
对象,同时还需要创建 SqlSession 的执行器 Excutor,最后实例化
DefaultSqlSession,传递给 SqlSession 接口.
根据项目需求使用 SqlSession 接口中的 API 完成具体的事务操作.
如果事务执行失败,需要进行 rollback 回滚事务.
如果事务执行成功提交给数据库.关闭 SqlSession

 浙公网安备 33010602011771号