ffmpeg概述
一、基础概念
fps = AVStream->avg_frame_rate,30/1,平均帧率。
tbr: tbr is guessed from the video stream and is the value users want to see when they look for the video frame rate,tbr = AVStream->r_frame_rate,代表帧率,30/1。
tbn: the time base(时间基准) in AVStream that has come from the container,tbn = 1/AVStream->time_base(AVRational),代表音视频流st的时间精度,如1s=1200k,1s增加1200K,把1s分成1200k个时间单元。
tbc: the time base in AVCodecContext for the codec used for a particular stream,代表编码器上下文(AVCodecContext)的时间精度,如1s=50,编码器上下文中一秒增加50,把1s分成50个时间单元。
# MP4
Stream #0:0(und): Video: h264 (High) (avc1 / 0x31637661), yuv420p, 1920x1080 [SAR 1:1 DAR 16:9], 4773 kb/s, 60 fps, 60 tbr, 15360 tbn, 120 tbc (default)
Stream #0:1(und): Audio: aac (LC) (mp4a / 0x6134706D), 48000 Hz, 6 channels, fltp, 391 kb/s (default)

# ts
Input #0, mpegts, from 'out.ts':
  Duration: 00:00:02.03, start: 0.012000, bitrate: 5592 kb/s
  Program 1
    Metadata:
      service_name    : Service01
      service_provider: FFmpeg
    Stream #0:0[0x100]: Video: h264 (High) ([27][0][0][0] / 0x001B), yuv420p(progressive), 1920x1080 [SAR 1:1 DAR 16:9], 60 fps, 60 tbr, 90k tbn, 120 tbc
    Stream #0:1[0x101]: Audio: aac (LC) ([15][0][0][0] / 0x000F), 48000 Hz, 6 channels, fltp, 334 kb/s
二、编译安装
参考:Compile FFmpeg for Ubuntu, Debian, or Mint 静态库下载:https://www.johnvansickle.com/ffmpeg/
x264交叉编译
./configure --prefix=${TOPDIR}/winstall \
    --host=arm-poky-linux-gnueabi --sysroot=/opt/fsl-imx-x11/4.1.15-2.1.0/sysroots/cortexa7hf-neon-poky-linux-gnueabi  \
    --cross-prefix="/opt/fsl-imx-x11/4.1.15-2.1.0/sysroots/x86_64-pokysdk-linux/usr/bin/arm-poky-linux-gnueabi/arm-poky-linux-gnueabi-" \
    --extra-cflags="-march=armv7ve -mfpu=neon  -mfloat-abi=hard -mcpu=cortex-a7" \
    --enable-shared --enable-strip --disable-asm --disable-cli
make
make install
ffmpeg交叉编译
./configure --prefix=${TOPDIR}/winstall \
    --enable-gpl --enable-shared --disable-static --disable-doc --cross-prefix=arm-poky-linux-gnueabi- \
    --cc="/opt/fsl-imx-x11/4.1.15-2.1.0/sysroots/x86_64-pokysdk-linux/usr/bin/arm-poky-linux-gnueabi/arm-poky-linux-gnueabi-gcc  -march=armv7ve -mfpu=neon  -mfloat-abi=hard -mcpu=cortex-a7 --sysroot=/opt/fsl-imx-x11/4.1.15-2.1.0/sysroots/cortexa7hf-neon-poky-linux-gnueabi" \
    --strip="/opt/fsl-imx-x11/4.1.15-2.1.0/sysroots/x86_64-pokysdk-linux/usr/bin/arm-poky-linux-gnueabi/arm-poky-linux-gnueabi-strip" \
    --enable-cross-compile --arch=arm --target-os=linux --enable-nonfree --enable-pthreads  --enable-libx264
make
make install
应用编译
$CC av.c -o acapture -I/home/wang/repoc/ffmpeg_cross/ffmpeg_arm/include -L/home/wang/repoc/ffmpeg_cross/ffmpeg_arm/lib -lavformat -lavcodec -lavdevice -lavutil -lswscale -lswresample -lavfilter -lpostproc -lm
三、命令行
3.1 ffmpeg
 ffmpeg -versionffmpeg -h
Ffmpeg的命令行参数非常多,可分为5部分:
$ ffmpeg {1全局参数} {2输入文件参数} -i {3输入文件} {4输出文件参数} {5输出文件}
常用命令行参数
-c:指定编码器
-c copy:直接复制,不经过重新编码(这样比较快)
-c:v:指定视频编码器
-c:a:指定音频编码器
-f:指定输入或输出文件格式
-vf = -filiter:v :视频滤镜
-i:指定输入文件
-an:去除音频流
-vn: 去除视频流
-preset:指定输出的视频质量,会影响文件的生成速度,有以下几个可用的值 ultrafast, superfast, veryfast, faster, fast, medium, slow, slower, veryslow。
-y:不经过确认,输出时直接覆盖同名文件。
-ar 48000 指定音频采样率为48khz
-ac 1 指定音频声道数
-re 按时间戳读取文件。
默认情况下,ffmpeg尝试以尽可能快的速度读取输入。-re这个选项会将输入的读取速度降低到输入的本地帧速率。它对于实时输出(例如直播流)很有用。ffmpeg读取文件有两种方式:一种是直接读取,文件被迅速读完;一种是按时间戳读取。一般都是按时间戳读取文件,命令行加入-re。
常用示例:
查看文件信息
ffmpeg -i input.mp4 -hide_banner // -hide_banner 只显示元信息
查看docoder/encoder/demuxer/muxer/filter所有选项
Ffmpeg -h type=libx264
查看ffmpeg支持的容器
Ffmpeg -h demuxer=v4l2 alsa
查看v4l2或alsa可设置的参数
Ffmpeg -formats // mp4 mkv webm avi
查看ffmpeg支持的编码格式
Ffmpeg -codecs // h.264 h.265 vp8 vp9 avi mp3 aac
查看ffmpeg已安装的编码器
Ffmpeg -encoders // libx264 libx265 libvpx libfdk-aac aac
查看ffmpeg支持的muxers
ffmpeg -muxers
查看设备
ffmpeg -devices
采集图片
ffmpeg -y -hide_banner -i /dev/video0 -vframes 1 -s 640x480 -q:v 2 -f image2 1.jpg
ffmpeg -y -hide_banner -f v4l2 -input_format mjpeg -s 640x480 -i /dev/ucam000 -vframes 1 -q:v 2 -f image2 2.jpeg
ffmpeg -y -hide_banner -f v4l2 -input_format yuyv422 -s 640x480 -i /dev/ucam000 -vframes 1 -f image2 3.jpeg
采集yuyv422格式视频
ffplay -f video4linux2 -input_format yuyv422 -framerate 25 -video_size 640x480 -i /dev/video0
ffmpeg -f v4l2 -input_format yuyv422 -s 640x480 -i /dev/video1 -vcodec copy testyuyv.mkv
采集mjpeg格式视频
ffplay -f video4linux2 -input_format mjpeg -framerate 30 -video_size 640x480 -i /dev/video0
ffmpeg -f v4l2 -input_format mjpeg -s 640x480 -i /dev/video1 -vcodec copy testyuyv.mkv
ffmpeg -y -f v4l2 -input_format mjpeg -framerate 20 -s 640x480 -i /dev/video1 -vcodec copy -t 18 avtest18.avi
推送mjpeg视频流
ffmpeg -f video4linux2 -input_format mjpeg -framerate 25 -video_size 1280x720 -i /dev/video0 -vcodec copy -rtsp_transport tcp -f rtsp rtsp://172.17.6.213/test
转码推送RTSP流(H264)
ffmpeg -framerate 15 -video_size 640x480 -i /dev/video0 -vcodec h264_omx -rtsp_transport tcp -f rtsp rtsp://172.17.6.213/test
转码推送RTMP流(H264)
ffmpeg -framerate 15 -video_size 640x480 -i /dev/video0 -vcodec h264_omx -f flv rtmp://127.0.0.1/live/test
ffmpeg -f alsa -thread_queue_size 1024 -ar 16000 -ac 1 -i hw:1 -f video4linux2 -thread_queue_size 1024 -s 640x480 -r 25 -i /dev/video0 -c:v h264_omx -f flv "rtmp地址"
ffmpeg -y -f alsa -thread_queue_size 2048 -ar 22050 -ac 1 -i hw:1,0 -f v4l2 -thread_queue_size 1024 -input_format yuyv422 -s 320x240 -i /dev/video0 -f flv -ar 44100 -ac 1 -b:v 200k -b:a 100k -r 30 -c:a aac rtmp://192.168.3.126/live/test
同时录取音频视频信息
ffmpeg -y -f alsa -ac 2 -i hw:0,1 -acodec pcm_s16le -f v4l2 -input_format mjpeg -framerate 25 -s 640x480 -i /dev/video1 -vcodec copy -t 10 avtest10.mkv
// USB拾音器的音频数据格式为pcm_s16le,保存原始的pcm数据
ffmpeg -y -f alsa -thread_queue_size 2048 -ar 22050 -ac 1 -i hw:1,0 -f s16le -c:a copy raw.pcm
保存并推送数据(多路输出)
参考:Creating Multiple Outputs wiki
ffmpeg -y -loglevel repeat+error -f alsa -thread_queue_size 2048 -ar 22050 -ac 1 -i hw:1,0 -f v4l2 -thread_queue_size 1024 -input_format h264 -s 320x240 -r 25 -i /dev/video4 -ar 22050 -ac 1 -r 25 -c:a aac -c:v copy -map 0 -map 1 -f tee "avtest.flv|[f=flv]rtmp://192.168.3.122/live/test"
指定分辨率(-vf)
ffmpeg -i video.mp4 -vf scale=1280:720 video_1280_720.mp4
ffmpeg -i video.mp4 -vf scale=1280:-1 video_1280_720.mp4; -1 就表示这个值是缺省值,可以自动计算出来
YUV 编码的坑 -1 与 -2
但是这里有个坑,就是yuv编码中,分辨率必须是偶数。所以当缺省的宽或者高计算出来是一个奇数的话,就会报错。
这个时候我们可以使用-2来代替-1,这样计算出来的结果会取偶数,实际上,我更推荐从一开始就用-2。
# 比如原始分辨率是 1920 * 1080
ffmpeg -i video.mp4 -vf scale=-1:480 video_480.mp4
# 使用 -1 计算就会报错,因为算出来的是 853 * 480
ffmpeg -i video.mp4 -vf scale=-2:480 video_480.mp4
# 使用 -2 计算就不会报错,因为算出来的是 852 * 480
音频加图片变成视频
ffmpeg -loop 1 -i cover.jpg -i input.mp3 -c:v libx264 -c:a aac -b:a 192k -shortest output.mp4
上面命令中,有两个输入文件,一个是封面图片 cover.jpg,另一个是音频文件 input.mp3。
-loop 1 参数表示图片无限循环,-shortest 参数表示音频文件结束,输出视频就结束。
直接转码切片
ffmpeg -i video.webm -c:a aac -ac 2 -c:v h264 -bsf:a aac_adtstoasc -bsf:v h264_mp4toannexb -f hls -hls_playlist_type vod -hls_flags 'split_by_time+append_list' -hls_time 15 -hls_segment_filename "hls/%06d.ts" hls/index.m3u8
这个命令里面有太多的参数了,实际上平时不会用到这么多。
-bsf:a aac_adtstoasc -bsf:v h264_mp4toannexb 转换HLS或者MP4或者FLV时最好加上这两个选项
-f hls 指定格式为 hls
-hls_playlist_type vod 指定视频为点播 同时会默认设置 -hls_list_size 0,点播的m3u8索引中ts数目不限制
-hls_flags 'split_by_time+append_list' 默认情况下,切片时长可能会长短不齐,split_by_time 可以使时间尽可能的相同,append_list是以追加的方式添加在m3u8文件末尾,这也是拼接HLS视频的一种方式。
-hls_time 15 每个切片的长度
-hls_segment_filename "hls/%06d.ts" 切片的文件名 %06d 表示 6位数字,从 0 开始,前面不足补 0
海康IP摄像头
ffmpeg -rtsp_transport tcp -i rtsp://admin:jiangxing123@10.56.0.17:554/h264/ch1/sub/av_stream -vcodec copy -an -f flv rtmp://10.55.2.185:1935/live/camera0
ffmpeg -rtsp_transport tcp -i rtsp://192.168.1.19:554/mpeg4 \ # base
-vcodec copy -an -f flv rtmp://172.17.0.1/live/camera0 \ # stream
-flags +global_header -f stream_segment -segment_time 60 -segment_format_options movflags=+faststart -reset_timestamps 1 -vcodec copy -q:v 4 -an -r 24 -strftime 1 /data/tmpfs/camera/video/%s.flv \ # video
-r 2/1 -strftime 1 -y /data/tmpfs/camera/capture.jpg # capture
ffmpeg -i input_audio.mp3 -ss 00:01:14 output_audio.mp3
ffmpeg -i input_audio.wav -ss 00:00:30 -t 10 output_audio.wav
ffmpeg -i input_video.h264 -ss 00:01:30 -to 00:01:40 output_video.h264
ffmpeg -i input_audio.ogg -ss 5 output_audio.ogg
3.2 ffprobe
ffprobe 是一个用来收集媒体文件信息的工具,可以以指定的格式打印出媒体文件信息。你可以用ffprobe查看视频,音频甚至是一张图片的信息。
ffprobe -loglevel quiet -of json -show_format -show_streams video.webm
ffprobe -v quiet -of json -show_format -show_streams video.webm
ffprobe -v 8 -of json -show_format -show_streams video.webm

# -v = -loglevel 日志的级别,常用的参数就是 -v quiet / -v 8,这样就可以获得一个比较干净的输出。
# -of = -print_format 输出的格式,json应该算是可读性比较高的,也可以选择 xml, csv 等。
# -show_format 打印格式信息
# -show_streams 打印流信息
比较两个媒体文件的差异:
vimdiff <(ffprobe -v quiet -of json -show_format -show_streams video1.mp4) <(ffprobe -v quiet -of json -show_format -show_streams video2.mp4)
3.3 ffplay
ffplay可以作为音视频数据的图形化分析工具,通过ffplay可以看到视频图像的运动估计方向、音频数据的波形等。
ffplay -f video4linux2 -input_format yuyv422 -framerate 25 -video_size 640x480 -i /dev/video0
ffplay -f video4linux2 -input_format mjpeg -framerate 30 -video_size 640x480 -i /dev/video0
四、基本组成
FFmpeg框架的基本组成包含AVFormat、AVCodec、AVFilter、AVDevice、AVUtil等模块库。
libavcodec: Reads and writes codecs (H.264, H.265, VP9, …),编解码库
libavfilter: Various filters for video and audio,graph-based frame editing library,过滤库
libavdevice: special devices muxing/demuxing library,输入输出设备
libavutil: common utility library
Libswresample: audio resampling, format conversion and mixing
Libswscale: color conversion and scaling library,视频场景比例缩放、色彩映射转换
Libpostproc: post processing library,后期效果处理
4.1 AVFormat封装模块
AVFormat中实现了目前多媒体领域中的绝大多数媒体封装格式,包括封装和解封装,如MP4、FLV、KV、TS等文件封装格式,RTMP、RTSP、MMS、HLS等网络协议封装格式。FFmpeg是否支持某种媒体封装格式,取决于编译时是否包含了该格式的封装库。
libavformat: IO and Reads and writes container formats (AVI, MKV, MP4, …),容器库,格式解析
Libavformat (lavf) is a library for dealing with various media container formats. Its main two purposes are demuxing - i.e. splitting a media file into component streams, and the reverse process of muxing - writing supplied data in a specified container format. It also has an I/O module which supports a number of protocols for accessing the data (e.g. file, tcp, http and others). Before using lavf, you need to call av_register_all() to register all compiled muxers, demuxers and protocols.
A supported input format is described by an AVInputFormat struct, conversely an output format is described by AVOutputFormat.
Main lavf structure used for both muxing and demuxing is AVFormatContext, which exports all information about the file being read or written. As with most Libavformat structures, its size is not part of public ABI, so it cannot be allocated on stack or directly with av_malloc(). To create an AVFormatContext, use avformat_alloc_context() (some functions, like avformat_open_input() might do that for you).
Most importantly an AVFormatContext contains:
1)the input or output format. It is either autodetected or set by user for input; always set by user for output.
2)an array of AVStreams, which describe all elementary streams stored in the file. AVStreams are typically referred to using their index in this array.
3)an I/O context. It is either opened by lavf or set by user for input, always set by user for output (unless you are dealing with an AVFMT_NOFILE format).
4.2 AVCodec编解码
AVCodec除了支持MP4、AAC、MJPEG等自带的媒体编码格式之外,还支持第三方编码器,如H264需要x264编码器;H.265(HEVC)需要x265编码器;MP3需要使用libmp3lame编码器。
4.3 AVFilter滤镜
AVFilter库提供了一个通用的音频、视频、字幕等滤镜处理框架。在AVFilter中,滤镜框架可以有多个输入和多个输出。
ffmpeg -i INPUT -vf "split [main] [tmp]; [tmp] crop=iw:ih/2:0:0, vflip [flip];[main][filip] overlay=0:H/2" OUTPUT
相同的Filter线性链之间用逗号分割;
不同的Filter线性链之间用分号分割;
4.4 swscale视频图像转换计算
4.5 swresample音频转换计算
4.6 AVDevice设备库
Special devices muxing/demuxing library.
Libavdevice is a complementary library to libavformat. It provides various "special" platform-specific muxers and demuxers, e.g. for grabbing devices, audio capture and playback etc. As a consequence, the (de)muxers in libavdevice are of the AVFMT_NOFILE type (they use their own I/O functions). The filename passed to avformat_open_input() often does not refer to an actually existing file, but has some special device-specific meaning - e.g. for xcbgrab it is the display name.
To use libavdevice, simply call avdevice_register_all() to register all compiled muxers and demuxers. They all use standard libavformat API.
五、视频处理

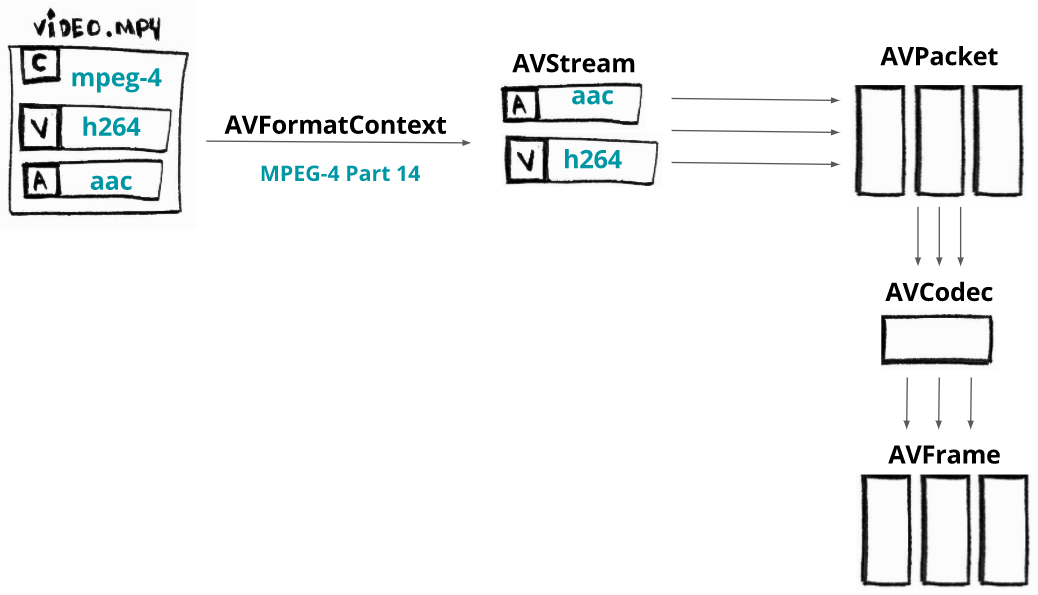
Suppose our video has two streams: an audio encoded with AAC CODEC and a video encoded with H264 (AVC) CODEC. From each stream we can extract pieces (slices) of data called packets that will be loaded into components named AVPacket.
AVFormatContext:保存需要读入的文件的格式信息,对容器或媒体文件的抽象。
AVStream :数据流(例如:音频,视频,字幕,元数据)。
AVCodecCotext:保存流的详细编码信息,比如视频的宽、高,编码类型等。
AVCodec:真正的编解码器,其中有编解码需要调用的函数
AVPacket:解析文件时会将音/视频帧读入到packet中。
AVFrame:用于保存数据帧的数据结构。
AVFilter:除了编解码外,针对于原始数据(AVFrame)的做音视频加工。
六、问题
1. Past duration 0.990669 too large
输入帧率大于输出帧率,导致一帧持续时间过长。
此为警告,不许处理,若要不显示只需要修改输入输出帧率相同即可。
2. 视频播放时进度条不显示时间,拉不动
写packet时pkt.duration没有赋值。
参考:
1. The Complete Guide for Using ffmpeg in Linux
2. ffmpeg-libav-tutorial ffmpeg应用教程
3. http://slhck.info/ffmpeg-encoding-course/
4. FFmpeg 不完全实战 知乎
5.我的跟我学Ffmpeg 视频受众有哪些人 王纲 视频
6. Using Visual Studio Code to debug ffmpeg
7.FFmpeg开发环境构建 - 叶余

 浙公网安备 33010602011771号