期中架构&防火墙¥四表五链
今日内容
- 架构图
- 包过滤防火墙
- Iptables
- 新建虚拟机
内容详细
一、架构图
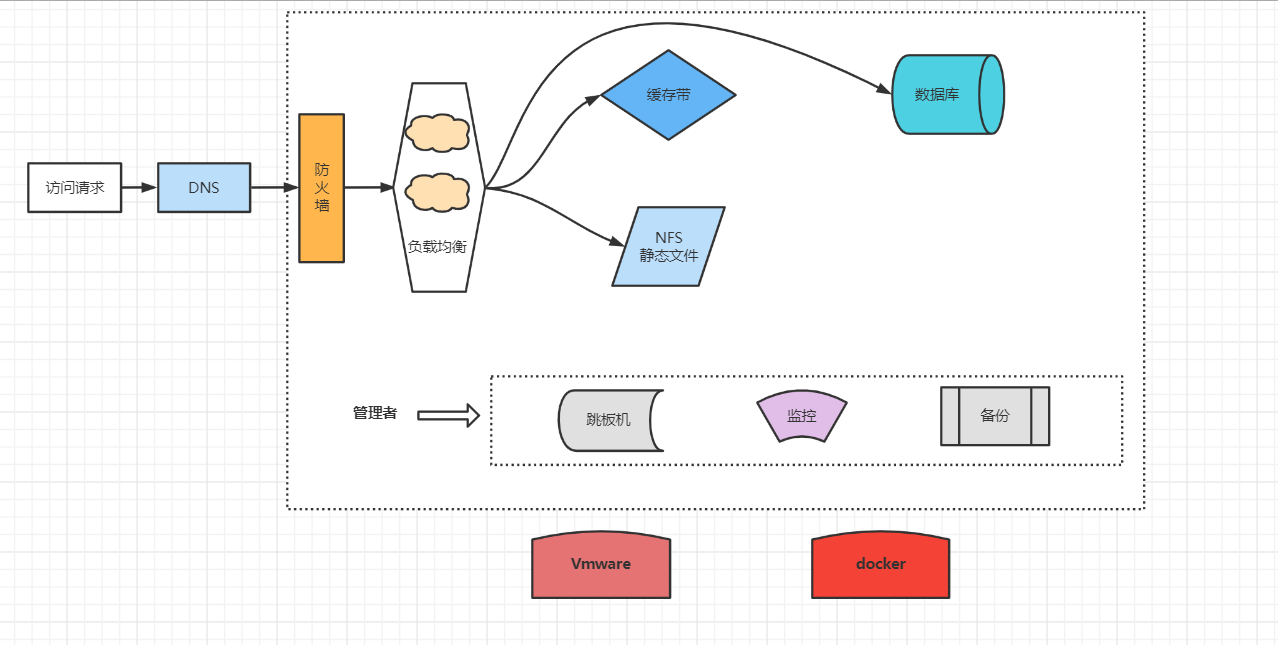
用户通过域名访问一个网站类比开车去饭店用餐
访问网站的流程
1、浏览器输入网站的域名(www.baidu.com),向网站请求资源
2、域名发送给 DNS 服务器解析成网站的 IP 地址,通过 IP 地址可以找到该网站的服务器地址
3、经过整个网站服务器的防火墙检验,进入内部
4、访问流量通过负载均衡引向各个 web 服务器
5、服务器首先在缓存带中寻找资源(提前准备好的比较快)
6、缓存带没有则去数据库服务器中找
7、再去静态文件 NFS 服务器中找

8、在底层有 跳板机 、监控、 备份
9、以上所有服务器运行在一些相应的平台中:Vmware 、docker
流程图
图1:
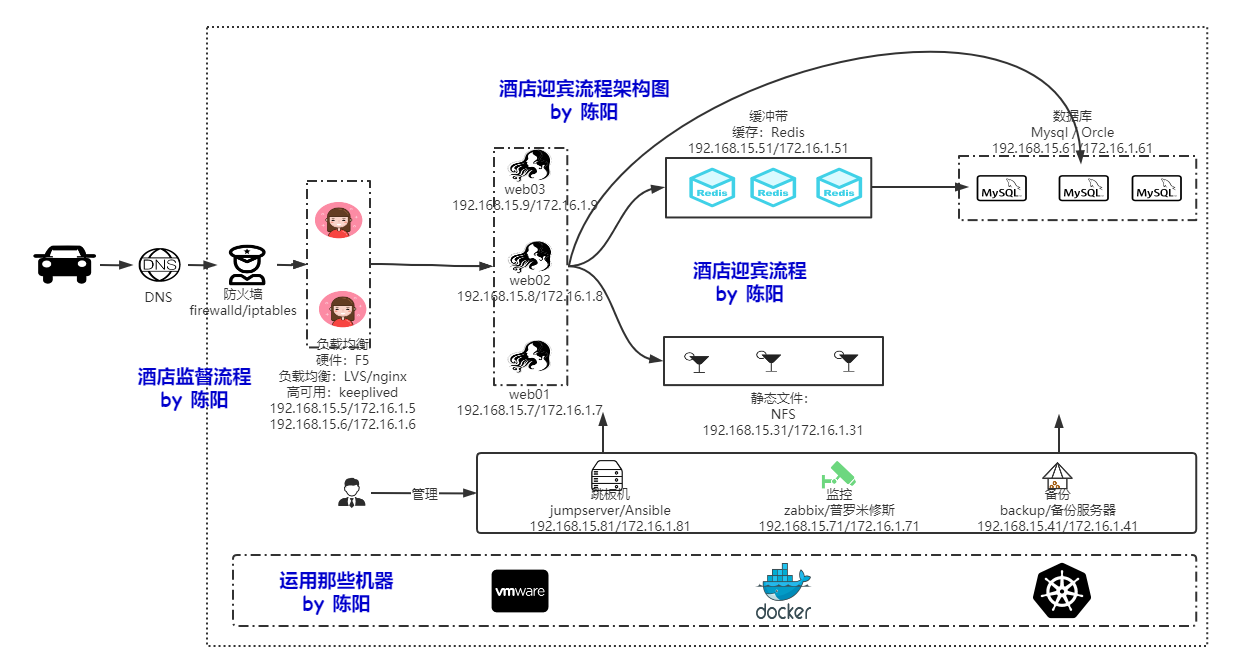
图二 :
二、包过滤防火墙
1、什么是包过滤防火墙
什么是包
在数据传输的过程中,并不是一次性全部传输完成的;
而是将数据分成若干个数据包,一个个一点点地传输
什么是包过滤防火墙
过滤数据包的防火墙
2、包过滤防火墙如何实现
通过系统安全框架,过滤数据包
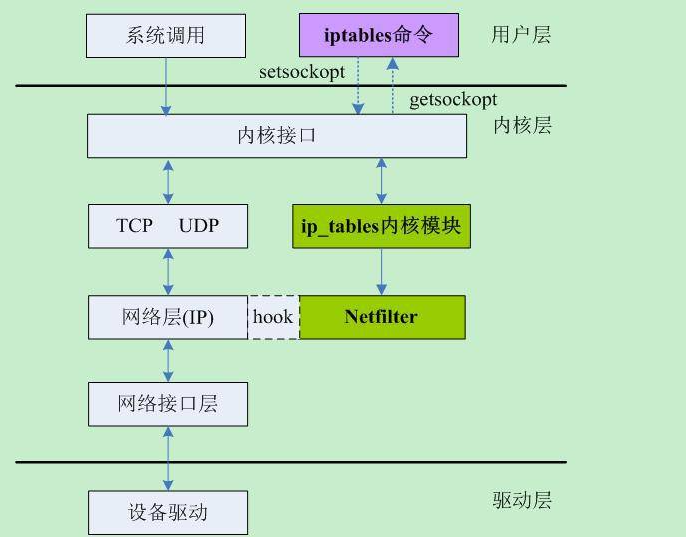
三、Iptable
1、简介
什么是防火墙
防止别人恶意访问
它是一种位于内部网络与外部网络之间的网络安全系统。是一项信息安全的防护系统,依照特定的规则,允许或是限制传输的数据通过。
防火墙(Firewall),也称防护墙,是由Check Point 创立者Gil Shwed于1993 年发明并引入国际互联网(US5606668(A)1993-12-15)。

 在网络的世界里,要由防火墙过滤的就是承载通信数据的通信包。

    在网络中,所谓“防火墙”,是指一种将内部网和公众访问网(如Internet)分开的方法,它实际上是一种隔离技术。防火墙是在两个网络通讯时执行的一种访问控制尺度,它能允许你“同意”的人和数据进入你的网络,同时将你“不同意”的人和数据拒之门外,最大限度地阻止网络中的黑客来访问你的网络。换句话说,如果不通过防火墙,公司内部的人就无法访问Internet,Internet上的人也无法和公司内部的人进行通信。
防火墙种类
1、硬件防火墙
	F5

2、软件防火墙
	iptables
	firewalld
安全组
补充
防火墙的分类方法,主要有以下6种:
1、软、硬件形式分类:软件防火墙、硬件防火墙、芯片级防火墙。

2、防火墙技术分类:包过滤型防火墙、应用代理型防火墙 。

3、防火墙结构分类:单一主机防火墙、路由器集成式防火墙、分布式防火墙。

4、防火墙的应用部署位置分类:边界防火墙、个人防火墙、混合防火墙。

5、防火墙性能分类:百兆级防火墙、千兆级防火墙。
6、防火墙使用方法分类:网络层防火墙、物理层防火墙、链路层防火墙。
2、Iptable 链的概念
四表五链
哪四个表,有哪些作用
具备某种功能的集合叫做表
1、filter : 负责做过滤功能
	INPUT、OUTPUT、FORWARD

2、nat : 网络地址转换
	PREROUTING、INPUT、OUTPUT、POSTROUTING

3、mangle : 负责修改数据包内容
	PREROUTING、INPUT、OUTPUT、POSTROUTING、FORWARD

4、raw : 负责数据包跟踪
	PREROUTING、OUTPUT
哪五条链,运行在哪些地方
1、PREROUTING : 主机外报文进入位置,允许的表mangle, nat(目标地址转换,把本机地址转换为真正的目标机地址,通常指响应报文)

2、INPUT : 报文进入本机用户空间位置,允许的表filter, mangle

3、OUTPUT : 报文从本机用户空间出去的位置,允许filter, mangle, nat

4、FORWARD : 报文经过路由并且发觉不是本机决定转发但还不知道从哪个网卡出去,允许filter, mangle

5、POSTROUTING : 报文经过路由被转发出去,允许mangle,nat(源地址转换,把原始地址转换为转发主机出口网卡地址)
3、Iptables 流程图
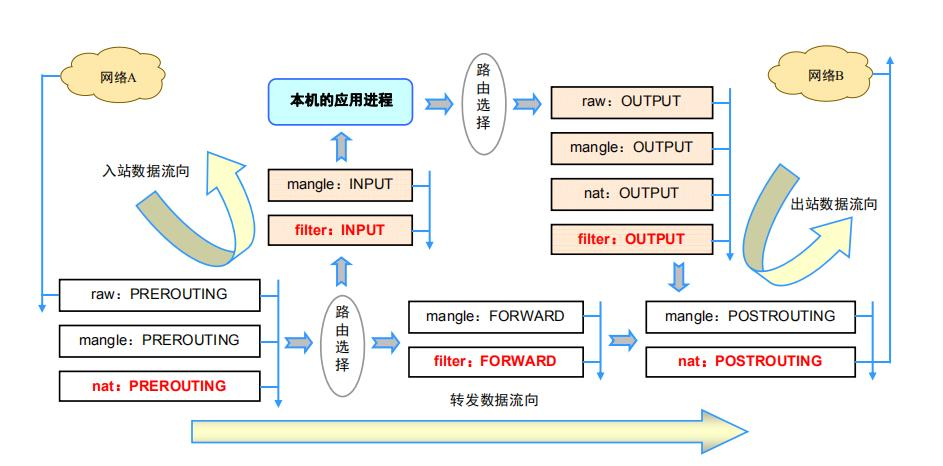
三个模板
    流入本机:PREROUTING  -->  INPUT  --> PROCESS(进程)
    经过本机:PREROUTING  --> FORWARD --> POSTROUTING
    从本机流出:PROCESS(进程) -->  OUTPUT --> POSTROUTING
流入本机:
流出本机:
经过本机(vpn)
中转站
流入本机: A  --->  PREROUTING  --->  INPUT ---> B
流出本机:OUTPUT  --->  POSTROUTING  ---> B
经过本机: A ---> OUTPUT ---> POSTROUTING | ---> PREROUTING ---> FORWARD  ---> POSTROUTING ---> C ---> PREROUTING  ---> INPUT ---> B

filter :  INPUT 、OUTPUT 、FORWARD
nat : PREROUTING 、 OUTPUT、 POSTROUTING
raw : PREROUTING、 OUTPUT
mangle : PREROUTING INPUT FORWARD OUTPUT POSTROUTING
四、新建虚拟机
1、模板机要准备的文件
创建一个 shell 脚本,用于修改虚拟机的ip和主机名
执行该脚本可以接收两个参数,
一个是修改后的ip地址后缀,一个是主机名
在脚本文件中用 $1 和 $2 来接收这两个参数,用于动态修改系统配置
# 1、指定解析器
#!/bin/bash
# 2、接收外部传入的参数 $1,修改网卡ip
sed -i "s/.100/.$1/g" /etc/config/network-scripts/ifcfg-eth[01]
# 3、修改主机名
hostnamectl set-hostname $2
# 4、修改完 ip 之后需要重启网络才能生效
systemctl restart network
易错点 : 脚本文件中如果要用 $1 接收外部输入的值,$1存在命令中的正则中时,引号一定要用双引号,接收变量值的意思,单引号就是输入什么打印什么
例子 :
sed -i "s/.100/.$1/g" /etc/sysconfig/network-scripts/ifcfg-eth[01]
传入系统优化文件 init.sh
Linux 系统优化文件的模板在博客的底部,请自取
给系统优化文件和新建的 shell 脚本文件都添加可执行权限
chmod +x /root/init.sh
chmod +x /root/changeIP
(备用)使用 xftp 给虚拟机系统传文件
如果下载 lrzsz 仍然传不了文件,那就下载 xftp 上传
测试脚本文件是否能修改 ip 和 主机名成功
/root/changeIP 81 m01
2、要创建的虚拟机(服务器)
负载均衡( 2 个)
# 类似迎宾服务员
lb01
lb02

使用ip :
	192.168.15.5
	192.168.15.6
网页资源( 3 个)
# 类似指引服务员
web01
web02
web03

使用ip :
	192.168.15.7
	192.168.15.8
	192.168.15.9
NFS 静态文件
# 类似仓库
nfs

使用ip :
	192.168.15.31
备份(backup)
backup

使用ip :
	192.168.15.41
数据库(db01)
# 类似食品
db01

使用ip :
	192.168.15.51
redis 缓存(cache)
# 类似先准备好的菜
事先准备好的资源

使用ip :
	192.168.15.61
zabbix 监控(prometheus)
使用ip :
	192.168.15.71
跳板机(jumpserver)
m01

使用ip :
	192.168.15.81
系统优化文件:
#!/bin/bash

mv /etc/yum.repos.d/CentOS-Base.repo /etc/yum.repos.d/CentOS-Base.repo.backup

curl -o /etc/yum.repos.d/CentOS-Base.repo https://mirrors.aliyun.com/repo/Centos-7.repo
curl -o /etc/yum.repos.d/epel.repo http://mirrors.aliyun.com/repo/epel-7.repo

yum update -y

yum -y install python-setuptools python-pip gcc gcc-c++ autoconf libjpeg libjpeg-devel libpng libpng-devel freetype freetype-devel libxml2 libxml2-devel zlib zlib-devel glibc glibc-devel glib2 glib2-devel bzip2 bzip2-devel zipqunzip ncurses ncurses-devel curl curl-devel e2fsprogs e2fsprogs-devel krb5-devel libidn libidn-devel openssl openssh openssl-develnss_ldap openldap openldap-devel openldap-clients openldap-servers libxslt-devel libevent-devel ntp libtool-ltdl bison libtool vim-enhanced python wget lsof iptraf strace lrzsz kernel-devel kernel-headers pam-devel tcl tk cmake ncurses-devel bisonsetuptool popt-devel net-snmp screen perl-devel pcre-devel net-snmp screen tcpdump rsync sysstat man iptables sudo libconfiggit bind-utils tmux elinks numactl iftop bwm-ng net-tools expect

setenforce 0

sed -i 's#SELINUX=enforcing#SELINUX=disabled#g' /etc/selinux/config

systemctl disable --now firewalld

echo '#Timing synchronization time' >>/var/spool/cron/root

echo '0 */1 * * * /usr/sbin/ntpdate ntp1.aliyun.com &>/dev/null' >>/var/spool/cron/root

cat >>/etc/sysctl.conf <<EOF
net.ipv4.tcp_fin_timeout = 2
net.ipv4.tcp_tw_reuse = 1
net.ipv4.tcp_tw_recycle = 1
net.ipv4.tcp_syncookies = 1
net.ipv4.tcp_keepalive_time = 600
net.ipv4.ip_local_port_range = 4000    65000
net.ipv4.tcp_max_syn_backlog = 16384
net.ipv4.tcp_max_tw_buckets = 36000
net.ipv4.route.gc_timeout = 100
net.ipv4.tcp_syn_retries = 1
net.ipv4.tcp_synack_retries = 1
net.core.somaxconn = 16384
net.core.netdev_max_backlog = 16384
net.ipv4.tcp_max_orphans = 16384
net.ipv4.ip_forward = 1
EOF

sysctl -p

sed -i 's/#UseDNS yes/UseDNS no/g' /etc/ssh/sshd_config
sed -i 's/GSSAPIAuthentication yes/GSSAPIAuthentication no/g' /etc/ssh/sshd_config
systemctl restart sshd

systemctl disable abrt-ccpp.service
systemctl disable abrt-oops.service
systemctl disable abrt-vmcore.service
systemctl disable abrt-xorg.service
systemctl disable abrtd.service
systemctl disable accounts-daemon.service
systemctl disable atd.service
systemctl disable auditd.service
systemctl disable autovt@.service
systemctl disable avahi-daemon.service
systemctl disable bluetooth.service
systemctl disable cups.service
systemctl disable dbus-org.bluez.service
systemctl disable dbus-org.fedoraproject.FirewallD1.service
systemctl disable dbus-org.freedesktop.Avahi.service
systemctl disable dbus-org.freedesktop.ModemManager1.service
systemctl disable dbus-org.freedesktop.NetworkManager.service
systemctl disable dbus-org.freedesktop.nm-dispatcher.service
systemctl disable display-manager.service
systemctl disable dmraid-activation.service
systemctl disable firewalld.service
systemctl disable gdm.service
systemctl disable irqbalance.service
systemctl disable iscsi.service
systemctl disable ksm.service
systemctl disable ksmtuned.service
systemctl disable libstoragemgmt.service
systemctl disable libvirtd.service
systemctl disable lvm2-monitor.service
systemctl disable mcelog.service
systemctl disable mdmonitor.service
systemctl disable microcode.service
systemctl disable ModemManager.service
systemctl disable multipathd.service
systemctl disable NetworkManager-dispatcher.service
systemctl disable NetworkManager.service
systemctl disable postfix.service
systemctl disable qemu-guest-agent.service
systemctl disable rngd.service
systemctl disable rtkit-daemon.service
systemctl disable smartd.service
systemctl disable spice-vdagentd.service
systemctl disable systemd-readahead-collect.service
systemctl disable systemd-readahead-drop.service
systemctl disable systemd-readahead-replay.service
systemctl disable tuned.service
systemctl disable vgauthd.service
systemctl disable vmtoolsd.service

cat >/etc/motd <<EOF
#********************************************************************#
# WelCome To Login                                                    #
# Author:chenyang                                                    #
# WX:Alvins0918                                                      #
# Date:2021-05-20                                                    #
# Description:老男孩IT教育Linux学院                                  #
# Copyright©:2021 All rightsreserved                                 #
#********************************************************************#
EOF

 浙公网安备 33010602011771号