JAVA WEB的前世今生
JAVA WEB的前世今生
1990年伯纳斯·李发明了WWW,从此完全改变了数字世界。
早期的网站功能都是很简单的,那时的网站还是静态页面,所谓的资源就是实实在在的文件,URL里的路径也是实实在在的文件路径。很明显,这样的缺点就是不能动态展示数据,如果需要发布一篇文章,就需要将文件上传到服务器,再编辑主页,将文章链接进去,如果找不到文件,那就返回404。

随着人民日益增长的美好生活需要和发展不平衡不充分之间的矛盾网络规模的发展,人们对动态网页的诉求和早期的静态网页技术的矛盾成为主要矛盾后,就需要一种技术能够动态生成网页,这个时候的解决方案就是CGI(Common Gateway Interface),译作“通用网关接口”。
起:CGI
谈到动态网页开发,一个绕不开的技术就是CGI,正如其名,Common Gateway Interface,通用是他的第一个特性,无论是C、C++、Java还是Python、Perl都是支持CGI的,理论上任何一种具有标准输入输出和环境变量的语言都可以用来编写CGI程序。
我们可以写一个简单的脚本hello放到服务器的cgi-bin目录下,然后访问http://example.com/cgi-bin/hello就可以看到脚本生效了,当然,这需要你的服务器支持CGI。
#!/usr/bin/python
# -*- coding: UTF-8 -*-

print('Content-type:text/html')
print('')						# blank line, end of headers
print('<html>')
print('<head>')
print('<meta charset="utf-8">')
print('<title>Hello Word!</title>')
print('</head>')
print('<body>')
print('<h2>Hello Word!</h2>')
print('</body>')
print('</html>')
虽然繁琐,但是屏蔽了底层的TCP连接,HTTP协议解析,开发的工作就只需要拼接字符串,做做输入输入就可以了,实在是一个飞跃。
CGI的第二个单词是Gateway,网关这个词在不同的语境里面有不同的含义,例如微服务、网络传输层,但是意思其实都差不多,可以理解为协议转换器,负责将网关两侧的协议转换。
Interface翻译成接口,所谓接口,就是需要遵守的规则,比如如何从环境变量获取数据输入,如何从标准输入stdin获取数据请求。
CGI的弊端也很明显,那就是他使用的是fork/exec模式,每当发送一次CGI请求都会fork一个进程,这在并发请求下会造成不小的压力,为了解决这个问题,后面诞生了FastCGI,也就是使用了常驻内存的进程池技术,由调度器将请求发送给相应的handler进程处理,请求结束后继续等待下一个请求。
时至今日,CGI早已淡出人们的视线,仍然在大规模使用的恐怕只有在C/C++了,这里面需要点名的就是鹅厂:
承:Servlet
JAVA最早是面向嵌入式设备的语言,在CGI蓬勃发展的年代,作为后来者自然而然的站在了前人的肩上,针对CGI的一些缺点,提出了Servlet。
Servlet很简单,只是一个接口,几行代码,5个方法,只要实现了Servlet接口就是Servlet。
public interface Servlet {
    void init(ServletConfig var1) throws ServletException;

    ServletConfig getServletConfig();

    void service(ServletRequest var1, ServletResponse var2) throws ServletException, IOException;

    String getServletInfo();

    void destroy();
}
其中最重要的就是三件事情了:
- init,初始化
- service,接受到请求
- destroy,销毁
加上servlet的加载和创建,他的什么周期共包含5个过程,
以下就是一个很简单的Servlet了
import javax.servlet.ServletException;
import javax.servlet.http.HttpServlet;
import javax.servlet.http.HttpServletRequest;
import javax.servlet.http.HttpServletResponse;
import java.io.IOException;

public class HelloServlet extends HttpServlet {
    private static final long serialVersionUID = -4159478011804388333L;

    @Override
    protected void doGet(HttpServletRequest req, HttpServletResponse resp) throws ServletException, IOException {
        resp.getWriter().println("Hello World!");
    }
}
web.xml文件用来描述servlet的映射关系
<?xml version="1.0" encoding="UTF-8"?>
<web-app xmlns="http://xmlns.jcp.org/xml/ns/javaee"
         xmlns:xsi="http://www.w3.org/2001/XMLSchema-instance"
         xsi:schemaLocation="http://xmlns.jcp.org/xml/ns/javaee http://xmlns.jcp.org/xml/ns/javaee/web-app_4_0.xsd"
         version="4.0">
    <servlet>
        <servlet-name>HelloServlet</servlet-name>
        <servlet-class>net.sk32.demo.HelloServlet</servlet-class>
    </servlet>
    <servlet-mapping>
        <servlet-name>HelloServlet</servlet-name>
        <url-pattern>/hello</url-pattern>
    </servlet-mapping>
</web-app>
Apache Tomcat
前面说了,Servlet只是一个协议,他并不直接与客户端打交道,我们写的这个servlet需要一个容器来执行,称做Servlet容器,Tomcat就是其中最著名的一个。
![]()
Tomcat 的主要目录结构
➜  tomcat tree -L 1 apache-tomcat-9.0.38
├── bin		// 存放可执行的文件,如 startup 和 shutdown
├── conf	// 存放配置文件,如核心配置文件 server.xml 和应用默认的部署描述文件 web.xml
├── lib		// 存放 Tomcat 运行需要的jar包
├── logs	// 存放运行的日志文件
├── webapps	// 存放默认的 web 应用部署目录
└── work	// 存放 web 应用代码生成和编译文件的临时目录
将前面的HelloServlet.java编译成class文件,再加上web.xml文件,拷贝到webapps目录,然后打开浏览器访问http://localhost:8080/helloWorld/hello就可以看到返回的页面了。
➜  webapps tree helloWorld
helloWorld
└── WEB-INF
    ├── HelloServlet.class
    └── web.xml
Tomcat的核心原理
这部分先占个坑,讲起来还需要一篇文章。
JSP(Java Server Pages)
同一时期PHP凭借良好的用户体验(可以在HTML中插入代码)大行其道,而这时的JAVA程序员画风还是这样的:
	public void doGet(HttpServletRequest request, HttpServletResponse response)
			throws ServletException, IOException {

		response.setContentType("text/html");
		PrintWriter out = response.getWriter();
		out.println("<!DOCTYPE HTML PUBLIC \"-//W3C//DTD HTML 4.01 Transitional//EN\">");
		out.println("<HTML>");
		out.println("  <HEAD><TITLE>A Servlet</TITLE></HEAD>");
		out.println("  <BODY>");
		out.print("    This is ");
		out.print(this.getClass());
		out.println(", using the GET method");
		out.println("  </BODY>");
		out.println("</HTML>");
		out.flush();
		out.close();
	}
一个页面几千行println简直蔚为壮观。
这个时候很多人纷纷转向了最好的语言PHP,SUN公司坐不住了,赶紧推出了JSP,画风就变成这样了:
<%@ page contentType="text/html;charset=UTF-8" language="java" %>
<html>
  <head>
    <title>$Title$</title>
  </head>
  <body>
  $END$
  </body>
</html>
看起来正常多了,是不是和HTML很像,那他是怎么运作的呢,实际上JSP本质上还是servlet,例如上面这个index.jsp最终会生成index.jsp.java文件:
package org.apache.jsp;

import javax.servlet.*;
import javax.servlet.http.*;
import javax.servlet.jsp.*;

public final class index_jsp extends org.apache.jasper.runtime.HttpJspBase
    implements org.apache.jasper.runtime.JspSourceDependent,
                 org.apache.jasper.runtime.JspSourceImports {
                     ...
  public void _jspService(final javax.servlet.http.HttpServletRequest request, final javax.servlet.http.HttpServletResponse response)
      throws java.io.IOException, javax.servlet.ServletException {
                         ...
    try {
      response.setContentType("text/html;charset=UTF-8");
      pageContext = _jspxFactory.getPageContext(this, request, response,
      			null, true, 8192, true);
      _jspx_page_context = pageContext;
      application = pageContext.getServletContext();
      config = pageContext.getServletConfig();
      session = pageContext.getSession();
      out = pageContext.getOut();
      _jspx_out = out;

      out.write("\n");
      out.write("\n");
      out.write("<html>\n");
      out.write("  <head>\n");
      out.write("    <title>$Title$</title>\n");
      out.write("  </head>\n");
      out.write("  <body>\n");
      out.write("  $END$\n");
      out.write("  </body>\n");
      out.write("</html>\n");
    } catch (java.lang.Throwable t) {
        ...
    } finally {
      _jspxFactory.releasePageContext(_jspx_page_context);
    }
  }
}
转:Spring
严格来说,Spring并不仅仅是解决Web开发而产生的,他更多的是一套框架,为了解决企业应用程序开发的复杂性而创建的,这篇文章更多的还是讲SpringMVC。
MVC并不是JAVA独有的,Model-View-Controller是一种经典的三层架构,例如PHP、Python都有相应的框架。
M(Model):模型,处理业务逻辑,封装实体
V(View):视图,展示内容
C(Controller):控制器,调度分发(接受请求-调用模型-转发视图)
太阳底下没有新鲜事,SpringMVC也是基于servlet的,想要使用SpringMVC,我们需要在前面的web.xml中配置DispatcherServlet,将所有请求映射到org.springframework.web.servlet.DispatcherServlet。
<servlet>
    <servlet-name>springmvc</servlet-name>
    <servlet-class>org.springframework.web.servlet.DispatcherServlet</servlet-class>
</servlet>
<servlet-mapping>
    <servlet-name>springmvc</servlet-name>
    <url-pattern>/</url-pattern>
</servlet-mapping>
SpringMVC请求流程
默认情况下,SpringMVC会去WEB-INF目录下寻找[servlet名称]-servlet.xml文件,在那里定义相关的Beans,大致的流程如下:
- 启动Servlet容器,例如
Tomcat,对DispatcherServlet进行实例化,然后调用它的init()方法进行初始化,这个过程完成:加载web.xml初始化参数;建立WebApplicationContext(SpringMVC的IOC容器);进行组件的初始化; - 客户端请求由
Servlet容器接收并匹配映射路径,按照我们在web.xml里的配置,转交给DispatcherServlet; DispatcherServlet从容器中查找能够处理Request请求的HandlerMapping实例,返回HandlerExecutionChain;DispatcherServlet查找能够处理该Handler的HandlerAdapter组件;- 执行
HandlerExecutionChain中所有拦截器的preHandler()方法,然后再利用HandlerAdapter执行Handler,执行完成得到ModelAndView,再依次调用拦截器的postHandler()方法; - 利用
ViewResolver将ModelAndView或是Exception(可解析成 ModelAndView)解析成View,然后 View 会调用render()方法再根据 ModelAndView 中的数据渲染出页面; - 最后再依次调用拦截器的
afterCompletion()方法,这一次请求就结束了。
SpringMVC源码分析
我们根据这个思路来看代码:
我们先从核心的DispatcherServlet入手,先全局了解一下继承关系。

DispatcherServlet初始化
根据前面的描述,servlet在初始化阶段会调用init()方法,DispatcherServlet的init()是继承自HttpServletBean#init
/**
 * Map config parameters onto bean properties of this servlet, and
 * invoke subclass initialization.
 * @throws ServletException if bean properties are invalid (or required
 * properties are missing), or if subclass initialization fails.
 */
@Override
public final void init() throws ServletException {
    // 处理init-param参数
    PropertyValues pvs = new ServletConfigPropertyValues(getServletConfig(), this.requiredProperties);
    if (!pvs.isEmpty()) {
        try {
            BeanWrapper bw = PropertyAccessorFactory.forBeanPropertyAccess(this);
            ResourceLoader resourceLoader = new ServletContextResourceLoader(getServletContext());
            bw.registerCustomEditor(Resource.class, new ResourceEditor(resourceLoader, getEnvironment()));
            initBeanWrapper(bw);
            bw.setPropertyValues(pvs, true);
        }
        catch (BeansException ex) {
            if (logger.isErrorEnabled()) {
                logger.error("Failed to set bean properties on servlet '" + getServletName() + "'", ex);
            }
            throw ex;
        }
    }
    // 初始化servlet
    initServletBean();
}
initServletBean这个方法在FrameworkServlet#initServletBean中实现了:
/**
 * Overridden method of {@link HttpServletBean}, invoked after any bean properties
 * have been set. Creates this servlet's WebApplicationContext.
 */
@Override
protected final void initServletBean() throws ServletException {
    getServletContext().log("Initializing Spring " + getClass().getSimpleName() + " '" + getServletName() + "'");
    if (logger.isInfoEnabled()) {
        logger.info("Initializing Servlet '" + getServletName() + "'");
    }
    long startTime = System.currentTimeMillis();
    try {
        // 初始化WebApplicationContext容器
        this.webApplicationContext = initWebApplicationContext();
        // 挂载点,默认没有任何实现
        initFrameworkServlet();
    }
    catch (ServletException | RuntimeException ex) {
        logger.error("Context initialization failed", ex);
        throw ex;
    }
    if (logger.isDebugEnabled()) {
        String value = this.enableLoggingRequestDetails ?
                            "shown which may lead to unsafe logging of potentially sensitive data" :
                            "masked to prevent unsafe logging of potentially sensitive data";
        logger.debug("enableLoggingRequestDetails='" + this.enableLoggingRequestDetails +
                            "': request parameters and headers will be " + value);
    }
    if (logger.isInfoEnabled()) {
        logger.info("Completed initialization in " + (System.currentTimeMillis() - startTime) + " ms");
    }
}
initWebApplicationContext方法初始化并返回容器,在FrameworkServlet#initWebApplicationContext实现:
/**
 * Initialize and publish the WebApplicationContext for this servlet.
 * <p>Delegates to {@link #createWebApplicationContext} for actual creation
 * of the context. Can be overridden in subclasses.
 * @return the WebApplicationContext instance
 * @see #FrameworkServlet(WebApplicationContext)
 * @see #setContextClass
 * @see #setContextConfigLocation
 */
protected WebApplicationContext initWebApplicationContext() {
    // ROOT context
    WebApplicationContext rootContext =
                    WebApplicationContextUtils.getWebApplicationContext(getServletContext());
    // 在创建该Servlet注入的上下文
    WebApplicationContext wac = null;
    if (this.webApplicationContext != null) {
        // A context instance was injected at construction time -> use it
        wac = this.webApplicationContext;
        if (wac instanceof ConfigurableWebApplicationContext) {
            ConfigurableWebApplicationContext cwac = (ConfigurableWebApplicationContext) wac;
            if (!cwac.isActive()) {
                // The context has not yet been refreshed -> provide services such as
                // setting the parent context, setting the application context id, etc
                if (cwac.getParent() == null) {
                    // 注入到 ROOT 上下文
                    cwac.setParent(rootContext);
                }
                configureAndRefreshWebApplicationContext(cwac);
            }
        }
    }
    if (wac == null) {
        // 查找已经绑定的上下文
        wac = findWebApplicationContext();
    }
    if (wac == null) {
        // 如果没有找到相应的上下文,并指定父亲为ROOT
        wac = createWebApplicationContext(rootContext);
    }
    if (!this.refreshEventReceived) {
        // 刷新上下文(执行一些初始化),这里加了同步代码块,我是5.2.6版本
        synchronized (this.onRefreshMonitor) {
            onRefresh(wac);
        }
    }
    // 推送事件通知
    if (this.publishContext) {
        // Publish the context as a servlet context attribute.
        String attrName = getServletContextAttributeName();
        getServletContext().setAttribute(attrName, wac);
    }
    return wac;
}
DispatcherServlet#onRefresh实现了onRefresh方法,基本是一些常用组件的初始化,我们可以详细的看一下initHandlerMappings和initHandlerAdapters:
/**
 * This implementation calls {@link #initStrategies}.
 */
@Override
    protected void onRefresh(ApplicationContext context) {
    initStrategies(context);
}

protected void initStrategies(ApplicationContext context) {
    initMultipartResolver(context);
    initLocaleResolver(context);
    initThemeResolver(context);
    initHandlerMappings(context);
    initHandlerAdapters(context);
    initHandlerExceptionResolvers(context);
    initRequestToViewNameTranslator(context);
    initViewResolvers(context);
    initFlashMapManager(context);
}

/**
 * Initialize the HandlerMappings used by this class.
 * <p>If no HandlerMapping beans are defined in the BeanFactory for this namespace,
 * we default to BeanNameUrlHandlerMapping.
 */
private void initHandlerMappings(ApplicationContext context) {
    this.handlerMappings = null;
    if (this.detectAllHandlerMappings) {
        // 从ApplicationContext容器中获取所有的HandlerMapping实例
        // 包括祖先contexts,就是一个递归实现的
        Map<String, HandlerMapping> matchingBeans =
                            BeanFactoryUtils.beansOfTypeIncludingAncestors(context, HandlerMapping.class, true, false);
        if (!matchingBeans.isEmpty()) {
            this.handlerMappings = new ArrayList<>(matchingBeans.values());
            // 排序,是OrderComparator的子类,可以支持@Order和@Priority注解
            AnnotationAwareOrderComparator.sort(this.handlerMappings);
        }
    } else {
        try {
            HandlerMapping hm = context.getBean(HANDLER_MAPPING_BEAN_NAME, HandlerMapping.class);
            this.handlerMappings = Collections.singletonList(hm);
        }
        catch (NoSuchBeanDefinitionException ex) {
            // Ignore, we'll add a default HandlerMapping later.
        }
    }
    // 如果没有HandlerMapping,加载默认的
    if (this.handlerMappings == null) {
        this.handlerMappings = getDefaultStrategies(context, HandlerMapping.class);
        if (logger.isTraceEnabled()) {
            logger.trace("No HandlerMappings declared for servlet '" + getServletName() +
                                    "': using default strategies from DispatcherServlet.properties");
        }
    }
}

/**
 * Initialize the HandlerAdapters used by this class.
 * <p>If no HandlerAdapter beans are defined in the BeanFactory for this namespace,
 * we default to SimpleControllerHandlerAdapter.
 */
private void initHandlerAdapters(ApplicationContext context) {
    this.handlerAdapters = null;
    if (this.detectAllHandlerAdapters) {
        // HandlerAdapters也是一样的,就不详细说明了
        Map<String, HandlerAdapter> matchingBeans =
                            BeanFactoryUtils.beansOfTypeIncludingAncestors(context, HandlerAdapter.class, true, false);
        if (!matchingBeans.isEmpty()) {
            this.handlerAdapters = new ArrayList<>(matchingBeans.values());
            // We keep HandlerAdapters in sorted order.
            AnnotationAwareOrderComparator.sort(this.handlerAdapters);
        }
    } else {
        try {
            HandlerAdapter ha = context.getBean(HANDLER_ADAPTER_BEAN_NAME, HandlerAdapter.class);
            this.handlerAdapters = Collections.singletonList(ha);
        }
        catch (NoSuchBeanDefinitionException ex) {
            // Ignore, we'll add a default HandlerAdapter later.
        }
    }
    // Ensure we have at least some HandlerAdapters, by registering
    // default HandlerAdapters if no other adapters are found.
    if (this.handlerAdapters == null) {
        this.handlerAdapters = getDefaultStrategies(context, HandlerAdapter.class);
        if (logger.isTraceEnabled()) {
            logger.trace("No HandlerAdapters declared for servlet '" + getServletName() +
                                    "': using default strategies from DispatcherServlet.properties");
        }
    }
}
HandlerMapping和HandlerAdapters
这里需要插入一点,HandlerMapping和HandlerAdapters是什么?
HandlerMapping接口主要有两类,分别继承自AbstractUrlHandlerMapping和AbstractHandlerMethodMapping,都继承自抽象类AbstractHandlerMapping。HandlerMapping接口只有一个方法getHandler,接受request,根据URL和method返回HandlerExecutionChain也就是handler和一堆HandlerInterceptor拦截器:

HandlerAdaptor也是一个接口,3个方法,supports,handle,getLastModified,字面上的意思就是处理适配器,作用就是调用具体的方法对用户发来的请求来进行处理。HandlerMapping获取到执行请求的controller时,DispatcherServlte会根据controller对应的controller类型来调用相应的HandlerAdapter来进行处理。
- SimpleControllerHandlerAdapter支持
org.springframework.web.servlet.mvc.Controller类型的handler - SimpleServletHandlerAdapter支持
javax.servlet.Servlet - HttpRequestHandlerAdapter支持
org.springframework.web.HttpRequestHandler

processRequest
我们继续回到DispatcherServlet,org.springframework.web.servlet.FrameworkServlet继承了doGet,doPost,doPut,doDelete,doOptions,doTrace等喜闻乐见的CRUD方法:
@Override
    protected final void doGet(HttpServletRequest request, HttpServletResponse response)
            throws ServletException, IOException {
    processRequest(request, response);
}

// 其他几个方法也是调用了processRequest
protected final void processRequest(HttpServletRequest request, HttpServletResponse response)
            throws ServletException, IOException {
    long startTime = System.currentTimeMillis();
    Throwable failureCause = null;
    // 返回与当前线程相关联的 LocaleContext
    LocaleContext previousLocaleContext = LocaleContextHolder.getLocaleContext();
    // 根据请求构建 LocaleContext,公开请求的语言环境为当前语言环境
    LocaleContext localeContext = buildLocaleContext(request);
    // 返回当前绑定到线程的 RequestAttributes
    RequestAttributes previousAttributes = RequestContextHolder.getRequestAttributes();
    ServletRequestAttributes requestAttributes = buildRequestAttributes(request, response, previousAttributes);
    // 获取当前请求的 WebAsyncManager,如果没有找到则创建
    WebAsyncManager asyncManager = WebAsyncUtils.getAsyncManager(request);
    asyncManager.registerCallableInterceptor(FrameworkServlet.class.getName(), new RequestBindingInterceptor());
    // 使 LocaleContext 和 requestAttributes 关联
    initContextHolders(request, localeContext, requestAttributes);
    try {
        // DispatcherServlet实现
        doService(request, response);
    }
    catch (ServletException | IOException ex) {
        failureCause = ex;
        throw ex;
    }
    catch (Throwable ex) {
        failureCause = ex;
        throw new NestedServletException("Request processing failed", ex);
    }
    finally {
        resetContextHolders(request, previousLocaleContext, previousAttributes);
        if (requestAttributes != null) {
            requestAttributes.requestCompleted();
        }
        logResult(request, response, failureCause, asyncManager);
        publishRequestHandledEvent(request, response, startTime, failureCause);
    }
}
接下来doService调用doDispatch:
protected void doDispatch(HttpServletRequest request, HttpServletResponse response) throws Exception {
    HttpServletRequest processedRequest = request;
    HandlerExecutionChain mappedHandler = null;
    Boolean multipartRequestParsed = false;
    WebAsyncManager asyncManager = WebAsyncUtils.getAsyncManager(request);
    try {
        ModelAndView mv = null;
        Exception dispatchException = null;
        try {
            // Multipart涉及到文件IO需要单独处理
            processedRequest = checkMultipart(request);
            multipartRequestParsed = (processedRequest != request);
            // 这就是前面提到的HandlerMapping了
            // 遍历所有的 HandlerMapping 找到与请求对应的 Handler
            // 并将其与一堆拦截器封装到 HandlerExecution 对象中
            mappedHandler = getHandler(processedRequest);
            if (mappedHandler == null) {
                noHandlerFound(processedRequest, response);
                return;
            }
            // 遍历所有的 HandlerAdapter,找到可以处理该 Handler 的 HandlerAdapter
            HandlerAdapter ha = getHandlerAdapter(mappedHandler.getHandler());
            // Last-Modified是一个响应首部,其中包含源头服务器认定的资源做出修改的日期及时间。
            // 它通常被用作一个验证器来判断接收到的或者存储的资源是否彼此一致,如果一致直接返回
            // https://developer.mozilla.org/zh-CN/docs/Web/HTTP/Headers/Last-Modified
            String method = request.getMethod();
            Boolean isGet = "GET".equals(method);
            if (isGet || "HEAD".equals(method)) {
                long lastModified = ha.getLastModified(request, mappedHandler.getHandler());
                if (new ServletWebRequest(request, response).checkNotModified(lastModified) && isGet) {
                    return;
                }
            }
            // 遍历拦截器,执行它们的 preHandle() 方法
            if (!mappedHandler.applyPreHandle(processedRequest, response)) {
                return;
            }
            // 执行实际的处理程序
            mv = ha.handle(processedRequest, response, mappedHandler.getHandler());
            if (asyncManager.isConcurrentHandlingStarted()) {
                return;
            }
            // 遍历拦截器,执行它们的 postHandle() 方法
            applyDefaultViewName(processedRequest, mv);
            mappedHandler.applyPostHandle(processedRequest, response, mv);
        }
        catch (Exception ex) {
            dispatchException = ex;
        }
        catch (Throwable err) {
            // As of 4.3, we're processing Errors thrown from handler methods as well,
            // making them available for @ExceptionHandler methods and other scenarios.
            dispatchException = new NestedServletException("Handler dispatch failed", err);
        }
        // 处理执行结果,是一个 ModelAndView 或 Exception,然后进行渲染
        processDispatchResult(processedRequest, response, mappedHandler, mv, dispatchException);
    }
    catch (Exception ex) {
        triggerAfterCompletion(processedRequest, response, mappedHandler, ex);
    }
    catch (Throwable err) {
        triggerAfterCompletion(processedRequest, response, mappedHandler,
                            new NestedServletException("Handler processing failed", err));
    }
    finally {
        if (asyncManager.isConcurrentHandlingStarted()) {
            // Instead of postHandle and afterCompletion
            if (mappedHandler != null) {
                // 遍历拦截器,执行它们的 afterCompletion() 方法
                mappedHandler.applyAfterConcurrentHandlingStarted(processedRequest, response);
            }
        } else {
            // Clean up any resources used by a multipart request.
            if (multipartRequestParsed) {
                cleanupMultipart(processedRequest);
            }
        }
    }
}
processDispatchResult用来渲染mv,或者封装exception成mv渲染:
/**
 * Handle the result of handler selection and handler invocation, which is
 * either a ModelAndView or an Exception to be resolved to a ModelAndView.
 */
private void processDispatchResult(HttpServletRequest request, HttpServletResponse response,
            @Nullable HandlerExecutionChain mappedHandler, @Nullable ModelAndView mv,
            @Nullable Exception exception) throws Exception {
    Boolean errorView = false;
    if (exception != null) {
        if (exception instanceof ModelAndViewDefiningException) {
            logger.debug("ModelAndViewDefiningException encountered", exception);
            mv = ((ModelAndViewDefiningException) exception).getModelAndView();
        } else {
            Object handler = (mappedHandler != null ? mappedHandler.getHandler() : null);
            mv = processHandlerException(request, response, handler, exception);
            errorView = (mv != null);
        }
    }
    // Did the handler return a view to render?
    if (mv != null && !mv.wasCleared()) {
        render(mv, request, response);
        if (errorView) {
            WebUtils.clearErrorRequestAttributes(request);
        }
    } else {
        if (logger.isTraceEnabled()) {
            logger.trace("No view rendering, null ModelAndView returned.");
        }
    }
    if (WebAsyncUtils.getAsyncManager(request).isConcurrentHandlingStarted()) {
        // Concurrent handling started during a forward
        return;
    }
    if (mappedHandler != null) {
        // Exception (if any) is already handled..
        mappedHandler.triggerAfterCompletion(request, response, null);
    }
}
这一阶段的SSM、SSH以及众多的开源框架奠定了JAVA在WEB开发界的领先地位。
合:Microservice
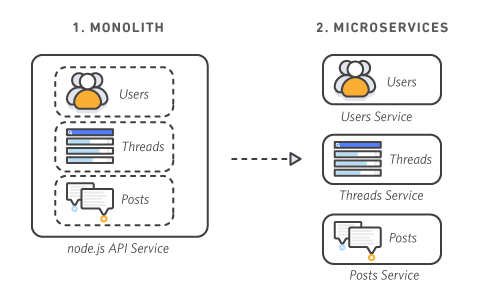
通过整体式架构,所有进程紧密耦合,并可作为单项服务运行。这意味着,如果应用程序的一个进程遇到需求峰值,则必须扩展整个架构。随着代码库的增长,添加或改进整体式应用程序的功能变得更加复杂。这种复杂性限制了试验的可行性,并使实施新概念变得困难。整体式架构增加了应用程序可用性的风险,因为许多依赖且紧密耦合的进程会扩大单个进程故障的影响。
使用微服务架构,将应用程序构建为独立的组件,并将每个应用程序进程作为一项服务运行。这些服务使用轻量级 API 通过明确定义的接口进行通信。这些服务是围绕业务功能构建的,每项服务执行一项功能。由于它们是独立运行的,因此可以针对各项服务进行更新、部署和扩展,以满足对应用程序特定功能的需求。
Spring Cloud 模块的相关介绍如下:
-
Eureka/Nacos:服务注册中心,用于服务管理
-
Ribbon:基于客户端的负载均衡组件
-
Hystrix/Sentinel:容错框架,能够防止服务的雪崩效应
-
Feign:Web 服务客户端,能够简化 HTTP 接口的调用
-
Zuul:API 网关,提供路由转发、请求过滤等功能
-
Config:分布式配置管理
-
Sleuth:服务跟踪
-
Stream:构建消息驱动的微服务应用程序的框架
-
Bus:消息代理的集群消息总线

借用一张图来描述Spring Cloud架构,时间关系先写这么多,有时间再写。


 浙公网安备 33010602011771号