
c++ 标准库多线程
C++ 多线程编程允许程序同时执行多个任务,从而提高性能和响应能力。C++11 引入了 <thread> 库,使得多线程编程更加方便。以下是一些基本概念和示例,帮助你理解如何在 C++ 中进行多线程编程。
1. 创建线程
使用 std::thread 类可以创建一个新线程。你需要将一个函数或可调用对象传递给 std::thread 构造函数。
#include <iostream>
#include <thread>

void threadFunction() {
    std::cout << "Hello from thread!\n";
}

int main() {
    std::thread t(threadFunction);  // 创建线程并执行 threadFunction
    t.join();  // 等待线程结束
    std::cout << "Hello from main!\n";
    return 0;
}
2. 传递参数给线程函数
你可以通过 std::thread 构造函数传递参数给线程函数。
#include <iostream>
#include <thread>

void printMessage(const std::string& message) {
    std::cout << message << "\n";
}

int main() {
    std::thread t(printMessage, "Hello from thread!");
    t.join();
    std::cout << "Hello from main!\n";
    return 0;
}
3. 线程同步
多个线程可能会同时访问共享资源,导致数据竞争。为了避免这种情况,可以使用互斥锁(std::mutex)来保护共享资源。
#include <iostream>
#include <thread>
#include <mutex>
#include <vector>

std::mutex mtx;  // 互斥锁

void printNumber(int num) {
    mtx.lock();  // 加锁
    std::cout << "Number: " << num << "\n";
    mtx.unlock();  // 解锁
}

int main() {
    std::vector<std::thread> threads;
    for (int i = 0; i < 10; ++i) {
        threads.emplace_back(printNumber, i);
    }
    for (auto& t : threads) {
        t.join();
    }
    return 0;
}
4. 使用 std::lock_guard 自动管理锁
std::lock_guard 是一个 RAII 风格的简单的锁管理器,它在构造时自动加锁,在析构时自动解锁。
#include <iostream>
#include <thread>
#include <mutex>
#include <vector>

std::mutex mtx;

void printNumber(int num) {
    std::lock_guard<std::mutex> lock(mtx);  // 自动加锁和解锁
    std::cout << "Number: " << num << "\n";
}

int main() {
    std::vector<std::thread> threads;
    for (int i = 0; i < 10; ++i) {
        threads.emplace_back(printNumber, i);
    }
    for (auto& t : threads) {
        t.join();
    }
    return 0;
}
5. 条件变量
条件变量(std::condition_variable)用于线程间的同步,允许一个线程等待另一个线程满足某些条件。
配合std::condition_variable::wait() 函数的第一个参数的必须是比lock_guard更灵活控制也更复杂重度的锁:std::unique_lock。
unique_lock可以RAII自动析构,也可以手动lock/unlock(手动提前解锁,缩小上锁代码粒度,提高效率);而手动unlock只是解锁,没有销毁,后续可以按需复用(再次 lock/unlock)。
#include <iostream>
#include <thread>
#include <mutex>
#include <condition_variable>

std::mutex mtx;
std::condition_variable cv;
bool ready = false;

void printMessage() {
    std::unique_lock<std::mutex> lock(mtx);
    cv.wait(lock, []{ return ready; });  // 等待条件满足
    std::cout << "Hello from thread!\n";
}

int main() {
    std::thread t(printMessage);
    {
        std::lock_guard<std::mutex> lock(mtx);
        ready = true;  // 设置条件为 true
    }
    cv.notify_one();  // 通知等待的线程
    t.join();
    std::cout << "Hello from main!\n";
    return 0;
}

相比lock_guard的优势:
1. 灵活性:unique_lock 支持延迟锁定(可以先构造对象而不立即加锁),而 lock_guard 在构造时就必须加锁。这意味着你可以先创建 unique_lock 对象,然后根据程序逻辑需要时再调用 lock() 或 unlock() 方法进行手动加锁或解锁。
2. 条件变量的支持:unique_lock 可以与标准库中的条件变量一起使用,如 std::condition_variable,这是 lock_guard 所不具备的功能。这是因为条件变量需要能够原子地释放锁并进入等待状态,这正是 unique_lock 提供的能力之一。
3. 锁的所有权转移:unique_lock 支持移动语义(move semantics),允许将锁的所有权从一个 unique_lock 对象转移到另一个对象,从而使得锁可以在不同的作用域中传递。而 lock_guard 不支持这种操作,它的锁所有权是固定的。
4. 尝试锁定(try-locking):除了基本的 lock() 和 unlock() 方法外,unique_lock 还提供了 try_lock() 方法,该方法尝试获取锁但不会阻塞线程,如果无法获得锁则立即返回失败结果。这对于避免线程长时间阻塞非常有用。

wait第二个参数predicate谓词的用法参见:
<https://en.cppreference.com/w/cpp/thread/condition_variable/wait>
predicate不满足不会结束等待执行后续语句。
6. 线程池
C++ 标准库没有直接提供线程池的实现,但你可以使用第三方库(如 Boost)或自己实现一个简单的线程池。
#include <iostream>
#include <thread>
#include <vector>
#include <queue>
#include <mutex>
#include <condition_variable>
#include <functional>

class ThreadPool {
public:
    ThreadPool(size_t numThreads) {
        for (size_t i = 0; i < numThreads; ++i) {
            workers.emplace_back([this] {
                while (true) {
                    std::function<void()> task;
                    {
                        std::unique_lock<std::mutex> lock(this->queueMutex);
                        this->condition.wait(lock, [this] { return this->stop || !this->tasks.empty(); });
                        if (this->stop && this->tasks.empty()) return;
                        task = std::move(this->tasks.front());
                        this->tasks.pop();
                    }
                    task();
                }
            });
        }
    }

    template<class F>
    void enqueue(F&& f) {
        {
            std::unique_lock<std::mutex> lock(queueMutex);
            tasks.emplace(std::forward<F>(f));
        }
        condition.notify_one();      //通知一个线程去处理掉新来的task
    }

    ~ThreadPool() {
        {
            std::unique_lock<std::mutex> lock(queueMutex);
            stop = true;
        }
        condition.notify_all();
        for (std::thread &worker : workers) {
            worker.join();
        }
    }

private:
    std::vector<std::thread> workers;
    std::queue<std::function<void()>> tasks;
    std::mutex queueMutex;
    std::condition_variable condition;
    bool stop = false;
};

int main() {
    ThreadPool pool(4);

    for (int i = 0; i < 8; ++i) {
        pool.enqueue([i] {
            std::cout << "Task " << i << " is running on thread " << std::this_thread::get_id() << "\n";
        });
    }

    return 0;
}
7. 线程局部存储
线程局部存储(Thread Local Storage, TLS)允许每个线程拥有自己的变量实例。C++11 引入了 thread_local 关键字来实现这一点。
#include <iostream>
#include <thread>

thread_local int threadLocalVar = 0;

void threadFunction(int id) {
    threadLocalVar = id;
    std::cout << "Thread " << id << " has threadLocalVar = " << threadLocalVar << "\n";
}

int main() {
    std::thread t1(threadFunction, 1);
    std::thread t2(threadFunction, 2);
    t1.join();
    t2.join();
    return 0;
}
8. 异步任务
C++11 引入了 std::async 和 std::future,用于异步执行任务并获取结果。
// (1) .使用 std::async 和 std::future
#include <iostream>
#include <future>

int compute() {
    std::this_thread::sleep_for(std::chrono::seconds(2));
    return 42;
}

int main() {
    // 启动异步任务
    std::future<int> fut = std::async(std::launch::async, compute);

    // 获取结果
    int result = fut.get();
    std::cout << "Result: " << result << std::endl;

    return 0;
}


// (2) .使用 std::packaged_task
#include <iostream>
#include <future>
#include <thread>

int compute() {
    std::this_thread::sleep_for(std::chrono::seconds(2));
    return 42;
}

int main() {
    // 创建 packaged_task
    std::packaged_task<int()> task(compute);

    // 获取 future
    std::future<int> fut = task.get_future();

    // 在另一个线程中执行任务
    std::thread t(std::move(task));
    t.join();

    // 获取结果
    int result = fut.get();
    std::cout << "Result: " << result << std::endl;

    return 0;
}


// (3) . 使用 std::promise
#include <iostream>
#include <future>
#include <thread>

void compute(std::promise<int> prom) {
    std::this_thread::sleep_for(std::chrono::seconds(2));
    prom.set_value(42);
}

int main() {
    // 创建 promise 和 future
    std::promise<int> prom;
    std::future<int> fut = prom.get_future();

    // 在另一个线程中执行任务
    std::thread t(compute, std::move(prom));

    // 获取结果
    int result = fut.get();
    std::cout << "Result: " << result << std::endl;

    t.join();
    return 0;
}
相比传统的多线程编程,C++11 的异步机制(利用std::future、std::async、std::packaged_task 和 std::promise等工具类)提供了以下额外的好处:
更高的抽象层次,简化了异步操作的管理。自动化的结果传递和异常处理。更灵活的线程管理和任务执行策略。更清晰的代码结构和更低的耦合度。支持任务组合和超时等待。
这些机制使异步编程更加直观、安全和高效,是现代 C++ 并发编程的重要组成部分。
9. 原子操作(无锁编程)
https://en.cppreference.com/w/cpp/thread
C++ 中的原子操作是通过 std::atomic 类型( #include <atomic>)来实现的,它提供了一种线程安全的方式来操作共享数据,避免了使用互斥+锁(即互斥std::mutex(mutual exclusive)和std::lock系列锁))的开销。原子操作适用于简单的数据操作(如整数、指针等),并且可以保证操作的原子性(即不会被其他线程中断)。
std::atomic 提供了 load() 和 store() 方法,用于安全地读取和写入原子变量的值。
std::atomic 提供了 compare_exchange_weak 和 compare_exchange_strong,用于实现比较并交换(Compare-And-Swap, CAS)操作。
支持指定内存顺序(Memory Order:https://en.cppreference.com/w/cpp/atomic/memory_order),用于控制原子操作的内存可见性和顺序一致性。内存顺序(memory order),可用于读写的:有默认的也是最强约束的memory_order_seq_cst、最弱顺序约束的memory_order_relaxed,另外各自用于单写(store)的memory_order_release、单读(load)的memory_order_acquire常常结合使用,因此并称为release-acquire内存顺序(memory_order_acq_rel表示acquire-release内存顺序,用于实现CAS(compare and swap)元语,实现compare_exchange_strong操作)。另一个release-consume内存顺序(release之前有relaxed的原子变量可以脱离顺序即优化在release之后执行)已经不推荐使用。release和acquire意指是相对于锁而言的“释放”、“获取”。
多线程本就是为了提高效率,但涉及到各种处理器【x86、AMD64、SPARC是强顺序体系结构(只允许storeload重排,即store可重排到load后面,即读早了可能不对),PowerPC、Alpha、Itanlium、Armv7、IA64、RISC(ARM)则是弱顺序体系结构(storeload、storestore、loadload、loadstore都可以重排)】和编译器两级对代码顺序的优化重排(reorder)会打乱直观的顺序,例如处理器技术中,为保证一些关键的指令执行顺序,通常需要特加一条内存栅栏(memory barrier)指令(PowerPC的sync指令),确保进入处理流水线的指令都完成后(排空流水线)才执行栅栏指令sync之后的指令,当然这会拖累性能。内存顺序指定相当于此。视乎你用的哪种硬件,一般用默认的就好,用memory_order_relaxed宽松了快了但小心可能不正确。
原子操作总结
-
std::atomic提供了一种高效的方式来实现线程安全的操作。 -
适用于简单的数据类型(如整数、布尔值、指针等)。
-
支持多种原子操作(如加载、存储、CAS 等)。
-
可以通过内存顺序控制操作的可见性和顺序一致性。
总结
C++ 标准库多线程编程提供了强大的工具来处理并发任务。通过使用 std::thread、std::mutex、std::condition_variable 等工具,你可以编写高效且安全的多线程程序。需要注意的是,多线程编程容易引入数据竞争和死锁等问题,因此需要仔细设计和测试。
pthread(POSIX Thread)多线程编程
POSIX是Portable Operating System Interface的缩写,是IEEE为各种*NIX OS 定义的一系列互相关联的软件API标准的总称。(Windows环境下无pthread,Linux GCC4.6以下编译需加-pthread编译选项)
c++11 的std::thread提供了更高层的抽象,更加简便易用、可移植性佳,而pthread功能更偏底层、功能也更强大。
在版本较新的 Linux Kernel 中,pthread API 的具体实现是 2003年由redhat主导重构的 NPTL(Native POSIX Thread Library)。
- 实现源码:https://github.com/lattera/glibc/blob/master/nptl/pthread_create.c
- 文档:https://docs.oracle.com/cd/E192
另可参考:https://www.cs.cmu.edu/afs/cs/academic/class/15492-f07/www/pthreads.html
https://man7.org/linux/man-pages/man3/pthread_create.3.html
pthread 代码例子:
#include <pthread.h>
#include <stdio.h>
#include <stdlib.h>

#define NUM_THREADS    5

void *PrintHello(void *threadid)
{
    long tid;
    tid = (long) threadid;
    printf("Hello World! It's me, thread #%ld!\n", tid);
    pthread_exit(NULL);
}

int main(int argc, char *argv[])
{
    pthread_t threads[NUM_THREADS];
    int rc;
    long t;
    for (t = 0; t < NUM_THREADS; t++)
    {
        printf("In main: creating thread %ld\n", t);
        rc = pthread_create(&threads[t], NULL, PrintHello, (void *) t);
        if (rc)
        {
            printf("ERROR; return code from pthread_create() is %d\n", rc);
            exit(-1);
        }
    }
    /* Last thing that main() should do */
    pthread_exit(NULL);
}
互斥锁:(代码参见:)
pthread_mutex_init (mutex,attr);
pthread_mutex_destroy (pthread_mutex_t *mutex);
pthread_mutexattr_init (attr);
pthread_mutexattr_destroy (attr);
phtread_mutex_lock(pthread_mutex_t *mutex);
phtread_mutex_trylock(pthread_mutex_t *mutex);
phtread_mutex_unlock(pthread_mutex_t *mutex);
条件变量:(代码参见:)
pthread_cond_wait (condition,mutex);
pthread_cond_signal (condition);
pthread_cond_broadcast (condition);
备注:pthread本身目前没有直接提供原子操作功能,它专注于线程管理和同步机制。
pthread要实现原子操作:可以
- 1. 使用C11/C++11 标准原子库:使用现代 C/C++ 标准(如 C11 的
<stdatomic.h>或 C++11 的<atomic>);(推荐) - 2. 使用由GCC、Clang 等编译器提供的内置原子函数(
__atomic_* 系列函数,如__atomic_add_fetch()); - 3. 平台特定的原子指令:x86 架构提供
LOCK前缀指令(如LOCK XADD)。ARM 架构使用LDREX/STREX指令实现原子操作。这些通常通过内联汇编或编译器内置函数调用。
| 机制 | 适用场景 | 性能 | 复杂度 |
| 条件变量+唯一互斥锁 | 等待条件复杂(任务队列) | 高 | 高 |
| pthread信号量 | 资源池(连接池)控制、生产者-消费者模型 | 高 | 中 |
| pthread互斥锁 | 短临界区互斥访问 | 极高 | 低 |
| 原子操作 | 简单计数器、标志位 | 最高 | 低 |
| c语言版本 | 面市年份 | 核心特性 |
|---|---|---|
| C89/C90 | 1989/1990 | 首个官方标准,基础语法和库 |
| C99 | 1999 | 单行注释、变长数组、long long |
| C11 | 2011 | 多线程、原子操作、泛型宏 |
| C17 | 2018 | 缺陷修复,无新语法 |
| C23 | 2023/2024 (已出草案) | #embed、constexpr、UTF-8增强 |
附知乎上一些专业意见:
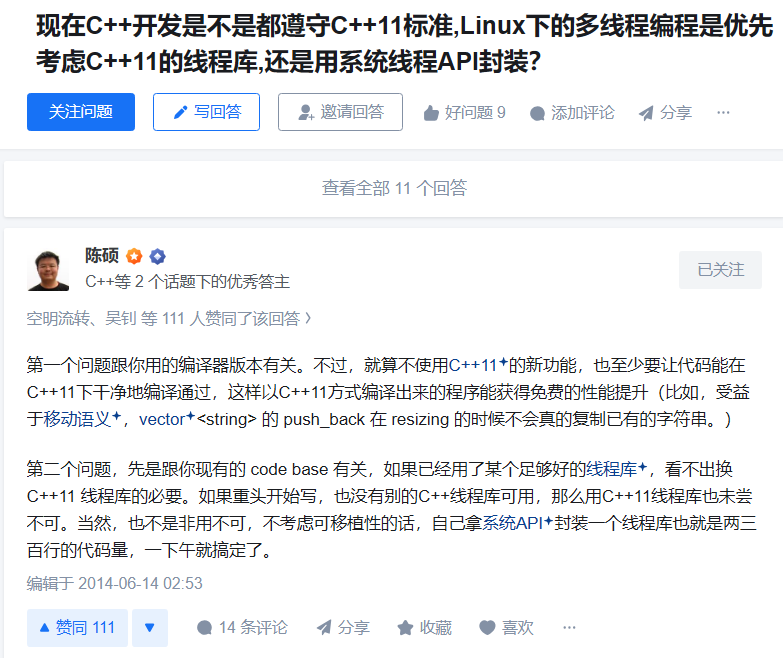
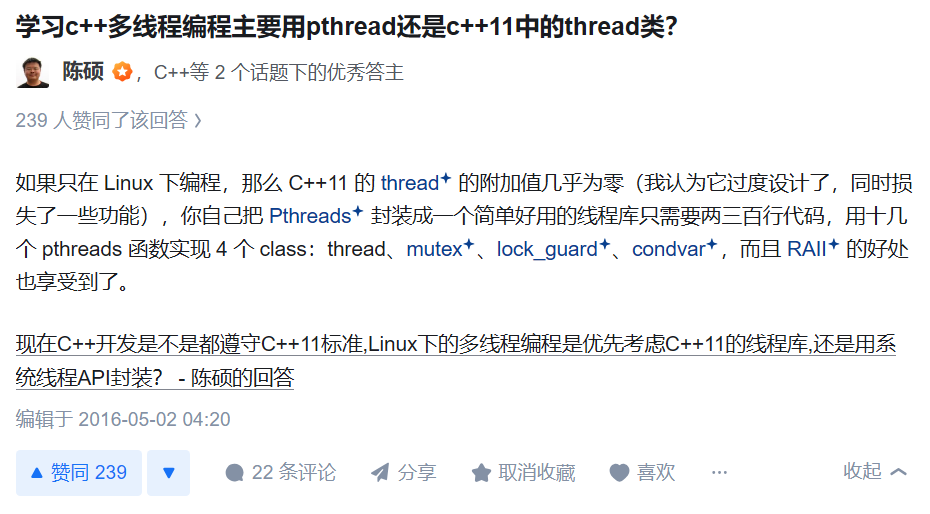
如何正确地使用设计模式? - 陈硕的回答 - 知乎
https://www.zhihu.com/question/23757906/answer/25567356
除非你还在写 Java,否则设计模式真没多大用处。
首先明确一点,这里说的“设计模式”,是“面向对象设计模式”的简称,以 GoF 书中列出的 23 个模式为代表。这些设计模式更多的是对于先前语言特性不足时的补充。

 浙公网安备 33010602011771号