4、基础语法,条件判断,循环语句 5、绑定样式,触发操作
一、vue 常用的指令
v-if 指令 # 条件渲染
v-show # 条件渲染
v-else # 条件渲染
v-for # 循环遍历
v-bind # 绑定样式
v-on # 绑定动作
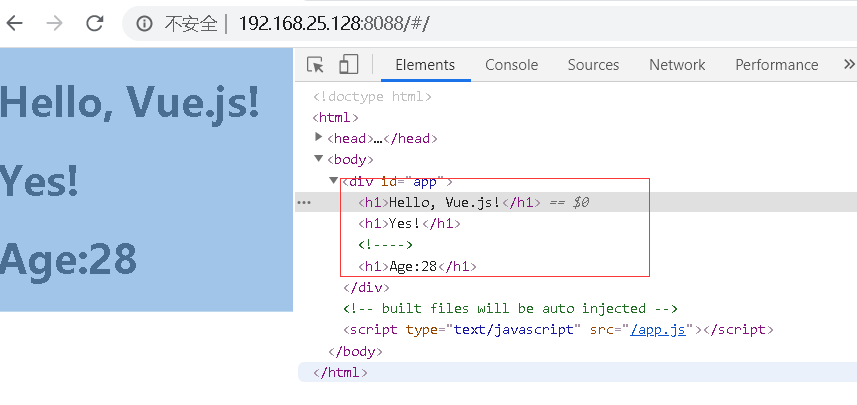
v-if 指令


<template>
  <div id="app">
    <h1>Hello, Vue.js!</h1>
    <h1 v-if="yes">Yes!</h1> <!--// 拿到正确返回值则条件成功显示-->
    <h1 v-if="no">No!</h1>
    <h1 v-if="age >= 25">Age:{{ age }}</h1>
  </div>
</template>

<script>
  export default {
    name: 'App',
    data(){
      return {
        yes: true,
        no: false,
        age: 28,
      }
    }
  }
</script>
 、
、
可以是布尔运算和条件判断:当然也可以用v-show,但是v-show 和v-if 的区别是,v-if 不会把不满足的条件渲染到html
v-show 指令
<template>
  <div id="app">
    <h1>Hello, Vue.js!</h1>
    <h1 v-show="yes">Yes!</h1> <!--// 拿到正确返回值则条件成功显示-->
    <h1 v-show="no">No!</h1>
    <h1 v-show="age >= 25">Age:{{ age }}</h1>
  </div>
</template>

<script>
  export default {
    name: 'App',
    data(){
      return {
        yes: true,
        no: false,
        age: 28,
      }
    }
  }
</script>
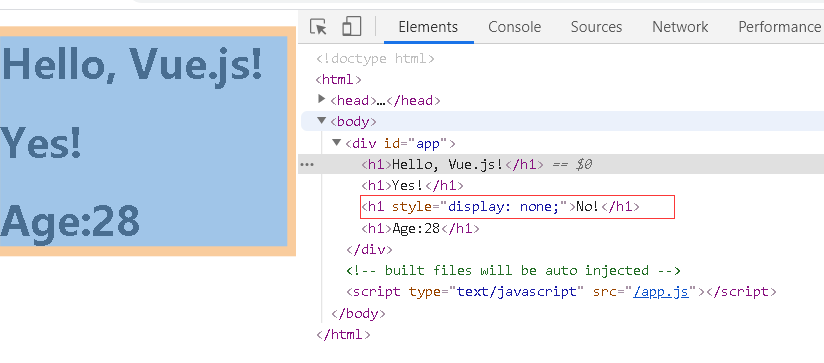
v-shou而是展示成display: none
v-else 指令 条件判断
举例 判断age 小于 25 时,返回 else 参数,了解原理,主要用于登录页面
<template>
  <div id="app">
    <h1>Hello, Vue.js!</h1>
    <h1 v-if="yes">Yes!</h1> <!--// 拿到正确返回值则条件成功显示-->
    <h1 v-if="no">No!</h1>
    <h1 v-if="age >= 25">Age:{{ age }}</h1>
    <h1 v-else="age">Age<=25</h1>  <!--不满足v-if时,生效-->
  </div>
</template>

<script>
  export default {
    name: 'App',
    data(){
      return {
        yes: true,
        no: false,
        age: 18,
      }
    }
  }
</script>
用户已经登录,显示注销,没有则登录,后面配合token判断这个值
<template>
  <div id="app">
    <button v-if="admin">注销</button>
    <button v-else>登录</button>
  </div>
</template>

<script>
  export default {
    name: 'App',
    data(){
      return {
        admin: false  // 用户已经登录,显示注销,没有则登录,后面配合token判断这个值
      }
    },

  }
</script>
v-for 遍历循环
v-for 遍历一个
元组或列表
循环的时候可以加 index位置,
<template>
  <div id="app">
    <li v-for="a in datalist">
      {{a}}
    </li>

    <li v-for="(value,index) in datalist">     <!--打印所在的位置-->
      {{value}}:{{index}}
    </li>

  </div>
</template>

<script>
  export default {
    name: 'App',
    data(){
      return {
        datalist:['张三','李四','王五']
      }
    },

  }
</script>
字典循环
<template>
  <div id="app">
    <li v-for="(value,key,index) in datalist">  <!--字典循环key value与Python相反-->
      {{key}}:{{value}}:{{index}}       <!--值格式 a:张三:0 -->
    </li>
  </div>
</template>

<script>
  export default {
    name: 'App',
    data(){
      return {
        datalist: {'a':'张三','b':'李四','c':'wangwu'}
      }
    },

  }
</script>
循环字典里数据到table表格,字典外面是 [] 列表形式
<template>
  <div id="app">
    <table border="1">        <!--table表格-->
      <thead>
      <tr>
        <th>Name</th>   <!--标题-->
        <th>Age</th>
        <th>Sex</th>
      </tr>
      </thead>

      <tbody>           <!--body数据-->
      <tr v-for="person in people">
        <td>{{ person.name  }}</td>
        <td>{{ person.age  }}</td>
        <td>{{ person.sex  }}</td>
      </tr>
      </tbody>
    </table>
  </div>
</template>

<script>
  export default {
    name: 'App',
    data(){
      return {
        people: [{       // 循环 字典里数据到table表格,字典外面是 [] 列表形式
          name: 'Jack',
          age: 30,
          sex: 'Male'
        }, {
          name: 'Bill',
          age: 26,
          sex: 'Male'
        }, {
          name: 'Tracy',
          age: 22,
          sex: 'Female'
        }, {
          name: 'Chris',
          age: 36,
          sex: 'Male'
        }]
      }
    }
  }
</script>
5、绑定样式与方法触发
v-bind # 绑定样式
动态地绑定一个或多个特性,或一个组件 prop 到表达式。
在绑定 class 或 style 特性时,支持其它类型的值,如数组或对象。可以通过下面的教程链接查看详情。
在绑定 prop 时,prop 必须在子组件中声明。可以用修饰符指定不同的绑定类型。
没有参数时,可以绑定到一个包含键值对的对象。注意此时 class 和 style 绑定不支持数组和对象。
<!-- 绑定一个属性 -->
<img v-bind:src="imageSrc">
<!-- 缩写 -->
<img :src="imageSrc">
<!-- with inline string concatenation -->
<img :src="'/path/to/images/' + fileName">
<!-- class 绑定 -->
<div :class="{ red: isRed }"></div>
<div :class="[classA, classB]"></div>
<div :class="[classA, { classB: isB, classC: isC }]">
<!-- style 绑定 -->
<div :style="{ fontSize: size + 'px' }"></div>
<div :style="[styleObjectA, styleObjectB]"></div>
<!-- 绑定一个有属性的对象 -->
<div v-bind="{ id: someProp, 'other-attr': otherProp }"></div>
<!-- 通过 prop 修饰符绑定 DOM 属性 -->
<div v-bind:text-content.prop="text"></div>
<!-- prop 绑定. “prop” 必须在 my-component 中声明。 -->
<my-component :prop="someThing"></my-component>
<!-- XLink -->
<svg><a :xlink:special="foo"></a></svg>
绑定跳转连接 v-bind 在a标签可以绑定 data定义的url变量
<<template>
  <div id="app">
    <a v-bind:href="url">好123跳转连接</a>        <!--v-bind可以绑定返回url值-->
    <br>
    <a href="http://www.baidu.com">百度跳转连接</a>      <!--不加v-bind,只能直接写地址,填写变量url不生效-->
    <br>
    <a :href="url">好123</a>          <!--简写 :href 加上冒号可以实现绑定变量-->


  </div>
</template>

<script>
  export default {
    name: 'App',
    data(){
      return {
        url: "http://www.hao123.com"
      }
    }
  }
</script>

App.vue
绑定样式
<template>
  <div id="app">
    <a :class="classstatus">连接</a>
  </div>
</template>

<script>
export default {
  name: 'App',
  data(){
    return {
        classstatus: "red"
    }
   }
}
<template>
  <div id="app">
    <a v-bind:style="[a,b]">连接</a>
    <br>
    <br>
    <a :style="[a,b]">连接2</a>      <!--简写-->

  </div>
</template>

<script>
  export default {
    name: 'App',
    data(){
      return {
        a:{'color':'red'},
        b:{'backgroundColor':'blue'}
      }
    }
  }
</script>
Element-UI https://element.eleme.cn/
绑定Element样式
<template>
  <div id="app">
    <el-button v-bind:type="status">{{host_status}}</el-button>
  </div>
</template>

<script>
  export default {
    name: 'App',
    data(){
      return {
        status:'danger',
        host_status:'主机异常'
      }
    }
  }
</script>
v-on # 绑定动作
v-on 绑定触发操作,调用Elemet-ui 按钮样式。
理解:script中的参数: data存放数据地方 methods 触发操作动作地方
<template>
  <div id="app">
    <el-button v-on:click="say">触发</el-button>
    <el-button type="primary" round>测试引入按钮样式主要按钮</el-button>
    <el-button v-bind:type="status" round>{{ message}}</el-button>     <!--传值Element-ui的type样式,message 状态信息-->

  </div>
</template>

<script>
  export default {
    name: 'App',
    data(){         //  存放数据地方
      return {
        status:'success',
        message: '主机正常'
      }
    },
    methods: {     // methods 触发操作动作地方
      say(){
        this.status='warning',
          this.message='主机异常'
      }
    }
  }
</script>

<!--v-on:clieck="say"-->
<!--<el-button @click="say">say hi</el-button>-->

<!--v-bind:type   ==== :type-->
本文来自博客园,作者:王竹笙,转载请注明原文链接:https://www.cnblogs.com/edeny/p/12591676.html

 浙公网安备 33010602011771号