BaGet:搭建 Nuget 私服
搭建 Nuget 私服
参考资料
官网:https://github.com/loic-sharma/BaGet
文档:https://loic-sharma.github.io/BaGet
BaGet: https://www.cnblogs.com/luoocean/p/11731878.html
脚本批量打包上传:https://www.cnblogs.com/yilezhu/p/12591174.html
拓展
将自己开发的类库上传到 NuGet 上:https://www.cnblogs.com/easy5weikai/p/18034254
本地运行
下载 BaGet,地址:https://github.com/loic-sharma/BaGet
文档:https://loic-sharma.github.io/BaGet/
这里使用的是 BaGet版本为: v0.4.0-preview2
使用 BaGet 搭建Nuget 私服的步骤:
1.Install .NET Core SDK
2.Download and extract BaGet's latest release
3.Start the service with dotnet BaGet.dll
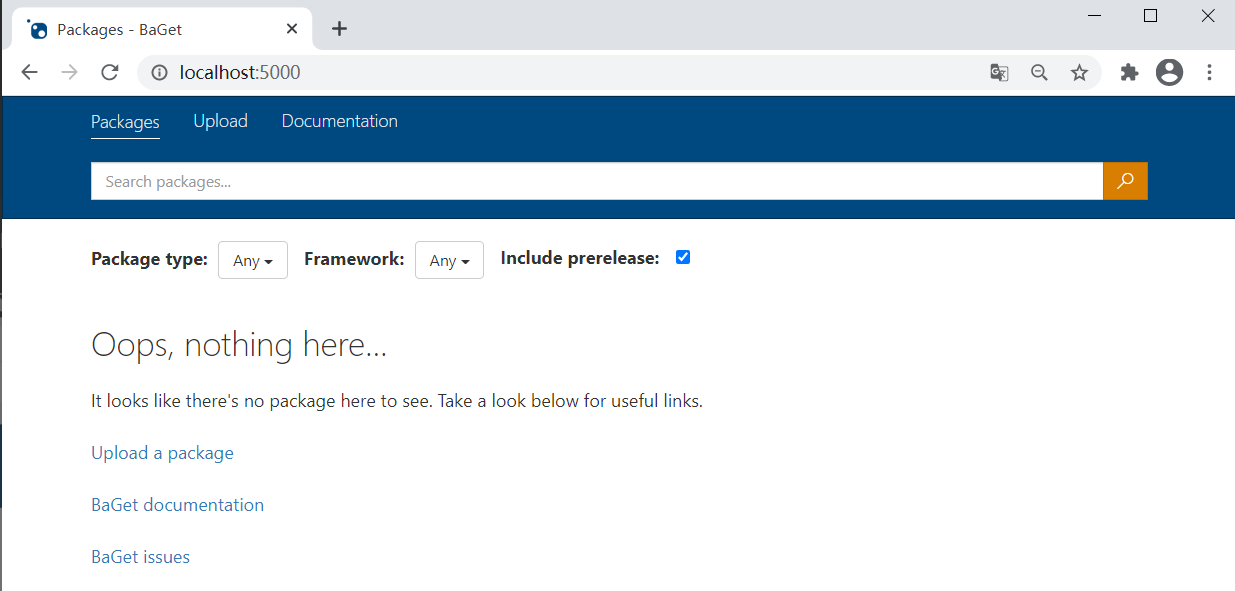
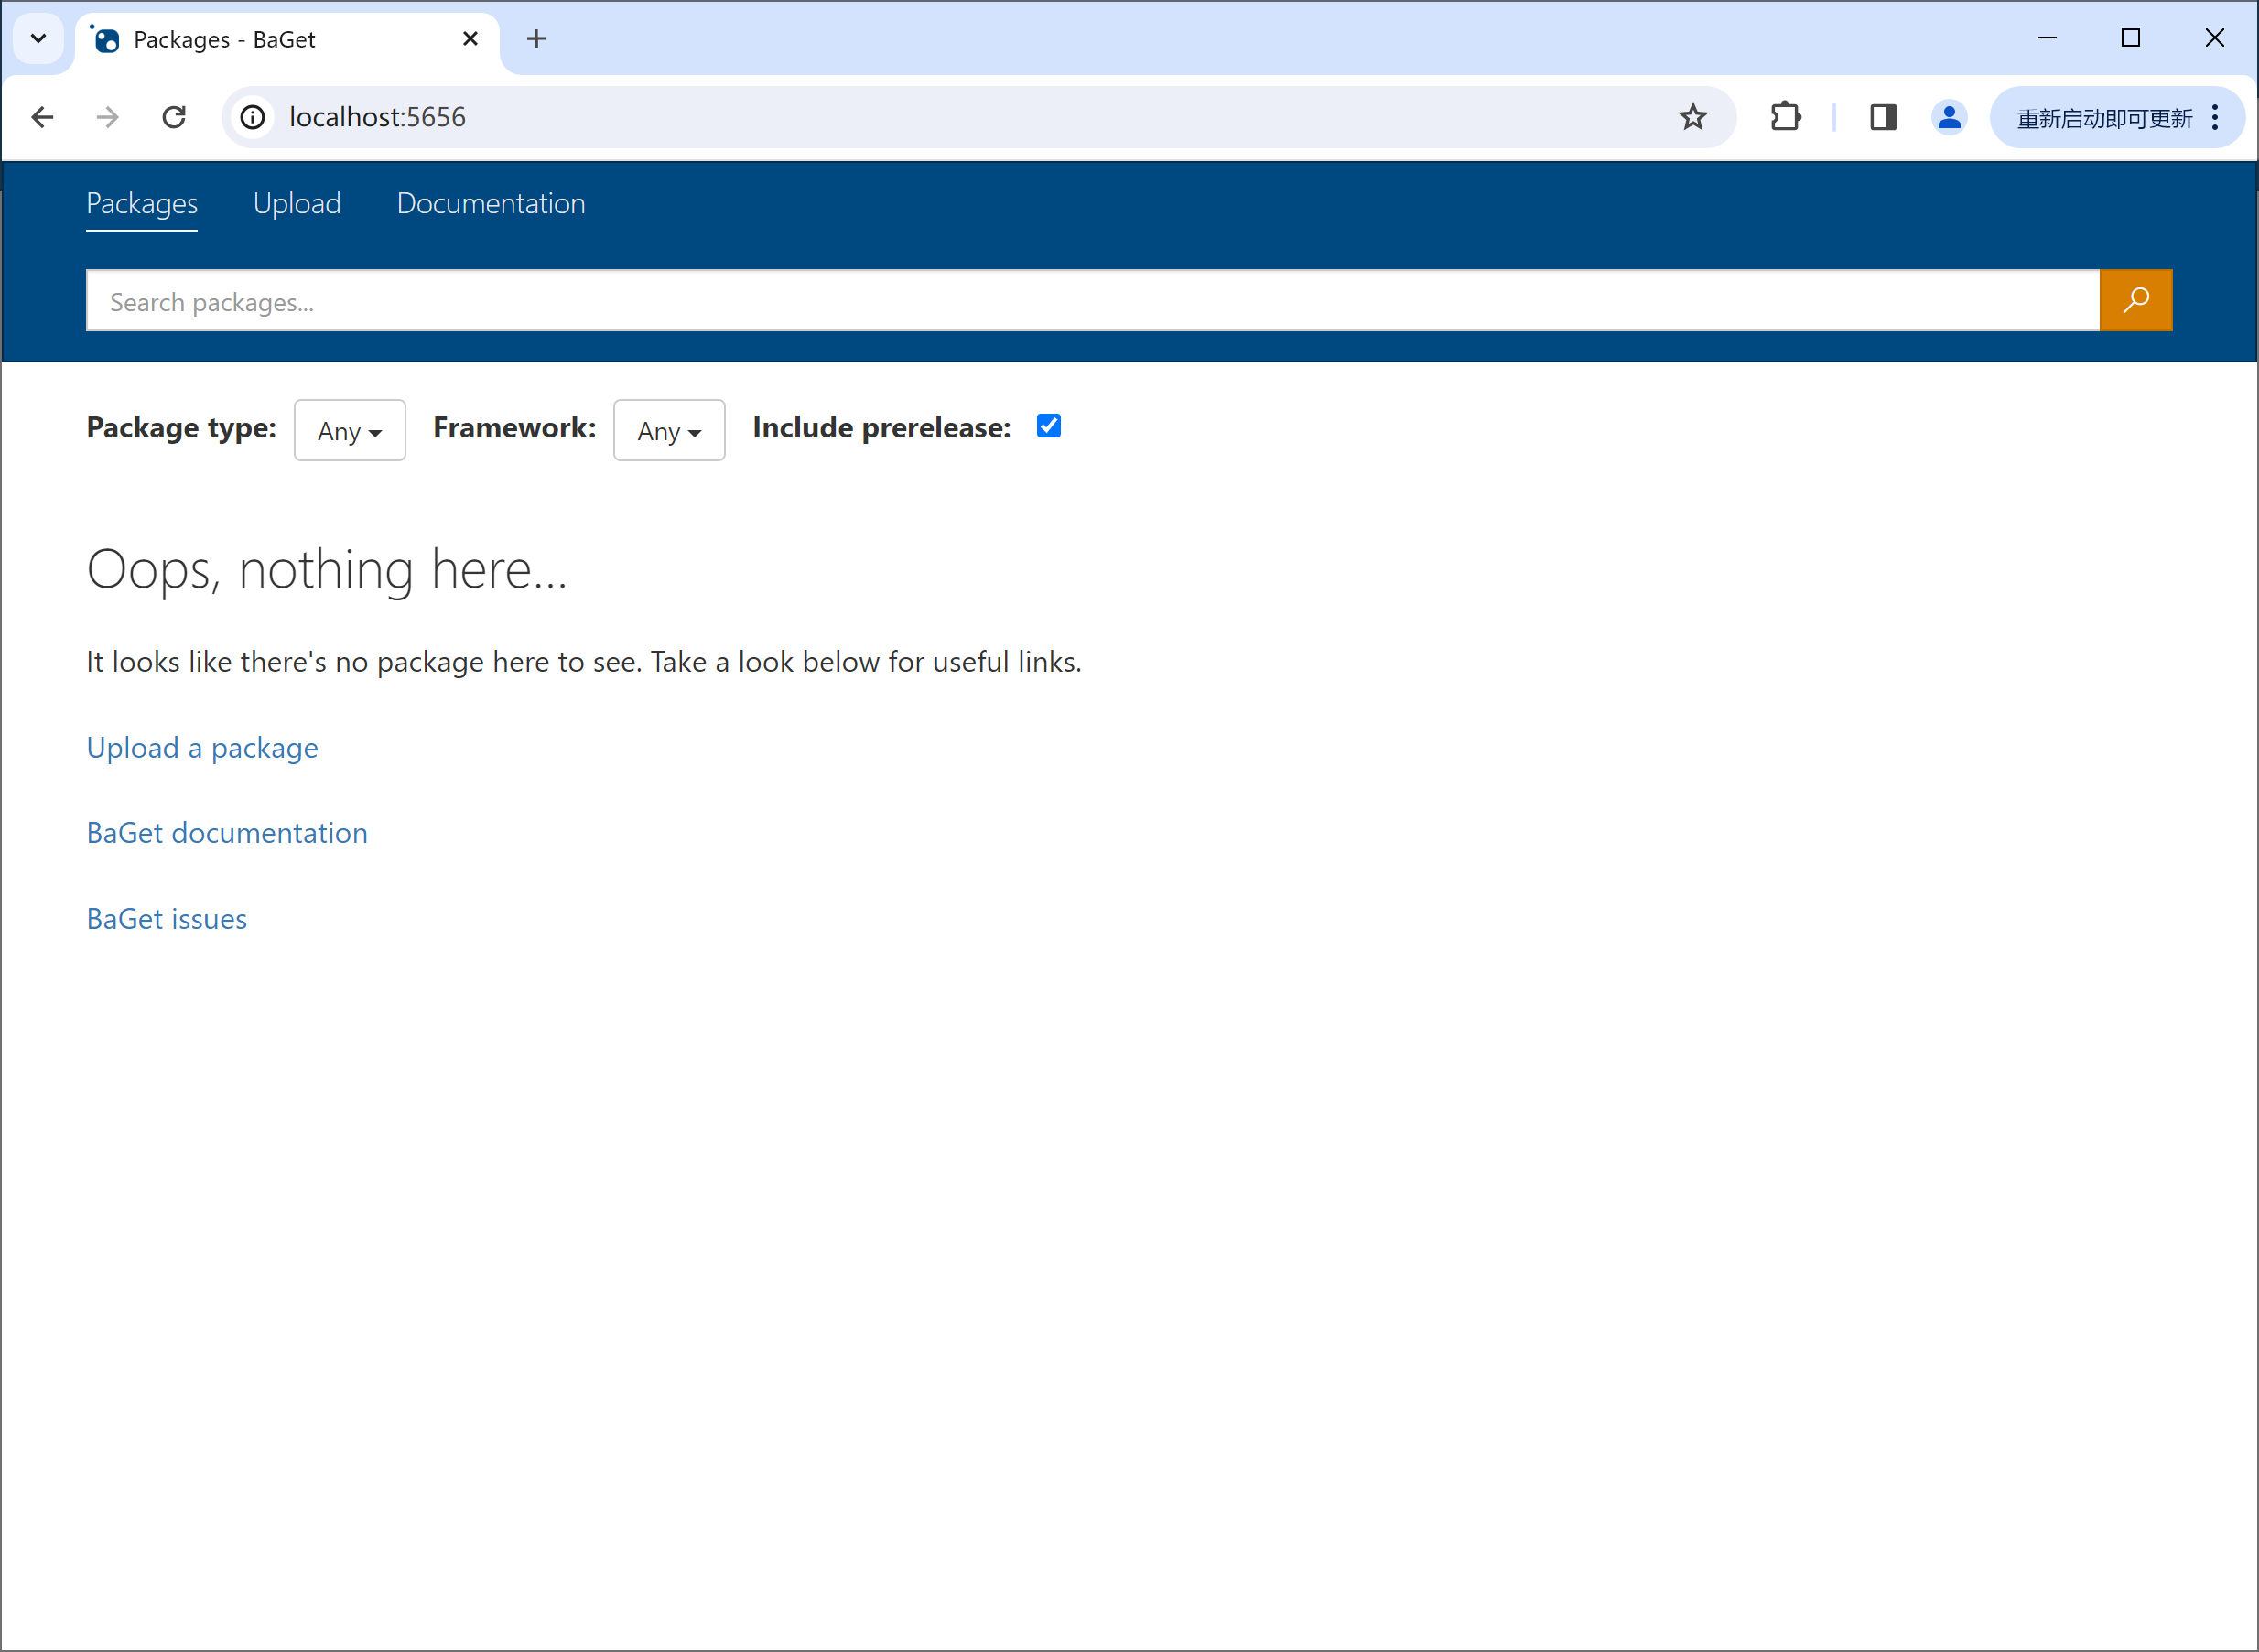
4.Browse http://localhost:5000/ in your browser
下载最新的版本,解压后,执行:
> dotnet BaGet.dll
info: Microsoft.Hosting.Lifetime[0]
      Now listening on: http://localhost:5000
info: Microsoft.Hosting.Lifetime[0]
      Now listening on: https://localhost:5001
info: Microsoft.Hosting.Lifetime[0]
      Application started. Press Ctrl+C to shut down.
info: Microsoft.Hosting.Lifetime[0]
      Hosting environment: Production
info: Microsoft.Hosting.Lifetime[0]
      Content root path: F:\96-ProgramDev\BaGet\BaGet
安装到 IIS
文档:https://loic-sharma.github.io/BaGet/installation/iis-proxy/
v0.4.0 版本需要下载 ASP.NET Core 3.1 Runtime :
https://dotnet.microsoft.com/zh-cn/download/dotnet/3.1
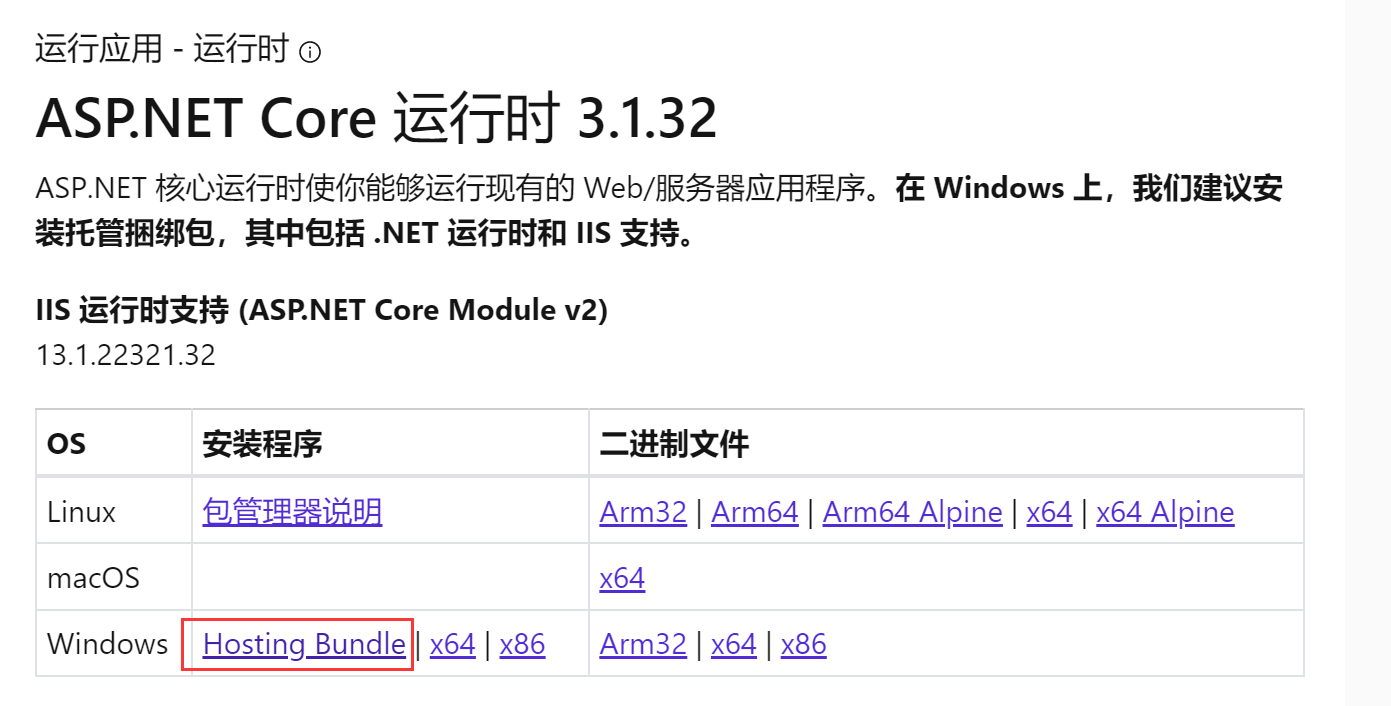
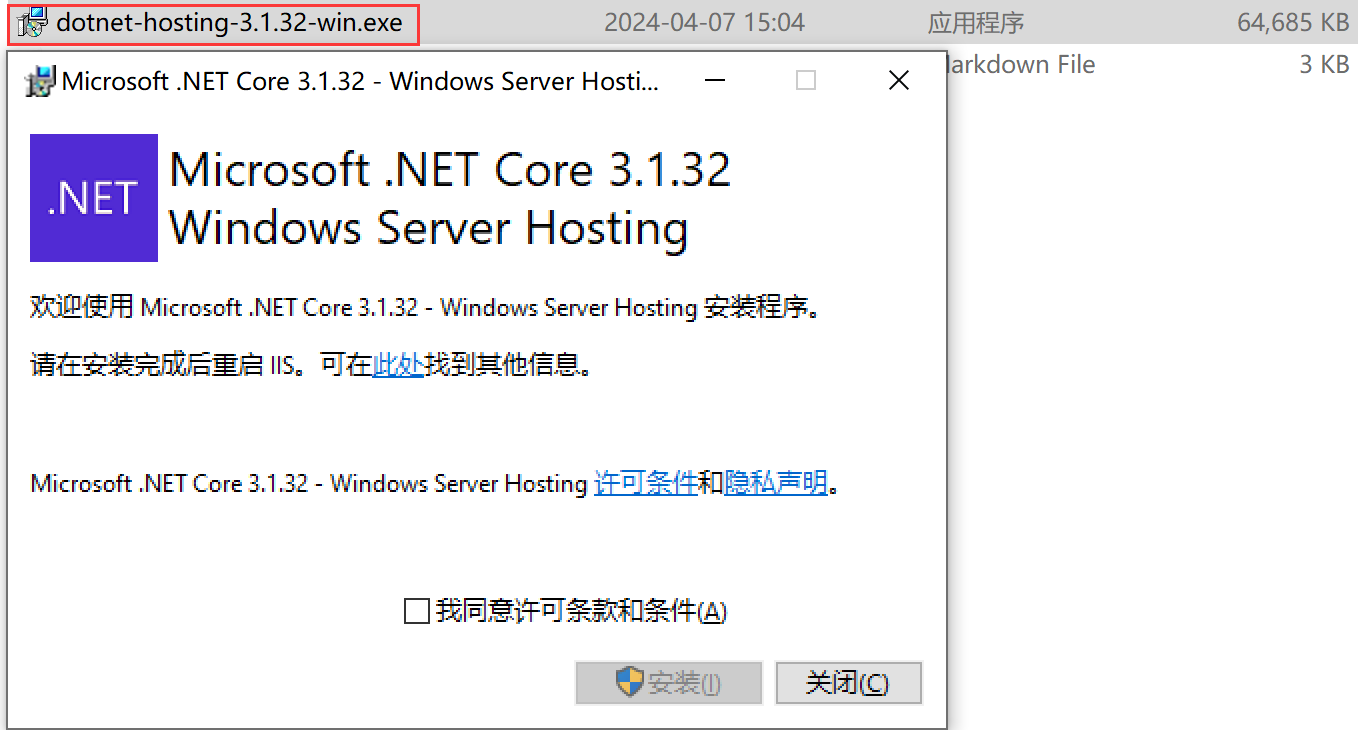
下载 Hosting Bundle 并安装:
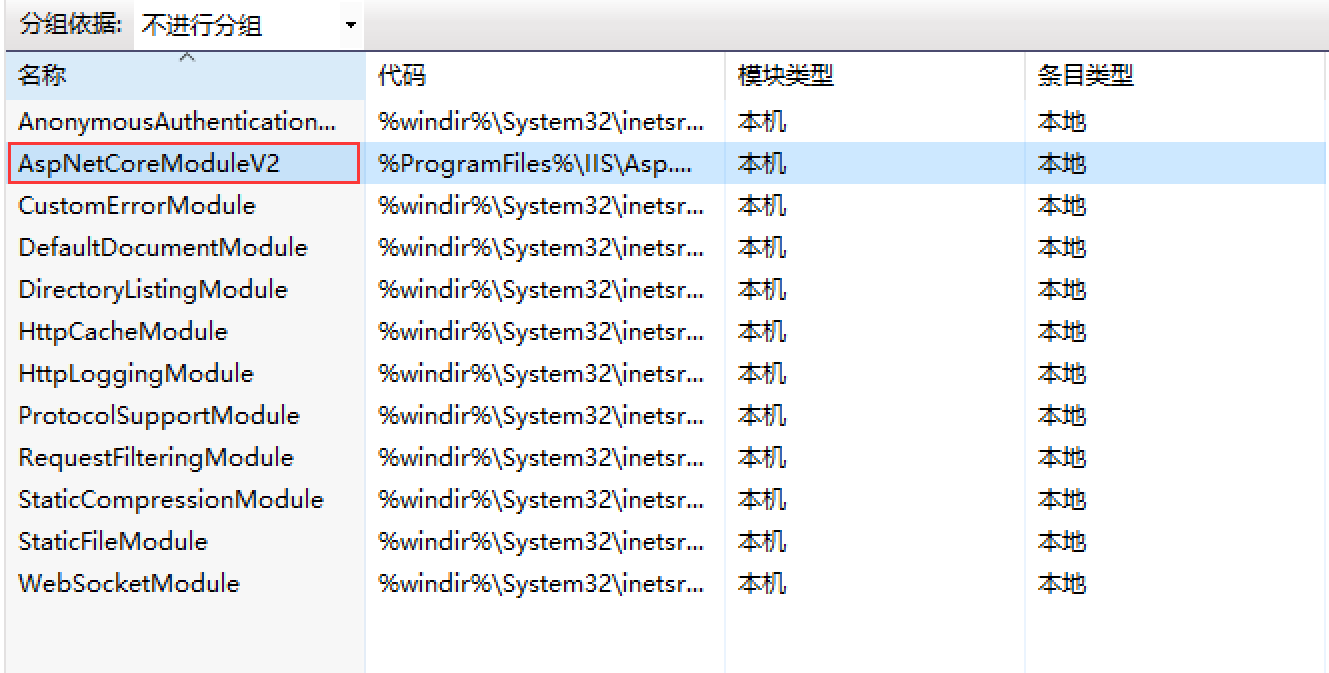
并在IIS中,点击【模块】
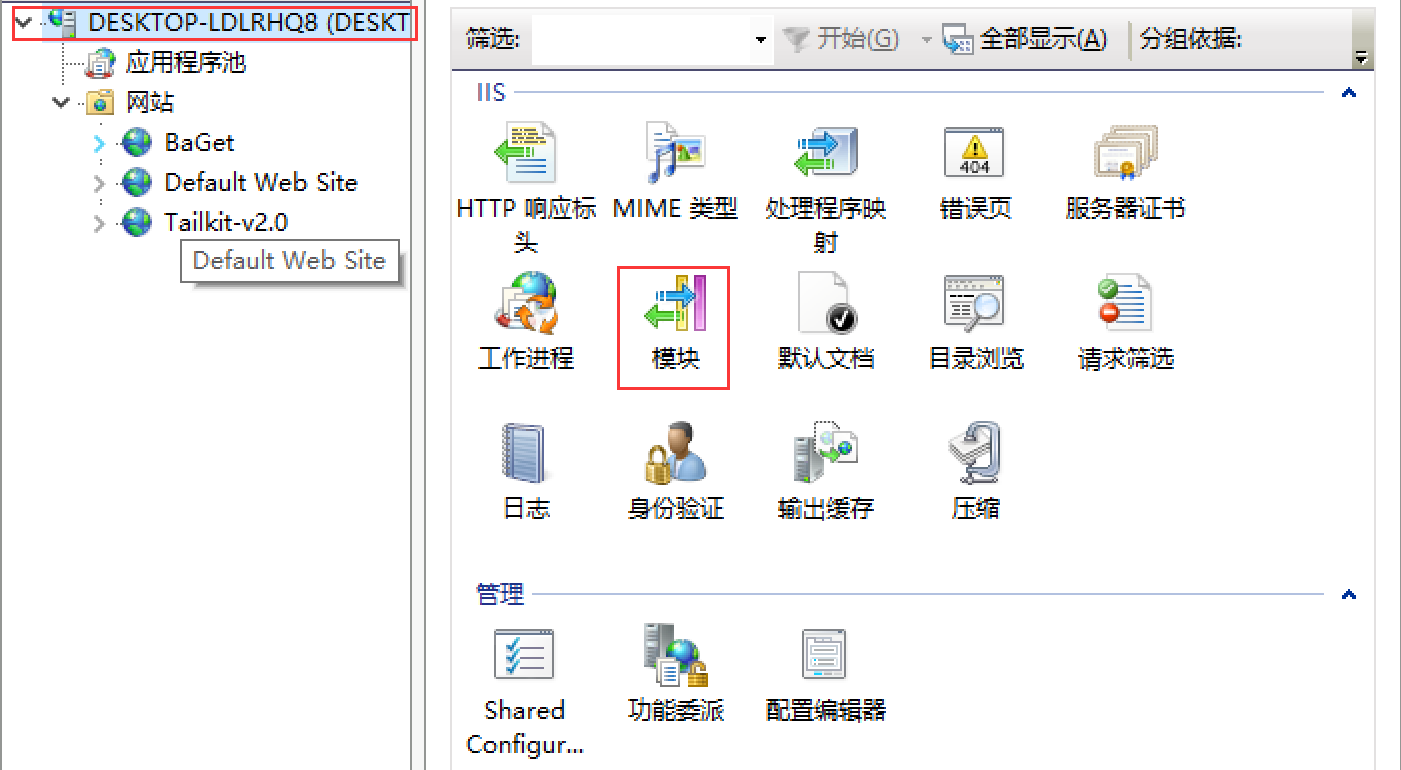
确保安装成功,如下图所示:
创建 BaGet IIS网站,
将网站物理路径指定为下载的BaGet发布文件夹:

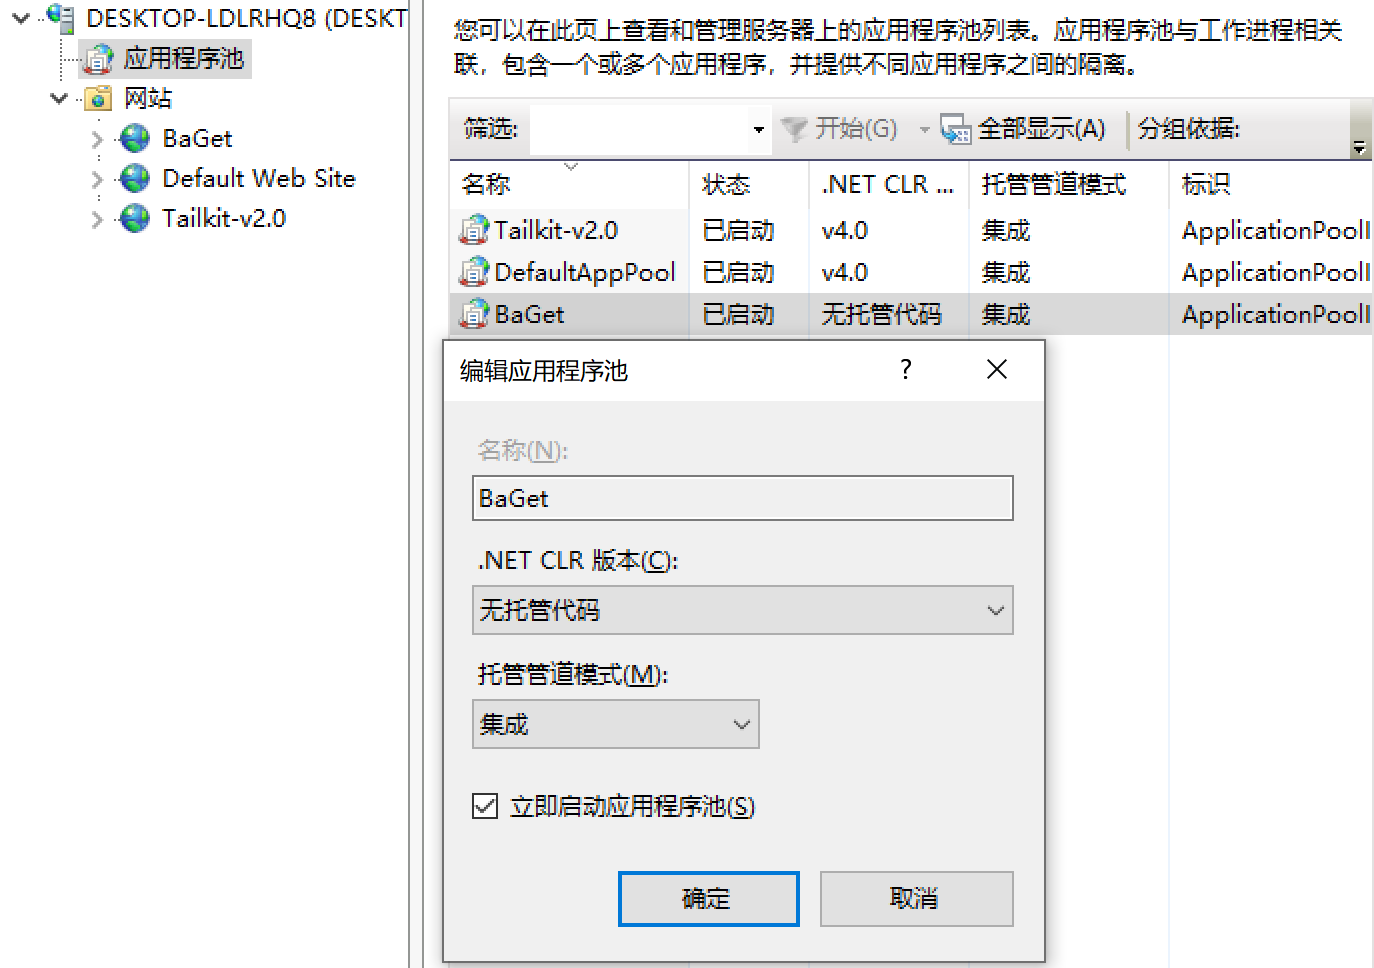
接着设置网站对应的 IIS 应用程序池,如下图所示:
为网站绑定端口:
- http端口:5656,
- https 端口:5657,并绑定证书,如下图所示:
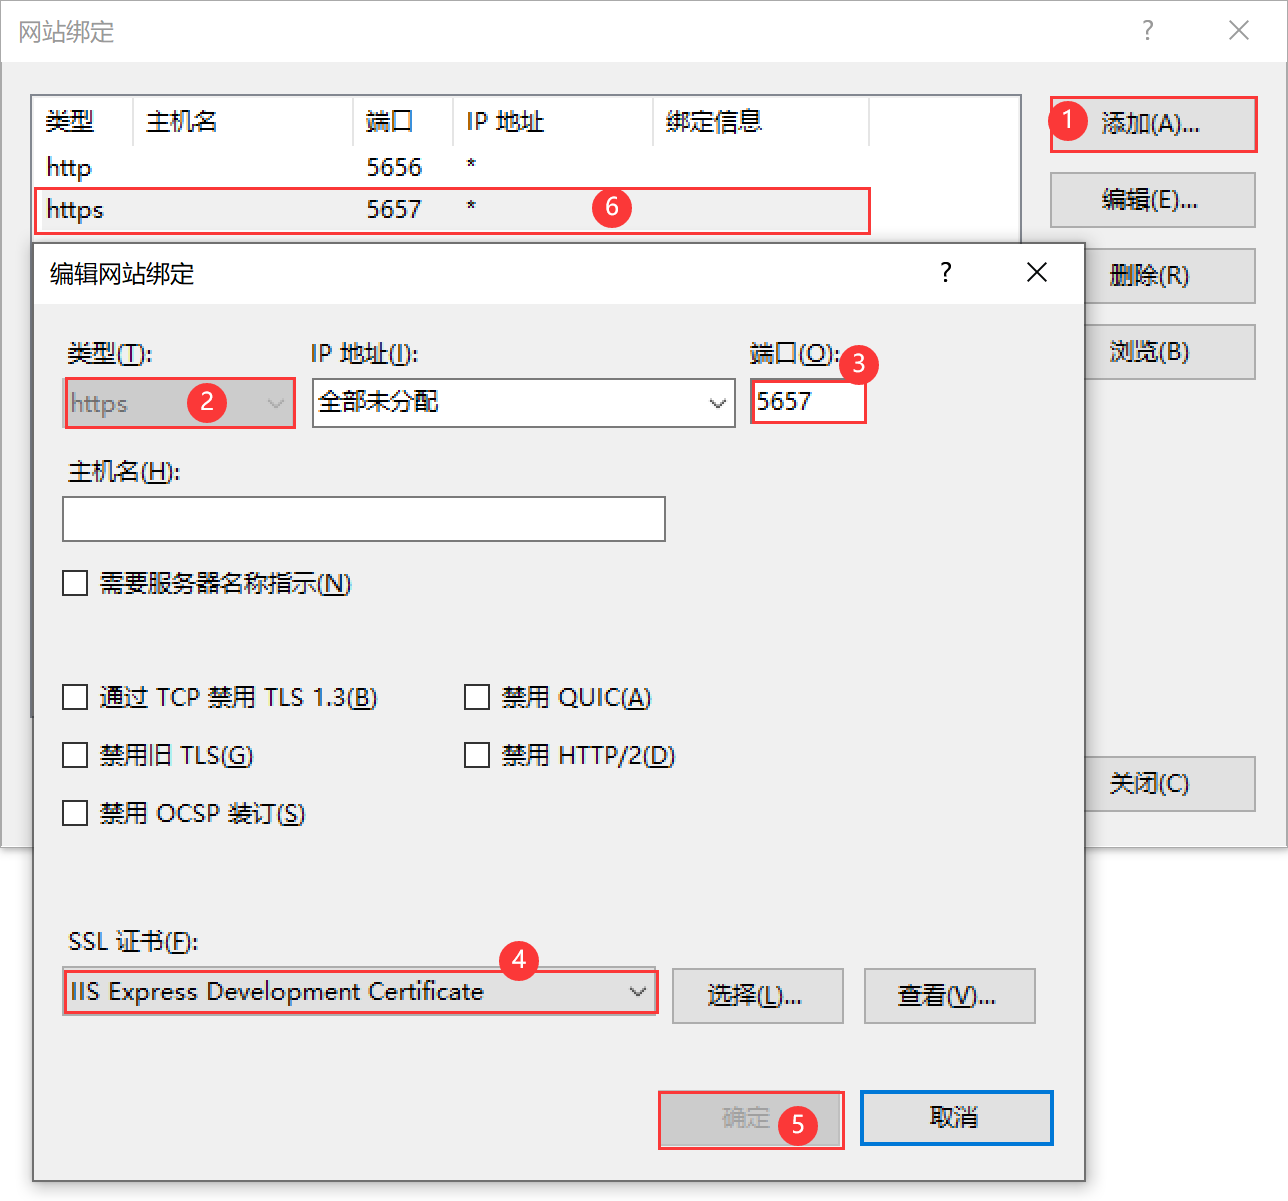
推荐使用 Https 协议,因为将来Visual Studio 会移出非 HTTPS 访问权限,如下图所示:
![1110457484]()
最后通过如下地址访问使用BaGet搭建的私有Nuget:http://localhost:5656 或者 https://localhost:5657
修改 BaGet 配置
打开 BaGet 程序文件夹,找到并打开配置文件 appsettings.json , 修改如下配置。
ApiKey
"ApiKey": "123456",
物理删除
-  "PackageDeletionBehavior": "Unlist",
+  "PackageDeletionBehavior": "HardDelete"
可覆盖包
  // Enable package overwrites
  "AllowPackageOverwrites": true,
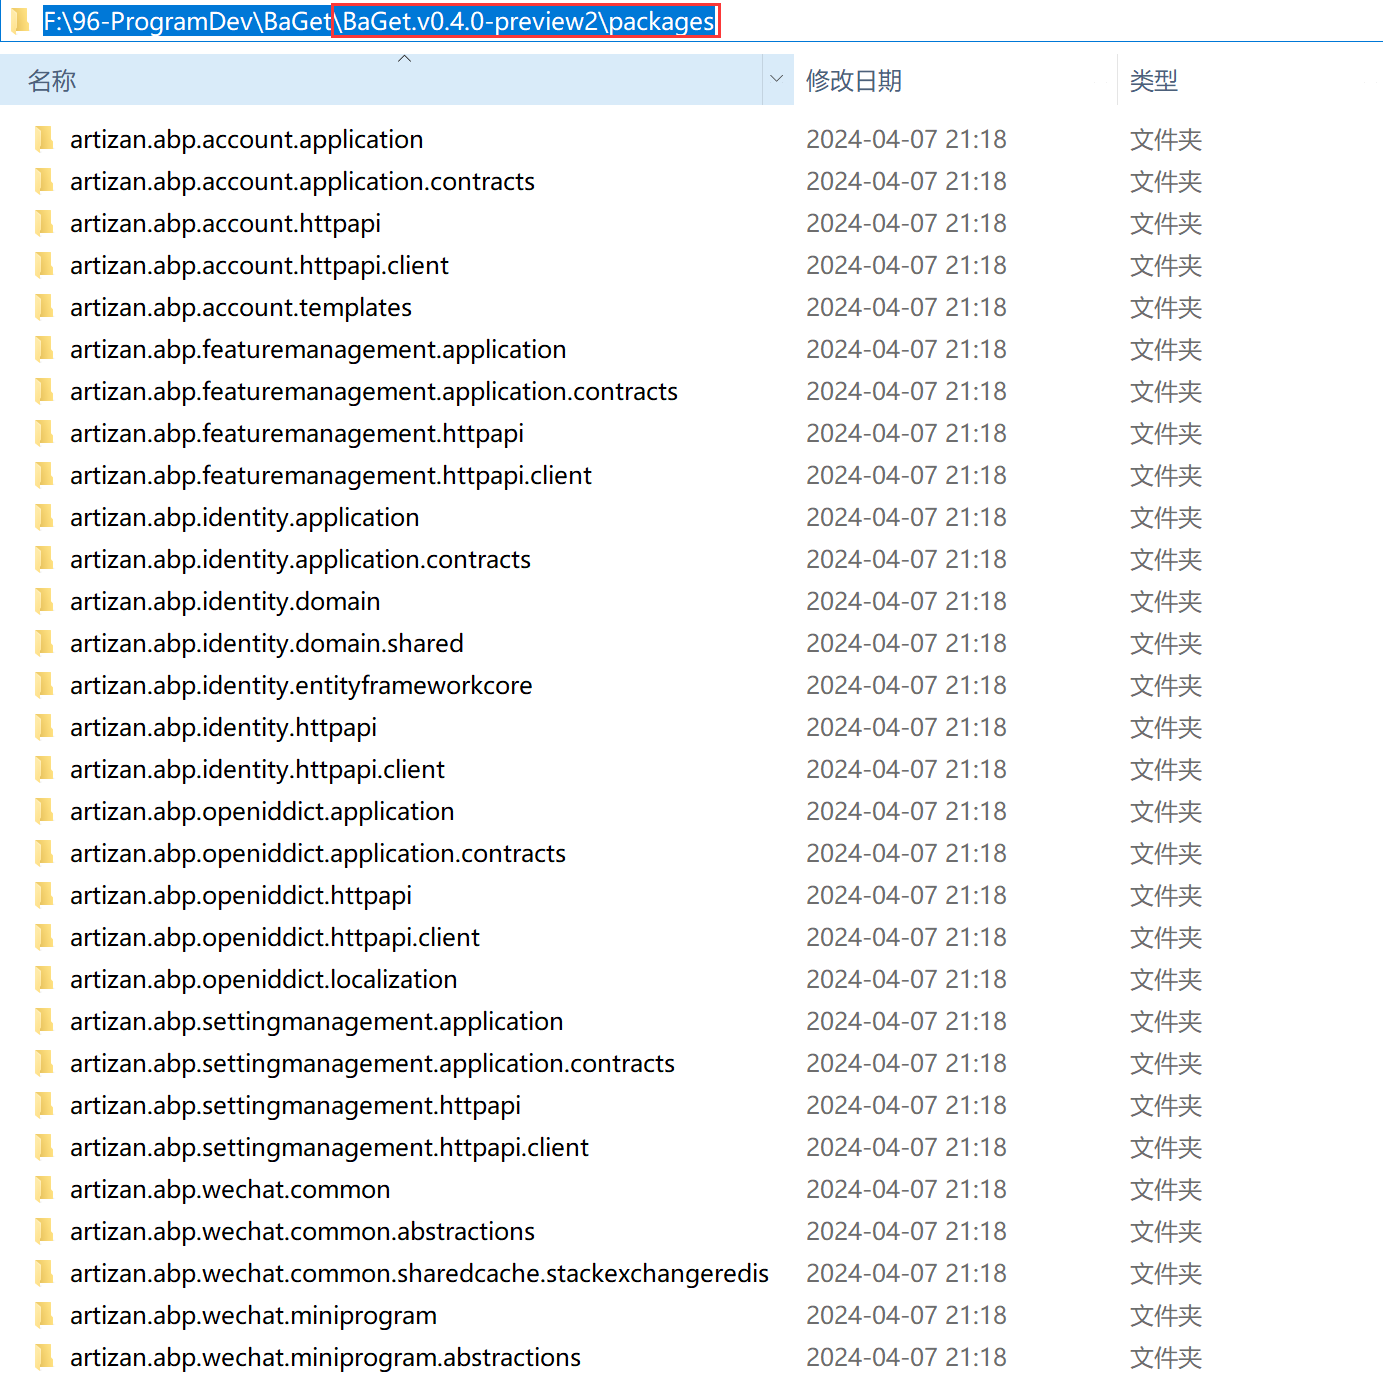
包的存储路径
包的存储位置默认值为:
  "Storage": {
    "Type": "FileSystem",
    "Path": ""
  },
此时,包的存储位置为程序根目录下的 packages 文件夹,如下图所示:
修改包的存储路径(可选):
  "Storage": {
    "Type": "FileSystem",
    "Path": "F://96-ProgramDev/BaGet/Packages"
  },
IIS 上传文件大小限制
  "IISServerOptions": {
    // 250MB
    "MaxRequestBodySize": 262144000
 }
项目打包
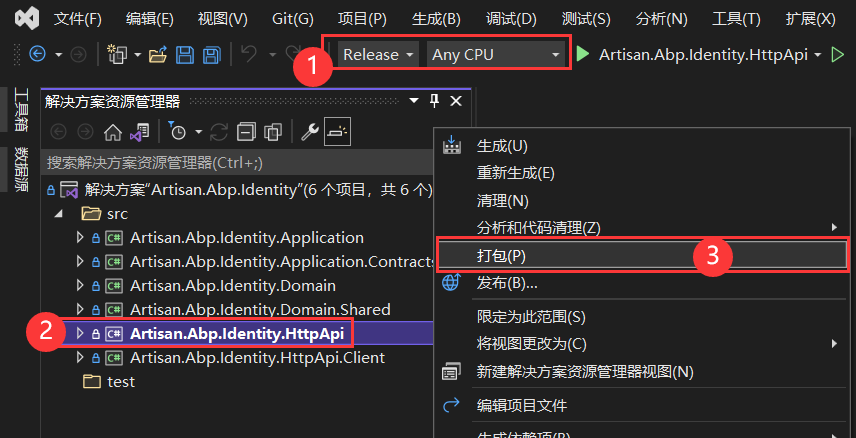
打开Visual Studio在工具栏菜单中选择 【Release】、【Any CPU】
然后选择要打包的项目,作为示例,这里我们选择:Artisan.Abp.Identity.HttpApi,
点击项目文件右键,在弹出的菜单中选择【打包】,如下图所示:
打包成功后,会在项目的 bin/Release 文件夹下生成:包文件和 *.nupkg文件,如下图所示:

上传包文件
在项目【Artisan.Abp.Identity.HttpApi】的目录 bin/Release 中打开CMD,执行如下命令进行打包:
dotnet nuget push -s http://localhost:5000/v3/index.json Artisan.Abp.Identity.HttpApi.0.1.0.nupkg
其中,
Artisan.Abp.Identity.HttpApi.0.1.0.nupkg就是打包后自动生成的文件。
执行输出结果如下:
E:\artisan\v5\src\modules\identity\src\Artisan.Abp.Identity.HttpApi\bin\Release>dotnet nuget push -s http://localhost:5000/v3/index.json Artisan.Abp.Identity.HttpApi.0.1.0.nupkg
warn : 未提供 API 密钥,找不到 'http://localhost:5000/api/v2/package' 的 API 密钥。要保存源的 API 密钥,请使用 "setApiKey" 密钥。
正在将 Artisan.Abp.Identity.HttpApi.0.1.0.nupkg 推送到 'http://localhost:5000/api/v2/package'...
  PUT http://localhost:5000/api/v2/package/
  Created http://localhost:5000/api/v2/package/ 914 毫秒
已推送包。
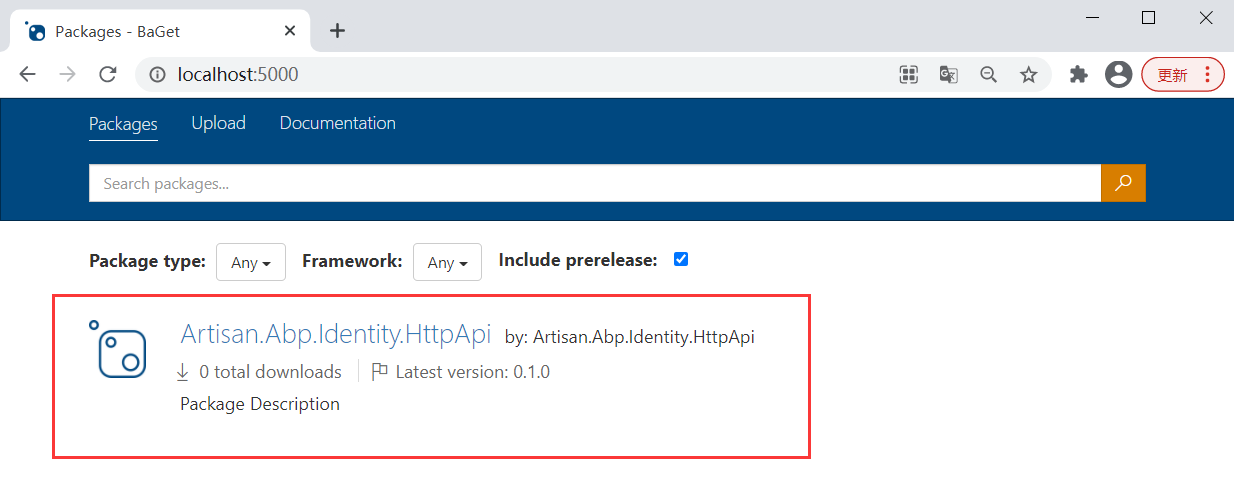
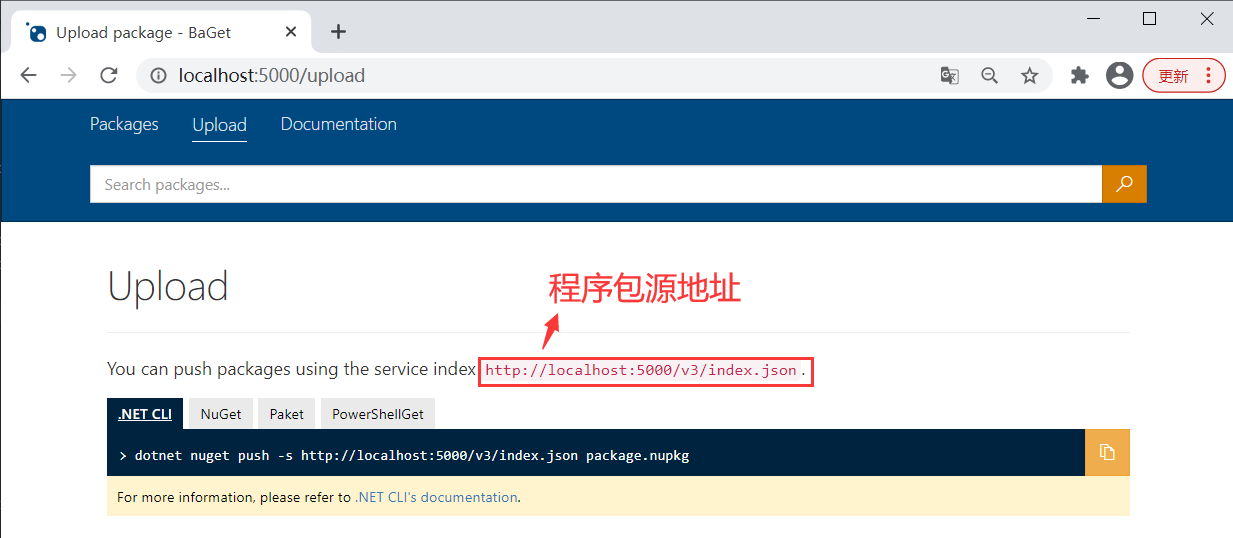
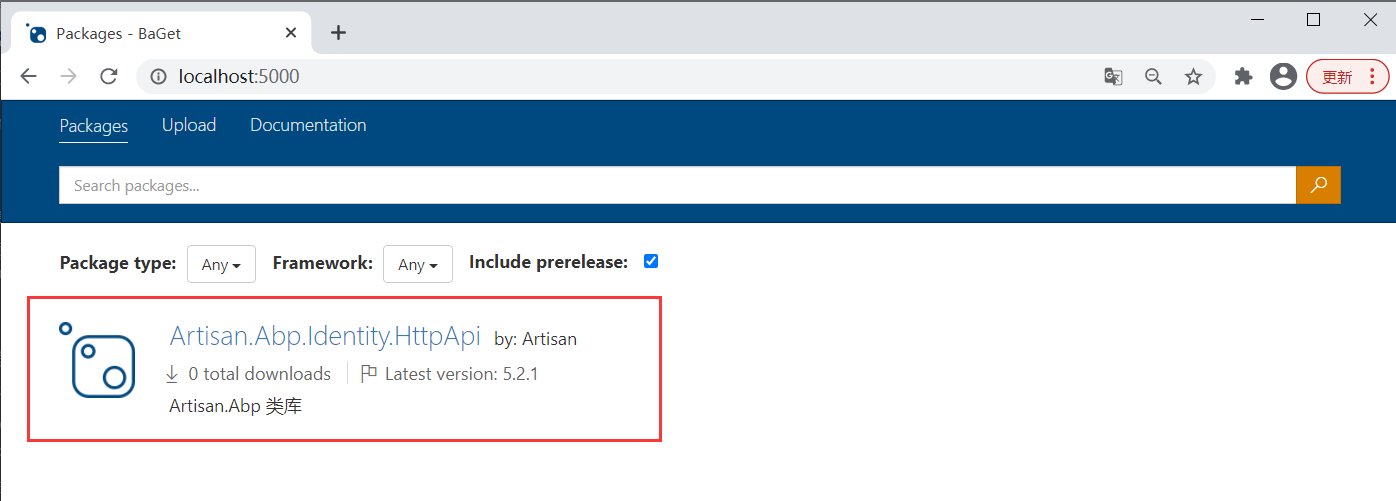
上传包成功后,访问:http://localhost:5000,就会看到刚才上传的包,如下图所示:
配置 Visual Studio 程序包源
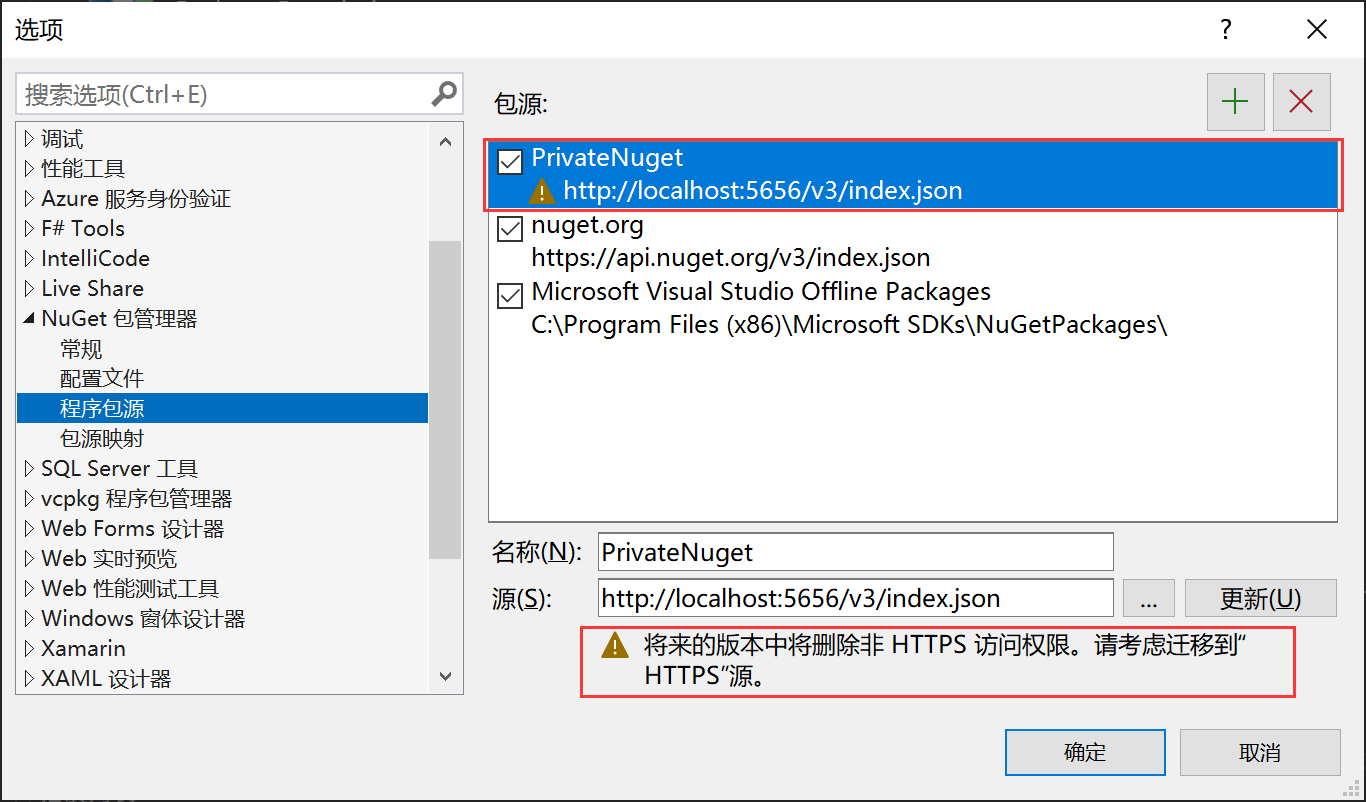
打开 Viusual Studio , 打开菜单【工具 > 选项】,在弹出框的左侧菜单中找到【Nuget 包管理器 > 程序包源】选项

点击 + 按钮,添加新的程序包源:
- 名称:MyBaGet
- 源:http://localhost:5000/v3/index.json
其中,程序包源的地址在这里可以查找到, 如下图所示:
然后,点击更新按钮,如下图所示:
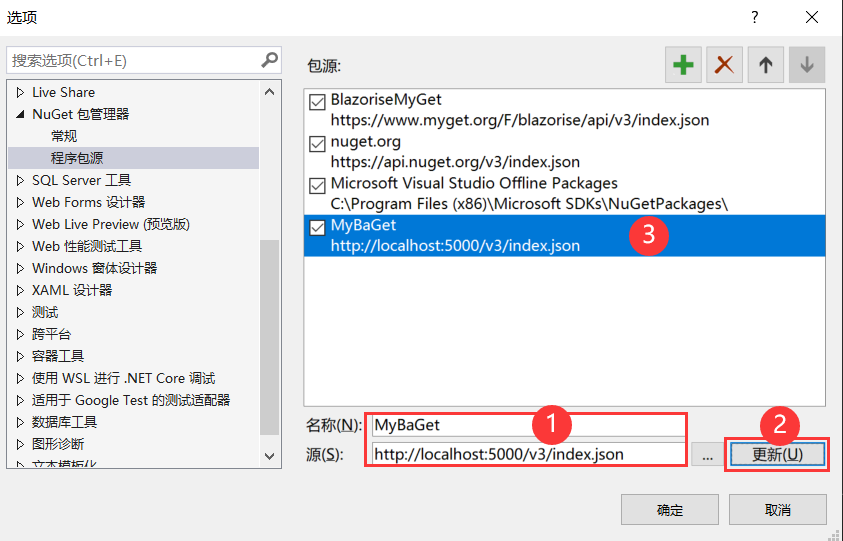
点击【确定】按钮,这样就成功添加了新的程序包源。
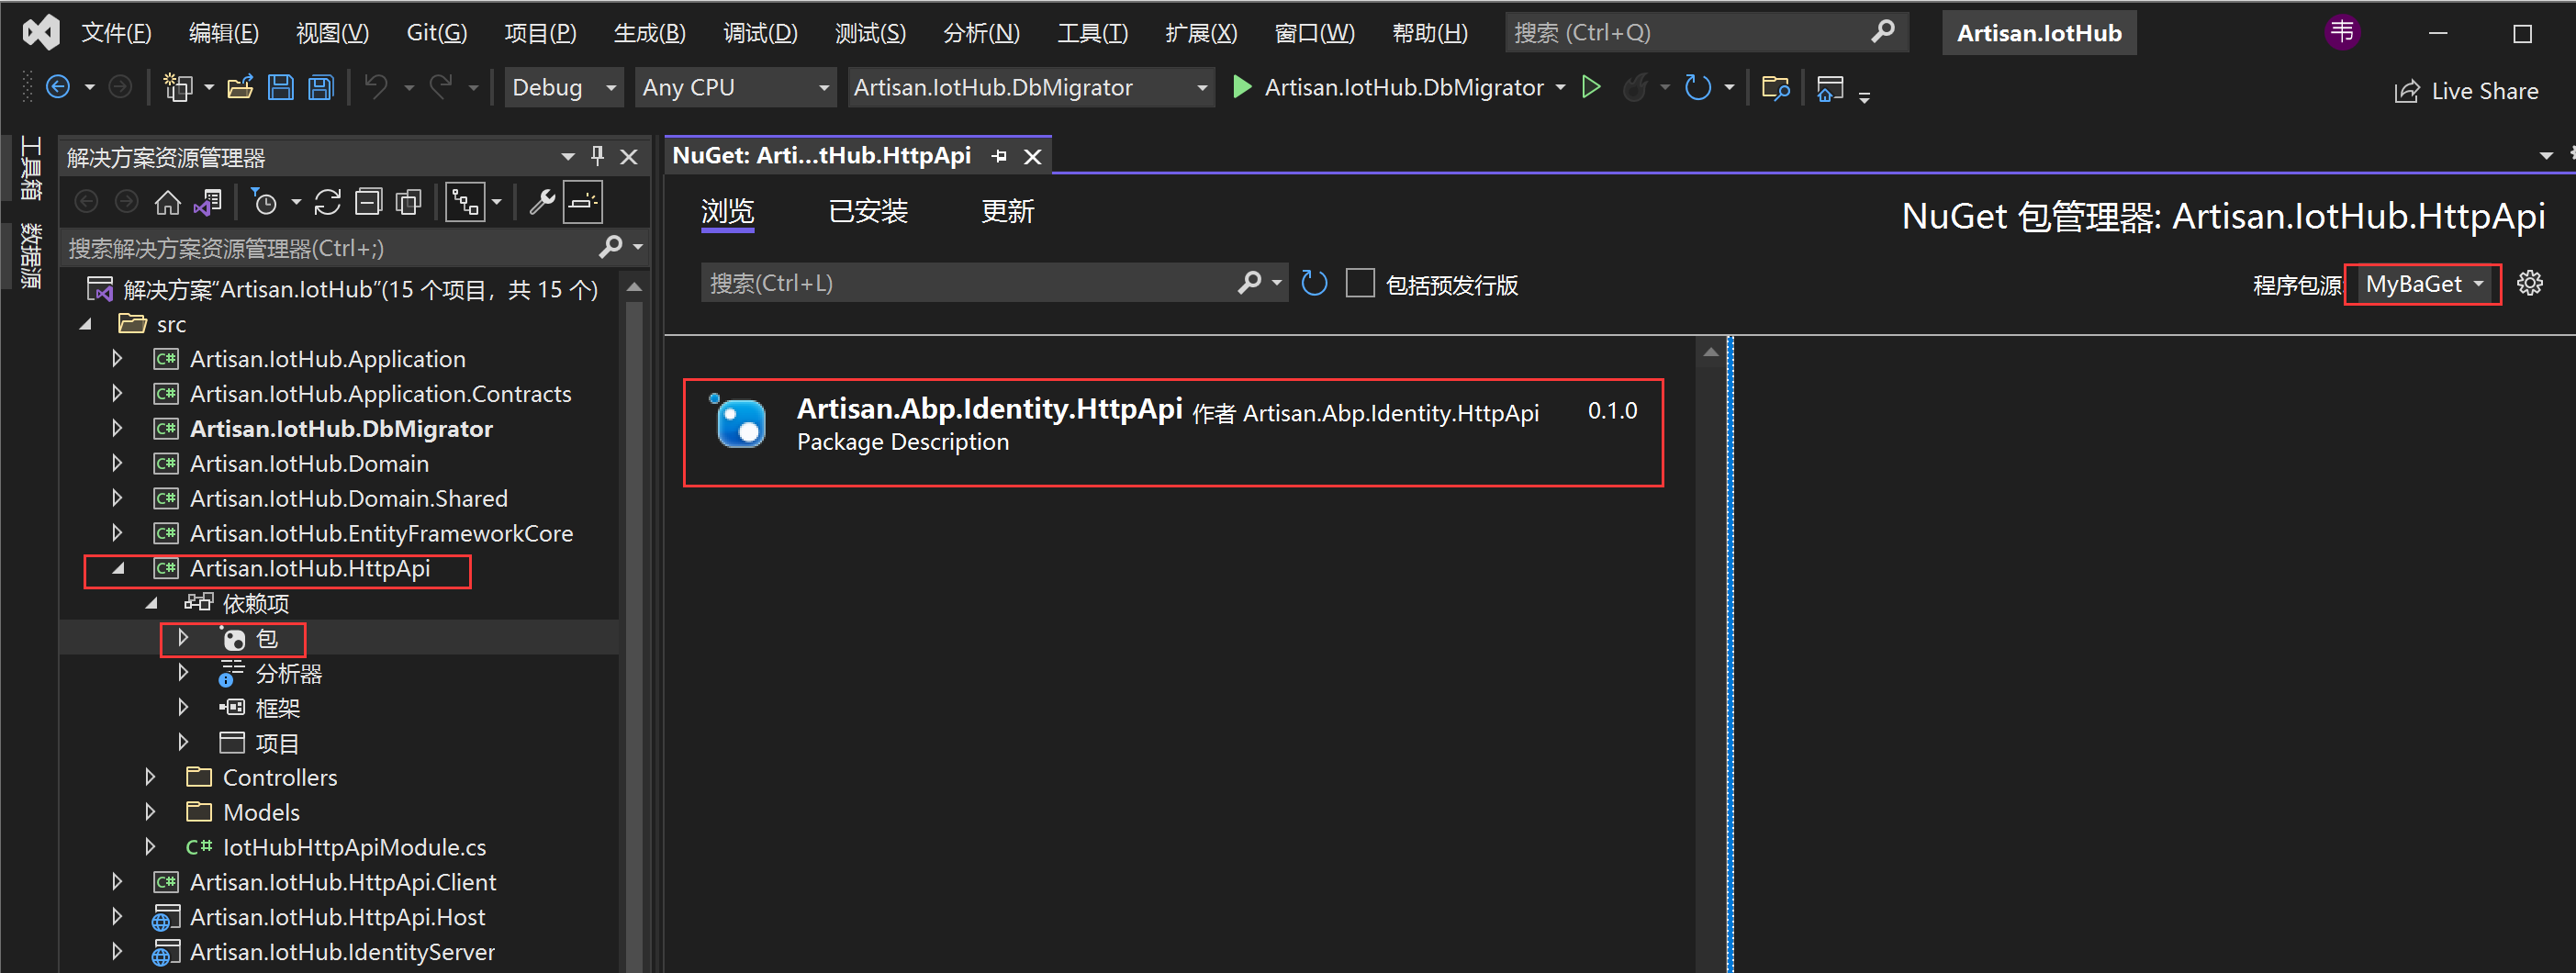
引用私服中的Nuget包
用 Visual Studio 打开要使用私服中Nuget包的项目,这里的示例项目是:Artisan.IotHub.HttpApi
打开项目包管理,在程序包源的下拉框中选择:MyBaGet,
然后就看到了我们刚才上传的包,如下图所示:
包的信息
右键项目【Artisan.Abp.Identity.HttpApi】,在菜单中选择【属性】,在菜单中找到【包 > 常规】选项:
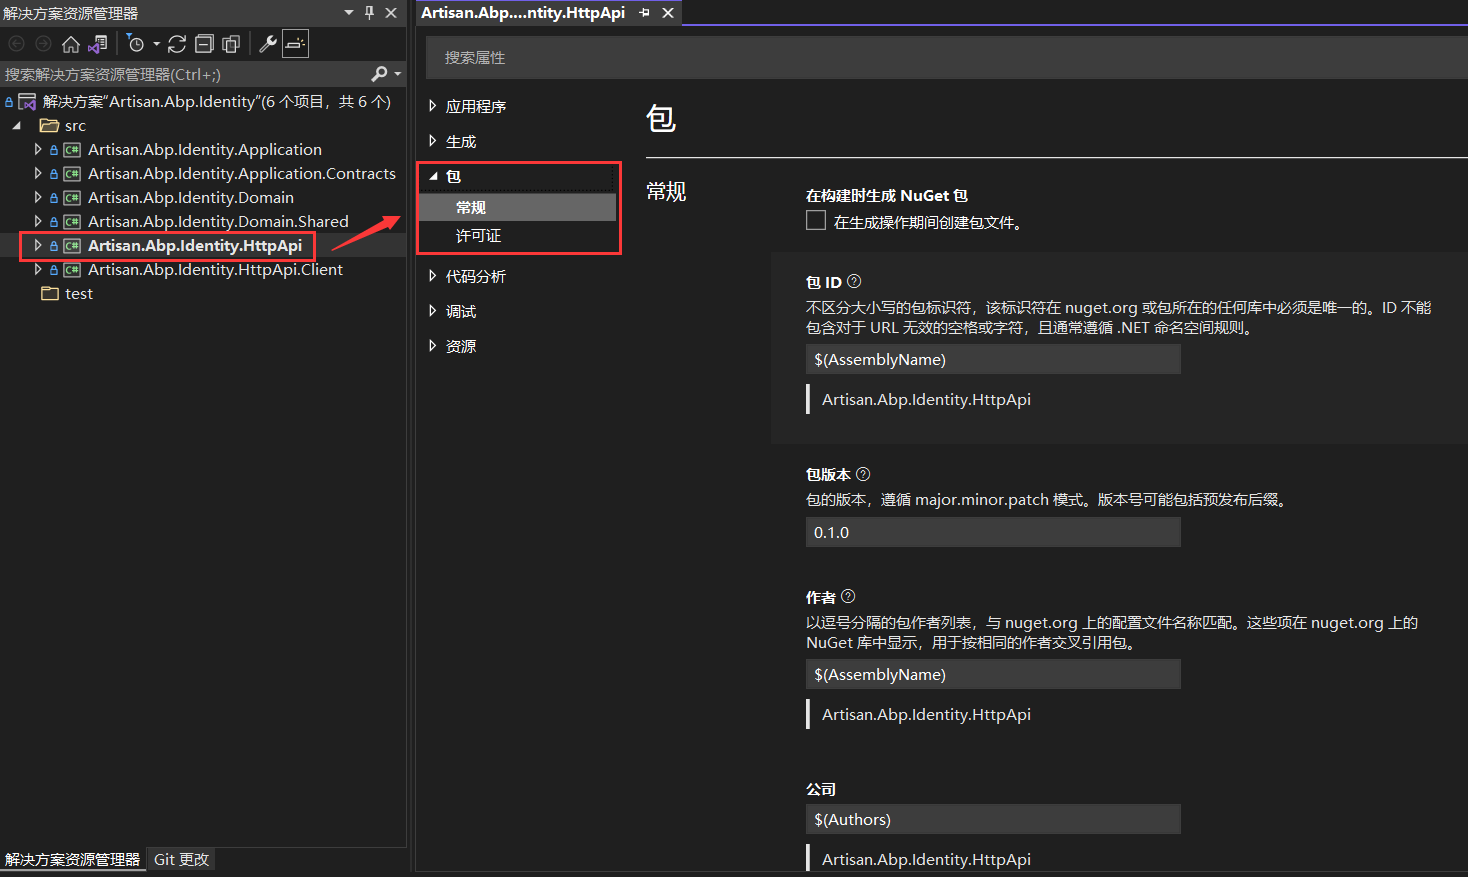
在这里可以对包的版本,作者,公司、图标,版权、说明等信息进行配置。
这里,我做如下修改:
版本:5.2.1
作者:Artsian
公司:Artisan
产品:Artisan.Abp
说明:Artisan.Abp 类库
然后重新打包项目,打包成功后,会产生一个新的文件
Artisan.Abp.Identity.HttpApi.5.2.1.nupkg
使用这个文件上传新的版本,打开CMD,执行如下命令将包上传到私服:
dotnet nuget push -s http://localhost:5000/v3/index.json Artisan.Abp.Identity.HttpApi.5.2.1.nupkg
上传成功后,访问:http://localhost:5000
注意
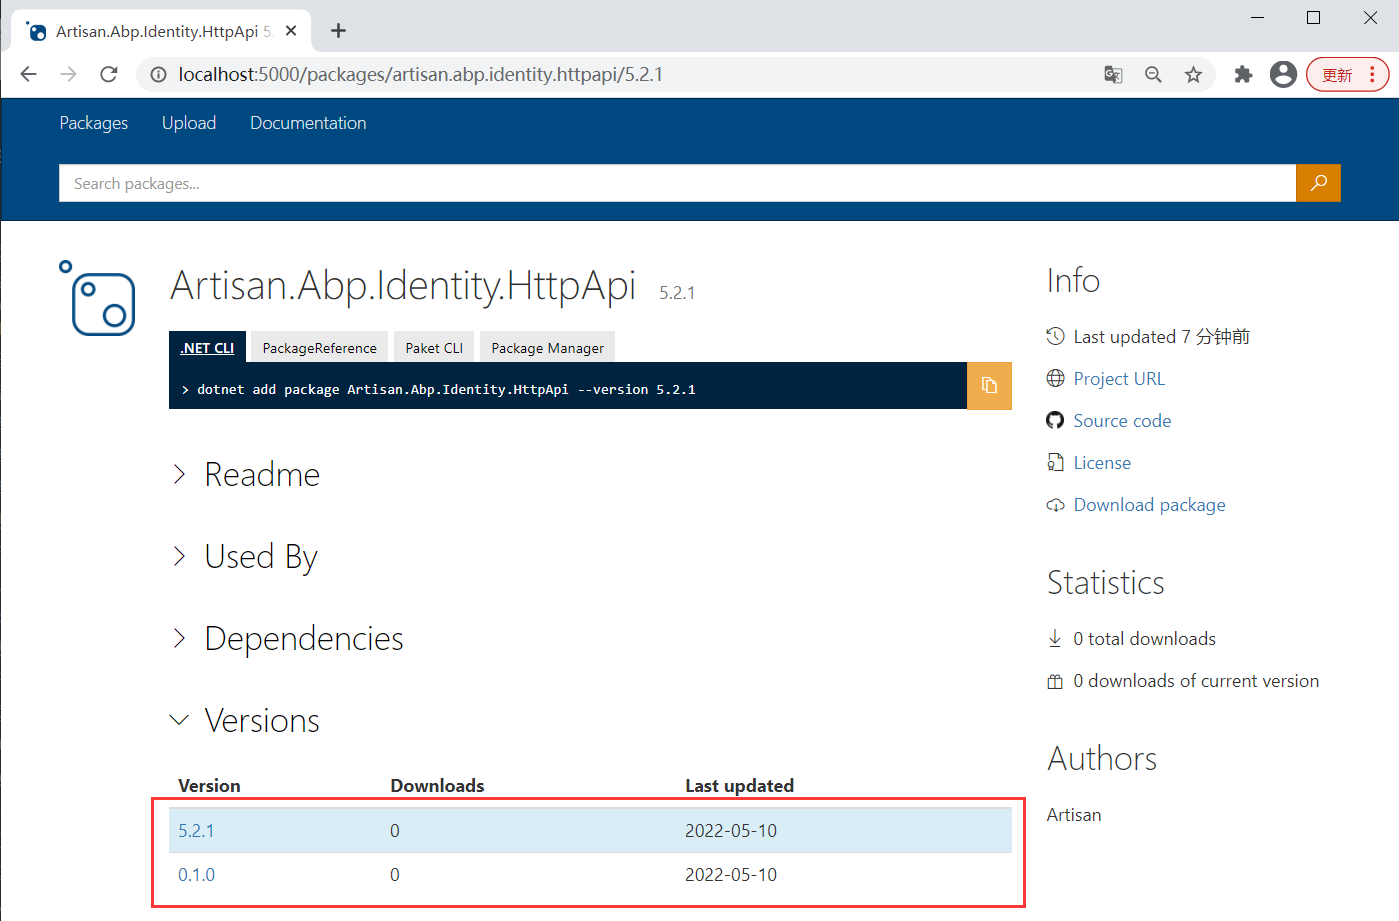
由刚才我们只是修改了项目的包信息,没有修改项目的代码,v0.1.0版包文件与 v5.2.1的版本本质是一样的,但是还是保存了两个版本,如下图所示
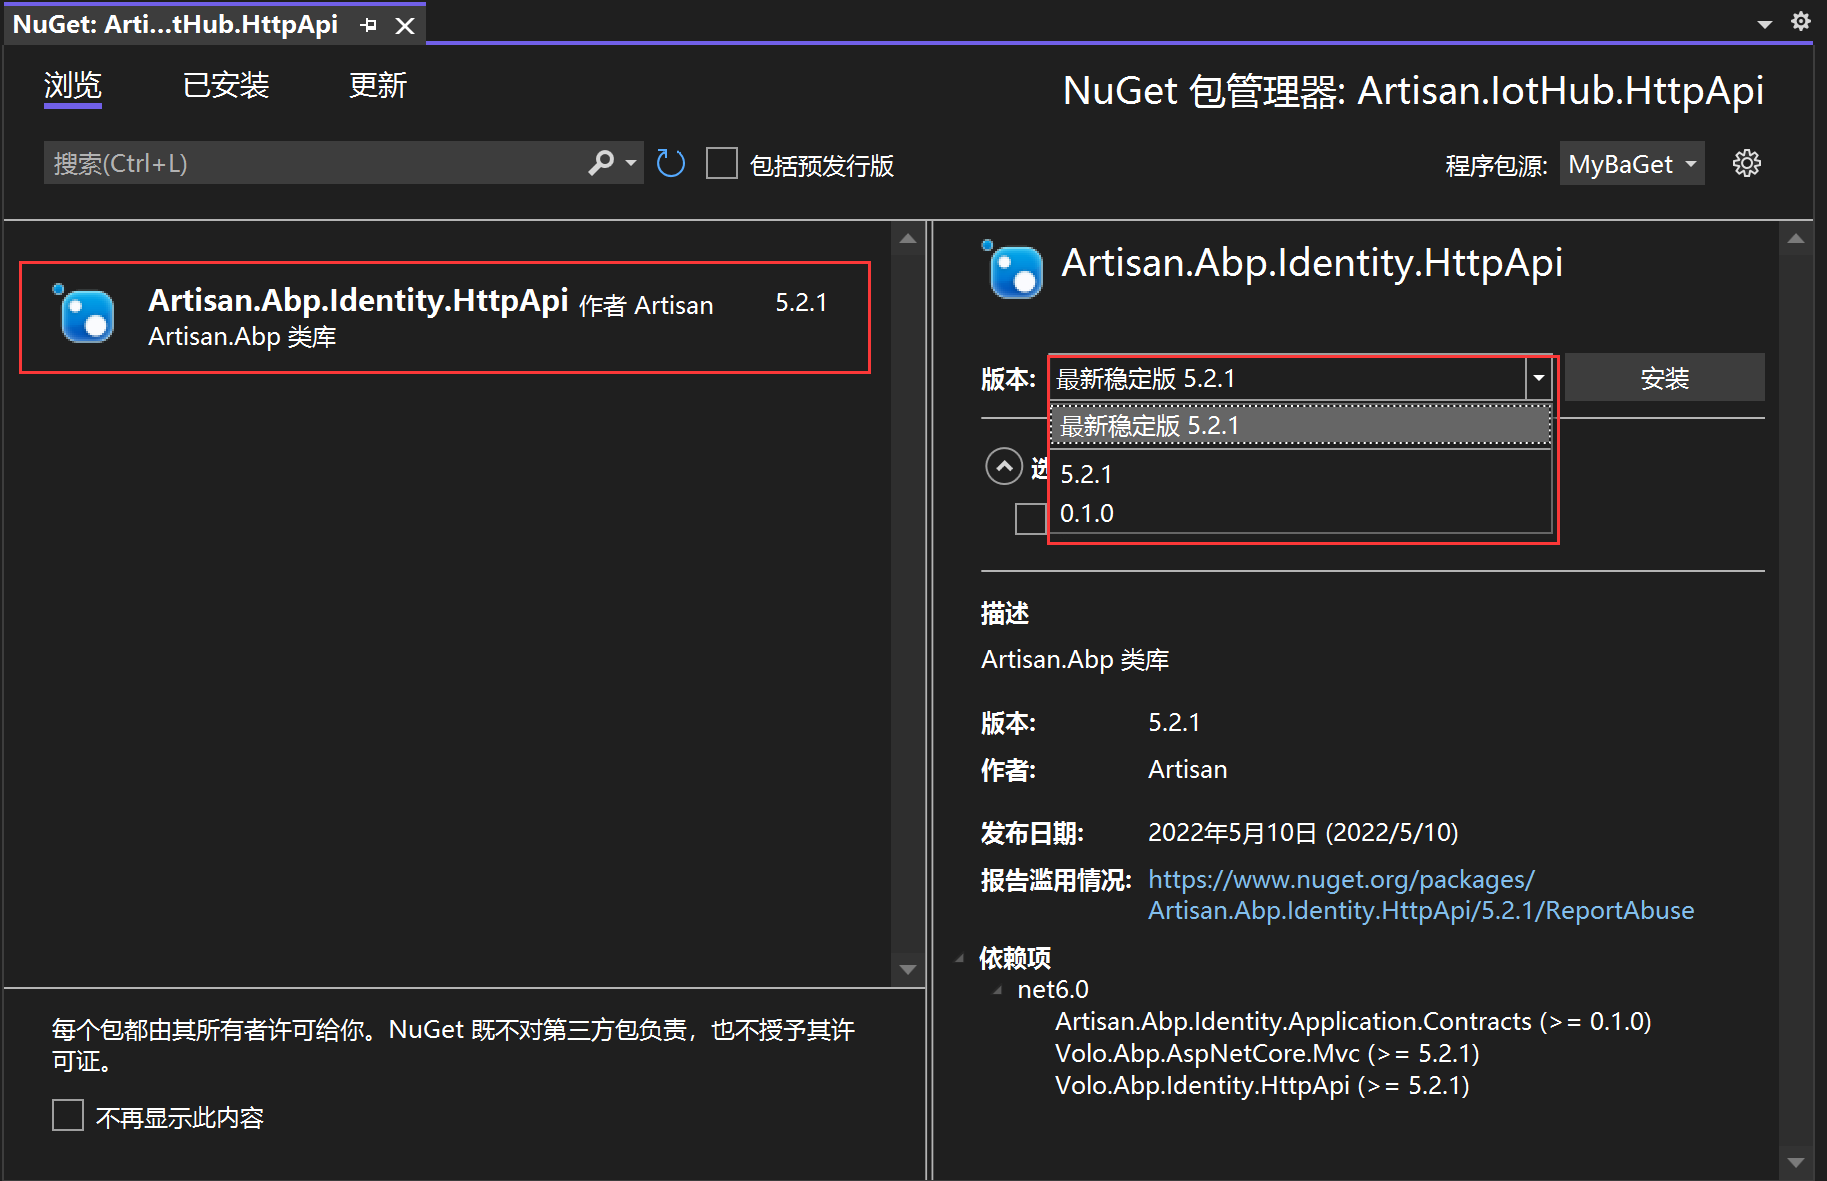
在Visual Studio 中也能看到两个版本:
删除包
Nuget 原则上是不能删除掉已经上传的包。
参见文档:Enable package hard deletions
为了防止“左键”问题,BaGet 的默认配置不允许删除包。每当 BaGet 收到一个包删除请求,它将取代“取消列表”包。未列出的软件包是不可发现的,但是如果您知道软件包的 id 和版本,仍然可以下载。你可以通过设置 PackageDeletionBehavior 来覆盖这个行为:
配置(类库)项目的 appsettings.json 文件:
You can modify BaGet's configurations by editing the
appsettings.jsonfile.
"PackageDeletionBehavior": "HardDelete",
这样配置后,Nuget列表中找不到包,但是项目还是能下载已经删除的包。
覆盖包
Normally, BaGet will reject a package upload if the id and version are already taken. You can configure BaGet to overwrite the already existing package by setting AllowPackageOverwrites:
通常,BaGet 会拒绝包上传,如果 id 和版本已经采取。你可以通过设置 AllowPackageOverwrites 来配置 BaGet 来覆盖已经存在的包:
You can modify BaGet's configurations by editing the
appsettings.jsonfile.
在项目配置文件的appsettings.json添加
{
    ...

    "AllowPackageOverwrites": true,

    ...
}
然后上传之后,只要包的Id和版本相同,就会覆盖掉。
为了实验,这里再上传一次 Artisan.Abp.Identity.HttpApi.5.2.1 这个版本的包
dotnet nuget push -s http://localhost:5000/v3/index.json Artisan.Abp.Identity.HttpApi.5.2.1.nupkg
结果上传失败,如下所示:
E:\artisan\v5\src\modules\identity\src\Artisan.Abp.Identity.HttpApi\bin\Release>dotnet nuget push -s http://localhost:5000/v3/index.json Artisan.Abp.Identity.HttpApi.5.2.1.nupkg
warn : 未提供 API 密钥,找不到 'http://localhost:5000/api/v2/package' 的 API 密钥。要保存源的 API 密钥,请使用 "setApiKey" 密钥。
正在将 Artisan.Abp.Identity.HttpApi.5.2.1.nupkg 推送到 'http://localhost:5000/api/v2/package'...
  PUT http://localhost:5000/api/v2/package/
  Conflict http://localhost:5000/api/v2/package/ 173 毫秒
要跳过已发布的包,请使用 --skip-duplicate 选项
error: Response status code does not indicate success: 409 (Conflict).

Usage: dotnet nuget push [arguments] [options]

Arguments:
  [root]  指定包路径和 API 密钥,将包推送到服务器。

Options:
  -h|--help                      Show help information
  --force-english-output         使用不变的基于英语的区域性强制应用程序运行。
  -s|--source <source>           要使用的包源(URL、UNC/文件夹路径或包源名称)。如果在 NuGet.Config 中指定,                                  则默认为 DefaultPushSource。
  -ss|--symbol-source <source>   要使用的符号服务器 URL。
  -t|--timeout <timeout>         推送到服务器的超时值(以秒为单位)。默认为 300 秒(5 分钟)。
  -k|--api-key <apiKey>          服务器的 API 密钥。
  -sk|--symbol-api-key <apiKey>  符号服务器的 API 密钥。
  -d|--disable-buffering         推送到 HTTP(S) 服务器时禁用缓存可减少内存使用。
  -n|--no-symbols                如果存在符号包,系统不会将该符号包推送到符号服务器。
  --no-service-endpoint          请勿将 "api/v2/package" 追加到源 URL。
  --interactive                  对于身份验证等操作,允许命令阻止并要求手动操作。
  --skip-duplicate               如果包和版本已存在,则跳过它并继续推送中的下一个包(若有)。
在BaGet的程序包文件夹中找到其配置文件【appsettings.json】,修改AllowPackageOverwrites的值为 true, 如下所示:
{
  "AllowPackageOverwrites": true
}
点击项目文件右键,在弹出的菜单中选择【打包】,然后执行如下命名,再次上传包:
dotnet nuget push -s http://localhost:5000/v3/index.json Artisan.Abp.Identity.HttpApi.5.2.1.nupkg
批量打包上传
参考资料:https://www.cnblogs.com/yilezhu/p/12591174.html
项目层级目录
src
├── framework # 框架
├── modules # 主目录
│   ├── account # account 模块
│   │   ├── src # 代码
│   │   │   ├── Artisan.Abp.Account.HttpApi # 项目
│   │   │   └── ...
│   │   ├── Artisan.Abp.Account.sln # 解决方案
│   │   └── ...
│   ├── identity # identity 模块
│   │   ├── src # 代码
│   │   │   ├── Artisan.Abp.Identity.HttpApi # 项目
│   │   │   └── ...
│   │   ├── Artisan.Abp.Identity.sln # 解决方案
│   │   └── ...
├── nupkg # nuget 相关文件
│   ├── baget # baget 打包上传脚本
│   │   ├── common.ps1 # 配置脚本
│   │   ├── pack.ps1 # 脚本:批量打包
│   │   └── push_packages.ps1 # 脚本:批量上传包
│   ├── nuget # nuget 打包上传脚本
├── common.props # 通用项目配置文件,每个项目都一个引用,就可以实现包的版本、作者等统一配置
└── ...
脚本
common.ps1
主要是定义要打包的程序集的目录路径
# Paths
$packFolder = (Get-Item -Path "./" -Verbose).FullName
$rootFolder = Join-Path $packFolder "../../"

# List of solutions
$solutions = (
    # "framework",
    "modules/account",
    "modules/identity"
)

# List of projects
$projects = (

    # framework
    # "framework/src/Volo.Abp.ApiVersioning.Abstractions",
    # "framework/src/Volo.Abp.AspNetCore.Authentication.JwtBearer",
    # "framework/src/Volo.Abp.AspNetCore.Authentication.OAuth",
    # "framework/src/Volo.Abp.AspNetCore",
    # "framework/src/Volo.Abp.Validation",
    # "framework/src/Volo.Abp.VirtualFileSystem",

    # modules/account
    "modules/account/src/Artisan.Abp.Account.Application",
    "modules/account/src/Artisan.Abp.Account.Application.Contracts",
    "modules/account/src/Artisan.Abp.Account.HttpApi",
    "modules/account/src/Artisan.Abp.Account.HttpApi.Client",

    # modules/identity
    "modules/identity/src/Artisan.Abp.Identity.Application",
    "modules/identity/src/Artisan.Abp.Identity.Application.Contracts",
    "modules/identity/src/Artisan.Abp.Identity.Domain",
    "modules/identity/src/Artisan.Abp.Identity.Domain.Shared",
    "modules/identity/src/Artisan.Abp.Identity.HttpApi",
    "modules/identity/src/Artisan.Abp.Identity.HttpApi.Client"
)
pack.ps1
批量打包Nuget的脚本
. ".\common.ps1"

# Rebuild all solutions
foreach($solution in $solutions) {
    $solutionFolder = Join-Path $rootFolder $solution
    Set-Location $solutionFolder
    & dotnet restore
}

# Create all packages
foreach($project in $projects) {

    $projectFolder = Join-Path $rootFolder $project

    # Create nuget pack
    Set-Location $projectFolder
    Remove-Item -Recurse (Join-Path $projectFolder "bin/Release")
    & dotnet msbuild /t:pack /p:Configuration=Release /p:SourceLinkCreate=true

    if (-Not $?) {
        Write-Host ("Packaging failed for the project: " + $projectFolder)
        exit $LASTEXITCODE
    }

    # Copy nuget package
    $projectName = $project.Substring($project.LastIndexOf("/") + 1)
    $projectPackPath = Join-Path $projectFolder ("/bin/Release/" + $projectName + ".*.nupkg")
    Move-Item $projectPackPath $packFolder

}

# Go back to the pack folder
Set-Location $packFolder
push_packages.ps1
批量上传 Nuget 包
. ".\common.ps1"

# Get the version
[xml]$commonPropsXml = Get-Content (Join-Path $rootFolder "common.props")
$version = $commonPropsXml.Project.PropertyGroup.Version

# Publish all packages
foreach($project in $projects) {
 $projectName = $project.Substring($project.LastIndexOf("/") + 1)
    & dotnet nuget push -s http://localhost:5000/v3/index.json ($projectName + "." + $version + ".nupkg")
}

# Go back to the pack folder
Set-Location $packFolder
其中,引用了自定义的通用项目配置文件
common.props
common.props 的内容如下:
<Project>
  <PropertyGroup>
    <LangVersion>latest</LangVersion>
    <Version>5.2.1</Version>
    <Authors>Artisan</Authors>
    <Company>Artisan</Company>
    <NoWarn>$(NoWarn);CS1591;CS0436</NoWarn>
  </PropertyGroup>
</Project>
其中 Version 节点设置了版本号为:5.2.1
这样每个要发布的项目引用这个文件,例如:
在要发布的项目【Artisan.Abp.Identity.HttpApi】的项目工程文件中,添加如下代码引用通用项目配置:
src\modules\identity\src\Artisan.Abp.Identity.HttpApi\Artisan.Abp.Identity.HttpApi.csproj
<Project Sdk="Microsoft.NET.Sdk">
  <Import Project="..\..\..\..\common.props" />
  ......
这样,可以实现包的版本、作者等统一配置。
批量打包
打开 powershell 执行如下脚本,进行批量打包
PS E:\artisan\v5\src\nupkg\baget> .\pack.ps1
执行
powershell脚本的时候可能会报如下的错误以管理员身份执行一次
set-executionpolicy remotesigned然后输入
y回车即可顺利执行。
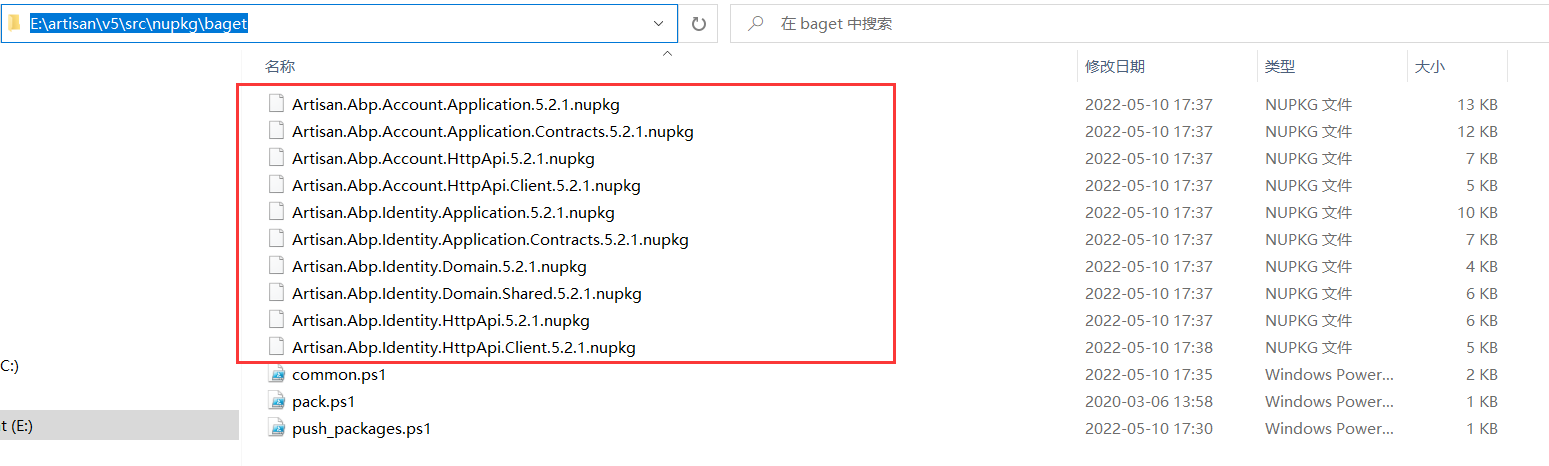
执行后,在目录 E:\artisan\v5\src\nupkg\baget 下自动生成若干个.nupkg文件,如下图所示:
批量上传
打开 powershell 执行如下脚本,进行包的批量上传
PS E:\artisan\v5\src\nupkg\baget> .\push_packages.ps1
上传成功后, 访问:http://localhost:5000/ , 可以看到包已经上传成功,如下图所示:


 浙公网安备 33010602011771号