前后端分离-crud&svn
前后端分离-crud&svn
1. 跨域
1.1 什么是跨域
请求方与服务方的源不同,即跨域,包括:
1. 协议不同
2. 域名不同
3. 端口不同
1.2 跨域不一定存在跨域问题
什么情况下存在跨域问题:
<a href="www.jd.com">
跨域问题: 浏览器 针对ajax请求的时候,如果不同的服务,存在跨域
浏览器机制: 同源策略拦截跨域的访问
1.3 解决跨域的方法
(1) jsonp方式 --json变种
localhost/department/list -- > <scprit src="/localhost/department/list">
缺点:
需要服务支持
只能发起GET请求
(2) nginx 反向代理
(3)方案3 -- 服务器允许cors这些请求
什么是cors?
同源(相同协议,相同域名,相同端口)
cors: 一个w3c标准 跨域资源共享"(Cross-origin resource sharing)
服务器怎么允许这些 / get/post/delete/put/options /patch
cors解决跨域方案:
(1)写一个配置类(针对spring4.2以下版本)
package cn.itsource.crud.config;

import org.springframework.context.annotation.Bean;
import org.springframework.context.annotation.Configuration;
import org.springframework.web.cors.CorsConfiguration;
import org.springframework.web.cors.UrlBasedCorsConfigurationSource;
import org.springframework.web.filter.CorsFilter;

@Configuration
public class GlobalCorsConfig {
    @Bean
    public CorsFilter corsFilter() {
        //1.添加CORS配置信息
        CorsConfiguration config = new CorsConfiguration();
        //1) 允许的域,不要写*,否则cookie就无法使用了
        config.addAllowedOrigin("http://127.0.0.1:8080/");
config.addAllowedOrigin("http://localhost:8080/");

        //2) 是否发送Cookie信息
        config.setAllowCredentials(true);
        //3) 允许的请求方式
        config.addAllowedMethod("OPTIONS");
        config.addAllowedMethod("HEAD");
        config.addAllowedMethod("GET");
        config.addAllowedMethod("PUT");
        config.addAllowedMethod("POST");
        config.addAllowedMethod("DELETE");
        config.addAllowedMethod("PATCH");
        // 4)允许的头信息
        config.addAllowedHeader("*");
        //2.添加映射路径,我们拦截一切请求
        UrlBasedCorsConfigurationSource configSource = new
                UrlBasedCorsConfigurationSource();
        configSource.registerCorsConfiguration("/**", config);
        //3.返回新的CorsFilter.
        return new CorsFilter(configSource);
    }
}
或者
(2)spring通过注解支持
CrossOrigin 注意: 4.2版本以后支持
一个注解解决(可以加在类或者方法上面)
@CrossOrigin
2. 前端crud主要代码
2.1 新增


addSubmit: function () {
   this.$refs.addForm.validate((valid) => {
      if (valid) {
         this.$confirm('确认提交吗?', '提示', {}).then(() => {
            this.addLoading = true;
            let para = Object.assign({}, this.addForm);
            this.$http.put("/department/save", para).then(res => {
               this.addLoading = false;
                             let {success, msg} = res.data;
                             if (success) {
                                 this.$message({
                                     message: msg,
                                     type: 'success'
                                 });
                             } else {
                                 this.$message({
                                     message: msg,
                                     type: 'error'
                                 });
                             }

               this.$refs['addForm'].resetFields();
               this.addFormVisible = false;
               this.getDepartments();
            });
         });
      }
   });
}
2.2 修改
editSubmit: function () {
   this.$refs.editForm.validate((valid) => {
      if (valid) {
         this.$confirm('确认提交吗?', '提示', {}).then(() => {
            this.editLoading = true;
            let para = Object.assign({}, this.editForm);
            // editUser(para).then((res) => {
                         this.$http.post("/department/save", para).then(res => {
                             let {success, msg} = res.data;
                             if (success) {
                                 this.$message({
                                     message: msg,
                                     type: 'success'
                                 });
                             } else {
                                 this.$message({
                                     message: msg,
                                     type: 'error'
                                 });
                             }
               this.editLoading = false;
               this.$refs['editForm'].resetFields();
               this.editFormVisible = false;
               this.getDepartments();
            });
         });
      }
   });
}
2.3 删除
handleDel: function (index, row) {
   this.$confirm('确认删除该记录吗?', '提示', {
      type: 'warning'
   }).then(() => {
      this.listLoading = true;
                 this.$http.delete("/department/" + row.id).then(res => {
         this.listLoading = false;
         let {success, msg} = res.data;
                     if (success) {
                         this.$message({
                             message: msg,
                             type: 'success'
                         });
                     } else {
                         this.$message({
                             message: msg,
                             type: 'error'
                         });
                     }
         this.getDepartments();
      });
   }).catch(() => {

   });
}
2.4 查询
getDepartments() {
   let para = {
      page: this.page,
      name: this.filters.name
   };
   this.listLoading = true;
   this.$http.patch("/department/list").then(res => {
      this.total = res.data.length;
      this.departments = res.data;
      this.listLoading = false;
   });
}
3. svn
3.1 安装svn
首先我们需要下载一个 svn的客户端
我们用的是TortoiseSVN(小乌龟),下载后安装 ,然后记住安装路径
官网下载地址:https://tortoisesvn.net/downloads.html
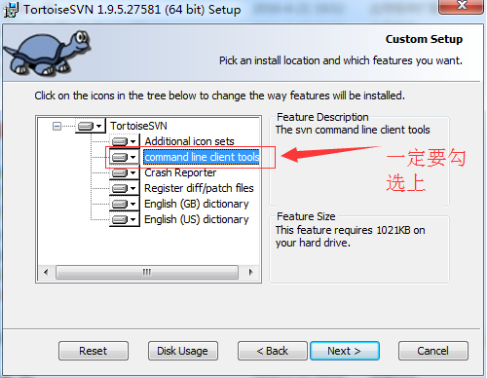
3.2 安装svn客户端
在安装svn客户端的时候一定要勾选,否则在idea上集成svn的时候会找不到 svn.exe 而报错。
如果安装时忘记勾选了的话,安装包重新运行,选择modify,然后勾选command line client tools项就行了。
3.3 操作svn
1)创建仓库

2)检出
代码
3)提交/更新
4)处理冲突
什么情况 会存在冲突?
多个人在去修改同一个文件的,如果修改的版本号不一致 就可以出现
5)idea操作svn
import
check out

 浙公网安备 33010602011771号