
Lnmp上安装Yaf学习(二)
上一节主要实践了在Lnmp上安装Yaf扩展,那么这一节将测试 Yaf 的一个简单demo的运行。
一、通过Lnmp 创建 vhost 文件
[root@localhost yaf-3.0.6]# lnmp vhost add
+-------------------------------------------+
|    Manager for LNMP, Written by Licess    |
+-------------------------------------------+
|              https://lnmp.org             |
+-------------------------------------------+
Please enter domain(example: www.lnmp.org): yafstudy.com
 Your domain: yafstudy.com
Enter more domain name(example: lnmp.org *.lnmp.org): n
 domain list: n
Please enter the directory for the domain: yafstudy.com
Default directory: /home/wwwroot/yafstudy.com: /home/work/yafstudy
Virtual Host Directory: /home/work/yafstudy
Allow Rewrite rule? (y/n) y
Please enter the rewrite of programme,
wordpress,discuz,typecho,sablog,typecho rewrite was exist.
(Default rewrite: other):
You choose rewrite: other
Allow access log? (y/n) y
Enter access log filename(Default:yafstudy.com.log):
You access log filename: yafstudy.com.log
Create database and MySQL user with same name (y/n) n
Add SSL Certificate (y/n) n
以上操作执行完之后,可以产生一个vhost 文件

通过命令:vim /usr/local/nginx/conf/vhost 进行编辑文件修改内容如下
[root@localhost /]# cat /usr/local/nginx/conf/vhost/yafstudy.com.conf
server
    {
        listen 80;
        #listen [::]:80;
        server_name yafstudy.com;
        index index.php;
        root  /home/work/yafstudy;

        include enable-php.conf;

        if (!-e $request_filename) {
	   rewrite ^/(.*) /index.php?$1 last;
	}

        access_log  /home/wwwlogs/yafstudy.com.log;
    }
[root@localhost /]#
修改完毕保存重启 lnmp.
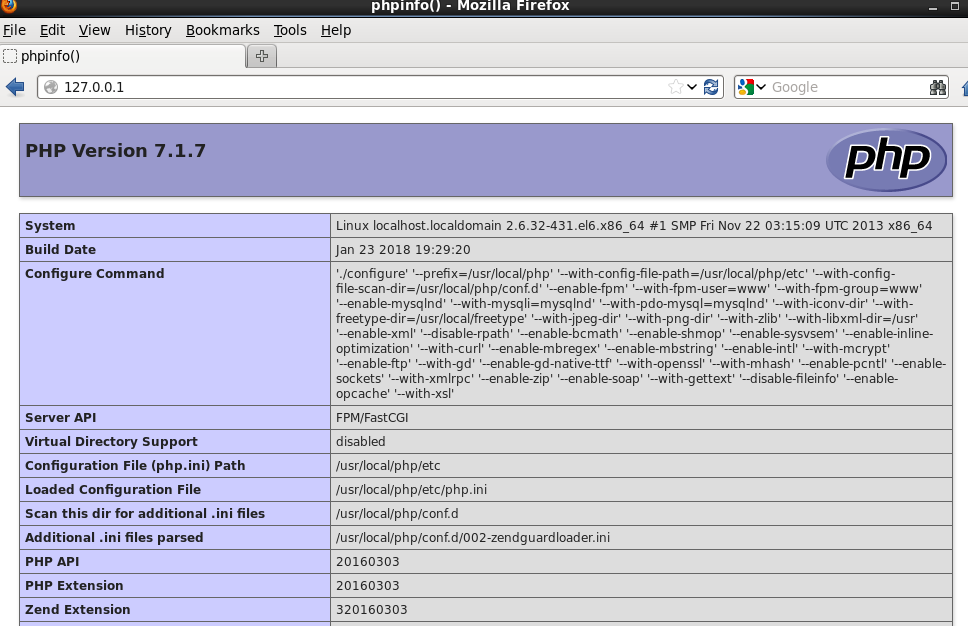
其次,查看一下phpinfo()是否正常使用,我继续往下走。
cd /home/work/yafstudy
创建一个index.php的文件,写入 phpinfo(); 然后再浏览器上执行目录;效果如下:
这个时候webserver开始启动起来了。下面开启Yaf 的第一次尝试。
二、Yaf 的 demo 运行
访问路径:https://github.com/laruence/yaf
1) 在项目的目录建立一个临时的文件夹,下载项目的压缩包
[root@localhost tmp]# wget https://github.com/laruence/yaf/archive/master.zip
2) 通过:unzip master.zip 进行解压,然后进入到目录中
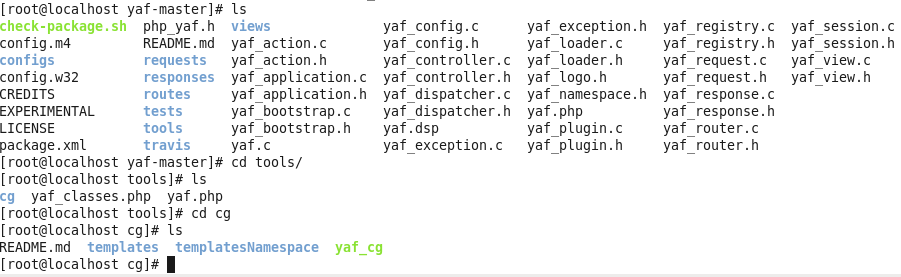
由此可见,yaf_cg 它就是那个可以生成一个最简单最简单的项目结构的框架目录。
3) 运行一下:./yaf_cg 回车
哦呦,提示要带上项目名称,那改成这个样子吧: ./yaf_cg yafcici 回车。
哦呦,报错了嘞;shell_exec() has been disabled for security reasons

这里是php.ini, 中 disable_functions = shell_exec, scandir, ..........
这里是禁用的危险函数,不能随便使用,这里临时去掉shell_exec, scandir一下下,假装看不见。重启nginx 即可
继续执行 : ./yaf_cg yafcici 回车。大功告成!如下图所示:
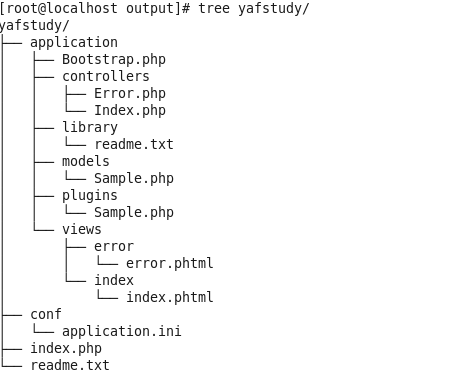
操作如下命令,将临时目录的代码拷贝到正式的项目目录中
[root@localhost yafstudy]# cp -rf ../tmp/yaf-master/tools/cg/output/yafstudy/* ./
[root@localhost yafstudy]# ll
total 16
drwxr-xr-x. 7 root root 4096 Jan 23 23:01 application
drwxr-xr-x. 2 root root 4096 Jan 23 23:01 conf
-rw-r--r--. 1 root root  174 Jan 23 23:01 index.php
-rw-r--r--. 1 root root  442 Jan 23 23:01 readme.txt
这样的话我们看看项目的访问情况,如下图所示:

可以看到Demo已经正常运行了。

 浙公网安备 33010602011771号