

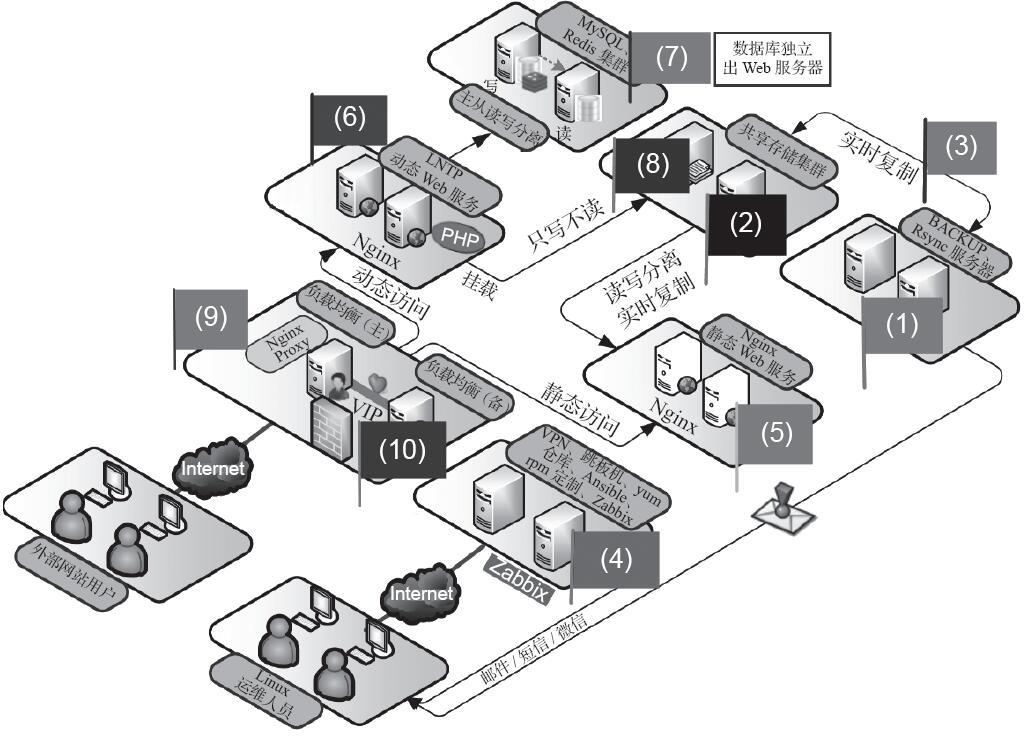
1、搭建管理机批量管理服务SSH+Shell管理(172.16.1.61),批量管理服务Ansible管理(172.16.1.61)
2、
01、
02、
03、
04、
05、
06、
07、
08、
09、
10、
11、
12、
13、
14、
15、
16、
17、
18、
19、
安装Ansible
01、yum install epel-release -y
02、yum install ansible -y
03、yum install libselinux-python -y
04、ansible --version
被管理服务节点安装libselinux-python
01、yum install epel-release -y
02、yum install libselinux-python -y
编写Ansible被管理主机列表
01、cp /etc/ansible/hosts{,.ori}
02、>/etc/ansible/hosts
03、vim /etc/ansible/hosts
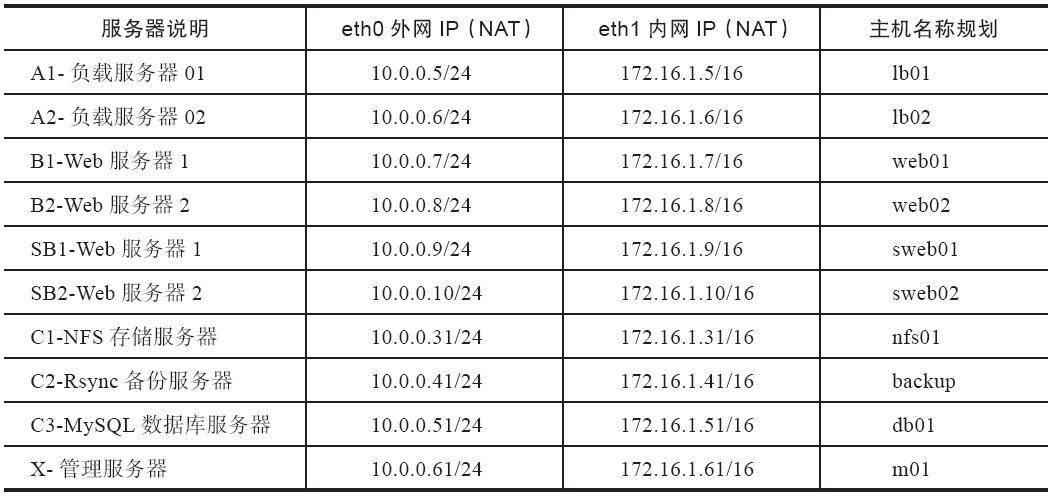
[lb]
172.16.1.5 ansible_ssh_port=52113 ansible_ssh_user=duke
172.16.1.6 ansible_ssh_port=52113 ansible_ssh_user=duke
[web]
172.16.1.7 ansible_ssh_port=52113 ansible_ssh_user=duke
172.16.1.8 ansible_ssh_port=52113 ansible_ssh_user=duke
[sweb]
172.16.1.9 ansible_ssh_port=52113 ansible_ssh_user=duke
172.16.1.10 ansible_ssh_port=52113 ansible_ssh_user=duke
[nfs]
172.16.1.31 ansible_ssh_port=52113 ansible_ssh_user=duke
[backup]
172.16.1.41 ansible_ssh_port=52113 ansible_ssh_user=duke
[db]
172.16.1.51 ansible_ssh_port=52113 ansible_ssh_user=duke
[manager]
172.16.1.61 ansible_ssh_port=52113 ansible_ssh_user=duke
SSH免密码登录
01、ssh-keygen -t rsa
02、一直回车,不建议设置私钥密码,否则需要配置ssh-agent
03、ssh-copy-id -i ~/.ssh/id_rsa.pub -p52113 duke@172.16.1.41
04、依次对集群内的所有服务进行ssh-copy-id操作
测试下主机的连通性
01、ansible all -m ping
2、搭建备份服务器BACKUP(172.16.1.41),核心是Rsync服务
(1)部署环境准备
01、cat /etc/redhat-release
02、uname -r
03、uname -m
04、rpm -qa rsync
(2)Rsync服务器端部署
01、cp /etc/rsyncd.conf{,.ori}
02、cat >/etc/rsyncd.conf<<EOF
#rsync_config_______________start
#created by oldboy
#site: http://www.oldboyedu.com
uid = rsync
gid = rsync
fake super = yes  #<==CentOS7比CentOS6增加的参数。
use chroot = no
max connections = 200
timeout = 600
pid file = /var/run/rsyncd.pid
lock file = /var/run/rsync.lock
log file = /var/log/rsyncd.log
ignore errors
read only = false
list = false
hosts allow = 172.16.1.0/24
hosts deny = 0.0.0.0/32
auth users = rsync_backup
secrets file = /etc/rsync.password
[backup]
comment = welcome to oldboyedu backup!
path = /backup/
EOF
(3)配置用于数据备份的目录
01、useradd rsync -s /sbin/nologin -M
02、mkdir -p /backup
03、chown -R rsync.rsync /backup
(4)配置用于Rsync复制的账号、密码及账号文件权限
01、echo "rsync_backup:oldboy" >/etc/rsync.password
02、chmod 600 /etc/rsync.password
03、cat /etc/rsync.password -A
04、ll /etc/rsync.password
(5)启动Rsync服务以及检查确认
01、systemctl start rsyncd
02、systemctl enable rsyncd
03、systemctl status rsyncd
04、ps -ef|grep rsync|grep -v grep
05、netstat -lntup|grep rsync
(6)Rsync客户端操作过程:共享存储服务器NFS(172.16.1.31)
01、配置密码文件方式(常用)
02、echo "oldboy" >/etc/rsync.password
03、chmod 600 /etc/rsync.password
04、cat /etc/rsync.password
05、ll /etc/rsync.password
(7)测试数据同步效果
01、推送:从客户端同步文件或目录到服务器端
02、rsync -avzP /etc rsync_backup@172.16.1.41::backup --password-file=/etc/rsync.password
03、拉取:从服务器端同步文件或目录到客户端
04、rsync -avz rsync_backup@172.16.1.41::backup /opt/ --password-file=/etc/rsync.password
09、rsync -vzrtopg rsync_backup@172.16.1.41::backup/etc/hosts /opt --password-file=/etc/rsync.password
(8)查看服务器端/backup目录
01、ls /backup/
02、du -sh /backup/
3、搭建共享存储服务器NFS(172.16.1.31),核心是NFS共享服务
安装NFS软件
01、yum install nfs-utils rpcbind -y
02、rpm -qa nfs-utils rpcbind
启动rpcbind服务
03、systemctl start rpcbind
04、systemctl status rpcbind
05、systemctl enable rpcbind
06、netstat -lntup|egrep "rpcbind|111"
07、rpcinfo -p localhost
停止rpcbind服务(了解,不操作)
08、systemctl stop rpcbind
09、rpcinfo -p localhost
10、netstat -lntup|egrep "rpcbind|111"
11、systemctl stop rpcbind.socket
12、netstat -lntup|egrep "rpcbind|111"
13、rpcinfo -p localhost
启动NFS服务
01、systemctl start nfs
02、systemctl enable nfs
03、systemctl status nfs
04、rpcinfo -p localhost
05、ps -ef|egrep "rpc|nfs"
配置NFS服务器端
01、useradd nfsnobody -s /sbin/nologin -M(待确认)
01、mkdir -p /data
02、touch /data/oldboy.txt
03、chown -R nfsnobody.nfsnobody /data
04、ls -ld /data
05、grep nfsnobody /etc/passwd
06、cat >>/etc/exports<<EOF
#shared /data by oldboy for students
/data 172.16.1.0/24(rw,sync)
EOF
07、tail -2 /etc/exports
08、systemctl reload nfs
09、showmount -e localhost
10、cat /var/lib/nfs/etab
11、mount -t nfs 172.16.1.31:/data /mnt
12、ls /mnt/ oldboy.txt
13、df -h|tail -1
4、Sersync部署环境准备(nfs端)
测试Sersync部署环境准备(nfs端)
01、rsync -avz --delete /data/ rsync_backup@172.16.1.41::backup/ --password-file=/etc/rsync.password
02、uname -r
03、ls -l /proc/sys/fs/inotify/
Sersync程序部署安装
01、mkdir -p /server/tools
02、cd /server/tools
03、wget https://sersync.googlecode.com/files/sersync2.5.4_64bit_binary_stable_final.tar.gz
04、tar xf sersync2.5.4_64bit_binary_stable_final.tar.gz
05、mv GNU-Linux-x86 /application/sersync
Sersync配置文件修改
01、cp confxml.xml confxml.xml.bak
02、vim confxml.xml 修改配置文件中的24--28行
<localpath watch="/data">
    <remote ip="172.16.1.41" name="backup"/>
    <!--<remote ip="192.168.8.39" name="tongbu"/>-->
    <!--<remote ip="192.168.8.40" name="tongbu"/>-->
</localpath>
03、修改29--35行,认证部分(rsync密码认证)
<rsync>
    <commonParams params="-avz"/>
    <auth start="true" users="rsync_backup" passwordfile="/etc/rsync.password"/>
    <userDefinedPort start="false" port="874"/><!-- port=874 -->
    <timeout start="true" time="100"/><!-- timeout=100 -->
    <ssh start="false"/>
</rsync>
04、chmod +x sersync2
05、/application/sersync/sersync2 -d -r -o /application/sersync/confxml.xml
Sersync应用设置
01、echo "/application/sersync/sersync2 -d -r -o /application/sersync/confxml.xml">>/etc/rc.d/rc.local
02、tail -1 /etc/rc.d/rc.local
03、chmod +x /etc/rc.d/rc.local
Sersync部署测试
01、cd /data
02、touch oldboy{1..3}.txt
03、ls
04、ls /backup/ 查看backup服务器/backup目录
使用systemctl命令管理Sersync
01、vim /etc/rc.d/init.d/sersync
#!/bin/bash
# chkconfig: 2345 21 81
# description: rsync service start and stop scripts
# Author: oldboy
# Organization: www.oldboyedu.com
start(){
  /application/sersync/sersync2 -d -o /application/sersync/confxml.xml &>/dev/null &>/dev/null
}
stop(){
  killall sersync 2>/dev/null
}
case "$1" in
  start)
     start
     ;;
  stop)
    stop
    ;;
  restart)
    stop
    sleep 2
    start
    ;;
  *)
    echo $"Usage:$0 {start|stop|restart}"
    exit 1
esac
02、cat /etc/rc.d/init.d/sersync
03、chmod +x /etc/rc.d/init.d/sersync
04、ls -l /etc/rc.d/init.d/sersync
配置serync.service
01、vim /usr/lib/systemd/system/sersync.service
[Unit]
Description=sersyncd service
After=network.target
[Service]
Type=forking
ExecStart=/etc/rc.d/init.d/sersync start
ExecReload=/etc/rc.d/init.d/sersync restart
ExecStop=/etc/rc.d/init.d/sersync stop
PrivateTmp=true
[Install]
WantedBy=multi-user.target
02、cat /usr/lib/systemd/system/sersync.service
03、chmod +x /usr/lib/systemd/system/sersync.service
04、ls -l /usr/lib/systemd/system/sersync.service
激活开机启动并测试启动、停止管理功能
01、systemctl enable sersync.service
02、systemctl start sersync
03、systemctl stop sersync
04、ps -ef|grep sersync|grep -v grep
05、systemctl start sersync
06、ps -ef|grep sersync|grep -v grep
07、systemctl status sersync
静态web节点不挂载NFS,NFS用Sersync推送数据到静态web节点
01、cd sersync/conf/
02、vim confxml.xml +28
24   <localpath watch="/data">
25     <remote ip="172.16.1.41" name="backup"/>
26     <remote ip="172.16.1.9" name="backup"/>   <!——推送到静态服务器172.16.1.9-->
27     <remote ip="172.16.1.10" name="backup"/>   <!——推送到静态服务器172.16.1.10-->
28   </localpath>
5、搭建Nginx静态Web服务(172.16.1.9/10)
配置Nginx官方yum源
01、cat /etc/yum.repos.d/nginx.repo
[nginx]
name=Nginx repo by oldboy
baseurl=http://nginx.org/packages/centos/7/$basearch/
gpgcheck=0
enabled=1
yum安装Nginx
01、rpm -qa nginx
02、yum install nginx -y
03、rpm -qa nginx
启动并检查Nginx状态
01、systemctl start nginx
02、systemctl enable nginx
03、systemctl status nginx
04、netstat -lntup|grep nginx
测试访问是否成功
01、wget 127.0.0.1
6、搭建Nginx动态Web服务(LNMP)(172.16.1.7/8)
安装Nginx
01、yum install openssl openssl-devel pcre pcre-devel -y
02、rpm -qa openssl openssl-devel pcre pcre-devel
03、mkdir -p /server/tools
04、cd /server/tools
05、wget http://nginx.org/download/nginx-1.16.0.tar.gz
06、ls -l nginx-1.16.0.tar.gz
07、useradd nginx -u 1111 -s /sbin/nologin -M
08、tar xf nginx-1.16.0.tar.gz
09、cd nginx-1.16.0
10、./configure --user=nginx --group=nginx --prefix=/application/nginx-1.16.0 --with-http_stub_status_module --with-http_ssl_module
10、make
11、make install
12、ln -s /application/nginx-1.16.0 /application/nginx
13、echo 'PATH="/application/nginx/sbin:$PATH"' >>/etc/profile
14、. /etc/profile
15、echo $PATH
16、nginx
17、netstat -lnput|grep nginx
18、wget 127.0.0.1
19、cd /application/nginx/conf/
20、cp nginx.conf nginx.conf.bak
21、egrep -v "^$|#" nginx.conf.bak>nginx.conf
22、cat nginx.conf
安装MySQL数据库
01、useradd -s /sbin/nologin -M mysql
02、id mysql
03、mkdir -p /home/oldboy/tools
04、cd /home/oldboy/tools/
05、wget -q http://mirrors.163.com/mysql/Downloads/MySQL-5.7/mysql-5.7.26-linux-glibc2.12-x86_64.tar.gz
06、ls -lsh
07、tar xf mysql-5.7.26-linux-glibc2.12-x86_64.tar.gz
08、mkdir -p /application/
09、mv mysql-5.7.26-linux-glibc2.12-x86_64 /application/mysql-5.7.26
10、ln -s /application/mysql-5.7.26/ /application/mysql
11、ls -l /application/
12、cd /application/mysql
13、find ./ -name "*.cnf"
14、ls -l support-files/
15、rpm -e --nodeps mariadb-libs
16、vim /etc/my.cnf
[mysqld]
basedir = /application/mysql/
datadir = /application/mysql/data
socket = /tmp/mysql.sock
server_id = 1
port = 3306
log_error = /application/mysql/data/oldboy_mysql.err
[mysql]
socket = /tmp/mysql.sock
prompt = oldboy [\\d]>
初始化MySQL数据库
01、rpm -qa mariadb-libs
02、yum install libaio-devel -y
03、mkdir -p /application/mysql/data
04、chown -R mysql.mysql /application/mysql/
05、ls -ld /application/mysql/
06、/application/mysql/bin/mysqld --initialize-insecure --user=mysql --basedir=/application/mysql/ --datadir=/application/mysql/data
配置并启动MySQL数据库
01、vim /etc/systemd/system/mysqld.service
[Unit]
Description=MySQL Server by oldboy
Documentation=man:mysqld(8)
Documentation=http://dev.mysql.com/doc/refman/en/using-systemd.html
After=network.target
After=syslog.target
[Install]
WantedBy=multi-user.target
[Service]
User=mysql
Group=mysql
ExecStart=/application/mysql/bin/mysqld --defaults-file=/etc/my.cnf
LimitNOFILE = 5000
02、systemctl start mysqld
03、systemctl enable mysqld
04、systemctl status mysqld
05、netstat -lntup|grep mysql
06、tail /application/mysql/data/oldboy_mysql.err
07、echo 'export PATH=/application/mysql/bin:$PATH' >>/etc/profile
08、tail -1 /etc/profile
09、source /etc/profile
10、echo $PATH
MySQL root用户设置密码
01、mysqladmin -u root password 'oldboy123'
02、mysql
03、mysql -uroot -p
登录MySQL测试
01、mysql
02、show databases;
03、select user,password,host from mysql.user;
04、select user,authentication_string,host from mysql.user;
05、quit
PHP安装准备
01、yum install zlib-devel libxml2-devel libjpeg-devel libjpeg-turbo-devel libiconv-devel -y
02、yum install freetype-devel libpng-devel gd-devel libcurl-devel libxslt-devel libxslt-devel -y
03、rpm -qa zlib-devel libxml2-devel libjpeg-devel libjpeg-turbo-devel libiconv-devel
04、rpm -qa freetype-devel libpng-devel gd-devel libcurl-devel libxslt-devel
05、mkdir -p /home/oldboy/tools
06、cd /home/oldboy/tools
07、wget http://ftp.gnu.org/pub/gnu/libiconv/libiconv-1.16.tar.gz
08、tar zxf libiconv-1.16.tar.gz
09、cd libiconv-1.16
10、./configure --prefix=/application/libiconv
11、make
12、make install
13、cd ../
14、wget /etc/yum.repos.d/epel.repo http://mirrors.aliyun.com/repo/epel-7.repo
15、rpm -qa libmcrypt-devel
16、yum install libmcrypt-devel -y
17、rpm -qa libmcrypt-devel
18、yum install mhash -y
19、rpm -qa mhash
安装PHP(FastCGI方式)服务
01、cd /home/oldboy/tools/
02、wget -q http://mirrors.sohu.com/php/php-7.3.5.tar.gz
03、ls -lsh php-7.3.5.tar.gz
04、tar xf php-7.3.5.tar.gz
05、cd php-7.3.5/
./configure \
--prefix=/application/php7.3.5 \
--enable-mysqlnd  \
--with-mysqli=mysqlnd \
--with-pdo-mysql=mysqlnd \
--with-iconv-dir=/application/libiconv \
--with-freetype-dir \
--with-jpeg-dir \
--with-png-dir \
--with-zlib \
--with-libxml-dir=/usr \
--enable-xml \
--disable-rpath \
--enable-bcmath \
--enable-shmop \
--enable-sysvsem \
--enable-inline-optimization \
--with-curl \
--enable-mbregex \
--enable-fpm \
--enable-mbstring \
--with-gd \
--with-openssl \
--with-mhash \
--enable-pcntl \
--enable-sockets \
--with-xmlrpc \
-enable-soap \
--enable-short-tags \
--enable-static \
--with-xsl \
--with-fpm-user=nginx \
--with-fpm-group=nginx \
--enable-ftp \
--enable-opcache=no
06、make
07、echo $?
08、make install
09、echo $?
PHP引擎配置文件php.ini
01、ln -s /application/php7.3.5/ /application/php
02、ls /application/php/
03、ls -l php.ini-*
04、cp php.ini-development /application/php/lib/php.ini
05、ls -l /application/php/lib/php.ini
PHP服务(FastCGI模式)配置文件php-fpm.conf
01、cd /application/php/etc/
02、ls
03、cp php-fpm.conf.default php-fpm.conf
04、cp php-fpm.d/www.conf.default php-fpm.d/www.conf
启动PHP服务(FastCGI模式)
01、/application/php/sbin/php-fpm
02、netstat -lntup|grep 9000
配置Nginx以支持PHP程序请求访问
01、echo "" > /application/nginx/html/index.php
02、vim /application/nginx/conf/nginx.conf
worker_processes  1;
error_log  logs/error.log;
events {
  worker_connections  1024;
}
http {
  include       mime.types;
  default_type  application/octet-stream;
  sendfile        on;
  keepalive_timeout  65;
  log_format  main  '$remote_addr - $remote_user [$time_local] "$request" '
     '$status $body_bytes_sent "$http_referer" '
     '"$http_user_agent" "$http_x_forwarded_for"';
  server {
     listen       80;
     server_name  localhost;
     location / {
         root   html;
         index  index.html index.htm;
     }
     location ~ .*\.(php|php5)?$ {
         root   html;
         fastcgi_pass  127.0.0.1:9000;
         fastcgi_index index.php;
         include fastcgi.conf;
     }
     error_page   500 502 503 504  /50x.html;
     location = /50x.html {
         root   html;
     }
  }
#include extra/02_bbs.conf;
#include extra/03_blog.conf;
#include extra/04_status.conf;
}
03、vim extra/blog.conf
server {
  listen       80;
  server_name  blog.etiantian.org;
  location / {
     root   html/blog;
     index  index.html index.htm;
  }
  location ~ .*\.(php|php5)?$ {
     root html/blog;
     fastcgi_pass  127.0.0.1:9000;
     fastcgi_index index.php;
     include fastcgi.conf;
  }
}
检查并启动Nginx
01、nginx -t
02、nginx -s reload
03、wget 192.168.5.7/index.php
WordPress博客程序的搭建
01、mysql -uroot -p
02、create database wordpress;
03、show databases like 'wordpress';
04、grant all on wordpress.* to wordpress@'localhost' identified by '123456';
05、grant all on wordpress.* to wordpress@'172.16.1.%' identified by '123456';
06、flush privileges;
07、show grants for wordpress@'localhost';
08、select user,authentication_string,host from mysql.user;
09、quit
10、cd /application/nginx/conf/extra/
11、cat 03_blog.conf
server {
  listen       80;
  server_name  blog.etiantian.org;
  location /{
    root html/blog;
    index index.php index.html index.htm;
  }
  location ~ .*\.(php|php5)?${
     root html/blog;
     fastcgi_pass 127.0.0.1:9000
     fastcgi_index index.php;
     include fastcgi.conf;
  }
}
12、../../sbin/nginx -s reload
13、cd ../../html/blog/
14、ls -sh wordpress-5.1.1.zip
15、tar xf wordpress-5.1.1.zip
16、ls
17、rm -f index.html test_mysql.php test_info.php
18、mv wordpress/* .
19、/bin/mv wordpress-5.1.1.zip /home/oldboy/tools/
20、chown -R nginx.nginx ../blog/
7、部署MySQL服务器(172.16.1.51),并将LNMP本地MySQL数据迁移至独立数据库
部署MySQL服务器
01、useradd mysql -s /sbin/nologin -M
02、id mysql
03、mkdir -p /server/tools/
04、cd /server/tools/
05、wget -q http://mirrors.163.com/mysql/Downloads/MySQL-5.7/mysql-5.7.26-linux-glibc2.12-x86_64.tar.gz
06、tar xf mysql-5.7.26-linux-glibc2.12-x86_64.tar.gz
07、mkdir -p /application/
08、mv mysql-5.7.26-linux-glibc2.12-x86_64 /application/mysql-5.7.26
09、ln -s /application/mysql-5.7.26/ /application/mysql
10、rpm -e --nodeps mariadb-libs
11、cat >/etc/my.cnf<<EOF
[mysqld]
basedir = /application/mysql/
datadir = /application/mysql/data
socket = /tmp/mysql.sock
server_id = 1
port = 3306
log_error = /application/mysql/data/oldboy_mysql.err
[mysql]
socket = /tmp/mysql.sock
prompt = oldboy
EOF
12、rpm -qa mariadb-libs
13、yum install libaio-devel -y
14、mkdir -p /application/mysql/data
15、chown -R mysql.mysql /application/mysql/
16、/application/mysql/bin/mysqld --initialize-insecure --user=mysql --basedir=/application/mysql/ --datadir=/application/mysql/data
17、cat >/etc/systemd/system/mysqld.service<<EOF
[Unit]
Description=MySQL Server by oldboy
Documentation=man:mysqld(8)
Documentation=http://dev.mysql.com/doc/refman/en/using-systemd.html
After=network.target
After=syslog.target
[Install]
WantedBy=multi-user.target
[Service]
User=mysql
Group=mysql
ExecStart=/application/mysql/bin/mysqld --defaults-file=/etc/my.cnf
LimitNOFILE = 5000
EOF systemctl start mysqld systemctl enable mysqld netstat -lntup|grep mysql
18、systemctl start mysqld
19、systemctl enable mysqld
21、netstat -lntup|grep mysql
22、echo 'export PATH=/application/mysql/bin:$PATH' >>/etc/profile
23、. /etc/profile
24、mysql
25、quit
数据库迁移(172.16.1.7/8)
01、mysqldump -uroot -poldboy123 -A -B|gzip >/tmp/web01_db.sql.gz
02、scp /tmp/web01_db.sql.gz 10.0.0.51:/tmp
03、systemctl stop mysqld
04、systemctl disable mysqld
05、lsof -i :3306
数据库修改(10.0.0.51)
01、cd /application/nginx/html/blog/
02、vim wp-config.php
define( 'DB_NAME', 'wordpress' );
/** MySQL database username */
define( 'DB_USER', 'wordpress' );
/** MySQL database password */
define( 'DB_PASSWORD', 'oldboy123' );
/** MySQL hostname */
define( 'DB_HOST', '172.16.1.51' );
03、cd /tmp
04、gzip -d web01_db.sql.gz
05、mysql
06、grant all privileges on wordpress.* to wordpress@'172.16.1.%' identified by 'oldboy123';
07、flush privileges;
08、select user,authentication_string,host from mysql.user;
8、把LNMP用户所上传数据的目录挂载到NFS共享存储上
4.7章 195页 NFS Clinet设置
01、
02、
03、
04、
05、
06、
07、
08、
09、
10、
11、
12、
13、
14、
15、
16、
17、
18、
19、
统一NFS和Web用户,关键是UID
01、id nginx #web
02、grep 1111 /etc/passwd #NFS
03、useradd nginx -u 1111 -s /sbin/nologin -M
04、grep 1111 /etc/passwd
配置NFS
01、cat /etc/exports
02、cd /data
03、mkdir blog_nfs
04、systemctl reload nfs
测试NFS挂载是否完成(web02)
01、showmount -e 172.16.1.31
02、mount -t nfs 172.16.1.31:/data /mnt
03、ls /mnt
04、scp -rp 2019 172.16.1.31:/data/blog_nfs/
05、mount -t nfs 172.16.1.31:/data/blog_nfs /application/nginx/html/blog/wp-content/uploads
在NFS服务器上对共享目录重新授权
01、chown -R nginx.nginx /data
9、搭建Nginx反向代理服务(172.16.1.5/6/7/8)
安装Nginx
01、yum install openssl openssl-devel pcre pcre-devel -y
02、rpm -qa openssl openssl-devel pcre pcre-devel
03、mkdir -p /server/tools
04、cd /server/tools
05、wget http://nginx.org/download/nginx-1.16.0.tar.gz
06、ls -l nginx-1.16.0.tar.gz
07、useradd nginx -u 1111 -s /sbin/nologin -M
08、tar xf nginx-1.16.0.tar.gz
09、cd nginx-1.16.0
10、./configure --user=nginx --group=nginx --prefix=/application/nginx-1.16.0 --with-http_stub_status_module --with-http_ssl_module
10、make
11、make install
12、ln -s /application/nginx-1.16.0 /application/nginx
13、echo 'PATH="/application/nginx/sbin:$PATH"' >>/etc/profile
14、. /etc/profile
15、echo $PATH
配置web01、web02
01、cd /application/nginx/conf/
02、cp nginx.conf{,.ori}
03、cat nginx.conf
worker_processes  1;
error_log  logs/error.log;
events {
  worker_connections  1024;
}
http {
  include       mime.types;
  default_type  application/octet-stream;
  sendfile        on;
  keepalive_timeout  65;
  log_format  main  '$remote_addr - $remote_user [$time_local] "$request" '
     '$status $body_bytes_sent "$http_referer" '
     '"$http_user_agent" "$http_x_forwarded_for"';
  server {
     listen       80;
     server_name  localhost;
     location / {
         root   html;
         index  index.html index.htm;
     }
     location ~ .*\.(php|php5)?$ {
         root   html;
         fastcgi_pass  127.0.0.1:9000;
         fastcgi_index index.php;
         include fastcgi.conf;
     }
     error_page   500 502 503 504  /50x.html;
     location = /50x.html {
         root   html;
     }
  }
#include extra/02_bbs.conf;
#include extra/03_blog.conf;
#include extra/04_status.conf;
}
worker_processes  1;
events {     worker_connections  1024; } http {     include       mime.types;     default_type  application/octet-stream;     sendfile        on;     keepalive_timeout  65;     log_format  main  '$remote_addr - $remote_user [$time_local] "$request" '                       '$status $body_bytes_sent "$http_referer" '                       '"$http_user_agent" "$http_x_forwarded_for"';     server {         listen       80;         server_name  bbs.etiantian.org;         location / {             root   html/bbs;             index  index.html index.htm;         }         access_log  logs/access_bbs.log  main;     }     server {         listen       80;         server_name  www.etiantian.org;         location / {             root   html/www;             index  index.html index.htm;         }         access_log  logs/access_www.log  main;
04、mkdir /application/nginx/html/{www,bbs}
05、echo "www8" >/application/nginx/html/www/index.html
06、cat /application/nginx/html/www/index.html
07、echo "bbs8" >/application/nginx/html/bbs/index.html
08、cat /application/nginx/html/bbs/index.html
09、nginx -t
10、nginx
10、netstat -lntup|grep
11、tail -2 /etc/hosts
10.0.0.8 www.etiantian.org bbs.etiantian.org
12、curl www.etiantian.org
13、curl bbs.etiantian.org
实现简单的负载均衡(10.0.0.5)
01、cat nginx.conf
 worker_processes  1; events {     worker_connections  1024; } http {     include       mime.types;     default_type  application/octet-stream;     sendfile        on;     keepalive_timeout  65;     upstream www_pools {                        #<==这里是定义Web服务器池,包含了9、10                                                   两个Web节点。          server 10.0.0.7:80  weight=1;          server 10.0.0.8:80  weight=1;     }     server {
<==这里是定义代理的负载均衡域名虚拟主机。        listen       80;        server_name  www.etiantian.org;        location / {         proxy_pass http://www_pools;    #<==访问www.etiantian.org,请求发送给                                                    www_pools里面的节点。        }     } }
02、nginx -t
03、nginx
04、netstat -lntup|grep nginx
05、tail -1 /etc/hosts
10.0.0.5 www.etiantian.org bbs.etiantian.org
06、curl www.etiantian.org
07、curl bbs.etiantian.org
安装Nginx
01、
02、
03、
04、
05、
06、
07、
08、
09、
10、
10、
11、
12、
13、
14、
15、
16、
17、
18、
19、
安装Nginx
01、
02、
03、
04、
05、
06、
07、
08、
09、
10、
安装Nginx
01、
02、
03、
04、
05、
06、
07、
08、
09、
10、
安装Nginx
01、
02、
03、
04、
05、
06、
07、
08、
09、
10、
安装Nginx
01、
02、
03、
04、
05、
06、
07、
08、
09、
10、
10、搭建Nginx反向代理服务器之间的高可用服务(172.16.1.5/6)
10、搭建Nginx反向代理服务器之间的高可用服务(172.16.1.5/6)
01、
02、
03、
04、
05、
06、
07、
08、
09、
10、

 浙公网安备 33010602011771号