ASP.NET Core 中的中间件
前言
由于是第一次写博客,如果您看到此文章,希望大家抱着找错误、批判的心态来看。 sky!
何为中间件?
在 ASP.NET Framework 中应该都知道请求管道。可参考:浅谈 ASP.NET 的内部机制 系列,个人感觉超详细。
题外话:
说到请求管道,就想以前还是超菜鸟时有次面试被问到这个问题,一脸懵逼只说了 Controller→Action→View。脸红啊!!
ASP.NET Core 中的中间件就是.net framework 请求管道的实现。下图演示了 Middlerware 的概念。 沿黑色箭头执行。
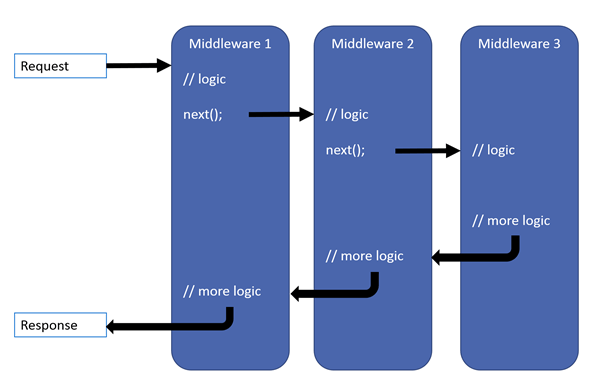
每一个中间件(Middleware1、Middleware2...)都是一个委托,这一系列委托就组成了整个管道。
中间件的写法
-
直接在Startup.cs类的Configure方法里写
app.Use(async (context, next) =>
{
    logger.LogInformation("中间件开始...");
    await next.Invoke(); //执行下一个中间件
    logger.LogInformation("中间件完成...");
});
结合上图:
//logic对应logger.LogInformation("中间件开始...");
next();对应await next.Invoke();
//more logic对应logger.LogInformation("中间件完成...");
其中//logic(即请求)是顺序执行。即:Middleware1→Middleware2→...→Middlewaren
而//more logic(即响应)是倒序执行。即:Middlewaren→...→Middleware2→Middleware1
-
同 1,只是不用 Use 而是用 Run:
 app.Run(async context =>
 {
     await context.Response.WriteAsync("请求终止了,下一步将会执行已执行过的Middleware的 //more logic");
 });
Run 会终止请求,即管道中最后一个中间件,后面详细剖析!
-
下面这种写法应该是比较合理的,也是比较优雅的
新建一个类如下(该类是有强制规范的,详细见下文):
public class RequestTestMiddleware { private readonly RequestDelegate _next; public RequestTestMiddleware(RequestDelegate next) { _next = next; } public async Task InvokeAsync(HttpContext context) { //中间件开始 logic await _next(context);//执行下一个中间件 //中间件完成 more logic } }在Startup.cs类的Configure方法里添加如下代码,效果和 1 相同:
app.UseMiddleware<RequestTestMiddleware>(); //app.UseMiddleware<RequestTestMiddleware>(params object[] parameters);//参数说明见下面不知发现了没,上面的InvokeAsync方法不是用的打印日志,而是用的注释。
因为我们没有引用logger对象,了解过 ASP.NET Core 的肯定知道依赖注入,我们只需要把ILogger注入进来就行了,改造如下:public class RequestTestMiddleware { private readonly RequestDelegate _next; public RequestTestMiddleware(RequestDelegate next) { _next = next; } public async Task InvokeAsync(HttpContext context, ILogger<TestMiddleware> logger) { logger.LogInformation("中间件开始 logic"); await _next(context); logger.LogInformation("中间件完成 more logic"); } } -
通过依赖注入方法添加中间件:
新建类 TestMiddleware.cs 注意依赖注入的位置和 3 不同public class TestMiddleware : IMiddleware { private readonly ILogger _logger; public TestMiddleware(ILogger<TestMiddleware> logger) { _logger = logger; } public async Task InvokeAsync(HttpContext context, RequestDelegate next) { _logger.LogInformation("中间件开始"); await next(context); _logger.LogInformation("中间件完成"); } }在Startup.cs类的ConfigureServices方法里添加如下代码:
services.AddTransient<TestMiddleware>();在Startup.cs类的Configure方法里添加如下代码:
app.UseMiddleware<TestMiddleware>(); -
还有一种第三方容器激活中间件
源代码分析(部分)
-
Run和Use的实现
直接放出源代码:
 public static void Run(this IApplicationBuilder app, RequestDelegate handler)
 {
     if (app == null)
     {
         throw new ArgumentNullException(nameof(app));
     }
     if (handler == null)
     {
         throw new ArgumentNullException(nameof(handler));
     }
     app.Use(_ => handler);
 }
public static IApplicationBuilder Use(this IApplicationBuilder app, Func<HttpContext, Func<Task>, Task> middleware) { return app.Use(next => { return context => { Func<Task> simpleNext = () => next(context); return middleware(context, simpleNext); }; }); }2 个方法最终调用的都是app.Use(),我们看下代码:
public IApplicationBuilder Use(Func<RequestDelegate, RequestDelegate> middleware) { _components.Add(middleware); return this; }_components是IList<Func<RequestDelegate, RequestDelegate>>类型,其实就是把我们的Middleware添加到 _components 中,继续看代码:
public RequestDelegate Build() { RequestDelegate app = context => { context.Response.StatusCode = 404; return Task.CompletedTask; }; foreach (var component in _components.Reverse()) { app = component(app); } return app; }该方法会在Program.cs中Main方法的 CreateWebHostBuilder(args).Build().Run(); 的 Run() 方法执行。
此方法把我们所有的Middleware再次组装成 1 个新的RequestDelegate,最终的顺序将会是:
Middleware1()
{
    next()=>Middleware2()
            {
                next()=>Middleware3()
                        {
                            next()=>最后的那个返回404的委托
                        }
            }
}
不知道写清楚了没( ╯□╰ ). 其中next()=>Middleware2()的意思为:next()就是 Middleware2()
-
继承 IMiddleware 和没继承 IMiddleware(根据规范必须要有 InvokeAsync 或 Invoke 方法等)的区别:
按功能实现方面来说是没区别的,但按性能方面应该是继承了 IMiddleware 的方式要好很多,因为没继承 IMiddleware 的方式会用到反射。(未测试,由于继承 IMiddleware 还需要用依赖注入这里只是猜测)
代码见:
Microsoft.AspNetCore.Http.Abstractions\Extensions\UseMiddlewareExtensions.cs 的 UseMiddleware 方法。 -
未继承 IMiddleware 时的约定,直接看代码吧:
//1.在middleware中必须存在public且有返回值的方法 var methods = middleware.GetMethods(BindingFlags.Instance | BindingFlags.Public); //2.必须有‘Invoke’或‘InvokeAsync’方法 var invokeMethods = methods.Where(m => string.Equals(m.Name, "Invoke", StringComparison.Ordinal) || string.Equals(m.Name, "InvokeAsync", StringComparison.Ordinal) ).ToArray(); //3.‘Invoke’和‘InvokeAsync’只能有1个 if (invokeMethods.Length > 1) {} //4.‘Invoke’和‘InvokeAsync’必须要存在 if (invokeMethods.Length == 0) {} var methodInfo = invokeMethods[0]; //5.返回结果类型必须为Task if (!typeof(Task).IsAssignableFrom(methodInfo.ReturnType)){} -
中间件传参
直接上代码:public class RequestTestMiddleware { private readonly RequestDelegate _next; private int _i; public RequestTestMiddleware(RequestDelegate next, int i) { _next = next; _i = i; } public async Task InvokeAsync(HttpContext context, ILogger<TestMiddleware> logger) { logger.LogInformation($"通过参数传递i值:{_i}"); logger.LogInformation("中间件开始"); await _next(context); logger.LogInformation("中间件完成"); } }在Startup.cs类的Configure方法里:
//参数类型为: params object[] args
app.UseMiddleware<RequestTestMiddleware>(1);
具体实现方式同样在 Microsoft.AspNetCore.Http.Abstractions\Extensions\UseMiddlewareExtensions.cs 的 UseMiddleware 方法中
高级用法 Map MapWhen
-
Map
app.Map("/map", _app =>
{
    _app.Run(async context =>
    {
        await context.Response.WriteAsync("Test Map!");
    });
});
当访问https://localhost:5001/map时将返回 Test Map!
这里说一下,代码中并没有 MapController....
-
MapWhen
app.MapWhen(context => context.Request.Query.ContainsKey("branch"), _app =>
{
    _app.Run(async context =>
    {
        await context.Response.WriteAsync("Test Map!");
    });
});
看源代码会发现,MapWhen 的第二个参数(委托)并不是上面Use()中next(),而是存在MapOptions的Branch属性中,也是RequestDelegate委托
其他说明
-
Middleware 的执行的有顺序的,在合适的 Middleware 返回请求可时管道更短,速度更快。
比如 UseStaticFiles(),静态资源不必走验证、MVC 中间件,所以该方法在中间件的前面执行。 -
我们看到有很多内置的中间件的用法是*Use**,其实是加了个扩展:
public static class RequestCultureMiddlewareExtensions
{
    public static IApplicationBuilder UseRequestCulture(
        this IApplicationBuilder builder)
    {
        return builder.UseMiddleware<RequestCultureMiddleware>();
    }
}
总结
第一次写博客,最大的感触就是慢,然后就是思维逻辑有点混乱,总想用最简单的语言来表达,就是掌握不好。最后看起来还是太啰嗦了点。最后说明,以上很可能有错误的说法,希望大家以批判的角度来看,有任何问题可在留言区留言!Thanks!

 浙公网安备 33010602011771号