
spring-session之一:简介、使用及实现原理
一、背景
二、spring-session简介
spring-session提供对用户session管理的一系列api和实现。提供了很多可扩展、透明的封装方式用于管理httpSession/WebSocket的处理。
三、支持功能
1)轻易把session存储到第三方存储容器,框架提供了redis、jvm的map、mongo、gemfire、hazelcast、jdbc等多种存储session的容器的方式。这样可以独立于应用服务器的方式提供高质量的集群。
2)同一个浏览器同一个网站,支持多个session问题。 从而能够很容易地构建更加丰富的终端用户体验。
3)Restful API,不依赖于cookie。可通过header来传递jessionID 。控制session id如何在客户端和服务器之间进行交换,这样的话就能很容易地编写Restful API,因为它可以从HTTP 头信息中获取session id,而不必再依赖于cookie。
4)WebSocket和spring-session结合,同步生命周期管理。当用户使用WebSocket发送请求的时候,能够保持HttpSession处于活跃状态。
5)在非Web请求的处理代码中,能够访问session数据,比如在JMS消息的处理代码中。
需要说明的很重要的一点就是,Spring Session的核心项目并不依赖于Spring框架,所以,我们甚至能够将其应用于不使用Spring框架的项目中。Spring Session提供了一种独立于应用服务器的方案,这种方案能够在Servlet规范之内配置可插拔的session数据存储,不依赖于任何应用服务器的特定API。这就意味着Spring Session能够用于实现了servlet规范的所有应用服务器之中(Tomcat、Jetty、 WebSphere、WebLogic、JBoss等),它能够非常便利地在所有应用服务器中以完全相同的方式进行配置。我们还可以选择任意最适应需求的外部session数据存储。这使得Spring Session成为一个很理想的迁移工具,帮助我们将传统的JavaEE应用转移到云中,使其成为满足如下:
3.1、每个用户有多个账号
假设我们在example.com上运行面向公众的Web应用,在这个应用中有些用户会创建多个账号。例如,用户Jeff Lebowski可能会有两个账户thedude@example.com和lebowski@example.com。和其他Java Web应用一样,我们会使用HttpSession来跟踪应用的状态,如当前登录的用户。所以,当用户希望从thedude@example.com切换到lebowski@example.com时,他必须要首先退出,然后再重新登录回来。
借助Spring Session,为每个用户配置多个HTTP session会非常容易,这样用户在thedude@example.com和lebowski@example.com之间切换的时候,就不需要退出和重新登录了。
3.2、多级别的安全预览
假设我们正在构建的Web应用有一个复杂、自定义的权限功能,其中应用的UI会基于用户所授予的角色和权限实现自适应。
例如,假设应用有四个安全级别:public、confidential、secret和top secret。当用户登录应用之后,系统会判断用户所具有的最高安全级别并且只会显示该级别和该级别之下的数据。所以,具有public权限的用户只能看到public级别的文档,具有secret权限的用户能够看到public、confidential和secret级别的文档,诸如此类。为了保证用户界面更加友好,应用程序应该允许用户预览在较低的安全级别条件下页面是什么样子的。例如,top secret权限的用户能够将应用从top secret模式切换到secret模式,这样就能站在具有secret权限用户的视角上,查看应用是什么样子的。
典型的Web应用会将当前用户的标识及其角色保存在HTTP session中,但因为在Web应用中,每个登录的用户只能有一个session,因此除了用户退出并重新登录进来,我们并没有办法在角色之间进行切换,除非我们为每个用户自行实现多个session的功能。
借助Spring Session,可以很容易地为每个登录用户创建多个session,这些session之间是完全独立的,因此实现上述的预览功能是非常容易的。例如,当前用户以top secret角色进行了登录,那么应用可以创建一个新的session,这个session的最高安全角色是secret而不是top secret,这样的话,用户就可以在secret模式预览应用了。
3.3、当使用Web Socket的时候保持登录状态
假设用户登录了example.com上的Web应用,那么他们可以使用HTML5的chat客户端实现聊天的功能,这个客户端构建在websocket之上。按照servlet规范,通过websocket传入的请求并不能保持HTTP session处于活跃状态,所以当用户在聊天的过程中,HTTP session的倒数计时器会在不断地流逝。即便站在用户的立场上,他们一直在使用应用程序,HTTP session最终也可能会出现过期。当HTTP session过期时,websocket连接将会关闭。
借助Spring Session,对于系统中的用户,我们能够很容易地实现websocket请求和常规的HTTP请求都能保持HTTP session处于活跃状态。
3.4、非Web请求访问Session数据
假设我们的应用提供了两种访问方式:一种使用基于HTTP的REST API,而另一种使用基于RabbitMQ的AMQP消息。执行消息处理代码的线程将无法访问应用服务器的HttpSession,所以我们必须要以一种自定义的方案来获取HTTP session中的数据,这要通过自定义的机制来实现。
通过使用Spring Session,只要我们能够知道session的id,就可以在应用的任意线程中访问Spring Session。因此,Spring Session具备比Servlet HTTP session管理器更为丰富的API,只要知道了session id,我们就能获取任意特定的session。例如,在一个传入的消息中可能会包含用户id的header信息,借助它,我们就可以直接获取session了。
四、Spring Session是如何运行的
我们已经讨论了在传统的应用服务器中,HTTP session管理存在不足的各种场景,接下来看一下Spring Session是如何解决这些问题的。
4.1、Spring Session的架构
当实现session管理器的时候,有两个必须要解决的核心问题。首先,如何创建集群环境下高可用的session,要求能够可靠并高效地存储数据。其次,不管请求是HTTP、WebSocket、AMQP还是其他的协议,对于传入的请求该如何确定该用哪个session实例。实质上,关键问题在于:在发起请求的协议上,session id该如何进行传输?
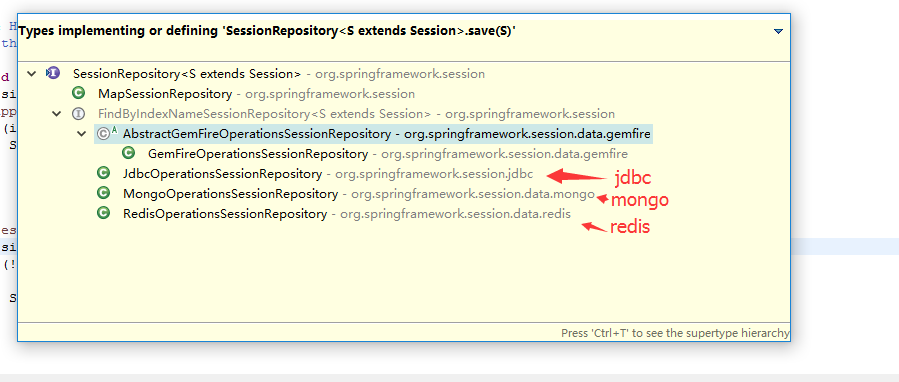
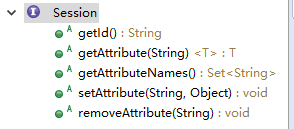
Spring Session认为第一个问题,也就是在高可用可扩展的集群中存储数据已经通过各种数据存储方案得到了解决,如Redis、GemFire以及Apache Geode等等,因此,Spring Session定义了一组标准的接口,可以通过实现这些接口间接访问底层的数据存储。Spring Session定义了如下核心接口:Session、ExpiringSession以及SessionRepository,针对不同的数据存储,它们需要分别实现。
org.springframework.session.Session接口定义了session的基本功能,如设置和移除属性。这个接口并不关心底层技术,因此能够比servlet HttpSession适用于更为广泛的场景中。org.springframework.session.ExpiringSession扩展了Session接口,它提供了判断session是否过期的属性。RedisSession是这个接口的一个样例实现。org.springframework.session.SessionRepository定义了创建、保存、删除以及检索session的方法。将Session实例真正保存到数据存储的逻辑是在这个接口的实现中编码完成的。例如,RedisOperationsSessionRepository就是这个接口的一个实现,它会在Redis中创建、存储和删除session。
Spring Session认为将请求与特定的session实例关联起来的问题是与协议相关的,因为在请求/响应周期中,客户端和服务器之间需要协商同意一种传递session id的方式。例如,如果请求是通过HTTP传递进来的,那么session可以通过HTTP cookie或HTTP Header信息与请求进行关联。如果使用HTTPS的话,那么可以借助SSL session id实现请求与session的关联。如果使用JMS的话,那么JMS的Header信息能够用来存储请求和响应之间的session id。
对于HTTP协议来说,Spring Session定义了HttpSessionStrategy接口以及两个默认实现,即CookieHttpSessionStrategy和HeaderHttpSessionStrategy,其中前者使用HTTP cookie将请求与session id关联,而后者使用HTTP header将请求与session关联。

4.2、Spring Session对HTTP的支持
Spring Session对HTTP的支持是通过标准的servlet filter来实现的,这个filter必须要配置为拦截所有的web应用请求,并且它应该是filter链中的第一个filter。Spring Session filter会确保随后调用javax.servlet.http.HttpServletRequest的getSession()方法时,都会返回Spring Session的HttpSession实例,而不是应用服务器默认的HttpSession。
如果要理解它的话,最简单的方式就是查看Spring Session实际所使用的源码。首先,我们了解一下标准servlet扩展点的一些背景知识,在实现Spring Session的时候会使用这些知识。
4.2.1、Spring Session对filer的request,response的装饰
在2001年,Servlet 2.3规范引入了ServletRequestWrapper。它的javadoc文档这样写道,ServletRequestWrapper“提供了ServletRequest接口的便利实现,开发人员如果希望将请求适配到Servlet的话,可以编写它的子类。这个类实现了包装(Wrapper)或者说是装饰(Decorator)模式。对方法的调用默认会通过包装的请求对象来执行”。如下的代码样例抽取自Tomcat,展现了ServletRequestWrapper是如何实现的。
javax.servlet-api-3.1.0.jar
package javax.servlet;
public class ServletRequestWrapper implements ServletRequest {

    private ServletRequest request;

    /**
     * 创建ServletRequest适配器,它包装了给定的请求对象。
     * @throws java.lang.IllegalArgumentException if the request is null
     */
    public ServletRequestWrapper(ServletRequest request) {
        if (request == null) {
            throw new IllegalArgumentException("Request cannot be null");
        }
        this.request = request;
    }

    public ServletRequest getRequest() {
        return this.request;
    }
    //...
}
Servlet 2.3规范还定义了HttpServletRequestWrapper,它是ServletRequestWrapper的子类,能够快速提供HttpServletRequest的自定义实现,如下的代码是从Tomcat抽取出来的,展现了HttpServletRequesWrapper类是如何运行的。
javax.servlet-api-3.1.0.jar
package javax.servlet.http;
public class HttpServletRequestWrapper extends ServletRequestWrapper implements HttpServletRequest {

    /**
     * Constructs a request object wrapping the given request.
     * @throws java.lang.IllegalArgumentException if the request is null
     */
    public HttpServletRequestWrapper(HttpServletRequest request) {
        super(request);
    }

    private HttpServletRequest _getHttpServletRequest() {
        return (HttpServletRequest) super.getRequest();
    }
    //...
}
所以,借助这些包装类就能编写代码来扩展HttpServletRequest,重载返回HttpSession的方法,让它返回由外部存储所提供的实现。如下的代码是从Spring Session项目中提取出来的,但是我将原来的注释替换为我自己的注释,用来在本文中解释代码,所以在阅读下面的代码片段时,请留意注释。
spring-session-1.3.1.RELEASE.jar
package org.springframework.session.web.http;

    private final class SessionRepositoryRequestWrapper
            extends HttpServletRequestWrapper {
        private Boolean requestedSessionIdValid;
        private boolean requestedSessionInvalidated;
        private final HttpServletResponse response;
        private final ServletContext servletContext;

        /**
        * 注意,这个构造器非常简单,它接受稍后会用到的参数,并且委托给它所扩展的HttpServletRequestWrapper
        */
        private SessionRepositoryRequestWrapper(HttpServletRequest request,
                HttpServletResponse response, ServletContext servletContext) {
            super(request);
            this.response = response;
            this.servletContext = servletContext;
        }

        /**
         * 使用HttpSessionStrategy写sessionid到返回对象,同时调用外部存储设备持久化session信息
         * sessionRepository相当于DAO,有关于session持久化的4个方法
         */
        private void commitSession() {
            HttpSessionWrapper wrappedSession = getCurrentSession();
            if (wrappedSession == null) {
                if (isInvalidateClientSession()) {
                    SessionRepositoryFilter.this.httpSessionStrategy
                            .onInvalidateSession(this, this.response);
                }
            }
            else {
                S session = wrappedSession.getSession();
                SessionRepositoryFilter.this.sessionRepository.save(session);
                if (!isRequestedSessionIdValid()
                        || !session.getId().equals(getRequestedSessionId())) {
                    SessionRepositoryFilter.this.httpSessionStrategy.onNewSession(session,
                            this, this.response);
                }
            }
        }

        /**
        * 在这里,Spring Session项目不再将调用委托给应用服务器,而是实现自己的逻辑,返回由外部数据存储作为支撑的HttpSession实例。
        * 基本的实现是,先检查是不是已经有session了。
        * 如果有的话,就将currentSession返回,
        * 否则的话,它会检查当前的请求中是否有session id。
        * 如果有的话,将会根据这个session id,从它的SessionRepository中加载session。
        * 如果session repository中没有session,或者在当前请求中,
        * 没有当前session id与请求关联的话,
        * 那么它会创建一个新的session,并将其持久化到session repository中。
        */
        @Override
        public HttpSessionWrapper getSession(boolean create) {
            HttpSessionWrapper currentSession = getCurrentSession();
            if (currentSession != null) {
                return currentSession;
            }
            String requestedSessionId = getRequestedSessionId();
            if (requestedSessionId != null
                    && getAttribute(INVALID_SESSION_ID_ATTR) == null) {
                S session = getSession(requestedSessionId);
                if (session != null) {
                    this.requestedSessionIdValid = true;
                    currentSession = new HttpSessionWrapper(session, getServletContext());
                    currentSession.setNew(false);
                    setCurrentSession(currentSession);
                    return currentSession;
                }
                else {
                    // This is an invalid session id. No need to ask again if
                    // request.getSession is invoked for the duration of this request
                    if (SESSION_LOGGER.isDebugEnabled()) {
                        SESSION_LOGGER.debug(
                                "No session found by id: Caching result for getSession(false) for this HttpServletRequest.");
                    }
                    setAttribute(INVALID_SESSION_ID_ATTR, "true");
                }
            }
            if (!create) {
                return null;
            }
            if (SESSION_LOGGER.isDebugEnabled()) {
                SESSION_LOGGER.debug(
                        "A new session was created. To help you troubleshoot where the session was created we provided a StackTrace (this is not an error). You can prevent this from appearing by disabling DEBUG logging for "
                                + SESSION_LOGGER_NAME,
                        new RuntimeException(
                                "For debugging purposes only (not an error)"));
            }
            S session = SessionRepositoryFilter.this.sessionRepository.createSession();
            session.setLastAccessedTime(System.currentTimeMillis());
            currentSession = new HttpSessionWrapper(session, getServletContext());
            setCurrentSession(currentSession);
            return currentSession;
        }

        @Override
        public ServletContext getServletContext() {
            if (this.servletContext != null) {
                return this.servletContext;
            }
            // Servlet 3.0+
            return super.getServletContext();
        }

        @Override
        public HttpSessionWrapper getSession() {
            return getSession(true);
        }

        @Override
        public String getRequestedSessionId() {
            return SessionRepositoryFilter.this.httpSessionStrategy
                    .getRequestedSessionId(this);
        }

        /**
         * Allows creating an HttpSession from a Session instance.
         *
         * @author Rob Winch
         * @since 1.0
         */
        private final class HttpSessionWrapper extends ExpiringSessionHttpSession<S> {

            HttpSessionWrapper(S session, ServletContext servletContext) {
                super(session, servletContext);
            }

            @Override
            public void invalidate() {
                super.invalidate();
                SessionRepositoryRequestWrapper.this.requestedSessionInvalidated = true;
                setCurrentSession(null);
                SessionRepositoryFilter.this.sessionRepository.delete(getId());
            }
        }
    }
response有对应SessionRepositoryResponseWrapper。
    /**
    这个就是Servlet response的重写类了
     */
    private final class SessionRepositoryResponseWrapper
            extends OnCommittedResponseWrapper {

        private final SessionRepositoryRequestWrapper request;


        SessionRepositoryResponseWrapper(SessionRepositoryRequestWrapper request,
                HttpServletResponse response) {
            super(response);
            if (request == null) {
                throw new IllegalArgumentException("request cannot be null");
            }
            this.request = request;
        }
         /**
            这步是持久化session到存储容器,我们可能会在一个控制层里多次调用session的操作方法
            如果我们每次对session的操作都持久化到存储容器,必定会带来性能的影响。比如redis
            所以我们可以在整个控制层执行完毕了,response返回信息到浏览器时,才持久化session
         **/
        @Override
        protected void onResponseCommitted() {
            this.request.commitSession();
        }
    }
4.2.2、Spring Session中SessionRepositoryFilter的处理
Spring Session定义了SessionRepositoryFilter,它实现了Servlet Filter接口。我抽取了这个filter的关键部分,将其列在下面的代码片段中,我还添加了一些注释,用来在本文中阐述这些代码,所以,同样的,请阅读下面代码的注释部分。
package org.springframework.session.web.http;
@Order(SessionRepositoryFilter.DEFAULT_ORDER)
public class SessionRepositoryFilter<S extends ExpiringSession>
        extends OncePerRequestFilter {
    /**  session存储容器接口,redis、mongoDB、genfire等数据库都是实现该接口  **/
    private final SessionRepository<S> sessionRepository;

    private ServletContext servletContext;
    /**
      sessionID的传递方式接口。目前spring-session自带两个实现类
      1.cookie方式 :CookieHttpSessionStrategy
      2.http header 方式:HeaderHttpSessionStrategy
      当然,我们也可以自定义其他方式。
    **/
    private MultiHttpSessionStrategy httpSessionStrategy = new CookieHttpSessionStrategy();
    public void setHttpSessionStrategy(HttpSessionStrategy httpSessionStrategy) {
        if (httpSessionStrategy == null) {
            throw new IllegalArgumentException("httpSessionStrategy cannot be null");
        }
        /**
        通过前面的spring-session功能介绍,我们知道spring-session可以支持单浏览器多
        session, 就是通过MultiHttpSessionStrategyAdapter来实现的。
        每个浏览器拥有一个sessionID,但是这个sessionID拥有多个别名(根据浏览器的tab)。如:
                别名1 sessionID
                别名2 sessionID
                ...
                而这个别名通过url来传递,这就是单浏览器多session原理了
                **/
        this.httpSessionStrategy = new MultiHttpSessionStrategyAdapter(
                httpSessionStrategy);
    }


    public void setHttpSessionStrategy(MultiHttpSessionStrategy httpSessionStrategy) {
        if (httpSessionStrategy == null) {
            throw new IllegalArgumentException("httpSessionStrategy cannot be null");
        }
        this.httpSessionStrategy = httpSessionStrategy;
    }

    /*
     * 这个方法是魔力真正发挥作用的地方。这个方法创建了
     * 我们上文所述的封装请求对象SessionRepositoryRequestWrapper和一个封装的响应对象SessionRepositoryResponseWrapper,然后调用其余的filter链。
     * 这里,关键在于当这个filter后面的应用代码执行时,
     * 如果要获得session的话,得到的将会是Spring Session的HttpServletSession实例,它是由后端的外部数据存储作为支撑的。
     */
    @Override
    protected void doFilterInternal(HttpServletRequest request,
            HttpServletResponse response, FilterChain filterChain)
            throws ServletException, IOException {
        request.setAttribute(SESSION_REPOSITORY_ATTR, this.sessionRepository);

        SessionRepositoryRequestWrapper wrappedRequest = new SessionRepositoryRequestWrapper(
                request, response, this.servletContext);
        SessionRepositoryResponseWrapper wrappedResponse = new SessionRepositoryResponseWrapper(
                wrappedRequest, response);

        HttpServletRequest strategyRequest = this.httpSessionStrategy
                .wrapRequest(wrappedRequest, wrappedResponse);
        HttpServletResponse strategyResponse = this.httpSessionStrategy
                .wrapResponse(wrappedRequest, wrappedResponse);

        try {
            filterChain.doFilter(strategyRequest, strategyResponse);
        }
        finally {
            wrappedRequest.commitSession();  //filter链处理完成后,写session信息到response及外围持久化设备,源码见上面的SessionRepositoryRequestWrapper
        }
    }
4.2.3、Spring Session中sessionRepository是session存储容器接口操作session信息的读取及存储
session存储容器接口,redis、mongoDB、genfire等数据库都是实现该接口1、sessionRepository
先看SessionRepository接口的4个方法:
package org.springframework.session;

public interface SessionRepository<S extends Session> {

    /**
     * 创建
     */
    S createSession();

    /**
     * 保存
     */
    void save(S session);

    /**
     * 读取
     */
    S getSession(String id);

    /**
     * 删除
     */
    void delete(String id);
实现类FindByIndexNameSessionRepository.java:
package org.springframework.session;
public interface FindByIndexNameSessionRepository<S extends Session>
        extends SessionRepository<S> {

    String PRINCIPAL_NAME_INDEX_NAME = FindByIndexNameSessionRepository.class.getName()
            .concat(".PRINCIPAL_NAME_INDEX_NAME");

    Map<String, S> findByIndexNameAndIndexValue(String indexName, String indexValue);
}
springsession项目启动后,redis会有:

Redis的实现类
package org.springframework.session.data.redis;

public class RedisOperationsSessionRepository implements
        FindByIndexNameSessionRepository<RedisOperationsSessionRepository.RedisSession>,
        MessageListener {

    /**
    * RedisSession的构造函数新建一个session,往里看源码是通过UUID生成MapSession.this(UUID.randomUUID().toString());
    */
    public RedisSession createSession() {
        RedisSession redisSession = new RedisSession();
        if (this.defaultMaxInactiveInterval != null) {
            redisSession.setMaxInactiveIntervalInSeconds(this.defaultMaxInactiveInterval);
        }
        return redisSession;
    }

    /**
    *  调用RedisTemplate.convertAndSend()保存到redis中
    */
    public void save(RedisSession session) {
        session.saveDelta();
        if (session.isNew()) {
            String sessionCreatedKey = getSessionCreatedChannel(session.getId());
            this.sessionRedisOperations.convertAndSend(sessionCreatedKey, session.delta);
            session.setNew(false);
        }
    }

    /**
    *  先构造MapSession,再查找对应的session
    */
    private RedisSession getSession(String id, boolean allowExpired) {
        Map<Object, Object> entries = getSessionBoundHashOperations(id).entries();
        if (entries.isEmpty()) {
            return null;
        }
        MapSession loaded = loadSession(id, entries);
        if (!allowExpired && loaded.isExpired()) {
            return null;
        }
        RedisSession result = new RedisSession(loaded);
        result.originalLastAccessTime = loaded.getLastAccessedTime();
        return result;
    }

    /**
    *  如果没有找到对应的session直接返回,如果找到就删除
    */
    public void delete(String sessionId) {
        RedisSession session = getSession(sessionId, true);
        if (session == null) {
            return;
        }

        cleanupPrincipalIndex(session);
        this.expirationPolicy.onDelete(session);

        String expireKey = getExpiredKey(session.getId());
        this.sessionRedisOperations.delete(expireKey);

        session.setMaxInactiveIntervalInSeconds(0);
        save(session);
    }
}
2、Session接口:(包路径package org.springframework.session;)
Redis的session实现类:其中MapSession中保存关联属性,创建完session会设置lastAccessTime。
package org.springframework.session.data.redis;

    final class RedisSession implements ExpiringSession {
        /**
         * Creates a new instance ensuring to mark all of the new attributes to be
         * persisted in the next save operation.
         */
        RedisSession() {
            this(new MapSession());
            this.delta.put(CREATION_TIME_ATTR, getCreationTime());
            this.delta.put(MAX_INACTIVE_ATTR, getMaxInactiveIntervalInSeconds());
            this.delta.put(LAST_ACCESSED_ATTR, getLastAccessedTime());
            this.isNew = true;
            this.flushImmediateIfNecessary();
        }

    }
4.2.4、Spring Session的ServletFilter配置
从4.2.1~4.2.3得到的关键信息是,Spring Session对HTTP的支持所依靠的是一个简单老式的ServletFilter,借助servlet规范中标准的特性来实现Spring Session的功能。最后一个问题是如何配置这个ServletFilter了,配置Spring Session Filter很容易,在Spring Boot中,只需要在Spring Boot的配置类上使用 @EnableRedisHttpSession注解就可以了,如下面的代码片段所示:
package org.springframework.session.data.redis.config.annotation.web.http;
@Retention(java.lang.annotation.RetentionPolicy.RUNTIME)
@Target({ java.lang.annotation.ElementType.TYPE })
@Documented
@Import(RedisHttpSessionConfiguration.class)
@Configuration
public @interface EnableRedisHttpSession {
    int maxInactiveIntervalInSeconds() default 1800;
        String redisNamespace() default "";
    String redisNamespace() default "";
}
RedisHttpSessionConfiguration是SpringHttpSessionConfiguration的redis的实现类。先看SpringHttpSessionConfiguration.java的源码,在这里定义了bean名称为springSessionRepositoryFilter的Filter,对所有请求[/*]都处理。这一点在启动日志也可以说明。

package org.springframework.session.config.annotation.web.http;
@Configuration public class SpringHttpSessionConfiguration implements ApplicationContextAware {

   //...
   @Bean public SessionEventHttpSessionListenerAdapter sessionEventHttpSessionListenerAdapter() {

       return new SessionEventHttpSessionListenerAdapter(this.httpSessionListeners);
   }
   @Bean public <S extends ExpiringSession> SessionRepositoryFilter<? extends ExpiringSession> springSessionRepositoryFilter( SessionRepository<S> sessionRepository) {
       SessionRepositoryFilter<S> sessionRepositoryFilter = new SessionRepositoryFilter<S>( sessionRepository);
       sessionRepositoryFilter.setServletContext(this.servletContext);
       if (this.httpSessionStrategy instanceof MultiHttpSessionStrategy) {
           sessionRepositoryFilter.setHttpSessionStrategy( (MultiHttpSessionStrategy) this.httpSessionStrategy);
       } else {
           sessionRepositoryFilter.setHttpSessionStrategy(this.httpSessionStrategy);
       }
       return sessionRepositoryFilter;
   }

//...
}
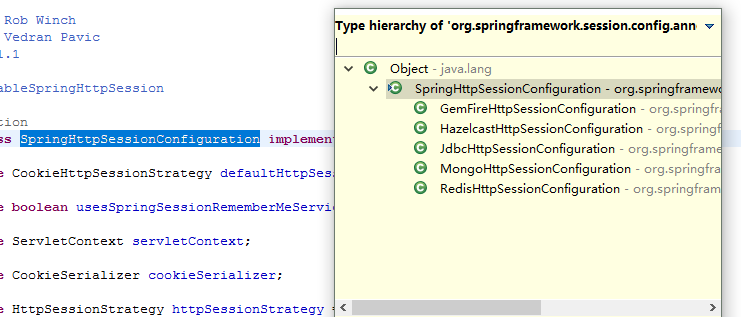
RedisHttpSessionConfiguration.java的源码:
package org.springframework.session.data.redis.config.annotation.web.http;

@Configuration
@EnableScheduling
public class RedisHttpSessionConfiguration extends SpringHttpSessionConfiguration
        implements EmbeddedValueResolverAware, ImportAware {
    private Integer maxInactiveIntervalInSeconds = 1800;

    private ConfigureRedisAction configureRedisAction = new ConfigureNotifyKeyspaceEventsAction();

    private String redisNamespace = "";

    private RedisFlushMode redisFlushMode = RedisFlushMode.ON_SAVE;

    private RedisSerializer<Object> defaultRedisSerializer;

    private Executor redisTaskExecutor;

    private Executor redisSubscriptionExecutor;

    private StringValueResolver embeddedValueResolver;

    @Bean
    public RedisMessageListenerContainer redisMessageListenerContainer(
            RedisConnectionFactory connectionFactory,
            RedisOperationsSessionRepository messageListener) {

        RedisMessageListenerContainer container = new RedisMessageListenerContainer();
        container.setConnectionFactory(connectionFactory);
        if (this.redisTaskExecutor != null) {
            container.setTaskExecutor(this.redisTaskExecutor);
        }
        if (this.redisSubscriptionExecutor != null) {
            container.setSubscriptionExecutor(this.redisSubscriptionExecutor);
        }
        container.addMessageListener(messageListener,
                Arrays.asList(new PatternTopic("__keyevent@*:del"),
                        new PatternTopic("__keyevent@*:expired")));
        container.addMessageListener(messageListener, Arrays.asList(new PatternTopic(
                messageListener.getSessionCreatedChannelPrefix() + "*")));
        return container;
    }

    @Bean
    public RedisTemplate<Object, Object> sessionRedisTemplate(
            RedisConnectionFactory connectionFactory) {
        RedisTemplate<Object, Object> template = new RedisTemplate<Object, Object>();
        template.setKeySerializer(new StringRedisSerializer());
        template.setHashKeySerializer(new StringRedisSerializer());
        if (this.defaultRedisSerializer != null) {
            template.setDefaultSerializer(this.defaultRedisSerializer);
        }
        template.setConnectionFactory(connectionFactory);
        return template;
    }

    @Bean
    public RedisOperationsSessionRepository sessionRepository(
            @Qualifier("sessionRedisTemplate") RedisOperations<Object, Object> sessionRedisTemplate,
            ApplicationEventPublisher applicationEventPublisher) {
        RedisOperationsSessionRepository sessionRepository = new RedisOperationsSessionRepository(
                sessionRedisTemplate);
        sessionRepository.setApplicationEventPublisher(applicationEventPublisher);
        sessionRepository
                .setDefaultMaxInactiveInterval(this.maxInactiveIntervalInSeconds);
        if (this.defaultRedisSerializer != null) {
            sessionRepository.setDefaultSerializer(this.defaultRedisSerializer);
        }

        String redisNamespace = getRedisNamespace();
        if (StringUtils.hasText(redisNamespace)) {
            sessionRepository.setRedisKeyNamespace(redisNamespace);
        }

        sessionRepository.setRedisFlushMode(this.redisFlushMode);
        return sessionRepository;
    }
    //...
}
4.2.5、sessionListener support

@Component
public class MyListener implements HttpSessionListener {
    @Override
    public void sessionCreated(HttpSessionEvent se) {
        System.out.println("sessionCreated()" + se);
        System.out.println("online + 1");
    }

    @Override
    public void sessionDestroyed(HttpSessionEvent se) {
        System.out.println("sessionDestroyed()" + se);
        System.out.println("online - 1");
    }

}

4.2.6、MultiHttpSessionStrategyAdapter单浏览器多session支持
    /**
     * A delegating implementation of {@link MultiHttpSessionStrategy}.
     */
    static class MultiHttpSessionStrategyAdapter implements MultiHttpSessionStrategy {
        private HttpSessionStrategy delegate;

        /**
         * Create a new {@link MultiHttpSessionStrategyAdapter} instance.
         * @param delegate the delegate HTTP session strategy
         */
        MultiHttpSessionStrategyAdapter(HttpSessionStrategy delegate) {
            this.delegate = delegate;
        }

        public String getRequestedSessionId(HttpServletRequest request) {
            return this.delegate.getRequestedSessionId(request);
        }

        public void onNewSession(Session session, HttpServletRequest request,
                HttpServletResponse response) {
            this.delegate.onNewSession(session, request, response);
        }

        public void onInvalidateSession(HttpServletRequest request,
                HttpServletResponse response) {
            this.delegate.onInvalidateSession(request, response);
        }

    //...
    }
Spring Session会为每个用户保留多个session,这是通过使用名为“_s”的session别名参数实现的。例如,如果到达的请求为http://example.com/doSomething?_s=0 ,那么Spring Session将会读取“_s”参数的值,并通过它确定这个请求所使用的是默认session。
如果到达的请求是http://example.com/doSomething?_s=1的话,那么Spring Session就能知道这个请求所要使用的session别名为1.如果请求没有指定“_s”参数的话,例如http://example.com/doSomething,那么Spring Session将其视为使用默认的session,也就是说_s=0。
要为某个浏览器创建新的session,只需要调用javax.servlet.http.HttpServletRequest.getSession()就可以了,就像我们通常所做的那样,Spring Session将会返回正确的session或者按照标准Servlet规范的语义创建一个新的session。下面的表格描述了针对同一个浏览器窗口,getSession()面对不同url时的行为。
|
HTTP请求URL |
Session别名 |
getSession()的行为 |
|
example.com/resource |
0 |
如果存在session与别名0关联的话,就返回该session,否则的话创建一个新的session并将其与别名0关联。 |
|
example.com/resource?_s=1 |
1 |
如果存在session与别名1关联的话,就返回该session,否则的话创建一个新的session并将其与别名1关联。 |
|
example.com/resource?_s=0 |
0 |
如果存在session与别名0关联的话,就返回该session,否则的话创建一个新的session并将其与别名0关联。 |
|
example.com/resource?_s=abc |
abc |
如果存在session与别名abc关联的话,就返回该session,否则的话创建一个新的session并将其与别名abc关联。 |
如上面的表格所示,session别名不一定必须是整型,它只需要区别于其他分配给用户的session别名就可以了。但是,整型的session别名可能是最易于使用的,Spring Session提供了HttpSessionManager接口,这个接口包含了一些使用session别名的工具方法。
五、回顾
5.1、spring-session的包结构介绍

- org.springframework.session包:
定义一些接口:如:Session接口、SessionRepository接口(存储接口)、
- org.springframework.session.web包:
SessionRepositoryFilter重写Filter;
集成Servlet,把上面的filter加入到filter chain、cookie和Http header方式存放到jsession,单浏览器多session支持等
- org.springframework.session.data、org.springframework.session.jdbc、org.springframework.session.hazelcast:
主要是各类存储容器的实现,如:redis、jvm的map、mongo、gemfire、hazelcast、jdbc等
- org.springframework.session.event包:
定义session生命周期相关的事件
- org.springframework.session.http包:
配置spring-session
5.2、spring-session重写servlet request 及 redis实现存储相关问题
spring-session无缝替换应用服务器的request大概原理是:
1.自定义个Filter,实现doFilter方法
2.继承 HttpServletRequestWrapper 、HttpServletResponseWrapper 类,重写getSession等相关方法(在这些方法里调用相关的 session存储容器操作类)。
3.在 第一步的doFilter中,new 第二步 自定义的request和response的类。并把它们分别传递 到 过滤器链
4.把该filter配置到 过滤器链的第一个位置上
Redis存储容器实现。
主要实现存储公共基础类->FindByIndexNameSessionRepository ,里面主要有根据indexName从redis中查找session、根据sessionID对redis中的session增删改查的方法。
关于redis的session存储容器,实际上spring-session是有些缺陷的。比如无法做到session的过期以及销毁的实时发布事件,以及getCurrentSession中可能存在的一些并发问题(小问题)。但整体来说还是可用性很高的,毕竟我们自己写一套这类框架成本很高。
以上只是针对redis session的存储容器,其他存储容器可能会比redis更好,比如gemfire,至少在事件发布上是完整了(根据它实现了事件猜的)

 浙公网安备 33010602011771号