Nexus Repository Manager OSS 2 配置阿里云私服做代理的坑
安装
搭建 Nexus 私服很简单,官网下载,解压:
使用管理员权限打开cmd:

> cd nexus-2.14.14-01-bundle\nexus-2.14.14-01\bin
> nexus.bat install # 安装nexus服务,然后在任务管理器启动nexus服务即可
为什么使用nexus 2 而不是nexus 3?
1. nexus 3的UI没有nexus 2紧凑好用
2. nexus 3 改用bytes存储下载的jar包,不直观。nexus 2 的 sonatype-work\nexus\storage\ 目录下是能直接找到下载的jar包的。
3. 既有遗留系统使用的是nexus 2。这是主要原因。
PS:
如果使用nexus 3, 则不会遇到这个问题,直接按照常规套路配置阿里云的proxy就能使用。
配置阿里云代理
本来是很简单的事情(常规做法:https://www.cnblogs.com/godwithus/p/8955824.html),但是有个隐藏的坑。
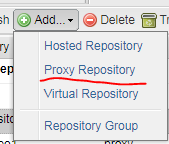
(1)在nexus manager中添加Proxy Repository:
填写configuration:ID、Name这些都简单,关键在这:
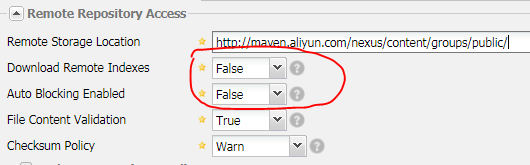
两个False。默认是True。地址用 https://maven.aliyun.com/repository/public 也行。
然后保存。
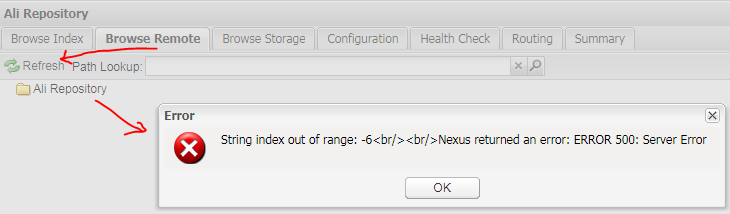
(2)刷新一下

注意看上图,Ali Repo(按上述设为两个False)的状态是In Service。aliyun repo1(默认True) 的 状态是Remote Automatically Blocked and Unavailable。
(3)将Ali Repo添加到public repo中,放在central的前面。OK。
(4)另一个bug。
虽然现在能正常使用了,但是在Browse Remote菜单下,还是无法查看远程阿里云repo的文件目录的。这里aliyun repo的限制。不影响IDEA构建使用。
(5)最后检查一下maven的settings.xml文件,在mirrors中添加:
<mirror>
    <!--This sends everything else to /public -->
    <id>nexus</id>
    <mirrorOf>central</mirrorOf>
    <name>my nexus</name
    <url>http://127.0.0.1:8081/nexus/content/groups/public/</url>
</mirror>
然后IDEA中使用OK。

 浙公网安备 33010602011771号