
vue-socket.io使用教程与踩坑记录
全手打原创,转载请标明出处:https://www.cnblogs.com/dreamsqin/p/12018866.html,多谢,=。=~
(如果对你有帮助的话请帮我点个赞啦)
请先允许我狠狠吐个槽:vue-socket.io相关中文博客实在太少太少,来来去去就那么几篇,教程也比较零散,版本也比较老,就算我有暴风式搜索还是找不到解决问题的方案,然后我怒了,开始看源码、写测试demo、几乎把相关的issues都看了一遍,折腾1天后终于。。。搞定了,下面总结一下~
考虑到很多小伙伴看完文章还是一头雾水或者无法复现方案,附加demo源码https://github.com/dreamsqin/demo-vue-socket.io一份,耗时一天~满意到话给我个start~感谢
前言
vue-socket.io其实是在socket.io-client基础上做了一层封装,将$socket挂载到vue实例上,同时你可以使用sockets对象轻松实现组件化的事件监听,让你在vue项目中使用起来更方便。我目前用的vue-socket.io:3.0.7,可以在其package.json中看到它依赖于socket.io-client:2.1.1。
我遇到的问题
websocket连接地址是从后端动态获取,所以导致页面加载时VueSocketIO实例还未创建,页面中通过this.$socket.emit发起订阅报错,同时无法找到vue实例的sockets对象(写在内部的事件将无法监听到,就算后面已经连接成功)
如果你的websocket连接地址是静态的(写死的),可以只看使用教程,如果你跟我遇到了同样的问题,那就跳跃到解决方案
console报错如下:
使用教程
先抛开可能遇到的问题,按照官网的教程我们走一遍:
安装
npm install vue-socket.io --save
引入(main.js)
import Vue from 'vue'
import store from './store'
import App from './App.vue'
import VueSocketIO from 'vue-socket.io'

Vue.use(new VueSocketIO({
    debug: true,
    connection: 'http://metinseylan.com:1992',
    vuex: {
        store,
        actionPrefix: 'SOCKET_',
        mutationPrefix: 'SOCKET_'
    },
    options: { path: "/my-app/" } //Optional options
}))

new Vue({
    router,
    store,
    render: h => h(App)
}).$mount('#app')
-
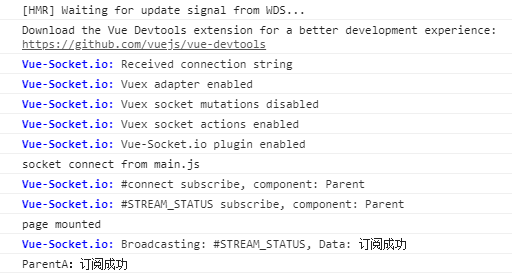
debug:生产环境建议关闭,开发环境可以打开,这样你就可以在控制台看到socket连接和事件监听的一些信息,例如下面这样:
![]()
-
connection:连接地址前缀,注意!这里只有前缀,我之前被坑过,因为明明后端有给我返回上下文,但莫名其妙的被去除了,vue-socket.io这里用到的是socket.io-client的Manager api,关键源码如下(只看我写中文备注的部分就好):
vue-socket.io(index.js)
import SocketIO from "socket.io-client";
export default class VueSocketIO {

    /**
     * lets take all resource
     * @param io
     * @param vuex
     * @param debug
     * @param options
     */
    constructor({connection, vuex, debug, options}){

        Logger.debug = debug;
        this.io = this.connect(connection, options); // 获取到你设定的参数后就调用了connect方法
        this.useConnectionNamespace = (options && options.useConnectionNamespace);
        this.namespaceName = (options && options.namespaceName);
        this.emitter = new Emitter(vuex);
        this.listener = new Listener(this.io, this.emitter);
    }
    /**
   * registering SocketIO instance
   * @param connection
   * @param options
   */
  connect(connection, options) {
    if (connection && typeof connection === "object") {
      Logger.info(`Received socket.io-client instance`);
      return connection;
    } else if (typeof connection === "string") {
      const io = SocketIO(connection, options);// 其实用的是socket.io-client的Manager API
      Logger.info(`Received connection string`);
      return (this.io = io);
    } else {
      throw new Error("Unsupported connection type");
    }
  }
socket.io-client(index.js)
var url = require('./url');
function lookup (uri, opts) {
  if (typeof uri === 'object') {
    opts = uri;
    uri = undefined;
  }

  opts = opts || {};

  var parsed = url(uri); // 通过url.js对connection前缀进行截取
  var source = parsed.source;
  var id = parsed.id;
  var path = parsed.path;
  var sameNamespace = cache[id] && path in cache[id].nsps;
  var newConnection = opts.forceNew || opts['force new connection'] ||
                      false === opts.multiplex || sameNamespace;

  var io;

  if (newConnection) {
    debug('ignoring socket cache for %s', source);
    io = Manager(source, opts);
  } else {
    if (!cache[id]) {
      debug('new io instance for %s', source);
      cache[id] = Manager(source, opts);
    }
    io = cache[id];
  }
  if (parsed.query && !opts.query) {
    opts.query = parsed.query;
  }
  return io.socket(parsed.path, opts);// 实际调用的是解析后的前缀地址
}
options.path: 这里就可以填websocket连接地址的后缀,如果不填会被默认添加/socket.io,关键源码如下(只看我写中文备注的部分就好):
其他的options配置可以参见https://socket.io/docs/client-api/#Manager
socket.io-client(manager.js)
function Manager (uri, opts) {
  if (!(this instanceof Manager)) return new Manager(uri, opts);
  if (uri && ('object' === typeof uri)) {
    opts = uri;
    uri = undefined;
  }
  opts = opts || {};

  opts.path = opts.path || '/socket.io'; // 看到没有,如果你不传递options.path参数的话会被默认安一个尾巴"/socket.io"
  this.nsps = {};
  this.subs = [];
  this.opts = opts;
  this.reconnection(opts.reconnection !== false);
  this.reconnectionAttempts(opts.reconnectionAttempts || Infinity);
  this.reconnectionDelay(opts.reconnectionDelay || 1000);
  this.reconnectionDelayMax(opts.reconnectionDelayMax || 5000);
  this.randomizationFactor(opts.randomizationFactor || 0.5);
  this.backoff = new Backoff({
    min: this.reconnectionDelay(),
    max: this.reconnectionDelayMax(),
    jitter: this.randomizationFactor()
  });
  this.timeout(null == opts.timeout ? 20000 : opts.timeout);
  this.readyState = 'closed';
  this.uri = uri;
  this.connecting = [];
  this.lastPing = null;
  this.encoding = false;
  this.packetBuffer = [];
  var _parser = opts.parser || parser;
  this.encoder = new _parser.Encoder();
  this.decoder = new _parser.Decoder();
  this.autoConnect = opts.autoConnect !== false;
  if (this.autoConnect) this.open();
}
vuex: 配置后可以在store.js的mutations或者actions监听到Vue-Socket.io事件(例如:connect、disconnect、reconnect等),这部分目前用得比较少,也挺简单,如果有疑问可以给我留言我再单独提供教程。
使用(Page.vue)
注意:熟悉socket.io-client的应该知道,默认情况下,websocket在创建实例的时候就会自动发起连接了,所以切记不要在组件中重复发起连接。如果你想自己控制发起连接的时机可以将options.autoConnect设置为false。
export default {
    name: 'Page',
    sockets: {// 通过vue实例对象sockets实现组件中的事件监听
      connect: function () {// socket的connect事件
        console.log('socket connected from Page')
      },
      STREAM_STATUS(data) {// 后端按主题名推送的消息数据
          console.log('Page:' + data)
      }
    },
    mounted() {
      console.log('page mounted')
      this.$socket.emit('STREAM_STATUS', { subscribe: true })// 在页面加载时发起订阅,“STREAM_STATUS”是你跟后端约定好的主题名
    }
  }
事件除了在sockets对象中默认监听,你还可以在外部单独注册事件监听或取消注册:
this.sockets.subscribe('EVENT_NAME', (data) => {
    this.msg = data.message;
});

this.sockets.unsubscribe('EVENT_NAME');
但这种方式从源码上看是不支持参数传递的,只支持传递事件名及回调函数(部分源码如下):
vue-Socket.io(mixin.js)
beforeCreate(){
        if(!this.sockets) this.sockets = {};

        if (typeof this.$vueSocketIo === 'object') {
            for (const namespace of Object.keys(this.$vueSocketIo)) {
                this.sockets[namespace] = {
                    subscribe: (event, callback) => {
                        this.$vueSocketIo[namespace].emitter.addListener(event, callback, this);
                    },
                    unsubscribe: (event) => {
                        this.$vueSocketIo[namespace].emitter.removeListener(event, this);
                    }
                }
            }
        } else {
            this.$vueSocketIo.emitter.addListener(event, callback, this);
            this.$vueSocketIo.emitter.removeListener(event, this);
        }
    }
解决方案
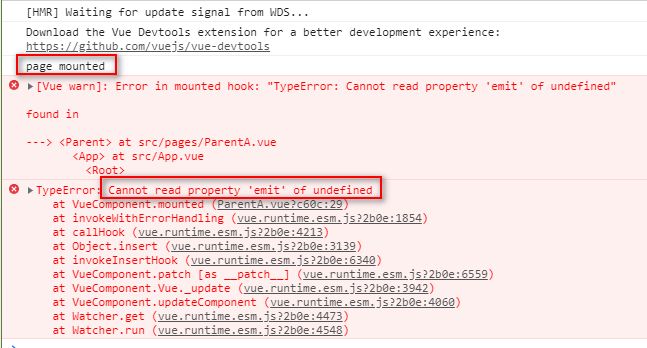
针对我上面描述的问题,最大原因就在于获取socket连接地址是异步请求,如文章开头的截图,page mounted打印时,this.$socket还是undefined。所以我们要做的就是怎么样让页面加载在VueSocketIO实例创建之后。
我提供两种解决方案,具体怎么选择看你们的需求~
保证拿到socket连接地址后再将vue实例挂载到app
缺点:如果你获取socket地址的请求失败了,整个项目的页面都加载不出来(一般服务器出现问题才会有这种情况产生)
优点:实现简单,一小段代码挪个位置就好
main.js
import Vue from 'vue'
import App from './App.vue'
import router from './router'
import store from './store'
import ParentApi from '@/api/Parent'
import VueSocketIO from 'vue-socket.io'

/* 使用vue-socket.io */
ParentApi.getSocketUrl().then((res) => {
    Vue.use(new VueSocketIO({
        debug: false,
        connection: res.data.path,
        options: { path: '/my-project/socket.io' }
    }))
    new Vue({
        router,
        store,
        render: h => h(App)
    }).$mount('#app')
})
控制台打印如下图:

结合connect事件+store+路由守卫实现拦截
原理:异步请求回调中创建VueSocketIO实例并监听connect事件,监听回调中修改isSuccessConnect参数的值,在Page页面路由中增加beforeEnter守卫,利用setInterval周期性判断isSuccessConnect的值,满足条件则取消定时执行并路由跳转。
缺点:实现起来稍微复杂一点
优点:不会影响其他页面的加载
main.js
import Vue from 'vue'
import App from './App.vue'
import router from './router'
import store from './store'
import ParentApi from '@/api/Parent'
import VueSocketIO from 'vue-socket.io'

ParentApi.getSocketUrl().then((res) => {
  let vueSocketIo = new VueSocketIO({
    debug: false,
    connection: res.data.path,
    options: { path: '/my-project/socket.io' }
  })
  // 监听connect事件,设置isSuccessConnect为true
  vueSocketIo.io.on('connect', () => {
    console.log('socket connect from main.js')
    store.commit('newIsSuccessConnect', true)
  })
  Vue.use(vueSocketIo)
})

new Vue({
  router,
  store,
  render: h => h(App)
}).$mount('#app')
store.js
import Vue from 'vue'
import Vuex from 'vuex'

Vue.use(Vuex)
export default new Vuex.Store({
  state: {
    // socket连接状态
    isSuccessConnect: false
  },
  mutations: {
    newIsSuccessConnect(state, value) {
      state.isSuccessConnect = value
    }
  },
  getters: {
    getIsSuccessConnect: state => {
      return state.isSuccessConnect
    }
  },
  actions: {
  }
})
router.js
import Vue from 'vue'
import Router from 'vue-router'
import store from './store'

Vue.use(Router)

export default new Router({
  mode: 'history',
  base: process.env.BASE_URL,
  routes: [
    {
      path: '/page',
      name: 'Page',
      component: () => import(/* webpackChunkName: "Page" */ './pages/Page.vue'),
      beforeEnter: (to, from, next) => {
        let intervalId = setInterval(() => {
         // 直到store中isSuccessConnect为true时才能进入/page
          if (store.getters.getIsSuccessConnect) {
            clearInterval(intervalId)
            next()
          }
        }, 500)
      }
    }
  ]
})
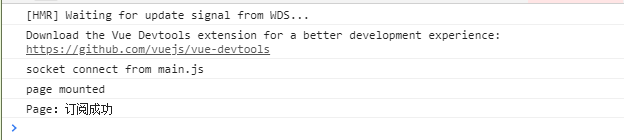
控制台打印如下图:
参考资料:
1、vue-socket.io:https://github.com/MetinSeylan/Vue-Socket.io
2、socket.io-client:https://github.com/socketio/socket.io-client
3、vue-router守卫:https://router.vuejs.org/zh/guide/advanced/navigation-guards.html#%E8%B7%AF%E7%94%B1%E7%8B%AC%E4%BA%AB%E7%9A%84%E5%AE%88%E5%8D%AB

 浙公网安备 33010602011771号