SpringMVC+Mybatis框架搭建
一、新建javaweb项目,并建好相应的包结构
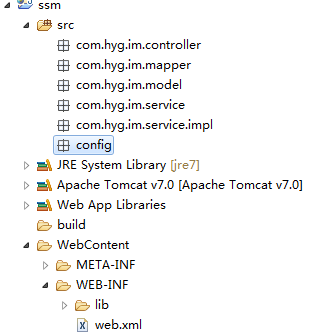
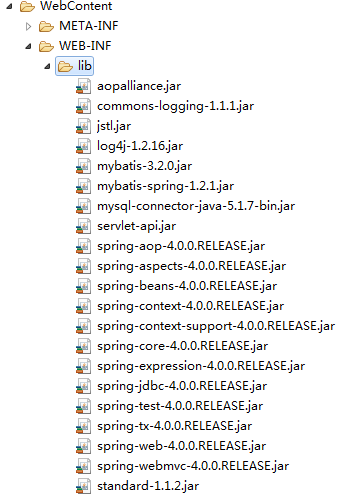
二、添加项目jar到lib目录下
三、在config包中新建配置文件
sping-mvc.xml,内容如下:
<?xml version="1.0" encoding="UTF-8"?>
<beans xmlns="http://www.springframework.org/schema/beans"
	xmlns:xsi="http://www.w3.org/2001/XMLSchema-instance" xmlns:context="http://www.springframework.org/schema/context"
	xmlns:mvc="http://www.springframework.org/schema/mvc"
	xsi:schemaLocation="http://www.springframework.org/schema/beans
	http://www.springframework.org/schema/beans/spring-beans.xsd
	http://www.springframework.org/schema/context
	http://www.springframework.org/schema/context/spring-context-4.0.xsd
	http://www.springframework.org/schema/mvc
	http://www.springframework.org/schema/mvc/spring-mvc-4.0.xsd">

	<!-- 注解扫描包 -->
	<context:component-scan base-package="com.hyg.im" />

	<!-- 开启注解 -->
	<mvc:annotation-driven />
</beans>
spring-common.xml内容如下:
<?xml version="1.0" encoding="UTF-8"?>
<beans xmlns="http://www.springframework.org/schema/beans"
	xmlns:xsi="http://www.w3.org/2001/XMLSchema-instance" xmlns:p="http://www.springframework.org/schema/p"
	xmlns:context="http://www.springframework.org/schema/context" xmlns:tx="http://www.springframework.org/schema/tx"
	xsi:schemaLocation="
		http://www.springframework.org/schema/beans
		http://www.springframework.org/schema/beans/spring-beans-4.0.xsd
		http://www.springframework.org/schema/context
		http://www.springframework.org/schema/context/spring-context-4.0.xsd
		http://www.springframework.org/schema/tx
		http://www.springframework.org/schema/tx/spring-tx-4.0.xsd">

	<!-- 1. 数据源 : DriverManagerDataSource -->
	<bean id="dataSource"
		class="org.springframework.jdbc.datasource.DriverManagerDataSource">
		<property name="driverClassName" value="com.mysql.jdbc.Driver" />
		<property name="url" value="jdbc:mysql://localhost:3306/test" />
		<property name="username" value="root" />
		<property name="password" value="123456" />
	</bean>

	<!--
		2. mybatis的SqlSession的工厂: SqlSessionFactoryBean dataSource:引用数据源
		MyBatis定义数据源,同意加载配置
	-->
	<bean id="sqlSessionFactory" class="org.mybatis.spring.SqlSessionFactoryBean">
		<property name="dataSource" ref="dataSource"></property>
	</bean>

	<!--
		3. mybatis自动扫描加载Sql映射文件/接口 : MapperScannerConfigurer sqlSessionFactory

		basePackage:指定sql映射文件/接口所在的包(自动扫描)
	-->
	<bean class="org.mybatis.spring.mapper.MapperScannerConfigurer">
		<property name="basePackage" value="com.hyg.im.mapper"></property>
		<property name="sqlSessionFactory" ref="sqlSessionFactory"></property>
	</bean>

	<!--
		4. 事务管理 : DataSourceTransactionManager dataSource:引用上面定义的数据源
	-->
	<bean id="txManager"
		class="org.springframework.jdbc.datasource.DataSourceTransactionManager">
		<property name="dataSource" ref="dataSource"></property>
	</bean>

	<!-- 5. 使用声明式事务
		 transaction-manager:引用上面定义的事务管理器
	 -->
	<tx:annotation-driven transaction-manager="txManager" />

</beans>
四、配置web.xml,内容如下:
<?xml version="1.0" encoding="UTF-8"?>
<web-app version="2.5" xmlns="http://java.sun.com/xml/ns/javaee"
	xmlns:xsi="http://www.w3.org/2001/XMLSchema-instance"
	xsi:schemaLocation="http://java.sun.com/xml/ns/javaee
	http://java.sun.com/xml/ns/javaee/web-app_2_5.xsd">

	<!-- 加载Spring容器配置 -->
	<listener>
	<listener-class>org.springframework.web.context.ContextLoaderListener</listener-class>
	</listener>
	<!-- 设置Spring容器加载所有的配置文件的路径 -->
	<context-param>
		<param-name>contextConfigLocation</param-name>
		<param-value>classpath*:config/spring-*.xml</param-value>
	</context-param>

	<!-- 配置SpringMVC核心控制器 -->
	<servlet>
		<servlet-name>springMVC</servlet-name>
		<servlet-class>org.springframework.web.servlet.DispatcherServlet</servlet-class>
		<!-- 配置初始配置化文件,前面contextConfigLocation看情况二选一 -->
		<init-param>
			<param-name>contextConfigLocation</param-name>
			<param-value>classpath*:config/spring-mvc.xml</param-value>
		</init-param>
		<!-- 启动加载一次 -->
		<load-on-startup>1</load-on-startup>
	</servlet>

	<!--为DispatcherServlet建立映射 -->
	<servlet-mapping>
		<servlet-name>springMVC</servlet-name>
		<!-- 此处可以可以配置成*.do,对应struts的后缀习惯 -->
		<url-pattern>/</url-pattern>
	</servlet-mapping>
	<servlet-mapping>
		<servlet-name>default</servlet-name>
		<url-pattern>*.html</url-pattern>
	</servlet-mapping>
	<servlet-mapping>
		<servlet-name>default</servlet-name>
		<url-pattern>*.gif</url-pattern>
	</servlet-mapping>
	<servlet-mapping>
		<servlet-name>default</servlet-name>
		<url-pattern>*.css</url-pattern>
	</servlet-mapping>
	<servlet-mapping>
		<servlet-name>default</servlet-name>
		<url-pattern>*.js</url-pattern>
	</servlet-mapping>
	<servlet-mapping>
		<servlet-name>default</servlet-name>
		<url-pattern>*.jpg</url-pattern>
	</servlet-mapping>
	<servlet-mapping>
		<servlet-name>default</servlet-name>
		<url-pattern>*.png</url-pattern>
	</servlet-mapping>

	<!-- 防止Spring内存溢出监听器 -->
	<listener>
	<listener-class>org.springframework.web.util.IntrospectorCleanupListener</listener-class>
	</listener>

	<!-- 解决工程编码过滤器 -->
	<filter>
		<filter-name>encodingFilter</filter-name>
	<filter-class>org.springframework.web.filter.CharacterEncodingFilter</filter-class>
		<init-param>
			<param-name>encoding</param-name>
			<param-value>UTF-8</param-value>
		</init-param>
		<init-param>
			<param-name>forceEncoding</param-name>
			<param-value>true</param-value>
		</init-param>
	</filter>
	<filter-mapping>
		<filter-name>encodingFilter</filter-name>
		<url-pattern>/*</url-pattern>
	</filter-mapping>
	<welcome-file-list>
		<welcome-file>login.jsp</welcome-file>
	</welcome-file-list>
</web-app>
五、在mysql中创建数据库test,并新建表user_info,字段如下

向user_info中添加几条数据,如下

六、用mybatis生成工具,生成实体类、映射文件
实体类UserInfo.java代码如下:
package com.hyg.im.model;

import java.util.Date;

public class UserInfo {
    private Integer userId;

    private String userName;

    private String password;

    private String trueName;

    private Date addedTime;

    public Integer getUserId() {
        return userId;
    }

    public void setUserId(Integer userId) {
        this.userId = userId;
    }

    public String getUserName() {
        return userName;
    }

    public void setUserName(String userName) {
        this.userName = userName == null ? null : userName.trim();
    }

    public String getPassword() {
        return password;
    }

    public void setPassword(String password) {
        this.password = password == null ? null : password.trim();
    }

    public String getTrueName() {
        return trueName;
    }

    public void setTrueName(String trueName) {
        this.trueName = trueName == null ? null : trueName.trim();
    }

    public Date getAddedTime() {
        return addedTime;
    }

    public void setAddedTime(Date addedTime) {
        this.addedTime = addedTime;
    }
}
UserInfoMapper.java代码如下:
package com.hyg.im.mapper;

import com.hyg.im.model.UserInfo;

public interface UserInfoMapper {
    int deleteByPrimaryKey(Integer userId);

    int insert(UserInfo record);

    int insertSelective(UserInfo record);

    UserInfo selectByPrimaryKey(Integer userId);

    int updateByPrimaryKeySelective(UserInfo record);

    int updateByPrimaryKey(UserInfo record);
}
UserInfoMapper.xml代码如下:
<?xml version="1.0" encoding="UTF-8" ?>
<!DOCTYPE mapper PUBLIC "-//mybatis.org//DTD Mapper 3.0//EN" "http://mybatis.org/dtd/mybatis-3-mapper.dtd" >
<mapper namespace="com.hyg.im.mapper.UserInfoMapper" >
  <resultMap id="BaseResultMap" type="com.hyg.im.model.UserInfo" >
    <id column="userId" property="userId" jdbcType="INTEGER" />
    <result column="userName" property="userName" jdbcType="VARCHAR" />
    <result column="password" property="password" jdbcType="VARCHAR" />
    <result column="trueName" property="trueName" jdbcType="VARCHAR" />
    <result column="addedTime" property="addedTime" jdbcType="DATE" />
  </resultMap>
  <sql id="Base_Column_List" >
    userId, userName, password, trueName, addedTime
  </sql>
  <select id="selectByPrimaryKey" resultMap="BaseResultMap" parameterType="java.lang.Integer" >
    select
    <include refid="Base_Column_List" />
    from user_info
    where userId = #{userId,jdbcType=INTEGER}
  </select>
  <delete id="deleteByPrimaryKey" parameterType="java.lang.Integer" >
    delete from user_info
    where userId = #{userId,jdbcType=INTEGER}
  </delete>
  <insert id="insert" parameterType="com.hyg.im.model.UserInfo" >
    insert into user_info (userId, userName, password,
      trueName, addedTime)
    values (#{userId,jdbcType=INTEGER}, #{userName,jdbcType=VARCHAR}, #{password,jdbcType=VARCHAR},
      #{trueName,jdbcType=VARCHAR}, #{addedTime,jdbcType=DATE})
  </insert>
  <insert id="insertSelective" parameterType="com.hyg.im.model.UserInfo" >
    insert into user_info
    <trim prefix="(" suffix=")" suffixOverrides="," >
      <if test="userId != null" >
        userId,
      </if>
      <if test="userName != null" >
        userName,
      </if>
      <if test="password != null" >
        password,
      </if>
      <if test="trueName != null" >
        trueName,
      </if>
      <if test="addedTime != null" >
        addedTime,
      </if>
    </trim>
    <trim prefix="values (" suffix=")" suffixOverrides="," >
      <if test="userId != null" >
        #{userId,jdbcType=INTEGER},
      </if>
      <if test="userName != null" >
        #{userName,jdbcType=VARCHAR},
      </if>
      <if test="password != null" >
        #{password,jdbcType=VARCHAR},
      </if>
      <if test="trueName != null" >
        #{trueName,jdbcType=VARCHAR},
      </if>
      <if test="addedTime != null" >
        #{addedTime,jdbcType=DATE},
      </if>
    </trim>
  </insert>
  <update id="updateByPrimaryKeySelective" parameterType="com.hyg.im.model.UserInfo" >
    update user_info
    <set >
      <if test="userName != null" >
        userName = #{userName,jdbcType=VARCHAR},
      </if>
      <if test="password != null" >
        password = #{password,jdbcType=VARCHAR},
      </if>
      <if test="trueName != null" >
        trueName = #{trueName,jdbcType=VARCHAR},
      </if>
      <if test="addedTime != null" >
        addedTime = #{addedTime,jdbcType=DATE},
      </if>
    </set>
    where userId = #{userId,jdbcType=INTEGER}
  </update>
  <update id="updateByPrimaryKey" parameterType="com.hyg.im.model.UserInfo" >
    update user_info
    set userName = #{userName,jdbcType=VARCHAR},
      password = #{password,jdbcType=VARCHAR},
      trueName = #{trueName,jdbcType=VARCHAR},
      addedTime = #{addedTime,jdbcType=DATE}
    where userId = #{userId,jdbcType=INTEGER}
  </update>
</mapper>
注意:UserInfoMapper.java和UserInfoMapper.xml的文件名需要一样,并放入包com.hyg.im.mapper中,UserInfo.java放入包com.hyg.im.model中
七、添加业务层方法,查询所有用户信息
接口UserInfoService.java代码如下:
package com.hyg.im.service;
import java.util.List;
import com.hyg.im.model.UserInfo;

public interface UserInfoService {
	/**
	 * 查询所有用户信息
	 */
	List<UserInfo> findUserInfoList();
}
接口实现类UserInfoServiceImpl.java代码如下:
package com.hyg.im.service.impl;
import java.util.List;
import javax.annotation.Resource;
import org.springframework.stereotype.Service;
import org.springframework.transaction.annotation.Transactional;
import com.hyg.im.mapper.UserInfoMapper;
import com.hyg.im.model.UserInfo;
import com.hyg.im.service.UserInfoService;

@Service
@Transactional  //此处不再进行创建SqlSession和提交事务,都已交由spring去管理了。
public class UserInfoServiceImpl implements UserInfoService {
	@Resource
	private UserInfoMapper mapper;

	@Override
	public List<UserInfo> findUserInfoList() {
		return mapper.findUserInfoList();
	}

}
八、添加Dao层方法
UserInfoMapper.java中同样加入 findUserInfoList()接口
代码如下:
List<UserInfo> findUserInfoList();
UserInfoMapper.xml中加入查询sql语句与之对应
  <select id="findUserInfoList" resultMap="BaseResultMap" parameterType="map" >
    select
    <include refid="Base_Column_List" />
    from user_info
  </select>
九、添加controller层代码
在包com.hyg.im.controller中新建UserInfoController.java,代码如下:
package com.hyg.im.controller;
import java.util.List;
import javax.servlet.http.HttpServletRequest;
import javax.servlet.http.HttpServletResponse;
import org.springframework.beans.factory.annotation.Autowired;
import org.springframework.stereotype.Controller;
import org.springframework.web.bind.annotation.RequestMapping;
import org.springframework.web.servlet.ModelAndView;
import com.hyg.im.model.UserInfo;
import com.hyg.im.service.UserInfoService;

@Controller
//@RequestMapping("/user")
public class UserInfoController{

	@Autowired
	private UserInfoService userInfoService;
	/**
	 * 查询用户列表
	 */
	@RequestMapping("/findUserInfoList")
	public ModelAndView findUserInfoList(HttpServletRequest request,HttpServletResponse response){
		ModelAndView mav = new ModelAndView();
        mav.setViewName("/userInfoList.jsp"); //返回的文件路径

        List<UserInfo> userInfoList = userInfoService.findUserInfoList();
        mav.addObject("userInfoList", userInfoList);
        return mav;

	}

}
十、添加view视图层代码
在WebContent根目录新建文件userInfoList.jsp,用于展示用户数据,代码如下:
<%@ page language="java" contentType="text/html; charset=utf-8" pageEncoding="utf-8"%>
<%@ taglib uri="http://java.sun.com/jsp/jstl/core" prefix="c" %>
<!DOCTYPE html PUBLIC "-//W3C//DTD HTML 4.01 Transitional//EN" "http://www.w3.org/TR/html4/loose.dtd">
<html>
<head>
<meta http-equiv="Content-Type" content="text/html; charset=utf-8">
<title>用户列表</title>
</head>
<body>

<table border="1">
 <tr>
  <td>用户ID</td><td>用户名</td><td>真实姓名</td>
 </tr>
 <c:forEach var="row" items="${userInfoList}">
 <tr>
  <td>${row.userId }</td><td>${row.userName }</td><td>${row.trueName}</td>
 </tr>
 </c:forEach>
</table>

</body>
</html>
十一、发布项目到Tomcat
项目右键/Run As/Run On Server,将项目发布到Tomcat
十二、浏览器访问,查看效果
访问地址:http://localhost:8080/ssm/findUserInfoList
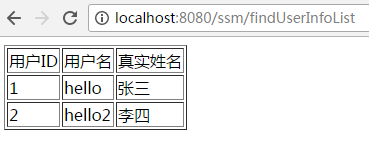
到此,springmvc+spring+mybatis框架搭建成功。
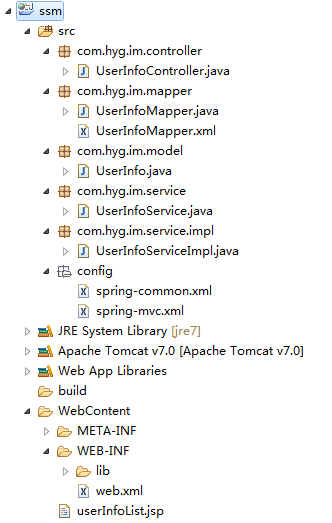
项目最终的目录结构如下图:

原创文章,转载请注明出处!!

 浙公网安备 33010602011771号