docker swarm使用keepalived+haproxy搭建基于percona-xtradb-cluster方案的高可用mysql集群
一、部署环境
| 序号 | hostname | ip | 备注 |
| 1 | manager107 | 10.0.3.107 | centos7;3.10.0-957.1.3.el7.x86_64 |
| 2 | worker68 | 10.0.3.68 | centos7;3.10.0-957.1.3.el7.x86_64 |
| 3 | worker80 | 10.0.3.80 | centos7;3.10.0-957.1.3.el7.x86_64 |
docker版本
docker version
Client:
 Version:           18.09.0
 API version:       1.39
 Go version:        go1.10.4
 Git commit:        4d60db4
 Built:             Wed Nov  7 00:48:22 2018
 OS/Arch:           linux/amd64
 Experimental:      false

Server: Docker Engine - Community
 Engine:
  Version:          18.09.0
  API version:      1.39 (minimum version 1.12)
  Go version:       go1.10.4
  Git commit:       4d60db4
  Built:            Wed Nov  7 00:19:08 2018
  OS/Arch:          linux/amd64
  Experimental:     false
二、首先搭建基于swarm的percona-xtradb-cluster集群,参见上一篇
三、三台服务器安装haproxy
1、编写haproxy-Dockerfile
1 cd /home/workspace/haproxy
2 vim haproxy-Dockerfile
haproxy-Dockerfile内容:
1 FROM haproxy
2 COPY ./haproxy.cfg /usr/local/etc/haproxy/
3 EXPOSE 4567 3306
4 CMD ["/usr/local/sbin/haproxy", "-db", "-f", "/usr/local/etc/haproxy/haproxy.cfg"]
2、编辑haproxy配置文件
vim haproxy.cfg
输入haproxy.cfg内容:
global
        #工作目录
        chroot /usr/local/etc/haproxy
        #日志文件,使用rsyslog服务中local5日志设备(/var/log/local5),等级info
        log 127.0.0.1 local5 info
        #守护进程运行
        daemon

defaults
        log     global
        mode    http
        #日志格式
        option  httplog
        #日志中不记录负载均衡的心跳检测记录
        option  dontlognull
        #连接超时(毫秒)
        timeout connect 5000
        #客户端超时(毫秒)
        timeout client  50000
        #服务器超时(毫秒)
        timeout server  50000

#监控界面
listen  admin_stats
        #监控界面的访问的IP和端口
        bind  0.0.0.0:4567
        #访问协议
        mode   http
        #URI相对地址
        stats uri   /haproxy
        #统计报告格式
        stats realm     Global\ statistics
        #登陆帐户信息
        stats auth  admin:abc123456
        #数据库负载均衡
listen  proxy-mysql
        #访问的IP和端口(前面ip=0代表任何ip都可访问)
        bind  0.0.0.0:3306
        #网络协议
        mode  tcp
        #负载均衡算法(轮询算法)
        #轮询算法:roundrobin
        #权重算法:static-rr
        #最少连接算法:leastconn
        #请求源IP算法:source
        balance  roundrobin
        #日志格式
        option  tcplog
        #在MySQL中创建一个没有权限的haproxy用户,密码为空。Haproxy使用这个账户对MySQL数据库心跳检测
        option  mysql-check user haproxy
        server  node1 node1:3306 check weight 1 maxconn 2000
        server  node2 node2:3306 check weight 1 maxconn 2000
        server  node3 node3:3306 check weight 1 maxconn 2000
        #使用keepalive检测死链
        option  tcpka
注:node1、node2、node3分别为三台服务器上的pxc集群的容器名字。
3、构建haproxy镜像
docker build -t haproxy01 .
4、三台服务器启动haproxy容器服务
1 docker run -it -d -p 3106:3306 -p 7010:4567 --name c_haproxy01 --net=pxc-net --privileged haproxy01
2 docker run -it -d -p 3106:3306 -p 7010:4567 --name c_haproxy02 --net=pxc-net --privileged haproxy01
3 docker run -it -d -p 3106:3306 -p 7010:4567 --name c_haproxy03 --net=pxc-net --privileged haproxy01
这时访问http://10.0.3.107:7010/haproxy,应该可以看到统计页面了。
四、三台服务器安装keepalived
1、三台服务器yum安装keepalived
2、选择107作为master,两外两台作为backup
在107配置keepalived:
1 cd /etc/keepalived/
2 vim keepalived.conf
keepalived.conf内容:
 1 ! Configuration File for keepalived
 2
 3 vrrp_instance VI_1 {
 4     state MASTER
 5     interface enp0s31f6
 6     virtual_router_id 51
 7     priority 100
 8     advert_int 1
 9     authentication {
10         auth_type PASS
11         auth_pass 1111
12     }
13     virtual_ipaddress {
14         10.0.3.63
15     }
16 }
17
18 virtual_server 10.0.3.63 7010 {
19     delay_loop 6
20     lb_algo rr
21     lb_kind NAT
22     persistence_timeout 50
23     protocol TCP
24
25     real_server 10.0.3.107 7010 {
26         weight 1
27     }
28
29     real_server 10.0.3.68 7010 {
30         weight 1
31     }
32
33     real_server 10.0.3.80 7010 {
34         weight 1
35     }
36
37 }
38
39 virtual_server 10.0.3.63 3106 {
40     delay_loop 6
41     lb_algo rr
42     lb_kind NAT
43     persistence_timeout 50
44     protocol TCP
45
46     real_server 10.0.3.107 3106 {
47         weight 1
48     }
49
50     real_server 10.0.3.68 3106 {
51         weight 1
52     }
53
54     real_server 10.0.3.80 3106 {
55         weight 1
56     }
57
58 }
启动keepalived
systemctl start keepalived
同样,在68和80上配置keepalived:
 1 ! Configuration File for keepalived
 2
 3 vrrp_instance VI_1 {
 4     state BACKUP
 5     interface enp3s0
 6     virtual_router_id 51
 7     priority 100
 8     advert_int 1
 9     authentication {
10         auth_type PASS
11         auth_pass 1111
12     }
13     virtual_ipaddress {
14         10.0.3.63
15     }
16 }
17
18
19 virtual_server 10.0.3.63 7010 {
20     delay_loop 6
21     lb_algo rr
22     lb_kind NAT
23     persistence_timeout 50
24     protocol TCP
25
26     real_server 10.0.3.107 7010 {
27         weight 1
28     }
29
30     real_server 10.0.3.68 7010 {
31         weight 1
32     }
33
34     real_server 10.0.3.80 7010 {
35         weight 1
36     }
37
38 }
39
40 virtual_server 10.0.3.63 3106 {
41     delay_loop 6
42     lb_algo rr
43     lb_kind NAT
44     persistence_timeout 50
45     protocol TCP
46
47     real_server 10.0.3.107 3106 {
48         weight 1
49     }
50
51     real_server 10.0.3.68 3106 {
52         weight 1
53     }
54
55     real_server 10.0.3.80 3106 {
56         weight 1
57     }
58
59 }
同样启动keepalived。
五、测试
现在可以用vip来访问统计页面(http://10.0.3.63:7010/haproxy)和连接数据库集群(10.0.3.63:3106)了。
模拟keepalived挂掉:
ip a

可以看到现在63正挂在107下面,现在在107上停掉keepalived
systemctl stop keepalived
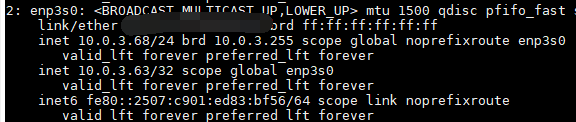
可以看到63已经漂移到了68下面了。
当然还可以配置服务器检查策略。

 浙公网安备 33010602011771号