Spring Security
Spring Security教程
字母哥的博客:
1.介绍
Spring Security is a powerful and highly customizable authentication and access-control framework.
Spring Security是一个
功能强大并且高度可定制的认证和授权框架.
1.1 特点
- Authentication:认证,用户登录的验证(解决你是谁的问题)
- Authorization:授权,用户对于服务器资源访问的权限(解决你能干什么的问题)
- 安全防护,防止攻击:例如session攻击,点击劫持,跨站点请求伪造等
1.2 与Shiro对比
Shiro也是一个支持认证和授权的框架
1.使用方便度(Shiro)
- shiro入门更加容易,使用起来也非常简单,这也是造成shiro的使用量一直高于Spring Security的主要原因
- 在没有Spring Boot之前,Spring Security的大部分配置要通过XML实现,配置还是还是非常复杂的。但是有了 Spring Boot之后,这一情况已经得到显著改善
2.功能丰富性(Security)
- Spring Security默认含有对OAuth2.0的支持,与Spring Social一起使用完成社交媒体登录也比较方便。shiro在这方面只能靠自己写代码实现。
3.总结
对于简单的Web应用,使用Shiro更加的轻量;对于分布式、微服务或者SpringCloud系列深度集成的项目使用Spring Security,因为它是Spring的亲儿子
1.3 SpringBoot 整合
<dependency>
            <groupId>org.springframework.boot</groupId>
            <artifactId>spring-boot-starter-security</artifactId>
</dependency>
2.HttpBasic模式
HttpBasic登录验证模式是Spring Security实现登录验证最简单的一种方式,不能进行定制登录页面,而是弹出一个Security提供的登录框进行认证,它是一种"防君子不防小人"的验证模式,可以通过劫持请求获取请求头Authorization解码破解获取用户名和密码,适合数据不是很敏感的场景
2.1 HttpBasic认证
如果使用的Spring Boot版本为1.X版本,依赖的Security 4.X版本,那么就无需任何配置,启动项目访问则会弹出默认的httpbasic认证.
spring boot2.0版本(依赖Security 5.X版本),HttpBasic不再是默认的验证模式,在spring security 5.x默认的验证模式已经是表单模式。所以我们要使用Basic模式,需要自己调整一下。并且security.basic.enabled已经过时了,所以我们需要自己去编码实现。
@Configuration
public class SecurityConfig extends WebSecurityConfigurerAdapter {
    @Override
    protected void configure(HttpSecurity http) throws Exception {
        http.httpBasic() //开启httpBasic模式认证
                .and()
                .authorizeRequests()
                .anyRequest()
                .authenticated(); //所有请求都需要认证才能访问
    }
}
启动程序,控制台会有一串base64,用于验证的密码
Using generated security password: 5bbe11f1-f011-4317-9910-5736086dcbaa
浏览器访问localhost:8080,会弹出授权框填写用户名密码授权就会进入主页,用户名默认为user,密码就上控制台的密码

也可以自定义用户名密码,在application.yml中
spring:
	security:
		user:
			name: admin
			password: 123456
2.2 HttpBasic原理
- 浏览器访问服务器资源,服务器需要浏览器发送用户名和密码验证
- 浏览器将用户名和密码通过base64编码放在请求头Authorization中发送给服务器,格式为Basic+空格+base64
- 服务器收到请求后会提取请求头Authorization的值并对base64解码,然后进行对比用户名和密码,一致则通过
知道了它的原理以后,就知道为什么不安全了,如果对http的Header进行劫持的话,然后获取到Authorization的信息进行Base64解码就可以得到用户名和密码
3.formLogin模式
fromLogin模式相比于httpBasic模式更常用,它支持定制化登录页面,而且提供多种登录模式;只能通过
POST方法去提交
3.1 formLogin认证
formLogin模式认证总结需要四个要素:
- 登录认证逻辑(登录页、登录请求的url、登录成功后请求的url)
- 资源权限访问控制(对页面以及url进行权限控制),对于权限的控制有
角色和权限ID两种方式 - 用户信息及角色和权限ID的分配设置
- 对静态资源进行忽略,开放静态资源不需要认证
3.2 登录认证及资源权限控制
首先,创建一个类继承WebSecurityAdapter,然后重写config(HttpSecurity http)方法,然后进行配置登陆认证逻辑和资源访问权限的控制
//登陆认证和权限控制
@Override
protected void configure(HttpSecurity http) throws Exception {

        http.csrf().disable()//关闭跨站csrf攻击防御,不然访问不了
             .formLogin() //开启formLogin模式认证
                //登录认证逻辑(静态)
                .loginPage("/login.html")   //登录页面
                .loginProcessingUrl("/login") //登录请求哪个url,与前端的form action保持一致
                .defaultSuccessUrl("/index")  //登录成功后请求哪个url
                .usernameParameter("uname") //默认是username,与前端中的name保持一致
                .passwordParameter("pword") //默认是password,与前端中的name保持一致
             .and()
                //资源权限访问控制(动态)
                .authorizeRequests()
                .antMatchers("/login.html", "/login").permitAll() //不需要认证就可以访问的页面和url
                .antMatchers("/biz1", "/biz2").hasAnyAuthority("ROLE_user", "ROLE_admin") //需要user或者admin权限才能访问
                .antMatchers("/sysuser", "/syslog").hasAnyRole("admin")  //需要admin权限才能访问
//                .antMatchers("/syslog").hasAuthority("sys:log")
//                .antMatchers("/sysuser").hasAuthority("sys:user")
                 //除了上面设置过的请求 ,其余任何请求都需要授权认证
                .anyRequest().authenticated();

}
对于上面代码的解析,主要分为两部分:
- 第一部分是
formLogin()配置,用于配置登陆认证逻辑相关的信息,如:登陆页面、登录请求的url等 - 第二部分是
authorizeRequests()配置,用于配置资源访问权限的控制信息,如:登录相关的资源permitAll全部开放无需认证,对于"biz1"、"biz2"需要user或者admin权限才可以访问,对于"/sysuser"、"/syslog"需要admin权限才可以访问,对于其它请求必须通过登录认证才可以访问 antMatchers()代表匹配的资源permitAll()代表无需认证就可以访问hasAnyAuthority()与hasAnyRole()作用一致,代表需要某个角色才可以访问,不同的是hasAnyAuthority()的格式为 "ROLE_角色名",需要 "ROLE"前缀,而hasAnyRole()只需要写角色名hashAuthority()配置的是权限ID,代表需要具备某个权限才可以访问anyRequest().authenticated();代表其余请求都需要授权认证才可访问,没有权限也可以
3.3 用户信息及角色权限分配设置
当配置好了登录认证逻辑和资源访问控制规则,还需要配置具体的用户和用户的角色,这样才能针对用户进行控制,重写WebSecurityConfigurerAdapter的config(AuthenticationManagerBuilder auth)方法
//用户和角色配置
@Override
protected void configure(AuthenticationManagerBuilder auth) throws Exception {
        auth.inMemoryAuthentication() //在内存中存储用户的身份认证和授权信息
                .withUser("user") //用户名
                .password(passwordEncoder().encode("123456")) //密码
                .roles("user") //分配user角色
//              .authorities("sys:user")
               .and()
                .withUser("admin") //用户名
                .password(passwordEncoder().encode("123456")) //密码
                .roles("admin") //分配admin角色
//              .authorities("sys:log")
               .and()
                .passwordEncoder(passwordEncoder());//配置BCrypt加密
}

//密码加密处理
@Bean
public PasswordEncoder passwordEncoder() {
    return new BCryptPasswordEncoder();
}
对于上面代码的解析:
inMemoryAuthentication():在内存中存储用户的身份认证和授权信息withUser("user")用户名是userpassword(passwordEncoder().encode("123456"))密码是加密后的123456roles("user")角色是user,可以访问上面规则中只有具有user角色才可以访问的资源,可以配置多个角色,以 "," 分割authorities("sys:user")权限ID是sys:user,可以访问上面规则中只有具有sys:user才可以访问的资源,可以配置多个权限ID,以 "," 分割passwordEncoder(passwordEncoder())配置密码用BCrypt加密
3.4 忽略静态资源
在开发中,不仅要对login相关的资源进行无条件的访问,还需要对静态资源,比如css、js、img、swagger等资源进行开放,不需要只有通过授权才可以访问,不然我们的资源就加载不出来,重写configure(WebSecurity web)方法
//忽略静态资源,将静态资源开放,不需要认证
@Override
public void configure(WebSecurity web) throws Exception {
    web.ignoring()
            .antMatchers("/css/**","/js/**","/image/**","/fonts/**");
}
这段代码很好理解,只需要对静态资源进行配置就可以忽略了
4.Spring Security认证原理
Spring Security基本都是通过
过滤器来完成身份认证、权限控制,核心就是过滤器链

对上图进行解析:
- 整个过滤器链始终有一个
上下文对象SecurityContext和Authentication对象(登录认证的主体) - 首先是
请求阶段,认证主体需要通过了过滤器认证,在最后的FilterSecurityInterceptor过滤器会判断认证状态,通过了就访问API,没有则抛出异常 - 之后会进入
响应阶段,FilterSecurityInterceptor抛出的异常被ExceptionTranslationFilter进行相应的处理。比如认证失败跳转到登陆页重新登陆 - 如果登陆成功,则会在SecurityContextPersistenceFilter中将SecurityContext对象
存入Session。下次请求的时候直接从session中获取认证信息,避免多次重复认证
SpringSecurity提供了多种登陆 认证方式,由过滤器实现,比如:
- BasicAuthenticationFilter实现的是HttpBasic模式的登录认证
- UsernamePasswordAuthenticationFilter实现用户名密码的登录认证
- RememberMeAuthenticationFilter实现登录认证的“记住我”的功能
- SmsCodeAuthenticationFilter实现短信验证码登录认证
- SocialAuthenticationFilter实现社交媒体方式登录认证的处理,如:QQ、微信
- Oauth2AuthenticationProcessingFilter和Oauth2ClientAuthenticationProcessingFilter实现Oauth2的鉴权方式
根据我们不同的需求实现及配置,不同的Filter会被加载到应用中。
4.1 过滤器认证细节

4.2 构建登陆认证的主体
当用户登陆时,首先会被某一种认证过滤器拦截,以UsernamePasswordAuthenticationFilter举例,会使用用户名和密码创建一个登陆认证凭证UsernamePasswordAuthenticationToken,然后获Authentication对象,代表身份验证的主体。
//准备认证 获取Authentication主体
public Authentication attemptAuthentication(HttpServletRequest request,
			HttpServletResponse response) throws AuthenticationException {

    //需要以POST方法提交
		if (postOnly && !request.getMethod().equals("POST")) {
			throw new AuthenticationServiceException(
					"Authentication method not supported: " + request.getMethod());
		}

  	//用户名和密码
		String username = obtainUsername(request);
		String password = obtainPassword(request);

		if (username == null) {
			username = "";
		}

		if (password == null) {
			password = "";
		}

		username = username.trim();

  	//构建Token凭证
		UsernamePasswordAuthenticationToken authRequest = new UsernamePasswordAuthenticationToken(
				username, password);

		//设置用户的信息
		setDetails(request, authRequest);

  	//返回Authentication
		return this.getAuthenticationManager().authenticate(authRequest);
	}
4.3 对认证主体进行认证
构建好了认证主体以后,会使用`接口进行认证
public interface AuthenticationManager {

   //尝试验证传递的{@link Authentication}对象,并返回 *完全填充的<code> Authentication </ code>对象(包括授予的权限)
   Authentication authenticate(Authentication authentication)
         throws AuthenticationException;

}
ProviderManger是它的实现核心类,它通过一个集合管理了多个AuthenticationProvider
public class ProviderManager implements AuthenticationManager, MessageSourceAware,
		InitializingBean {

	private List<AuthenticationProvider> providers = Collections.emptyList();

}
每一种登陆认证方式也就是Provider都可以对主体进行认证,只要有一个认证通过,那就说明该主体被认证,比如:
- RememberMeAuthenticationProvider定义了“记住我”功能的登录验证逻辑
- DaoAuthenticationProvider加载数据库用户信息,进行用户密码的登录验证
- …..
4.3.1 DaoAuthenticationProvider
这个认证器是肯定会用到的,因为我们总不能去手动设置所以用户的信息.
public class DaoAuthenticationProvider extends ... {


		protected final UserDetails retrieveUser(String username,
			UsernamePasswordAuthenticationToken authentication)
			throws AuthenticationException {
		prepareTimingAttackProtection();
		try {

      //返回用户信息
			UserDetails loadedUser = this.getUserDetailsService().loadUserByUsername(username);
			if (loadedUser == null) {
				throw new InternalAuthenticationServiceException(
						"UserDetailsService returned null, which is an interface contract violation");
			}
			return loadedUser;
		}
		catch (UsernameNotFoundException ex) {
			mitigateAgainstTimingAttack(authentication);
			throw ex;
		}
		catch (InternalAuthenticationServiceException ex) {
			throw ex;
		}
		catch (Exception ex) {
			throw new InternalAuthenticationServiceException(ex.getMessage(), ex);
		}
	}

}
所以如果我们在项目中要加载用户信息,需要去实现UserDetailsService接口重写loadUserByUsername方法,并传入用户名,并返回UserDetails用户信息
4.4 认证结果的处理
当认证完后,会走到最后的FilterSecurityInteceptor过滤器,进行判断认证状态
- 如果认证失败,就抛出异常,由
AuthenticationfailureHandler处理,默认跳转到登陆页 - 如果认证成功 ,就将
Authentication对象放入SecurityContext中存入session,下次请求直接从session中获取认证信息,避免多次重复认证。由AuthenticationSuccessHandler进行登录结果处理,默认跳转到defaultSuccessUrl对应的页面,
5.自定义登陆认证结果处理
上述说了SpringSecurity对认证结果默认的处理是跳转到对应的页面,但是当前后端分离的时候我们
需要给前端返回json,而不是html,那应该怎么处理呢?我们也可以自定义成功处理和失败处理,分别去实现AuthenticationSuccessHandler和AuthenticationfailureHandler接口即可
5.1 自定义登陆成功处理
通常我们不会直接实现AuthenticationSuccessHandler,而是继承SavedRequestAwareAuthenticationSuccessHandler,重写onAuthenticationSuccess方法,因为这个类它做了一个功能,就是会记住上一次请求的资源路径,比如访问A.html页面没有权限会跳转到登陆页面,当你认证成功后它又会直接跳到A.html页面
@Component
public class MyAuthenticationSuccessHandler extends SavedRequestAwareAuthenticationSuccessHandler {

  	//这个是用配置来控制的 为json就用json处理
    @Value("${spring.security.loginType}")
    private String loginType;

    @Override
    public void onAuthenticationSuccess(HttpServletRequest request, HttpServletResponse response, Authentication authentication) throws ServletException, IOException {

        if (loginType.equalsIgnoreCase("JSON")) {
            //返回json处理
            response.setCharacterEncoding("UTF-8");
            response.setContentType("application/json;charset=utf-8");
            response.getWriter().write(new ObjectMapper().writeValueAsString(AjaxResponse.success()));
        } else {
            //调用父类的方法,跳转页面处理
            super.onAuthenticationSuccess(request, response, authentication);
        }
    }

}
对上面代码的解析:
- 上面的代码通过读取配置文件的值进行判断,这样既适应于json处理,也适用于html页面处理
- ObjectMapper是JACKSON的类,用于将Object转为json字符串
- AjaxResponse是通用返回类,定义code、message等返回给前端的信息
5.2 自定义登陆失败处理
这里我们同样没有直接实现AuthenticationFailureHandler接口,而是继承SimpleUrlAuthenticationFailureHandler 类,重写onAuthenticationFailure方法,因为该类中默认实现了登录验证失败的跳转逻辑,即登陆失败之后回到登录页面,我们可以利用这一点简化我们的代码。
@Component
public class MyAuthenticationFailHandler extends SimpleUrlAuthenticationFailureHandler {

    @Value("${spring.security.loginType}")
    private String loginType;

    @Override
    public void onAuthenticationFailure(HttpServletRequest request, HttpServletResponse response, AuthenticationException exception) throws IOException, ServletException {
        if (loginType.equalsIgnoreCase("JSON")) {
            //返回json处理
            response.setCharacterEncoding("UTF-8");
            response.setContentType("application/json;charset=utf-8");
            response.getWriter().write(
                    new ObjectMapper().writeValueAsString(
                            AjaxResponse.error(
                                    new CustomException(CustomExceptionType.USER_INPUT_ERROR, "用户名或者密码错误,请重新输入")
                            )
                    )
            );
        } else {
            //跳转登录页面
            super.onAuthenticationFailure(request, response, exception);
        }
    }
}


@ControllerAdvice
public class WebExceptionHandler {

    @ExceptionHandler(CustomException.class)
    @ResponseBody
    public AjaxResponse customerException(CustomException e) {
        return AjaxResponse.error(e);
    }

}
对上面代码的解析:
- 上面的代码通过读取配置文件的值进行判断,这样既适应于json处理,也适用于html页面处理
- 如果是json就返回json格式的错误信息,如果不是就默认跳转登陆页面
- CustomException是自定义异常,WebExceptionHandler类会对异常进行处理
5.3 配置SecurityConfig
在自定义完了成功和失败Handler以后,还需要注入到Spring Security配置类中才能生效
@Configuration
public class SecurityConfig extends WebSecurityConfigurerAdapter {


    @Autowired
    MyAuthenticationSuccessHandler successHandler;

    @Autowired
    MyAuthenticationFailHandler failHandler;

    //登陆认证和权限控制
    @Override
    protected void configure(HttpSecurity http) throws Exception {

        http.csrf().disable()//关闭跨站csrf攻击防御,不然访问不了
                .formLogin()
                .loginPage("/login.html")
                .loginProcessingUrl("/login")
                //.defaultSuccessUrl("/index")  //登录成功后请求哪个url
          			//.failureUrl("/login.html")		//登录失败后跳转哪个url
                .successHandler(successHandler) //自定义认证成功处理
                .failureHandler(failHandler)    //自定义认证失败处理
    }
}
注意:不要配置defaultSuccessUrl和failureUrl,否则自定义handler会失效!
6.Session会话管理
6.1 SpringSecurity创建和使用Session的策略
always:如果当前请求没有session存在,Spring Security创建一个sessionifRequired:在需要Session时才创建Sessionnever:永远不会主动创建Session,但是如果Session存在,就使用该Session,比如Spring也会创建Sessionstateless:永远不会创建和使用Session,适合无状态应用情况,比如使用jwt,节省资源
在SpringSecurity配置类中配置session管理的策略,在configure(HttpSecurity http) 方法中配置
@Override
protected void configure(HttpSecurity http) throws Exception {
    http.sessionManagement()
        .sessionCreationPolicy(
                SessionCreationPolicy.IF_REQUIRED
        )
}
注意:该配置只能控制Spring Security如何创建与使用session,而不是控制整个应用程序。
6.2 Session会话超时管理
当session会话超时后,需要用户重新登录才能访问应用
设置超时时间,注意的是:在SpringBoot中Session超时时间最短为1分钟,如果小于1分钟,也按1分钟算
server:
  servlet:
    session:
      timeout: 10s
当超时后再访问资源跳转到哪个页面,通过invalidSessionUrl设置
http.sessionManagement()
          .invalidSessionUrl("/login.html");    //session超时跳转页面
6.3 Session会话固化保护
该功能是一定程度上防止非法用户窃取用户session及cookies信息,进而模拟session的行为
三种方式:
-
migrateSession:默认设置,每次登录验证将创建一个新的HTTP会话,旧的HTTP会话将无效,并且旧会话的属性将被复制;即使Session被窃取,当下次登录时也就无效了 -
none:原始会话不会失效 -
newSession:将创建一个干净的会话,而不会复制旧会话中的任何属性
在SpringSecurity配置类中配置:
http.sessionManagement().sessionFixation().migrateSession()
6.4 Cookie的安全
提高Cookies的安全性,实际上就是提高session的安全性。在Spring Boot中可以通过配置方式来实现:
server:
 	servlet:
 		session:
 			cookie:
 				http-only: true
				secure: true
对上面配置解析:
http-only: true:设置为true,浏览器脚本就无法访问cookiesecure: true:设置为true,只能通过https访问cookie,http请求无法访问
6.5 限制最大用户数量
这个功能也很常见,比如qq、微信,当账号在其他设备登录就会提示你并且强制下线,同时这也可以保护保护session不被复制、盗窃。使用Spring Security的配置我们可以轻松的实现这个功能。
 @Autowired
 CustomExpiredSessionStrategy expiredSessionStrategy;

@Override
protected void configure(HttpSecurity http) throws Exception {

  	http.sessionManagement()
              .maximumSessions(1)
              .maxSessionsPreventsLogin(false)
              .expiredSessionStrategy(expiredSessionStrategy);
}
对上面代码解析:
maximumSessions(1):表示同一个账户同时只有一台设备可以登录maxSessionsPreventsLogin:限制策略,为true表示其他用户直接无法登录,为false表示其他用户可以登录并且当前用户会下线expiredSessionStrategy:表示当前用户被挤下线后的处理策略,maxSessionsPreventLogin为false才生效
通过实现SessionInformationExpiredStrategy来自定义被挤下线的处理策略.
@Component
public class CustomExpiredSessionStrategy implements SessionInformationExpiredStrategy {
    @Override
    public void onExpiredSessionDetected(SessionInformationExpiredEvent event) throws IOException, ServletException {
        Map<String, Object> map = new HashMap<>();
        map.put("code", "400");
        map.put("msg", "您的登录已经超时或者已经在另一台机器登录,您被迫下线." + event.getSessionInformation().getLastRequest());
        event.getResponse().setCharacterEncoding("UTF-8");
        event.getResponse().setContentType("application/json;charset=utf-8");
        event.getResponse().getWriter().write(new ObjectMapper().writeValueAsString(map));
    }
}
event.getSessionInformation().getLastRequest():上次登录的时间- 返回json格式信息给前端
当其他用户登录后,当前用户再访问资源,就会提示该信息:

7.动态加载用户以及权限
7.1 创建MyUserDetails用户信息类
UserDetails就是用户信息,即:用户名、密码、该用户具有的权限等信息,字段名要与数据库的字段一致
@Data
public class MyUserDetails implements UserDetails {
    Integer id;       //id
    String password;  //密码
    String username;  //用户名
    boolean enabled;  //账号是否可用
    Collection<? extends GrantedAuthority> authorities;  //用户的权限集合
}
7.2 创建MyUserDetailsService加载用户
UserDetailsService接口有一个方法叫做loadUserByUsername,我们实现动态加载用户、角色、权限信息就是通过实现该方法。函数见名知义:通过用户名加载用户。该方法的返回值就是UserDetails。
@Component
public class MyUserDetailsService implements UserDetailsService {
    @Autowired
    MyUserDetailsMapper detailsMapper;

    @Override
    public UserDetails loadUserByUsername(String username) throws UsernameNotFoundException {
        //根据用户名获取用户信息
        MyUserDetails userDetails = detailsMapper.findByUserName(username);
        if (userDetails == null) {
            System.out.println("用户不存在");
            return null;
        }
        //获取角色列表
        List<String> roles = detailsMapper.findRolesByUserName(username);

        //为角色标识添加ROLE前缀
        roles = roles.stream()
                .map(s -> "ROLE_" + s)
                .collect(Collectors.toList());

        //获取权限列表
        List<String> authorities = detailsMapper.findUrlsByUserId(userDetails.getId());

        //因为角色也属于特殊的权限,所以将角色添加到权限列表中
        authorities.addAll(roles);

        //设置权限
        userDetails.setAuthorities(
                AuthorityUtils.commaSeparatedStringToAuthorityList(String.join(",", authorities))
        );
        return userDetails;
    }
}
7.3 注册MyUserDetailsService
@AutoWired
private MyUserDetailsService userDetailsService;

@Override
protected void configure(AuthenticationManagerBuilder builder) throws Exception {
    builder.userDetailsService(userDetailsService)
            .passwordEncoder(passwordEncoder());//数据库中的密码必须是经过BCrypt加密过的
}
7.4 MyUserDetailsMapper
MyUserDetailsMapper主要负责通过用户名获取用户信息、角色信息、权限信息
@Mapper
public interface MyUserDetailsMapper {

    /**
     * 根据用户名查找用户信息.
     */
    @Select(value = "SELECT * FROM sys_user WHERE username = #{username}")
    MyUserDetails findByUserName(String username);


    /**
     * 根据用户名查找角色信息.
     */
    @Select("SELECT\n" +
            "role_code\n" +
            "FROM sys_role r\n" +
            "INNER JOIN sys_user_role ur ON r.id =  ur.role_id\n" +
            "INNER JOIN sys_user u ON u.id =  ur.user_id\n" +
            "WHERE u.username = #{username}")
    List<String> findRolesByUserName(String username);

    /**
     * 根据用户id查找权限信息
     */
    @Select("SELECT \n" +
            "DISTINCT m.url\n" +
            "FROM sys_menu m\n" +
            "INNER JOIN sys_role_menu rm on m.id = rm.menu_id\n" +
            "INNER JOIN sys_user_role ur on rm.role_id = ur.role_id\n" +
            "INNER JOIN sys_role r on r.id = ur.role_id\n" +
            "WHERE ur.user_id = #{userId}")
    List<String> findUrlsByUserId(Integer userId);

}
8. 动态加载资源鉴权规则
在之前的代码中,对于资源的权限和角色鉴权规则我们是通过手动配置的,我们也需要和用户信息一样从数据库中加载并鉴权,有两种方法:
- 全局配置
- 通过注解对方法配置
8.1 全局配置
创建一个专门负责鉴权的类
@Component
public class MyRBACService {

    /**
     * 判断某用户是否具有该request资源的访问权限
     */
    public boolean hasPermission(HttpServletRequest request, Authentication authentication) {
        Object principal = authentication.getPrincipal();

        if (principal instanceof UserDetails) {
            UserDetails userDetails = ((UserDetails) principal);
            List<GrantedAuthority> authorityList =
                  AuthorityUtils.commaSeparatedStringToAuthorityList(request.getRequestURI());

            return userDetails.getAuthorities().contains(authorityList.get(0));
        }
        return false;
    }
}
对上面代码解析:
commaSeparatedStringToAuthorityList:返回List集合 - 检查当前用户信息中的权限是否包含请求的权限,这里是因为将数据库中的url当作了权限
在Spring Security配置类中配置,使用表达式
 //登陆认证和权限控制
@Override
protected void configure(HttpSecurity http) throws Exception {

http.csrf().disable()//关闭跨站csrf攻击防御,不然访问不了
        .successHandler(successHandler)
        .failureHandler(failHandler)
        .and()
        //资源权限访问控制(动态)
        .authorizeRequests()
        .antMatchers("/login.html", "/login").permitAll()
  //安全表达式。必须是request
  .anyRequest().access("@myRBACService.hasPermission(request,authenticationn)")
}
8.2 在方法上配置
如果我们想实现方法级别的安全配置,Spring Security提供了四种注解,分别是@PreAuthorize , @PreFilter , @PostAuthorize 和 @PostFilter
8.2.1. 开启方法级别注解的配置
在Spring Security配置类上,加上@EnableGlobalMethodSecurity注解,开启方法级别安全配置功能。
@EnableGlobalMethodSecurity(prePostEnabled = true)
@Configuration
public class MySecurityConfig extends WebSecurityConfigurerAdapter {

}
8.2.2 使用PreAuthorize注解
@PreAuthorize 注解适合进入方法前的权限验证。如果当前登录用户没有PreAuthorize需要的权限,将抛出org.springframework.security.access.AccessDeniedException异常!
//只有拥有admin角色才可以访问
@PreAuthorize("hasRole('admin')")
public List<PersonDemo> findAll(){
    return null;
}


//只有拥有sys:log权限才可以访问
@PreAuthorize("hasAuthority('sys:log')")
public List<PersonDemo> findAll(){
    return null;
}
8.2.3 使用PostAuthorize注解
@PostAuthorize 在方法执行后再进行权限验证,适合根据返回值结果进行权限验证。Spring EL 提供返回对象能够在表达式语言中获取返回的对象returnObject。下文代码只有返回值的name等于authentication对象的name(当前登录用户名)才能正确返回,否则抛出异常。
@PostAuthorize("returnObject.name == authentication.name")
public PersonDemo findOne(){
    String authName =
            SecurityContextHolder.getContext().getAuthentication().getName();
    System.out.println(authName);
    return new PersonDemo("admin");
}
8.2.4 使用PreFilter注解
PreFilter 针对参数进行过滤,下文代码表示针对ids参数进行过滤,只有id为偶数的元素才被作为参数传入函数。
//当有多个对象是使用filterTarget进行标注
@PreFilter(filterTarget="ids", value="filterObject%2==0")
public void delete(List<Integer> ids, List<String> usernames) {

}
8.2.5 使用PostFilter 注解
PostFilter 针对返回结果进行过滤,特别适用于集合类返回值,过滤集合中不符合表达式的对象。
@PostFilter("filterObject.name == authentication.name")
public List<PersonDemo> findAllPD(){

    List<PersonDemo> list = new ArrayList<>();
    list.add(new PersonDemo("kobe"));
    list.add(new PersonDemo("admin"));

    return list;
}
9.记住我功能
当我们登录成功之后,一定的周期内当我们再次访问该网站,不需要重新登录。
9.1 前端
要实现该功能前端必须需要传递一个值,为remember-me,后面可以自定义
<label><input type="checkbox" name="remember-me"/>记住密码</label>
9.2 SpringSecurity设置
@Override
protected void configure(HttpSecurity http) throws Exception {
    http.rememberMe();   //实现记住我自动登录配置,核心的代码只有这一行
}
9.3 原理
- 当我们登陆的时候,除了用户名、密码,还可以勾选
remember-me - 如果我们勾选了remember-me,当我们登录成功之后服务端会
生成一个Cookie返回给浏览器,这个Cookie的名字默认是remember-me;值是一个token令牌。 - 当我们在token有效期内再次访问应用时,经过
RememberMeAuthenticationFilter,读取Cookie中的token进行验证。验正通过不需要再次登录就可以进行应用访问。
9.3.1 Token组成
token = username + expireTime + md5签名的Base64加密,当cookie被劫持,别人拿到了这个字符串在有效期内就可以访问你的应用
9.4 个性化设置
@Override
protected void configure(HttpSecurity http) throws Exception {
    http.rememberMe()
          .rememberMeParameter("remember-me-new")
          .rememberMeCookieName("remember-me-cookie")
          .tokenValiditySeconds(2 * 24 * 60 * 60);
}
对上面代码解析:
rememberMeParameter:设置前端表单传递过来的参数名称,默认必须为remember-me,需要和前端保持一致rememberMeCookieName:设置保存在浏览器端cookie的名称,默认也是remember-metokenValiditySeconds:设置token的有效期,即多长时间内可以免除重复登录,单位是秒。不修改配置情况下默认是2周
9.5 数据库存储token方式
上面我们讲的方式,就是最简单的实现“记住我-自动登录”功能的方式。这种方式的缺点在于:token与用户的对应关系是在内存中存储的,当我们重启应用之后所有的token都将消失,即:所有的用户必须重新登陆。为此,Spring Security还给我们提供了一种将token存储到数据库中的方式,重启应用也不受影响。
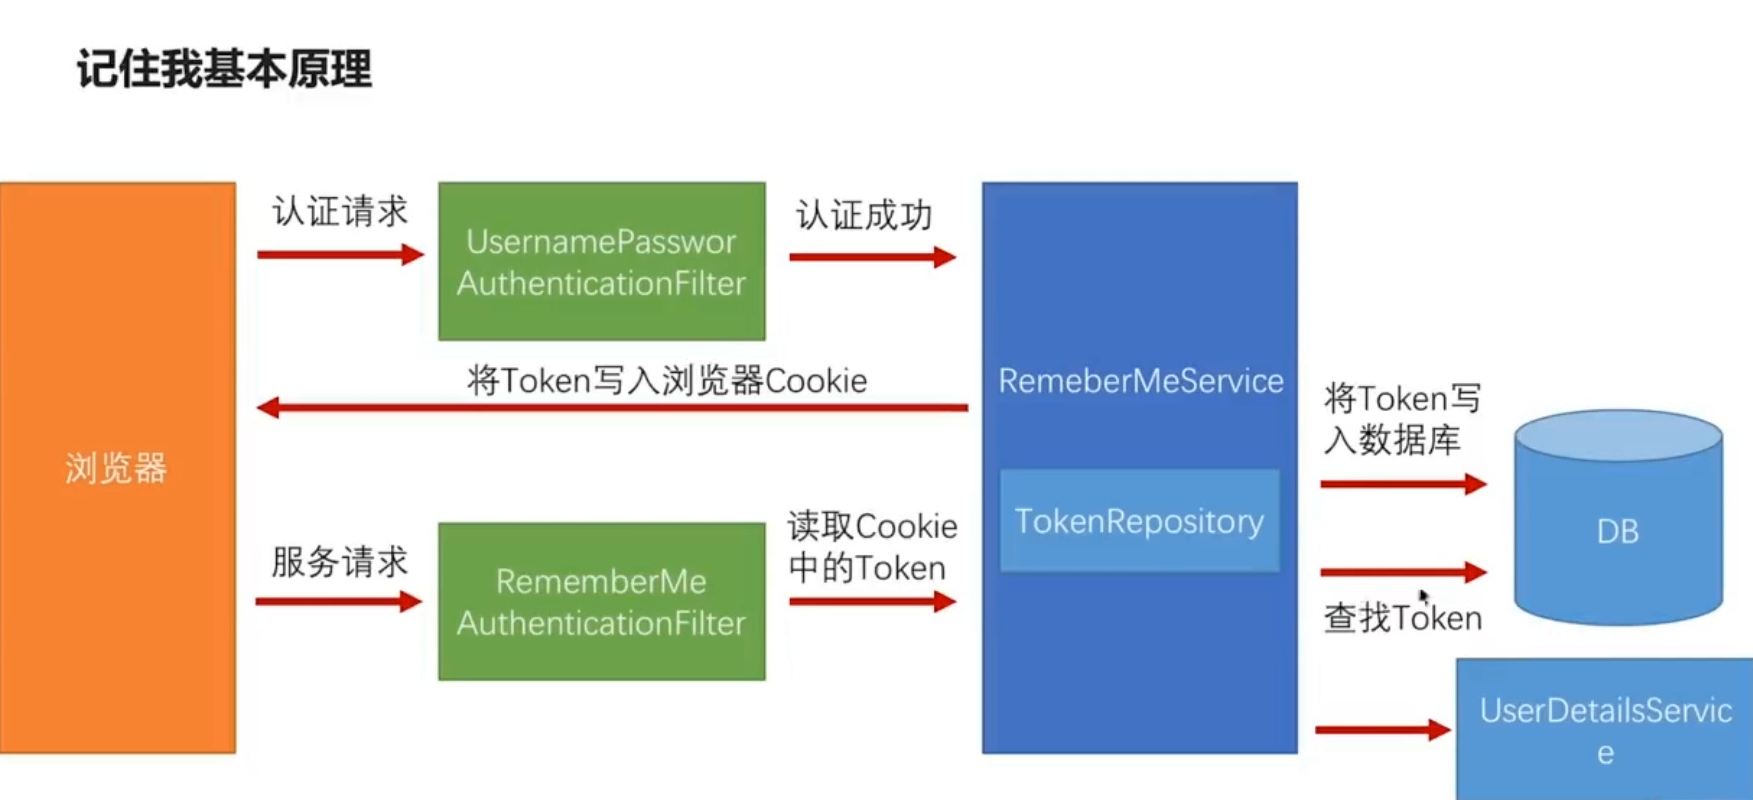
9.5.1 创建数据库表
表名必须是persistent_logins,这是SpringSecurity规定的
CREATE TABLE `persistent_logins` (
  `username` varchar(64) NOT NULL,
  `series` varchar(64) NOT NULL,
  `token` varchar(64) NOT NULL,
  `last_used` timestamp NOT NULL DEFAULT CURRENT_TIMESTAMP ON UPDATE CURRENT_TIMESTAMP,
  PRIMARY KEY (`series`)
) ENGINE=InnoDB DEFAULT CHARSET=utf8;
9.5.2 Security配置类
首先创建一个PersistentTokenRepository的Bean,将系统的DataSource注入,他就负责操作表
@Autowired
private DataSource dataSource;

 @Bean
 public PersistentTokenRepository persistentTokenRepository(){
     JdbcTokenRepositoryImpl tokenRepository = new JdbcTokenRepositoryImpl();
     tokenRepository.setDataSource(dataSource);
     return tokenRepository;
 }
然后在configure(HttpSecurity http)中配置该Bean
http.rememberMe()
    .tokenRepository(persistentTokenRepository())
然后就实现完成了,即使重启服务器token也不会消失~
10.退出登陆
SpringSecurity提供了退出功能,不需要自己去实现logout
10.1 核心代码
Spring Security进行logout非常简单,只需要在spring Security配置类配置项上加上这样一行代码:http.logout()
@Override
  protected void configure(final HttpSecurity http) throws Exception {
      http.logout();
 }
加上logout配置之后,在你的“退出”按钮上使用/logtou作为请求登出的路径。
<a href="/logout" >退出</a>
logout功能我们就完成了。实际上的核心代码只有两行。
10.2 默认的logout做了什么?
- 当前session会话失效
- 删除当前用户的 remember-me“记住我”功能信息
- clear清除当前的 SecurityContext
- 重定向到登录页面,loginPage配置项指定的页面
10.3 个性化设置
@Override
protected void configure(HttpSecurity http) throws Exception {
    http.logout()
           .logoutUrl("/signout")
           .logoutSuccessUrl("/aftersignout.html")
           .deleteCookies("JSESSIONID")
      		 .logoutSuccessHandler(logoutSuccessHandler)

}
对上面代码解析:
logoutUrl:配置退出请求的默认路径,默认为/logout,当然html退出按钮的请求url也要修改logoutSuccessUrl:指定退出之后的跳转页面deleteCookies:退出后删除指定的cookielogoutSuccessHandler:如果上面的个性化配置,仍然满足不了您的应用需求。可能您的应用需要在logout的时候,做一些特殊动作,比如登录时长计算,清理业务相关的数据,返回JSON信息等等
10.4 LogoutSuccessHandler
@Component
public class MyLogoutSuccessHandler implements LogoutSuccessHandler {
    @Override
    public void onLogoutSuccess(HttpServletRequest request, HttpServletResponse response, Authentication authentication) throws IOException, ServletException {
        //这里书写你自己的退出业务逻辑
        System.out.println("退出了...");
        // 重定向到登录页
        response.sendRedirect("/aftersignout.html");
    }
}
然后将MyLogoutSuccessHandler配置到Security配置类中
http.logout().logoutSuccessHandler(logoutSuccessHandler)
然后登陆功能就实现完成了!
11.图片验证码功能
基于Kaptcha实现验证码功能;生成文字谜底+图片谜面的样式
11.1 验证码配置
pom文件引入kaptcha依赖
<dependency>
   <groupId>com.github.penggle</groupId>
   <artifactId>kaptcha</artifactId>
   <version>2.3.2</version>
   <exclusions>
      <exclusion>
         <artifactId>javax.servlet-api</artifactId>
         <groupId>javax.servlet</groupId>
      </exclusion>
   </exclusions>
</dependency>
新建文件kaptcha.properties,用于配置验证码相关信息
kaptcha.border=no     //边框
kaptcha.border.color=105,179,90 //边框颜色
kaptcha.image.width=100   //宽度
kaptcha.image.height=45    //高度
kaptcha.session.key=kaptcha  //session key
kaptcha.textproducer.font.color=blue  //文字颜色
kaptcha.textproducer.font.size=35    //字体大小
kaptcha.textproducer.char.length=4
kaptcha.textproducer.font.names=宋体,楷体,微软雅黑
创建CaptchaConfig,加载kaptcha.properties文件完成配置
@Component
@PropertySource(value = {"classpath:kaptcha.properties"})
public class CaptchaConfig {

    @Value("${kaptcha.border}")
    private String border;
    @Value("${kaptcha.border.color}")
    private String borderColor;
    @Value("${kaptcha.textproducer.font.color}")
    private String fontColor;
    @Value("${kaptcha.image.width}")
    private String imageWidth;
    @Value("${kaptcha.image.height}")
    private String imageHeight;
    @Value("${kaptcha.session.key}")
    private String sessionKey;
    @Value("${kaptcha.textproducer.char.length}")
    private String charLength;
    @Value("${kaptcha.textproducer.font.names}")
    private String fontNames;
    @Value("${kaptcha.textproducer.font.size}")
    private String fontSize;

    @Bean(name = "captchaProducer")
    public DefaultKaptcha getKaptchaBean() {
        DefaultKaptcha defaultKaptcha = new DefaultKaptcha();
        Properties properties = new Properties();
        properties.setProperty("kaptcha.border", border);
        properties.setProperty("kaptcha.border.color", borderColor);
        properties.setProperty("kaptcha.textproducer.font.color", fontColor);
        properties.setProperty("kaptcha.image.width", imageWidth);
        properties.setProperty("kaptcha.image.height", imageHeight);
        properties.setProperty("kaptcha.session.key", sessionKey);
        properties.setProperty("kaptcha.textproducer.char.length", charLength);
        properties.setProperty("kaptcha.textproducer.font.names", fontNames);
        properties.setProperty("kaptcha.textproducer.font.size", fontSize);
        Config config = new Config(properties);
        defaultKaptcha.setConfig(config);
        return defaultKaptcha;
    }

}
11.2 验证码生成之session保存
首先,创建生成验证码的Controller。同时需要开放路径/kaptcha的访问权限,配置成不需登录也无需任何权限即可访问的路径。
@RestController
public class CaptchaController {

  	//绘制验证码图像
    @Resource
    DefaultKaptcha captchaProducer;

    /**
     * 获取验证码
     */
    @RequestMapping(value = "/kaptcha", method = RequestMethod.GET)
    public void kaptcha(HttpSession session, HttpServletResponse response) throws Exception {

        response.setDateHeader("Expires", 0);
        response.setHeader("Cache-Control", "no-store, no-cache, must-revalidate");
        response.addHeader("Cache-Control", "post-check=0, pre-check=0");
        response.setHeader("Pragma", "no-cache");
        response.setContentType("image/jpeg");

        String capText = captchaProducer.createText();
        CaptchaImageVO captchaImageVO = new CaptchaImageVO(capText,2 * 60);
        //将验证码存到session
        session.setAttribute(Constants.KAPTCHA_SESSION_KEY, captchaImageVO);

        //将图片返回给前端
        try(ServletOutputStream out = response.getOutputStream();) {
            BufferedImage bi = captchaProducer.createImage(capText);
            ImageIO.write(bi, "jpg", out);
            out.flush();
        }//使用try-with-resources不用手动关闭流
    }

}
对上面代码解析:
- 通过captchaProducer.createText()生成验证码文字,并和失效时间一起保存到CaptchaImageVO中
- 将CaptchaImageVO验证码信息类对象,保存到session中
- 通过captchaProducer.createImage(capText)生成验证码图片,并通过ServletOutputStream返回给前端
我们要把CaptchaImageVO保存到session里面。所以该类中不要加图片,只保存验证码文字和失效时间,用于后续验证即可。把验证码图片保存起来既没有用处,又浪费内存。
@Data
public class CaptchaImageVO {

    //验证码文字
    private String code;
    //验证码失效时间
    private LocalDateTime expireTime;

    public CaptchaImageVO(String code, int expireAfterSeconds){
        this.code = code;
        this.expireTime = LocalDateTime.now().plusSeconds(expireAfterSeconds);
    }

    //验证码是否失效
    public boolean isExpried() {
        return LocalDateTime.now().isAfter(expireTime);
    }

    public String getCode() {
        return code;
    }
}
11.3 验证码用户访问
<img src="/kaptcha" id="kaptcha" width="110px" height="40px"/>

<script>
    window.onload=function(){
        var kaptchaImg = document.getElementById("kaptcha");
        kaptchaImg.onclick = function(){
            kaptchaImg.src = "/kaptcha?" + Math.floor(Math.random() * 100)
        }
    }
</script>
- 实现的效果是,页面初始化即加载验证码。以后每一次点击,都会更新验证码。
- 注意:一定设置width和height,否则图片无法显示。
- 需要为“/kaptcha”配置permitAll公开访问权限,否则无法访问到
- Math.floor(Math.random() * 100)是防止浏览器有缓存,刷新时验证码不会更换
11.4 验证码之安全校验
编写我们的自定义图片验证码过滤器CaptchaCodeFilter,过滤器中拦截登录请求
@Component
public class CaptchaCodeFilter extends OncePerRequestFilter {

    @Autowired
    MyAuthenticationFailHandler failHandler;

    @Override
    protected void doFilterInternal(HttpServletRequest request,
                                    HttpServletResponse response,
                                    FilterChain filterChain)
            throws ServletException, IOException {
        // 必须是登录的post请求才能进行验证,其他的直接放行
        if (StringUtils.equals("/login", request.getRequestURI())
                && StringUtils.equalsIgnoreCase(request.getMethod(), "post")) {

            try {
                //1.验证谜底与用户输入是否匹配
                validate(new ServletWebRequest(request));
            } catch (AuthenticationException e) {
                //2.捕获步骤1中校验出现异常,交给失败处理类进行进行处理
                failHandler.onAuthenticationFailure(request, response, e);
                return;
            }

        }
        //通过校验,就放行
        filterChain.doFilter(request, response);

    }

    private void validate(ServletWebRequest request) throws ServletRequestBindingException {

        HttpSession session = request.getRequest().getSession();
        //获取用户登录界面输入的captchaCode
        String codeInRequest = ServletRequestUtils.getStringParameter(
                request.getRequest(), "captchaCode");

        if (StringUtils.isEmpty(codeInRequest)) {
            throw new SessionAuthenticationException("验证码不能为空");
        }

        // 获取session池中的验证码谜底
        CaptchaImageVO codeInSession = (CaptchaImageVO)
                session.getAttribute(Constants.KAPTCHA_SESSION_KEY);
        if (Objects.isNull(codeInSession)) {
            throw new SessionAuthenticationException("您输入的验证码不存在");
        }

        // 校验服务器session池中的验证码是否过期
        if (codeInSession.isExpried()) {
            session.removeAttribute(Constants.KAPTCHA_SESSION_KEY);
            throw new SessionAuthenticationException("验证码已经过期");
        }

        // 请求验证码校验
        if (!StringUtils.equals(codeInSession.getCode(), codeInRequest)) {
            throw new SessionAuthenticationException("验证码不匹配");
        }

    }
}
对上面代码解析:
- 首先,只拦截
/login请求,然后获取captchaCode前端传过来的验证码与Session中的验证码进行对比 - 如果比对不通过,抛出
SessionAuthenticationException异常,然后交给MyAuthenticationFailureHandler进行处理 - 如果比对通过,就放行
需要注意的是,验证码过滤器需要在UsernamePasswordAuthenticationFilter过滤器之前执行,否则会拦截不到/login请求,所以要在Security配置类中配置
@Autowired
CaptchaCodeFilter captchaCodeFilter;

@Override
protected void configure(HttpSecurity http) throws Exception {
  http.addFilterBefore(captchaCodeFilter, UsernamePasswordAuthenticationFilter.class)
}
12. JWT
12.1 认证流程
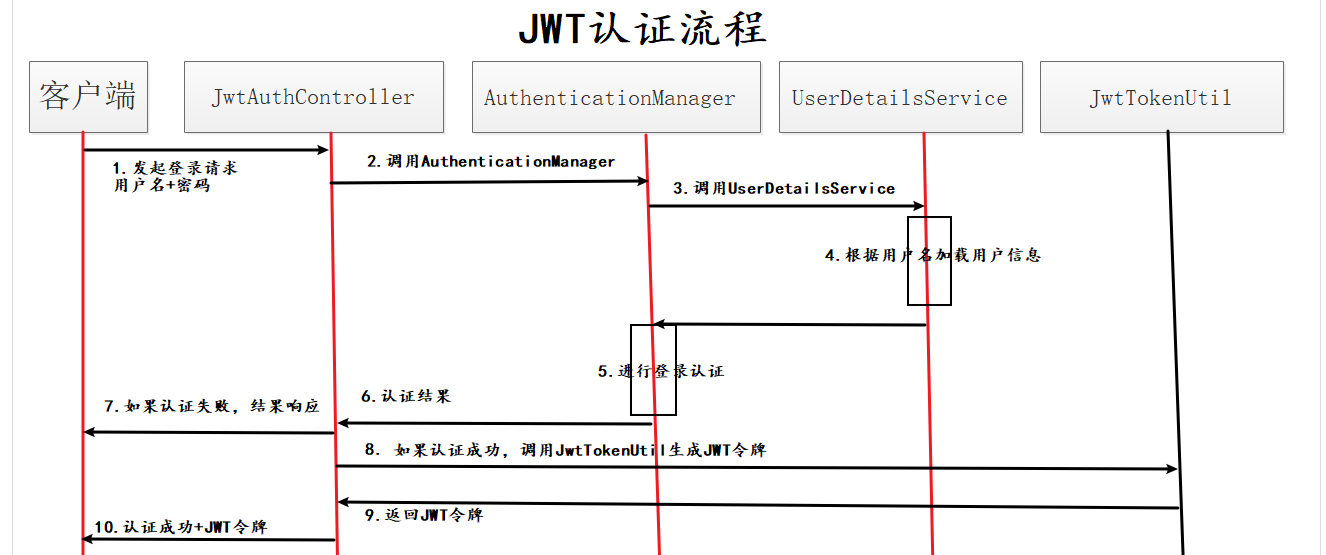
- 用户发起
/login登录请求,传递参数:用户名和密码 - 使用用户名和密码构建登录认证凭证,然后由SpringSecurity提供的
AuthenticationManager的authenticate方法帮我们完成认证,authenticate方法会去调用UserDetailService根据用户名和密码加载用户信息,然后进行密码对比认证,返回认证结果 - 如果认证失败,就提示用户名密码错误
- 如果认证成功,就要给该用户生成
JWT令牌,通常此时我们需要使用UserDetailsService的loadUserByUsername方法加载用户信息,然后根据信息生成JWT令牌,JWT令牌生成之后返回给客户端
12.2 授权流程
当客户端获取到JWT之后,他就可以使用JWT请求接口资源服务了。在到达Controller之前通过Filter过滤器进行JWT解签和权限校验。
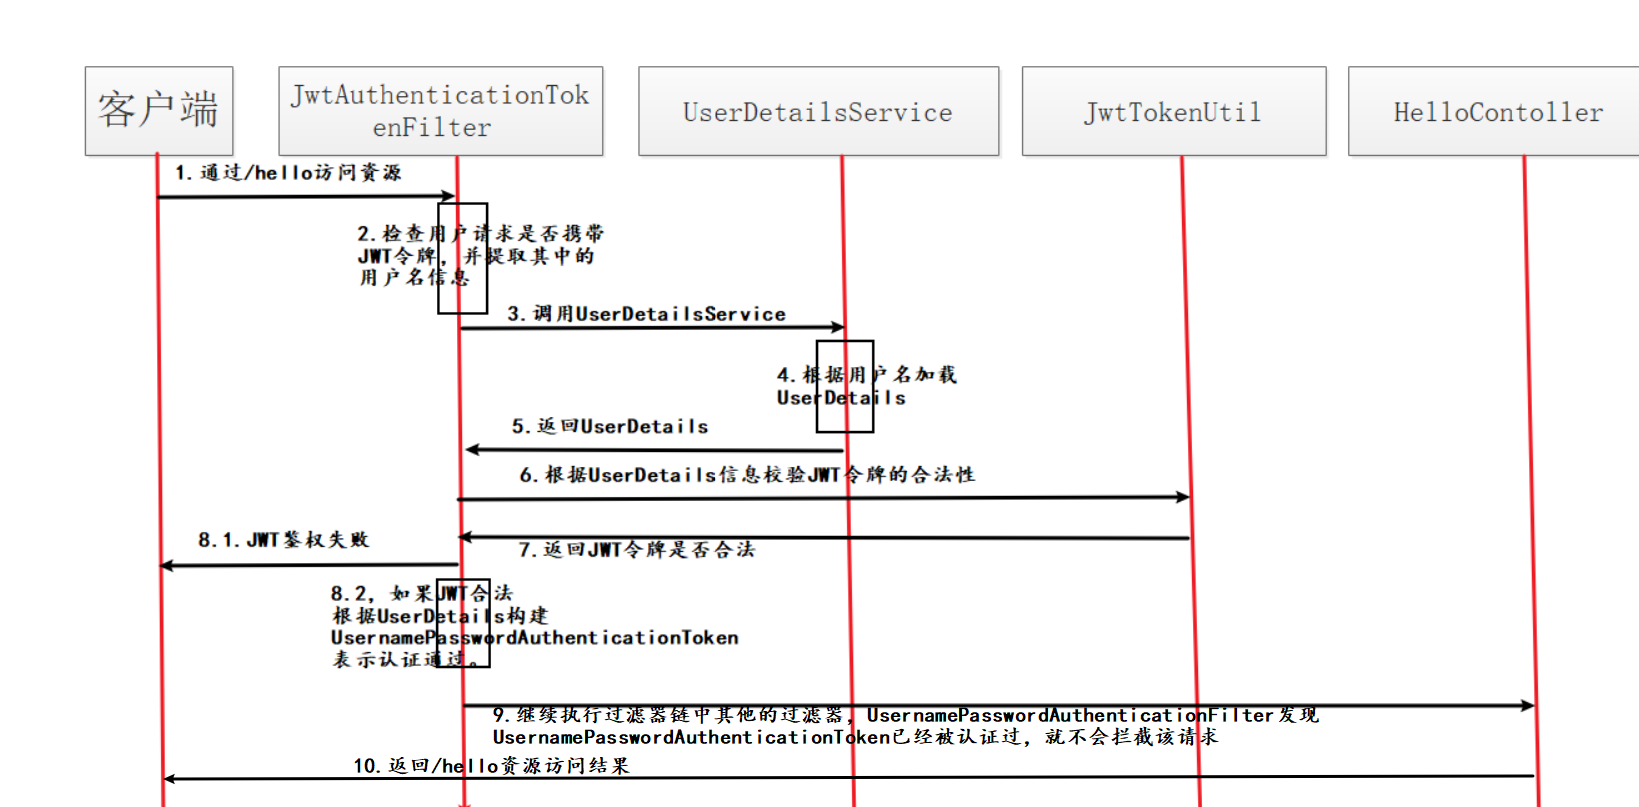
假如我们有一个接口资源“/hello”定义在HelloWorldcontroller中,鉴权流程是如何进行的?请结合上图进行理解:
- 当客户端请求“/hello”资源的时候,他应该在HTTP请求的Header带上JWT字符串。Header的名称前后端服务自己定义,但是要统一。
- 服务端需要自定义JwtRequestFilter,拦截HTTP请求,并判断请求Header中是否有JWT令牌。如果没有,就执行后续的过滤器。因为Spring Security是有完成的鉴权体系的,你没赋权该请求就是非法的,后续的过滤器链会将该请求拦截,最终返回无权限访问的结果。
- 如果在HTTP中解析到JWT令牌,就调用JwtTokenUtil对令牌的有效期及合法性进行判定。如果是伪造的或者过期的,同样返回无权限访问的结果。
- 如果JWT令牌在有效期内并且校验通过,我们仍然要通过UserDetailsService加载该用户的权限信息,并将这些信息交给Spring Security。只有这样,该请求才能顺利通过Spring Security一系列过滤器的关卡,顺利到达HelloWorldcontroller并访问“/hello”接口。

 浙公网安备 33010602011771号