【转载,并做少量修改整合】Java 双亲委派模型与应用:SPI(Service Provider Interface)
在说双亲委派模型之前首先得先了解一下类加载阶段。
类的加载阶段
类加载阶段分为加载、连接、初始化三个阶段,而加载阶段需要通过类的全限定名来获取定义了此类的二进制字节流。
Java特意把这一步抽出来用类加载器来实现。把这一步骤抽离出来使得应用程序可以按需自定义类加载器。并且得益于类加载器,OSGI、热部署等领域才得以在JAVA中得到应用。
在Java中任意一个类都是由这个类本身和加载这个类的类加载器来确定这个类在JVM中的唯一性。也就是你用你A类加载器加载的com.aa.ClassA和你A类加载器加载的com.aa.ClassA它们是不同的,也就是用instanceof这种对比都是不同的。所以即使都来自于同一个class文件但是由不同类加载器加载的那就是两个独立的类。
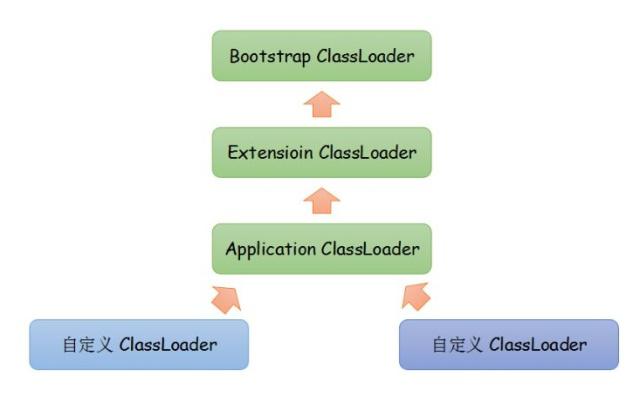
类加载器除了能用来加载类,还能用来作为类的层次划分。Java自身提供了3种类加载器
1、启动类加载器(Bootstrap ClassLoader),它是属于虚拟机自身的一部分,用C++实现的,主要负责加载
<JAVA_HOME>\lib目录中或被-Xbootclasspath指定的路径中的并且文件名是被虚拟机识别的文件。它等于是所有类加载器的爸爸。
2、扩展类加载器(Extension ClassLoader),它是Java实现的,独立于虚拟机,主要负责加载<JAVA_HOME>\lib\ext目录中或被java.ext.dirs系统变量所指定的路径的类库。
3、应用程序类加载器(Application ClassLoader),它是Java实现的,独立于虚拟机。主要负责加载用户类路径(classPath)上的类库,如果我们没有实现自定义的类加载器那这玩意就是我们程序中的默认加载器。
双亲委派模型
知道上面这几个概念就能来看看双亲委派模型了。

双亲委派的意思是如果一个类加载器需要加载类,那么首先它会把这个类请求委派给父类加载器去完成,每一层都是如此。一直递归到顶层,当父加载器无法完成这个请求时,子类才会尝试去加载。这里的双亲其实就指的是父类,没有mother。父类也不是我们平日所说的那种继承关系,只是调用逻辑是这样。

双亲委派模型不是一种强制性约束,也就是你不这么做也不会报错怎样的,它是一种JAVA设计者推荐使用类加载器的方式。
双亲委派有啥好处呢?它使得类有了层次的划分。就拿java.lang.Object来说,你加载它经过一层层委托最终是由Bootstrap ClassLoader来加载的,也就是最终都是由Bootstrap ClassLoader去找<JAVA_HOME>\lib中rt.jar里面的java.lang.Object加载到JVM中。
这样如果有不法分子自己造了个java.lang.Object,里面嵌了不好的代码,如果我们是按照双亲委派模型来实现的话,最终加载到JVM中的只会是我们rt.jar里面的东西,也就是这些核心的基础类代码得到了保护。因为这个机制使得系统中只会出现一个java.lang.Object。不会乱套了。你想想如果我们JVM里面有两个Object,那岂不是天下大乱了。
因此既然推荐使用这种模型当然是有道理了。
但是人生不如意事十之八九,有些情况不得不违反这个约束,例如SPI(Service Provider Interface),由于这种类型的接口支持框架扩展和可替换组件,Bootstrap ClassLoader就得委托子类来加载其他类提供的具体实现。因为它的手只能摸到<JAVA_HOME>\lib中,其他的它无能为力。
SPI的定义及其应用
服务提供者接口(SPI)是一个API,它是由第三方实现或扩展的。它可以用于支持框架扩展和可替换组件。
JDBC示例程序


 1 public static void JDBCExample(){
 2         try {
 3             //Class.forName("com.mysql.jdbc.Driver");
 4             Connection connection = DriverManager.getConnection("jdbc:mysql://127.0.0.1:3306/hhl?useServerPrepStmts=true&cachePrepStmts=true&prepStmtCacheSize=25&prepStmtCacheSqlLimit=2048&characterEncoding=utf8&useSSL=false",
 5                     "root", "123456");
 6             PreparedStatement preparedStatement = connection.prepareStatement("SELECT * FROM product p WHERE p.productName=?");
 7             preparedStatement.setString(1,"Mango");
 8             ResultSet resultSet = preparedStatement.executeQuery();
 9             while (resultSet.next()){
10                 System.out.println(resultSet.getString(1));
11             }
12             resultSet.close();
13             preparedStatement.close();
14             connection.close();
15         } catch (Exception e) {
16             e.printStackTrace();
17         }
18     }
自JDBC4.0以后就支持SPI了,不再需要用Class.forName()加载数据库驱动了,当然以前程序中用Class.forName()加载数据库驱动的仍然可以正常工作(用数据库连接池的还都是用Class.forName()加载数据库驱动的)。那么加载数据库驱动的操作在哪儿实现呢,java.sql.DriverManager.java
1 static {
2         loadInitialDrivers();
3         println("JDBC DriverManager initialized");
4 }
根据注释看出从jdbc.properties和利用ServiceLoader机制加载JDBC驱动。jdbc.properties的先不管,看下ServiceLoader机制
 1 private static void loadInitialDrivers() {
 2         String drivers;
 3         try {
 4             drivers = AccessController.doPrivileged(new PrivilegedAction<String>() {
 5                 public String run() {
 6                     return System.getProperty("jdbc.drivers");
 7                 }
 8             });
 9         } catch (Exception ex) {
10             drivers = null;
11         }
12         // If the driver is packaged as a Service Provider, load it.
13         // Get all the drivers through the classloader
14         // exposed as a java.sql.Driver.class service.
15         // ServiceLoader.load() replaces the sun.misc.Providers()
16
17         AccessController.doPrivileged(new PrivilegedAction<Void>() {
18             public Void run() {
19
20                 ServiceLoader<Driver> loadedDrivers = ServiceLoader.load(Driver.class);
21                 Iterator<Driver> driversIterator = loadedDrivers.iterator();
22
23                 /* Load these drivers, so that they can be instantiated.
24                  * It may be the case that the driver class may not be there
25                  * i.e. there may be a packaged driver with the service class
26                  * as implementation of java.sql.Driver but the actual class
27                  * may be missing. In that case a java.util.ServiceConfigurationError
28                  * will be thrown at runtime by the VM trying to locate
29                  * and load the service.
30                  *
31                  * Adding a try catch block to catch those runtime errors
32                  * if driver not available in classpath but it's
33                  * packaged as service and that service is there in classpath.
34                  */
35                 try{
36                     while(driversIterator.hasNext()) {
37                         driversIterator.next();
38                     }
39                 } catch(Throwable t) {
40                 // Do nothing
41                 }
42                 return null;
43             }
44         });
45
46         println("DriverManager.initialize: jdbc.drivers = " + drivers);
47
48         if (drivers == null || drivers.equals("")) {
49             return;
50         }
51         String[] driversList = drivers.split(":");
52         println("number of Drivers:" + driversList.length);
53         for (String aDriver : driversList) {
54             try {
55                 println("DriverManager.Initialize: loading " + aDriver);
56                 Class.forName(aDriver, true,
57                         ClassLoader.getSystemClassLoader());
58             } catch (Exception ex) {
59                 println("DriverManager.Initialize: load failed: " + ex);
60             }
61         }
62     }
ServiceLoader关键代码如下几行
1 ServiceLoader<Driver> loadedDrivers = ServiceLoader.load(Driver.class);
2 Iterator<Driver> driversIterator = loadedDrivers.iterator();
3 try{
4     while(driversIterator.hasNext()) {
5         driversIterator.next();
6     }
7 } catch(Throwable t) {
8     // Do nothing
9 }
逐行看下 java.util.ServiceLoader.java
1 public static <S> ServiceLoader<S> load(Class<S> service) {
2     ClassLoader cl = Thread.currentThread().getContextClassLoader();
3     return ServiceLoader.load(service, cl);
4 }
其中的classLoader是当前线程上下文的加载器(为了解决spi问题,引入了现成上下文类加载器 Thread Context ClassLoader(就是这里!!!打破了上述双亲委派模型),泛型S代表服务类型的类,本例中就是Driver;参数service 为代表服务的接口或者抽象类,本例中是Driver.class。
1 public static <S> ServiceLoader<S> load(Class<S> service, ClassLoader loader)
2 {
3     return new ServiceLoader<>(service, loader);
4 }
根据service和loader创建了一个ServiceLoader
1 private ServiceLoader(Class<S> svc, ClassLoader cl) {
2     service = Objects.requireNonNull(svc, "Service interface cannot be null");
3     loader = (cl == null) ? ClassLoader.getSystemClassLoader() : cl;
4     acc = (System.getSecurityManager() != null) ? AccessController.getContext() : null;
5     reload();
6 }
本例中,其中acc为null,接着看reload方法
1 public void reload() {
2     providers.clear();
3     lookupIterator = new LazyIterator(service, loader);
4 }
清空了providers缓存
1 // Cached providers, in instantiation order
2 private LinkedHashMap<String,S> providers = new LinkedHashMap<>();
创建了lookupIterator
1 // The current lazy-lookup iterator
2 private LazyIterator lookupIterator;
 1 // Private inner class implementing fully-lazy provider lookup
 2 private class LazyIterator implements Iterator<S>
 3 {
 4     Class<S> service;
 5     ClassLoader loader;
 6     Enumeration<URL> configs = null;
 7     Iterator<String> pending = null;
 8     String nextName = null;
 9
10     private LazyIterator(Class<S> service, ClassLoader loader) {
11         this.service = service;
12         this.loader = loader;
13     }
14
15     private boolean hasNextService() {
16         if (nextName != null) {
17             return true;
18         }
19         if (configs == null) {
20             try {
21                 String fullName = PREFIX + service.getName();
22                 if (loader == null)
23                     configs = ClassLoader.getSystemResources(fullName);
24                 else
25                     configs = loader.getResources(fullName);
26             } catch (IOException x) {
27                 fail(service, "Error locating configuration files", x);
28             }
29         }
30         while ((pending == null) || !pending.hasNext()) {
31             if (!configs.hasMoreElements()) {
32                 return false;
33             }
34             pending = parse(service, configs.nextElement());
35         }
36         nextName = pending.next();
37         return true;
38     }
39
40     private S nextService() {
41         if (!hasNextService())
42             throw new NoSuchElementException();
43         String cn = nextName;
44         nextName = null;
45         Class<?> c = null;
46         try {
47             c = Class.forName(cn, false, loader);
48         } catch (ClassNotFoundException x) {
49             fail(service, "Provider " + cn + " not found");
50         }
51         if (!service.isAssignableFrom(c)) {
52             fail(service, "Provider " + cn + " not a subtype");
53         }
54         try {
55             S p = service.cast(c.newInstance());
56             providers.put(cn, p);
57             return p;
58         } catch (Throwable x) {
59             fail(service, "Provider " + cn + " could not be instantiated", x);
60         }
61         throw new Error();          // This cannot happen
62     }
63
64     public boolean hasNext() {
65         if (acc == null) {
66             return hasNextService();
67         } else {
68             PrivilegedAction<Boolean> action = new PrivilegedAction<Boolean>() {
69                 public Boolean run() { return hasNextService(); }
70             };
71             return AccessController.doPrivileged(action, acc);
72         }
73     }
74
75     public S next() {
76         if (acc == null) {
77             return nextService();
78         } else {
79             PrivilegedAction<S> action = new PrivilegedAction<S>() {
80                 public S run() { return nextService(); }
81             };
82             return AccessController.doPrivileged(action, acc);
83         }
84     }
85
86     public void remove() {
87         throw new UnsupportedOperationException();
88     }
89 }
创建改对象的原因就是为了实现延迟服务提供者查找。延迟到什么时候,继续看代码。
3、loadedDrivers.iterator()
public Iterator<S> iterator() {
    return new Iterator<S>() {
        Iterator<Map.Entry<String,S>> knownProviders = providers.entrySet().iterator();
        public boolean hasNext() {
            if (knownProviders.hasNext())
                return true;
            return lookupIterator.hasNext();
        }
        public S next() {
            if (knownProviders.hasNext())
                return knownProviders.next().getValue();
            return lookupIterator.next();
        }
        public void remove() {
            throw new UnsupportedOperationException();
        }
    };
}
创建了一个内部类Iterator,用于操作缓存providers和延迟加载类lookupIterator
4、driversIterator.hasNext()
操作的就是上面的hasNext
1 public boolean hasNext() {
2     if (knownProviders.hasNext())
3         return true;
4     return lookupIterator.hasNext();
5 }
用到了LazyIterator中的hasNext()
 1 public boolean hasNext() {
 2     if (acc == null) {
 3         return hasNextService();
 4     } else {
 5         PrivilegedAction<Boolean> action = new PrivilegedAction<Boolean>() {
 6             public Boolean run() { return hasNextService(); }
 7         };
 8         return AccessController.doPrivileged(action, acc);
 9     }
10 }
这里acc为null,不需要特权继续执行hasNextService
 1 private boolean hasNextService() {
 2     if (nextName != null) {
 3         return true;
 4     }
 5     if (configs == null) {
 6         try {
 7             String fullName = PREFIX + service.getName();
 8             if (loader == null)
 9                 configs = ClassLoader.getSystemResources(fullName);
10             else
11                 configs = loader.getResources(fullName);
12         } catch (IOException x) {
13             fail(service, "Error locating configuration files", x);
14         }
15     }
16     while ((pending == null) || !pending.hasNext()) {
17         if (!configs.hasMoreElements()) {
18             return false;
19         }
20         pending = parse(service, configs.nextElement());
21     }
22     nextName = pending.next();
23     return true;
24 }
起初nextName为null,configs也为null,这个时候就会根据fullName获取包含其的资源,然后parse解析
1 private static final String PREFIX = "META-INF/services/";
本例中fullName就是META-INF/services/java.sql.Driver,mysql驱动中该文件内容如下:
1 com.mysql.jdbc.Driver
2 com.mysql.fabric.jdbc.FabricMySQLDriver
 1 private Iterator<String> parse(Class<?> service, URL u) throws ServiceConfigurationError
 2 {
 3     InputStream in = null;
 4     BufferedReader r = null;
 5     ArrayList<String> names = new ArrayList<>();
 6     try {
 7         in = u.openStream();
 8         r = new BufferedReader(new InputStreamReader(in, "utf-8"));
 9         int lc = 1;
10         while ((lc = parseLine(service, u, r, lc, names)) >= 0);
11     } catch (IOException x) {
12         fail(service, "Error reading configuration file", x);
13     } finally {
14         try {
15             if (r != null) r.close();
16             if (in != null) in.close();
17         } catch (IOException y) {
18             fail(service, "Error closing configuration file", y);
19         }
20     }
21     return names.iterator();
22 }
改文件需要utf-8编码,返回的就是包含有文件内容的集合迭代器。
5、driversIterator.next()
接着看Next
1 public S next() {
2     if (knownProviders.hasNext())
3         return knownProviders.next().getValue();
4     return lookupIterator.next();
5 }
起初走lookupIterator.next()
 1 public S next() {
 2     if (acc == null) {
 3         return nextService();
 4     } else {
 5         PrivilegedAction<S> action = new PrivilegedAction<S>() {
 6             public S run() { return nextService(); }
 7         };
 8         return AccessController.doPrivileged(action, acc);
 9     }
10 }
直接走nextService
 1 private S nextService() {
 2     if (!hasNextService())
 3         throw new NoSuchElementException();
 4     String cn = nextName;
 5     nextName = null;
 6     Class<?> c = null;
 7     try {
 8         c = Class.forName(cn, false, loader);
 9     } catch (ClassNotFoundException x) {
10         fail(service, "Provider " + cn + " not found");
11     }
12     if (!service.isAssignableFrom(c)) {
13         fail(service, "Provider " + cn  + " not a subtype");
14     }
15     try {
16         S p = service.cast(c.newInstance());
17         providers.put(cn, p);
18         return p;
19     } catch (Throwable x) {
20         fail(service, "Provider " + cn + " could not be instantiated", x);
21     }
22     throw new Error();      // This cannot happen
23 }
这里会加载并初始化获取到的驱动,例如com.mysql.jdbc.Driver,这里还是需要Class.forName。采用
S p = service.cast(c.newInstance());
providers.put(cn, p);
初始化驱动,因此驱动需要有一个默认的构造函数。
至此,利用ServiceLoader加载并初始化驱动的操作就完成了。那么那么多驱动,要选择哪个驱动呢,就是根据url确定,像jdbc:mysql://127.0.0.1:3306/hhl
如上url就会选择com.mysql.jdbc.Driver进行连接操作,其判断由驱动自己去做,由驱动中的acceptsURL及parseURL判断驱动支持的url,具体可看代码
com.mysql.jdbc.NonRegisteringDriver.java
总结:SPI的机制就是在不修改原有程序的基础上实现扩展
当服务的提供者,提供了服务接口(java.sql.Driver)的一种实现之后,在jar包的META-INF/services/目录里同时创建一个以服务接口命名的文件。该文件里就是实现该服务接口的具体实现类。而当外部程序装配这个模块的时候,就能通过该jar包META-INF/services/里的配置文件找到具体的实现类名,并装载实例化,完成模块的注入。 基于这样一个约定就能很好的找到服务接口的实现类,而不需要再代码里指定。
————————————————
版权声明:本文为CSDN博主「洪海亮」的原创文章以及百家号「yes的练级攻略」的原创文章的组合,遵循 CC 4.0 BY-SA 版权协议,转载请附上原文出处链接及本声明。
原文链接:https://blog.csdn.net/honghailiang888/article/details/72636627
还有:https://baijiahao.baidu.com/s?id=1633056679004596814&wfr=spider&for=pc

 浙公网安备 33010602011771号