【快应用】表单组件的model属性实际运用

 【关键词】

表单组件、model


【问题背景】

在使用表单组件时,往往需要同时绑定值和 change 事件动态更新数据,当表单交互较多的场景下会有大量与业务无关的代码。

快应用从1100版本开始引入 model 指令,使用 model 指令可以简化代码逻辑,在框架内部对值进行绑定与更新,实现双向绑定的效果。


【实现方法】

model 指令本质上是一个语法糖,原理是在编译时为组件自动绑定了 change 事件,通过 change 事件为双向绑定的数据更新变更后的值,目前仅支持在input,select和textarea中使用。

使用 model 指令实现双向绑定

Input组件type为text时:

 <text class="txt">input value:{{ inputValue }}</text>
 <input class="btn" model:value="{{inputValue}}" />

Input组件type为raido时, 可以为“model:value”绑定一个数组,该数组将包含所有选中的 checkbox 的 value 值:

<div>
      <input type="checkbox" id="jack" value="Jack" model:value="{{checkedNames}}"></input>
      <label target="jack">Jack</label>
    </div>
    <div>
      <input type="checkbox" id="john" value="John" model:value="{{checkedNames}}"></input>
      <label target="john">John</label>
    </div>
    <div>
      <input type="checkbox" id="mike" value="Mike" model:value="{{checkedNames}}"></input>
      <label target="mike">Mike</label>
    </div>
    <text>Checked names: {{ checkedNames }}</text>

Select组件中使用model:

    <text class="txt">selected value:{{ selectedValue }}</text>
    <select class="select" model:value="{{selectedValue}}">
      <option value="item0">item0</option>
      <option value="item1">item1</option>
      <option value="item2">item2</option>
      <option value="item3">item3</option>
      <option value="item4">item4</option>
    </select>

 Textarea中使用model: 

    <text class="txt">input textarea value:{{ newValue }}</text>
    <textarea class="btn" model:value="{{newValue}}"></textarea>

组件中使用model

1.定义一个含有表单元素的自定义组件,当触发change事件时,“update:sampleName”事件会向父级传递值。

“update:”为固定前缀。

“sampleName”为当前组件和父级双向绑定的属性名称。

<template>
  <input class="btn" value="{{sampleName}}" @change="$emit('update:sampleName', evt.value)"></input>
</template> 
<script>
    export default {
        props: ['sampleName']
    }
</script>

2. 父组件中正常引入组件,并使用“model:sample-name”,即可完成自定义组件的 sampleName 属性双向绑定。

    <text class="title">comp use model</text>
    <div style="flex-direction: column">
      <text>sampleName: {{ name }}</text>
      <model-sample model:sample-name="{{name}}"></model-sample>
    </div>

Tips请勿在使用 model 指令时,再为组件手动绑定 change 事件,如果同时使用 toolkit 编译时,只会保留开发者定义的 change 事件,导致 model 指令失效。


【完整代码】

hello.ux

<import name="model-sample" src="./comp.ux"></import>
<template>
  <div class="container">
    <text class="txt">input value:{{ inputValue }}</text>
    <input class="btn" model:value="{{inputValue}}" />
    <text class="txt">selected value:{{ selectedValue }}</text>
    <select class="select" model:value="{{selectedValue}}">
      <option value="item0">item0</option>
      <option value="item1">item1</option>
      <option value="item2">item2</option>
      <option value="item3">item3</option>
      <option value="item4">item4</option>
    </select>
    <text class="txt">input textarea value:{{ newValue }}</text>
    <textarea class="btn" model:value="{{newValue}}"></textarea>

    <text class="title">input type is radio</text>
    <div>
      <input type="checkbox" id="jack" value="Jack" model:value="{{checkedNames}}"></input>
      <label target="jack">Jack</label>
    </div>
    <div>
      <input type="checkbox" id="john" value="John" model:value="{{checkedNames}}"></input>
      <label target="john">John</label>
    </div>
    <div>
      <input type="checkbox" id="mike" value="Mike" model:value="{{checkedNames}}"></input>
      <label target="mike">Mike</label>
    </div>
 
    <text>Checked names: {{ checkedNames }}</text>
    <text class="title">comp use model</text>
    <div style="flex-direction: column">
      <text>sampleName: {{ name }}</text>
      <model-sample model:sample-name="{{name}}"></model-sample>
    </div>
  </div>
</template>
<style>
  .container {
    flex-direction: column;
  }
  .btn {
    width: 90%;
    height: 100px;
    border: 1px solid #000000;
    margin-bottom: 10px;
  }
  .select {
    width: 90%;
    height: 100px;
    border: 1px solid #000000;
  }
  .txt {
    font-size: 40px;
  }
  .title {
    font-size: 50px;
    color: red;
  }
</style>
<script>
  export default {
    data: {
      inputValue: 'new value',
      selectedValue: 'item0',
      newValue: 'textarea value',
      checkedNames: [],
      name: "demo sample"
    },
  }
</script>

comp.ux

<template>
  <input class="btn" value="{{sampleName}}" @change="$emit('update:sampleName', evt.value)"></input>
</template>


<script>
    export default {
        props: ['sampleName']
    }
</script>
<style>
    .btn {
      width: 90%;
      height: 100px;
      border: 1px solid #000000;
      margin-bottom: 10px;
    }
</style>

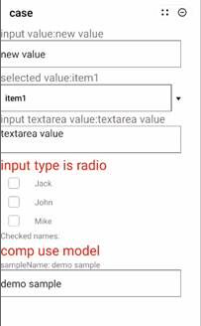
【效果图】

cke_30976.png


 欲了解更多更全技术文章,欢迎访问https://developer.huawei.com/consumer/cn/forum/?ha_source=zzh

posted @ 2023-04-23 09:55  华为开发者论坛  阅读(35)  评论(0编辑  收藏  举报