nexus安装实例
Nexus安装
1、下载Nexus:[笔者版本nexus-2.11.2-03-bundle.tar.gz]
2、 安装nexus
[root@localhost local]# pwd
/usr/local
[root@localhost local]# mkdir nexus-2.11.2-03
[root@localhost local]# tar -zxvf nexus-2.11.2-03-bundle.tar.gz -C nexus-2.11.2-03
[root@localhost local]# cd nexus-2.11.2-03
[root@localhost nexus-2.11.2-03]# ls
nexus-2.11.2-03  sonatype-work
[root@localhost nexus-2.11.2-03]# mv nexus-2.11.2-03 nexus-server
[root@localhost nexus-2.11.2-03]# ls
nexus-server  sonatype-work
说明:nexus-server : 为私服 、sonatype-work:为私有库目录
3、配置端口和私有库目录
[root@localhost nexus-2.11.2-03]# pwd
/usr/local/nexus-2.11.2-03
[root@localhost nexus-2.11.2-03]# cd nexus-server/conf/
[root@localhost conf]# vim nexus.properties
# Jetty section
application-port=8081
application-host=0.0.0.0
nexus-webapp=${bundleBasedir}/nexus
nexus-webapp-context-path=/nexus

# Nexus section
nexus-work=${bundleBasedir}/../sonatype-work/nexus
runtime=${bundleBasedir}/nexus/WEB-INF
4、编辑nexus配置用户角色
[root@localhost bin]# pwd
/usr/local/nexus-2.11.2-03/nexus-server/bin
[root@localhost bin]# cat nexus | grep AS_USE -n
23:#RUN_AS_USER=
[root@localhost bin]# vim nexus
RUN_AS_USER=root
说明:将用户角色配置成root
5、配置防火墙开放nexus的访问端口:[笔者使用默认的8081]
[root@localhost bin]# vim /etc/sysconfig/iptables
-A INPUT -m state --state NEW -m tcp -p tcp --dport 8081 -j ACCEPT
[root@localhost bin]# service iptables restart
iptables: Setting chains to policy ACCEPT: filter          [  OK  ]
iptables: Flushing firewall rules:                         [  OK  ]
iptables: Unloading modules:                               [  OK  ]
iptables: Applying firewall rules:                         [  OK  ]
6、启动nexus
[root@localhost bin]# pwd
/usr/local/nexus-2.11.2-03/nexus-server/bin
[root@localhost bin]# ./nexus start
****************************************
WARNING - NOT RECOMMENDED TO RUN AS ROOT
****************************************
Starting Nexus OSS...
Started Nexus OSS.
访问:http://192.168.147.129:8081/nexus
7、增加nginx反响代理
创建日志文件
[root@localhost nexus]# pwd
/usr/local/nexus-2.11.2-03/nexus-server/nexus
[root@localhost nexus]# mkdir logs
[root@localhost nexus]# ls
favicon.ico  favicon.png  images  LICENSE.html  logs  robots.txt  WEB-INF
[root@localhost nexus]# cd logs/
[root@localhost logs]# pwd
/usr/local/nexus-2.11.2-03/nexus-server/nexus/logs
upstream配置
[root@localhost logs]# vim /usr/local/nginx/conf/domains/tools.nexus.local.com
upstream tomcat_tools.nexus.local {
                server 127.0.0.1:8081  weight=10 max_fails=2 fail_timeout=300s;
}
server {
                listen                   80;
                server_name              tools.nexus.local.com;
                root                     /usr/local/nexus-2.11.2-03/nexus-server/nexus/;
                access_log               /usr/local/nexus-2.11.2-03/nexus-server/nexus/logs/tools.nexus.local.com_access.log main;
                error_log                /usr/local/nexus-2.11.2-03/nexus-server/nexus/logs/tools.nexus.local.com_error.log warn;
                error_page              403 404 /40x.html;

                location / {
                        index index.html index.htm;
                        proxy_next_upstream     http_500 http_502 http_503 http_504 error timeout invalid_header;
                        proxy_set_header        Host  $host;
                        proxy_set_header        X-Real-IP        $remote_addr;
                        proxy_set_header        X-Forwarded-For $proxy_add_x_forwarded_for;
                        proxy_pass              http://tomcat_tools.nexus.local;
                        expires                 0d;
                }
}
8、重新启动nginx,启动nexus
访问.tools.nexus.local.com/nexus

Nexus的配置
1、密码找回邮箱配置:
a)菜单Administration/Server配置邮箱服务地址(如果忘记密码,可以通过该邮箱找回)
如图配置:
![]()

可以点击按钮:Test SMTP settings 检测配置是否成功,如果成功会收到一封配置成功的消息邮件!
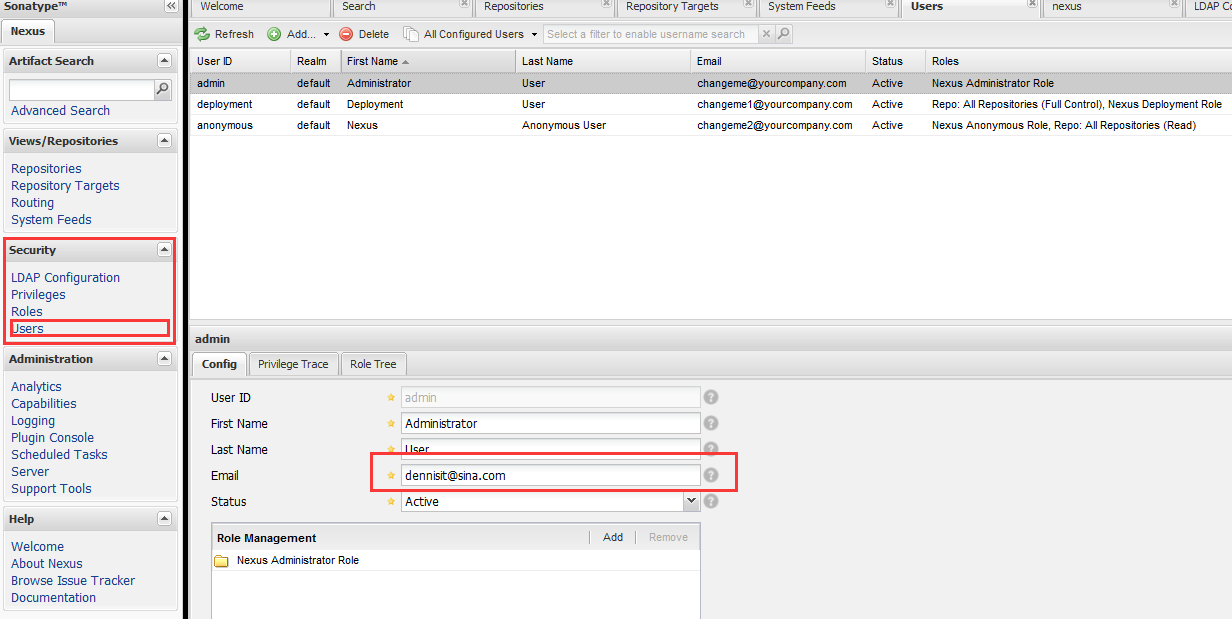
b)菜单Security/Users给用户配置邮箱地址,方便密码忘记时找回:
![]()
2、修改当前密码:
当前账号名显示处[右下角]/Profile.
![]()
3、仓库类型

![]()
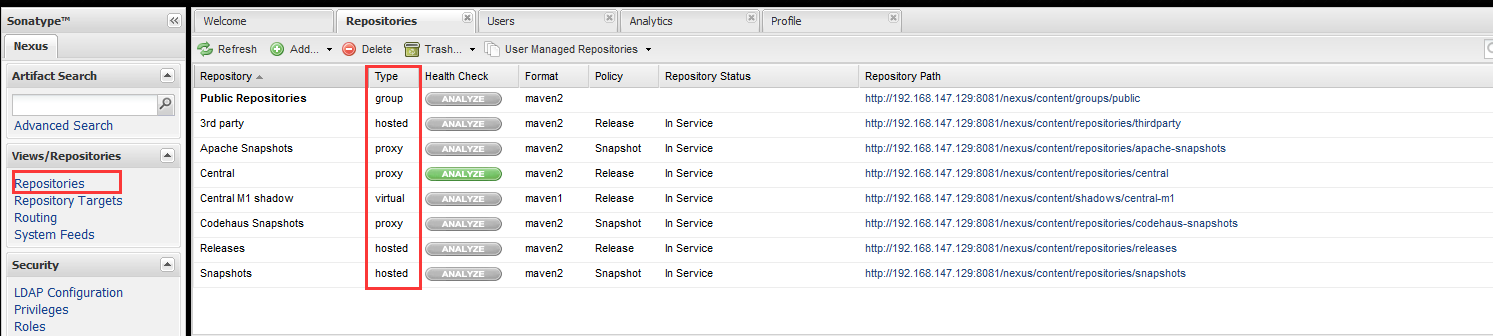
一般用到的仓库种类是hosted、proxy、Hosted代表宿主仓库,用来发布一些第三方不允许的组件,比如oracle驱动、比如商业软件jar包。Proxy代表代理远程的仓库,最典型的就是Maven官方中央仓库、JBoss仓库等等。如果构建的Maven项目本地仓库没有依赖包,那么就会去这个代理站点去下载,那么如果代理站点也没有此依赖包,就回去远程中央仓库下载依赖,这些中央仓库就是proxy。代理站点下载成功后再下载至本机。笔者认为,其实Maven这个自带的默认仓库一般情况下已经够大多数项目使用了。特殊情况时在配置新的仓库,指定url即可,一般熟悉ExtJS的人操作这个Nexus都没什么问题,单词不是很难,不明白的查查单词基本差不多。就是如果Sonatype公司对其做了国际化的处理就更好了。
hosted   类型的仓库,内部项目的发布仓库
releases 内部的模块中release模块的发布仓库
snapshots 发布内部的SNAPSHOT模块的仓库
3rd party 第三方依赖的仓库,这个数据通常是由内部人员自行下载之后发布上去
proxy   类型的仓库,从远程中央仓库中寻找数据的仓库
group   类型的仓库,组仓库用来方便我们开发人员进行设置的仓库
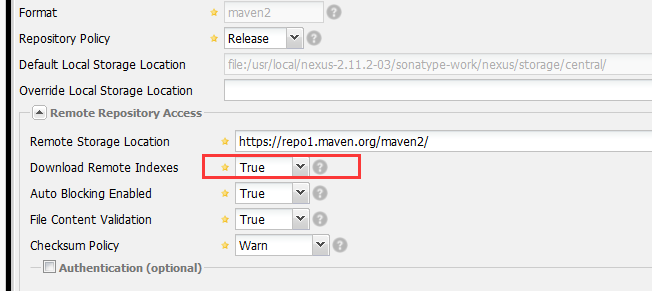
4、maven项目索引
下载Maven项目索引,项目索引是为了使用者能够在私服站点查找依赖使用的功能
![]()
5、随机启动
[root@localhost local]# cp /usr/local/nexus-2.11.2-06/bin/nexus /etc/init.d/
[root@localhost local]# cd /etc/init.d/
[root@localhost init.d]# chmod 755 nexus
[root@localhost init.d]# chkconfig nexus on
[root@localhost init.d]# service nexus start
[更多查看] http://blog.csdn.net/zwc0910/article/details/17349111

转载请注明出处:[http://www.cnblogs.com/dennisit/p/4546307.html]
热爱生活,热爱Coding,敢于挑战,用于探索 ...

 浙公网安备 33010602011771号