
在 kvm 虚拟机上使用 kubespray 部署高可用 k8s 集群
部署环境:
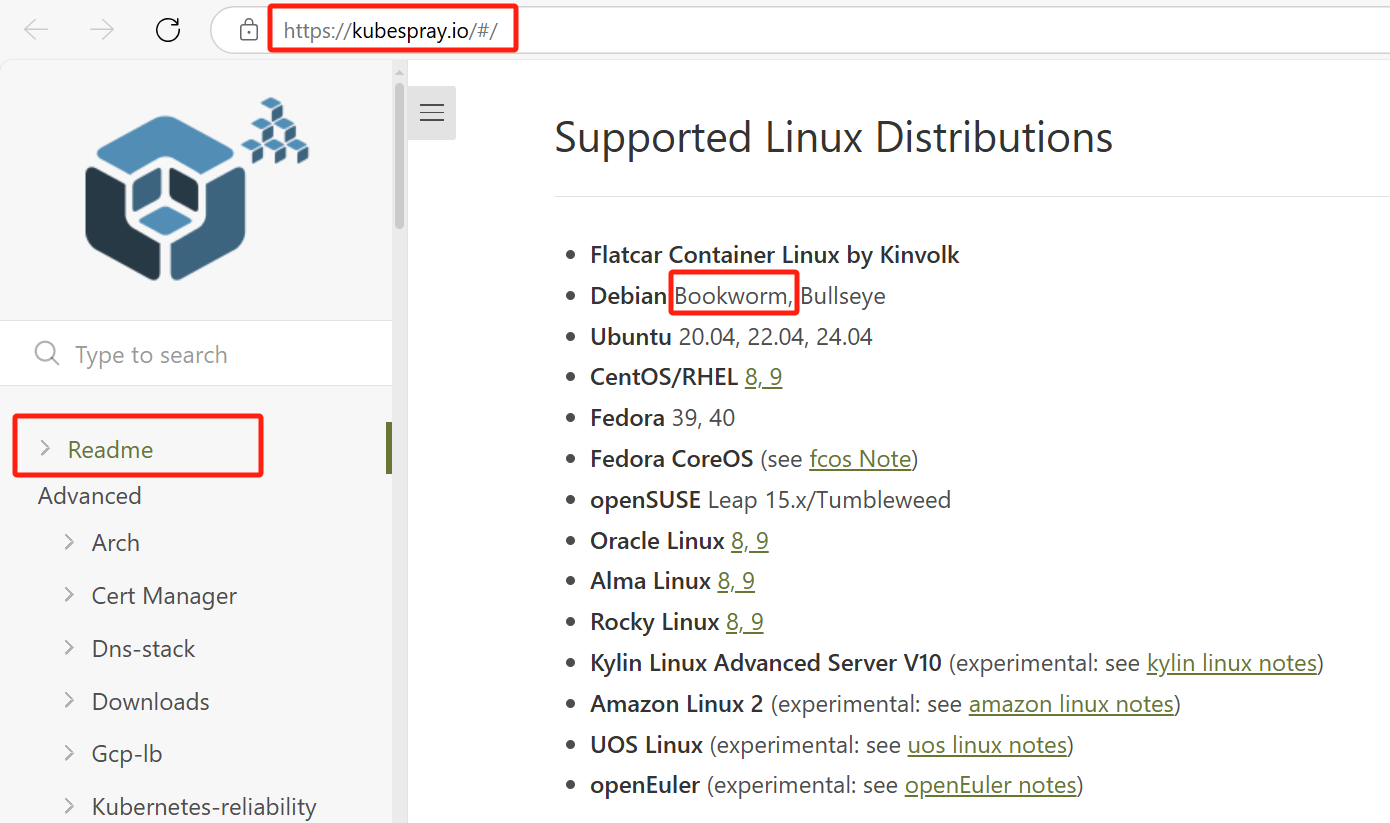
VM:Debian12(Bookworm)
CRI:containerd
k8s version:1.27.10
# 可在 kubespray 官网查看支持的 Linux 发行版本
# 查看 CPU 是否支持虚拟化
grep -wE '(vmx|svm)' /proc/cpuinfo (有输出结果代表支持)
# 第一步:安装虚拟化所需软件并启动对应服务
apt update
apt install -y qemu-kvm libvirt-daemon-system libvirt-clients virtinst guestfs-tools
# qemu-kvm kvm 虚拟化的核心后端
# libvirt-daemon-system libvirt 守护进程(管理虚拟机的服务)
# libvirt-clients libvirt 的命令行工具 (如 virsh)
# virtinst 创建虚拟机的工具 (如 virt-install)
# guestfs-tools 在不启动虚拟机的情况下修改虚拟磁盘(如重置 root 密码)
# bridge-utils 网络桥接工具(可选,本文以 nmcli 创建网桥为例)
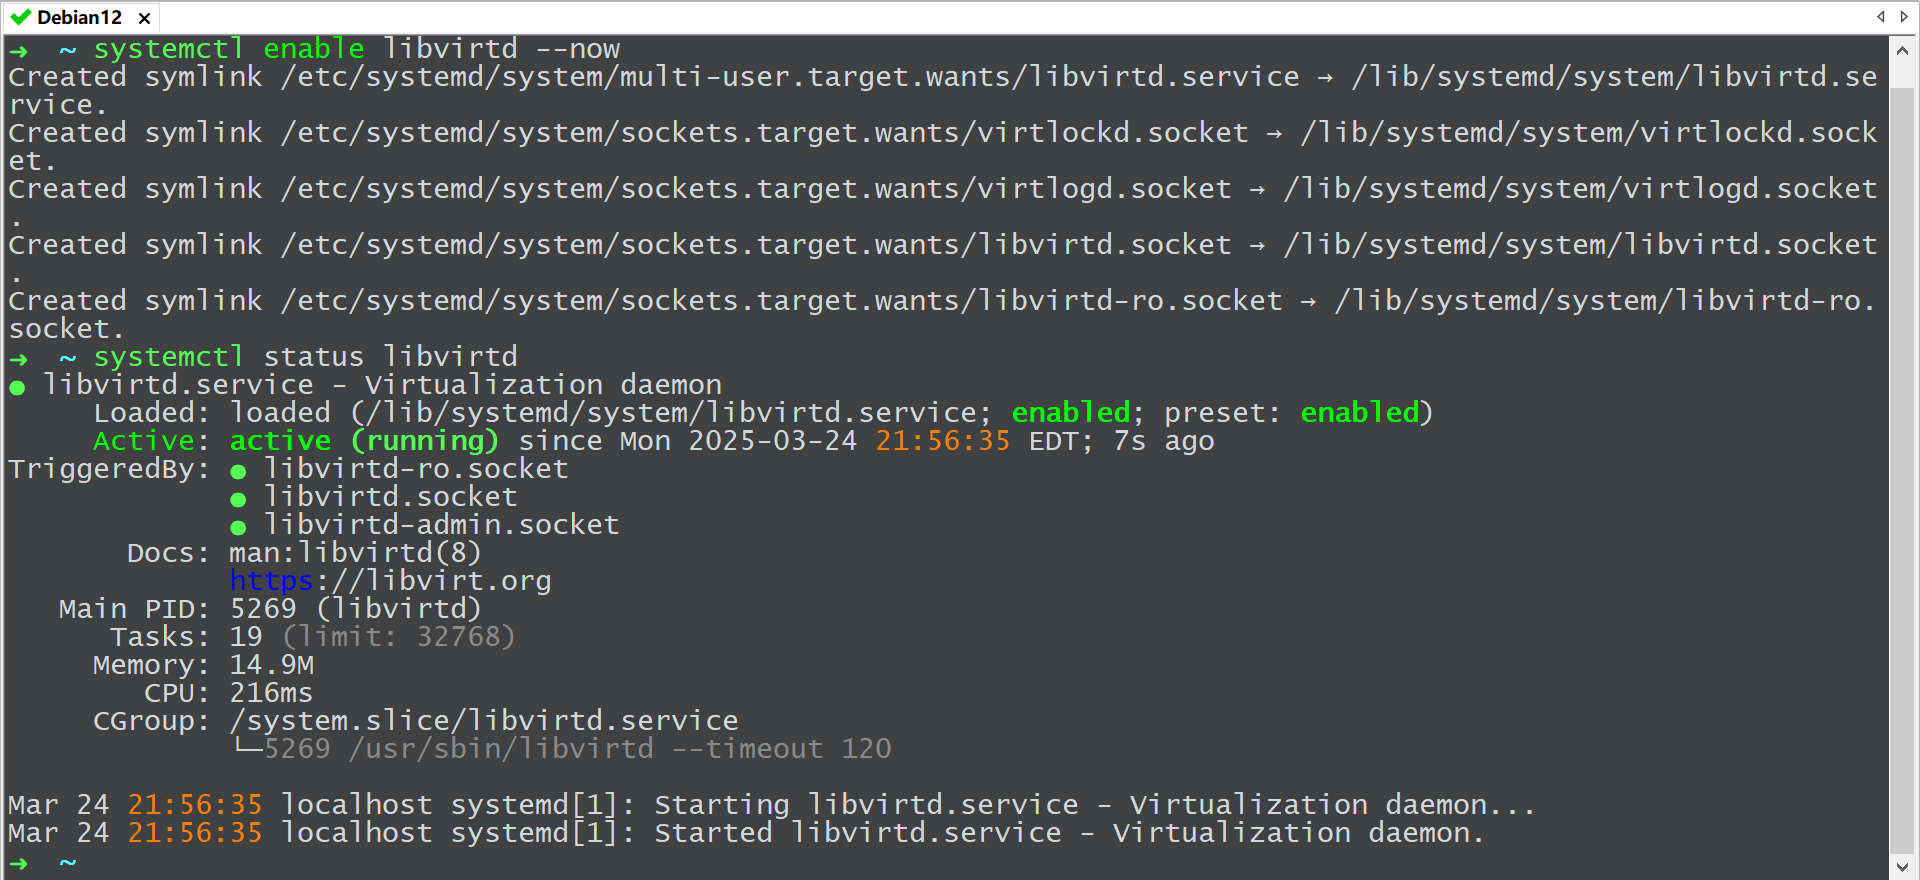
# 启动 libvirtd 服务
# 第二步:下载 debian12-qcow2 镜像并创建部署 k8s 所需的虚拟机
# 下载 qcow2 镜像
wget https://cloud.debian.org/images/cloud/bookworm/20250316-2053/debian-12-generic-amd64-20250316-2053.qcow2
# 重置虚拟磁盘 root 密码

# 查看根分区只有不到3G,因此需要扩容虚拟硬盘的根分区
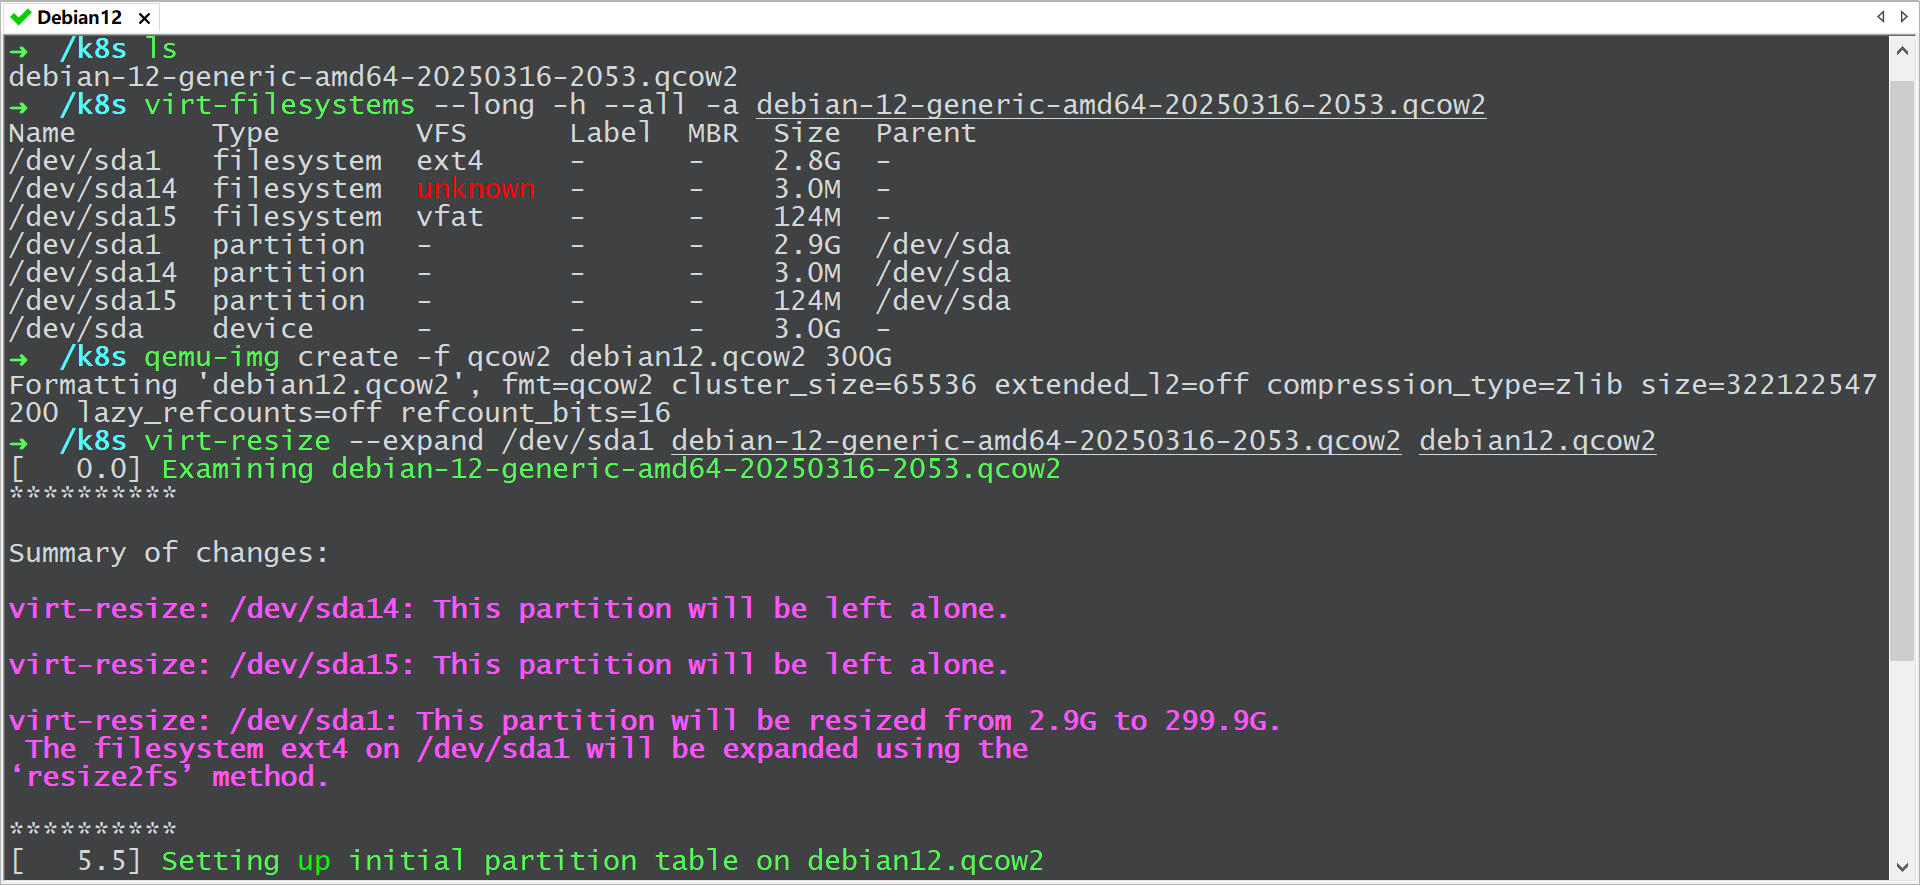

# 复制虚拟机对应的磁盘文件

# 创建连接虚拟机的网桥

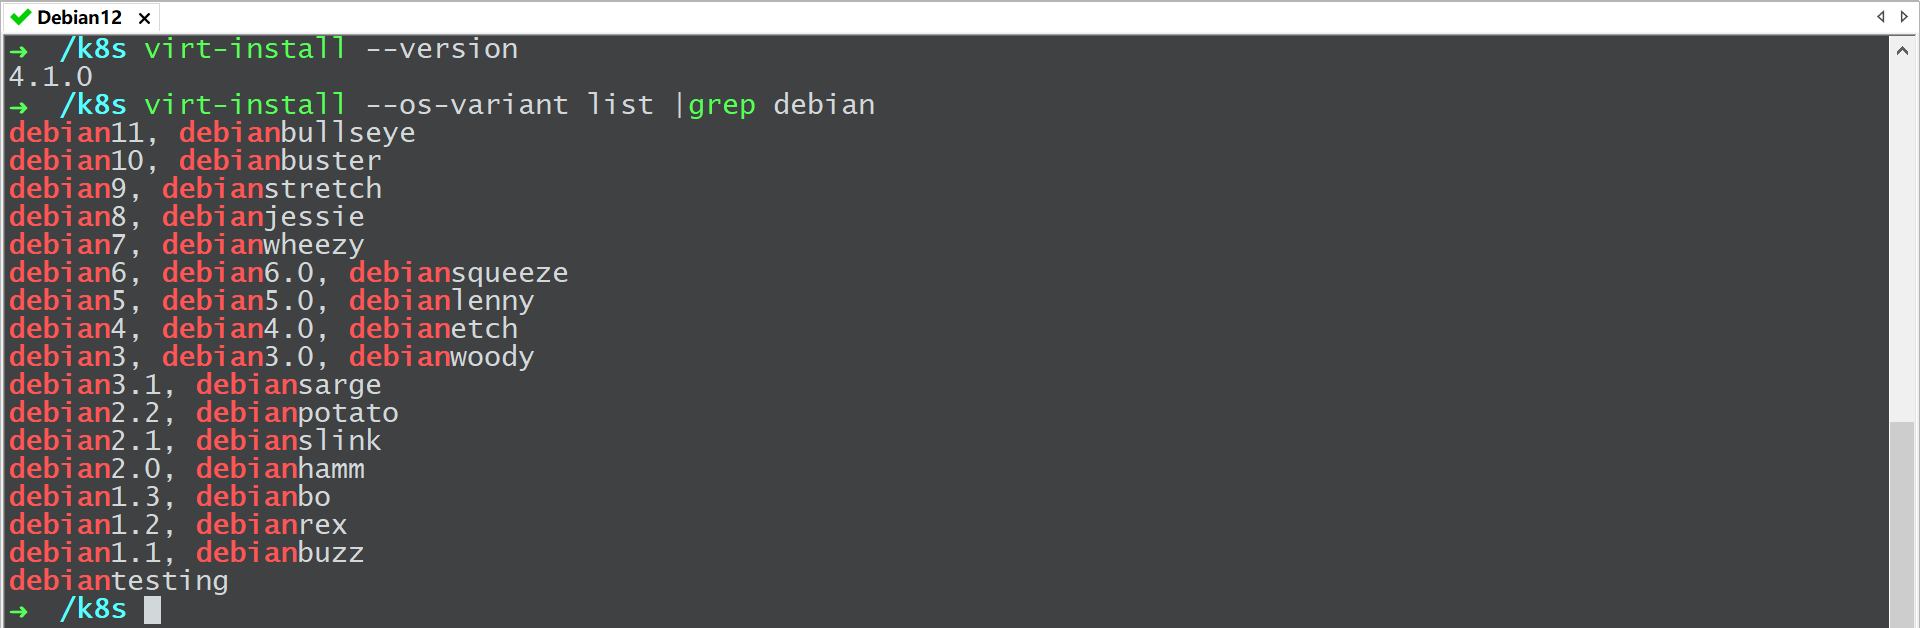
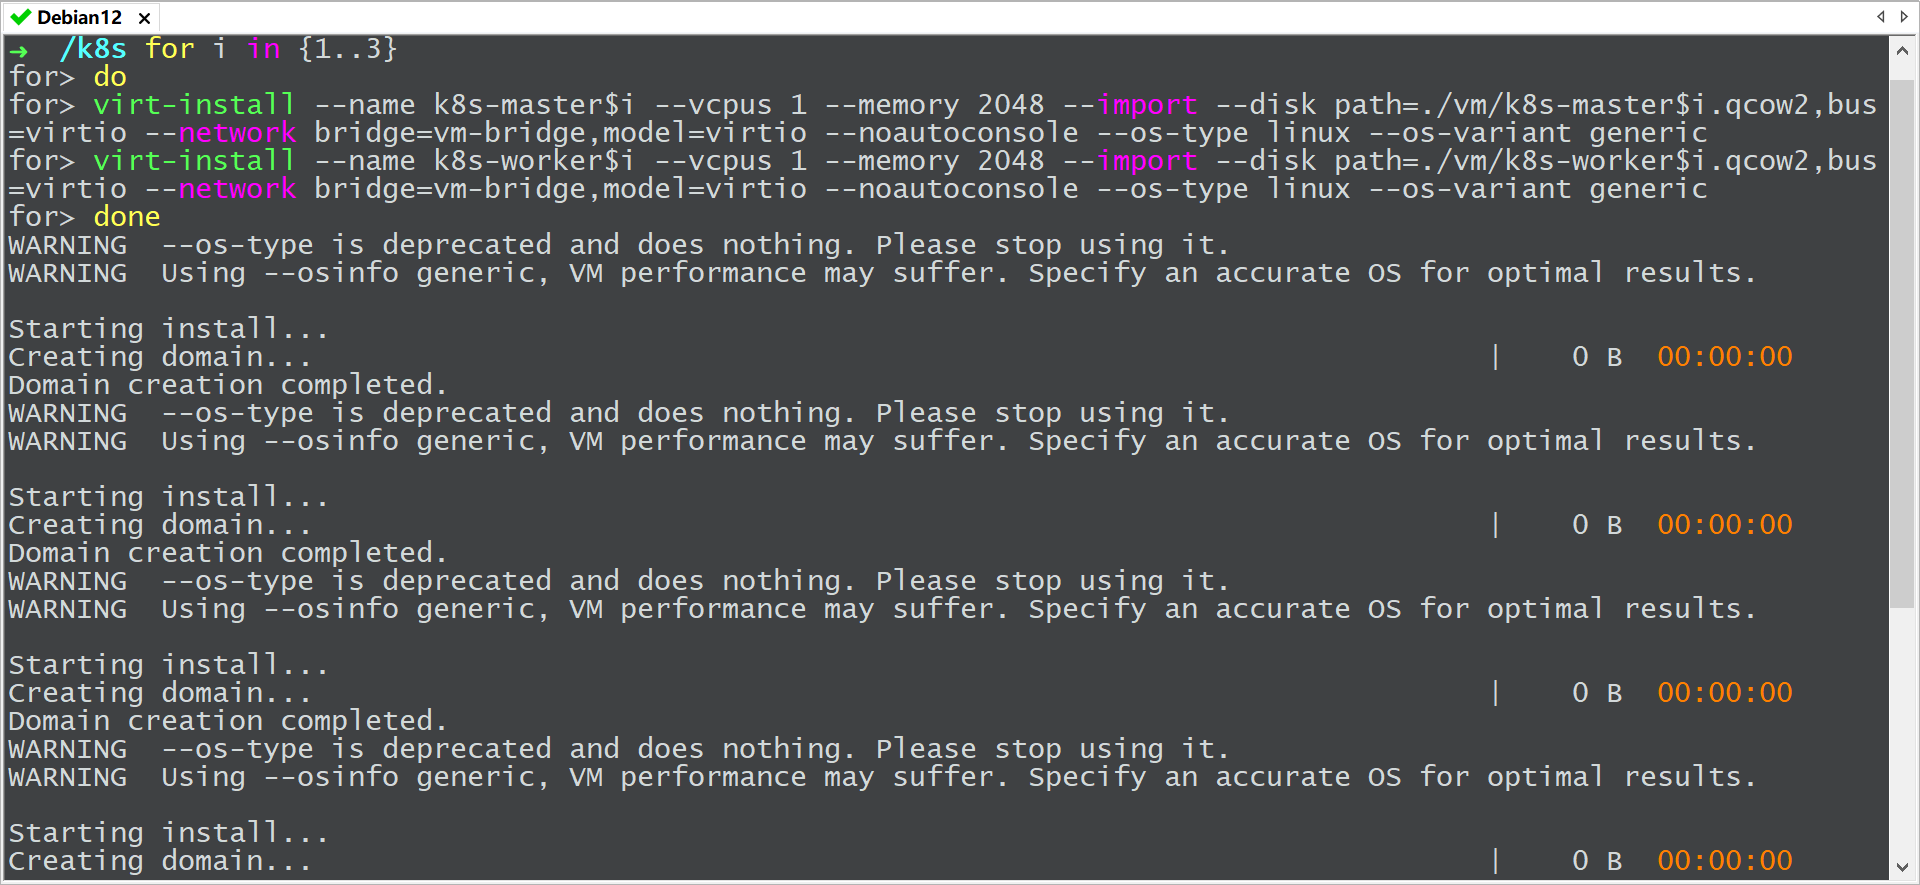
# 由于 4.1.0 版本的 virt-install 还不支持 debian12 参数,所以可以用 --os-type linux --os-variant generic 参数代替
# 创建虚拟机(宿主机配置高的情况下可增加虚拟机的配置)
# 创建虚拟机后也可通过 virsh setvcpus 和 virsh setmem 命令对虚拟机进行动态扩容
# virsh setvcpus k8s-master1 2 --live(将 k8s-master1 的 cpu 扩容至2核,--config 可永久生效)
# virsh setmem k8s-master1 $((4*1024*1024)) --live (将 k8s-master1 的 mem 扩容至4G,--config 可永久生效)
# 若虚拟机不支持动态扩容,可将虚拟机关机后使用 virsh edit <vm-name/vm-id> 修改 xml 文件后再重启

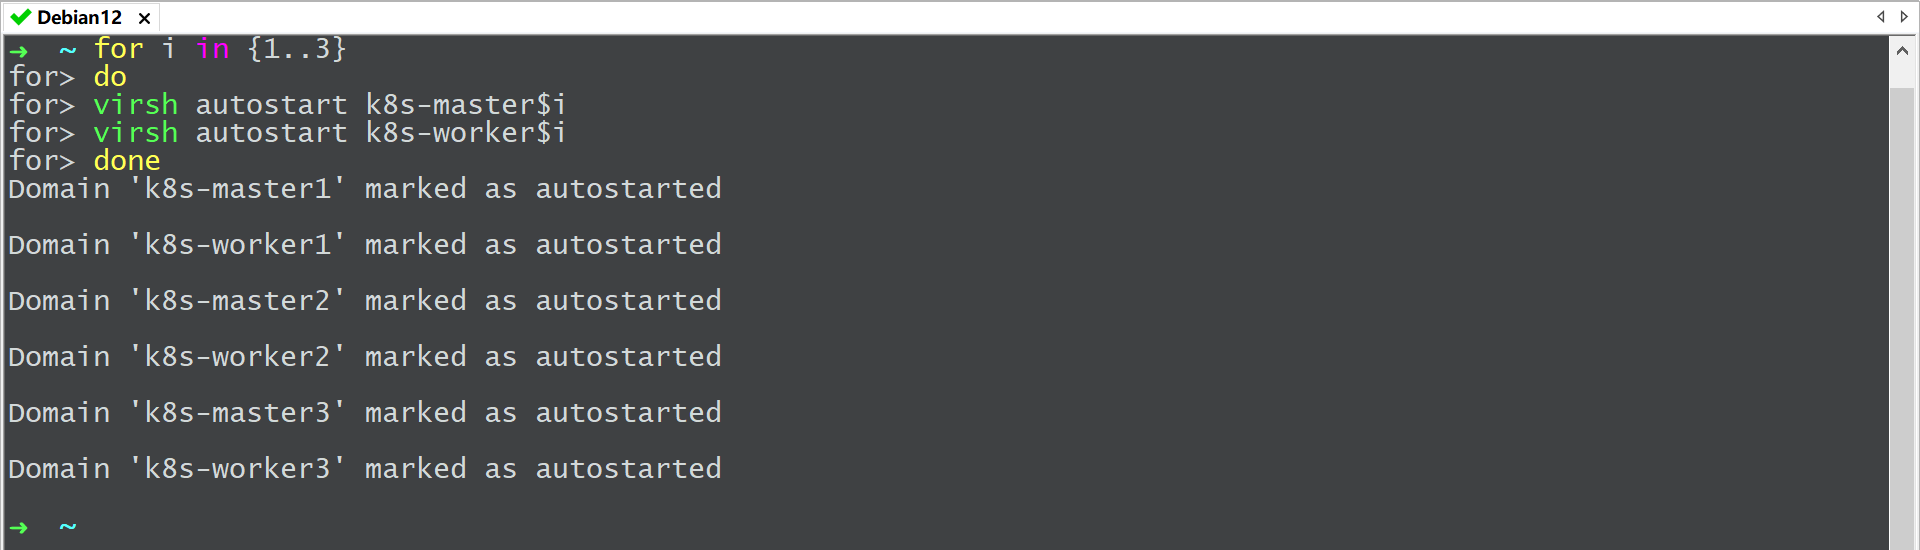
# 设置虚拟机为下次开机自启动
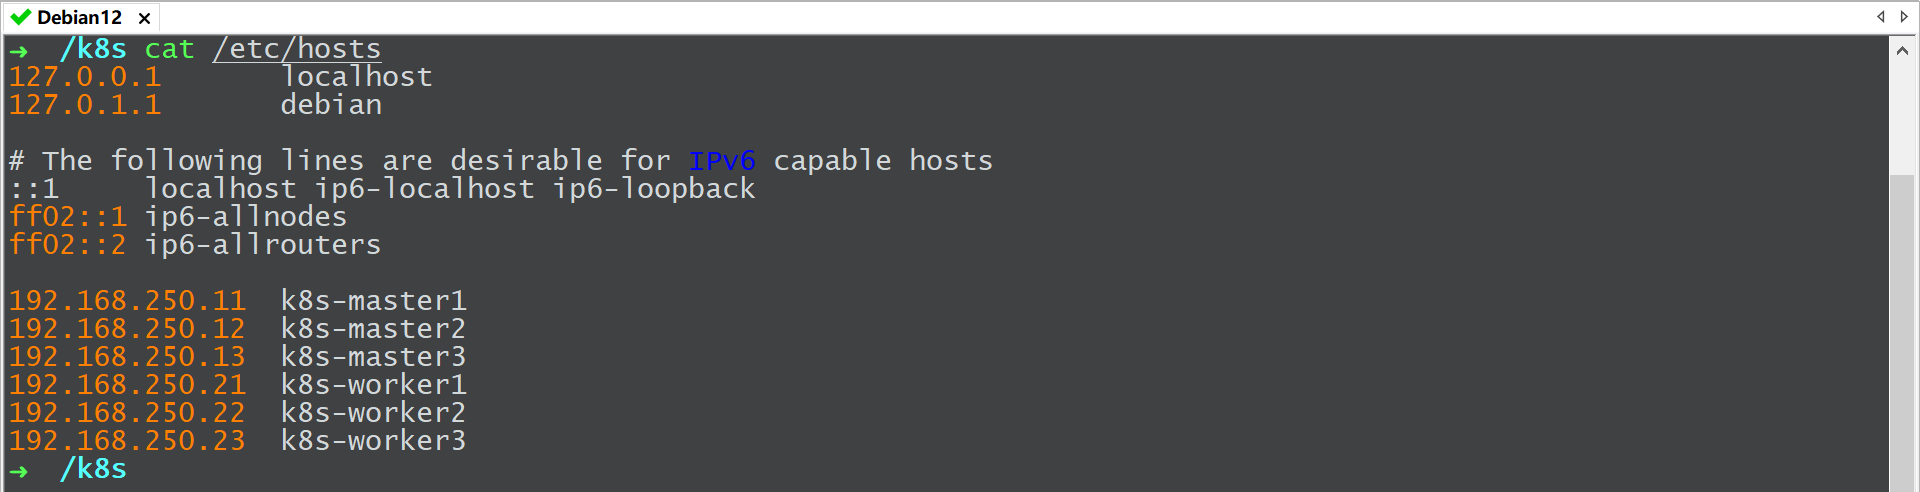
# 给虚拟机配置 IP 和主机名并在宿主机上配置解析
# 安装后续所需软件
apt -y install sshpass git python3-pip
# k8s 虚拟机默认不能访问外网

# 宿主机配置 SNAT 规则使其 k8s 虚拟机可以访问外网
sysctl -w net.ipv4.ip_forward=1
echo "net.ipv4.ip_forward=1" >/etc/sysctl.d/k8s.conf
iptables -t nat -A POSTROUTING -s 192.168.250.0/24 -o eth0 -j MASQUERADE
mkdir -pv /etc/iptables
iptables-save >/etc/iptables/rules.v4
# iptables 永久生效
apt install iptables-persistent -y
netfilter-persistent save
# 配置免密登录
ssh-keygen -t rsa -N '' -f ~/.ssh/id_rsa -b 2048
for i in {1..3}
do
sshpass -p'1' ssh-copy-id -i ~/.ssh/id_rsa.pub k8s-master$i
sshpass -p'1' ssh-copy-id -i ~/.ssh/id_rsa.pub k8s-worker$i
done
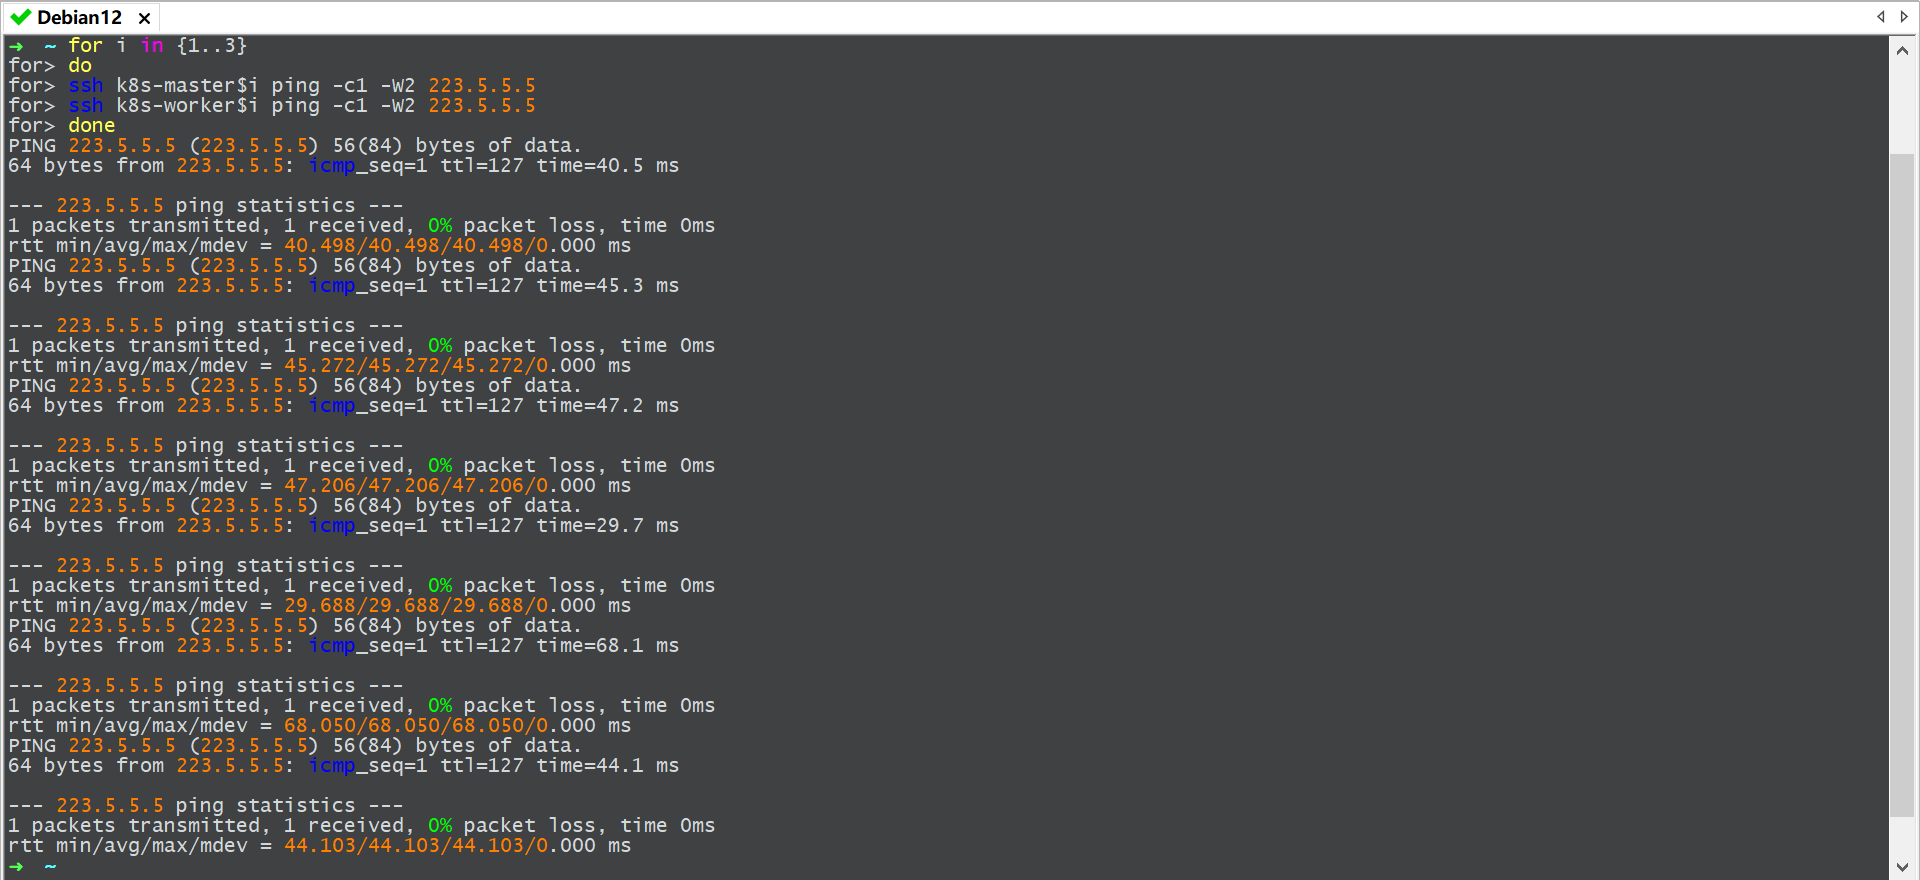
# 验证 k8s 虚拟机是否可以访问外网
# 虚拟机配置 apt 源并安装基础软件
for i in {1..3}
do
ssh k8s-master$i 'rm -rf /etc/apt/sources.list.d/*'
ssh k8s-worker$i 'rm -rf /etc/apt/sources.list.d/*'
scp /etc/apt/sources.list k8s-master$i:/etc/apt
scp /etc/apt/sources.list k8s-worker$i:/etc/apt
ssh k8s-master$i 'echo "nameserver 223.5.5.5" | tee /etc/resolv.conf'
ssh k8s-worker$i 'echo "nameserver 223.5.5.5" | tee /etc/resolv.conf'
ssh k8s-master$i apt update
ssh k8s-worker$i apt update
ssh k8s-master$i apt -y install vim bash-completion network-manager net-tools
ssh k8s-worker$i apt -y install vim bash-completion network-manager net-tools
done
# 虚拟机网络配置
for i in {1..3}
do
ssh k8s-master$i "nmcli con modify ens3 ipv4.addresses 192.168.250.1$i ipv4.gateway 192.168.250.1 ipv4.method manual connection.autoconnect yes ipv4.dns 223.5.5.5 +ipv4.dns 8.8.8.8"
ssh k8s-worker$i "nmcli con modify ens3 ipv4.addresses 192.168.250.2$i ipv4.gateway 192.168.250.1 ipv4.method manual connection.autoconnect yes ipv4.dns 223.5.5.5 +ipv4.dns 8.8.8.8"
ssh k8s-master$i "nmcli con reload && nmcli con up ens3"
ssh k8s-worker$i "nmcli con reload && nmcli con up ens3"
done
# 下载使用 kubespray
git clone -b release-2.23 https://github.com/kubernetes-sigs/kubespray.git
cd kubespray/
echo "ansible_ssh_pass: 1" >> inventory/sample/group_vars/all/all.yml
cat >inventory/sample/inventory.ini <<END
[all]
k8s-master1 ansible_host=192.168.250.11
k8s-master2 ansible_host=192.168.250.12
k8s-master3 ansible_host=192.168.250.13
k8s-worker1 ansible_host=192.168.250.21
k8s-worker2 ansible_host=192.168.250.22
k8s-worker3 ansible_host=192.168.250.23
[kube-master]
k8s-master1 ansible_host=192.168.250.11
k8s-master2 ansible_host=192.168.250.12
k8s-master3 ansible_host=192.168.250.13
[etcd]
k8s-master1
k8s-master2
k8s-master3
[kube-node]
k8s-master1
k8s-master2
k8s-master3
k8s-worker1
k8s-worker2
k8s-worker3
[calico-rr]
[k8s-cluster:children]
kube-master
kube-node
calico-rr
END

# 在虚拟环境中运行 playbook(playbook 脚本默认从境外下载对应软件包,inventory/sample/group_vars/all/all.yml 的 http_proxy 和 https_proxy 参数可修改)
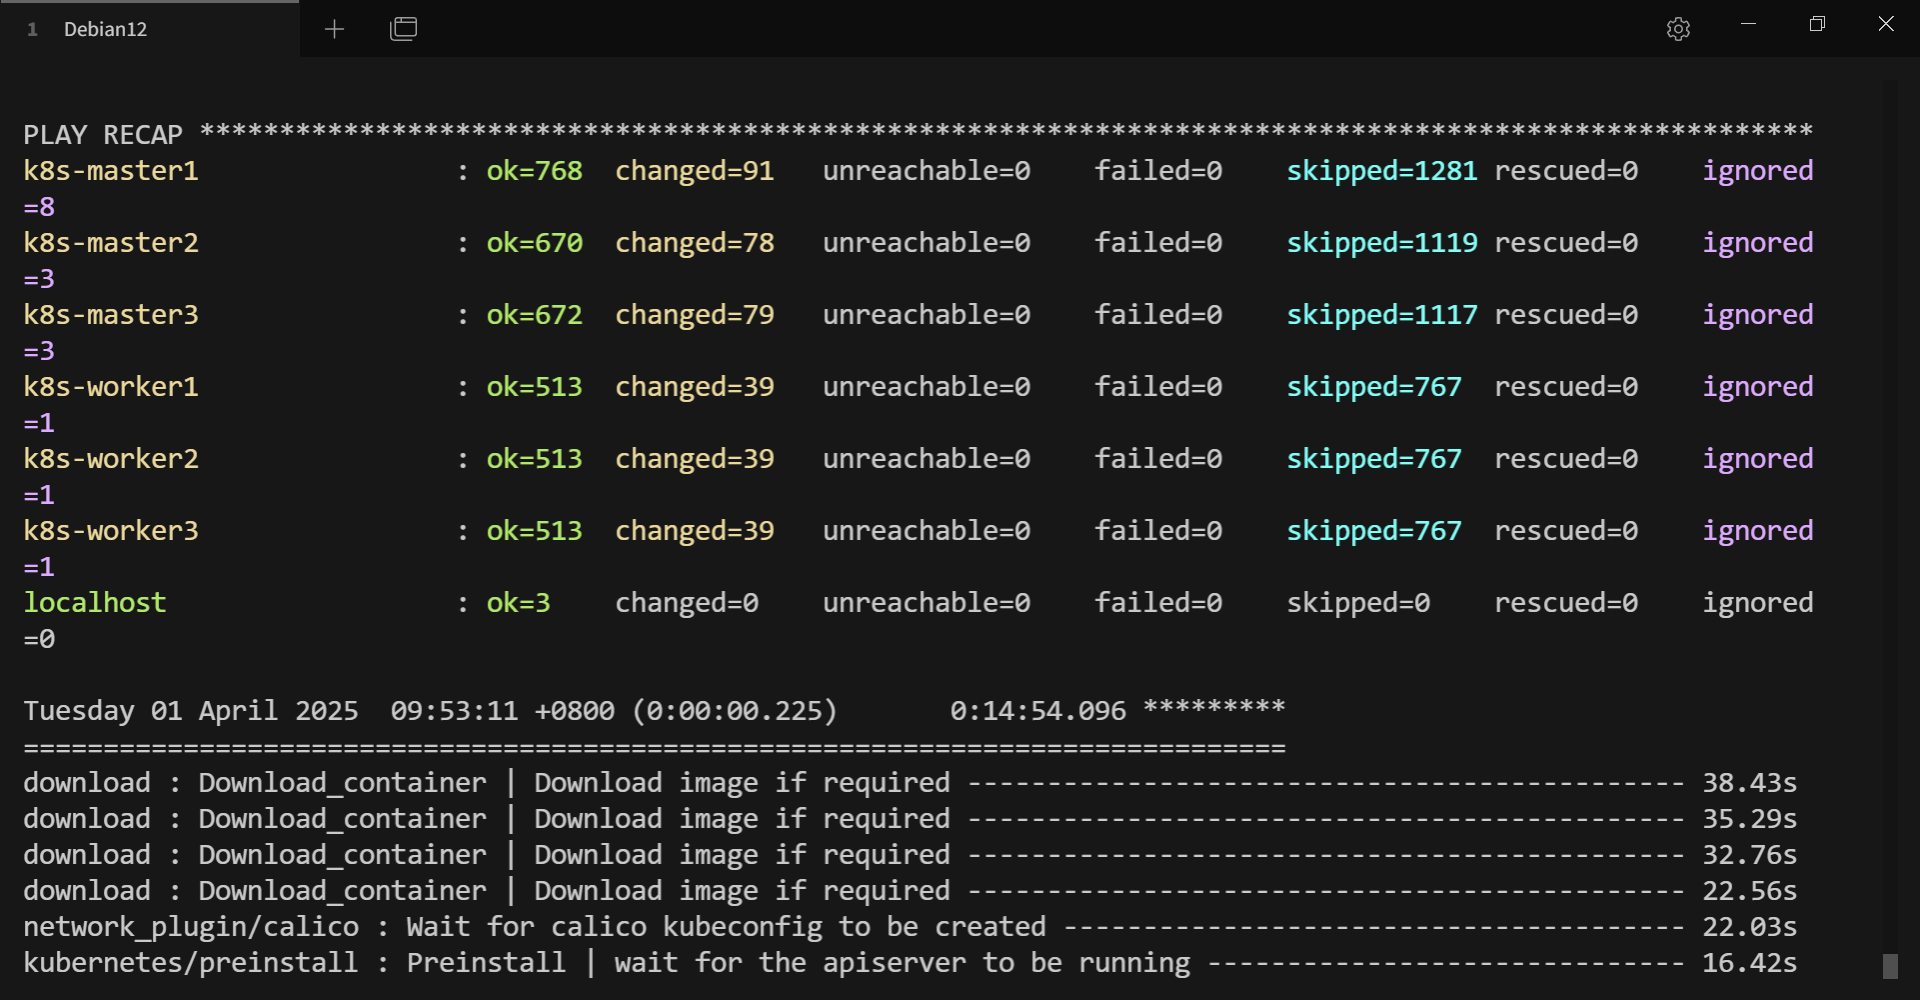
ansible-playbook -i inventory/sample/inventory.ini cluster.yml -u root --private-key=~/.ssh/id_rsa -v
# 执行成功后如下所示(成功后可使用 deactivate 命令退出虚拟环境)
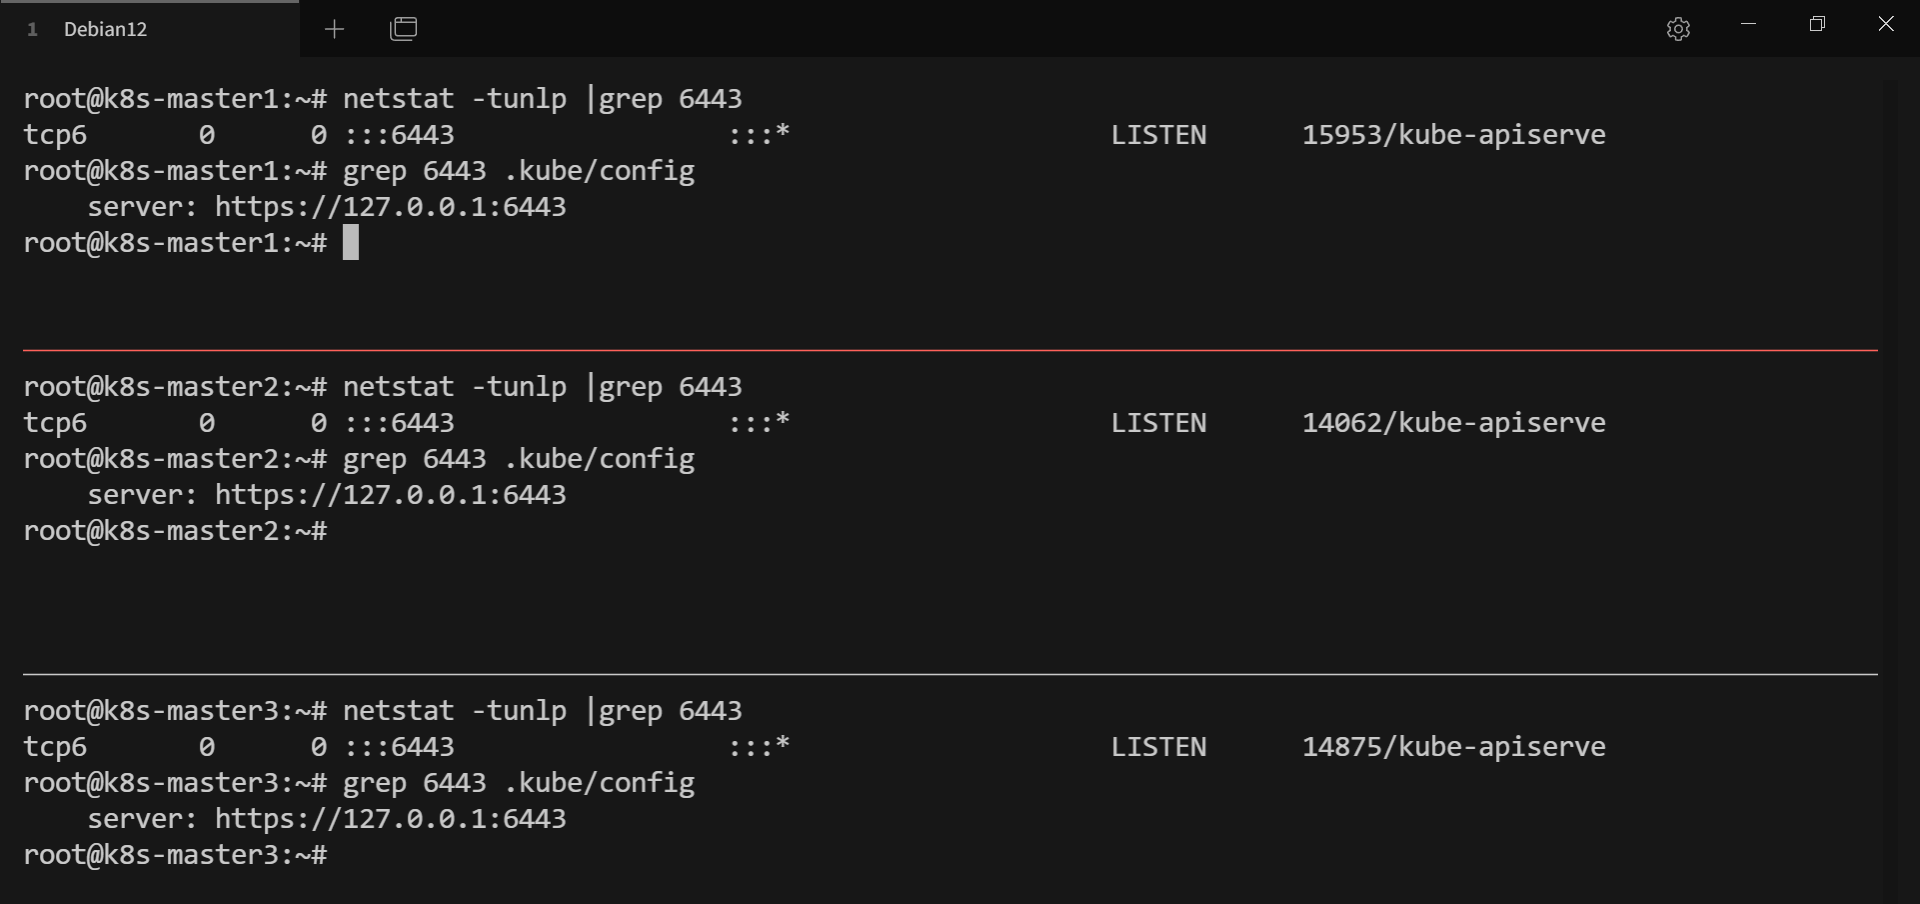
# 查看 k8s 节点状态

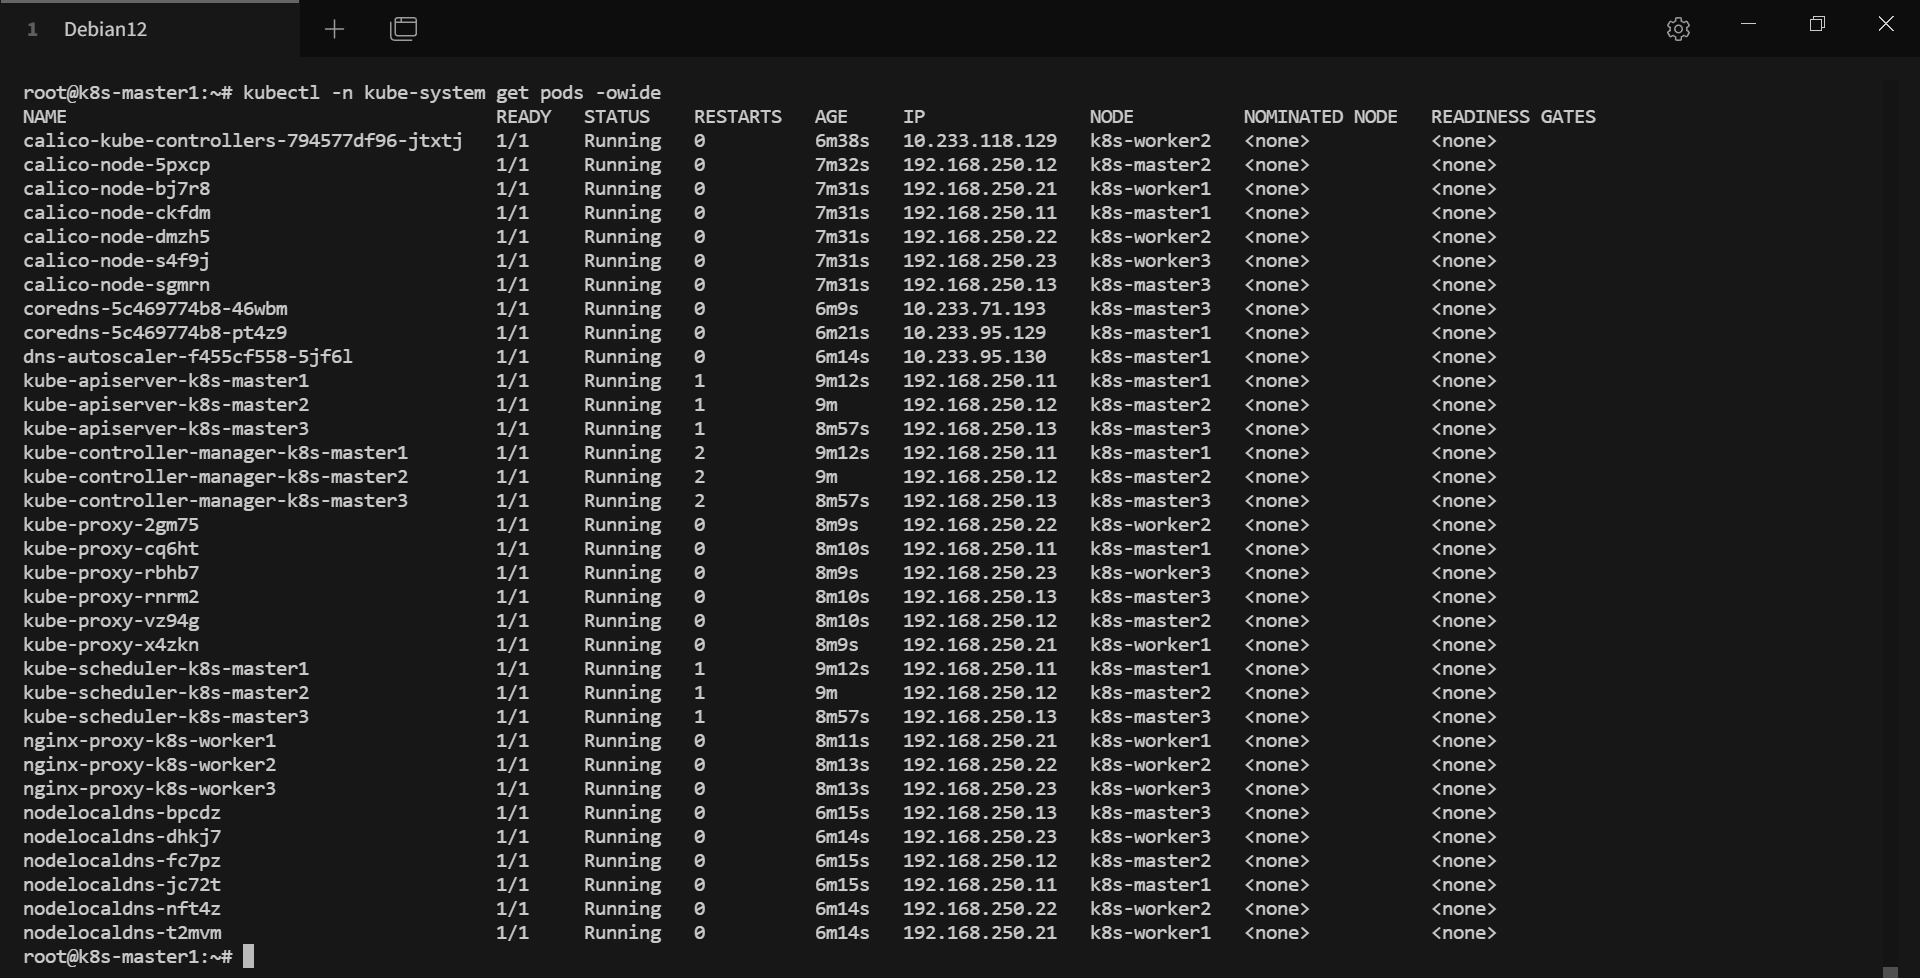
# 查看 k8s pod 状态
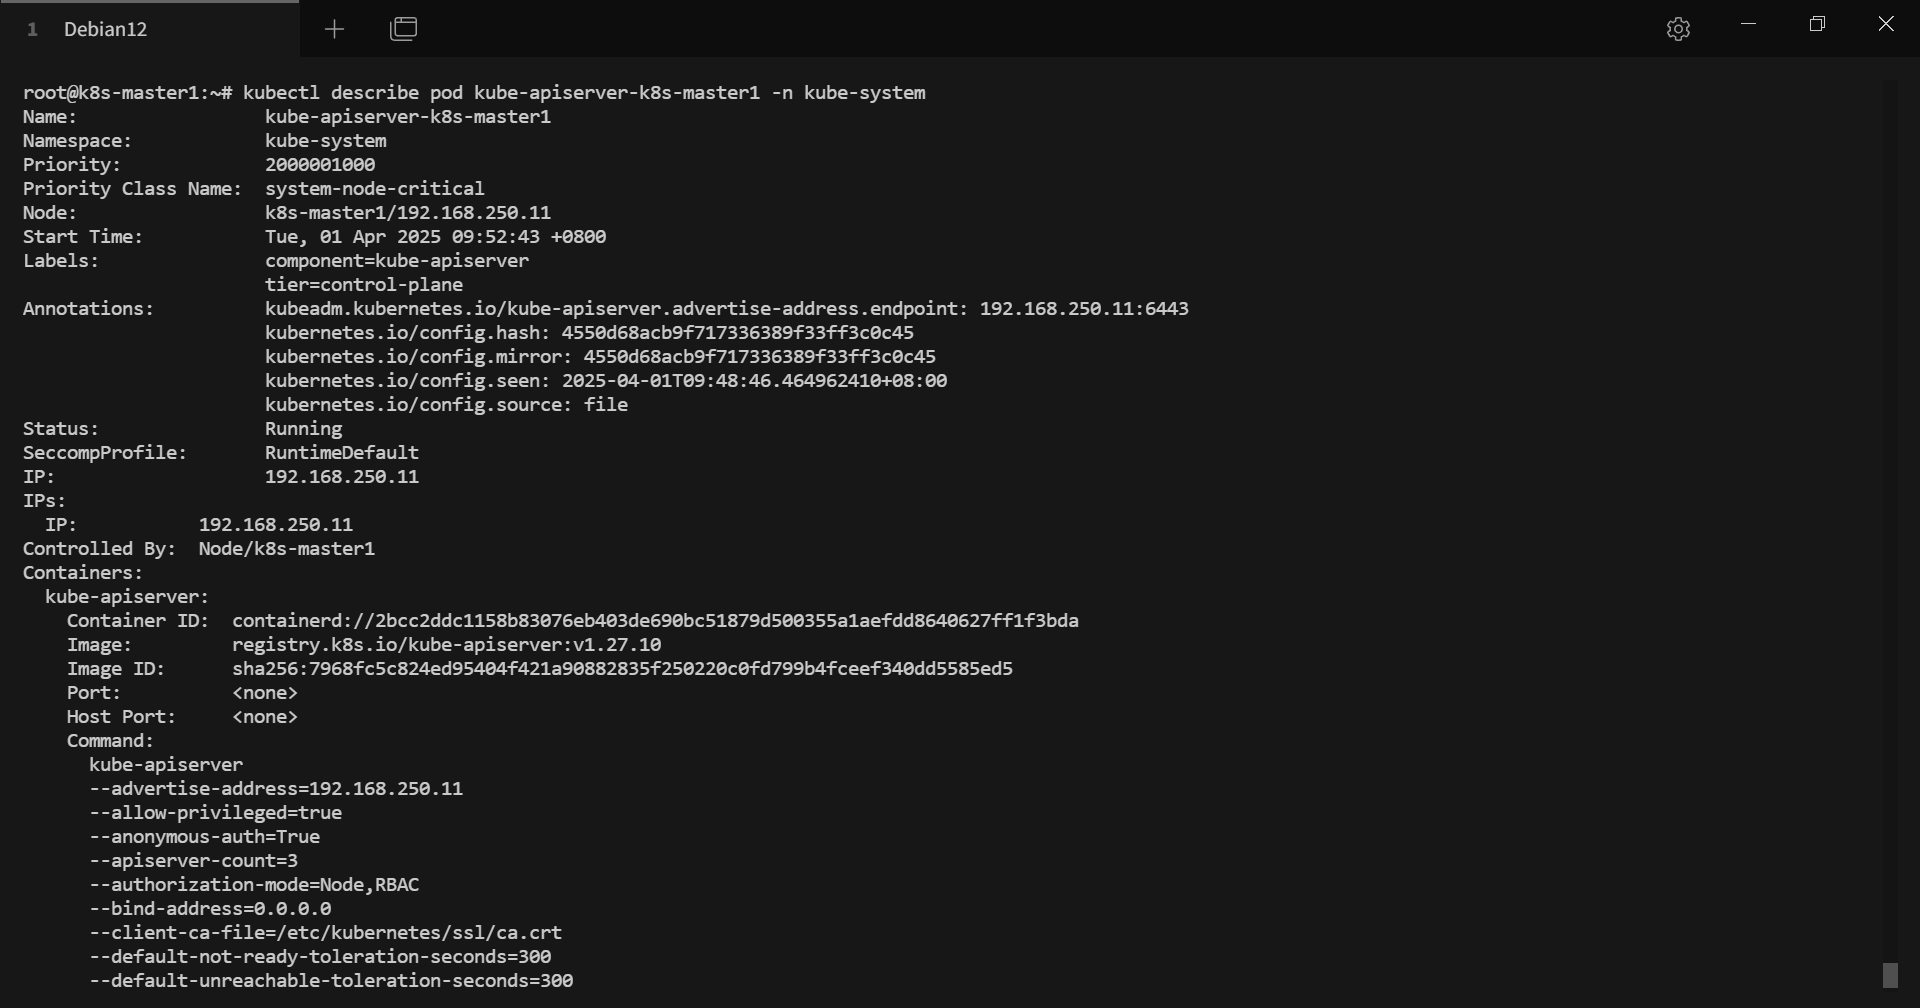
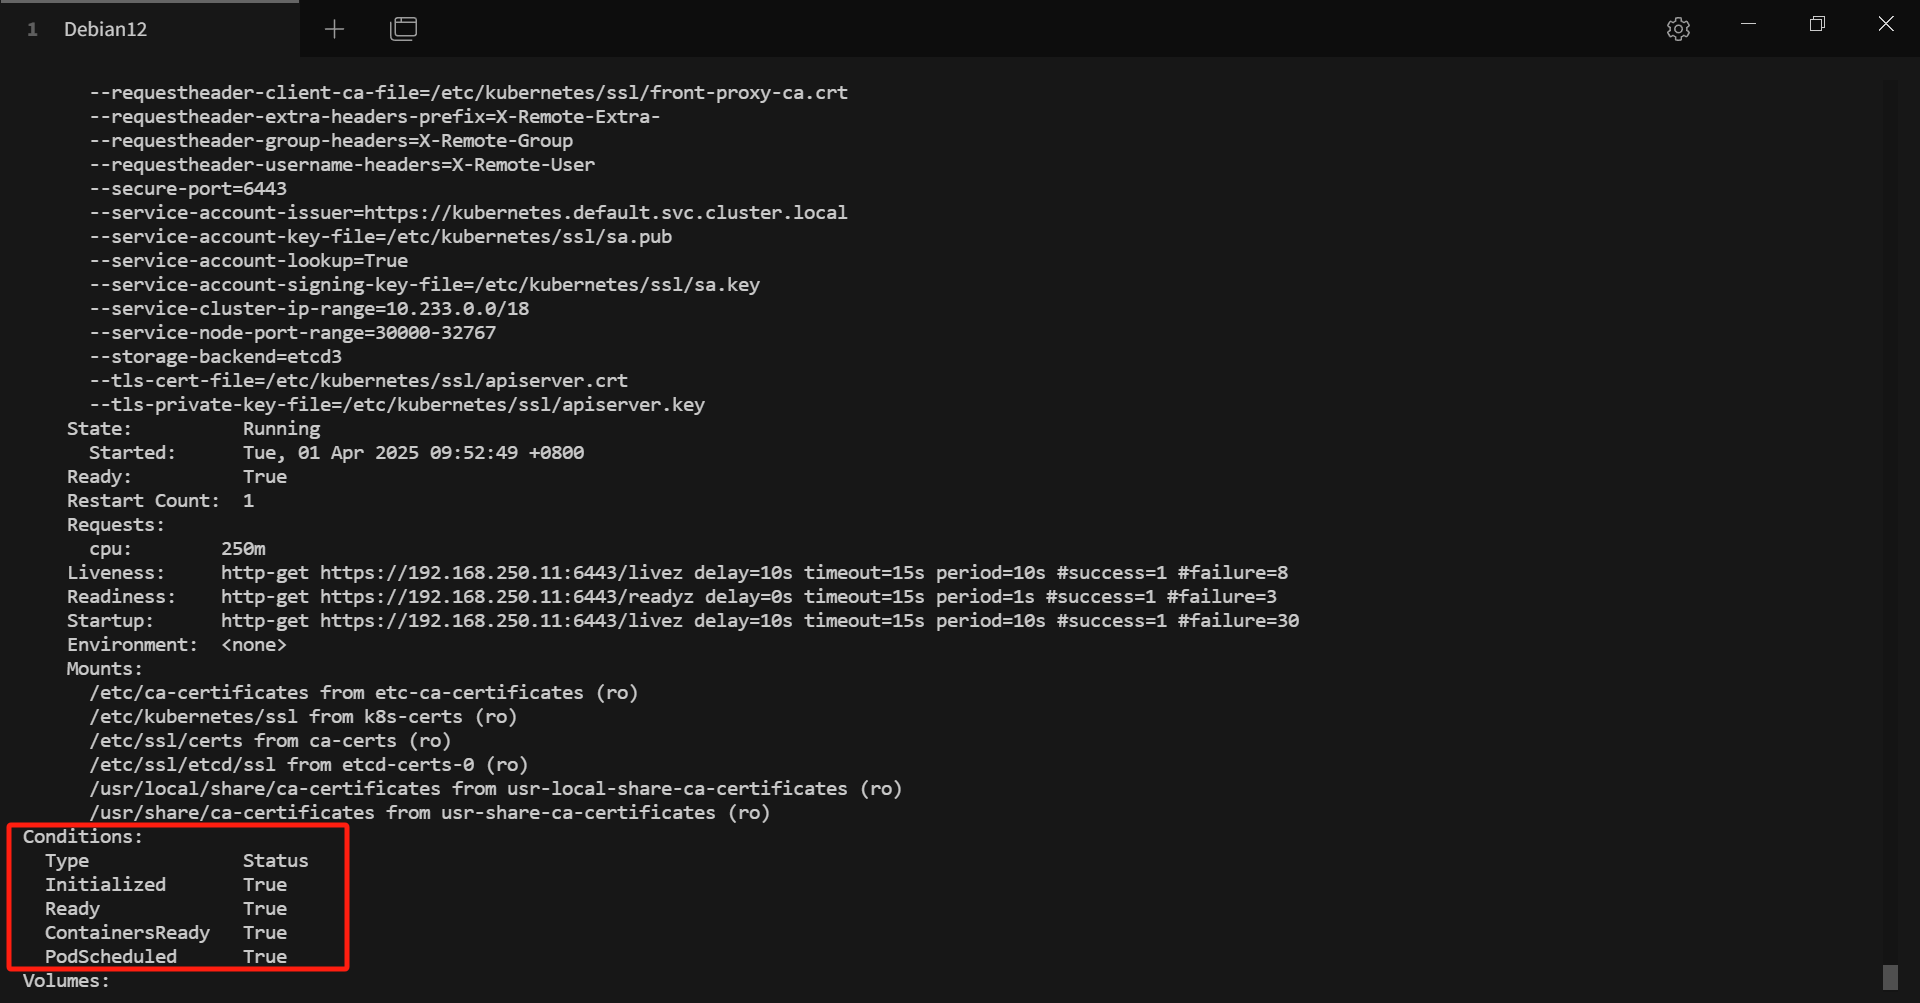
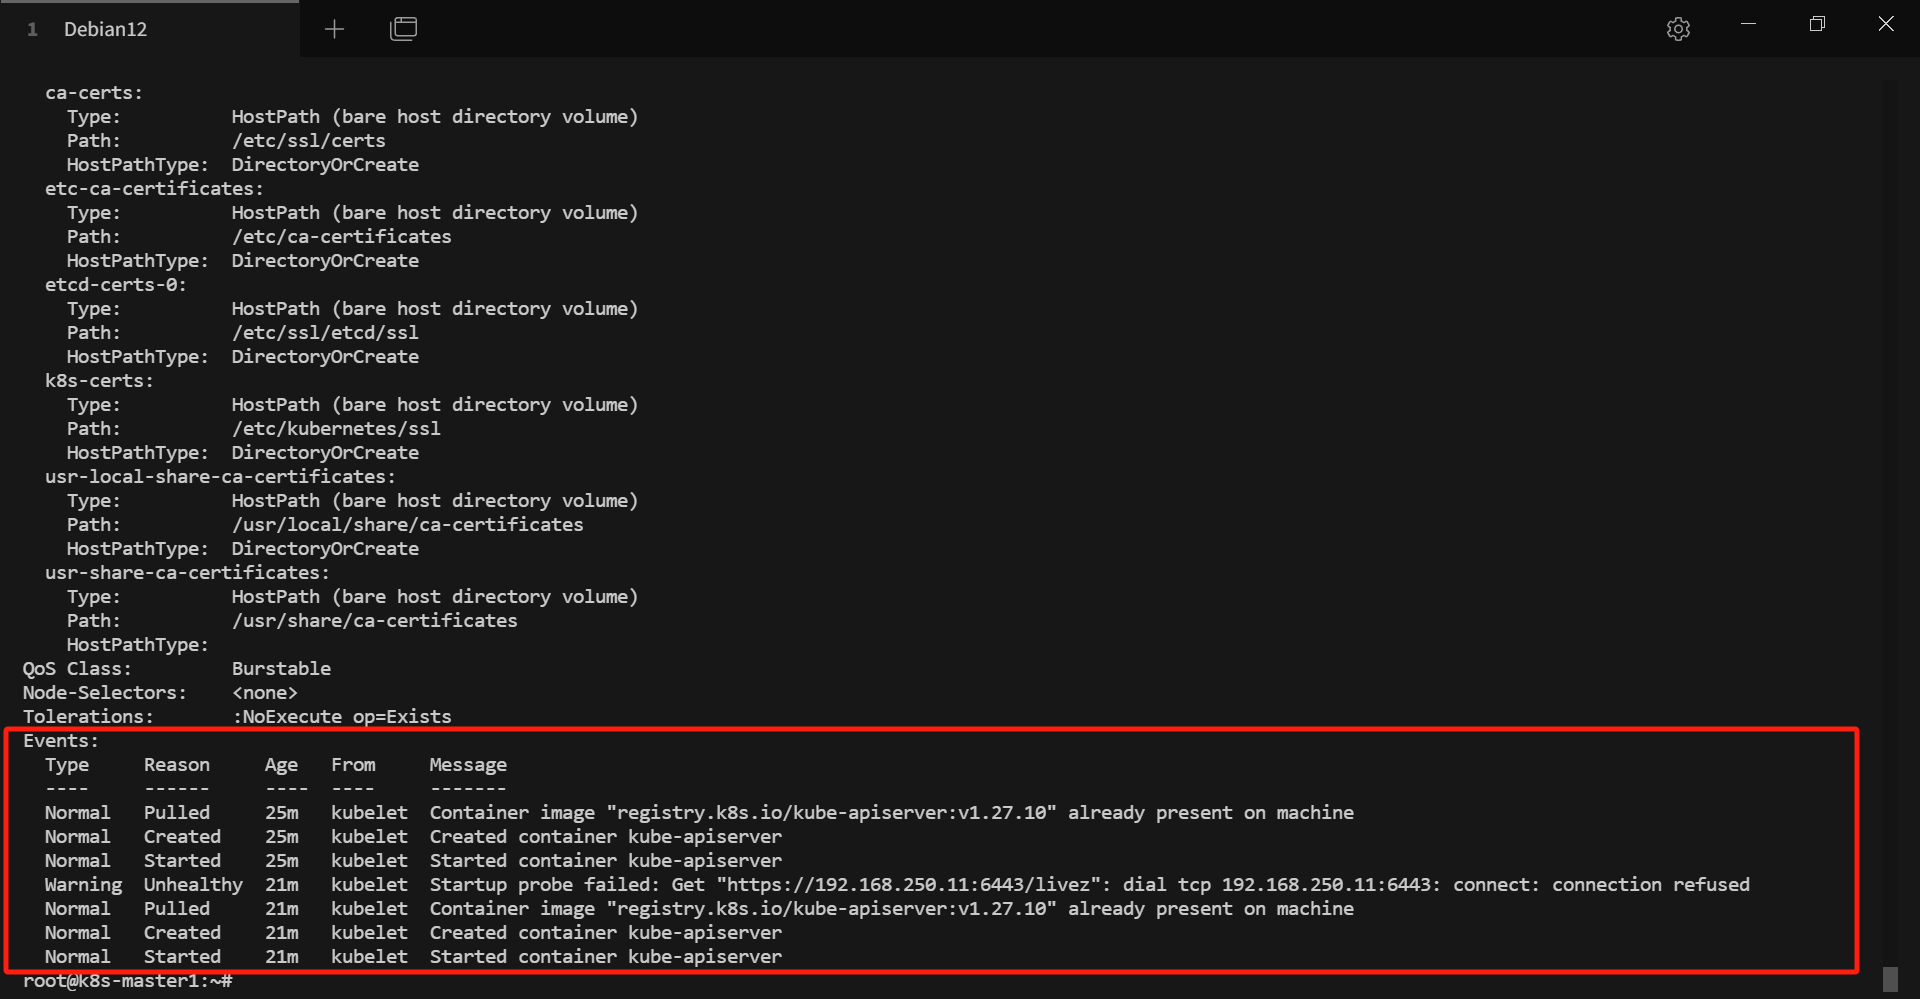
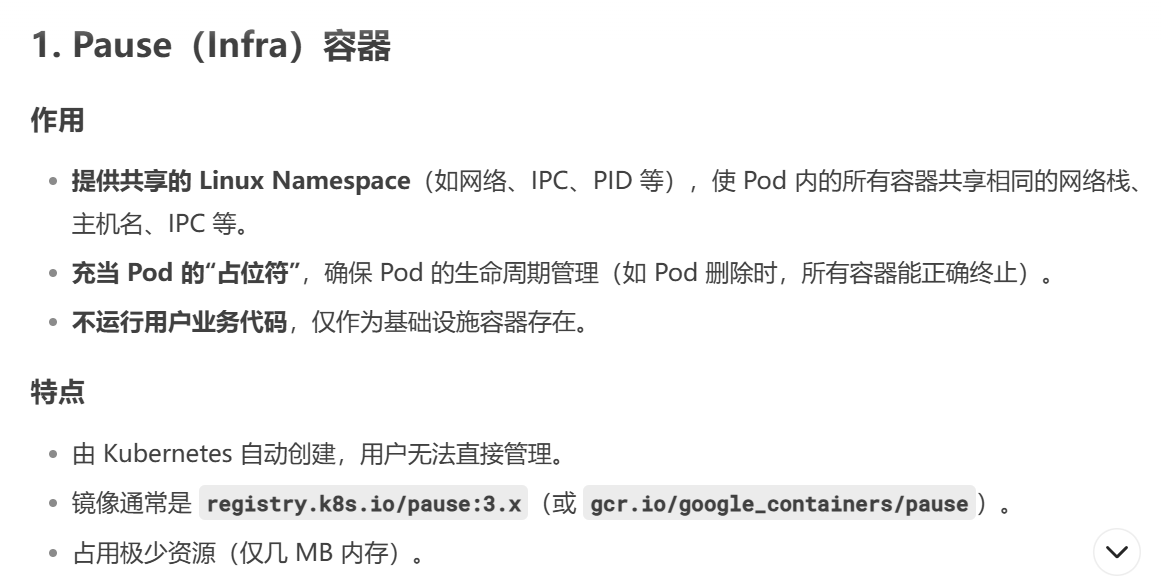
# 查看 pod 详细信息,describe 中包含 pod 的 Conditions 和 Events 等信息
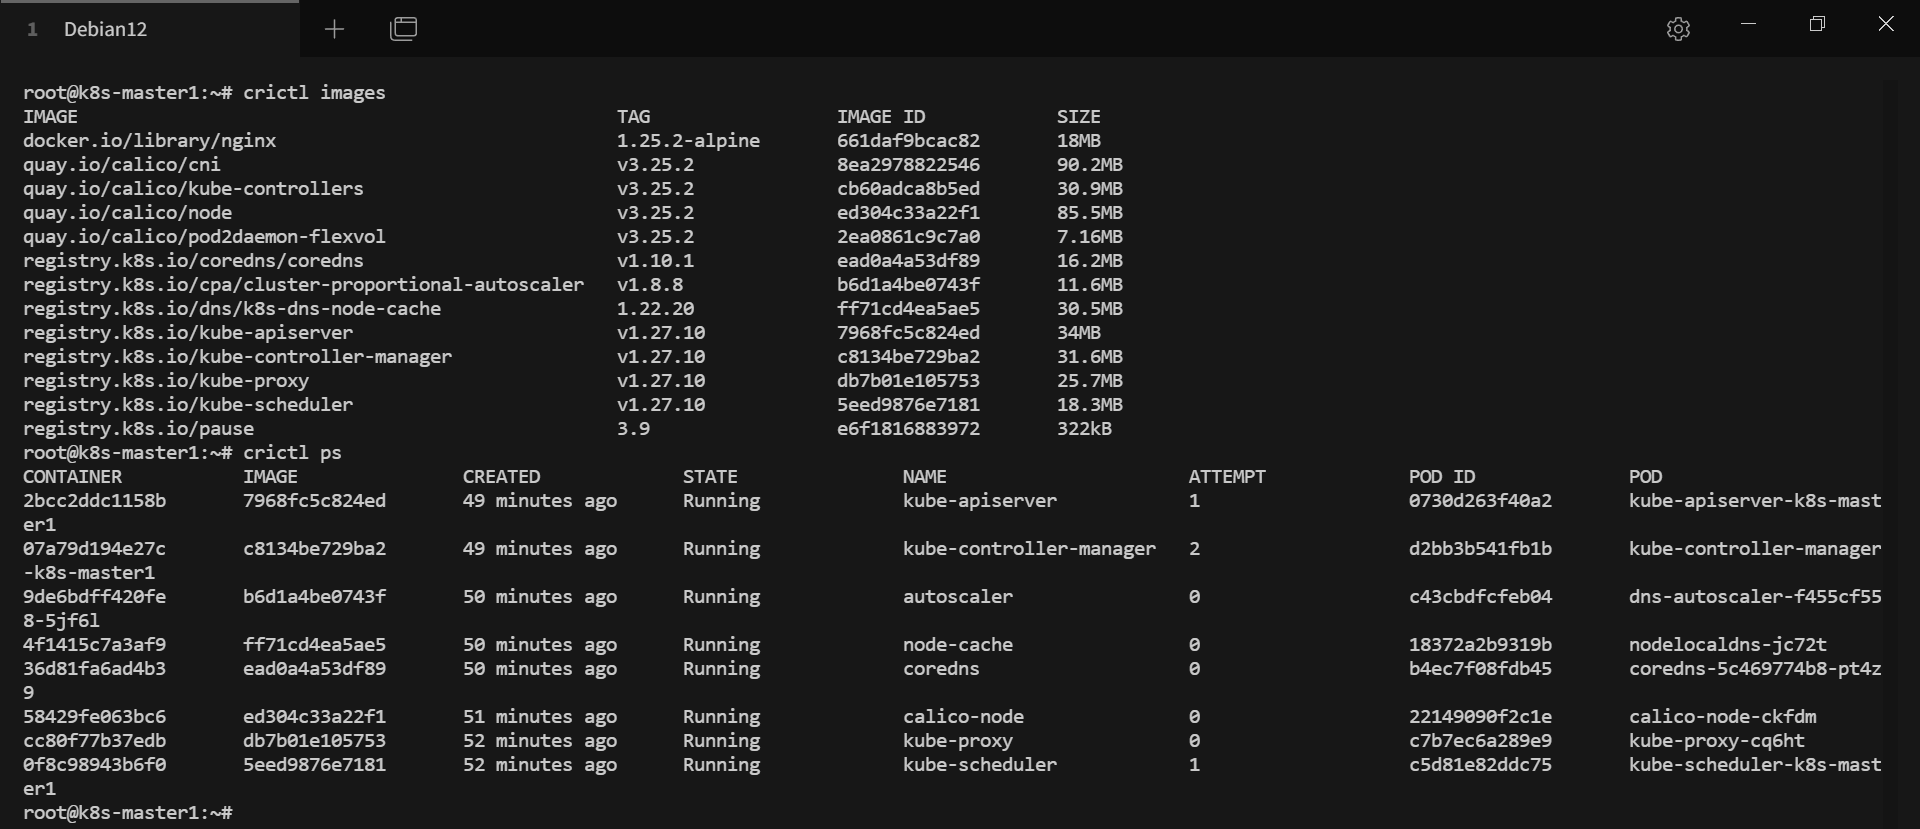
# crictl 查看镜像和运行的容器
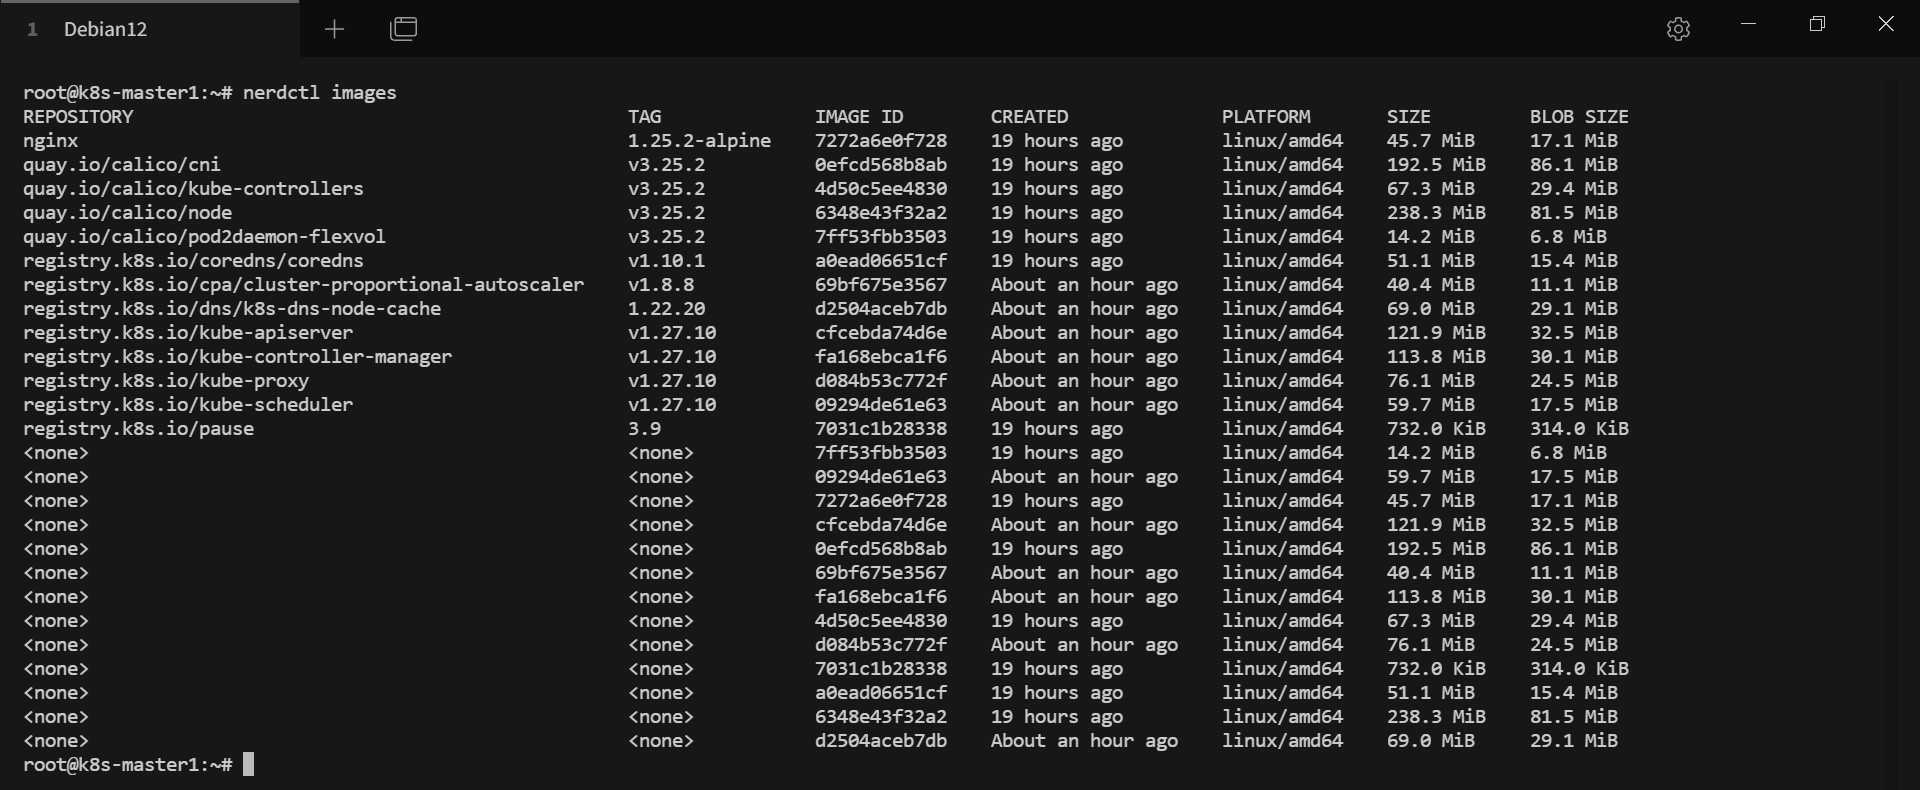
# nerdctl 查看镜像和运行的容器

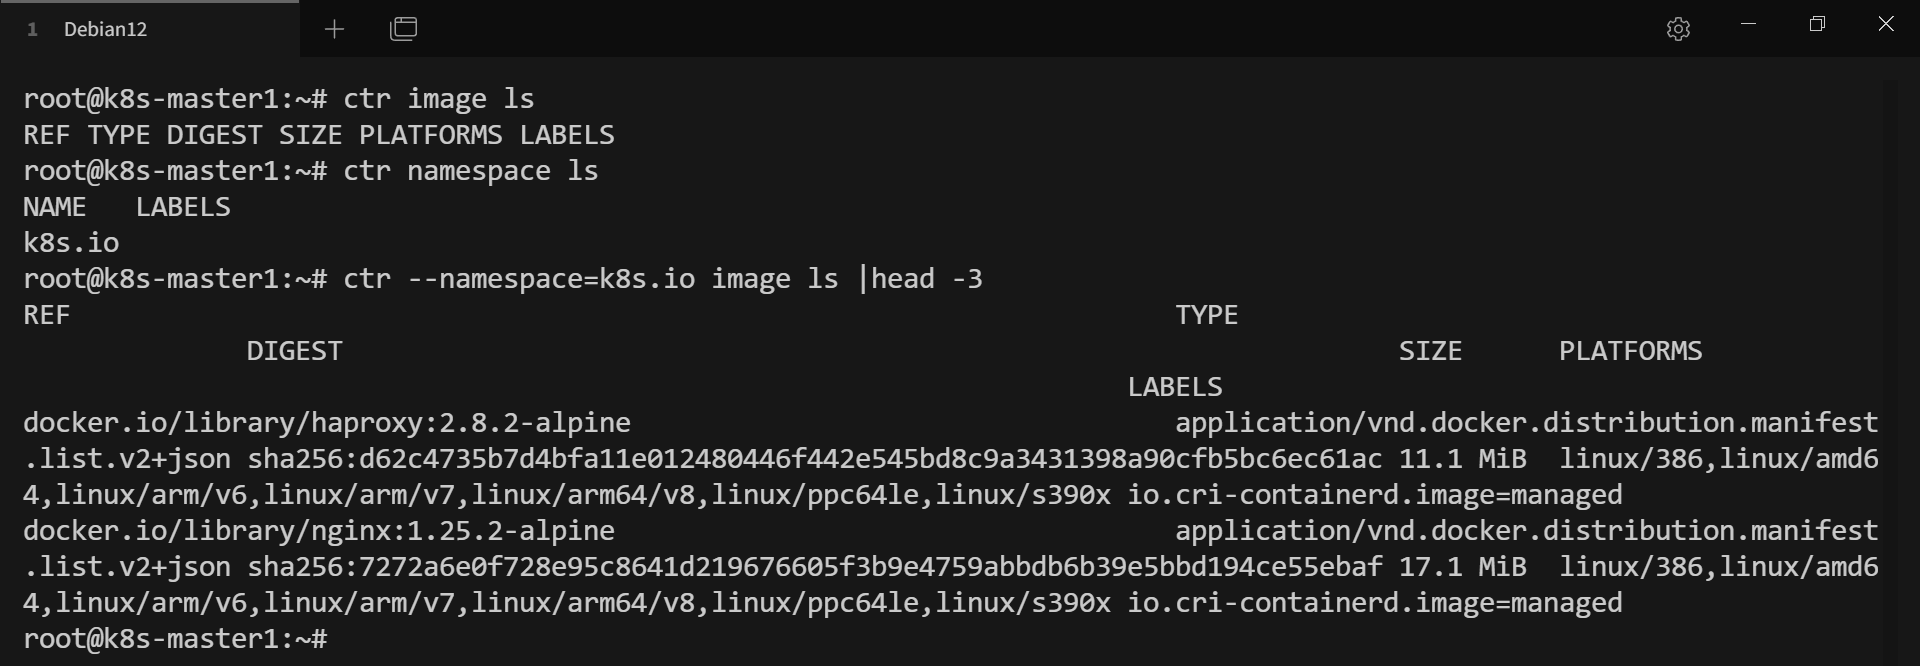
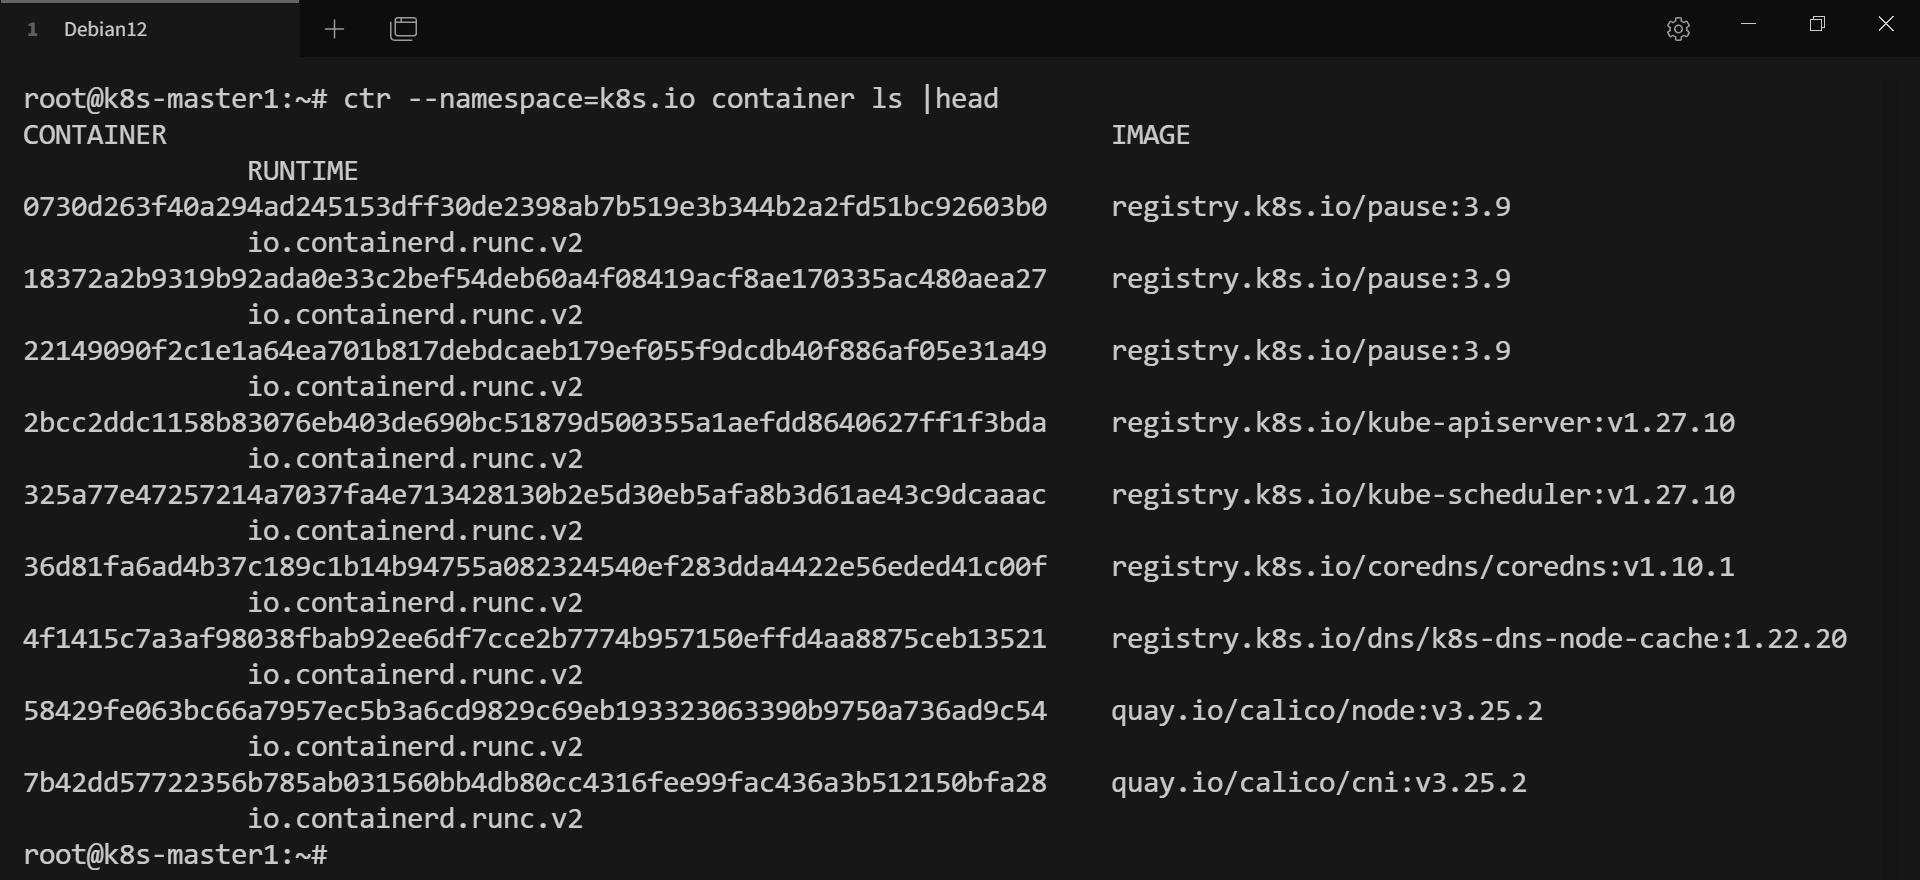
# ctr 查看镜像和运行的容器
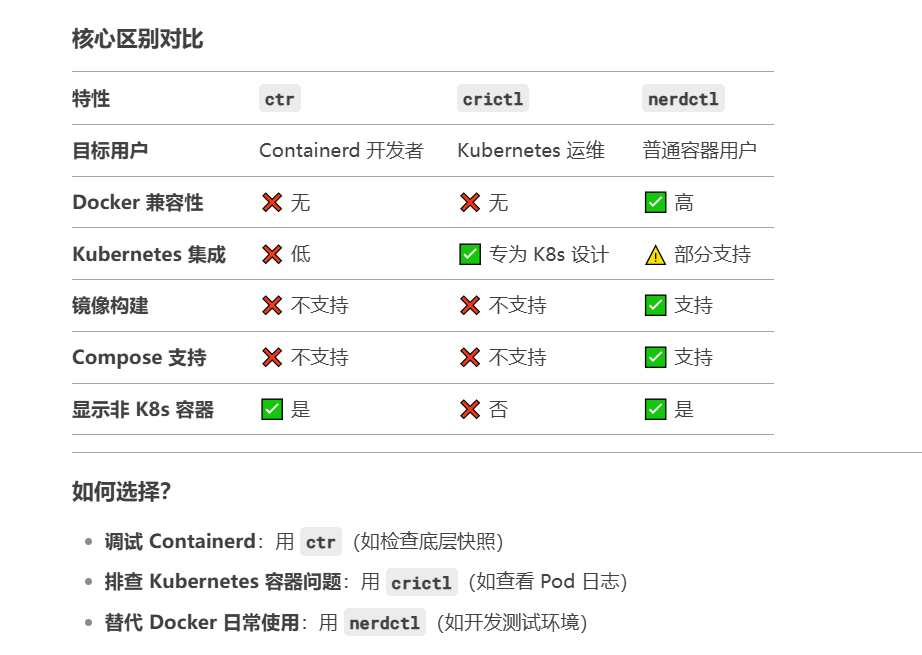
# crictl、nerdctl、ctr 是不同的容器管理工具,主要用于不同的容器运行时环境,区别如下
# pod 常用操作
# 获取当前命名空间下的所有 pod
kubectl get pods (-n 指定命名空间, -o 指定格式输出 pod 信息, -w 可以动态查看 pod 信息, -A 查看所有命名空间的 pod)
# 查询 pod 详细信息
kubectl describe pod <podName> -n <namespaceName>
# 创建 pod
kubectl run <podName> --image=<imageName>
# 删除 pod
kubectl delete pod <podName>
# 查看 pod log
kubectl logs <podName>
# 进入容器
kubectl exec -it <podName> -c <containerName> -- /bin/sh

# pod 中容器镜像拉取策略
pod yaml 定义中的 imagePullPolicy 用于设置镜像拉取策略,k8s 支持的三种镜像拉取策略:
1. Always:从远程仓库拉取镜像
2. ifNotPresent:本地有镜像则从本地拉取,本地没有则去远程仓库拉取镜像
3. Never:只从本地拉取镜像,从不去远程仓库拉取镜像,本地没有会报错
imagePullPolicy 默认值说明:
1. 如果镜像 tag 为具体的版本号,默认策略是 ifNotPresent
2. 如果镜像 tag 为 latest,默认策略是 Always
所以 imagePullPolicy 可以针对同一个 pod 下不同的容器采用不同的拉取策略
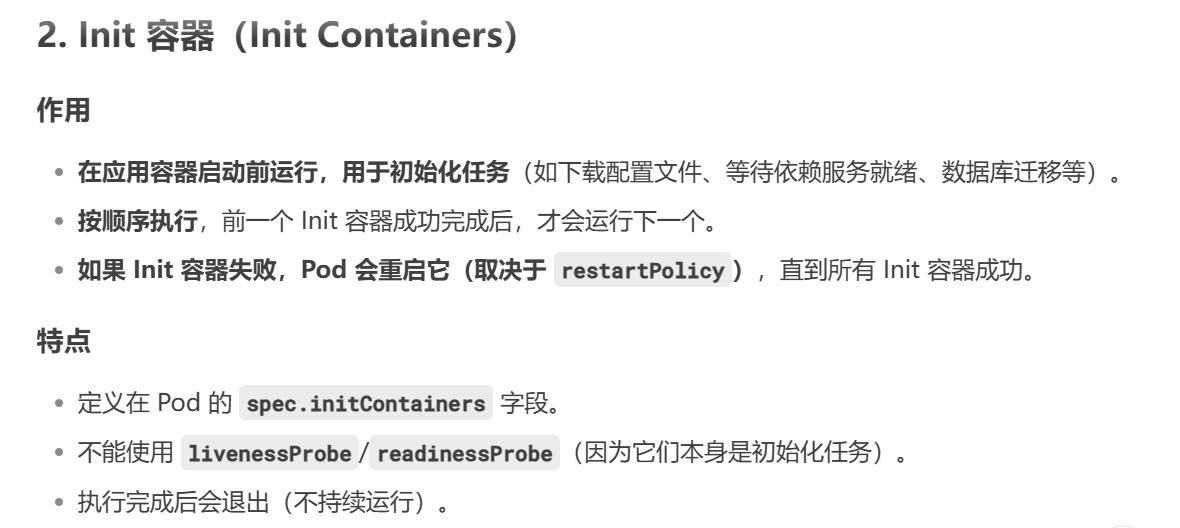
# pod 重启策略
pod yaml 定义中的 .spec.restartPolicy 用于设置 pod 重启策略,目前支持以下3种策略:
1. Always:当容器终止退出后,总是重启容器,默认策略
2. OnFailure:当容器终止异常退出(退出码非0时)重启容器
3. Never:当容器终止退出时,从不重启容器
# 安装配置 keepalived + haproxy
mkdir -pv /k8s/kubespray/templates


 1 ---
 2 - name: Deploy keepalived and haproxy on k8s-master
 3   hosts: kube-master
 4   vars:
 5     # keepalived vars
 6     virtual_ip: "192.168.250.15"
 7     priority_master: 100
 8     vrrp_interface: ens3
 9
10     # haproxy vars
11     haproxy_frontend_port: 16443
12     haproxy_backend_port: 6443
13   tasks:
14     - name: install keepalived and haproxy
15       ansible.builtin.apt:
16         update_cache: yes
17         name: "{{ item }}"
18         state: present
19       loop:
20         - keepalived
21         - haproxy
22
23     - name: configure keepalived
24       template:
25         src: templates/keepalived.conf.j2
26         dest: /etc/keepalived/keepalived.conf
27         owner: root
28         group: root
29         mode: 0644
30       notify: restart keepalived
31
32     - name: configure haproxy
33       template:
34         src: templates/haproxy.cfg.j2
35         dest: /etc/haproxy/haproxy.cfg
36         owner: root
37         group: root
38         mode: 0644
39       notify: restart haproxy
40
41     - name: Enable and start services
42       systemd:
43         name: "{{ item }}"
44         state: started
45         enabled: yes
46       loop:
47         - keepalived
48         - haproxy
49   handlers:
50     - name: restart keepalived
51       systemd:
52         name: keepalived
53         state: restarted
54
55     - name: restart haproxy
56       systemd:
57         name: haproxy
58         state: restarted
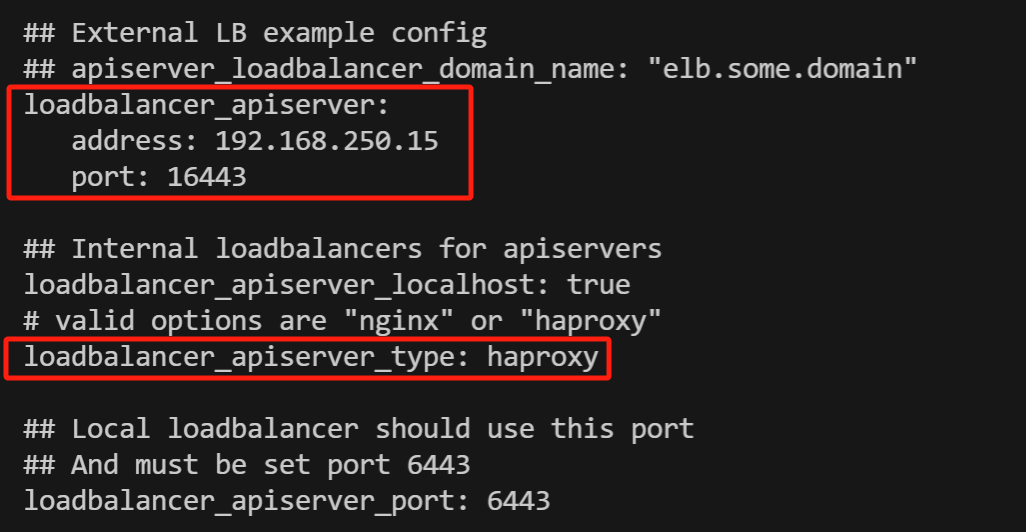
 1 ! Configuration File for keepalived
 2
 3 global_defs {
 4     router_id LVS_DEVEL
 5 }
 6
 7 vrrp_instance VI_1 {
 8     state MASTER
 9     virtual_router_id 51
10     interface {{ vrrp_interface }}
11     priority {{ priority_master }}
12     advert_int 1
13     authentication {
14         auth_type PASS
15         auth_pass 1111
16     }
17     virtual_ipaddress {
18         {{ virtual_ip }}/24 dev {{ vrrp_interface }}
19     }
20 }
 1 global
 2     log 127.0.0.1 local0
 3     log 127.0.0.1 local1 notice
 4     maxconn 4096
 5     #chroot /usr/share/haproxy
 6     #user haproxy
 7     #group haproxy
 8     daemon
 9
10 defaults
11     log global
12     mode http
13     option httplog
14     option dontlognull
15     retries 3
16     option redispatch
17     timeout connect 5000
18     timeout client 50000
19     timeout server 50000
20
21 frontend stats-front
22     bind *:8081
23     mode http
24     default_backend stats-back
25
26 frontend frontend_k8s_16443
27     bind *:{{ haproxy_frontend_port }}
28     mode tcp
29     timeout client 1h
30     log global
31     option tcplog
32     default_backend backend_k8s_6443
33     acl is_websocket hdr(Upgrade) -i WebSocket
34     acl is_websocket hdr_beg(Host) -i ws
35
36 backend stats-back
37     mode http
38     balance roundrobin
39     stats uri /haproxy/stats
40     stats auth pxcstats:secret
41
42 backend backend_k8s_6443
43     mode tcp
44     timeout queue 1h
45     timeout server 1h
46     timeout connect 1h
47     log global
48     balance roundrobin
49     {% for host in groups['kube-master'] %}
50     server {{ host }} {{ hostvars[host].ansible_host }}:{{ hostvars[host].haproxy_port | default(6443) }}
51     {% endfor %}
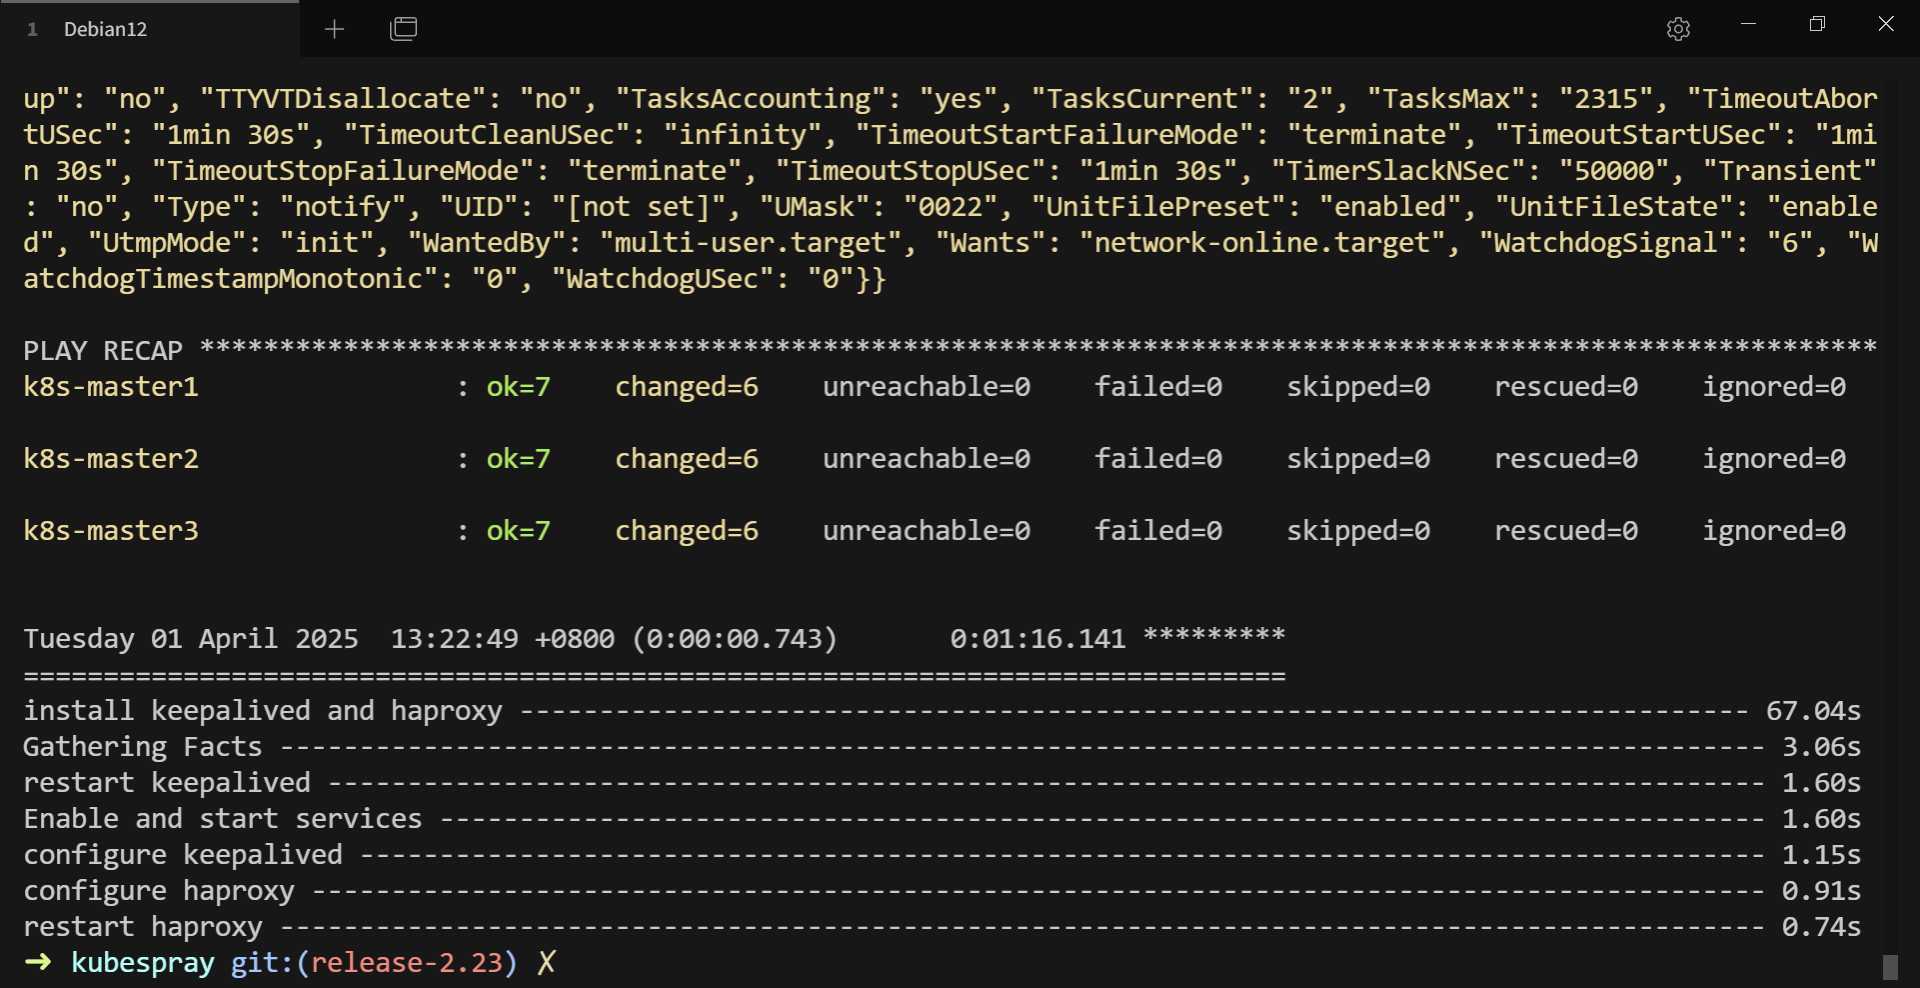
# 执行命令:ansible-playbook -i inventory/sample/inventory.ini keepalived-haproxy.yml -v(结果如下所示)
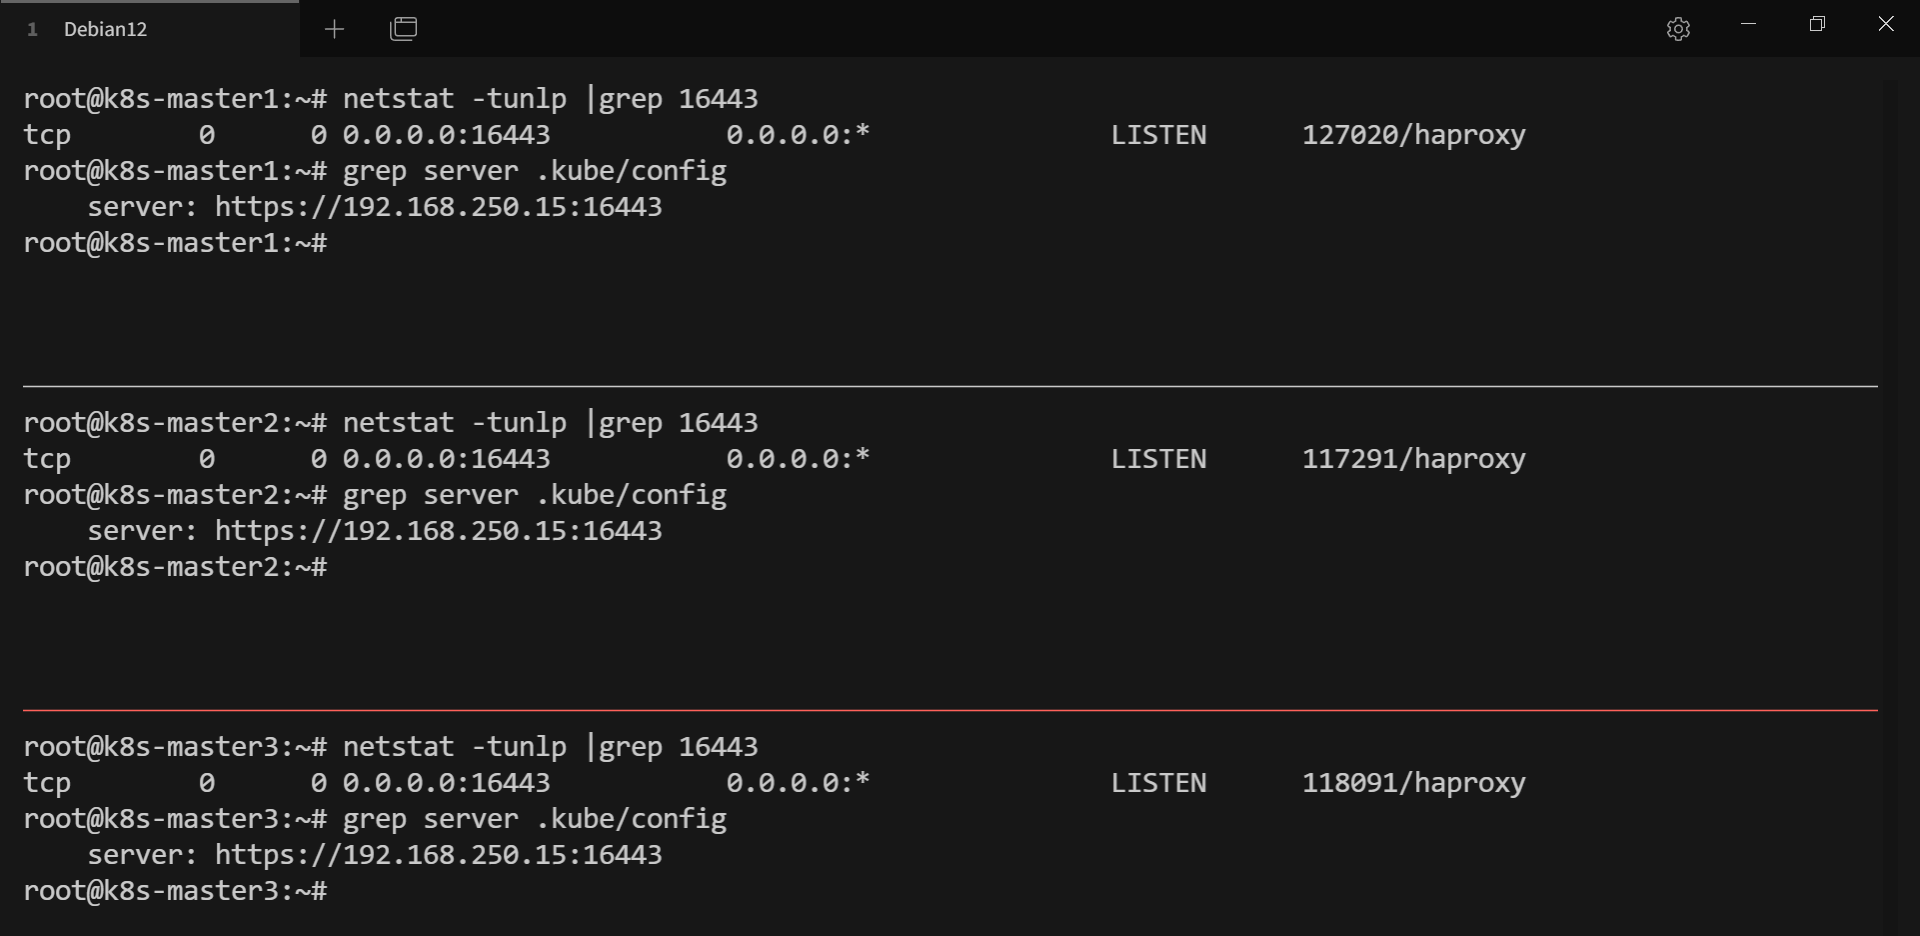
# 修改配置文件
for i in {1..3}
do
ssh k8s-master$i 'sed -i "s|server:.*|server: https://192.168.121.15:16443|" ~/.kube/config'
done
# 再次执行 ansible-playbook -i inventory/sample/inventory.ini cluster.yml -u root --private-key=~/.ssh/id_rsa -v 更新证书
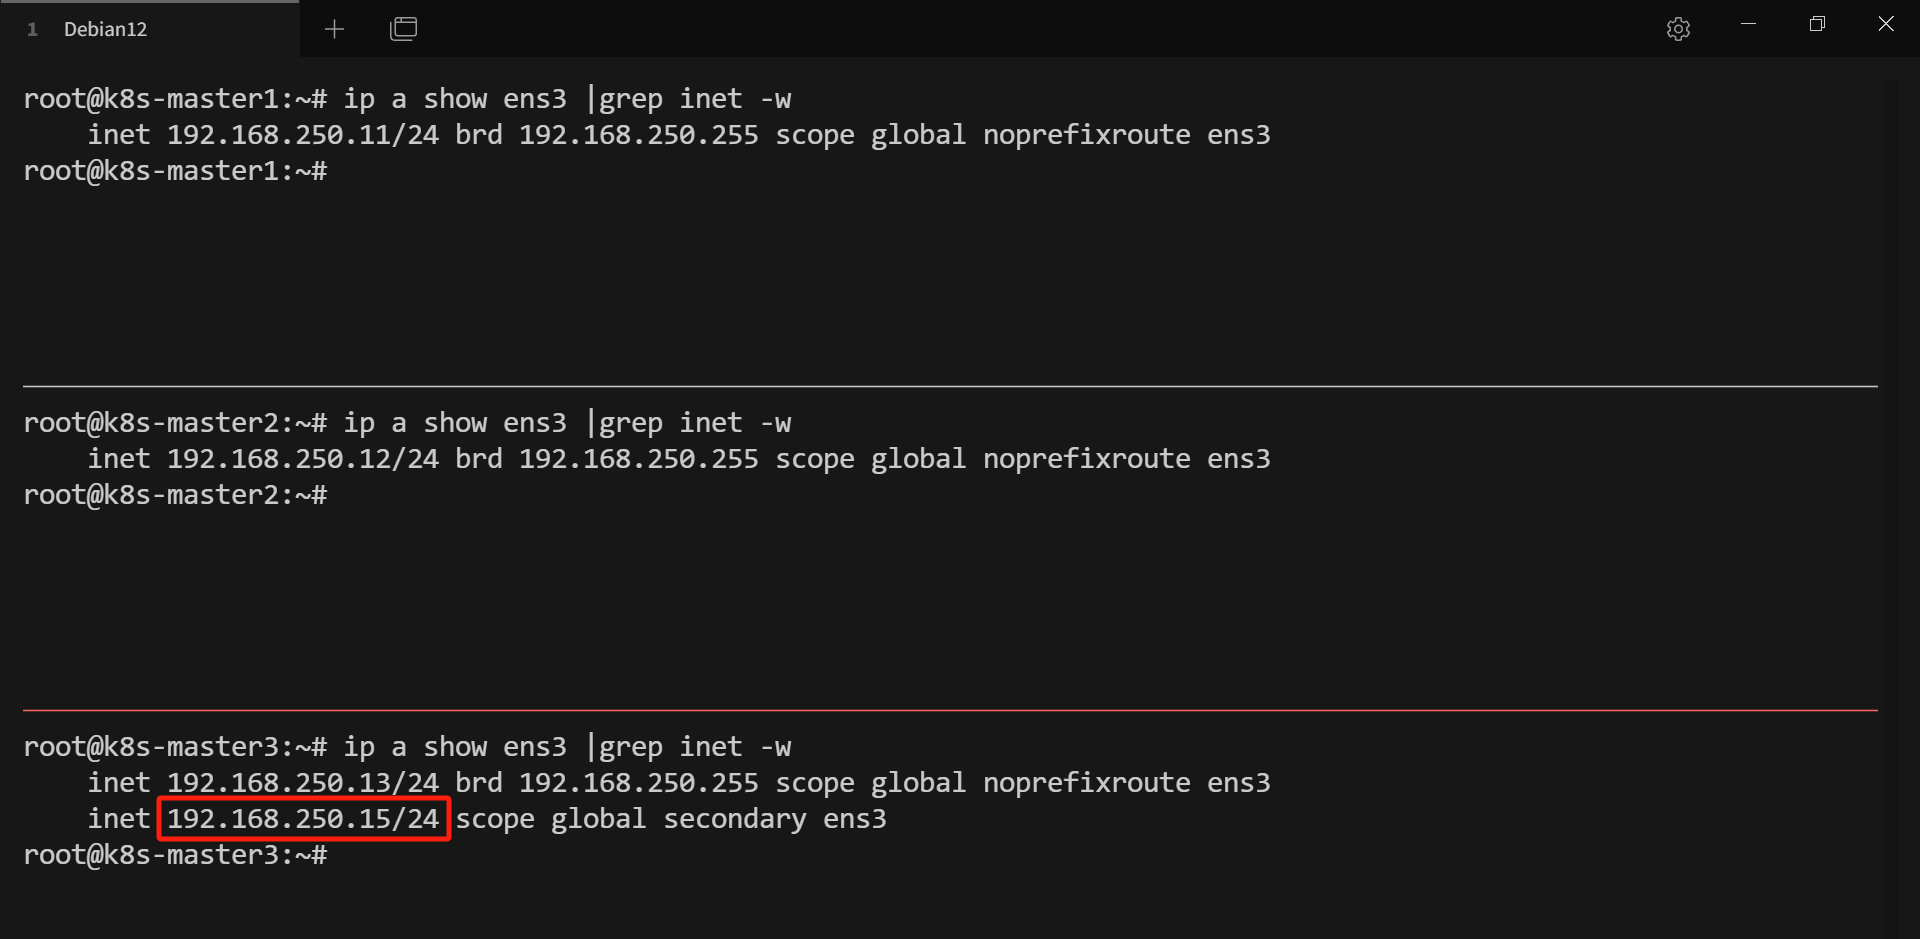
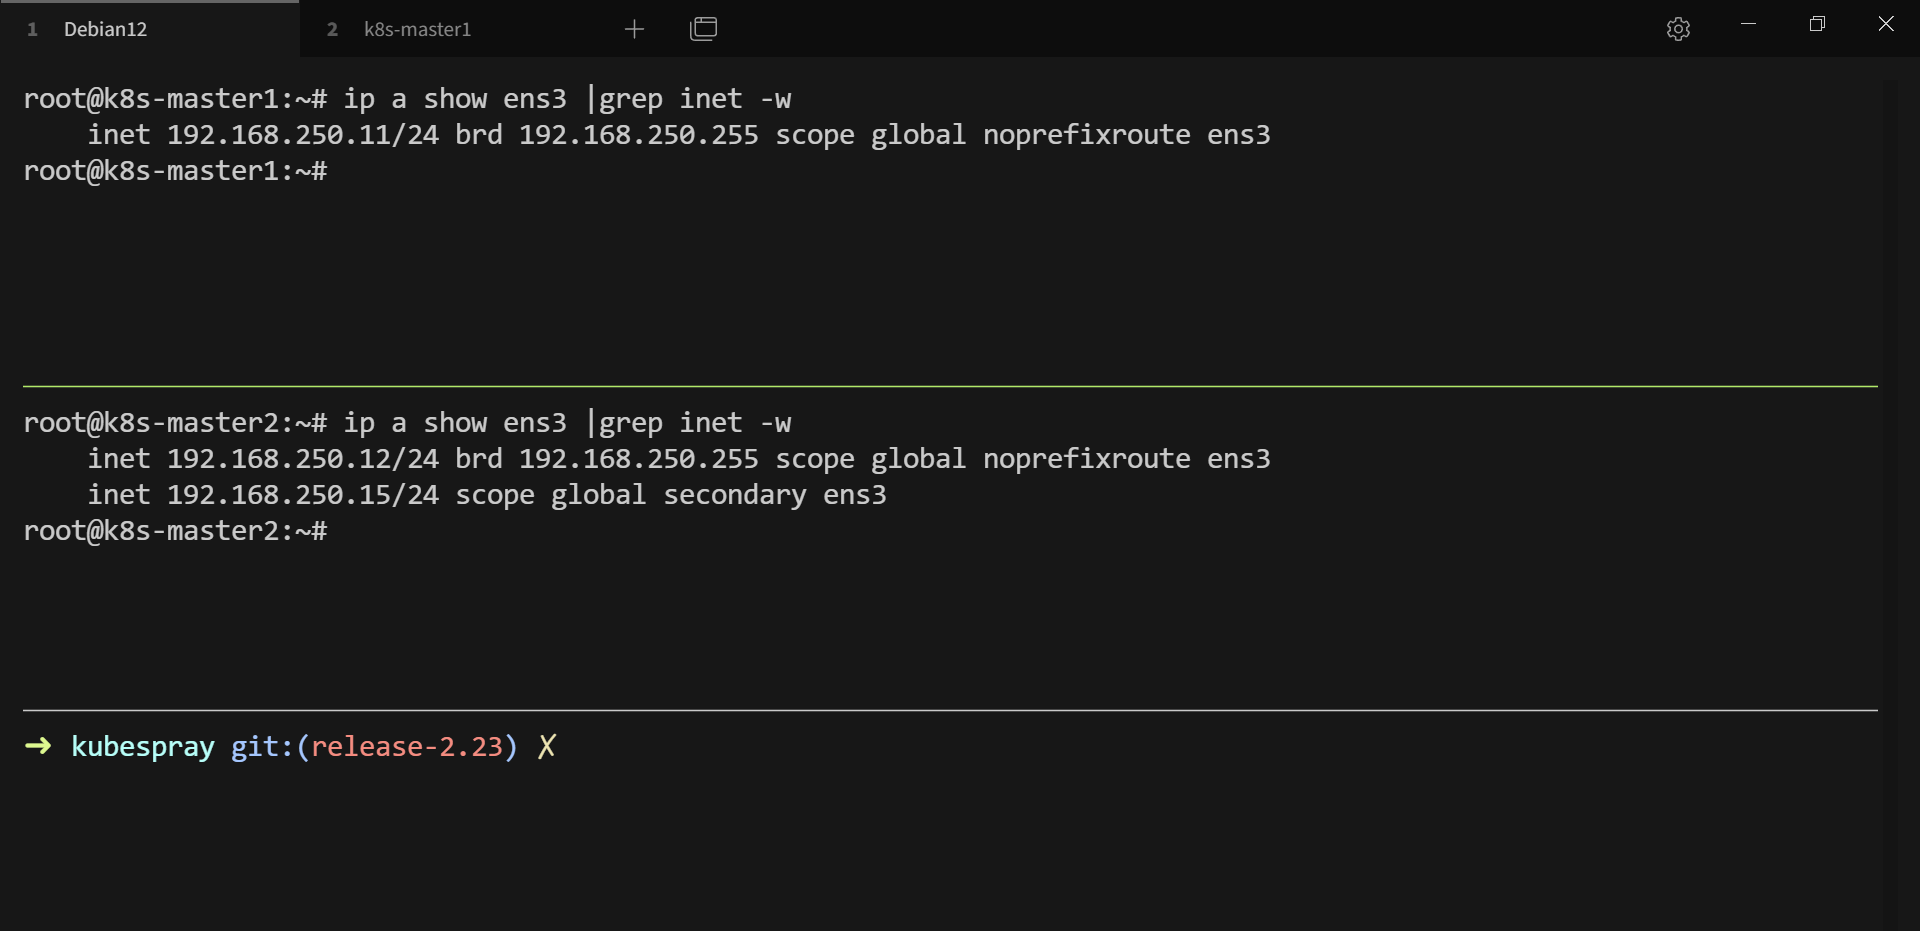
# 查看 VIP 在哪台 master 上
# 将 VIP 对应的 master 节点关机(模拟 master 宕机)
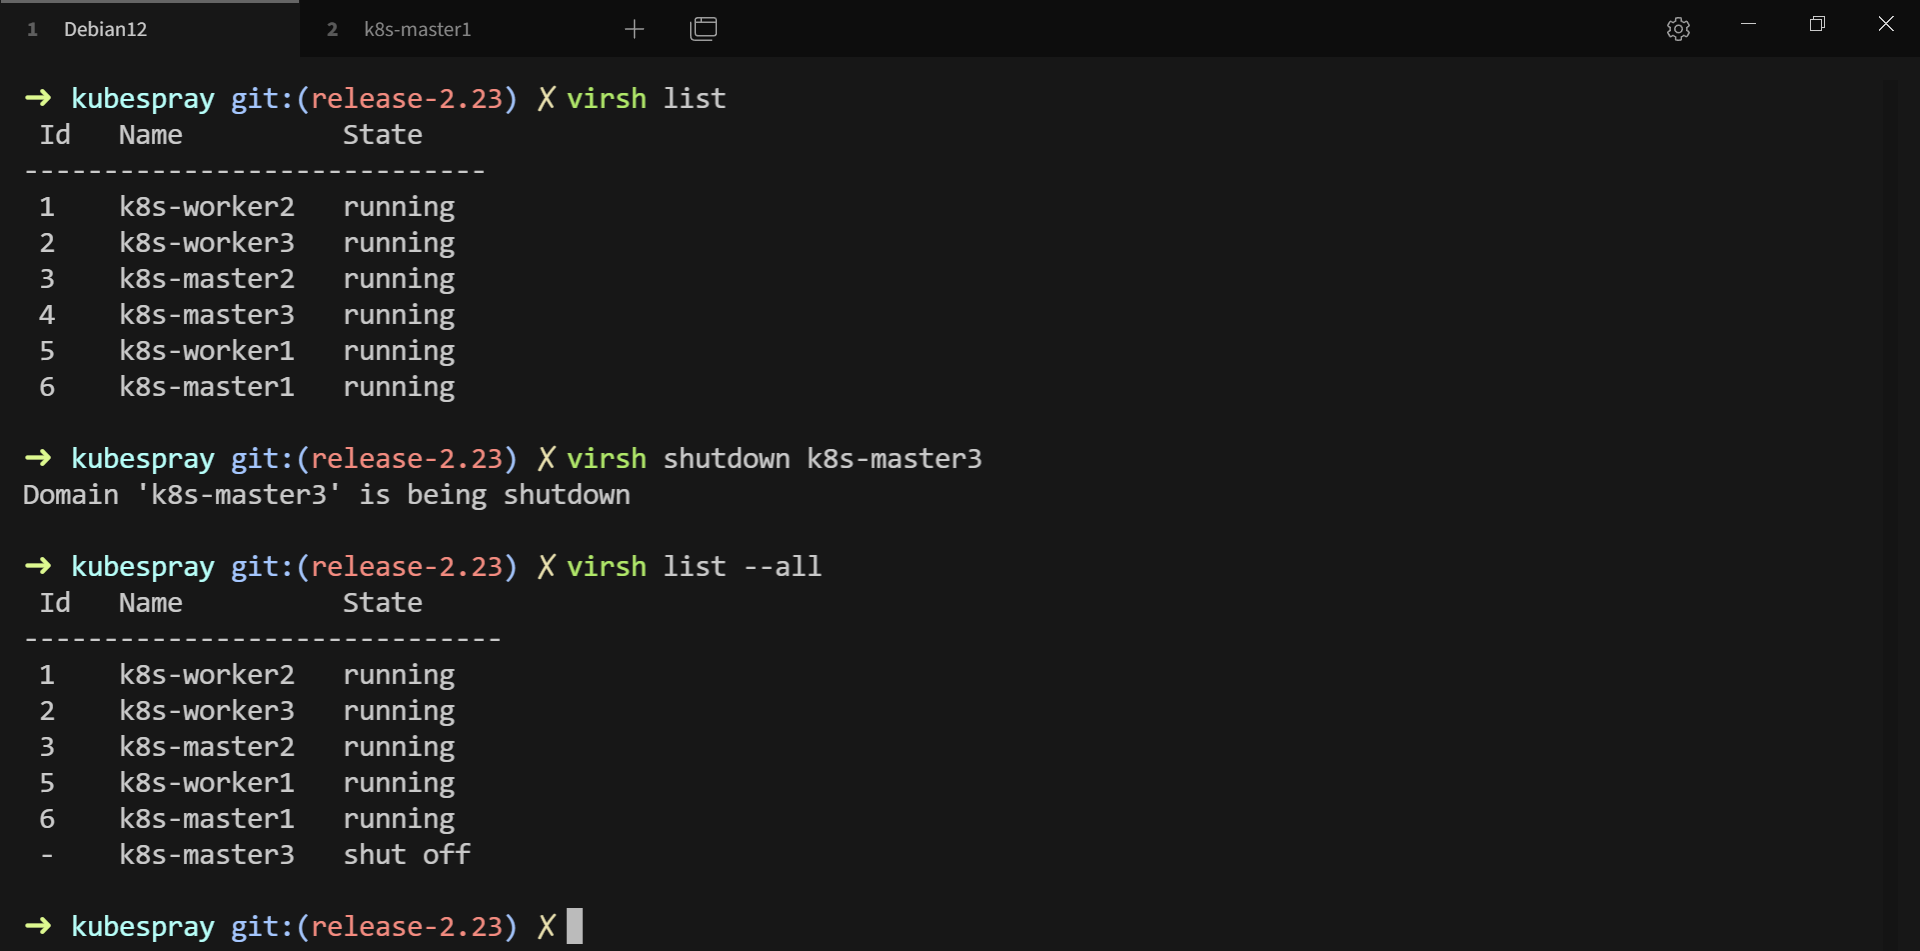
# 此时集群和 kube-apiserver 的访问依旧正常

# curl -k https://<apiserver-VIP>:<haproxy-port>/healthz 和 kubectl get --raw /healthz 可查看 kube-apiserver 是否存活

# 并且 VIP 已转移到其它 master 节点,至此 k8s 的高可用集群已部署完成

 浙公网安备 33010602011771号