

Upgrading VS 2003 Web Projects to be VS 2005 Web Application Projects
The below tutorial helps explain how you can now use the VS 2005 Web Application Project preview to more easily migrate existing web projects in VS 2003 to VS 2005. Please make sure that you have already completed Tutorials 1-6 on this site first, as this will help provide you with context about how the VS 2005 Web Application Project model works - as well as what features are not yet supported with the first preview release (note: these features will be added early next year).
Migrating from VS 2003 to VS 2005 using the Web Application Project Preview
There are a couple of different strategies you can take when migrating a VS 2003 Web Project to VS 2005. One option (which is the default with the shipping VS 2005 bits) is to migrate the project to use the new VS 2005 Web Site project model.
An alternative (and now much easier) approach, is to migrate a VS 2003 Web Application Project to use the VS 2005 Web Application Project option instead. The VS 2005 Web Application Project model uses the same conceptual approach as VS 2003 (project file to include/exclude files, and compilation to a single assembly, etc), and so doesn't require any architectural changes (the only things that might impact you are deprecated API warnings -- which can optionally be ignored -- and/or language changes).
With the final release of the VS 2005 Web Application Project download, VS 2005 will provide an automatic prompt to let developers choose whether they want to automatically upgrade a VS 2003 project to use the VS 2005 Web Site Project model or the VS 2005 Web Application Project Model when they attempt to open a VS 2003 based web project using VS 2005.
The automatic migration wizard functionality to-do this is not yet implemented in this first release of the preview. However, the below tutorial can be used to walkthrough steps that will allow you to manually achieve the same results. In general, you should be able to complete the first 8 steps in ~15-20 minutes (I've gone into exhaustive detail on each step -- but in general they only take 1-2 each minutes to-do).
Please follow the below steps in exact order. If you have problems (or better yet success) in migrating an application using the below steps, please send me email at: scottgu@microsoft.com. I will then update the below tutorial over the next few days to help clarrify any questions people have.
Step 1: Backup Your VS 2003 Projects
Please make absolutely sure to save a backup of your VS 2003 Web Projects and Solutions before attempting any of the below steps. The below steps are still "preview" steps (meaning we've tried them successfully with many apps -- but there still could be issues), and there is the chance that you might need to roll-back to the VS 2003 solution if you run into issues.
Step 2: Open Your VS 2003 Web Project and Make Sure it Compiles Clean
Before attempting to migrate anything, please make sure that you open up your existing VS 2003 solution and perform a clean-re-compile of the entire solution -- and then run the application. Spending 2 minutes to verify everything is working before you migrate can save a lot of grief later (especially if the cause is because of a last-minute directory move, etc).
Step 3: Modify the VS 2003 .sln/.csproj files to change the web project to be a class library
VS 2003 Web Projects have the same semantics as class library projects -- but with additional hooks to integrate with FrontPage Server Extensions and IIS. As part of the manual conversion process needed with this preview release, you will need to modify the VS 2003 Web Projects in your solution to be treated as regular class libraries instead. This will then allow us to use the standard VS 2005 class-library project migration utility instead of the Web-Site project migration utility (that would otherwise run) with the shipping VS 2005 product. We'll then convert them to be VS 2005 Web Application Projects after this migration has taken place.
To convert your VS 2003 Web Projects to be vanilla class-library, make the following chages:
1) Close the Solution in VS 2003
2) Using notepad, open the .sln solution file for the solution. The .sln file is a text-based file that contains your project wide-settings, as well as pointers to all of the projects and project-files contained within it. For example, the below snippet shows a VS 2003 solution file with a web-project and a classlibrary:
Microsoft Visual Studio Solution File, Format Version 8.00
Project("{FAE04EC0-301F-11D3-BF4B-00C04F79EFBC}") = "PortalCSVS", "http://localhost/PortalCSVS/PortalCSVS.csproj", "{345F0E9A-24F3-451C-B8EE-6B3796797BC8}"
	ProjectSection(ProjectDependencies) = postProject
	EndProjectSection
EndProject
Project("{FAE04EC0-301F-11D3-BF4B-00C04F79EFBC}") = "ClassLibrary1", "ClassLibrary1\ClassLibrary1.csproj", "{50CC4DB3-6AE3-4A01-A3C8-000DB914F9CF}"
	ProjectSection(ProjectDependencies) = postProject
	EndProjectSection
EndProject
Global
	GlobalSection(SolutionConfiguration) = preSolution
		Debug = Debug
		Release = Release
	EndGlobalSection
	GlobalSection(ProjectConfiguration) = postSolution
		{345F0E9A-24F3-451C-B8EE-6B3796797BC8}.Debug.ActiveCfg = Debug|.NET
		{345F0E9A-24F3-451C-B8EE-6B3796797BC8}.Debug.Build.0 = Debug|.NET
		{345F0E9A-24F3-451C-B8EE-6B3796797BC8}.Release.ActiveCfg = Release|.NET
		{345F0E9A-24F3-451C-B8EE-6B3796797BC8}.Release.Build.0 = Release|.NET
		{50CC4DB3-6AE3-4A01-A3C8-000DB914F9CF}.Debug.ActiveCfg = Debug|.NET
		{50CC4DB3-6AE3-4A01-A3C8-000DB914F9CF}.Debug.Build.0 = Debug|.NET
		{50CC4DB3-6AE3-4A01-A3C8-000DB914F9CF}.Release.ActiveCfg = Release|.NET
		{50CC4DB3-6AE3-4A01-A3C8-000DB914F9CF}.Release.Build.0 = Release|.NET
	EndGlobalSection
	GlobalSection(ExtensibilityGlobals) = postSolution
	EndGlobalSection
	GlobalSection(ExtensibilityAddIns) = postSolution
	EndGlobalSection
EndGlobal
Manually edit the web-project definitions to remove the http:// path location information, and instead just point to the .csproj file directly (like you would for a normal class library -- using file-path information relative to the .sln file). For example, the first web project definition above -- "http://localhost/PortalCSVS/PortalCSVS.csproj" -- would change to instead be "PortalCSVS\PortalCSVS.csproj" (note that the path had to change from "/" to "\" because it is now a file-path):
Project("{FAE04EC0-301F-11D3-BF4B-00C04F79EFBC}") = "PortalCSVS", "PortalCSVS\PortalCSVS.csproj", "{345F0E9A-24F3-451C-B8EE-6B3796797BC8}"
	ProjectSection(ProjectDependencies) = postProject
	EndProjectSection
EndProject
3) Using notepad, open and edit each of the .csproj files for the web projects in your solution. They will each contain a header that looks like this:
<VisualStudioProject>
    <CSHARP
        ProjectType = "Web"
        ProductVersion = "7.10.3077"
        SchemaVersion = "2.0"
        ProjectGuid = "{345F0E9A-24F3-451C-B8EE-6B3796797BC8}"
    >
Change the "ProductType" value from "Web" to "Local", and then save and close the files:
<VisualStudioProject>
    <CSHARP
        ProjectType = "Local"
        ProductVersion = "7.10.3077"
        SchemaVersion = "2.0"
        ProjectGuid = "{345F0E9A-24F3-451C-B8EE-6B3796797BC8}"
    >
4) Lastly (and importantly), delete the .webinfo files associated with each project. For example, if the .csproj file's name is "PortalCSVS.csproj", look for and delete it's "PortalCSVS.csproj.webinfo" file.
Step 4: Re-open the solution in VS 2003 and verify that the projects open and build fine
Once you've completed the above steps, your web-projects will be treated as class-libraries in VS 2003. They will have the same build semantics as before -- but their tie to Frontpage Server Extensions will be gone.
To validate that everything still builds and compiles fine, re-open the .sln solution file in VS 2003. Note that you will need to open the solution file directly -- since you will not be able to open it as a http:// solution anymore (since you just changed it from being a web-project to being a class library). Ensure that all of the projects load in the solution explorer. Then choose the "Build->Rebuild Solution" menu item and make sure a full re-build still builds clean. This should work just fine. The most likely error could be a path issue with how you referenced the .csproj file above in the solution, or that a .webinfo file was not deleted. If this occurs, close the solution, fix the error, and then re-open to verify things build clean.
Step 5: Open the solution in VS 2005 and perform a project migration
Close the solution in VS 2003, and start VS 2005. Choose "File->Open File" from the File menu, and select the .sln file for the solution you wish to migrate. This will cause the VS 2005 Migration Wizard dialog to launch:
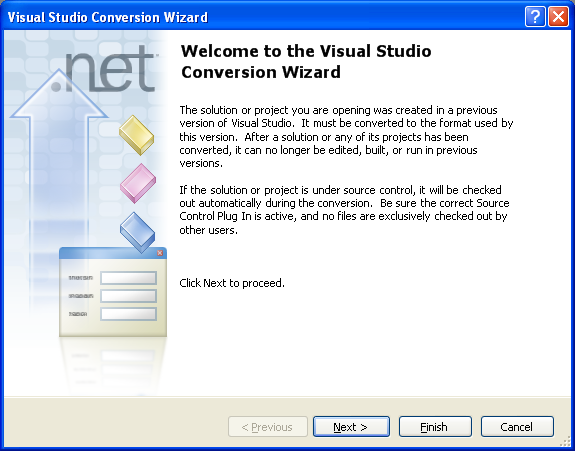
Walkthrough the wizard (hit next along the way). VS 2005 will then convert the project file to be MSBuild based (which is the new project file-format in VS 2005).
VS 2005 will generate an XML based report providing a summary of the conversion process, and flagging any known issues. By default, this conversion report file will be saved in the same directory as your .sln solution file. You will want to be able to refer back to this if you have issues you need to fix later when compiling.
Step 6: Convert your web projects to be Visual Studio 2005 Web Application Projects
Now that your web projects have been converted to VS 2005's new MSBuild based project format, the next step is to go in and add one additional meta-data value in them to indicate that VS 2005 should treat them as VS 2005 Web Application Projects. To-do this:
1) Choose the "Save All" command in Visual Studio's file-menu to make sure that you save the converted solution and project files and everything you have open.
2) Close the solution (File->Close Solution)
3) Using notepad, open up the .csproj files for your web-projects again. This project file will now be in a MSBuild based file-format that looks like this:
<Project DefaultTargets="Build" xmlns="http://schemas.microsoft.com/developer/msbuild/2003">
  <PropertyGroup>
    <ProjectType>Local</ProjectType>
    <Configuration Condition=" '$(Configuration)' == '' ">Debug</Configuration>
    <Platform Condition=" '$(Platform)' == '' ">AnyCPU</Platform>
    <ProductVersion>8.0.50727</ProductVersion>
    <SchemaVersion>2.0</SchemaVersion>
    <ProjectGuid>{22C5DF64-8114-41F3-92DF-DBC285835584}</ProjectGuid>
    <OutputType>Library</OutputType>
    <AppDesignerFolder>Properties</AppDesignerFolder>
    <RootNamespace>WebApplication10</RootNamespace>
    <AssemblyName>WebApplication10</AssemblyName>
  </PropertyGroup>
You then need to delete the <ProjectType> line value above and replace it with the exact line below:
<ProjectTypeGuids>{349c5851-65df-11da-9384-00065b846f21};{fae04ec0-301f-11d3-bf4b-00c04f79efbc}</ProjectTypeGuids>
This instructs VS 2005 to treat this project not as a regular class library project, but rather as a VS 2005 Web Application Project (this will cause the web-items to by added to your new item dialog, support running the application using the built-in VS web-server or IIS, and enable auto-attaching to web-servers for debug scenarios among other things).
4) Save and close the web project's .csproj file and re-open the .sln solution file
Step 7: Setup the Web Project to use IIS
By default, your new web project will launch and run using the built-in VS Web Server (aka Cassini). While you might eventually want to take advantage of this with your converted web project, the easiest migration path to begin with is to get everything working first under IIS. To-do this follow the below steps:
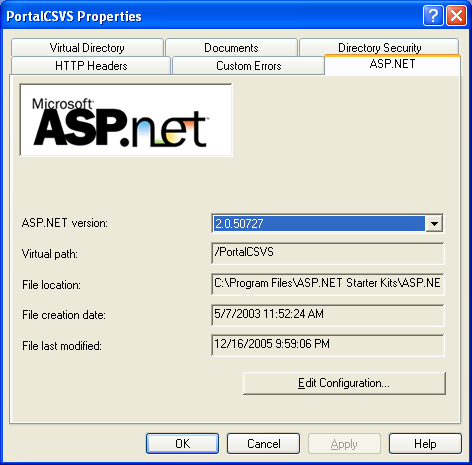
1) Right-click on your web-project's root node in the solution explorer, and pull up its properties page. Then click on the "web" tab of it, select the "Use IIS Web Server" option, and enter the http:// path to your web-application:

Then close the property page and save the project.
2) Right-click on the web project in your solution, and select the "Set As Startup Project" menu-item. This will cause VS 2005 to launch and run the web project when you press F5 (or Ctrl-F5)
3) Run the IIS Admin Tool that comes with Windows, and pull up the property page details on the web application path you entered above. Within the property pages of the application, select the "ASP.NET" tab and make sure that the application is configured to use ASP.NET V2.0 (by default it will probably still be configured to use ASP.NET V1.1):
If you are using IIS6 on Windows 2003, you should also then make sure that the above application is not configured to run in the same application pool (worker process) as another ASP.NET V1.1 application. Otherwise there will be a load failure if both CLR versions (V1.1 and V2.0) try to run in the same process. You should create a new application pool within IIS6 if necessary to avoid this conflict.
Step 8: Handling Possible XHTML Compliance Issues
By default, VS 2005 now generates and validates XHTML compliant markup. This helps you build web applications that are standards compliant, and also helps you minimize browser rendering differences between the major browser vendors.
Unfortunately VS 2003 did not generate XHTML compliant markup -- so you might run into validation and rendering issues with existing VS 2003 generated pages with the default settings. To fix this:
1) Switch the default HTML Validation setting from XHTML Transitional to IE 6.0 (which was the VS 2003 default setting). To-do this, select the Tool->Options menu item. Then within this dialog, drill into the Text Editor->HTML->Validation tree-menu item. Change the Target Validation to be Internet Explorer 6.0, and uncheck the "Show Errors" checkbox.
2) You should also consider adding the below section to your web.config file which will tell ASP.NET to render the legacy (non-XHTML compliant) markup from its server-controls. This will avoid you potentially seeing slight rendering differences in your pages:
<system.web>
  <xhtmlConformance mode="Legacy" />
</system.web>
Step 9: Compiling and Running your Web Project
You are now ready to compile your web project. Choose "Build->Build Solution" or Ctrl-Shift-B to do this.
The most common issue I've seen people run into at this stage are compile conflicts with new class names introduced with V2.0. For example: ASP.NET now has a built-in menu and treview control (as well as built-in profile, membership and rolemanagent APIs) -- so if you declare these types in your VS 2003 web projects today you may get an "ambiguous type" compiler error when you compile (note: the compiler lists each line and typename for you). If this happens, you should update your declarations to fully qualify the TreeView/Menu/Etc. you want to use (for example: change "TreeView" to "MyCompany.MyControls.TreeView").
You may or may not also run into some API changes when moving to V2. This site lists the known set of breaking API or functionality changes that were made between V1.1 and V2.0. You should consult this if you run into a problem.
Once your project is compiling clean, you should be able to run and debug in on IIS using ASP.NET 2.0.
Next Steps: What about Partial Classes?
When you migrate your project using the above steps, none of your code-behind page code or classes are modified. This means that the code should look (and work) just like it did in VS 2003. This makes it much easier to migrate existing code to VS 2005.
With the next refresh of the VS Web Application Project download, we will add context-menu support in the solution explorer for automatically converting an existing code-behind page into two separate files -- one for your code and event handlers, and the other a .designer.cs file that contains the control field declarations for the code-behind. Please review this tutorial for more details on how this new code-behind model works.
You will then be able to optionally migrate each page in your project to use the new partial class code-behind model as you like (with one strategy being to only ever split it into two files if you decide to make changes to the page - alternatively you could keep it how it is today). When you add new pages into your web project, they will be default use the partial-class based code-behind template.

 浙公网安备 33010602011771号