
第三天.添加编辑客户信息、分页
内容回顾:
    1. ModelForm--和form一样最终目的是获取用户的输入帮你存到数据库
        1. 是什么?(首先要知道form是干什么的--帮你生成html标签,帮你对输入校验is_valid,帮你展示错误提示信息)
            把Models和Form结合不用自己重复手写字段
        2. 注意事项
            1. 自定义字段的那些配置信息不能放在class Meta中,因class Meta主要配置的是models中的字段
        3. ModelForm的优势:
            1. 不用自己写字段
            2. 更新时使用instance参数,直接调用save()就保存到数据库了
    2. admin:https://www.cnblogs.com/liwenzhou/p/9519321.html
        1. 如何使用admin管理自己的表
            1. app/admin.py中注册
            2. admin.site.register(类名)
        2. models中字段的几个表中参数
            1. verbose_name            --> 在admin展示的名字(字段名/表名)
            2. blank=True,null=True  此两通常搭配用 --> admin管理后台页面上可以不写该字段,可以为空
            3. related_name='xx'       --> 反向查询时使用的字段
            4. help_text="提示信息"    --> admin管理后台输入框下面的提示信息
        3. 带choice字段的展示
            1. get_字段_display()

    3. 展示客户信息
        1. 在model类中定义自定义的方法--前端模版中对象可直接调用此方法
        2. 日期格式化的方法
            1. {{var|date:'Y-m-d H:i:s'}}
            2. settings.py定义全局的日期格式化配置
                DATE_FORMAT = 'Y-m-d'
                DATETIME_FORMAT = 'Y-m-d H:i:s'
                USE_L10N = False                 --> 是否启用本地化
        3. Django 模板语言
一.添加客户信息
就是把models.py中customer这张表写一个页面,让公司的网络咨询师能往里边录入客户信息,但是customer客户表中有几十个字段,要是写成form的话,太多麻烦,要重复一遍,所以用modelform写就好,
(1)crm/crm_urls.py中:
from django.conf.urls import url
from crm import views

urlpatterns = [
    url(r'customer_list/$', views.customer_list,name='customer_list'),
    url(r'add/$', views.add_customer,name='add_customer'),
]
(2)views.py中:
进入添加客户信息add_customer页面中,点提交后,它获取你填的所有信息并发post请求给我,我在我的页面add_customer上配置了一个post请求。所以做判断是POST请求,则把所有数据放进来
提交成功后则跳转到客户列表页面。
(3)add_customer.html中:
此页面使用客户数据展示页面customer_list.html的模版和继承即可,如导航条,左侧菜单,等公用部分拿出来做一个母版base.html.
继承母版,并替换对应块(在此块中放一form表单把所有input框写到里面).
bootstrap中表单--内联标单(左右布局的)拷贝过来。并做相应修改for循环展示字段。
循环中有一个字段要生成标签--此标签中有label和提示信息。
效果如下:
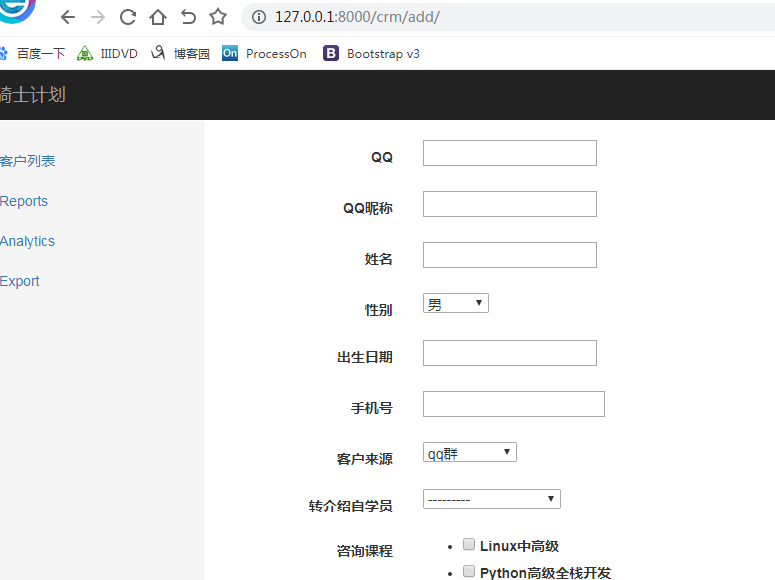
给它加form_control样式类--forms.py中。
但是加上样式类后,咨询课程展示混乱,所以在forms.py中用插件给此字段加上多选框。
怎么把有错误后提示信息变红色?--有错误的话在它父标签加一个has-error样式类--做判断就可
from crm.forms import RegForm,CustomerForm #导入我自己写的forms文件
from crm.models import UserProfile,Customer
from django.urls import reverse

def add_customer(request):
    form_obj = CustomerForm()  # 生成一个form表单
    if request.method == 'POST':
        form_obj = CustomerForm(request.POST)
        if form_obj.is_valid():
            form_obj.save()
            #跳转到此别名的url中
            url = reverse('customer_list')
            return redirect(url)
    return render(request,'add_customer.html',{'form_obj':form_obj})
(4)base.html中:
复制customer_list.html所有代码到此。
在此母版中定义很多用来被替换的块。
同时为了方便可以在母版中给每个js文件写上block,那我在子页面就可以定向的导入自己本页面才用到的js文件。
把客户列表的url这前是写死的,现在改成反转映射--反向解析。
<!DOCTYPE html>
<html lang="zh-CN">
<head>
    <meta http-equiv="Content-Type" content="text/html; charset=UTF-8">

    <meta http-equiv="X-UA-Compatible" content="IE=edge">
    <meta name="viewport" content="width=device-width, initial-scale=1">
    <meta name="description" content="">
    <meta name="author" content="">
    <link rel="icon" href="https://v3.bootcss.com/favicon.ico">

    <title>客户展示页面</title>
    {% load static %}
    <!-- Bootstrap core CSS -->
    <link href="{% static 'bootstrap-3.3.7/css/bootstrap.css' %}" rel="stylesheet">
    <!-- Custom styles for this template -->
    <link href="{% static 'css/dashboard.css' %}" rel="stylesheet">
    {% block page-css %}

    {% endblock %}
</head>

<body>

{% include 'nav.html' %} {# 导入nav组件 #}

<div class="container-fluid">
    <div class="row">
        <div class="col-sm-3 col-md-2 sidebar">
            <ul class="nav nav-sidebar">
                <li><a href="{% url 'customer_list' %}">客户列表</a>{# url反转映射 #}
                </li>
                <li><a href="https://v3.bootcss.com/examples/dashboard/#">Reports</a></li>
                <li><a href="https://v3.bootcss.com/examples/dashboard/#">Analytics</a></li>
                <li><a href="https://v3.bootcss.com/examples/dashboard/#">Export</a></li>
            </ul>
        </div>
        <div class="col-sm-9 col-sm-offset-3 col-md-10 col-md-offset-2 main">
            {% block page-main %}  {# 在此母版中定义很多用来被替换的块 #}

            {% endblock %}
        </div>
    </div>
</div>

<!-- Bootstrap core JavaScript
================================================== -->
<!-- Placed at the end of the document so the pages load faster -->
<script src="{% static 'jquery.js' %}"></script>
<script src="{% static 'bootstrap-3.3.7/js/bootstrap.js' %}"></script>
{% block page-js %}

{% endblock %}
</body>
</html>
(5)customer_list.html中:
把原来所有的代码干掉,让其继承母版妈可.
替换母版里的相应块。
加一个添加按钮。用反向解析的url。一点跳转到add添加页面
{% extends 'base.html' %} {# 继承 #}
{% block page-main %} {# 定制的去替换母版里的page-main这块 #}
    <h2 class="sub-header">客户列表</h2>
    <div>
        <a href="{% url 'add_customer' %}" class=btn btn-success btn-sm>添加</a> {# 小一点的按钮 #}
    </div>
    <div class="table-responsive">
        <table class="table table-striped">
            <thead>
            <tr>
                <th>#</th>
                <th>QQ</th>
                <th>QQ昵称</th>
                <th>姓名</th>
                <th>电话</th>
                <th>客户来源</th>
                <th>咨询课程</th>
                <th>班级类型</th>
                <th>状态</th>
                <th style="width: 100px">咨询日期</th>
                <th style="width: 100px!important;">已报班级</th>
            </tr>
            </thead>
            <tbody>
            {% for customer in customer_list %}{# 写for循环挨个展示上述这些字段即可 #}
                <tr>
                    <td>{{ forloop.counter }}</td>
                    <td>{{ customer.qq }}</td>
                    <td>{{ customer.qq_name }}</td>
                    <td>{{ customer.name }}</td>
                    <td>{{ customer.phone|default:"暂无" }}</td>
                    {# 当pthon没有值时显示暂无 #}
                    <td>{{ customer.get_source_display }}</td>
                    <td>{{ customer.course }}</td>
                    <td>{{ customer.get_class_type_display }}</td>
                    <td>{{ customer.show_status }}</td>
                    <td>{{ customer.date|date:"Y-m-d" }}</td>
                    {# 给日期格式化成此格式 #}
                    <td>{{ customer.show_class_list }}</td>
                </tr>
            {% endfor %}
            </tbody>
        </table>
    </div>

{% endblock %}
(6)forms.py中:
告诉它我指定是哪个表.
给每个字段加form_control样式类-重写它的__init__.
from crm.models import UserProfile,Customer

class CustomerForm(forms.ModelForm):
    def __init__(self,*args,**kwargs):#重写
        super(CustomerForm,self).__init__(*args,**kwargs)#先继承父类的
        #做自己自定制的内容
        for filed in self.fields.values():#拿到它所有字段
            filed.widget.attrs.update({'class':'form-control'}) #更新字典
    class Meta:
        model = Customer #告诉它我指定是哪个表
        fields = '__all__'#拿所有字段
        widgets = {
            'course': forms.widgets.SelectMultiple
        }
二.编辑客户信息
在客户展示页面再加一列操作编辑。
(1)customer_list.html中:
加编辑的a标签,并不显示名字显示图标。
图标从https://fontawesome.dashgame.com/拷贝.
下载font awesome包并解压拷贝到static目录中。
母版base.html中引入它的css样式 。
给反向解析url,传值customer.id给它的别名对应的url---拼成一个完整的url路径
{% extends 'base.html' %} {# 继承 #}
{% block page-main %} {# 定制的去替换母版里的page-main这块 #}
    <h2 class="sub-header">客户列表</h2>
    <div>
        <a href="{% url 'add_customer' %}" class=btn btn-success btn-sm>添加</a> {# 小一点的按钮 #}
    </div>
    <div class="table-responsive">
        <table class="table table-striped">
            <thead>
            <tr>
                <th>#</th>
                <th>QQ</th>
                <th>QQ昵称</th>
                <th>姓名</th>
                <th>电话</th>
                <th>客户来源</th>
                <th>咨询课程</th>
                <th>招生老师</th>
                <th>班级类型</th>
                <th>状态</th>
                <th style="width: 100px">咨询日期</th>
                <th style="width: 100px!important;">已报班级</th>
                <th style="width: 100px!important;">操作</th>
            </tr>
            </thead>
            <tbody>
            {% for customer in customer_list %}{# 写for循环挨个展示上述这些字段即可 #}
                <tr>
                    <td>{{ forloop.counter }}</td>
                    <td>{{ customer.qq }}</td>
                    <td>{{ customer.qq_name }}</td>
                    <td>{{ customer.name }}</td>
                    <td>{{ customer.phone|default:"暂无" }}</td>
                    {# 当pthon没有值时显示暂无 #}
                    <td>{{ customer.get_source_display }}</td>
                    <td>{{ customer.course }}</td>
                    <td>{{ customer.consultant }}</td>
                    <td>{{ customer.get_class_type_display }}</td>
                    <td>{{ customer.show_status }}</td>
                    <td>{{ customer.date|date:"Y-m-d" }}</td>
                    {# 给日期格式化成此格式 #}
                    <td>{{ customer.show_class_list|default:'暂无' }}</td>
                    <td><a href="{% url 'edit_customer' customer.id %}"><i class="fa fa-edit" aria-hidden="true"></i></a></td>
                </tr>
            {% endfor %}
            </tbody>
        </table>
    </div>

{% endblock %}
(2)crm_urls.py中:
点哪一行的编辑就是哪行的id编辑--分组匹配,把捕获的值传给edit_customer函数
url(r'edit/(\d+)/$', views.edit_customer,name='edit_customer'),
(3)base.html中:
<!DOCTYPE html>
<html lang="zh-CN">
<head>
    <meta http-equiv="Content-Type" content="text/html; charset=UTF-8">

    <meta http-equiv="X-UA-Compatible" content="IE=edge">
    <meta name="viewport" content="width=device-width, initial-scale=1">
    <meta name="description" content="">
    <meta name="author" content="">
    <link rel="icon" href="https://v3.bootcss.com/favicon.ico">

    <title>客户展示页面</title>
    {% load static %}
    <!-- Bootstrap core CSS -->
    <link href="{% static 'bootstrap-3.3.7/css/bootstrap.css' %}" rel="stylesheet">
    <!-- Custom styles for this template -->
    <link href="{% static 'css/dashboard.css' %}" rel="stylesheet">
    <link rel="stylesheet" href="{% static 'font-awesome/css/font-awesome.css' %}">  #引入图标的css样式
    {% block page-css %}

    {% endblock %}
</head>

<body>

{% include 'nav.html' %} {# 导入nav组件 #}

<div class="container-fluid">
    <div class="row">
        <div class="col-sm-3 col-md-2 sidebar">
            <ul class="nav nav-sidebar">
                <li><a href="{% url 'customer_list' %}">客户列表</a>{# url反转映射 #}
                </li>
                <li><a href="https://v3.bootcss.com/examples/dashboard/#">Reports</a></li>
                <li><a href="https://v3.bootcss.com/examples/dashboard/#">Analytics</a></li>
                <li><a href="https://v3.bootcss.com/examples/dashboard/#">Export</a></li>
            </ul>
        </div>
        <div class="col-sm-9 col-sm-offset-3 col-md-10 col-md-offset-2 main">
            {% block page-main %}  {# 在此母版中定义很多用来被替换的块 #}

            {% endblock %}
        </div>
    </div>
</div>

<!-- Bootstrap core JavaScript
================================================== -->
<!-- Placed at the end of the document so the pages load faster -->
<script src="{% static 'jquery.js' %}"></script>
<script src="{% static 'bootstrap-3.3.7/js/bootstrap.js' %}"></script>
{% block page-js %}

{% endblock %}
</body>
</html>
(4)views.py中:
接收edit_id值。
edit_id可以从数据库中把当前客户对象拿到。
进入edit_customer.html页面编辑内容后点提交此时要发post请求.
#编辑客户信息
def edit_customer(request, edit_id):
    customer_obj = Customer.objects.filter(id=edit_id).first()  # 拿到这个edit_id可以从数据库中把当前客户对象拿到
    form_obj = CustomerForm(instance=customer_obj)  # 使用当前对象的数据填充生成input标签
    if request.method == 'POST':
        form_obj = CustomerForm(request.POST, instance=customer_obj)#使用POST提交的数据去更新指定的istance实例
        if form_obj.is_valid():#看提交的数据是否有问题
            form_obj.save()
            return redirect(reverse('customer_list'))
    return render(request, 'edit_customer.html',{'form_obj':form_obj}
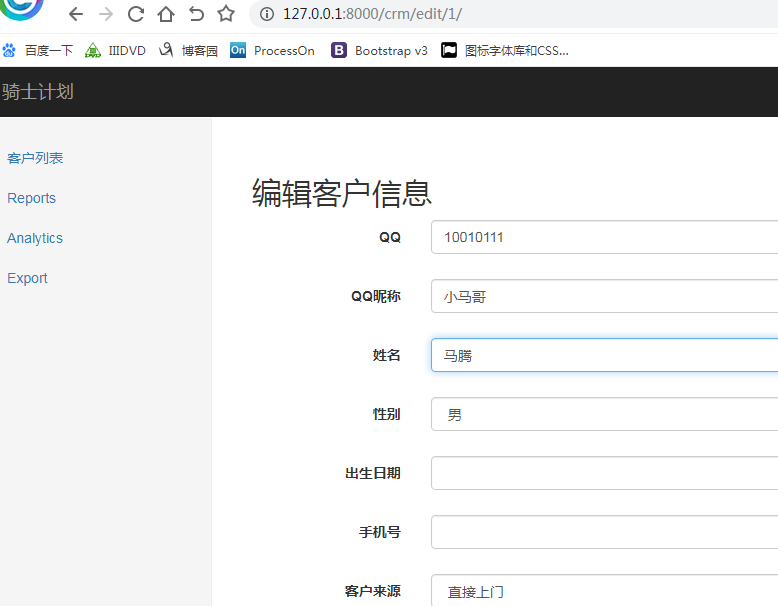
(5)edit_customer.html中:(直接复制add_customer.html几乎一样)
{% extends 'base.html' %}
{% block page-main %} {# 替换母版中这块 #}
    <div>
        <h2 class="text-center">编辑客户信息</h2>
        <form class="form-horizontal" action="" method="post" novalidate>
            {% csrf_token %}
            {% for field in form_obj %}
                <div class="form-group {% if field.errors.0 %}has-error{% endif %}">
                    {# field.errors有值错误就加has-error样式 #}
                    <label for="{{ field.id_for_label }}" class="col-sm-2 control-label">{{ field.label }}</label>
                    <div class="col-sm-10">
                        {{ field }}
                        <span class="help-block">{{ field.errors.0 }}</span>
                    </div>
                </div>
            {% endfor %}
            <div class="form-group">
                <div class="col-sm-offset-2 col-sm-10">
                    <button type="submit" class="btn btn-default">提交</button>
                </div>
            </div>
        </form>
    </div>
{% endblock %}
效果如下:并点提交后能跳到客户信息展示页面了
三.但是views.py中添加和编辑这两个功能函数有很多相似之处大同小异,包括它们的html也几乎一样,
那怎么优化?--怎么二合一成一个函数
1. 多个路由可以使用同一个视图函数来处理
            2. URL可以捕获参数,传递给视图函数、视图函数可以设置默认参数
            3. filter(条件) --> 找不到不会报错返回一个空的QuerySet对象
            4. 对一个空的QuerySet对象调用first()/last()不会报错,返回None
            5. ModelForm实例化的时候不给instance传值,默认就是None
(1)crm_urls.py:
两个url用一个视图函数来处理.
from django.conf.urls import url
from crm import views

urlpatterns = [
    url(r'customer_list/$', views.customer_list,name='customer_list'),
    url(r'add/$', views.customer,name='add_customer'),
    url(r'edit/(\d+)/$', views.customer,name='edit_customer'),
]
(2)views.py中:
两个url中增加客户这个不会给函数传参数,但编辑客户url这个会给函数传一个带id的值--所以可给此函数设一默认参数edit_id=None。也就是说edit_id为None时就是新增客户,有值则是编辑状态。
#编辑和添加二合一的视图函数
def customer(request, edit_id=None):
    return HttpResponse(edit_id)
    #如果edit_id=None则表示新增操作
    #如是有值则表示编辑操作
    customer_obj = Customer.objects.filter(id=edit_id).first() #如是你的edit_id=None那这里就找不到当前客户对象那这里也是none,如果有值这里就能查到一具体对象
    form_obj = CustomerForm(instance=customer_obj)#如果你拿到的对象是none那就实例化一个空的input标签否则生成input标签并有值
    if request.method == 'POST':#如果发post请求
        form_obj = CustomerForm(request.POST, instance=customer_obj)#使用POST提交的数据去更新指定的istance实例
        if form_obj.is_valid():#看提交的数据是否有问题
            form_obj.save()
            return redirect(reverse('customer_list'))
    return render(request, 'customer.html', {'form_obj': form_obj,'edit_id':edit_id})
(3)customer.html:复制一模样的add_customer.html
怎样区分是编辑还是添加?---作判断它们唯一的区别是edit_id是否有值,所以在视图函数中把edit_id也传过来。
{% extends 'base.html' %}
{% block page-main %} {# 替换母版中这块 #}
    <div>
        <h2 class="text-center">{% if edit_id %}编辑客户信息{% else %}录入客户信息{% endif %}</h2>
        <form class="form-horizontal" action="" method="post" novalidate>
            {% csrf_token %}
            {% for field in form_obj %}
                <div class="form-group {% if field.errors.0 %}has-error{% endif %}">
                    {# field.errors有值错误就加has-error样式 #}
                    <label for="{{ field.id_for_label }}" class="col-sm-2 control-label">{{ field.label }}</label>
                    <div class="col-sm-10">
                        {{ field }}
                        <span class="help-block">{{ field.errors.0 }}</span>
                    </div>
                </div>
            {% endfor %}
            <div class="form-group">
                <div class="col-sm-offset-2 col-sm-10">
                    <button type="submit" class="btn btn-default">提交</button>
                </div>
            </div>
        </form>
    </div>
{% endblock %}
5

 浙公网安备 33010602011771号