Python RabbitMQ
RabbitMQ
RabbitMQ是实现了 AMQP 的开源消息代理软件(亦称面向消息的中间件),实现程序间通信
AMQP(Advanced Message Queuing Protocol-高级消息队列协议) 是应用层协议的一个开放标准,为面向消息的中间件设计
RabbitMQ 官网:https://www.rabbitmq.com/
简介
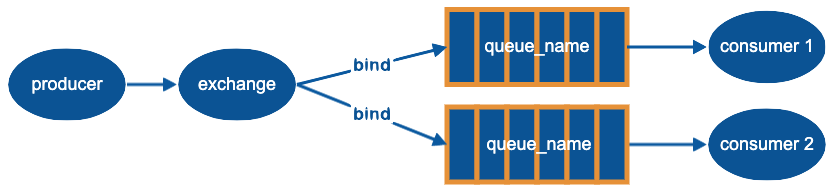
消息发送经过了 producers、exchange、queue、consumer 四个部分
producer 将消息发给 exchange,由 exchange 根据 routing_key 确定将消息发给哪个或哪些 queue,consumer 从 queue 中获取数据

producer
producer 负责 publish ,发布消息(channel.basic_publish)包含以下参数
-exchange:指定 exchange
-routing_key:设置 routing_key 指定消息类型,exchange='' 时,routing_key 为 queue name
-body:消息内容
-properties=None:设置特性
-mandatory=False:当消息没有放入队列,False:直接丢弃,True:返回给发送者
exchange
exchange 负责将收到的消息发到指定的队列
声明 exchange (channel.exchange_declare)时的参数:
-exchange:exchange name,可以为字母、数字、'-'、'_'、'.'、':'
-exchange_type='direct':有4种:direct fanout topic header
-passive=False:主动声明还是仅仅检查是否已经存在
-durable=False:是否持久化
-auto_delete=False:当所有与之绑定的消息队列都完成了对此交换机的使用后,删掉它
-internal=False:是否只接收其他 exchange 消息
-arguments=None:自定义键值对
queue
consumer 要先 declare queue,然后 queue 要 bind exchange
声明 queue (channel.queue_declare)时的参数:
-queue:队列名,为空就自动设置
-passive=False:是否只检查队列是否存在
-durable=False:是否持久化
-exclusive=False:只允许当前连接访问
-auto_delete=False:在 consumer 断开连接后自动删除
-arguments=None:自定义键值对
bind (channel.queue_bind)时的参数
-queue:要 bind 的 queue
-exchange:要 bind 的 exchange
-routing_key=None:订阅的关键词
-arguments=None:订阅的自定义键值对
consumer
-consumer 负责从 queue 中取消息,取消息(channel.basic_consume)时包含以下参数:
-queue:获取数据的队列
-on_message_callback:处理数据的函数,获取数据后自动执行 on_message_callback(channel, method, properties, body)
-auto_ack=False:获取数据后自动发送确认
-exclusive=False:不允许其他 consumer 连接该队列
-consumer_tag=None:可以指定 consumer_tag,否则就自动生成
-arguments=None:给 consumer 的自定义键值对
实现
一对一

示例:
注意:要先启动 RabbitMQ
publisher:
import pika

connection = pika.BlockingConnection(pika.ConnectionParameters('localhost'))
channel = connection.channel()
channel.queue_declare(queue='first_queue')

channel.basic_publish(exchange='', routing_key='first_queue', body='消息内容')

print('sent message')
connection.close()
consumer:
import pika

connection = pika.BlockingConnection(pika.ConnectionParameters('localhost'))
channel = connection.channel()
channel.queue_declare(queue='first_queue')  # 如果 consumer 先启动,没有声明队列就会报错


def callback(ch, method, properties, body):
    print('recv:', body.decode())


channel.basic_consume('first_queue', callback, auto_ack=True)
print('Waiting for messages. To exit press CTRL+C')
channel.start_consuming()
分发轮询
当一个 send 对应了多个 recv 时,多个 recv 会按照连接顺序依次从 queue 中获取消息
可以启动多个 recv 查看效果
但是由于处理消息的速度会有不同,消息均匀分配,但是处理的时间可能并不均匀。通过 channel.basic_qos(prefetch_count=1) 可以使 recv 消息没有处理完成之前不再接收消息
消息持久化
当一个 recv 没有处理完消息就断开连接时,消息不会再发送给其他 recv,需要将 basic_consume() 中参数改为 auto_ack=False,这样 recv 接收到消息就不会自动发送一个确认,断开后之前的消息还存在,直到在 callback 中手动发送确认 ch.basic_ack(delivery_tag=method.delivery_tag)
注意: 自动确认是在 recv 接收到消息的时候就确认了,而手动确认可以根据需要放在 callback 的任何地方
但是当服务关闭之后,数据和队列都消失了
声明队列时加入参数 durable=True 使队列持久化,这样服务关闭之后队列会被保留
channel.queue_declare(queue='queue', durable=True)
发布消息时加入参数 properties=pika.BasicProperties(delivery_mode=2, ) 使消息持久化,这样服务关闭之后消息会被保留(在队列持久化前提下)
channel.basic_publish(exchange='',
                      routing_key="task_queue",
                      body=message,
                      properties=pika.BasicProperties(delivery_mode = 2,))
示例:
publisher:
import pika

connection = pika.BlockingConnection(pika.ConnectionParameters('localhost'))
channel = connection.channel()
channel.queue_declare(queue='first_queue', durable=True)

channel.basic_publish(exchange='', routing_key='first_queue', body='消息内容',
                      properties=pika.BasicProperties(delivery_mode=2, ))


print('sent message')
connection.close()
consumer:
import pika

connection = pika.BlockingConnection(pika.ConnectionParameters('localhost'))
channel = connection.channel()
channel.queue_declare(queue='first_queue', durable=True)  # 如果 consumer 先启动,没有声明队列就会报错


def callback(ch, method, properties, body):
    print('recv:', body.decode())
    ch.basic_ack(delivery_tag=method.delivery_tag)


channel.basic_qos(prefetch_count=1)
channel.basic_consume('first_queue', callback, auto_ack=False)
print('Waiting for messages. To exit press CTRL+C')
channel.start_consuming()
可以使用 RabbitMQ 中的 rabbitmqctl 查看当前队列
使用方法:
- 进入 rabbitmq 下的 sbin
cd /usr/local/opt/rabbitmq/sbin/(目录可能会有不同) - 运行
./rabbitmqctl list_queues
一对多发送
类似于广播,消息不做停留直接发送,只有在 publish 前 bind 的才能收到消息
exchange_type 有 direct、topic、headers 和 fanout 四种
fanout
所有 bind 到此 exchange 的 queue 都可以接收消息
示例:
publisher:
import pika

connection = pika.BlockingConnection(pika.ConnectionParameters('localhost'))
channel = connection.channel()
channel.exchange_declare(exchange='logs', exchange_type='fanout')

channel.basic_publish(exchange='logs', routing_key='', body='消息内容')

print('sent message')
connection.close()
consumer:
import pika

connection = pika.BlockingConnection(pika.ConnectionParameters('localhost'))
channel = connection.channel()
channel.exchange_declare(exchange='logs', exchange_type='fanout')

result = channel.queue_declare('', exclusive=True)
# 不指定 queue 名字, rabbit 会随机分配一个名字, exclusive=True 会在使用此 queue 的消费者断开后,自动将 queue 删除
queue_name = result.method.queue

channel.queue_bind(exchange='logs', queue=queue_name)
print('Waiting for logs. To exit press CTRL+C')


def callback(ch, method, properties, body):
    print('recv:', body.decode())


channel.basic_consume(queue_name, callback, auto_ack=True)
channel.start_consuming()
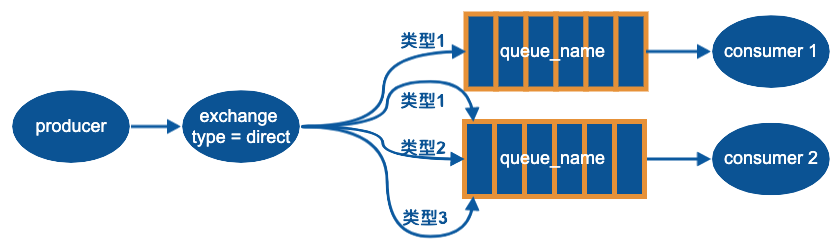
direct
通过 direct 可以订阅一个分组的消息
示例:
publisher:
import pika

connection = pika.BlockingConnection(pika.ConnectionParameters('localhost'))
channel = connection.channel()
channel.exchange_declare(exchange='direct_logs', exchange_type='direct')

severity = '消息类型'
message = '消息内容'

channel.basic_publish(exchange='direct_logs', routing_key=severity, body=message)
print("Sent %r:%r" % (severity, message))
connection.close()
consumer:
import pika

connection = pika.BlockingConnection(pika.ConnectionParameters('localhost'))
channel = connection.channel()
channel.exchange_declare(exchange='direct_logs', exchange_type='direct')

result = channel.queue_declare(queue='', exclusive=True)
queue_name = result.method.queue

severities = ['消息类型', ]	# 列表,可同时接收多个消息类型

for severity in severities:
    channel.queue_bind(exchange='direct_logs', queue=queue_name, routing_key=severity)

print('Waiting for logs. To exit press CTRL+C')


def callback(ch, method, properties, body):
    print("%r:%r" % (method.routing_key, body.decode()))


channel.basic_consume(queue_name, callback, auto_ack=True)
channel.start_consuming()
当有多个 recv 且它们接收的消息类型不同时,就可以看出效果
topic
发给 topic exchange 的 routing_key 不能仅仅是一个词,必须是多个以 '.' 分隔的词,这些词通常用来表示消息的特点,且最多255 bytes
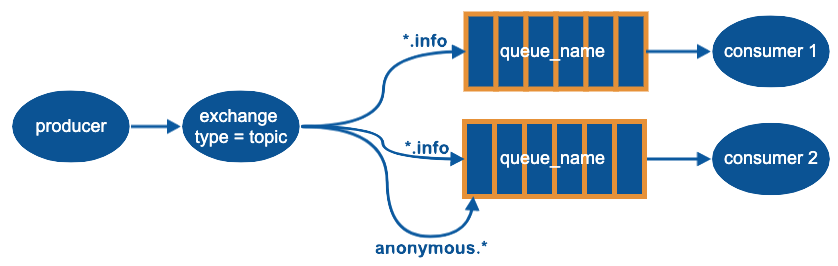
'*': 代替一个单词
'#': 代替0个或多个单词或符号
当使用 '#' 时就和 fanout 一样,获取所有消息
当不使用 '#' 和 '*' 时就和 direct 一样,只获取一个类别的消息
示例:
producer:
import pika

connection = pika.BlockingConnection(pika.ConnectionParameters('localhost'))
channel = connection.channel()
channel.exchange_declare(exchange='topic_logs', exchange_type='topic')

routing_key = 'anonymous.info'
message = '消息内容'

channel.basic_publish(exchange='topic_logs', routing_key=routing_key, body=message)
print("Sent %r:%r" % (routing_key, message))
connection.close()
consumer:
import pika

connection = pika.BlockingConnection(pika.ConnectionParameters('localhost'))
channel = connection.channel()
channel.exchange_declare(exchange='topic_logs', exchange_type='topic')

result = channel.queue_declare(queue='', exclusive=True)
queue_name = result.method.queue

binding_keys = ['#']	# '*.info', 'anonymous.*'

for binding_key in binding_keys:
    channel.queue_bind(exchange='topic_logs', queue=queue_name, routing_key=binding_key)
print('Waiting for logs. To exit press CTRL+C')


def callback(ch, method, properties, body):
    print("%r:%r" % (method.routing_key, body.decode()))


channel.basic_consume(queue_name, callback, auto_ack=True)
channel.start_consuming()
双向通信
RPC(Remote procedure call)
之前的通信全部都是单向的通信,要实现 RPC (远程过程调用) 就需要两个单项的通信
具体方法:
server 启动,先声明一个 queue,开始接收这个 queue 消息
client 启动,先声明一个 queue 作为接收消息时用的队列,向 server 声明的 queue 发送一条消息,里面包含 correlation_id(这条请求的 ID) 、reply_to(接收返回消息的队列) 、body(请求内容)
server 接收到消息,处理之后获得结果,向 client 要求的 queue 发送一条消息,里面包含 correlation_id(这个返回结果所属请求的 ID) 、body(返回结果)
client 接收到消息,验证 correlation_id 确认返回结果是否有效
代码实现
示例:
RPC server:
import pika

connection = pika.BlockingConnection(pika.ConnectionParameters('localhost'))
channel = connection.channel()
channel.queue_declare(queue='rpc_queue')


def func(n):
    """
    用于处理数据
    """
    return n + 1


def on_request(ch, method, props, body):
    """
    调用处理数据函数,
    并将处理结果发送出去。
    """
    n = int(body)
    print('get', n)
    response = func(n)
    # 发送数据处理结果
    ch.basic_publish(exchange='', routing_key=props.reply_to,
                     properties=pika.BasicProperties(correlation_id=props.correlation_id),
                     body=str(response))
    ch.basic_ack(delivery_tag=method.delivery_tag)


channel.basic_qos(prefetch_count=1)
channel.basic_consume('rpc_queue', on_request)

print("Awaiting RPC requests")
channel.start_consuming()
RPC client:
import pika
import uuid


class RpcClient(object):
    def __init__(self):
        self.connection = pika.BlockingConnection(pika.ConnectionParameters('localhost'))
        self.channel = self.connection.channel()
        # 自动生成队列并获取
        result = self.channel.queue_declare(queue='', exclusive=True)
        self.callback_queue = result.method.queue
        self.channel.basic_consume(self.callback_queue, self.on_response, auto_ack=True)
        self.response = None
        self.corr_id = str(uuid.uuid4())

    def on_response(self, ch, method, props, body):
        """
        callback 函数,当确认从服务器端接收到的结果正确后,写入 self.response
        """
        if self.corr_id == props.correlation_id:
            self.response = body

    def call(self, n):
        """
        用于给服务器发送请求并接收服务器返回的结果
        """
        self.channel.basic_publish(exchange='', routing_key='rpc_queue',
                                   properties=pika.BasicProperties(
                                       reply_to=self.callback_queue,    # 告诉服务器将结果返回哪个队列
                                       correlation_id=self.corr_id,     # 用于判断返回结果属于哪条请求
                                   ),
                                   body=str(n))
        while self.response is None:
            # 开始接收消息,非阻塞版的 start_consuming
            self.connection.process_data_events()
        return self.response


rpc_client = RpcClient()
num = 3
print('Sent ' + str(num))
response = rpc_client.call(num)
print("Got " + response.decode())


 浙公网安备 33010602011771号