


K8S-Service 学习
- 什么是 Kubernetes Service?
Service 是 Kubernetes 中用于为一组 Pod(通常是 Deployment/ReplicaSet 管理的)提供稳定访问入口的抽象对象。
Pod 的 IP 是不固定的,Pod 重建后 IP 会变。
Service 提供一个“虚拟 IP”(ClusterIP),无论后端 Pod 如何变化,访问 Service 的方式不变。
Service 还实现了负载均衡,将流量分发到后端所有健康的 Pod。
2. Service 的工作原理
Service 会根据 selector(标签选择器)自动发现一组符合条件的 Pod,Service 发布的时候,通过label去找哪些Pod 可以部署这个service。
Service 在集群内部创建一个虚拟 IP(ClusterIP),所有请求都会自动转发到后端 Pod。
K8s 使用 kube-proxy 实现流量转发和负载均衡。
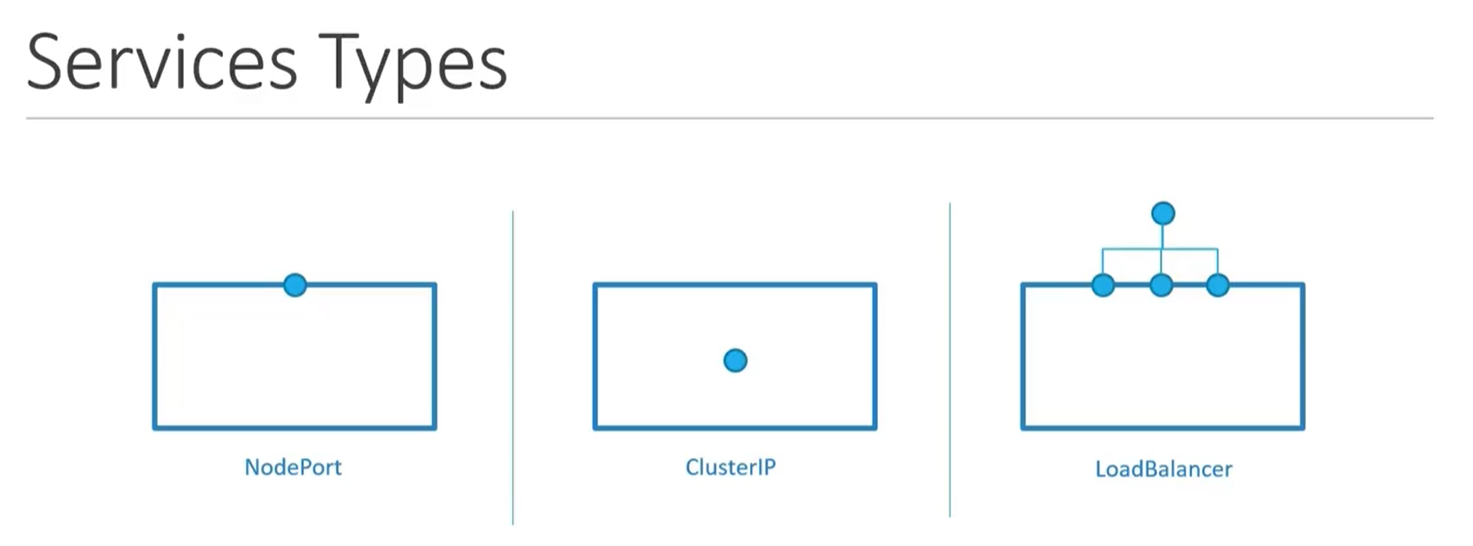
3. 常见 Service 类型
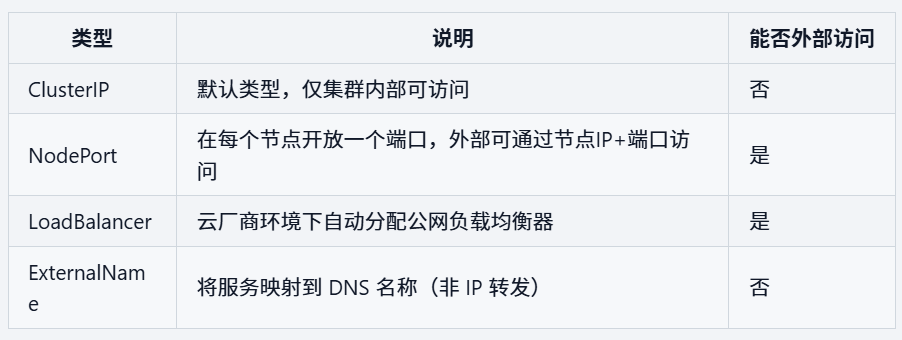
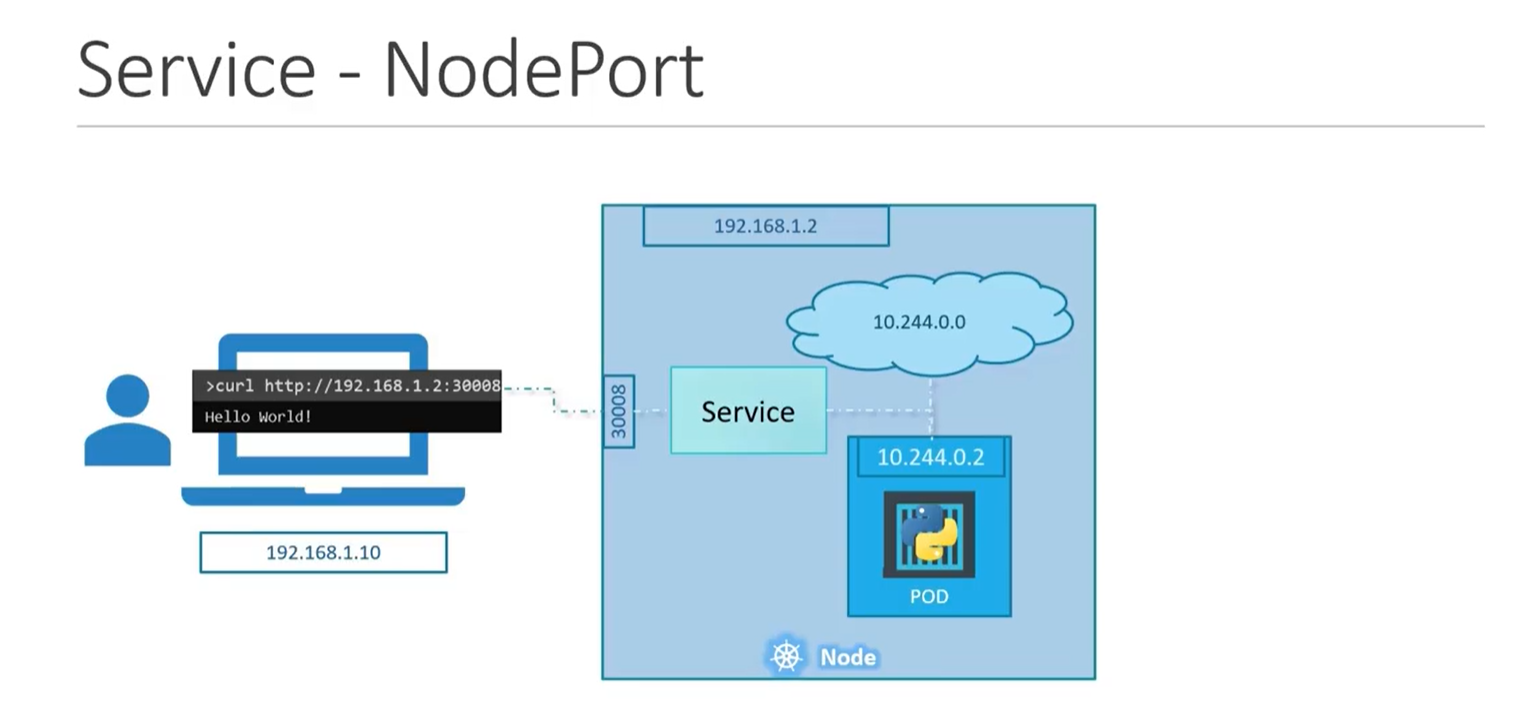
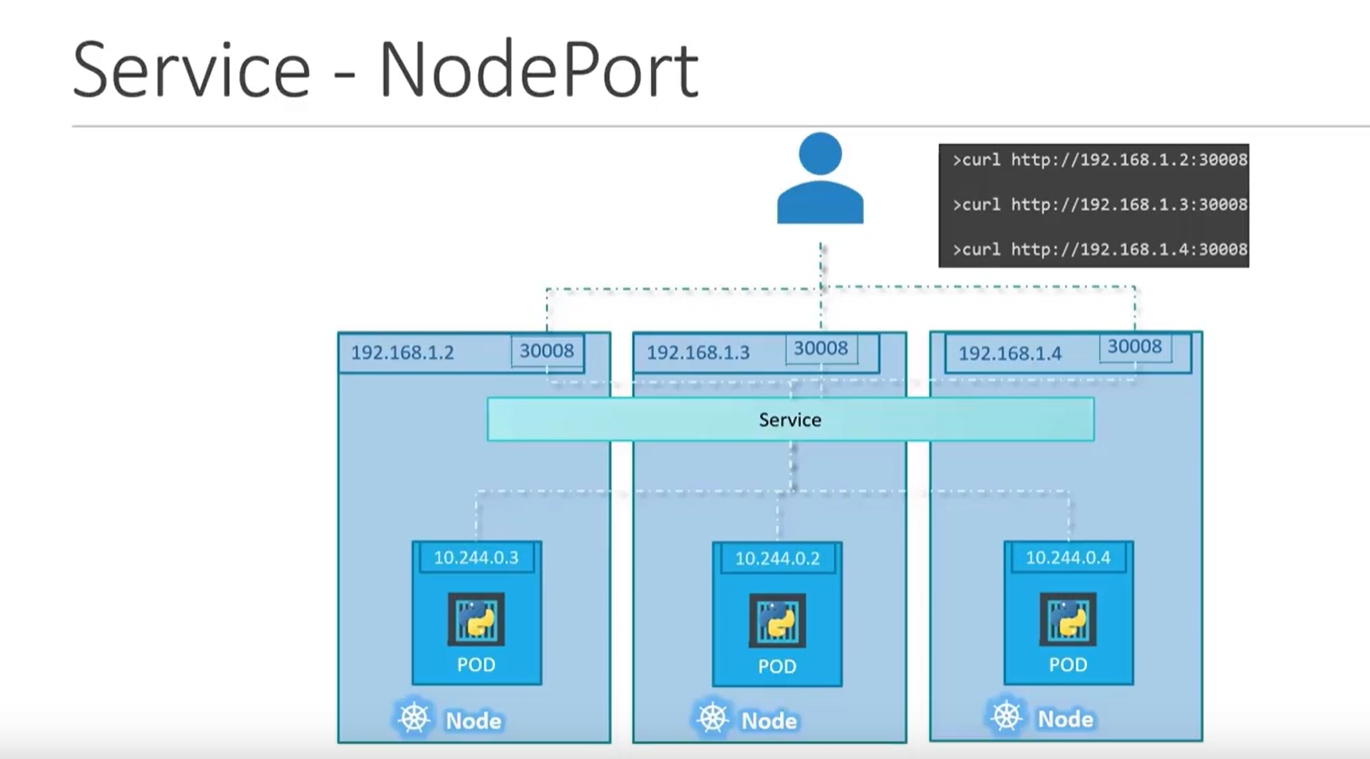
NodePort 模式
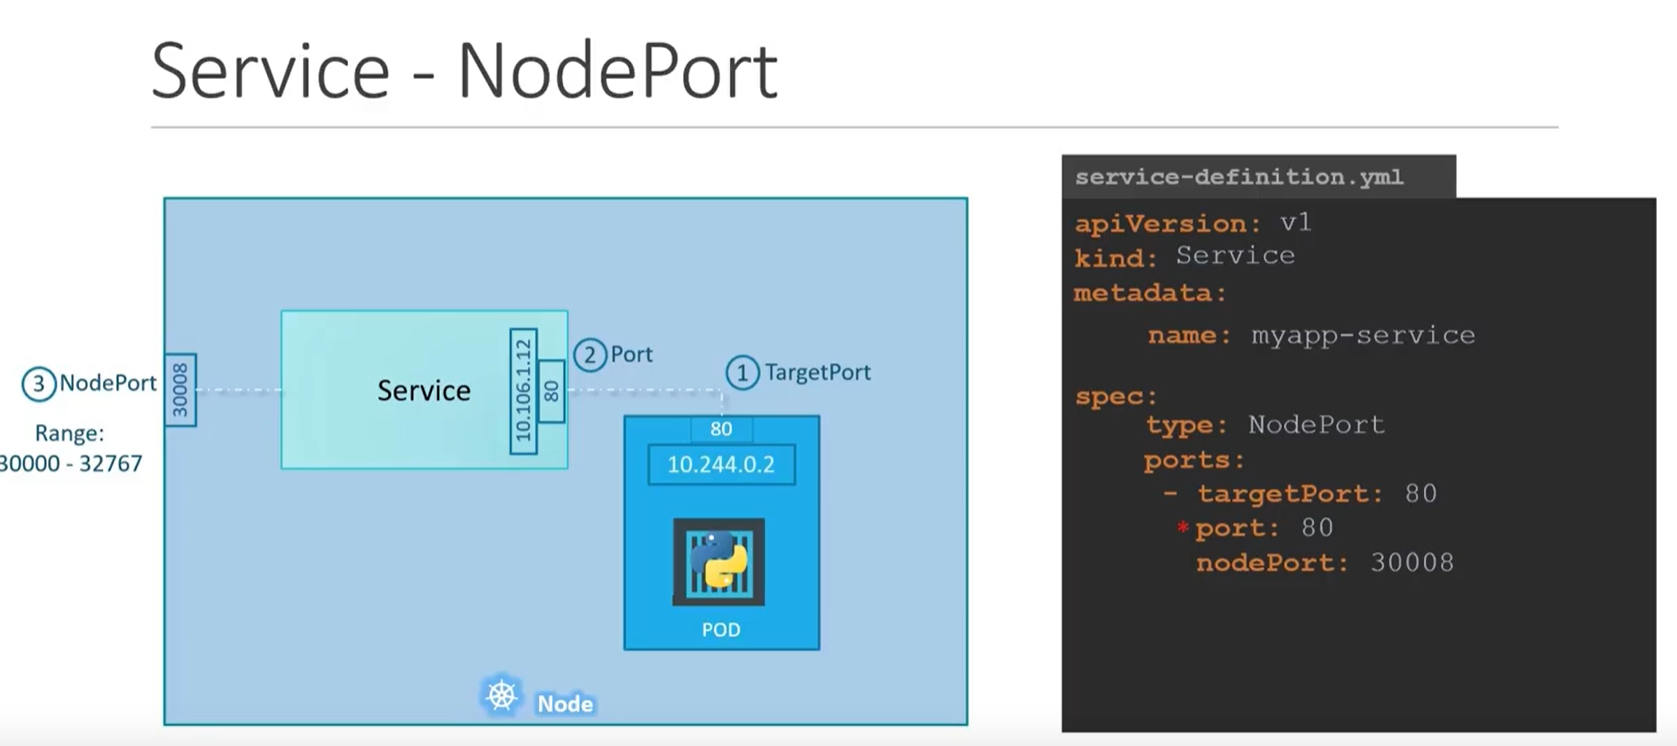
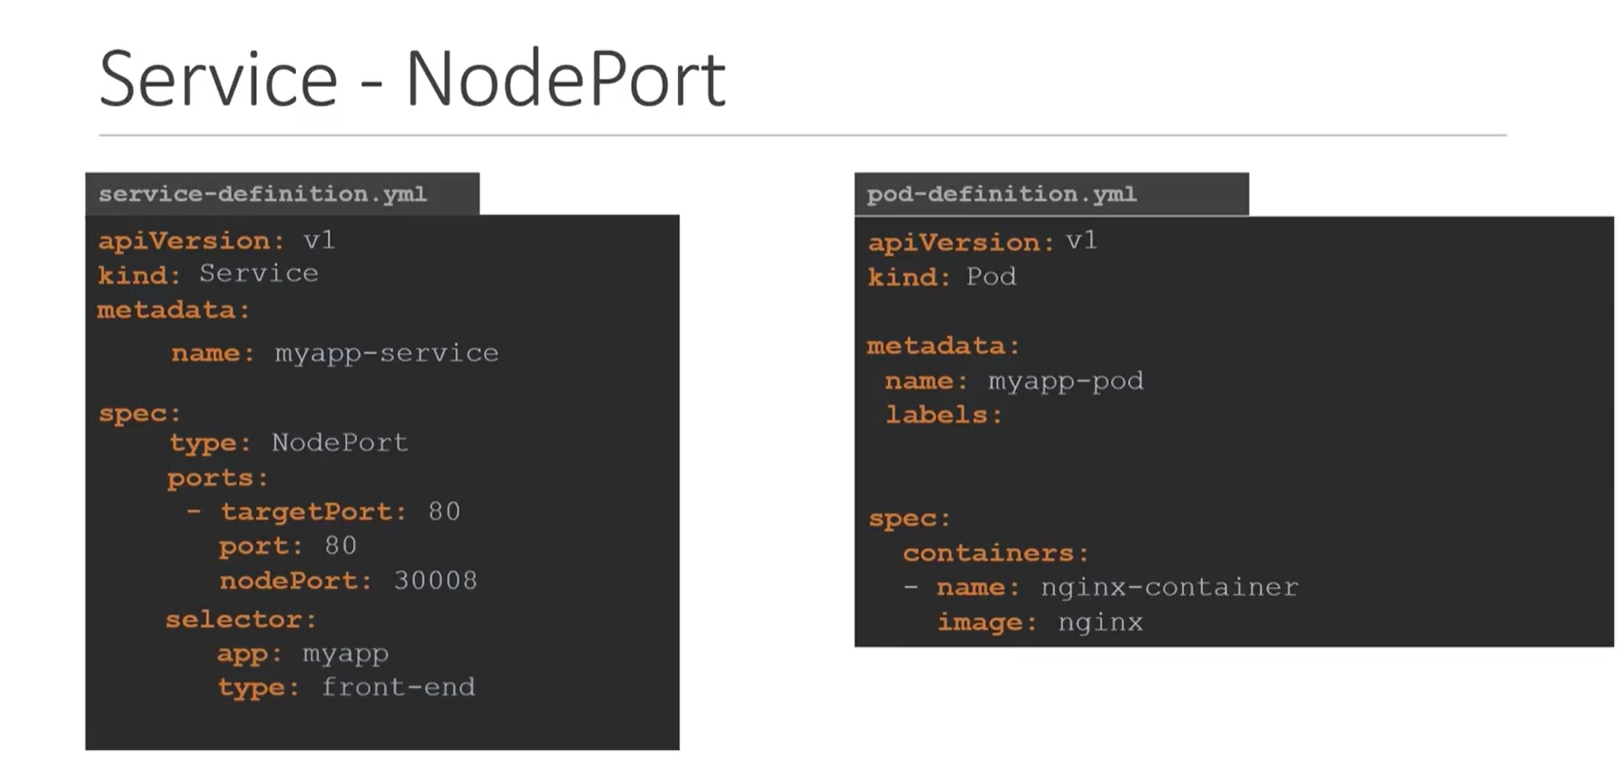
创建nodeport的yaml
azureuser@master-001:~$ cat Nodeport.yaml
apiVersion: v1
kind: Service
metadata:
  name: web-nodeport-svc
spec:
  type: NodePort
  selector:
    app: web
  ports:
    - port: 80           # Service端口(集群内访问)
      targetPort: 80     # Pod容器端口(nginx)
      nodePort: 30080    # 可省略,K8s自动分配30000-32767之间的端口号,也可以手动指定。
执行并测试, Master 可以通过node的IP,pod IP访问, vnet 内部可以通过node IP 访问, 外网可以通过公网地址访问。
azureuser@master-001:~$ kubectl apply -f Nodeport.yaml
service/web-nodeport-svc created
azureuser@master-001:~$ kubectl get pod
NAME                           READY   STATUS    RESTARTS   AGE
nginx-deploy-f88b65dbc-54gdx   1/1     Running   0          98m
nginx-deploy-f88b65dbc-fq7db   1/1     Running   0          98m
nginx-deploy-f88b65dbc-nxss8   1/1     Running   0          98m
azureuser@master-001:~$ kubectl get service
NAME                TYPE        CLUSTER-IP       EXTERNAL-IP   PORT(S)        AGE
kubernetes          ClusterIP   10.96.0.1        <none>        443/TCP        45h
nginx-svc           ClusterIP   10.102.29.115    <none>        80/TCP         3h20m
nodeport-svc        NodePort    10.101.111.134   <none>        80:30443/TCP   44h
web-clusterip-svc   ClusterIP   10.102.249.165   <none>        80/TCP         105m
web-nodeport-svc    NodePort    10.109.102.59    <none>        80:30080/TCP   13s
web-svc             ClusterIP   10.104.249.89    <none>        80/TCP         44h
azureuser@master-001:~$ kubectl describe service web-nodeport-svc
Name:                     web-nodeport-svc
Namespace:                default
Labels:                   <none>
Annotations:              <none>
Selector:                 app=web
Type:                     NodePort
IP Family Policy:         SingleStack
IP Families:              IPv4
IP:                       10.109.102.59
IPs:                      10.109.102.59
Port:                     <unset>  80/TCP
TargetPort:               80/TCP
NodePort:                 <unset>  30080/TCP
Endpoints:                10.244.1.16:80,10.244.2.20:80,10.244.2.21:80
Session Affinity:         None
External Traffic Policy:  Cluster
Events:                   <none>
azureuser@master-001:~$ ip route
default via 10.0.0.1 dev eth0 proto dhcp src 10.0.0.8 metric 100
10.0.0.0/24 dev eth0 proto kernel scope link src 10.0.0.8 metric 100
10.244.0.0/24 dev cni0 proto kernel scope link src 10.244.0.1
10.244.1.0/24 via 10.244.1.0 dev flannel.1 onlink
10.244.2.0/24 via 10.244.2.0 dev flannel.1 onlink
168.63.129.16 via 10.0.0.1 dev eth0 proto dhcp src 10.0.0.8 metric 100
169.254.169.254 via 10.0.0.1 dev eth0 proto dhcp src 10.0.0.8 metric 100
azureuser@master-001:~$
azureuser@master-001:~$
azureuser@master-001:~$
azureuser@master-001:~$
azureuser@master-001:~$ curl http://10.0.0.5:30080
<!DOCTYPE html>
<html>
<head>
<title>Welcome to nginx!</title>
<style>
html { color-scheme: light dark; }
body { width: 35em; margin: 0 auto;
font-family: Tahoma, Verdana, Arial, sans-serif; }
</style>
</head>
<body>
<h1>Welcome to nginx!</h1>
<p>If you see this page, the nginx web server is successfully installed and
working. Further configuration is required.</p>

<p>For online documentation and support please refer to
<a href="http://nginx.org/">nginx.org</a>.<br/>
Commercial support is available at
<a href="http://nginx.com/">nginx.com</a>.</p>

<p><em>Thank you for using nginx.</em></p>
</body>
</html>
azureuser@master-001:~$ curl http://10.244.1.16:80
<!DOCTYPE html>
<html>
<head>
<title>Welcome to nginx!</title>
<style>
html { color-scheme: light dark; }
body { width: 35em; margin: 0 auto;
font-family: Tahoma, Verdana, Arial, sans-serif; }
</style>
</head>
<body>
<h1>Welcome to nginx!</h1>
<p>If you see this page, the nginx web server is successfully installed and
working. Further configuration is required.</p>

<p>For online documentation and support please refer to
<a href="http://nginx.org/">nginx.org</a>.<br/>
Commercial support is available at
<a href="http://nginx.com/">nginx.com</a>.</p>

<p><em>Thank you for using nginx.</em></p>
</body>
</html>
如何让vnet 内的VM 通过pod IP 访问?
kubenet 下,仅靠 UDR 无法让 VNet 其它 VM 直通 Pod IP。必须用 NodePort、LoadBalancer Service 或切换到 Azure CNI 等原生方案。
ClusterIP 模式
ClusterIP 只能在cluster内部访问,一般用于各个service 之间的相互访问。

创建clusterIP的yaml文件
apiVersion: v1
kind: Service
metadata:
        name: web-clusterip-svc
spec:
        type: ClusterIP
        selector:
                app: web
        ports:
                - port: 80
                  targetPort: 80
部署yaml文件
azureuser@master-001:~$ vi svc-clusterip.yaml
azureuser@master-001:~$ vi deployment1.yaml
#可以创建成功
azureuser@master-001:~$ kubectl apply -f svc-clusterip.yaml
service/web-clusterip-svc created
azureuser@master-001:~$ kubectl get pods
NAME                            READY   STATUS    RESTARTS   AGE
nginx-deploy-8556777689-2dd92   1/1     Running   0          95m
nginx-deploy-8556777689-9r8w2   1/1     Running   0          95m
nginx-deploy-8556777689-b9hwl   1/1     Running   0          95m
nginx-deploy-8556777689-h5fcm   1/1     Running   0          95m
nginx-deploy-8556777689-sm89m   1/1     Running   0          95m
azureuser@master-001:~$ kubectl get service
NAME                TYPE        CLUSTER-IP       EXTERNAL-IP   PORT(S)        AGE
kubernetes          ClusterIP   10.96.0.1        <none>        443/TCP        43h
nginx-svc           ClusterIP   10.102.29.115    <none>        80/TCP         94m
nodeport-svc        NodePort    10.101.111.134   <none>        80:30443/TCP   42h
web-clusterip-svc   ClusterIP   10.102.249.165   <none>        80/TCP         13s
web-svc             ClusterIP   10.104.249.89    <none>        80/TCP         42h

# 但访问测试失败

azureuser@master-001:~$ kubectl run testbox --image=busybox --restart=Never --rm -it -- /bin/sh
 -O- http://web-clusterip-svc.default.svc.cluster.local/
If you don't see a command prompt, try pressing enter.
/ # # ? busybox ??????
/ # wget -O- http://web-clusterip-svc.default.svc.cluster.local/
Connecting to web-clusterip-svc.default.svc.cluster.local (10.102.249.165:80)
wget: can't connect to remote host (10.102.249.165): Connection refused
/ #
/ #
/ # wget -O- http://web-svc.default.svc.cluster.local/
Connecting to web-svc.default.svc.cluster.local (10.104.249.89:80)
wget: can't connect to remote host (10.104.249.89): Connection refused

/ # wget -O- http://10.102.249.165
Connecting to 10.102.249.165 (10.102.249.165:80)
wget: can't connect to remote host (10.102.249.165): Connection refused

^C
/ #
/ #
/ #
/ # exit
pod "testbox" deleted
pod default/testbox terminated (Error)

# 查看Deployment的yaml 文件,发现label 和service的不一致,导致service 找不到pod去部署,修改label 从nginx 到app

apiVersion: apps/v1
kind: Deployment
metadata:
        name: nginx-deploy
spec:
        replicas: 3
        selector:
                matchLabels:
                        app: web
        template:
                metadata:
                        labels:
                                app: web
                spec:
                        containers:
                                - name: nginx
                                  image: nginx:1.25.3
                                  ports:
                                          - containerPort: 80

# 更新Deployment失败,
azureuser@master-001:~$ kubectl apply -f deployment1.yaml
The Deployment "nginx-deploy" is invalid: spec.selector: Invalid value: v1.LabelSelector{MatchLabels:map[string]string{"app":"web"}, MatchExpressions:[]v1.LabelSelectorRequirement(nil)}: field is immutable

# 原因是selector的label 不能修改,只能删除重建

azureuser@master-001:~$ kubectl delete deployment nginx-deploy
deployment.apps "nginx-deploy" deleted

#删除后,原service还在,但访问不通了

azureuser@master-001:~$ kubectl get service
NAME                TYPE        CLUSTER-IP       EXTERNAL-IP   PORT(S)        AGE
kubernetes          ClusterIP   10.96.0.1        <none>        443/TCP        43h
nginx-svc           ClusterIP   10.102.29.115    <none>        80/TCP         101m
nodeport-svc        NodePort    10.101.111.134   <none>        80:30443/TCP   43h
web-clusterip-svc   ClusterIP   10.102.249.165   <none>        80/TCP         6m44s
web-svc             ClusterIP   10.104.249.89    <none>        80/TCP         43h

azureuser@master-001:~$ kubectl get deployment
No resources found in default namespace.
azureuser@master-001:~$ kubectl apply -f deployment1.yaml
deployment.apps/nginx-deploy created
azureuser@master-001:~$ kubectl get deployment
NAME           READY   UP-TO-DATE   AVAILABLE   AGE
nginx-deploy   3/3     3            3           3s

azureuser@master-001:~$ kubectl get service
NAME                TYPE        CLUSTER-IP       EXTERNAL-IP   PORT(S)        AGE
kubernetes          ClusterIP   10.96.0.1        <none>        443/TCP        43h
nginx-svc           ClusterIP   10.102.29.115    <none>        80/TCP         101m
nodeport-svc        NodePort    10.101.111.134   <none>        80:30443/TCP   43h
web-clusterip-svc   ClusterIP   10.102.249.165   <none>        80/TCP         7m25s
web-svc             ClusterIP   10.104.249.89    <none>        80/TCP         43h

#重新测试,可以访问了

azureuser@master-001:~$ kubectl run testbox --image=busybox --restart=Never --rm -it -- /bin/sh
If you don't see a command prompt, try pressing enter.
/ # wget -O- http://10.102.249.165
Connecting to 10.102.249.165 (10.102.249.165:80)
writing to stdout
<!DOCTYPE html>
<html>
<head>
<title>Welcome to nginx!</title>
<style>
html { color-scheme: light dark; }
body { width: 35em; margin: 0 auto;
font-family: Tahoma, Verdana, Arial, sans-serif; }
</style>
</head>
<body>
<h1>Welcome to nginx!</h1>
<p>If you see this page, the nginx web server is successfully installed and
working. Further configuration is required.</p>

<p>For online documentation and support please refer to
<a href="http://nginx.org/">nginx.org</a>.<br/>
Commercial support is available at
<a href="http://nginx.com/">nginx.com</a>.</p>

<p><em>Thank you for using nginx.</em></p>
</body>
</html>
-                    100% |*****************************************************************************************************************************************************************|   615  0:00:00 ETA
written to stdout
/ #
/ #
/ # wget -O- http://10.102.249.165
Connecting to 10.102.249.165 (10.102.249.165:80)
writing to stdout
<!DOCTYPE html>
<html>
<head>
<title>Welcome to nginx!</title>
<style>
html { color-scheme: light dark; }
body { width: 35em; margin: 0 auto;
font-family: Tahoma, Verdana, Arial, sans-serif; }
</style>
</head>
<body>
<h1>Welcome to nginx!</h1>
<p>If you see this page, the nginx web server is successfully installed and
working. Further configuration is required.</p>

<p>For online documentation and support please refer to
<a href="http://nginx.org/">nginx.org</a>.<br/>
Commercial support is available at
<a href="http://nginx.com/">nginx.com</a>.</p>

<p><em>Thank you for using nginx.</em></p>
</body>
</html>
-                    100% |*****************************************************************************************************************************************************************|   615  0:00:00 ETA
written to stdout
/ # wget -O- http://10.102.29.115
Connecting to 10.102.29.115 (10.102.29.115:80)
wget: can't connect to remote host (10.102.29.115): Connection refused
/ #
/ #
/ # exit
pod "testbox" deleted
pod default/testbox terminated (Error)
azureuser@master-001:~$
azureuser@master-001:~$
LoadBalancer 模式
什么是 LoadBalancer Service?
LoadBalancer 类型的 Service 是 Kubernetes 提供的最直接的“对外流量入口”方式。
当你在云环境(如 Azure、AWS、GCP)创建 type=LoadBalancer 的 Service 时,Kubernetes 会自动调用云平台 API,创建一个云负载均衡器(Azure LB),并将其公网/内网 IP 作为服务入口。
云 LB 会将流量分发到后端 K8s 节点,再由 kube-proxy 转发到具体 Pod。
在 Azure 上 LoadBalancer 的工作机制
K8s Master 检测到 type=LoadBalancer 的 Service 后,调用 Azure Cloud Provider。
Azure 自动分配一个公网IP(默认)或内网IP,并创建 LB 资源。
LB 后端池自动包含所有 K8s 节点。
LB 的健康探针和转发规则自动配置好,将流量转发到各节点上对应的 NodePort,然后再由 kube-proxy 转发到 Pod。
Service 的 EXTERNAL-IP 字段变成 LB 分配的 IP,你可以直接 curl 这个地址访问服务。
测试发现,通过load balancer 去调用Azure API,要修改很多配置文件,填写很多azure认证信息,cluster还要重新部署, 整体配置起来很复杂。 测试阶段,建议手动部署Azure lb,并关联到node(VM)即可。
总结与注意事项
ClusterIP:只能在集群内部访问。
NodePort:可通过任意节点 IP+端口访问(记得放行防火墙)。
LoadBalancer:云厂商自动分配公网 IP,可直接外网访问。
Selector 必须与 Deployment 的 labels 匹配,否则无后端 Pod。


 浙公网安备 33010602011771号