
Java Selenium实战秘籍:快速搭建自动化测试框架
在软件测试领域,自动化测试已成为提升效率和质量的关键。
本文是一篇面向开发人员和测试工程师的实战教程,详细介绍了如何在Mac系统上搭建Java Selenium自动化测试环境,包括Maven、Java、Selenium和ChromeDriver的安装与配置。
文章还通过具体示例,展示了如何结合Cucumber实现行为驱动开发(BDD)测试,从环境搭建到测试脚本编写,再到运行测试,内容丰富且实用。
无论是初学者还是有一定经验的工程师,都能从中获得有价值的参考。

从Maven官网https://maven.apache.org/download.cgi下载stable版本,
本次下载的是Stable 3.8.8 Release,下载后解压缩,把maven文件夹放置到本地路径,如“/Users/pingguo/Documents/apache-maven-3.8.8”
输入sudo vim .bash_profile,打开编辑页,输入i(input)进入编辑模式,输入命令
export PATH=$PATH:/path/to/your/program
按esc退出编辑模式,再按shift+:wq,保存并退出。
通过env命令查看所有环境变量,找到上述路径则表示添加成功。
如不生效,则输入命令vim ~/.bashrc
export PATH=/usr/local/maven/bin:$PATH
输入source ~/.bashrc使生效
然后输入mvn -v得到:
Apache Maven 3.8.8 (4c87b05d9aedce574290d1acc98575ed5eb6cd39)
Maven home:/usr/local/maven
Java version: 21.0.5,vendor: Oracle Corporation, runtime:/Library/Java/JavaVir tualMachines/jdk-21.jdk/Contents/Home
Default locale: zh_CN_#Hans, platform encoding:UTF-8
OS name: "mac os x", version:"15.2", arch:"aarch64", family: "mac"
在IntelliJ Idea新建maven project,pom.xml里复制依赖。
可打开
https://mvnrepository.com/artifact/org.seleniumhq.selenium/selenium-java/3.141.59,(找到usage最多的版本)复制pom到所建项目的pom文件里,修改后的如下
<project xmlns="http://maven.apache.org/POM/4.0.0" xmlns:xsi="http://www.w3.org/2001/XMLSchema-instance"
xsi:schemaLocation="http://maven.apache.org/POM/4.0.0 http://maven.apache.org/xsd/maven-4.0.0.xsd">
<modelVersion>4.0.0</modelVersion>
<groupId>.testauto</groupId>
<artifactId>test</artifactId>
<version>0.0.1-SNAPSHOT</version>
<dependencies>
<!-- selenium依赖-->
<dependency>
<groupId>org.seleniumhq.selenium</groupId>
<artifactId>selenium-java</artifactId>
<version>3.141.59</version>
</dependency>
</dependencies>
</project>
在https://mvnrepository.com/artifact/org.testng/testng/7.1.0查询testng,复制依赖添加到pom.xml。
安装jdk,默认mac不用配置环境变量。
下载selenium,
https://selenium-release.storage.googleapis.com/index.html?path=3.9/。
安装依赖,右上角设置页->project structure->Modules,新增Dependencies,导入jar包。

下载chromedriver驱动,复制到IJ的bin文件夹下

安装java,配置环境变量,编辑环境变量文件
vim ~/.bash_profile
按住i,输入
JAVA_HOME="/Library/Java/JavaVirtualMachines/jdk-21.jdk/Contents/Home"
export JAVA_HOME
CLASS_PATH="$JAVA_HOME/lib"
PATH=".$PATH=$JAVA_HOME/bin"
按esc退出,按住shift:wq保存并退出编辑
执行命令使配置生效:source .bash_profile
在终端输入java -version验证:
java -version
java version "21.0.5"2024-10-15 LTS
Java(TM) SE Runtime Environment(build 21.0.5+9-LTS-239)
Java HotSpot(TM) 64-Bit Server VM (build 21.0.5+9-LTS-239,mixed mode, sharing)
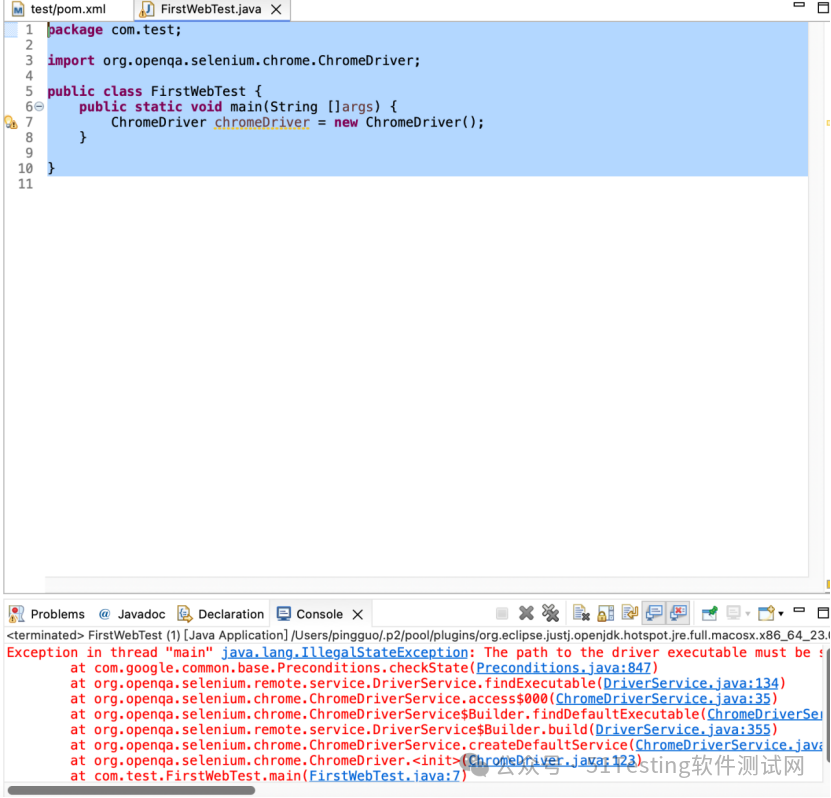
然后在src/test/java下新建package,可命名为com.test,再新建class,命名为FirstWebTest,添加代码:
package com.test;

import org.openqa.selenium.chrome.ChromeDriver;

public class FirstWebTest {
public static void main(String []args) {
ChromeDriver chromeDriver = new ChromeDriver();
}

}
执行java application时报错,
下载chromedriver,几番寻找,终于找到含有最新版chrome的driver下载网址,
https://registry.npmmirror.com/binary.html?path=chrome-for-testing/
把下载好的对应版本复制到src/test/resources下。
本次chrome版本是131.0.6778.265。
将下载的driver放到/usr/local/bin中
sudo mv /Users/pingguo/Downloads/chromedriver-mac-arm64/chromedriver /usr/local/bin
再执行run as java application时提示无法打开chromedriver,因为无法验证开发者,因为mac不信任下载的webdriver文件,打开安全隐私模式添加信任即可:
sudo xattr -d com.apple.

quarantine /usr/local/bin/chromedriver
在控制台启动chromedriver,得到如下
chromedriver
Starting ChromeDriver 131.0.6778.264 (2d05e31515360f4da764174f7c448b33e36da871-refs/branch-heads/6778@{#4323}) on port 0
Only local connections are allowed.
Please see https://chromedriver.chromium.org/security-considerations for suggestions on keeping ChromeDriver safe.
ChromeDriver was started successfully on port 54241.

打开百度
package come.autotest;

import org.openqa.selenium.WebDriver;
import org.openqa.selenium.chrome.ChromeDriver;
import org.testng.annotations.AfterClass;
import org.testng.annotations.BeforeClass;
import org.testng.annotations.Test;

import java.nio.file.Path;
import java.nio.file.Paths;

public class webtest {
   public WebDriver webDriver;

   @BeforeClass
   public void setUp(){
       Path p1 = Paths.get("src","drivers", "chromedriver");
       System.setProperty("webdriver.chrome.driver",p1.toAbsolutePath().toString());
       //创建浏览器实例
       webDriver = new ChromeDriver();
   }

   @Test
   public void openHomepage() throws InterruptedException {
       webDriver.manage().window().maximize();

       webDriver.get("https://www.baidu.com");
       Thread.sleep(2);
   }

   @AfterClass
   public void tearDown(){
       webDriver.quit();
   }

}

在pom.xml中添加依赖
<dependency>
<groupId>io.cucumber</groupId>
<artifactId>cucumber-java</artifactId>
<version>7.15.0</version>
<scope>test</scope>
</dependency>
为避免后面用到把junit依赖也加上
<!-- https://mvnrepository.com/artifact/io.cucumber/cucumber-junit -->
<dependency>
   <groupId>io.cucumber</groupId>
   <artifactId>cucumber-junit</artifactId>
   <version>7.15.0</version>
   <scope>test</scope>
</dependency>
在终端输入,以新建cucumber项目
mvn archetype:generate \
"-DarchetypeGroupId=io.cucumber" \
"-DarchetypeArtifactId=cucumber-archetype" \
"-DarchetypeVersion=7.15.0" \
"-DgroupId=hellocucumber" \
"-DartifactId=hellocucumber" \
"-Dpackage=hellocucumber" \
"-Dversion=1.0.0-SNAPSHOT" \
安装成功后显示如下
[INFO] Project created from Archetype in dir: /Users/pingguo/hellocucumber
[INFO] ------------------------------------------------------------------------
[INFO] BUILD SUCCESS
[INFO] ------------------------------------------------------------------------
[INFO] Total time: 0.744 s
在刚创建的项目文件夹下打开项目,cd hellocucumber
在IntelliJ Idea中打开这个项目

这时就拥有一个cucumber的第一个项目了。
为了确保项目工作正常,在打开的路径下来运行cucumber,继续在终端执行命令:
mvn test
得到结果如下,有一份示例的测试通过:
[INFO] Running hellocucumber.RunCucumberTest

Scenario: The example                      # hellocucumber/example.feature:3
 Given an example scenario                 # hellocucumber.StepDefinitions.anExampleScenario()
 When all step definitions are implemented # hellocucumber.StepDefinitions.allStepDefinitionsAreImplemented()
 Then the scenario passes                  # hellocucumber.StepDefinitions.theScenarioPasses()
[INFO] Tests run: 1, Failures: 0, Errors: 0, Skipped: 0, Time elapsed: 0.109 s -- in hellocucumber.RunCucumberTest
[INFO]
[INFO] Results:
[INFO]
[INFO] Tests run: 1, Failures: 0, Errors: 0, Skipped: 0
[INFO]
[INFO] ------------------------------------------------------------------------
[INFO] BUILD SUCCESS
[INFO] ------------------------------------------------------------------------
[INFO] Total time: 01:04 min
在src/test/resources/hellocucumber/example.feature文件中,看到有示例的场景.scenario已经被定义好:
Feature: An example
Scenario: The example
Given an example scenario
When all step definitions are implemented
Then the scenario passes
现在来把它写成另一个场景:来验证周六不是周五
Feature:Is it Friday yet?
Everyone wants to know when it's Friday
Scenario: Saturday isn't Friday
Given today is Saturday
When I ask whether it's Friday yet
Then I should be told "No"
最好命名一个与内容相近的文件名,如is_friday_yet.feature。
cucumber是这样执行的,首先第一行以Feature开头,描述名称,与文件名相近,接着第四行以Scenario关键词开头验证场景,末三行分别以Given、When、Then关键词来展开场景的步骤。
再次执行mvn test,会收到一个步骤未被定义的错误:
[ERROR] Tests run: 2, Failures: 0, Errors: 1, Skipped: 0, Time elapsed: 0.135 s <<< FAILURE! -- in hellocucumber.RunCucumberTest
[ERROR] Is it Friday yet?.Saturday isn't Friday -- Time elapsed: 0.024 s <<< ERROR!
io.cucumber.junit.platform.engine.UndefinedStepException:
The step 'today is Saturday' and 2 other step(s) are undefined.
根据提示于是在
src/test/java/hellocucumber/StepDefinitions.java中定义:
@Given("today is Saturday")
   public void today_is_saturday() {
       // Write code here that turns the phrase above into concrete actions
//       throw new io.cucumber.java.PendingException();
   }
   @When("I ask whether it's Friday yet")
   public void i_ask_whether_it_s_friday_yet() {
       // Write code here that turns the phrase above into concrete actions
//       throw new io.cucumber.java.PendingException();
   }
   @Then("I should be told {string}")
   public void i_should_be_told(String string) {
       // Write code here that turns the phrase above into concrete actions
//       throw new io.cucumber.java.PendingException();
   }
再次运行mvn test,得到的结果通过了✅:
[INFO] Running hellocucumber.RunCucumberTest


Scenario: The example                      # hellocucumber/example.feature:3

 Given an example scenario                 # hellocucumber.StepDefinitions.anExampleScenario()

 When all step definitions are implemented # hellocucumber.StepDefinitions.allStepDefinitionsAreImplemented()

 Then the scenario passes                  # hellocucumber.StepDefinitions.theScenarioPasses()


Scenario: Saturday isn't Friday     # hellocucumber/is_friday_yet.feature:4

 Given today is Saturday            # hellocucumber.StepDefinitions.today_is_saturday()

 When I ask whether it's Friday yet # hellocucumber.StepDefinitions.i_ask_whether_it_s_friday_yet()

 Then I should be told "No"         # hellocucumber.StepDefinitions.i_should_be_told(java.lang.String)

[INFO] Tests run: 2, Failures: 0, Errors: 0, Skipped: 0, Time elapsed: 0.110 s -- in hellocucumber.RunCucumberTest

[INFO]

[INFO] Results:

[INFO]

[INFO] Tests run: 2, Failures: 0, Errors: 0, Skipped: 0

[INFO]

[INFO] ------------------------------------------------------------------------

[INFO] BUILD SUCCESS

[INFO] ------------------------------------------------------------------------

[INFO] Total time: 1.475 s
接下来充实一下代码
class IsItFriday {
   static String isItFriday(String today) {
       return "No";
   }
}

public class StepDefinitions {
   private String today;
   private String actualAnswer;

   @Given("today is Saturday")
   public void today_is_Saturday() {
       today = "Saturday";
   }

   @When("I ask whether it's Friday yet")
   public void i_ask_whether_it_s_Friday_yet() {
       actualAnswer = IsItFriday.isItFriday(today);
   }

   @Then("I should be told {string}")
   public void i_should_be_told(String expectedAnswer) {
       assertEquals(expectedAnswer, actualAnswer);
   }
再次运行得到:
[INFO] Running hellocucumber.RunCucumberTest


Scenario: The example                      # hellocucumber/example.feature:3

 Given an example scenario                 # hellocucumber.StepDefinitions.anExampleScenario()

 When all step definitions are implemented # hellocucumber.StepDefinitions.allStepDefinitionsAreImplemented()

 Then the scenario passes                  # hellocucumber.StepDefinitions.theScenarioPasses()


Scenario: Saturday isn't Friday     # hellocucumber/is_friday_yet.feature:4

 Given today is Saturday            # hellocucumber.StepDefinitions.today_is_Saturday()

 When I ask whether it's Friday yet # hellocucumber.StepDefinitions.i_ask_whether_it_s_Friday_yet()

 Then I should be told "No"         # hellocucumber.StepDefinitions.i_should_be_told(java.lang.String)

[INFO] Tests run: 2, Failures: 0, Errors: 0, Skipped: 0, Time elapsed: 0.114 s -- in hellocucumber.RunCucumberTest

[INFO]

[INFO] Results:

[INFO]

[INFO] Tests run: 2, Failures: 0, Errors: 0, Skipped: 0

[INFO]

[INFO] --------------------------------------------------------------

[INFO] BUILD SUCCESS

 浙公网安备 33010602011771号