【Anacoda&Tensorflow】---本地安装And服务器部署---Tensorflow中Jupyter notebook安装使用
一、Anacoda安装
1、官网下载对应的Python版本
官网地址:
https://www.anaconda.com/products/individual#download-section
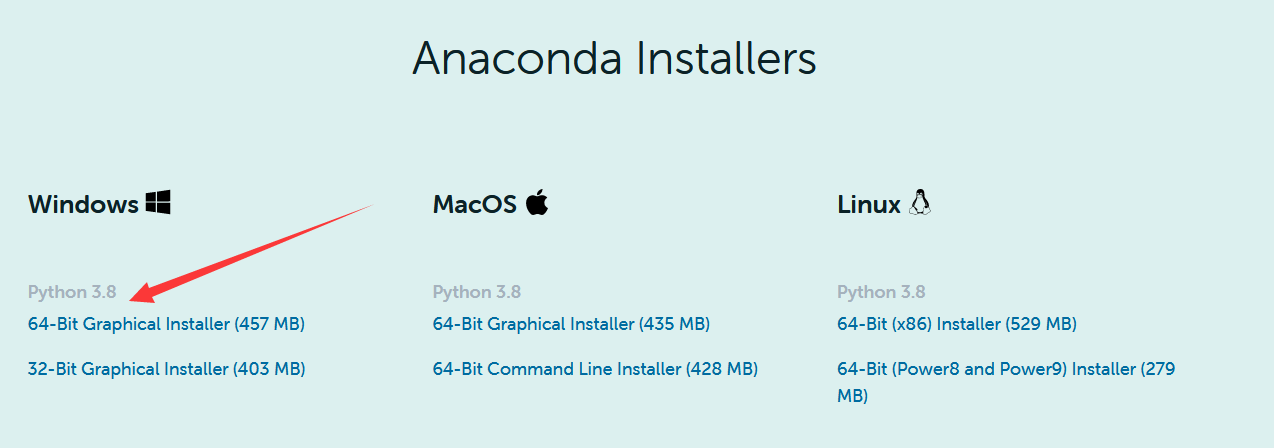
注意这个地方Python3.8,本机Python环境应该与之对应。
在安装的过程中,选中这一项

2、换源---清华源
打开Anacoda Prompt
conda config --set show_channel_urls yes
借着用文本编辑器打开"C:\Users\xxx.condarc"文件,将内容换为下面的内容
hannels:
  - defaults
show_channel_urls: true
default_channels:
  - https://mirrors.tuna.tsinghua.edu.cn/anaconda/pkgs/main
  - https://mirrors.tuna.tsinghua.edu.cn/anaconda/pkgs/r
  - https://mirrors.tuna.tsinghua.edu.cn/anaconda/pkgs/msys2
custom_channels:
  conda-forge: https://mirrors.tuna.tsinghua.edu.cn/anaconda/cloud
  msys2: https://mirrors.tuna.tsinghua.edu.cn/anaconda/cloud
  bioconda: https://mirrors.tuna.tsinghua.edu.cn/anaconda/cloud
  menpo: https://mirrors.tuna.tsinghua.edu.cn/anaconda/cloud
  pytorch: https://mirrors.tuna.tsinghua.edu.cn/anaconda/cloud
  simpleitk: https://mirrors.tuna.tsinghua.edu.cn/anaconda/cloud
3、使用下面的命令清楚索引缓存
conda clean -i
二、安装TensorFlow
下面的内容是参考复制了CSDN的文章:
https://blog.csdn.net/baidu_39157459/article/details/104109304
1、打开Anaconda Prompt,分布运行下面的指令:
# 提前注明:<>号代表是需要更改内容的,不能直接拿到指令里运行
# 第一步,创立环境
conda create --name <环境变量名> python=<python版本号>
# 第二步,激活环境
conda activate <环境变量名>
# 第三步,pip安装
pip3 install -i https://pypi.tuna.tsinghua.edu.cn/simple/ <--upgrade> tensorflow==<tensorflow版本号>
下面是一些实例和说明:
# 说明
1.<环境变量名>取自己喜欢的名字即可,如tf、tfcpu、tensorflow等等都可以,注意第二第三步的环境变量名要一致
2.<python版本号>是python对应的安装版本号
3.<tensorflow版本号>是tensorflow对应的安装版本号,省去不写默认安装最新版本
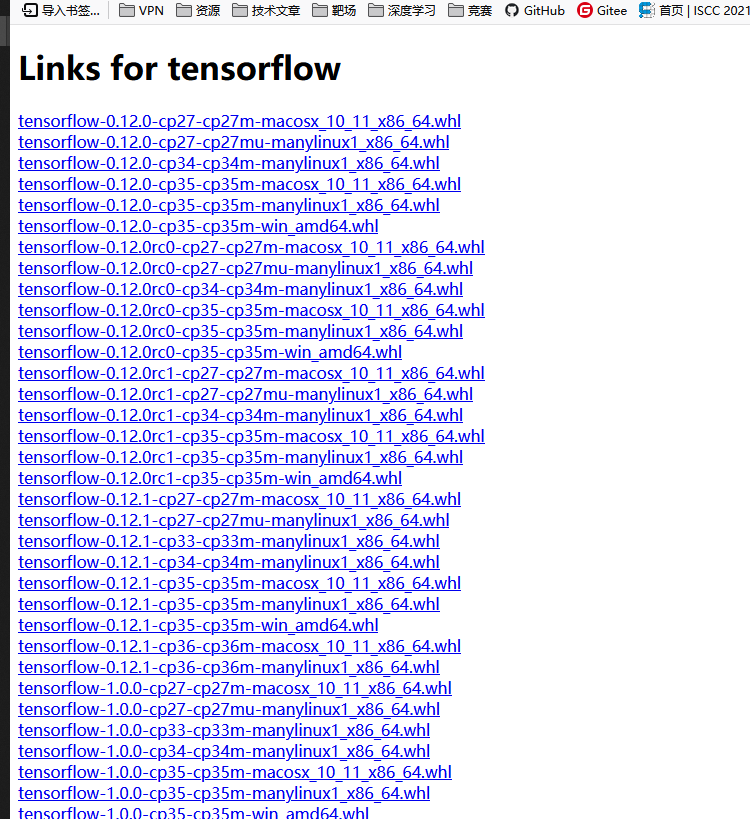
注意python和tensorflow两者版本号对应的安装包要能在https://pypi.tuna.tsinghua.edu.cn/simple/tensorflow/ 找到对应的,详见安装过程分述
4.<--upgrade>选择是否更新tensorflow,要更新tensorflow就把两个尖角号去掉,不更新直接删除就可以
5.如果你安装的是python3,直接把pip3改成pip也可以
6.安装过程中如果遇到[y/n]时(表示是否继续),填y后回车即可继续安装
# 示例
conda create --name tfcpu python=3.5
conda activate tfcpu
pip install -i https://pypi.tuna.tsinghua.edu.cn/simple/ --upgrade tensorflow==1.1.0
2、检验
在安装后进入Python程序,输入Import tensorflow,测试一下就行。
3、安装其他科学报的过程
清华镜像地址:
https://pypi.tuna.tsinghua.edu.cn/simple/tensorflow/
命令:
# 安装其他科学包的方法
pip3 install -i https://pypi.tuna.tsinghua.edu.cn/simple/ <--upgrade> <科学包名字>==<科学包版本号>
三、安装Jupyter
在安装好的tensorflow环境中安装Jupyter
conda install jupyter
你会发现在安装完以后,jupyter运行不了代码,因为还得安装notebook
pip install notebook
然后安装完notebook,重启jupyter
jupyter notebook
如果有报错的话,缺少啥就:
conda install xxx
或者:
pip install xxx
四、配置Jupyter notebook远程
这里我是阿里云大的服务器,操作系统是windows server 2008,前三大步和本地搭建都一样。
1、生成配置文件
jupyter notebook --generate-config
2、生成密码
#使用ipython或者python
#在Anacoda promote中进入虚拟环境
ipython

In[1]: from notebook.auth import passwd

In[2]: passwd()
Enter password:
Verify password:
Out[2]: 'sha1:dasjkljwqoiueioqwnenlqwjdlksajdas.....'
这里要把密文sha1:这些都复制下来。
3、修改配置文件
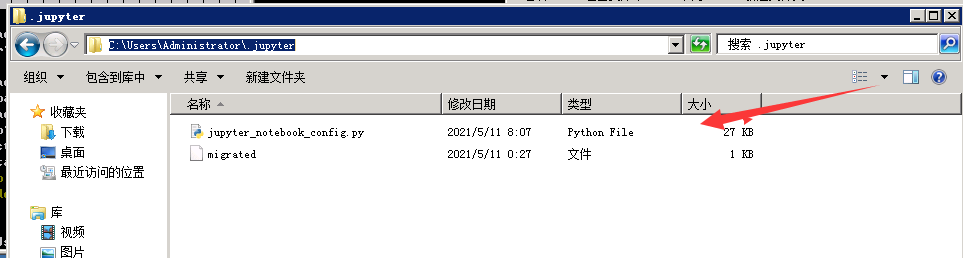
#我这里是windows server,在下面的路径找到配置文件
C:\Users\Administrator\.jupyter
#如果是linux
vim ~/.jupyter/jupyter_notebook_config.py
然后在下面的部分修改下面几个属性值:
    c.NotebookApp.ip='*' #意思是任意IP都可以访问
    c.NotebookApp.password = 'sha1:sadjlaskjdaskjdkla..' #刚才那个生成的密文
    c.NotebookApp.open_browser = False  #意思是默认不打开浏览器
    c.NotebookApp.port =8888 #随便指定一个你想要的端口,后面可以从这个端口使用
注意,要把签名的#号删除掉才能生效哈。
4、启动jupyter notebook
5、远程访问 ServerIP:port

如果访问失败,可能是防火墙的问题,开放下端口,安全组设置一下试试。

 浙公网安备 33010602011771号