
Android 学习 笔记_03. SQLite的使用
SQLite是一种轻量级的小型数据库,虽然比较小,但是功能相对完善,具备一些常见的数据库基本功能,在现在的嵌入式系统中使用该数据库的比较多,因为它占用系统资源很少。
现在将通过学习SQLite来进行数据的创建表、更新表、插入数据、更新数据、查询数据、删除数据的操作。
效果图如下:
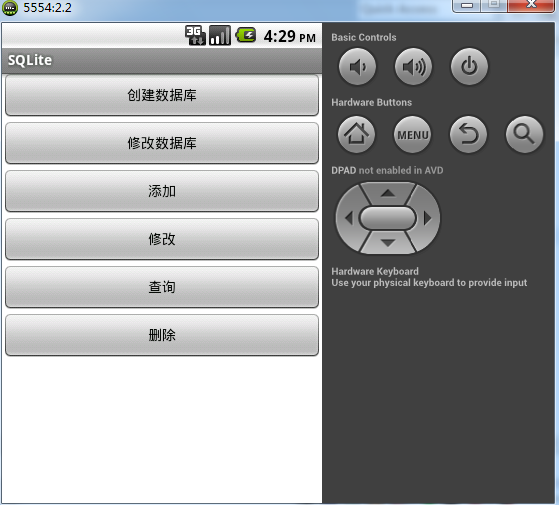
1、创建表:
(1 SQLite页面中点击“创建数据库”
在 cmd中输入如下命令:adb shell; cd data; cd data; ls; cd zzl.sqlite; ls;
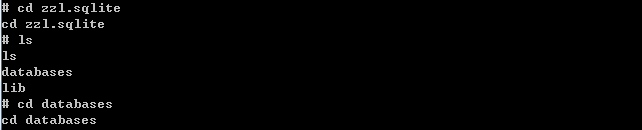
如果没有点击页面,则ls查询到的不会有databases这个文件,这时候我创建的是一个数据库名为test_db的数据库
(2 SQLite页面中点击“修改数据库”

则会输出对应的语句
(3 添加
点击页面,然后继续在cmd中输入命令:sqlite3 test_db; .schema; select * from user

如果没有添加,则查询出来的结果是空的,否则:
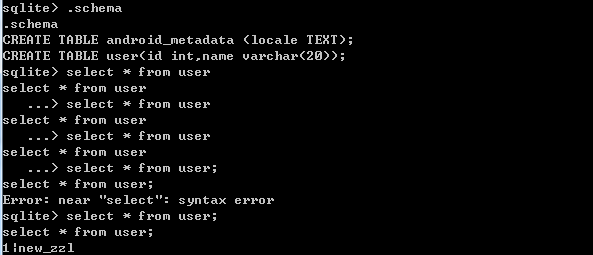
(4 修改
点击修改

查询和删除已完成的,请自测!
SQLite_Activity.java
  1 package zzl.sqlite;
  2
  3 import zzl.sqlite.db.DatabaseHelper;
  4 import android.app.Activity;
  5 import android.content.ContentValues;
  6 import android.database.Cursor;
  7 import android.database.sqlite.SQLiteDatabase;
  8 import android.os.Bundle;
  9 import android.view.View;
 10 import android.view.View.OnClickListener;
 11 import android.widget.Button;
 12
 13 public class SQLite_Activity extends Activity {
 14
 15     private Button updateDBbutton = null;
 16     private Button createDBbutton = null;
 17     private Button insertButton = null;
 18     private Button queryButton = null;
 19     private Button updateButton = null;
 20     private Button deleteButton=null;
 21
 22     @Override
 23     public void onCreate(Bundle savedInstanceState) {
 24         super.onCreate(savedInstanceState);
 25         setContentView(R.layout.main);
 26         updateDBbutton = (Button) findViewById(R.id.createDBbutton);
 27         createDBbutton = (Button) findViewById(R.id.updateDBbutton);
 28         insertButton = (Button)findViewById(R.id.insertButton);
 29         updateButton = (Button)findViewById(R.id.updateButton);
 30         queryButton = (Button)findViewById(R.id.queryButton);
 31         deleteButton=(Button)findViewById(R.id.deleteButton);
 32
 33         createDBbutton.setOnClickListener(new createDBListener());
 34         updateDBbutton.setOnClickListener(new updateDBListener());
 35         insertButton.setOnClickListener(new insertListener());
 36         updateButton.setOnClickListener(new updateListener());
 37         queryButton.setOnClickListener(new queryListener());
 38         deleteButton.setOnClickListener(new deleteListener());
 39     }
 40
 41     private final class createDBListener implements OnClickListener{
 42
 43         public void onClick(View v) {
 44             // TODO Auto-generated method stub
 45             //创建一个DatabaseHelper对象
 46             DatabaseHelper dbHelper = new DatabaseHelper(SQLite_Activity.this,"test_db");
 47             //只有调用了DatabaseHelper对象的getReadableDatabase()方法,
 48             //或者是getWritableDatabase()方法之后,才会创建,或打开一个数据库
 49             SQLiteDatabase db = dbHelper.getReadableDatabase();
 50         }
 51
 52     }
 53
 54     private final class updateDBListener implements OnClickListener{
 55
 56         public void onClick(View v) {
 57             DatabaseHelper dbHelper = new DatabaseHelper(SQLite_Activity.this,"test_db",null,2);
 58             SQLiteDatabase db = dbHelper.getReadableDatabase();
 59         }
 60     }
 61     private final class insertListener implements OnClickListener{
 62
 63         public void onClick(View v) {
 64
 65             //生成ContentValues对象
 66             ContentValues values = new ContentValues();
 67             DatabaseHelper dbHelper = new DatabaseHelper(SQLite_Activity.this, "test_db",null,2);
 68             SQLiteDatabase db = dbHelper.getWritableDatabase();
 69             //想该对象当中插入键值对,其中键是列名,值是希望插入到这一列的值,值必须和数据库当中的数据类型一致
 70             values.put("id",1);
 71             values.put("name", "zzl_NO1");
 72             //调用insert方法,就可以讲数据插入到数据库当中
 73             db.insert("user",null,values);
 74         }
 75     }
 76     //UPDATE table_name SET XXXO=XXXX WHERE XXXO=XX...
 77      private final class updateListener implements OnClickListener{
 78
 79             public void onClick(View v) {
 80                 ContentValues values = new ContentValues();
 81                 DatabaseHelper dbHelper = new DatabaseHelper(SQLite_Activity.this, "test_db");
 82                 SQLiteDatabase db = dbHelper.getWritableDatabase();
 83                 values.put("name", "new_zzl");
 84                 //update(String table, ContentValues values, String whereClause, String[] whereArgs)
 85                 //1-更新的表名  2-ContentValues对象  3-where子句(不包含where本身) 4-前个参数有几个占位符?就有多几个参数
 86                 db.update("user",values,"id=?",new String[]{"1"});
 87             }
 88      }
 89
 90      private final class queryListener implements OnClickListener{
 91
 92             public void onClick(View v) {
 93                 DatabaseHelper dbHelper = new DatabaseHelper(SQLite_Activity.this, "test_db");
 94                 SQLiteDatabase db = dbHelper.getReadableDatabase();
 95                 Cursor cursor = db.query("user", new String[]{"id","name"}, "id=?", new String[]{"1"}, null, null,null);
 96                 while(cursor.moveToNext()){
 97                     String name = cursor.getString(cursor.getColumnIndex("name"));
 98                     System.out.println("query--->" + name);
 99                 }
100             }
101      }
102      private final class deleteListener implements OnClickListener{
103
104             public void onClick(View v) {
105                 DatabaseHelper dbHelper = new DatabaseHelper(SQLite_Activity.this, "test_db");
106                 SQLiteDatabase db = dbHelper.getWritableDatabase();
107                 db.delete("user", "id=?", new String[]{"2"});
108             }
109      }
110 }
DatabaseHelper.java
 1 package zzl.sqlite.db;
 2
 3 import android.content.Context;
 4 import android.database.sqlite.SQLiteDatabase;
 5 import android.database.sqlite.SQLiteDatabase.CursorFactory;
 6 import android.database.sqlite.SQLiteOpenHelper;
 7
 8
 9 //DatabaseHelper 是作为一个访问SQLite的助手类
10 //1, getReadablebase(),getWriteableDatabase()以获得SQLiteDatabse对象,通过该对象可以对数据库进行操作
11 //第二,提供了onCreate()和onUpgrade()两个回调函数,允许我们在创建和升级数据库时,进行自己的操作
12 public class DatabaseHelper extends SQLiteOpenHelper{
13
14     //构造函数
15     private static final int VERSION=1;
16
17    public DatabaseHelper(Context context, String name, CursorFactory factory,
18            int version) {
19        //必须通过super调用父类当中的构造函数
20        //context:ACtivity对象
21        //name:表的名字
22        //version:当前数据库版本(正数递增)
23        super(context, name, factory, version);
24    }
25
26    public DatabaseHelper(Context context,String name){
27        this(context,name,VERSION);
28    }
29    public DatabaseHelper(Context context,String name,int version){
30        this(context,name,null,VERSION);
31    }
32
33    //调用函数,第一次创建数据库的时候执行
34    @Override
35    public void onCreate(SQLiteDatabase db) {
36            System.out.println("create a Database");
37            //execSQL函数用于执行SQL语句
38            db.execSQL("create table user(id int,name varchar(20))");
39
40    }
41
42    //数据库文件的版本号在更新的时候调用,所以为了添加新的字段,要修改版本号
43    @Override
44    public void onUpgrade(SQLiteDatabase db, int oldVersion, int newVersion) {
45        // TODO Auto-generated method stub
46        System.out.println("update a Database");
47    }
48 }
main.xml
 1 <RelativeLayout xmlns:android="http://schemas.android.com/apk/res/android"
 2     xmlns:tools="http://schemas.android.com/tools"
 3     android:layout_width="match_parent"
 4     android:layout_height="match_parent" >
 5
 6
 7     <Button
 8         android:layout_width="fill_parent"
 9         android:layout_height="wrap_content"
10         android:text="@string/createDatabase"
11         android:id="@+id/createDBbutton"
12               />
13
14      <Button
15         android:layout_width="fill_parent"
16         android:layout_height="wrap_content"
17         android:text="@string/updateDatabase"
18         android:id="@+id/updateDBbutton"
19         android:layout_below="@id/createDBbutton"
20         />
21
22       <Button
23         android:layout_width="fill_parent"
24         android:layout_height="wrap_content"
25         android:text="@string/insert"
26         android:id="@+id/insertButton"
27         android:layout_below="@id/updateDBbutton"
28         />
29
30        <Button
31         android:layout_width="fill_parent"
32         android:layout_height="wrap_content"
33         android:text="@string/update"
34         android:id="@+id/updateButton"
35         android:layout_below="@id/insertButton"
36         />
37
38         <Button
39         android:layout_width="fill_parent"
40         android:layout_height="wrap_content"
41         android:text="@string/query"
42         android:id="@+id/queryButton"
43         android:layout_below="@id/updateButton"
44         />
45
46         <Button
47         android:layout_width="fill_parent"
48         android:layout_height="wrap_content"
49         android:text="@string/delete"
50         android:id="@+id/deleteButton"
51         android:layout_below="@id/queryButton"
52         />
53 </RelativeLayout>
总结:
(1 在用到“adb”这样一个工具的时候,我们需要配置好环境变量,当然在安装SDK过程中如果已经配置好的话就没有问题了,如果配置好了,则在命令行:开始——>运行——>cmd——>adb 会出现下面这样的界面:

如果输入“adb”出现“不是内部命令”这样的语句则说明没有配置好环境,则需要以下步骤:
① 我的电脑——>属性——>高级——>环境变量——>系统变量——>新建——>变量名:ANDROID;
变量值:D:\Android\android-sdk_r18-windows\android-sdk-windows\platform-tools;D:\Android\android-sdk_r18-windows\android-sdk-windows\tools——>确定——>(注意这里是爱系统变量(S)中新建)
② path——>编辑——>变量值:……;%ANDROID%——>确定
(2 ...

 浙公网安备 33010602011771号