部署灾备nginx+keepalived-HA负载均衡分配Spring
1,系统Centos 7.9 两台 安装nginx+keepalived
2,Spring 两套
资源分配
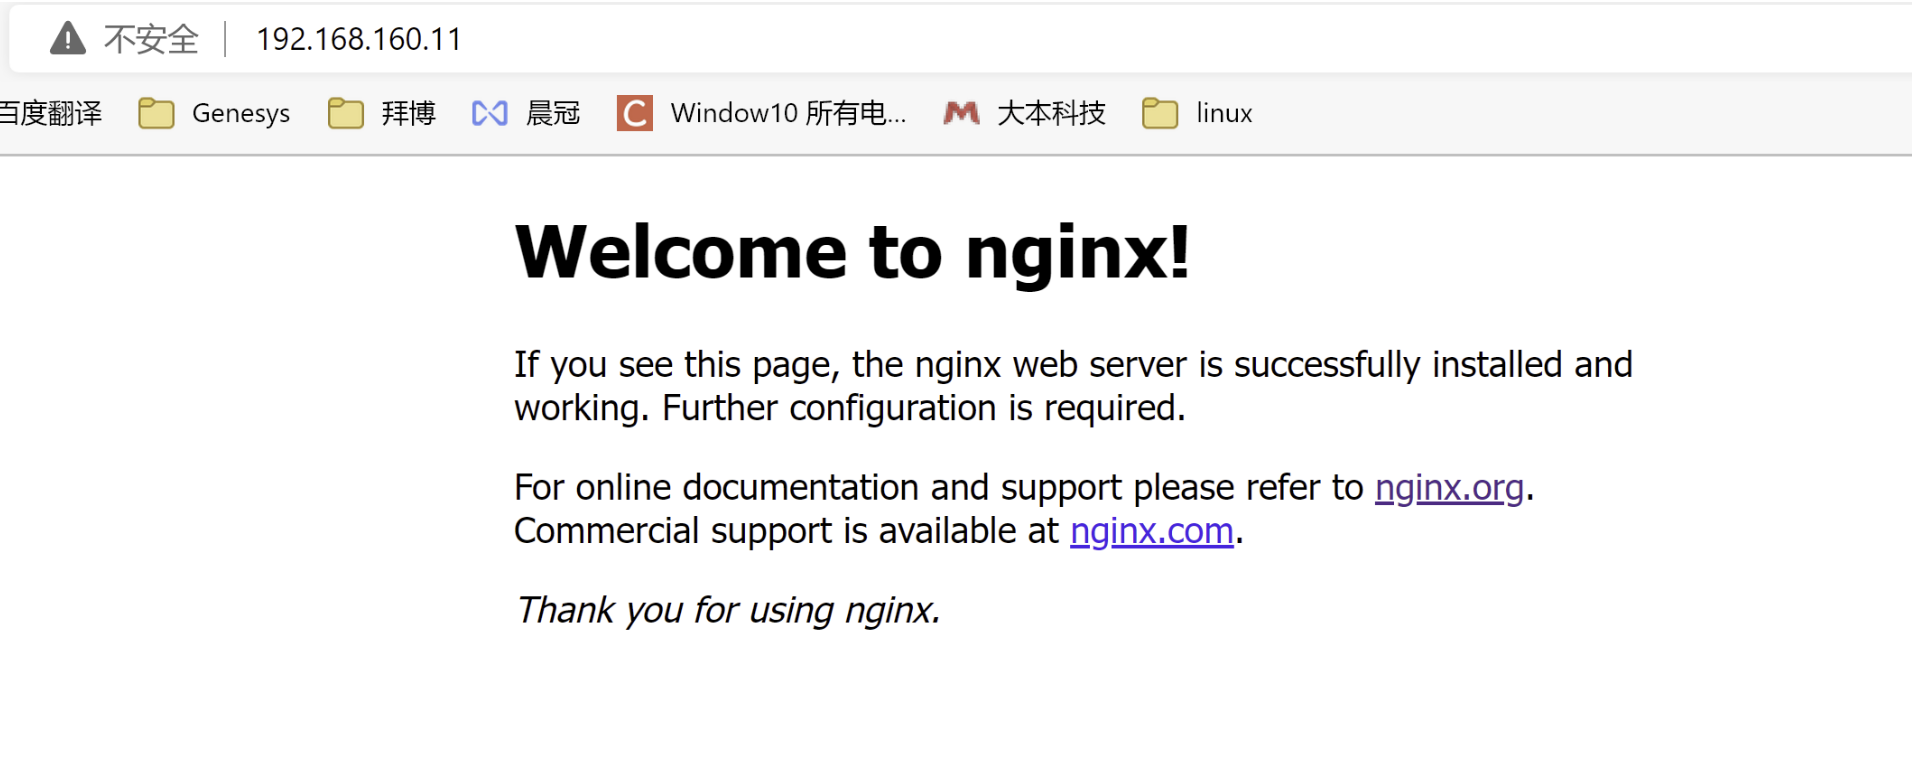
nginx-1+keepalived1 192.168.160.11
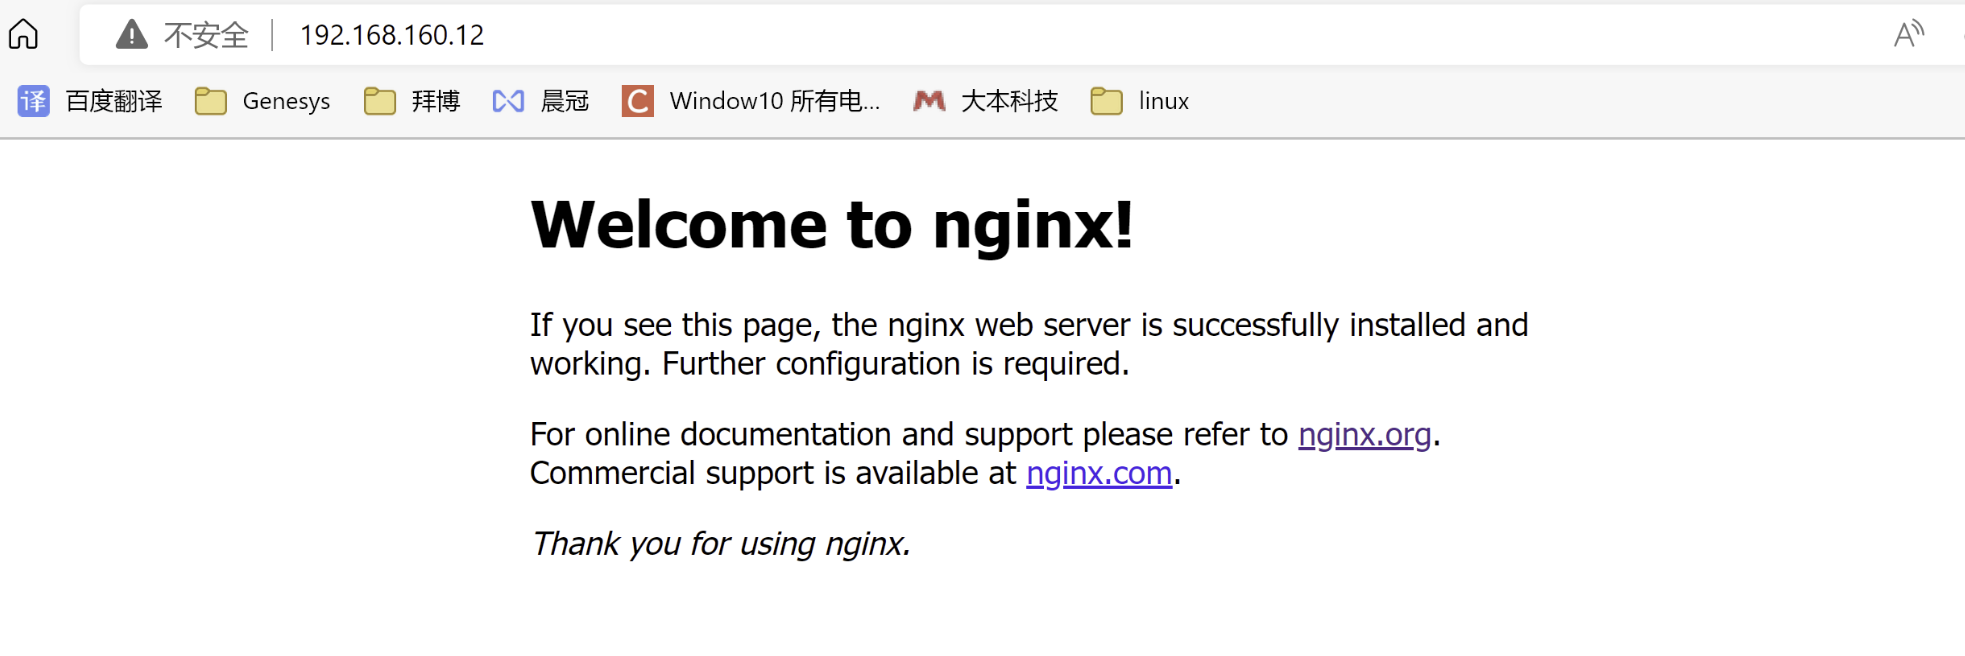
nginx-2+keepalived2 192.168.160.12
nginx+keepalived HA 192.168.160.10
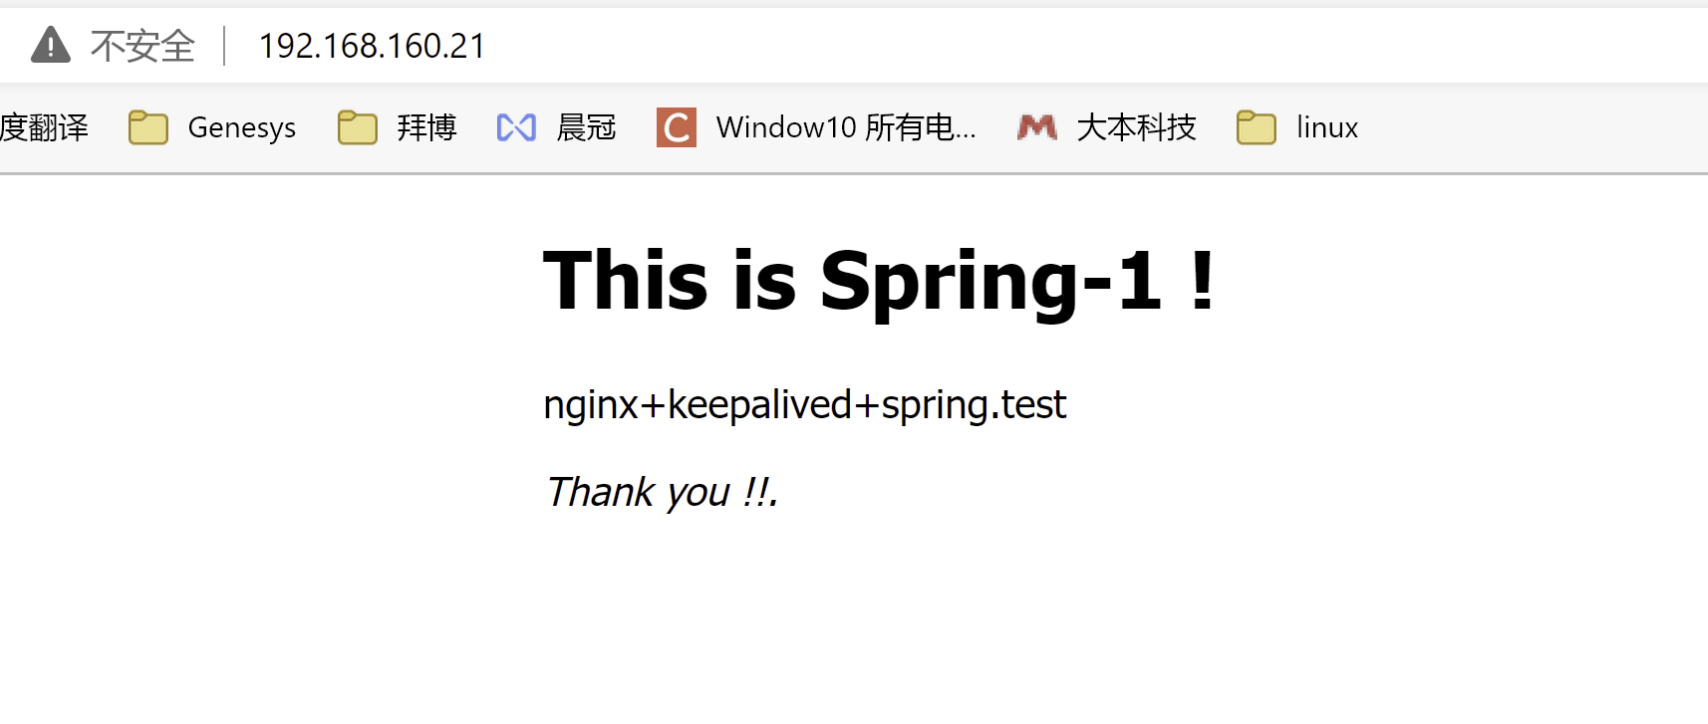
Spring-1 192.168.160.21
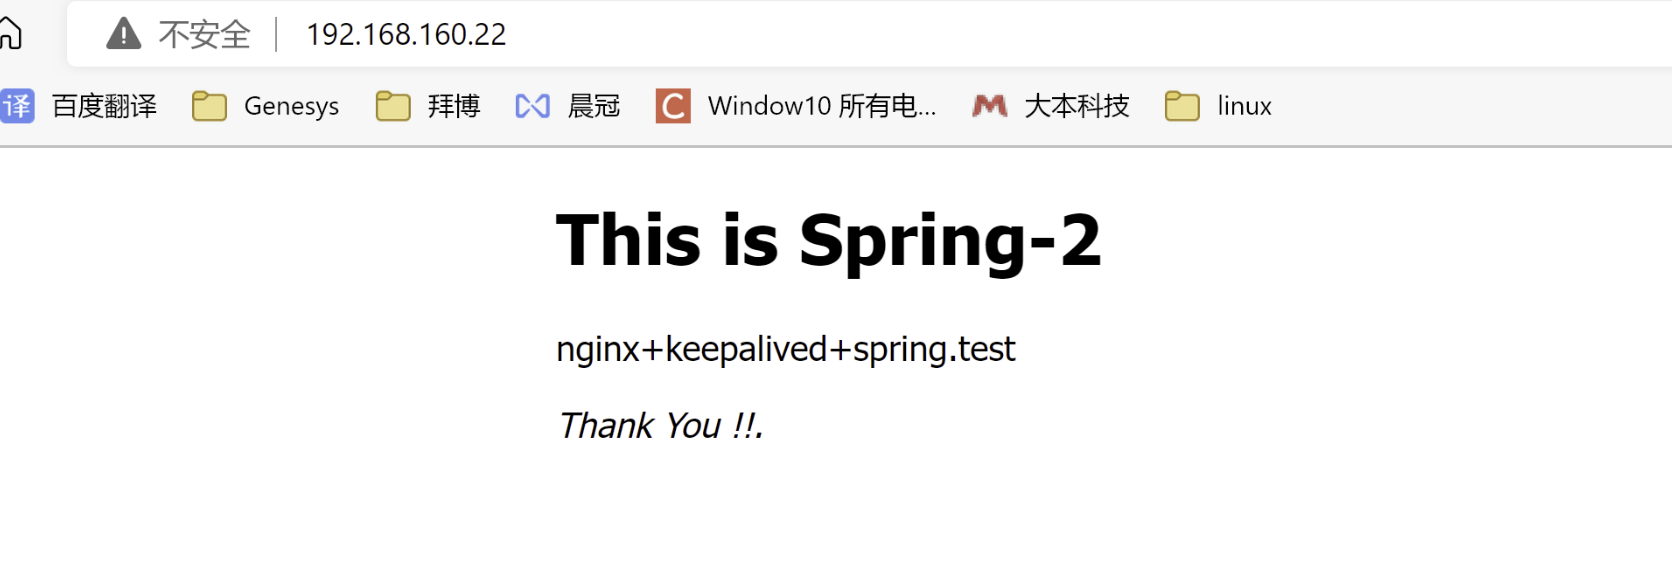
Spring-2 192.168.160.22
二,检查Spring
Spring-1安装不做介绍
http://192.168.160.21
Spring-2
http://192.168.160.22
三,安装nginx
1,安装依赖包
gcc-c++、zlib-devel、pcre-devel、openssl-devel
yum install -y gcc-c++ zlib-devel pcre-devel openssl-devel
2,上传nginx包
/root/nginx-1.21.6.tar.gz 这是最新版本
3,安装Nginx
[root@nginx-1 yum.repos.d]# cd /root
[root@nginx-1 ~]# ls
anaconda-ks.cfg nginx-1.21.6.tar.gz
[root@nginx-1 ~]# tar -zxvf nginx-1.21.6.tar.gz
........解压完成
[root@nginx-1 ~]# cd nginx-1.21.6
[root@nginx-1 nginx-1.21.6]# ls
auto CHANGES CHANGES.ru conf configure contrib html LICENSE man README src
[root@nginx-1 nginx-1.21.6]# ./configure --prefix=/usr/local/nginx
[root@nginx-1 nginx-1.21.6]# make $ make install
test -d '/usr/local/nginx/html' \
|| cp -R html '/usr/local/nginx'
test -d '/usr/local/nginx/logs' \
|| mkdir -p '/usr/local/nginx/logs'
make[1]: Leaving directory `/root/nginx-1.21.6'
[1]+ Done make
安装完成
[root@nginx-1 nginx-1.21.6]#
相关命令:
进入安装好的目录/usr/local/nginx/sbin
./nginx 启动
./nginx -s stop 快速停止
./nginx -s quit 优雅关闭,在退出前完成已经接受的连接请求
./nginx -s reload 重新加载配置
4,开放端口80
[root@nginx-1 nginx-1.21.6]# firewall-cmd --zone=public --add-port=80/tcp --permanent
success
[root@nginx-1 nginx-1.21.6]# firewall-cmd --reload
success
[root@nginx-1 nginx-1.21.6]#
5,配置自启动
[root@nginx-1 nginx-1.21.6]# vi /usr/lib/systemd/system/nginx.service 将nginx配置成系统服务
键入:
------------------------------------------------------------------------------------
[Unit]
Description=nginx - web server
After=network.target remote-fs.target nss-lookup.target
[Service]
Type=forking
PIDFile=/usr/local/nginx/logs/nginx.pid
ExecStartPre=/usr/local/nginx/sbin/nginx -t -c /usr/local/nginx/conf/nginx.conf
ExecStart=/usr/local/nginx/sbin/nginx -c /usr/local/nginx/conf/nginx.conf
ExecReload=/usr/local/nginx/sbin/nginx -s reload
ExecStop=/usr/local/nginx/sbin/nginx -s stop
ExecQuit=/usr/local/nginx/sbin/nginx -s quit
PrivateTmp=true
[Install]
WantedBy=multi-user.target
-------------------------------------------------------------------------------------
保存
[root@nginx-1 nginx-1.21.6]# systemctl daemon-reload 重新加载系统服务
[root@nginx-1 nginx-1.21.6]# systemctl enable nginx.service
Created symlink from /etc/systemd/system/multi-user.target.wants/nginx.service to /usr/lib/systemd/system/nginx.service 设置成开机自启服务
[root@nginx-1 nginx-1.21.6]#
相关命令
systemctl stauts nginx 查看状态
systemctl start nginx 启动
systemctl stop nginx 快速停止
systemctl reload nginx 重新加载配置
6,启动NGINX
[root@nginx-1 nginx-1.21.6]# systemctl start nginx 启动nginx-1
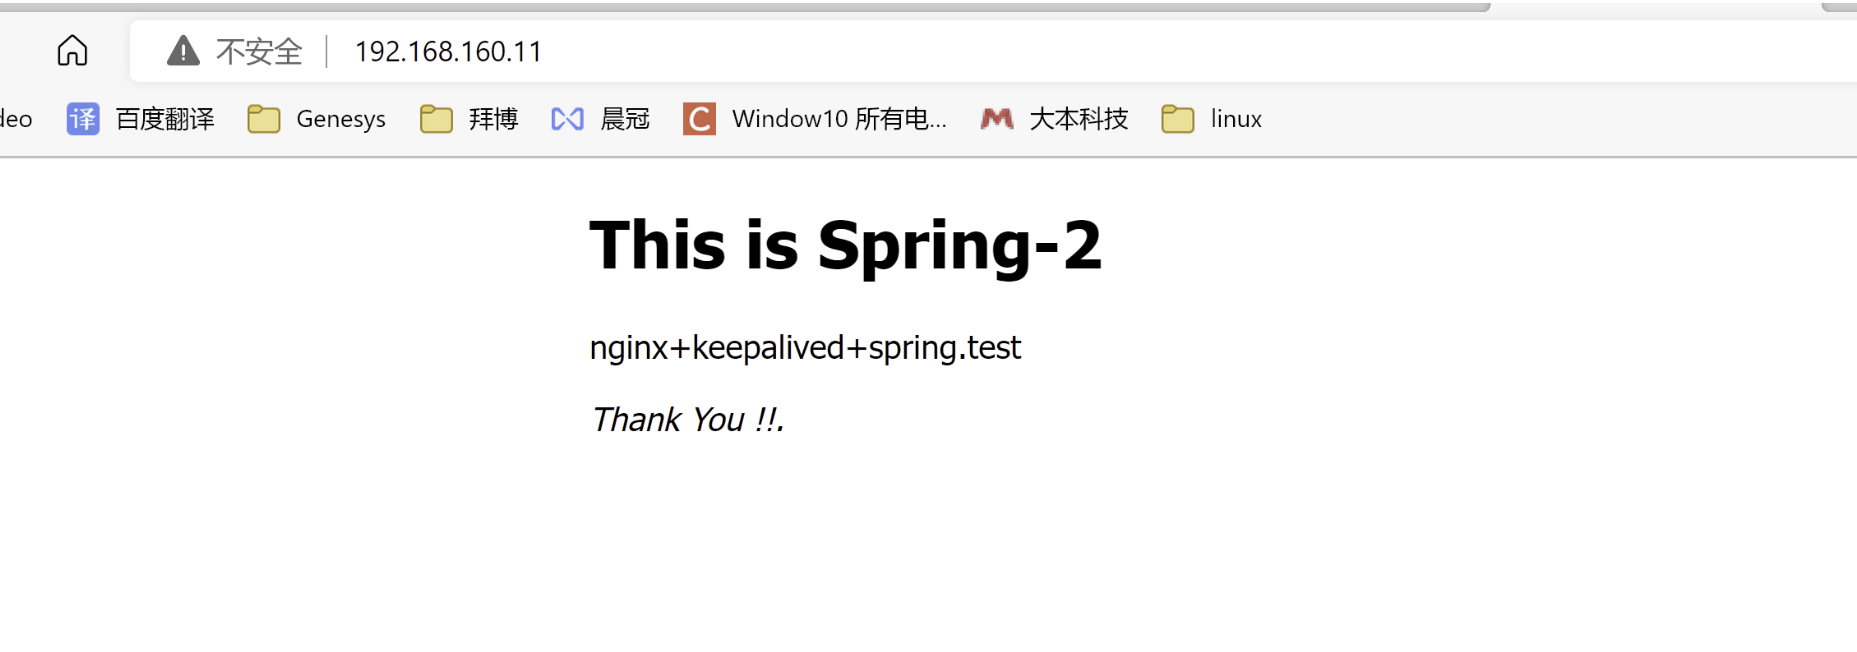
网页登录nginx-1
http://192.168.160.11
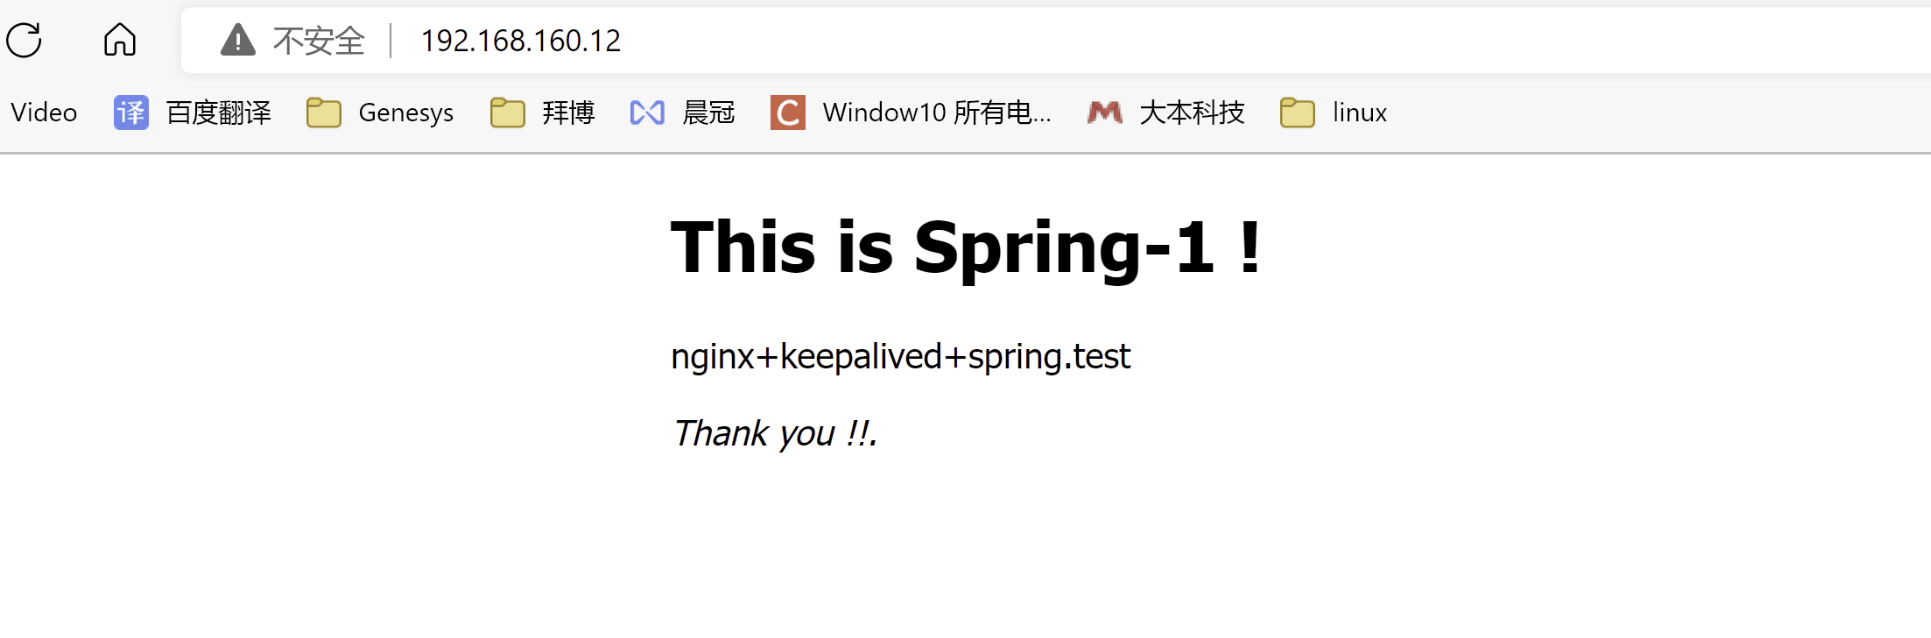
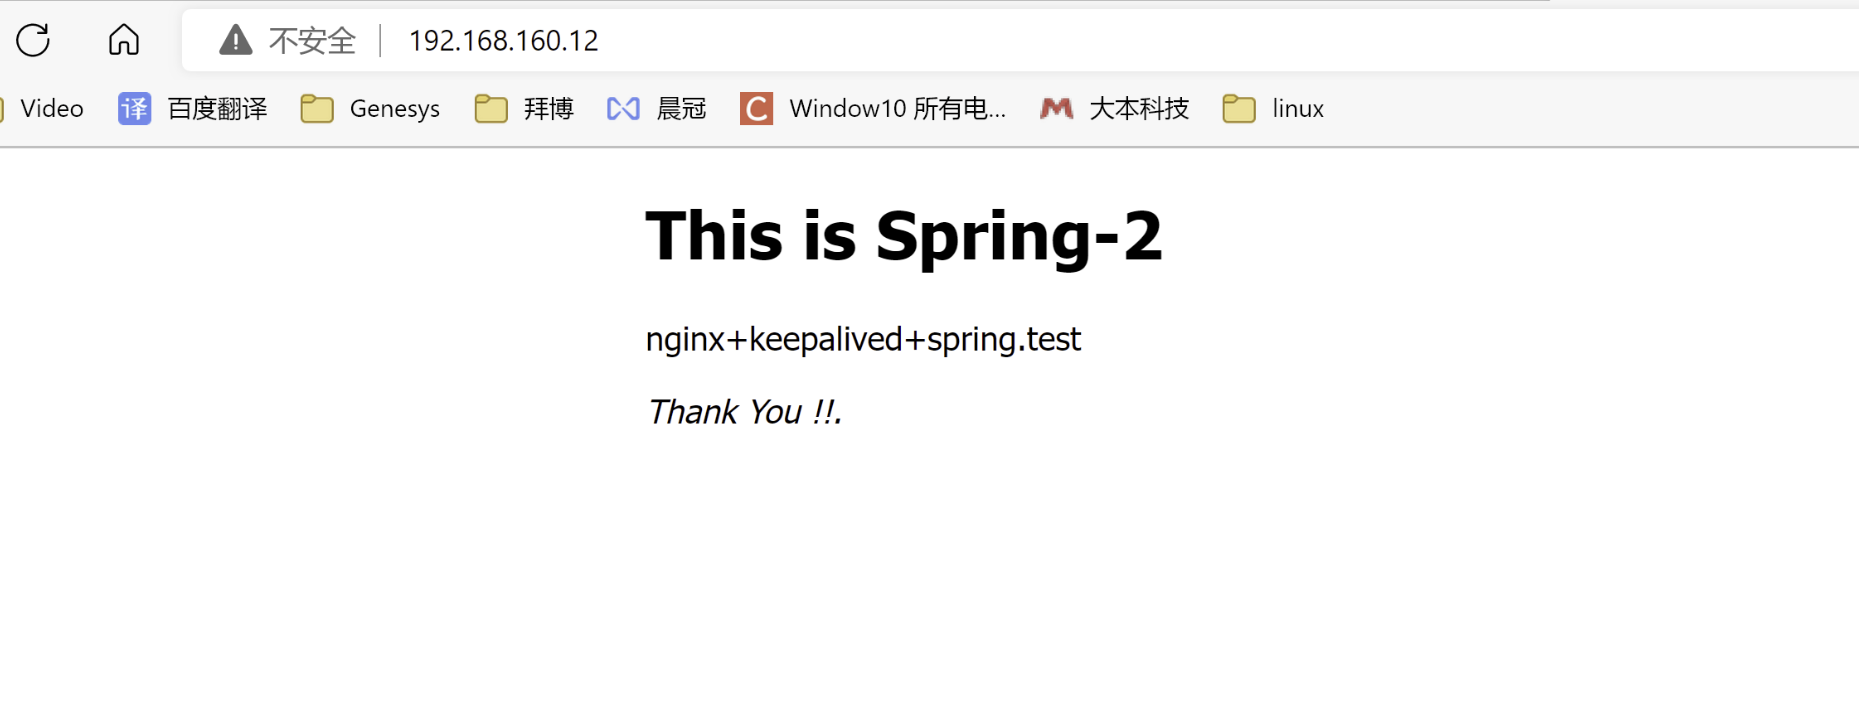
网页登录nginx-2
http://192.168.160.12
四,配置反向代理负载均衡
1,配置nginx.conf
[root@nginx-1 conf]# vi /usr/local/nginx/conf/nginx.conf
---------------------------------------------------------------------------------
worker_processes  1;	#默认为1,表示开启一个业务进程,可以根据CPU设定
worker_rlimit_nofile 65535;	#一个nginx进程打开的最多文件描述符数目
events {
    worker_connections  1024;	#最大连接数,默认为1024
    use epoll;
}


http {
    include       mime.types;	#引入http mime类型,文件扩展名与文件类型映射表
    default_type  application/octet-stream;	#如果mime类型没匹配上,默认使用二进制流的方式传输
    sendfile        on;	#使用linux的sendfile(socket, file, len) 高效网络传输,也就是数据0拷贝
    keepalive_timeout  65;

        upstream myspring {		#反向代理server列表
        server 192.168.160.21:80 weight=1;
        server 192.168.160.22:80 weight=1;
        }
    server {
        listen       80;	#监听端口
        server_name  192.168.160.11;	#监控主机

        location / {	#匹配路径
            proxy_pass  http://myspring;	#反向代理server
            proxy_read_timeout  30;	#

        }

        error_page   500 502 503 504  /50x.html;
        location = /50x.html {
            root   html;
        }


    }

}
2,启动nginx
[root@nginx-1 conf]# systemctl start nginx
3,Web访问nginx
http://192.168.160.11
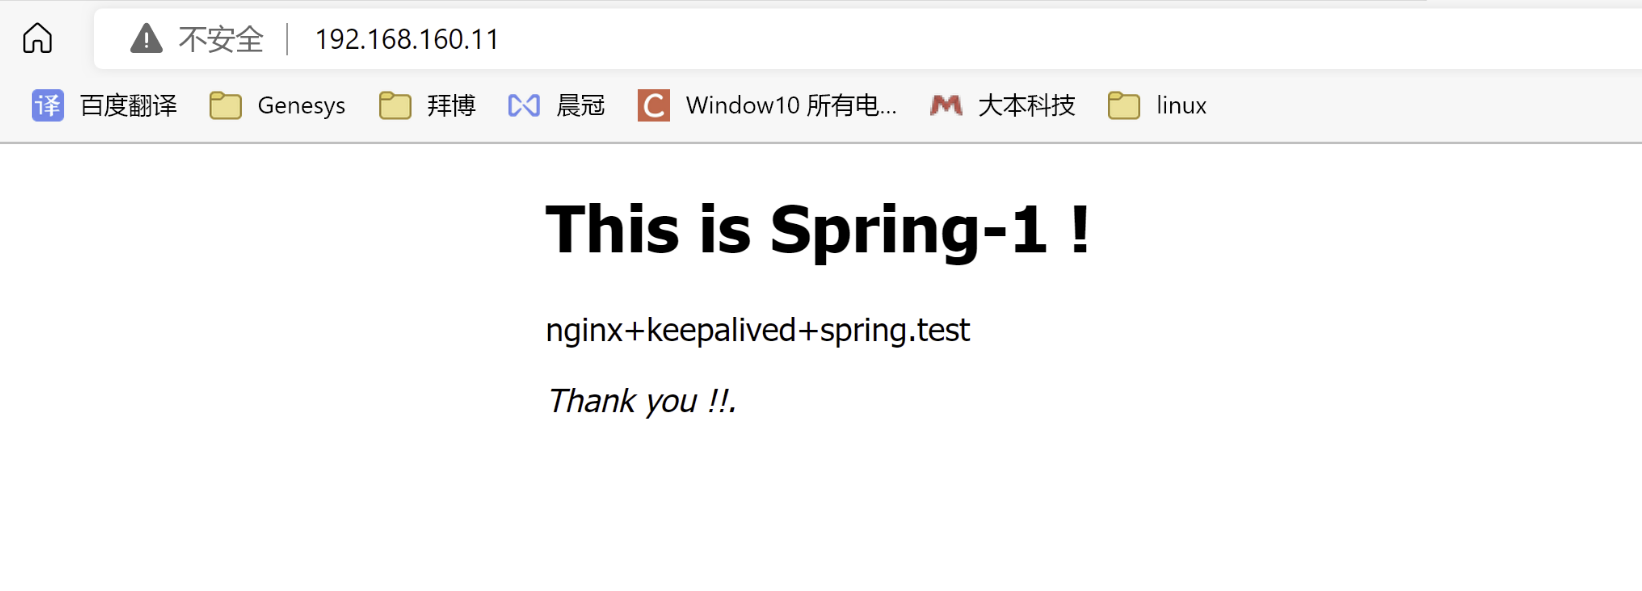
再刷新一次,你会发现去了不同的spring
同样的操作,nginx-2配置一遍
五,安装keepalived
1,安装
[root@nginx-1 conf]# yum install keepalived -y
2,配置开机自启
[root@nginx-1 conf]# systemctl enable keepalived
Created symlink from /etc/systemd/system/multi-user.target.wants/keepalived.service to /usr/lib/systemd/system/keepalived.service.
[root@nginx-1 conf]#
3,配置keepalived
keepalived-1
[root@nginx-1 conf]# cd /etc/keepalived/
[root@nginx-1 keepalived]# vi keepalived.conf
------------------------------------------------------------------------------------
! Configuration File for keepalived
global_defs {
	router_id nginx-1
	script_user root
    enable_script_security
}
vrrp_script check_nginx
{
	script "/etc/keepalived/check_nginx.sh"	#监控nginx脚本位置
	interval 2
	weight 10
}
vrrp_instance nginx {
	state MASTER
	interface ens33
	virtual_router_id 51
	priority 100
	nopreempt
	advert_int 1
authentication {
	auth_type PASS
	auth_pass 1111
}
track_script {
	check_nginx	#监控nginx
	}
virtual_ipaddress {
	192.168.160.10
}
}
keepalived-2
[root@nginx-1 conf]# cd /etc/keepalived/
[root@nginx-1 keepalived]# vi keepalived.conf
------------------------------------------------------------------------------------
! Configuration File for keepalived
global_defs {
	router_id nginx-2
}
vrrp_script check_nginx {
	script "/etc/keepalived/check_nginx.sh"	#监控nginx脚本位置
	interval 2
	weight 10
	}
vrrp_instance nginx {
	state BACKUP
	interface ens33
	virtual_router_id 51
	priority 90
	nopreempt
	advert_int 1
authentication {
	auth_type PASS
	auth_pass 1111
}
track_script {
	check_nginx	#监控nginx
	}
virtual_ipaddress {
	192.168.160.10
}
}
4,防火墙开放vrrp协议
[root@nginx-2 keepalived]# firewall-cmd --direct --permanent --add-rule ipv4 filter INPUT 0 --in-interface ens33 --destination 224.0.0.18 --protocol vrrp -j ACCEPT
success			#命令中的IP 224.0.0.18是VRRP协议固定所用的作为组播的IP地址
[root@nginx-2 keepalived]# firewall-cmd --reload
success
[root@nginx-2 keepalived]#
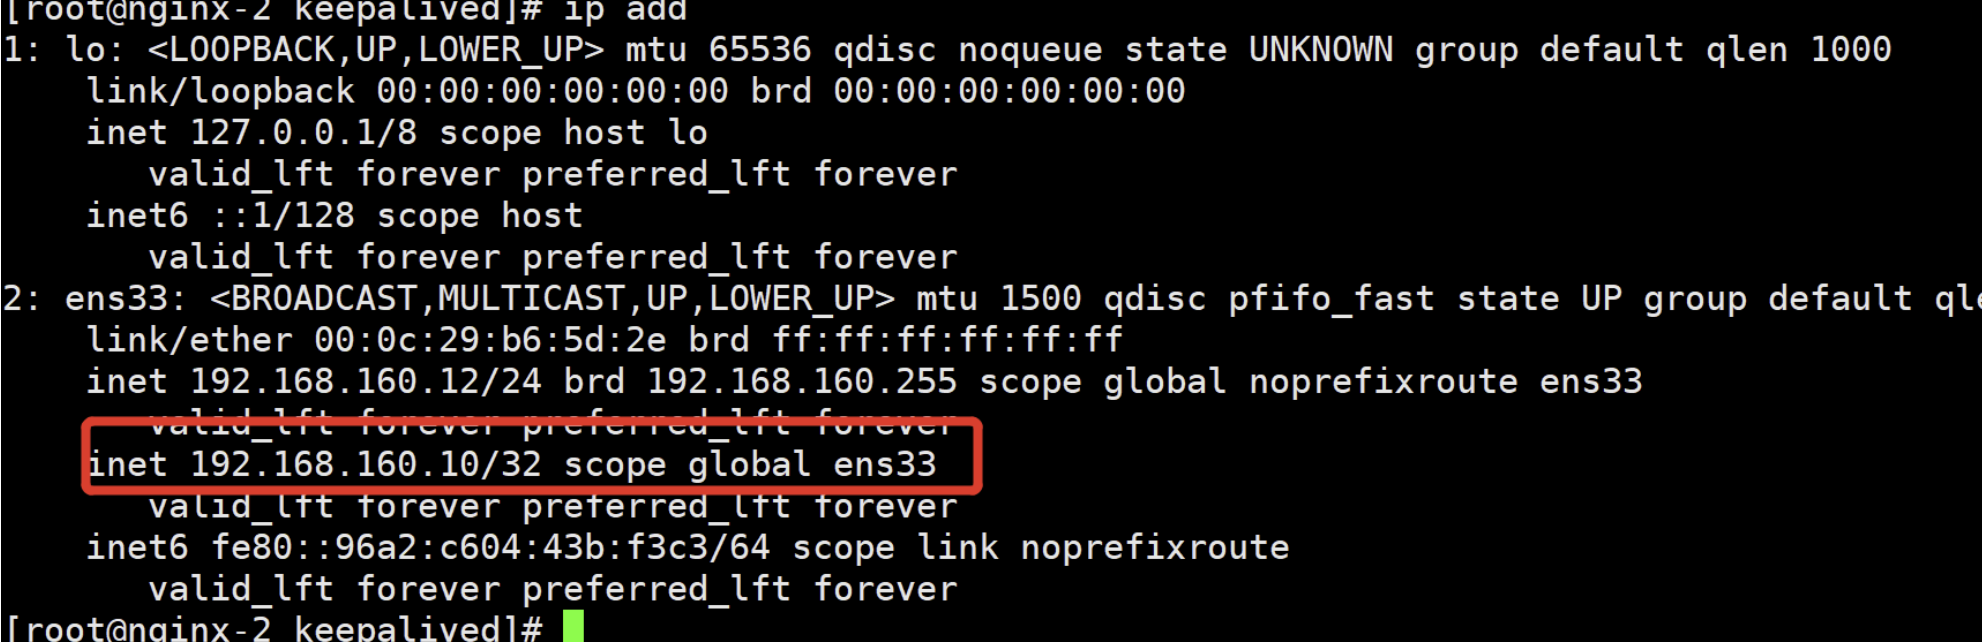
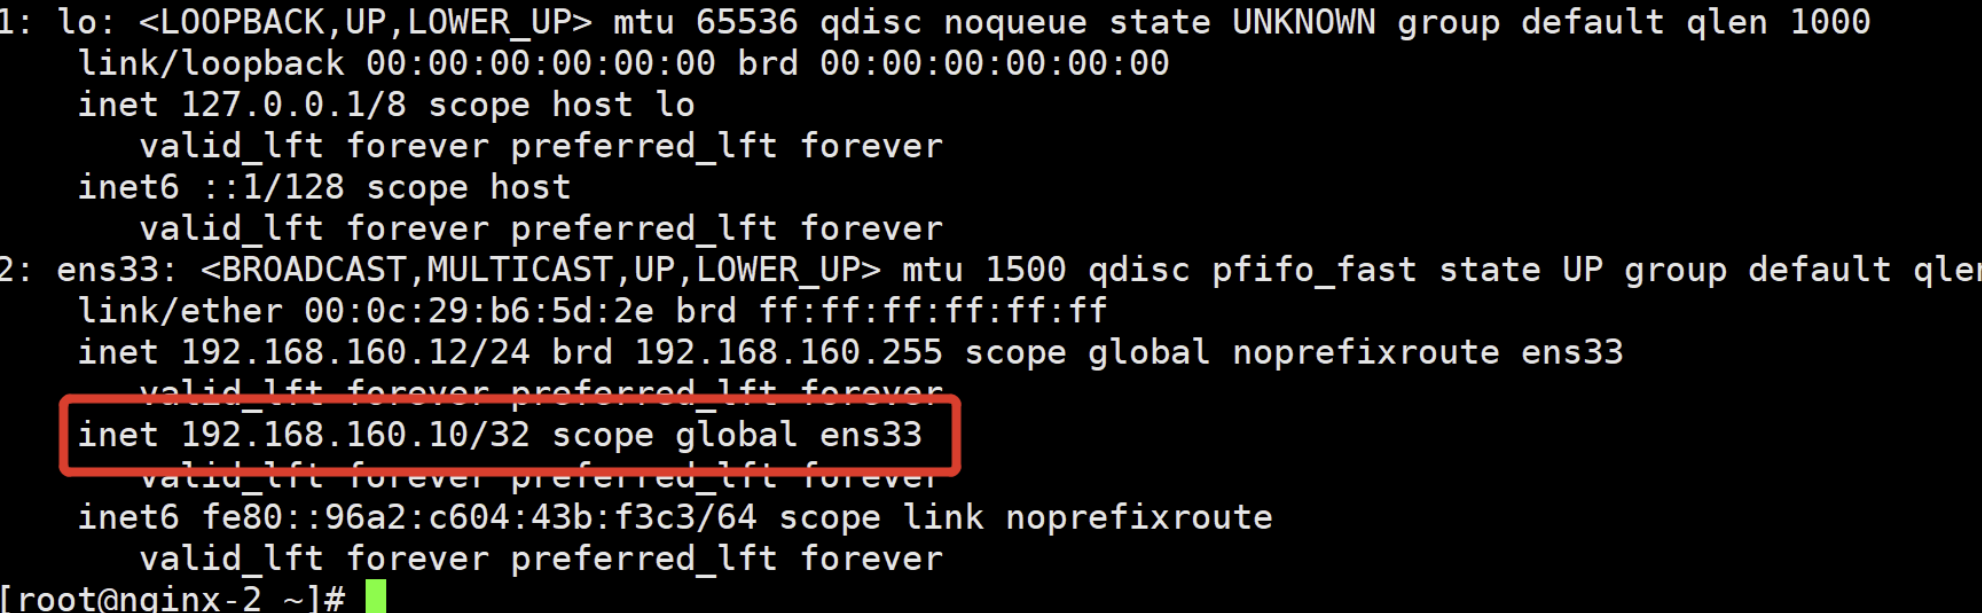
5,切换验证
1.HA主机关闭Keepalived
[root@nginx-1 keepalived]# systemctl stop keepalived
2.检查备用keepalived 是否接管
[root@nginx-2 keepalived]# ip add
五,监控NGINX服务
1,编写监控脚本
[root@nginx-1 keepalived]# vi check_nginx.sh
----------------------------------------------------------------------------------
#!/bin/bash
if [ `ps -C nginx --no-header |wc -l` -eq 0 ];then
        systemctl stop keepalived
fi
----------------------------------------------------------------------------------
[root@nginx-1 keepalived]# chmod +x check_nginx.sh 	#赋予执行权限

检查脚本可以根据自己需要编写。
我这里写的意思是,如果发现nginx服务down机后,将关掉keepalived。
2,验证脚本
[root@nginx-1 keepalived]# systemctl start keepalived
[root@nginx-1 keepalived]# systemctl stop nginx
[root@nginx-1 keepalived]# ./check_nginx.sh
[root@nginx-1 keepalived]# ps -ef | grep keepalived
root       1448   1262  0 00:15 pts/0    00:00:00 grep --color=auto keepalived
验证成功,当nginx服务down机后,将关掉keepalived
3,关闭SELINUX
[root@nginx-1 ~]# setenforce 0	#临时关闭
[root@nginx-1 ~]# vi /etc/selinux/config	永久关闭
----------------------------------------------------------------------------------
# This file controls the state of SELinux on the system.
# SELINUX= can take one of these three values:
#     enforcing - SELinux security policy is enforced.
#     permissive - SELinux prints warnings instead of enforcing.
#     disabled - No SELinux policy is loaded.
SELINUX=disabled							#改为disabled
# SELINUXTYPE= can take one of three values:
#     targeted - Targeted processes are protected,
#     minimum - Modification of targeted policy. Only selected processes are protected.
#     mls - Multi Level Security protection.
SELINUXTYPE=targeted
-----------------------------------------------------------------------------------
[root@nginx-1 ~]#reboot		#永久关闭,需要重启系统
4,开启NGINX+Keepalived
如果做了开机自启,不在执行一下步骤
1,nginx-1服务器开启nginx
[root@nginx-1 keepalived]# systemctl start nginx
2,nginx-1服务器开启keepalived
[root@nginx-1 keepalived]# systemctl start keepalived
3,nginx-2服务器开启nginx
[root@nginx-2 keepalived]# systemctl start nginx
4,nginx-2服务器开启keepalived
[root@nginx-2 keepalived]# systemctl start keepalived
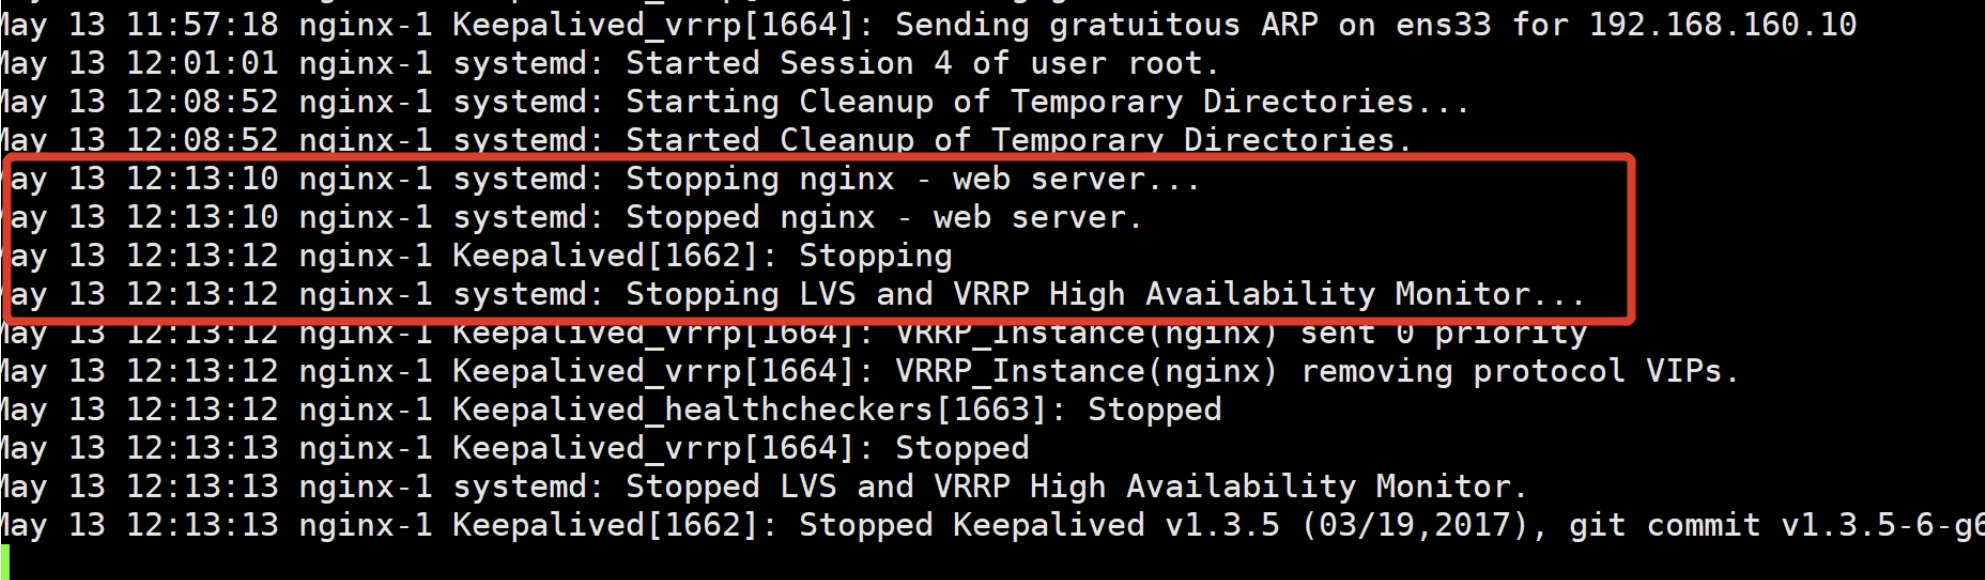
5,关闭Nginx服务验证keepalived是否切换
1,nginx-1服务器关闭nginx
[root@nginx-1 keepalived]# systemctl stop nginx
2,nginx-1服务器查看keepalived
[root@nginx-1 keepalived]# ps -ef | grep keepalived
1.如果没有进程,表明keepalived已经被杀死
2.也可以通过跟踪日志查看keepalived的状态
[root@nginx-1 keepalived]# tail -f /var/log/message
3,nginx-2查看keepalived是否接管
[root@nginx-2 keepalived]# ip add

 浙公网安备 33010602011771号