CentOS7安装elasticsearch
1.创建新用户并授权
1.1. 切换到管理员账户
$ su root
1.2. 创建用户
$ useradd phoneStore
1.3. 设置密码
$ passwd phone
1.4. 授权sudo
个人用户的权限只可以在本home下有完整权限,其他目录要看别人授权。而经常需要root用户的权限,这时候sudo可以化身为root来操作。新创建的用户并不能使用sudo命令,需要给他添加授权。
1.4.1 查找sudoers文件位置
$ whereis sudoers
1.4.2 找到这个文件位置之后再查看权限:
[root@centos7 admin]# ls -l /etc/sudoers
-r--r-----. 1 root root 4328 Sep 30 21:18 /etc/sudoers
只有只读权限,想要修改先添加写权限
1.4.3 添加写权限
[root@centos7 admin]# chmod -v u+w /etc/sudoers
mode of ‘/etc/sudoers’ changed from 0440 (r--r-----) to 0640 (rw-r-----)
1.4.4 修改sudoer文件
vim /etc/sudoers
1.4.4.1 在root下新增phone用户
## Allow root to run any commands anywher
root    ALL=(ALL)       ALL
phone  ALL=(ALL)       ALL  #这个是新增的用户
1.4.5 收回sudoer写权限
[root@centos7 admin]# chmod -v u-w /etc/sudoers
mode of ‘/etc/sudoers’ changed from 0640 (rw-r-----) to 0440 (r--r-----)
1.4.6 切换到phone用户
$ su phone
2.安装elasticsearch
2.1 从官网下载elasticsearch-6.3.0.tar.gz
拖拽文件到VMware虚拟机
[phone@centos7 ~]$ '//tmp/VMwareDnD/e26Mae/elasticsearch-6.3.0.tar.gz'
暂存路径(phone用户没有权限访问该路径,切换到root用户把elasticsearch-6.3.0.tar.gz 移动到/home/phone/路径下)
$ mv elasticsearch-6.3.0.tar.gz /home/phone
2.2 解压缩
tar -zxvf elasticsearch-6.2.4.tar.gz
2.3 把目录重命名为elasticsearch
mv elasticsearch-6.3.0/ elasticsearch
2.4 进入elasticsearch
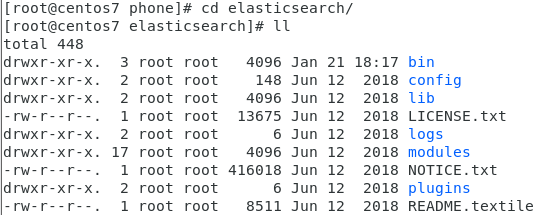
2.5 进入config配置文件目录

2.6 修改配置文件
2.6.1 elasticsearch.yml
$ vim elasticsearch.yml
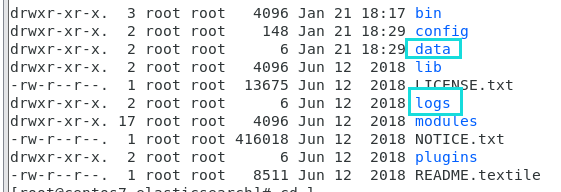
- 修改数据和日志目录:
path.data: /home/phone/elasticsearch/data # 数据目录位置

path.logs: /home/phone/elasticsearch/logs # 日志目录位置

network.host: 0.0.0.0 # 绑定到0.0.0.0,允许任何ip来访问
我们把data和logs目录修改指向了elasticsearch的安装目录。但是这两个目录并不存在,因此我们需要创建出来。
# 在elasticsearch文件创建
mkdir data
mkdir logs # 目录下已经存在logs,不用创建
2.6.2 jvm.options
$ vim jvm.options
默认配置如下:
-Xms1g
-Xmx1g
内存占用太多了,我们调小一些:
-Xms512m
-Xmx512m
3. 运行
进入elasticsearch/bin执行
$ ./elasticsearch
报错:

- 不能用root运行
can not run elasticsearch as root改用phone账户运行
还是报错:
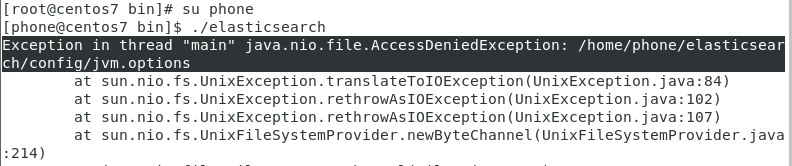
错误原因:Elasticsearch不能以root方式启动,执行ll命令发现elasticsearch文件owner是root,
解决方法:到elasticsearch文件所在目录下改变目录及其目录下所有文件的所有者为你自己的用户名
$ sudo chown -R phone elasticsearch

进入elasticsearch/bin启动
$ ./elasticsearch
报错:

- 文件权限不足
[1]: max file descriptors [4096] for elasticsearch process is too low, increase to at least [65536]
解决:
切换到root用户修改配置文件:
$ vim /etc/security/limits.conf
添加下面的内容:
* soft nofile 65536

* hard nofile 131072

* soft nproc 4096

* hard nproc 4096
2.线程数不足
[2]: max number of threads [3757] for user [phone] is too low, increase to at least [4096]
解决:
修改配置:* soft nproc 4096(问题1的解决已加)
- 进程虚拟内存
[3]: max virtual memory areas vm.max_map_count [65530] is too low, increase to at least [262144]
解决:
vm.max_map_count:限制一个进程可以拥有的VMA(虚拟内存区域)的数量,继续修改配置文件, :
vim /etc/sysctl.conf
添加下面内容:
vm.max_map_count=655360
然后执行命令:
sysctl -p
重启终端窗口
所有错误修改完毕,一定要重启你的 Xshell终端,否则配置无效。
4. 启动成功

可以看到绑定了两个端口:
- 9300:集群节点间通讯接口
- 9200:客户端访问接口
!!!问题:外网不能访问
应该是没关防火墙
查看防火墙状态:
$ systemctl status firewalld.service
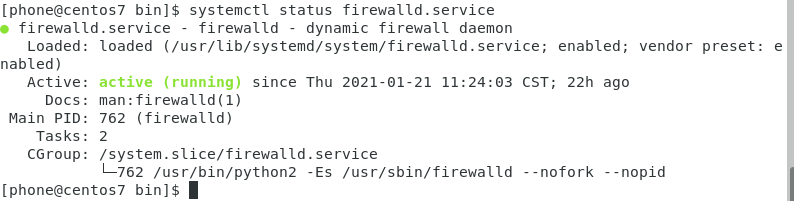
绿得running,表示防火墙开启
执行关闭命令:
$ systemctl stop firewalld.service
输入管理员密码即可关闭。
再次执行查看防火墙命令:
$ systemctl status firewalld.service

执行开机禁用防火墙自启命令:
systemctl disable firewalld.service

 浙公网安备 33010602011771号