


jenkins部署问题及处理
1、GitLab容器启动报错502

解决方法:1、查看容器是否完全启动, 等待容器 完全启动后访问;
2、由于虚拟机内存较小导致,需扩大虚拟机内存。
2、报错:
/usr/bin/docker-current: Error response from daemon: driver failed programming external connectivity on endpoint compassionate_bassi (7a208177d5e4d8e2afa3f10a391101a6361844689f8b911b5a8451bd63f659d4):
(iptables failed: iptables --wait -t nat -A DOCKER -p tcp -d 0/0 --dport 8080 -j DNAT --to-destination 172.17.0.6:8080 ! -i docker0: iptables: No chain/target/match by that name.
(exit status 1)).
解决方法:重启docker
3、报错:
[ERROR] [ERROR] Some problems were encountered while processing the POMs:
[FATAL] Non-resolvable parent POM for com.dream:apple:0.0.1-SNAPSHOT: Could not transfer artifact
org.springframework.boot:spring-boot-starter-parent:pom:2.3.1.RELEASE from/to aliyun
(http://maven.aliyun.com/nexus/content/groups/public): Transfer failed for
http://maven.aliyun.com/nexus/content/groups/public/org/springframework/boot/spring-boot-starter
parent/2.3.1.RELEASE/spring-boot-starter-parent-2.3.1.RELEASE.pom and 'parent.relativePath' points at no local POM @ line 5, column 13
解决方法:查看虚拟机是否可以连接外网,重启docker, 调整网卡, 使其可以连接外网
4、Jenkins添加Git地址时报错:
无法连接仓库:Command "git ls-remote -h -- http://192.168.1.175/dangzp/appledemo.git HEAD" returned status code 128:
stdout:
stderr: fatal: unable to access 'http://192.168.1.175/dangzp/appledemo.git/': Failed to connect to 192.168.1.175 port 80: No route to host
无法连接仓库:Error performing git command: ls-remote -h http://192.168.1.175/dangzp/appledemo.git HEAD
解决方法:
测试环境下,关闭防火墙
|
systemctl status firewalld systemctl stop firewalld |
5、Jenkins自动部署时报错
[apple] $ /bin/sh -xe /tmp/jenkins7555650707965496885.sh
+ docker ps
/tmp/jenkins7555650707965496885.sh: 2: /tmp/jenkins7555650707965496885.sh: docker: Permission denied
+ grep 192.168.1.175:5000/apple
+ result=
Build step 'Execute shell' marked build as failure
Finished: FAILURE
解决方法:检查shell的格式是否正确
6、vim找不到
解决方法:安装vim
|
apt-get update apt-get install -y vim |
7)、Jenkins中构建触发器下没有GitLab选项
解决方法:安装插件gitlab插件
8、jenkins安装插件时报错
java.net.UnknownHostException: updates.jenkins-ci.org
at java.net.AbstractPlainSocketImpl.connect(AbstractPlainSocketImpl.java:184)
at java.net.SocksSocketImpl.connect(SocksSocketImpl.java:392)
可能原因:Docker中容器或宿主机无法连网导致
解决方法:重启docker
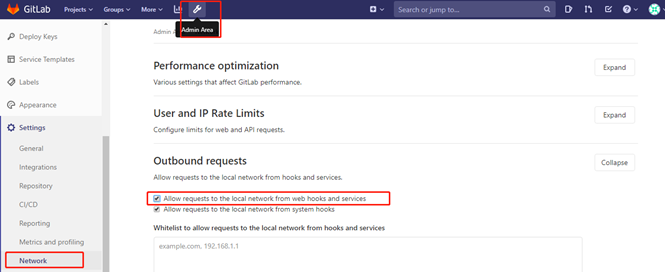
9、Gitlab添加wenhooks时保错:
Url is blocked: Requests to the local network are not allowed
解决方法:进入 Admin area => Settings => Network ,然后点击 Outbound requests 右边 的“expand”按钮,如下:
10、打包docker镜像时保错
You don't have either docker-client or docker-client-latest installed. Please install either one and retry.
解决方法:安装docker客户端
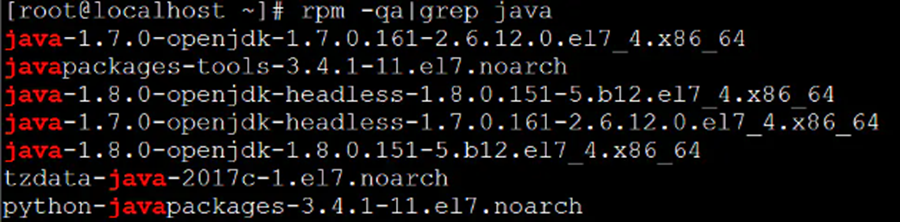
11、Linux自带的openJDK导致无法卸载
背景:新安装好Linux虚拟机(centos)后,想要卸载Linux自带的openJDK,但出现package相互依赖的报错,导致无法卸载。问题及解决如下:
1.rpm为管理套件的命令,q命令为每次执行前询问,a命令为查询所有套件,grep为查询,java为要查询的字符串
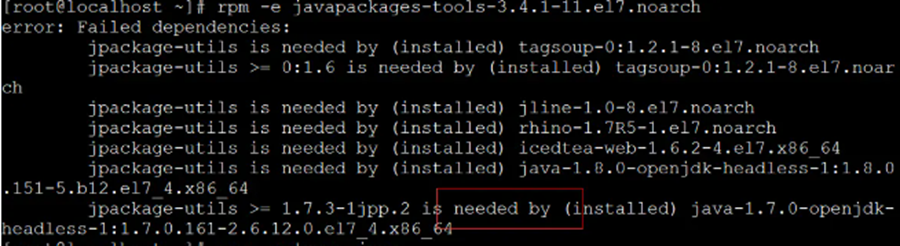
2.用rpm -e 命令卸载,出现互相依存错误,原本想找一个无需依存的先卸载,结果并不存在
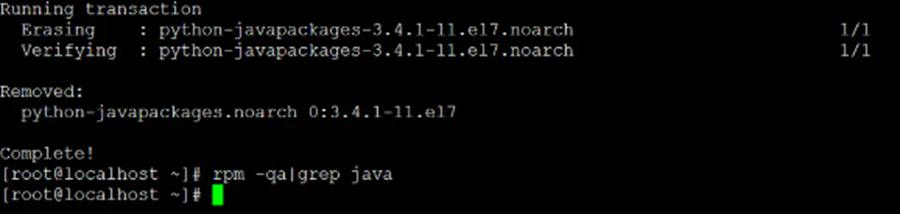
3。用yum命令成功完成卸载

12、使用docker安装Jenkins配置jdk等报错
使用docker安装Jenkins配置jdk等报错is not a directory on the Jenkins master(but perhaps it exists on some agents。其实不止jdk还要maven
是因为本地的maven和java没有挂载到Jenkins容器:
解决方案(docker-compose.yml):
/usr/java/jdk1.8.0_181(本地 换成自己的):/usr/java/jdk1.8.0_181(docker)
/usr/local/maven:/usr/local/maven \
13、启动docker容器权限不足
通过如下命令启动docker容器后,使用命令”docker logs -f jenkins”查看jenkins容器日志,
docker run -d -p : -v /docker-data/jenkins:/var/jenkins_home --name jenkins jenkinsci/blueocean
日志如下:
touch:cannot touch '/var/jenkins_home/copy_reference_file.log':Permission deniedCan not write to /var/jenkins_home/copy_reference_file.log.Wrong volume permissions?
原因:jenkins默认以jenkins:jenkins用户来运行,该用户对于/docker-data/jenkins目录没有写权限,所以无法写入容器中的/var/jenkins_home目录。
解决办法:
a、将/docker-data/jenkins目录授权给jenkins:jenkins用户,使用命令”chown -R jenkins:jenkins /docker-data/jenkins”。
b、以root用户启动jenkins容器,在docker run 命令中添加”-u root”选项。
c、如果按以上两种方法仍然出现Permission denied错误,那么可以通过命令 sestatus 检查一下selinux状态,开启的情况下会导致一些服务安装、使用不成功。临时关闭:”setenforce 0″,永久关闭:修改配置文件/etc/selinux/config,将其中SELINUX设置为disabled。
14、library initialization failed - unable to allocate file descriptor table - out of memoryAborted (core dumped)
问题描述:
使用Docker run container 的时候, 容器在启动几秒后自动退出 , 或者不退出,但里面的服务无法启动成功。 此例的服务是用 java -jar 来启动一个服务。 使用 docker logs 来查看日志时,只有一句日志: library initialization failed - unable to allocate file descriptor table - out of memoryAborted (core dumped)
解决思路及过程:
1 既然是报内存分配过程中,由于内存不够而 Aborted。 那就增大点儿内存再试试, 结果并没有成功。 我在其它机器启动这个java服务只分配了2G内存就启动成功,此处增大到8G, 仍无法成功。 所以这并不是内存不足导致的。
2 上网搜索,得到答案是需要设置 ulimit 下 nofile 和 nproc 这两个参数。 搜索到的结果有两种, 一种是说主机系统默认值是1024, 这个太小需要调大值 65535 或 100000 或 1048576 。 另一种是说docker启动容器时,有时这个值太大,需要调低一些。 总的来说就是这个值大小不合适,需要调整。 调整步骤有两个:
调整主机的系统默认值:
我先用 ulimit -n 查看了一下, 系统默认值是1024 。 然后在 /etc/profile 中添加 ulimit -n 65535 。 然后使用 source /etc/profile 命令使配置生效。
调整Docker下的默认值, 这个网上的方法很多,此处就随便说两种
方法一: 在执行 docker run 命令时添加参数 --ulimit nofile=65535:65535 --ulimit nproc=65535:65535
例如:
docker run -itd -p 7010:7010 --name service-a 64b87045a6fa --ulimit nofile=65535:65535 --ulimit nproc=65535:65535
方法二:
在 /etc/systemd/system/ 目录下, 创建 docker.service.d 目录
进入该目录,创建一个文件,名为 docker.conf
在文件中加入以下配置:
|
[Service] ExecStart= ExecStart=/usr/bin/dockerd --default-ulimit nofile=65535:65535 -H fd:// |
啥意思呢? 就是说在执行docker命令时,直接默认使用该参数, 不需要在docker run 命令中定义了。
执行 systemctl daemon-reload (重启Docker daemon)
执行 systemctl restart docker (重启Docker 服务)
两边都配置好后, 再次开始测试, 然鹅结果依旧不行。 因为帖子上有很多赞,说明这个方法确实解决了一些道友的问题, 但我的问题不是如此。
3 我觉得也许是我第二步的配置有问题,但自己没发现导致问题依然存在。 于是就进入container中, 瞅瞅 container 中的 ulimit -n 值会是多少。 此时报了另外一个错: bash: ulimit: open files: cannot get limit: Operation not permitted.
再次搜索, 发现在Docker run命令中加上 --privileged=true 即可以有权限在container中执行这些命令。
例如: docker run -itd --privileged=true -p 7010:7010 --name service-a 64b87045a6fa 。 然后进入容器再次执行 ulimit -n 命令, 成功的输出了 65535 . 说明之前的配置确实是生效了的。
然鹅,就在这时发现, 原本几秒后就挂了的container, 这次不挂了。 以前不挂的container里面, java服务也能启来了, 不在报上面的错了。 问题解决了。 问题出在了这个 --privileged=true 参数上
分析:
虽然问题解决了, 但不能保证是 --privileged=true 的作用,还是这个参数再加上 nofile 和 nproc 的配置一起产生的作用。 然后我在另外一台同样的机器上,不改nofile 和 nproc, 只使用–privileged=true,发现也可以生效, 所以是 --privileged=true 单独作用产生的结果。
Privileged:
By default, Docker containers are “unprivileged” and cannot, for example, run a Docker daemon inside a Docker container. This is because by default a container is not allowed to access any devices, but a “privileged” container is given access to all devices (see the documentation on cgroups devices).
When the operator executes docker run --privileged, Docker will enable access to all devices on the host as well as set some configuration in AppArmor or SELinux to allow the container nearly all the same access to the host as processes running outside containers on the host. Additional information about running with --privileged is available on the Docker Blog.
这两句是官方文档给的解释。 意思是默认情况下,docker container 是以unprivileged方式运行的, 如果以 privileged 方式运行,就可以在一个container中再run一个docker daemon。之所以这样, 是因为 privileged 模式下, container可以有权访问主机里的任何设备, 还允许在AppArmor或SELinux中去修改一些配置, 也就是几乎可以在container中干和主机一样的事儿。
15、Cannot run program "mvn" (in directory "..."): error=2, No such file or directory
报错信息如下:
Caused: java.io.IOException: Cannot run program "mvn" (in directory "..."): error=2, No such file or directory
at java.lang.ProcessBuilder.start(ProcessBuider.java:1048)
at hudson.Proc$LocalProc.<init>(Proc.java:249)
解决办法:
配置-> 构建-> 调用顶层Maven目标-> Maven版本-> 选择在"系统管理" -> "全局工具配置" 里配置的Maven Name。
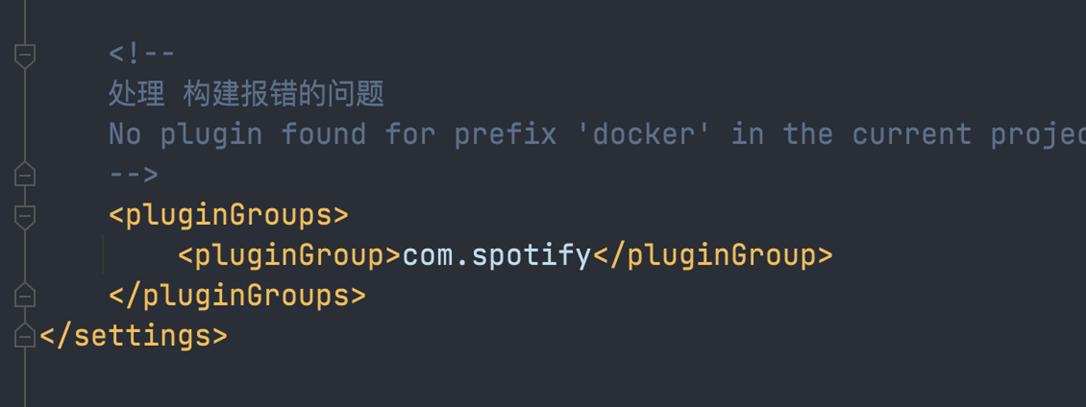
16、使用maven插件 docker-maven-plugin 执行 docker:build 报错的问题
No plugin found for prefix 'docker' in the current project and in the plugin groups
[org.apache.maven.plugins, org.codehaus.mojo]
available from the repositories [local (/root/.m2/repository),
central (https://repo.maven.apache.org/maven2)] -> [Help 1]
处理方式:settings里面增加配置项
|
17、编辑docker容器中的文件
一般docker中没有VI或者其它相应的文本编辑器,为了写个东西安装个vi就可以解决问题,除此之外还有别的办法
登陆docker中找到需要编辑的文件的位置
|
sudo docker ps -a sudo docker exec -it xxx /bin/bash |
通过docker cp把这个文件拷贝出来
|
|
再拷贝回去
|
|
注意:这个xxxx是docker ps -a 获取的container id
18、springBoot打jar包启动访问报404
1、 打包后用 java -jar ***.jar 命令启动后访问,报404错误
原因:.jar包中没有jsp文件,报404错误,没有添加jsp打包路径
解决方案:在pom.xml中添加如下代码
|
<build> <resources> <resource> <directory>src/main/resources</directory> <includes> <include>**/**</include> </includes> <filtering>false</filtering> </resource> <resource> <directory>src/main/java</directory> <excludes> <exclude> **/*.java </exclude> </excludes> </resource> <resource> <directory>src/main/webapp</directory> <!--注意此次必须要放在此目录下才能被访问到 --> <targetPath>META-INF/resources</targetPath> <includes> <include>**/**</include> </includes> </resource> </resources> </build> |
2、 还是访问不到页面,报404错误,或者不报错但是一直在编译
原因:maven编译版本问题:
解决方案:将版本改为1.4.2.RELEASE(目前只有这个版本打jar包才能解析jsp)
| <plugin> <groupId>org.springframework.boot</groupId> <artifactId>spring-boot-maven-plugin</artifactId> <!--版本必须为1.4.2.RELEASE 目前只有这个版本打jar包才能解析jsp --> <version>1.4.2.RELEASE</version> </plugin> |
3、 编译的时候还报错:
报错日志:Failed to execute goal org.springframework.boot:spring-boot-maven-plugin:1.4.2.RELEASE:repackage (default) on project fulan-demo: Execution default of goal org.springframework.boot:spring-boot-maven-plugin:1.4.2.RELEASE:repackage failed: Unable to find a single main class from the following candidates
原因:没有指定启动类的位置
解决方案:在pol.xml中指定启动类
<configuration> |
4、 解决完后完整的配置:
|
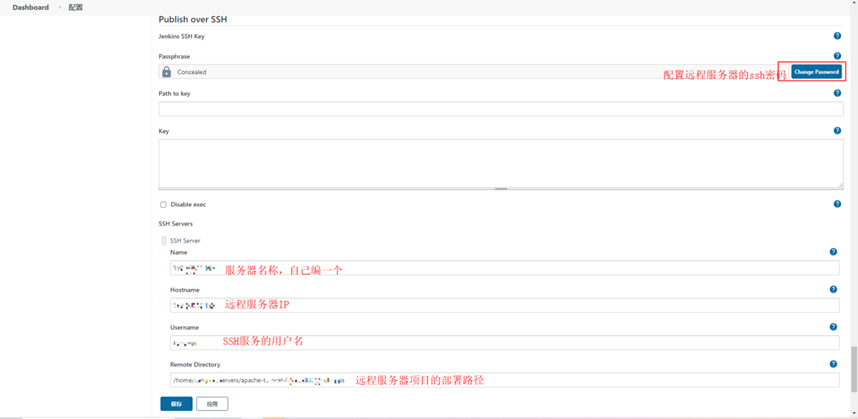
19、Jenkins部署远程项目到tomcat
Jenkins部署远程项目要先到Jenkins配置中找到configure system,进入后下滑到最下面,配置好SSH Servers:Hostname填写远程服务器IP,Username远程服务器ssh服务的账号,Remote Directory远程服务器的部署路径
然后在Jenkins构建maven项目时,构建后操作与用插件本地部署不一样。构建后的操作选择Send build artifacts over SSH,SSH Server填写远程服务器名称(上一步配置好的SSH服务),Source files填写源WAR路径默认是target\gydl.war,Exec command执行的脚本填写bash /home/kangwei/servers/apache-tomcat-8.5.28-8081/bin/tomcat.sh,tomcat.sh是我自己写的一个启动脚本,因为我要替换项目的配置文件,所以脚本写成启动tomcat(第一次启动目的是解压WAR包)-------kill -9 杀死进程----删除WAR包---替换配置文件---再次启动tomcat,完成项目部署。

tomcat.sh脚本内容:

20、maven 加载依赖sqljdbc4报错
Maven Failure to find com.microsoft.sqlserver:sqljdbc4:jar:4.0
maven 加载依赖sqljdbc4报错
|
<dependency> <groupId>com.microsoft.sqlserver</groupId> <artifactId>sqljdbc4</artifactId> <version>4.0</version> </dependency> |
|
mvn install:install-file -Dfile=sqljdbc4.jar -DgroupId=com.microsoft.sqlserver -DartifactId=sqljdbc4 -Dversion=4.0 -Dpackaging=jar |

 浙公网安备 33010602011771号