
关于PushKit的使用总结
1.PushKit的认识
(1)概念
ios8苹果新引入了名为pushkit的框架和一种新的push通知类型,被称作voip push.该push方式旨在提供区别于普通apns push的能力,通过这种push方式可以使app执行制定的代码(在弹出通知给用户之前);而该通知的默认行为和apns通知有所区别,它的默认行为里面是不会弹出通知的
(2)作用
pushkit中的voippush,可以帮助我们提升voip应用的体验,优化voip应用的开发实现,降低voip应用的电量消耗,它需要我们重新规划和设计我们的voip应用,从而得到更好的体验(voip push可以说是准实时的,实侧延时1秒左右);苹果的目的是提供这样一种能力,可以让我们抛弃后台长连接的方案,也就是说应用程序通常不用维持和voip服务器的连接,在呼叫或者收到呼叫时,完成voip服务器的注册;当程序被杀死或者手机重启动时,都可以收到对方的来电,正常开展voip的业务。也就是说,我们当前可以利用它来优化voip的体验,增加接通率;
2.PushKit的使用教程
(1)创建指定APP ID(非通配)
与远程推送类似,App ID不能使用通配ID必须使用指定APP ID并且生成配置文件中选择Push Notifications服务,一般的开发配置文件无法完成注册;应用程序的Bundle Identifier必须和生成配置文件使用的APP ID完全一致。
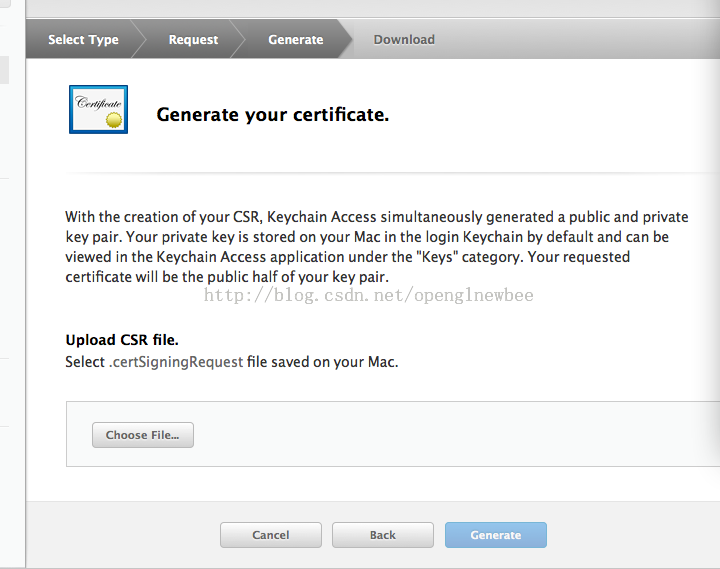
(2)创建voip服务的证书
跟apns push类似,pushkit的voippush也需要申请证书,voip push的证书申请步骤截图如下:


(3)导出证书为.pem格式(证书和私钥)
详细方法见:http://www.cnblogs.com/cy568searchx/
(4)把.pem文件提供给服务端
(5)在appDelegate中注册PushKit的服务(与注册通知相同),ios8.0方式如下:
UIUserNotificationSettings *userNotifySetting = [UIUserNotificationSettings settingsForTypes:UIUserNotificationTypeBadge | UIUserNotificationTypeSound | UIUserNotificationTypeAlert categories:nil];
[[UIApplication sharedApplication] registerUserNotificationSettings:userNotifySetting];
[[UIApplication sharedApplication] registerForRemoteNotifications];
3 代码中集成
(1)在应用启动(appdelegate的didfinishlaunchwithoptions)后或根控制器的初始化等方法内调用如下代码:
1 PKPushRegistry *pushRegistry = [[PKPushRegistry alloc] initWithQueue:dispatch_get_main_queue()];
2 pushRegistry.delegate = self;
3 pushRegistry.desiredPushTypes = [NSSet setWithObject:PKPushTypeVoIP];
(2) 在appdelegate或框架viewcontroller类中实现voip push的代理:
- (void)pushRegistry:(PKPushRegistry *)registry didUpdatePushCredentials:(PKPushCredentials *)credentials forType:(NSString *)type { }
上面的代理方法是设备从苹果服务器获取到了voip token,然后传递给应用程序;我们需要把这个token传递到push服务器(和apns push类似,我们也是要传递apns token到push服务器,但是这两个token的获取方式不同,分别在不同的代理方法中回调给应用,且这两个token的内容也是不同的)。
(3)在一切正常的情况下,push server在获取到用户的voip token之后,如下回调会在push server下发消息到对应token的设备时被触发
- (void)pushRegistry:(PKPushRegistry *)registry didReceiveIncomingPushWithPayload:(PKPushPayload *)payload forType:(NSString *)type { }
上面的回调代码里仅仅打印了日志,触发了一个本地通知;这个代理方法是收到voip push通知时触发的;
如果一切正常,该通知在手机重启、应用被系统回收、手动kill程序的情况下,依然能够被触发,且可以有一段时间用来执行自己的代码(比如voip注册等)
注:应用申请一个精确ID的mobile provision打包;
为了测试方便:可以通过一个网上的一个MAC应用Demo:PushMeBaby
下面是比较官方的一份说明文档:
What PushKit does and why you should use it.
In iOS 8 Apple introduced PushKit as part of their effort to improve battery life, performance, and stability for VoIP applications such as Skype, WhatsApp, and LINE.
Previously, VoIP apps needed to maintain a persistent connection in order to receive calls. Keeping a connection open in the background, drains the battery as well as causes all kinds of problems when the app crashes or is terminated by the user.
PushKit is meant to solve these problems by offering a high-priorty push notification with a large payload. The VoIP app receives the notification in the background, sets up the connection and displays a local notification to the user. When the user swipes the notification, the call is ready to connect.
This guide will walk you through the steps to setup a VoIP application. We'll be using Swift to implement this example. Source files from this example are available on Github.
Differences from regular APNS Push Notifications
VoIP push notifications are different than regular APNS notifications mainly in how they are setup from the iOS app. Instead of using application.registerForRemoteNotifications() and handling the received notifications in application:didReceiveRemoteNotification, we use PushKit and thePKPushRegistryDelegate to request a device token and handle the delegate methods.
Unlike regular push notifications, PushKit does not prompt the user to accept VoIP pushes. PushKit will always grant a device token to apps that have the VoIP entitlements without asking for approval. Further, VoIP pushes do not have any UI and do not show an alert. They act more like content-available pushes, and you must handle the received notification and present a local notification.
| Regular Push | VoIP Push | |
|---|---|---|
| Getting Device Token | application.registerForRemoteNotifications() |
set PKPushRegistry.desiredPushTypes |
| Handle Registration | application:didRegisterForRemoteNotificationsWithDeviceToken: |
pushRegistry:didUpdatePushCredentials |
| Handle Received Notification | application:didReceiveRemoteNotification |
pushRegistry:didReceiveIncomingPushWithPayload |
| Payload Size | 2048 bytes | 4096 bytes |
| Certificate Type | iOS Push Services | VoIP Services |
| Requires User Consent | Yes | No* |
* The user must agree to receive local notifications.

 浙公网安备 33010602011771号