

k8s使用总结
基本概念
-
k8s是一个容器编排工具,管理多主机里面的容器化服务,一般和docker一起使用,比docker compose更加擅长管理多主机,docker compose一般用于管理一个主机上面的多个服务。
-
k8s的 pod 类似 docker compose的 service,一个 pod 里面有镜像,不同镜像运行在不同容器内,不同容器有各自的环境。k8s里面 pod 是最小部署单位。pod里面的容器应该是有关联的紧耦合的。
-
k8s前身是 google borg系统
-
k8s结构图
![image-20240108192154257]()
![image-20231218141846836]()
-
默认的namespace 是 default,需要指定命名控制在后面加 -n 命名空间名字,kube-system是系统命名空间
- kubectl get ns 查看命名空间
- kubectl get 资源类型 资源名字 -n 命名空间名字 查看命名空间下面的资源列表
-
k8s资源命名规则,不用大写字母,符号只能用-和.,可以用小写字母和数字,但是必须字母开头
-
容器的 restart 在镜像上配置,滚动更新策略是在搞一级的资源上配置的( sts deploy等上面)
-
有状态服务和无状态服务,会依赖之前存储数据的服务就是有状态服务。mysql,是有状态,java程序一般无状态,redis 如果作为缓存就是无状态,需要持久化就是有状态。
-
元数据类型资源 HPA ,podTemplate,资源限制
-
集群类型的资源 node ,clusterRole,clusterRoleBanding


命令总结
-
kubectl create -f xxx.yaml 根据配置文件创建一个资源
-
kubectl replace -f xxx.yaml 替换配置文件(有些参数改了是不能替换的)
-
kubectl apply -f xxx.xml 和create的区别在于如果已经创建就是替换
-
kubectl create 资源名字 --image=镜像版本 使用镜像直接创建资源
-
kubectl create 资源名字 --image=镜像版本 --dry-run -o -yaml 然后输出配置文件,不会运行
-
kubectl edit 资源类型 资源名字 编辑资源yaml(pod配置不能修改)
-
kubectl pach 资源类型 资源名字 -p '{"replicas":5}'
-
kubectl get 资源类型 资源名字 查看资源列表
-
kubectl get 资源类型 资源名字 -o wide 查看资源列表,会多列出部署节点等信息
-
kubectl get 资源类型 资源名 --show-labels 查看所有标签
-
kubectl delete 资源类型 资源名字 删除资源
-
kubectl describe 资源类型 资源名字 看着资源详情
-
kubectl exec -it pod名字 bash 进入容器内部(要过期了)
-
kubectl exec -it pod名字 sh 进入容器内部
-
kubectl exec -it pod名字 -- ls / 在指定pod容器里面执行 ls / 命令
-
kubectl label 资源类型 资源名 key1=value 添加标签
-
kubectl label 资源类型 资源名 key1- 去掉标签
-
kubectl label 资源类型 资源名 key1=value2 --overwrite 修改标签key的值
-
kubectl taint node nodeName key1=value1:影响 添加污点
-
kubectl rollout status 资源类型 资源名字 查看滚动更新情况
-
kubectl rollout history 资源类型 资源名字 查看滚动更新版本记录
-
kubectl rollout history 资源类型/资源名字 可以写成/方式
-
kubectl rollout history 资源类型 名字 --revision=1 查询版本详情
-
kubectl rollout undo 资源类型 名字 --to-revision=1 确认回退
-
kubectl rollout pause 资源类型 名字 暂停滚动更新
-
kubectl rollout resume 资源类型 名字 恢复滚动更新
-
kubectl scale --replicas=1 类型 deploy名字 修改副本数量
-
kubectl autoscale 资源类型 资源名字 --cpu-percent=20 --min=2 --max=5 自动扩容
-
kubectl logs -f podName 查看指定pod的日志
-
kubectl logs -f podName -c 容器名字 查看指定容器的日志
-
helm install xxx . helm安装软件后面 点表示安装文件位置
-
helm uninstall xxx helm卸载软件
-
kubectl create cm --from-file=key1=文件1 把指定文件加入configMap
配置不可变
和container同级别的immutables=true,可以让配置文件不能被 kubectl edit 修改
immutables: true
k8s的资源
| 资源名字 | 简写 | 介绍 |
|---|---|---|
| node | no | 容器外的虚拟机或者物理机 |
| pod | po | pod运行在node上 |
| deployment | deploy | 无状态服务 |
| replicaset | rs | 无状态服务副本集 |
| statefulSet | sts | 有状态服务 |
| service | svc | 管理横向流量 |
| ingress | 管理垂直流量 | |
| configMap | cm | 配置文件 |
| secret | base64加密的配置 | |
| PersistentVolume | pv | 持久卷 |
| PersistentVolumeClaim | pvc | 持久卷申领 |
| namespace | ns | |
| serviceAccount | sa | |
| role | namespace下面的角色 | |
| RoleBinding | ||
| clusterRole | 整个集群都有效的角色 | |
| clusterRoleBinding | ||
| StorageClass | sc | 存储类 |
定时任务
cron只有5段,不是6段,最小单位是分不是秒
piVersion: batch/v1
kind: CronJob
metadata:
  name: cron-job
spec:
  concurrencyPolicy: Allow # 并发调度策略:Allow 允许并发调度,Forbid:不允许并发执行,Replace:如果之前的任务还没执行完,就直接执行
新的,放弃上一个任务
  failedJobsHistoryLimit: 1 # 保留多少个失败的任务
  successfulJobsHistoryLimit: 3 # 保留多少个成功的任务
  suspend: false # 是否挂起任务,若为 true 则该任务不会执行
#  startingDeadlineSeconds: 30 # 间隔多长时间检测失败的任务并重新执行,时间不能小于 10
  schedule: "* * * * * " # 调度策略
  jobTemplate:
    spec:
      template:
        spec:
          containers:
          - name: hello
            image: busybox:1.28
            imagePullPolicy: IfNotPresent   #如果镜像不存在才拉取
            command:                        #定时任务执行的命令
            - /bin/sh
            - -c
            - date; echo Hello from the Kubernetes cluster
          restartPolicy: OnFailure
查看定时任务
[root@master cronJob]# kubectl get cronjob
NAME       SCHEDULE    SUSPEND   ACTIVE   LAST SCHEDULE   AGE
cron-job   * * * * *   False     0        <none>          14s
账号和权限
k8s里面角色分成两种role 和 clusterrole,role是 namespace内有效,clusterrole是全局有效,角色通过RoleBinding(ClusterRoleBinding)和serviceAccount关联。
我们使用命令行的时候默认使用的当前namespace下面default的serviceAccount。
查看serviceAccount
kubectl get sc
查看角色列表
kubectl get role
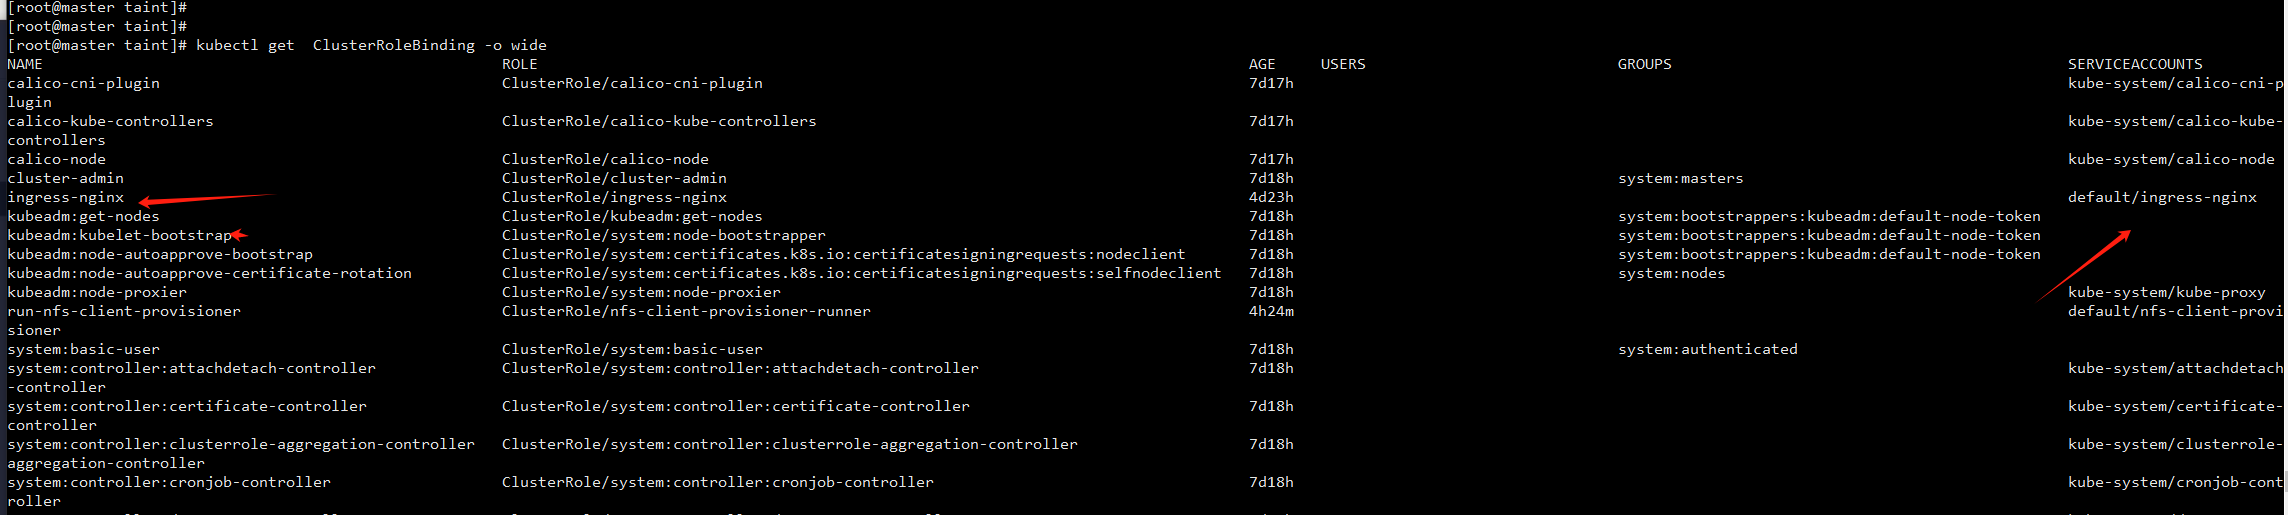
查看角色绑定情况,能看大角色 和 serviceAccount 对应关系
get ClusterRoleBinding -o wide
查看指定角色的权限
[root@master taint]# kubectl get role  ingress-nginx -o yaml
apiVersion: rbac.authorization.k8s.io/v1
kind: Role
metadata:
  annotations:
    meta.helm.sh/release-name: ingress-nginx
    meta.helm.sh/release-namespace: default
  creationTimestamp: "2024-01-03T10:37:27Z"
  labels:
    app.kubernetes.io/component: controller
    app.kubernetes.io/instance: ingress-nginx
    app.kubernetes.io/managed-by: Helm
    app.kubernetes.io/name: ingress-nginx
    app.kubernetes.io/part-of: ingress-nginx
    app.kubernetes.io/version: 1.5.1
    helm.sh/chart: ingress-nginx-4.4.2
  name: ingress-nginx
  namespace: default
  resourceVersion: "231441"
  uid: d47badf0-ef95-429d-84f8-e9d7d0868275
rules:                      #权限列表
- apiGroups:
  - ""
  resources:
  - namespaces
  verbs:
  - get
- apiGroups:            #Apigroup 权限分组
  - ""
  resources:             #权限
  - configmaps
  - pods
  - secrets
  - endpoints
  verbs:                 #权限动作
  - get
  - list
  - watch
- apiGroups:
  - ""
  resources:
  - services
  verbs:
  - get
  - list
  - watch
- apiGroups:
  - networking.k8s.io
  resources:
  - ingresses
  verbs:
  - get
  - list
  - watch
- apiGroups:
  - networking.k8s.io
  resources:
  - ingresses/status
  verbs:
  - update
- apiGroups:
  - networking.k8s.io
  resources:
  - ingressclasses
  verbs:
  - get
  - list
  - watch
- apiGroups:
  - coordination.k8s.io
  resourceNames:
  - ingress-nginx-leader
  resources:
  - leases
  verbs:
  - get
  - update
- apiGroups:
  - coordination.k8s.io
  resources:
  - leases
  verbs:
  - create
- apiGroups:
  - ""
  resources:
  - events
  verbs:
  - create
  - patch
- apiGroups:
  - discovery.k8s.io
  resources:
  - endpointslices
  verbs:
  - list
  - watch
  - get
探针
用于检查资源状态,相比直接查看进程是否存(ps -ef|grep xxx)在更加细致
-
探针,检查资源状态,探针的三种类型
- StartupProbe 启动探针(程序启动),优先于另外两种,它的检查完成另外的两个探针检测才会执行
- LivenessProbe 存活探针(程序活着)
- ReadinessProde 可用探测(程序可用了),一般用这个表示程序可以对外提供服务,StartupProbe 只是启动了,不一定对外提供服务,成功以后外部流量才能进来
探针配置例子
spec: containers: - args: - -conf - /etc/coredns/Corefile image: registry.aliyuncs.com/google_containers/coredns:v1.8.6 imagePullPolicy: IfNotPresent livenessProbe: #存活探针 failureThreshold: 5 httpGet: path: /health port: 8080 scheme: HTTP initialDelaySeconds: 60 periodSeconds: 10 successThreshold: 1 timeoutSeconds: 5 readinessProbe: #可用探针 failureThreshold: 3 httpGet: path: /ready port: 8181 scheme: HTTP periodSeconds: 10 successThreshold: 1 timeoutSeconds: 1 -
探针的探测方式
- exec 命令行方式,执行一个命令返回非0就是成功
- TCPSocker TCP 方式,如果端口能通就是成功
- HTTPGet HTTP请求方式 ,如果返回200 或者 300开头 就是成功
-
探针的参数
- initalDelaySeconds 初始化容器以后,多少秒以后才开启探测,
- timeoutSeconds 探测超时时间,超过就算失败
- periodSeconds 探测间隔时间
- successThresshold 连续探测成功几次就确定状态为成功,一般一次成功就算成功
- failureThresshold 连续探测失败几次就确定状态为失败,考虑网络因素,一般会失败次数多次才会考虑是失败
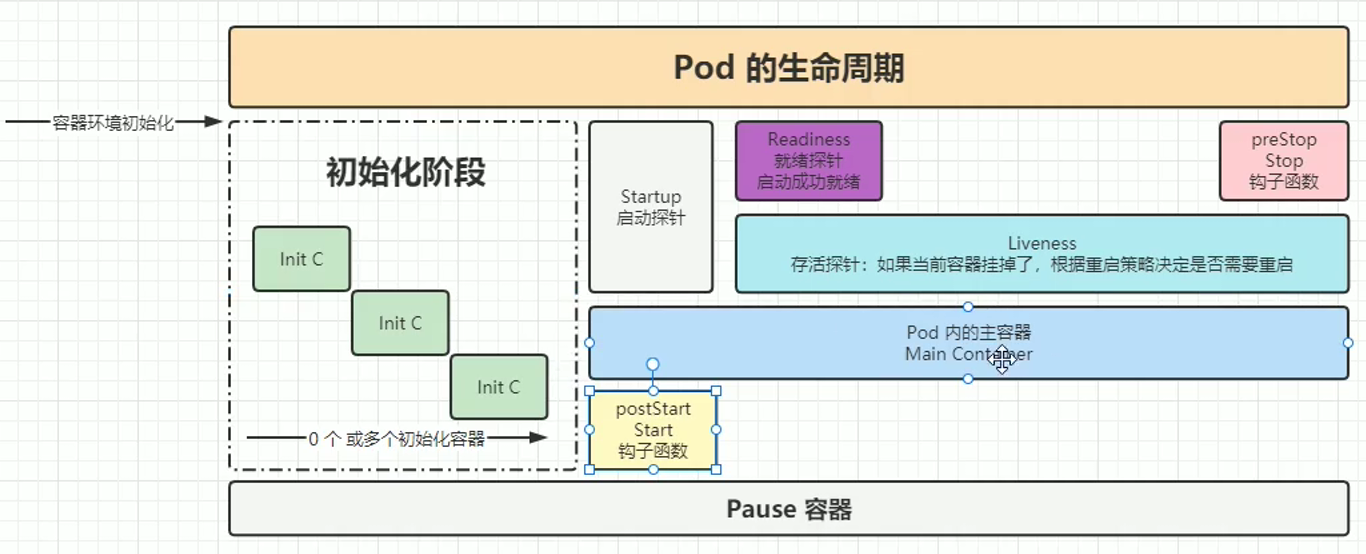
pod的生命周期
先是intiC(程序启动前),然后是postStart钩子函数(在程序开启后触发,执行的过程中程序可能已经初始化完成),然后触发三探针,同时触发的还是有Startup探针,然后是readiness探针,然后是liveness探针,在程序结束之前触发preStop钩子函数
如果需要在程序启动前做一些事情需要用initc,但是initC 和 普通容器是空间隔离的,不是同一个容器,适合做状态检查,initc默认会无限重启,不能做容器内数据初始化
程序关闭前的资源回收用preStop,preStop 回收时长不能超过 terminationGracePeriodSeconds 指定的时长
使用例子
apiVersion: v1
kind: Pod
metadata:
  name: lifecycle-demo
spec:
  containers:
  - name: lifecycle-demo-container
    image: nginx
    terminationGracePeriodSeconds: 60       #优雅终止最大时长(preStop回收资源的时间不能长于它不然会强制关闭)
    lifecycle:
      preStop:                               #生命周期函数
        exec:
          command: ["/bin/sh", "-c", "echo 'Stopping application'"]   #打印程序结束
initContainers
initContainers空间上平行于别的Containers,时间上优先于别的Containers,他们是独立开的,所以在initContainers节点写入的数据不会在主容器内,严格来说initC已经在容器生命周期以外了,只是早于一些比Containers早的容器。
apiVersion: v1
kind: Pod
metadata:
  name: init-pod
  labels:
    app.kubernetes.io/name: MyApp
spec:
  containers:
  - name: c-main
    image: busybox:1.28
    command: ['sh', '-c', 'echo The app is running! && sleep 3600']
  initContainers:                   #initc
  - name: c-init-a
    image: busybox:1.28
    command: ['sh', '-c', "echo 2 >> /bbb.txt;echo a is running!"]
  - name: c-init-b
    image: busybox:1.28
    command: ['sh', '-c', "echo 1 >> /aaa.txt;echo b is running!"]
查看日志
[root@master initc]# kubectl logs -f init-pod -c c-init-a
a is running!
标签和选择
k8s用于管理大规模集群,所以它的思想是不关心部署到具体那个节点,而是通过一些倾向自动分配合适节点
标签
命令行添加的label,这种方式资源重启就没了,零时有效
kubectl label 资源类型 资源名 key1=value                                        添加标签
kubectl label 资源类型 资源名 key1-                                             去掉标签
kubectl label 资源类型 资源名 key1=value2 --overwrite                           修改标签key的值
kubectl get 资源类型 资源名 --show-labels                                       查看所有标签

#标签的选择
kubectl get po -l type=app,version=0.0.2                                     筛选有指定标签的资源(默认是and关系)
kubectl get po -l 'type in (app1,app)' --show-labels                         筛选有指定标签的资源,in匹配一个就行
kubectl get po -l 'type=!app,version=0.0.2'                                    不等于
修改配置文件添加label,永久有效
apiVersion: v1
kind: Pod
metadata:
 name: nginx-demo-metadate
 labels:
  type: app
  version: 0.0.1
 namespace: 'default'
spec:
污点和容忍
污点类似一个特殊的标签,有了污点默认是不用,配了容忍以后是可以使用。标签没有陪选择就是可以使用,配了就是指定使用。所以污点更加合适稀缺资源分配(默认不会被别服务使用)。
添加污点
污点有三个要素,key,value,effect
#在node2 上添加污点
kubectl taint node node2 nfs=true:NoExecute

#去掉污点
kubectl taint node node2 nfs=true:NoExecute-

#查看节点描述可以看到污点
kubectl describe node node1
taint effect(污点影响)
- NoExecute 不执行,并且会立刻驱逐不能容忍的资源
- 驱逐时间受到容忍时间限制(tolerationSeconds)
- NoSchedule 不调度,资源在这个节点上删除以后会部署到别的节点
添加容忍
添加了污点的node默认不会被使用,添加了容忍以后就可以被使用了
tolerations和containers同级别
apiVersion: apps/v1
kind: Deployment
metadata:
  labels:
    app: nginx-deploy
  name: toleration-deploy
  namespace: default
spec:  #这一层配置rs的配置
  replicas: 5
  revisionHistoryLimit: 10
  selector:
    matchLabels:
      app: nginx-pod
  strategy:
    rollingUpdate:
      maxSurge: 25%
      maxUnavailable: 25%
    type: RollingUpdate
  template:       #下面是构建pod的配置
    metadata:
      creationTimestamp: null
      labels: #pod的标签
        app: nginx-pod
    spec:
      tolerations:                                #添加容忍
      - key: "nfs"                                #容忍的key
        value: "true"                             #容忍的值
        effect: NoExecute                         #容忍的影响
        operator: "Equal"   #Equal  比对key,effect,value;   Exits 只比对key和effect
        tolerationSeconds: 3600  #容忍时间,指定时间以后会被驱逐,不配就是长期容忍,只对NoExecute 有效
      containers:
      - image: nginx:1.7.9
        imagePullPolicy: IfNotPresent
        name: nginx
        resources: {}
        terminationMessagePath: /dev/termination-log
        terminationMessagePolicy: File
      dnsPolicy: ClusterFirst
      restartPolicy: Always
      schedulerName: default-scheduler
      securityContext: {}
      terminationGracePeriodSeconds: 30
tolerations.operator
- Equal 比对key,effect,value
- Exits 只比对key和effect
NoExecute类型的容忍可以通过 tolerations.tolerationSeconds: 3600 指定容忍时间,不指定默认永久容忍。NoSchedule 和驱逐无关,tolerations.tolerationSeconds无效。
亲和力
亲和性是标签选择的升级版,标签选择matchLabels结果只有满足和不满足,亲和力在满足的基础上使用了匹配程度的概念,匹配值高的优先被会被选中。
node亲和力
pod部署到亲和力高的node
配置例子
标签分布:
node1 disk-type=ssd,gpu=a
node2 disk-type=hdd,gpu=n
部署以后,会部署在node2上
affinity和containers同级别
requiredDuringSchedulingIgnoredDuringExecution和preferredDuringSchedulingIgnoredDuringExecution
一个是必须一个是加分项,requiredDuringSchedulingIgnoredDuringExecution的数组nodeSelectorTerms下面,preferredDuringSchedulingIgnoredDuringExecution 在 weight上面。matchExpressions后面都一样。
apiVersion: apps/v1
kind: Deployment
metadata:
  labels:
    app: affinity-depoly
  name: affinity-deploy
  namespace: default
spec:  #这一层配置rs的配置
  replicas: 5
  revisionHistoryLimit: 10
  selector:
    matchLabels:
      app: nginx-pod
  template:       #下面是构建pod的配置
    metadata:
      creationTimestamp: null
      labels: #pod的标签
        app: nginx-pod
    spec:
      affinity:                                             #亲和力
       nodeAffinity:                      #affinity 类型;nodeAffinity   节点亲和性
        requiredDuringSchedulingIgnoredDuringExecution:    #必须条件
         nodeSelectorTerms:
         - matchExpressions:
           - key: disk-type                                #匹配标签disk-type
             operator: In                                  #值是 ssd 或者 hdd
             values:
             - ssd
             - hdd
        preferredDuringSchedulingIgnoredDuringExecution:    #加分条件
        - weight: 1                                         #匹配上加多少分
          preference:
           matchExpressions:
           - key: gpu
             operator: In                                      #匹配方式
             values:
             - “n”
      containers:
      - image: nginx:1.7.9
        imagePullPolicy: IfNotPresent
        name: nginx
        resources: {}
        terminationMessagePath: /dev/termination-log
        terminationMessagePolicy: File
亲和性 matchExpressions.operator
- in 满足一个
- NotIn 都不满足
- Exists 存在
- DoesNotExist 不存在
- Gt 大于
- Lt 小于
affinity 类型
- nodeAffinity 节点亲和性,pod部署到亲和力高的的node
- podAffinity pod亲和性,pod部署到亲和力高的pod所在的node
- podAntAffinity pod 反亲和性,pod远离反亲和力高的pod所在的node
pod亲和力
pod部署到亲和力高的pod所在的node(先选择node标签,然后再选着pod标签)
使用topologyKey选择节点
    spec:
      affinity:                                             #亲和力
       podAffinity:                               #affinity 类型;podAffinity   节点亲和性
        requiredDuringSchedulingIgnoredDuringExecution:    #必须条件
        - labelSelector:                                    #这里是labels
          topologyKey:nodeLabe                                  #node上的标签
           matchExpressions:
           - key: disk-type                                #匹配标签disk-type
             operator: In                                  #值是 ssd 或者 hdd
             values:
             - ssd
             - hdd
        preferredDuringSchedulingIgnoredDuringExecution:    #加分条件
        - weight: 1                                         #匹配上加多少分
          podAffinityTerm:
           labelSelector
           topologyKey:nodeLabe                                 #node上的标签
            matchExpressions:
            - key: gpu
              operator: In                                   #匹配方式
              values:
              - “n”
pod反亲和力
pod远离反亲和力高的pod所在的node((先选择node标签,然后再选着pod标签)),和亲和性类型
deployment
deployment是 replicaset的上层封装,replicaset是pod的上层封装,创建deploy会创建一个 deploy名字前缀的 replicaset
创建一个deployment
kubectl create deployment 名字 --image=镜像版本
kubectl create deploy nginx-deploy1 --image=nginx:1.7.9
输出指定deploy的配置文件:kubectl get deploy 名字 -o yaml
kubectl get deploy nginx-deploy1 -o yaml
deploy配置例子
deploy里面pod的标签会传递给replicaset,rs 通过matchLabels 指定的标签名字和 pod 做匹配
一个deploy里面一个副本集,里面有多个pod,修改镜像版本之类的操作会产生新的副本集,扩容缩容之类的操作不会产生新的副本集
apiVersion: apps/v1
kind: Deployment
metadata:
  labels:
    app: nginx-deploy
  name: nginx-deploy1
  namespace: default
spec:  #这一层配置rs的配置
  replicas: 1  #副本的数量,也就是这个副本集下面pod的数量
  revisionHistoryLimit: 10 #保存副集版本数
  selector:
    matchLabels:   #这里的label需要和pod里面匹配
      app: nginx-pod
  strategy:
    rollingUpdate:   #滚动更新 副本数最多不超出125%,最低不低于75%
      maxSurge: 25%
      maxUnavailable: 25%
    type: RollingUpdate
  template:       #下面是构建pod的配置
    metadata:
      creationTimestamp: null
      labels: #pod的标签
        app: nginx-pod
    spec:
      containers:
      - image: nginx:1.7.9
        imagePullPolicy: IfNotPresent   #拉取镜像策略,如果不存在才拉取
        name: nginx
        resources: {}
        terminationMessagePath: /dev/termination-log
        terminationMessagePolicy: File
      dnsPolicy: ClusterFirst
      restartPolicy: Always         # 任何原因导致的关闭都会重启
      schedulerName: default-scheduler
      securityContext: {}
      terminationGracePeriodSeconds: 30
修改指定deploy的配置文件:
修改deploy副本数量:kubectl edit deploy deploy名字
apiVersion: apps/v1
kind: Deployment
metadata:
  labels:
    app: nginx-deploy
  name: nginx-deploy1
  namespace: default
spec:
  replicas: 1  #副本的数量,也就是这个副本集下面pod的数量
扩容和缩容
kubectl scale --replicas=1 deploy deploy名字
滚动更新
apiVersion: apps/v1
kind: Deployment
metadata:
  labels:
    app: nginx-deploy
  name: nginx-deploy1
  namespace: default
spec:  #这一层配置rs的配置
  replicas: 1  #副本的数量,也就是这个副本集下面pod的数量
  revisionHistoryLimit: 10 #保存副集版本数
  strategy:
    rollingUpdate:   #滚动更新 副本数最多不超出125%,最低不低于75%
      maxSurge: 25%
      maxUnavailable: 25%
    type: RollingUpdate
回退版本
kubectl rollout history deploy deploy名字 #查询历史版本
kubectl rollout history deploy 名字 --revision=1 #查询历史版本变动
kubectl rollout undo deploy 名字 --to-revision=1 #确认回退到指定版本
滚动更新暂停和恢复
kubectl rollout pause deploy deploy名字 #暂停滚动更新
kubectl rollout resume deploy deploy名字 #恢复滚动更新
statefulset
statefulset和deploy的区别
| statefulset | deploy | |
|---|---|---|
| 适用场景 | statefulset针对的是有状态服务 | deploy针对无状态服务 |
| 资源关系 | statefulset 直接和 pod关联,并且需要和service关联 | deploy下面是replicas,replicas后面才是pod,可以不和service关联 |
| 数据持久化 | 一般有数据卷,而且是独立于容器的数据卷 | 一般没有外部数据卷 |
| pod顺序 | 有序,pod命名方式 sts名字-pod有序下标 | deployName-rs随机号-pod随机号 |
创建yaml例子
#定义sts,版本是app/v1
apiVersion: apps/v1
kind: StatefulSet
metadata:
  name: sts-web             #statefulset 的名字
spec:
  serviceName: sts-web-svc  # 关联SVC资源,和下面内嵌yaml里面 svc 名字对应
  replicas: 3               # 副本数
  selector:
    matchLabels:            # 关联具有app=web-nginx标签的Pod
      app: web-nginx
  template:
    metadata:
      labels:               #pod的标签
        app: web-nginx
    spec:
      containers:
      - name: web-nginx
        image: nginx:1.18.0
        imagePullPolicy: IfNotPresent
        ports:
        - containerPort: 80
          name: web

#内嵌的svc
---  #内嵌yaml 标记
apiVersion: v1
kind: Service
metadata:
  name: sts-web-svc   #service的名字
spec:
  ports:
  - port: 80
    targetPort: 80
  clusterIP: None
---
sts和svc是可以独立创建的,上面的写法只是测试方便,把内嵌svc的配置文件独立出来可以单独创建service
sts 删除的时候 不会级联删除 service,默认会级联删除pod
sts的po名字是有序的
并且扩容缩容都是从最大编号开始
[root@master statefulset]# kubectl get po
NAME                             READY   STATUS    RESTARTS   AGE
sts-web-0                        1/1     Running   0          75s
sts-web-1                        1/1     Running   0          74s
sts-web-2                        1/1     Running   0          72s
替换配置文件的几种方式
- 使用命令行替换
- 编辑配置文件
更新策略
-
滚动更新
#定义sts,版本是app/v1 apiVersion: apps/v1 kind: StatefulSet metadata: name: sts-web spec: serviceName: sts-web-svc # 关联SVC资源 replicas: 3 # 副本数 selector: matchLabels: # 关联具有app=web-nginx标签的Pod app: web-nginx updateStrategy: #更新策略 deploy里面是 strategy rollingUpdate: partition: 1 #编号>=1的pod会被更新,设置为0全部更新 type: RollingUpdate #滚动更新,配置rollingUpdate的时候,type: RollingUpdate 可以不写 template: metadata: labels: app: web-nginx spec: containers: - name: c-nginx image: nginx:1.18.0 imagePullPolicy: IfNotPresent ports: - name: p1 -
灰度发布
在rollingUpdate里面指定partition,实现灰度发布灰度发布不仅是一个更新策略的事,更需要程序的兼容- 需要做到数据库支持新旧版本,
- 需要程序接口支持新旧办呢,
- 需要前面路由的时候同样ip的用户映射到同样的服务
- 灰度发布需要花费巨大的开发开发测试成本,如果设计阶段没有考虑灰度发布,不要随意尝试
-
删除时更新
- type: OnDelete
updateStrategy: #更新策略 deploy里面是 strategy type: OnDelete #删除pod才会更新- 删除 pod以后重启的pod名字会保持不变
级联删除
statefulset 默认会级联删除pod,如果想保留pod需要关闭级联删除 --cascade=false
kubectl delete sts sts名字 --cascade=false
扩容和缩容几种方式
- kubectl scale sts stsName --replicas=5
- kubectl pach sts stsName -p '{"replicas":5}' json串描述需要修改的配置
- kubectl edit sts stsName 然后修改replicas的值
daemonset
daemonset可以通过标签动态的选择应该部署的node和副本数量(不管是deploy还是statefulset 一般都是手动指定副本数的,即便自动扩容也是通过资源指标来的),当创建新的带有指定标签的节点的时候daemonset会自动在此节点部署,比如给在特定标签的节点上做日志收集,资源统计等任务
daemonset配置例子
kind: DaemonSet
apiVersion: apps/v1
metadata:
  name: nginx-ds
spec:
  selector:
   matchLabels:
    podType: nginx-ds-type
  template:
    metadata:
      labels:
        podType: nginx-ds-type
      name: pod-nginx
    spec:
     nodeSelector:    #选择标签里面有disk=ssd的部署,如果没有写nodeSelector,会部署给所有node
      disk: ssd
     containers:
     - image: nginx:1.7.9
       name: c-nginx
使用 kubectl apply -f deamon-demo.yaml 创建 daemonset
这时候 不会部署到任何node
[root@master daemon]# kubectl get ds
NAME       DESIRED   CURRENT   READY   UP-TO-DATE   AVAILABLE   NODE SELECTOR   AGE
nginx-ds   0         0         0       0            0           disk=ssd        61s
给node2 添加标签以后就会部署到node2节点
daemonset的三种方式
daemonset选择是写在pod的spec里面的
-
nodeSelector
kind: DaemonSet spec: template: spec: nodeSelector: #选择标签里面有disk=ssd的部署,如果没有写nodeSelector,会部署给所有node disk: ssd -
nodeAffinity
-
podAffinity
HPA
horizontal pod autoscale 横向 pod 自动伸缩
配置例子
apiVersion: apps/v1
#定义sts,版本是app/v1
apiVersion: apps/v1
apiVersion: apps/v1
kind: Deployment
metadata:
  name: nginx-hpa
spec:  #这一层配置rs的配置
  replicas: 1
  revisionHistoryLimit: 10
  selector:
    matchLabels:
      app: nginx-hpa-pod
  strategy:
    rollingUpdate:
      maxSurge: 25%
      maxUnavailable: 25%
    type: RollingUpdate
  template:       #下面是构建pod的配置
    metadata:
      labels: #pod的标签
        app: nginx-hpa-pod
    spec:
      containers:
      - image: nginx:1.7.9
        name: nginx-docker-name
        resources:
         limits:
          cpu: 200m
         requests:
          cpu: 10m
#内嵌的svc
---  #内嵌yaml 标记
apiVersion: v1
kind: Service
metadata:
  name: nginx-hpa-svc   #service的名字
spec:
  selector:
   app: nginx-hpa-pod   #svc 关联的pod 标签
  ports:
  - port: 80   #service 端口,不是宿主机的端口,内网端口
    targetPort: 80   #pod里面的容器端口
  type: NodePort     #主机端口,随机一个
---
自动扩容缩容
给名字为 nginx-deploy的deploy 创建hpa,当pod cpu 资源大于20%的时候扩容,最大5个,最小2个
kubectl autoscale deploy nginx-hpa --cpu-percent=20 --min=2 --max=5
这里--cpu-percent=20 和 deploy 资源限制里面的 cpu资源有关,相对resources.requests.cpu=20m的20%就会扩容,自动扩容缩容有等待时间,默认是30秒检查一次,可以通过controller manager--horizontal-pod-autoscaler-sync-period 修改
安装metrics能够看到pod的 CPU 内存使用情况,可以看到hpa触发时候资源状况
service
sts和service通过serviceName管理,deploy和service通过pod的标签关联,有关联pod时候创建service的时候会自动创建endpoint,endpoint 里面保存有管理的pod列表
service也可以独立创建,然后创建endpoints,在endpoint里面可以指定连接集群外部的资源
service的配置文件
使用service连接statefulset的pod,通过serviceName连接
#定义sts,版本是app/v1
apiVersion: apps/v1
kind: StatefulSet
metadata:
  name: sts-web             #statefulset 的名字
spec:
  serviceName: sts-web-svc  # 关联SVC资源,和下面内嵌yaml里面 svc 名字对应-------关键-----------


#内嵌的svc
---  #内嵌yaml 标记
apiVersion: v1
kind: Service
metadata:
  name: sts-web-svc   #service的名字
spec:
  ports:
  - port: 80
    targetPort: 80
  clusterIP: None
---
使用service连接deploy的pod,使用 selector 连接
---  #内嵌yaml 标记
apiVersion: v1
kind: Service
metadata:
  name: nginx-hpa-svc   #service的名字
spec:
  selector:
   app: nginx-hpa-pod   #svc 关联的pod 标签------------------------关键----------------
  ports:
  - port: 80   #service 端口,不是宿主机的端口,内网端口
    targetPort: 80   #pod里面的容器端口
  type: NodePort     #主机端口,随机一个,也可以指定
使用service连接外部应用
kubectl create -f baidu-svc.yaml
#baidu-svc.yaml文件
#独立创建的service,不关联pod
apiVersion: v1
kind: Service
metadata:
  name: baidu-svc   #service的名字
spec:
  ports:
  - port: 80   #service 端口,不是宿主机的端口,内网端口
    targetPort: 80   #pod里面的容器端口
    name: http
  type: ClusterIP    # 集群ip,不对外暴露端口
kubectl create -f baidu-svc-ep.yaml
#baidu-svc-ep.yaml文件
#独立创建的endpoints,关联到百度首页
apiVersion: v1
kind: Endpoints
metadata:
  name: baidu-svc   #需要和service的名字一样
subsets:
- addresses:
  - ip: 39.156.66.14  #指向百度首页
  ports:               #需要和service一样
  - port: 80
    name: http
nginx-hpa-svc 的内网ip是10.102.229.59端口80,外网端口是31633
[root@master hpa]# kubectl get svc
NAME            TYPE        CLUSTER-IP      EXTERNAL-IP   PORT(S)        AGE
nginx-hpa-svc   NodePort    10.102.229.59   <none>        80:31633/TCP   17m
名为nginx-hpa-svc 的endpoints,下面管理0.244.104.38:80,10.244.166.166:80的两个pod
可以通过service外网ID:外网端口访问,或者service内网ip:端口访问,如果是容器内还可以通过serviceName.namespace访问,通过service的请求会转发到对应的pod
[root@master hpa]# kubectl get ep
NAME            ENDPOINTS                            AGE
nginx-hpa-svc   10.244.104.38:80,10.244.166.166:80   19m
删除service的时候默认会级联删除endpoints
service type
-
NodePort #可以通过 nodePort 指定外部访问端口,不指定随机分配一个(实际在相关节点的kube-proxy上开了一个端口),任意通过任意节点外部IP都能访问服务,负载均衡分配节点时间复杂度O(n)的比ingress效率低,适合横向流量
selector: app: nginx-hpa-pod #svc 关联的pod 标签------------------------关键---------------- ports: - port: 80 #service 端口,不是宿主机的端口,内网端口 targetPort: 80 #pod里面的容器端口 nodePort: 3333 #外部主机端口 type: NodePort #主机端口,随机一个 -
ClusterIP #默认值,只分配集群ip,不分配外部端口
selector: app: nginx-hpa-pod #svc 关联的pod 标签------------------------关键---------------- ports: - port: 80 #service 端口,不是宿主机的端口,内网端口 targetPort: 80 #pod里面的容器端口 type: ClusterIP #主机端口,随机一个 -
ExternalName #指向域名,这样不会给service分配集群ID
apiVersion: v1 kind: Service metadata: name: my-service spec: type: ExternalName externalName: www.baidu.com -
LoadBalancer 用于三方云服务
Ingress
按照ingress 控制器 ingress-nginx,ingres控制器是ingress的一种实现底层就是一个nginx,ingress还有很多实
Helm下载安装:
#下载解压,然后复制到可运行目录
wget https://get.helm.sh/helm-v3.2.3-linux-amd64.tar.gz
tar -zxvf helm-v3.2.3-linux-amd64.tar.gz
cd linux-amd64
cp helm /usr/local/bin
添加仓库:
# 添加仓库
helm repo add ingress-nginx https://kubernetes.github.io/ingress-nginx

# 查看仓库列表
helm repo list
ingress-nginx安装
可以使用 helm安装ingress-nginx
# 搜索 ingress-nginx
helm search repo ingress-nginx

#下载安装包(下不下来在外部用VPN下载,然后上传上去)
#地址https://github.com/kubernetes/ingress-nginx/releases/download/helm-chart-4.9.0/ingress-nginx-4.4.2.tgz
helm pull ingress-nginx/ingress-nginx


#解压修改配置文件
tar -zxvf ingress-nginx-4.4.2.tgz
cd ingress-nginx


#修改配置文件
#修改 nginx-ingress-controller 镜像附近位置替换下面,注释掉 digest pullPolicy 对应行(去掉权限)
registry: registry.cn-hangzhou.aliyuncs.com
image: google_containers/nginx-ingress-controller
tag: v1.3.0

#修改 kube-webhook-certgen 镜像附近位置 替换下面
registry: registry.cn-hangzhou.aliyuncs.com
image: google_containers/kube-webhook-certgen
tag: v1.3.0

#kind: Deployment 处改成 DaemonSet
kind: DaemonSet
.
.省略
.
   nodeSelector:
    kubernetes.io/os: linux
    ingress: "true"           #这是ingress部署的节点标签

#hostNetwork 改成true
hostNetwork 改成true: "true"
dnsPolicy: ClusterFirstWithHostNet
# 查找 LoadBalancer
type: ClusterIP
# 查找 admissionWebhooks.enabled
admissionWebhooks:
	enabled: false


# 为需要部署 ingress 的节点上加标签,部署到node2
kubectl label node node2 ingress=true

# 安装 ingress-nginx,后面有个 .
helm install ingress-nginx .

#查看
[root@master ingress-nginx]# kubectl get po
NAME                             READY   STATUS    RESTARTS   AGE
ingress-nginx-controller-sg5g2   1/1     Running   0          19s
ingress匹配类型
- Perfix 前缀匹配
- Exact 固定匹配
- ImplementationSpecific 需要指定 IngressClass
ingress配置文件例子
apiVersion: networking.k8s.io/v1
kind: Ingress
metadata:
  name: ingress-2-ng
  annotations:
   kubernetes.io/ingress.class: "nginx"    #这个必须有,不然ingres-nginx 会忽略这个配置
spec:
  rules:
  - host: cxygg.com
    http:
      paths:
      - pathType: Prefix       #匹配类型
        path: /api              #匹配的api开头的前缀
        backend:
          service:
           name: nginx-hpa-svc     #指向service名字
           port:
            number: 80          #服务端口
[root@master ingress]# kubectl get ingress
NAME           CLASS    HOSTS       ADDRESS   PORTS   AGE
ingress-2-ng   <none>   cxygg.com             80      14m
查询ingress-nginx日志查询
#使用 helm 安装ingress-nginx后,会在 node2(拥有标签 ingress: "true" 的节点)上启动一个pod
kubectl logs -f ingress-nginx-pod的名字
注意事项1:ingress-nginx启动爆错 创建 configmaps 没有权限
E0103 10:54:00.212398 7 leaderelection.go:334] error initially creating leader election record: configmaps is forbidden: User "system:serviceaccount:default:ingress-nginx" cannot create resource "configmaps" in API group "" in the namespace "default"
解决办法
查看 ingress-nginx 的权限
[root@master ingress]# kubectl describe clusterRole ingress-nginx
Name:         ingress-nginx
Labels:       app.kubernetes.io/instance=ingress-nginx
              app.kubernetes.io/managed-by=Helm
              app.kubernetes.io/name=ingress-nginx
              app.kubernetes.io/part-of=ingress-nginx
              app.kubernetes.io/version=1.5.1
              helm.sh/chart=ingress-nginx-4.4.2
Annotations:  meta.helm.sh/release-name: ingress-nginx
              meta.helm.sh/release-namespace: default
PolicyRule:
  Resources                           Non-Resource URLs  Resource Names  Verbs
  ---------                           -----------------  --------------  -----
  events                              []                 []              [create patch]
  services                            []                 []              [get list watch]
  ingressclasses.networking.k8s.io    []                 []              [get list watch]
  ingresses.networking.k8s.io         []                 []              [get list watch]
  configmaps                          []                 []              [list watch get update create]   #这里是我加的
  nodes                               []                 []              [list watch get]
  endpointslices.discovery.k8s.io     []                 []              [list watch get]
  endpoints                           []                 []              [list watch]
  namespaces                          []                 []              [list watch]
  pods                                []                 []              [list watch]
  secrets                             []                 []              [list watch]
  leases.coordination.k8s.io          []                 []              [list watch]
  ingresses.networking.k8s.io/status  []                 []              [update]
编辑权限:kubectl edit clusterRole ingress-nginx 在末尾加上下面的权限
- apiGroups:
  - ""
  resources:
  - configmaps
  verbs:
  - get
  - list
  - watch
  - update
  - create
注意事项2:如果配置文件annotation出没有写 kubernetes.io/ingress.class: "nginx",ingress 会被 ingress-nginx忽略,也就访问不到对应的service
[root@master ingress]#  kubectl get ingressclass
NAME    CONTROLLER             PARAMETERS   AGE
nginx   k8s.io/ingress-nginx   <none>       39m
I0103 10:56:19.788322       7 store.go:425] "Ignoring ingress because of error while validating ingress class" ingress="default/ingress-2-ng" error="ingress does not contain a valid IngressClass"
^C
ConfigMap
configmap是存配置文件的,如果需要configMap 不可改,可以用 使用 kubectl edit 修改 immutable:true
configMap 命令语法
如果不指定key默认就是去掉路径的文件名
kubectl create cm --from-file=文件夹
kubectl create cm --from-file=key1=文件1  --from-file=key1=文件1
kubectl create cm --from-file=文件1  --from-file=文件2
kubectl create cm --from-literal=key1=value1
configMap使用例子
#加入有下面两个文件
[root@master configmap]# more aplication.yaml
apiVersion:v1
redis:
 host: 192.168.0.1
 prot: 3306


 [root@master configmap]# more mysql.properties
ip=127.0.1
prot=6379
#把当前目录下的文件都加入configMap
kubectl create cm cm1 --from-file=.

#加入指定文件
kubectl create cm cm3 --from-file=./mysql.properties --from-file=./aplication.yaml

#加入指定文件,并且指定别名
kubectl create cm cm2 --from-file=key1=./mysql.properties --from-file=key2=./aplication.yaml

#不用文件直接加入
kubectl create cm cm4 --from-literal=key1=value1
查询有那些configmap
[root@master configmap]# kubectl get cm
NAME                       DATA   AGE
cm1                        2      18m
cm2                        2      15m
cm3                        2      16m
cm4                        1      31s
查询configmap内容
[root@master configmap]# kubectl describe cm cm2
Name:         cm2
Namespace:    default
Labels:       <none>
Annotations:  <none>

Data
====
key1:        #指定的文件名名
----         #这后面是文件内容,想些啥些啥,想什么格式什么格式
ip=127.0.1
prot=6379

key2:             #指定的文件名名
----               #这后面是文件内容,想些啥些啥,想什么格式什么格式
apiVersion:v1
redis:
 host: 192.168.0.1
 prot: 3306


BinaryData
====

Events:  <none>
可以在yaml中定义configMap
apiVersion: v1
kind: ConfigMap
metadata:
  name: cm5
  namespace: default
data:
  name1: value1
在别的资源中使用confimap
apiVersion: v1
kind: Pod
metadata:
  name: use-cm
spec:
  containers:
    - name: test-container
      image: alpine
      command: ["/bin/sh","-c","env"]   #打印环境变量
      env:
        - name: mysql-confg
          valueFrom:                    #引用configmap
            configMapKeyRef:
              name: cm5                 #cm的名字
              key: name1                #cm中的key
configMap 可以作为volume的目录
configMap 相当于一个文件夹,下面反着多个配置文件
volumes:
 - name: my-volume
   configMap:
    name: cm5             #configMap的名字
    items:                #不写items 默认映射全部
    - key:"文件1.txt"
      path:"文件1.txt改名字"
Secret
类似加了密的configMap,使用 decribe是看不到的,使用的base64 转码。
命令格式
kubectl create secret secretType secret名字
secretType
| TYPE类型 | 申明方式 |
|---|---|
| docker-registry | –docker-username,–docker-password,–docker-email |
| generic | –from-literal和–from-file |
| tls | –cert–key |
可以使用 spec.imagePullSecrets指定 docker-registry 类型的 secret
spec:
 imagePullSecrets:
 - name: secreteName    #指定加密配置文件名字
Volume
用于文件存储和docker类似k8s支持hostPath,configMap,emptyDir,NSF等方式的volume
hostPath volumen配置例子
volumes申明和container同级别,volumeMounts和images同级别
apiVersion: v1
kind: Pod
metadata:
  name: nginx-volume
spec:
 containers:
 - name: test-container
   image: nginx
   volumeMounts:
   - name: xxxDIr                  #数据卷的名字,需要在volumes里面申明,相当于使用一个数据卷
     mountPath: /opt/data          #容器里面的挂载路径
 volumes:
 - name: xxxDIr                   #数据卷名字,相当于申明一个数据卷
   hostPath:
    path: /opt/data                  #宿主机目录
    type: DirectoryOrCreate         #如果给的目录不存在就创建一个
hostPath volume 的hostPath.type 说明
- 不写的默认值,空字符串 ,不做检查
- DirectoryOrCreate 如果给的目录不存在就创建一个
- Directory 一个已经存在的目录
- FileOrCreate 如果文件不存就创建一个
- FIle 必须是一个已经存在的文件
- Socket 套接字,必须存在
- CharDevice 字符设备,必须存在
- BlockDevice 块设备,必须存在
configMap 可以作为volume的目录挂载到容器内部
这样配置默认会覆盖mountPath下面的所有文件,热更新是有延时的大概30秒更新一次
apiVersion: v1
kind: Pod
metadata:
  name: nginx-volume
spec:
 containers:
 - name: test-container
   image: nginx
   volumeMounts:
   - name: v1                  #数据卷的名字,需要在volumes里面申明,相当于使用一个数据卷
     mountPath: /opt/volume          #容器里面的挂载路径
 volumes:
 - name: v1                 #数据卷名字,相当于申明一个数据卷
   configMap:
    name: cm1              #configMap的名字
    items:                 #不写items 默认映射全部
    - key: "mysql.properties"       #cm  key的名字
      path: "mysql1.properties" #映射的名字,相当于取别名
subPath可以只映射指定文件
使用subPath以后修改configMap容器内是不会更新的,这时候可以映射到别的目录,然后通过ln 创建软连接映射到原来的配置目录的配置文件,取代subPath
 volumeMounts:
 - name: my-volume               #数据卷的名字,需要在volumes里面申明,相当于使用一个数据卷
   mountPath: /opt/data          #容器里面的挂载路径
   subPath: "文件1.txt改名字"      #只映射这个文件
volumes:
 - name: my-volume
   configMap:
    name: cm5              #configMap的名字
    items:                 #不写items 默认映射全部
    - key:"文件1.txt"       #cm  key的名字
      path:"文件1.txt改名字" #映射的名字,相当于取别名
使用empty-dir实现同一个pod里面两个容器之间文件共享
如下c-1和c-2之间可以共享 /opt/volume 目录,但是不对外持久化
apiVersion: v1
kind: Pod
metadata:
  name: nginx-volume
spec:
 containers:
 - name: c-1
   image: nginx
   volumeMounts:
   - name: v1                  #数据卷的名字,需要在volumes里面申明,相当于使用一个数据卷
     mountPath: /opt/volume    #容器里面的挂载路径
 - name: c-2
   image: nginx
   volumeMounts:
   - name: v1                  #数据卷的名字,需要在volumes里面申明,相当于使用一个数据卷
     mountPath: /opt/volume    #容器里面的挂载路径
 volumes:
 - name: v1                 #数据卷名字,相当于申明一个数据卷
   emptyDir: {}
volume挂载 NFS
apiVersion: v1
kind: Pod
metadata:
  name: nginx-volume
spec:
 containers:
 - name: test-container
   image: nginx
   volumeMounts:
   - name: xxxDIr                  #数据卷的名字,需要在volumes里面申明,相当于使用一个数据卷
     mountPath: /opt/data          #容器里面的挂载路径
 volumes:
 - name: xxxDIr                   #数据卷名字,相当于申明一个数据卷
   nfs:
    server: 192.168.100.182         #nfs 服务器地址
    path: /data/nfs                 #nfs服务器共享目录
    readOnly: false                 #是否只读
PV和PVC
PV:PersistentVolume,PV 定义持久化数据卷
PVC:PersistentVolumeClaim,PVC定义需要什么要的持久化数据卷,然后再别的资源配置文件里面指定PVC的名字
资源选择PVC,PVC选中PV
创建PV
apiVersion: v1
kind: PersistentVolume
metadata:
  name: pv-volume
spec:
  capacity:
    storage: 5Gi # pv 的容量
  volumeMode: Filesystem # 存储类型为文件系统
  accessModes: # 访问模式:ReadWriteOnce、ReadWriteMany、ReadOnlyMany
    - ReadWriteMany # 可被多节点独写
  persistentVolumeReclaimPolicy: Recycle # 回收策略,Retain ,delete ,Recycle
#  storageClassName: slow # 创建 PV 的存储类名,需要与 pvc 的相同
  mountOptions: # 加载配置
    - hard
    - nfsvers=4.1
  nfs: # 连接到 nfs
    path: /data/nfs # 存储路径
    server: 192.168.100.182 # nfs 服务地址
accessModes 访问模式
- ReadWriteMany 多节点读写
- ReadWriteOnce 单节点读写
- ReadOnlyMany 多节点只读
persistentVolumeReclaimPolicy 回收策略
- Retain 重复使用
- delete 用完删除
- Recycle 用完释放,下次使用的时候初始化
创建PVC
accessModes,volumeMode,storage,storageClassName,还有后面的selector 需要和PV对应
apiVersion: v1
kind: PersistentVolumeClaim
metadata:
  name: pvc-volume
spec:
  accessModes:
    - ReadWriteMany # 权限需要与对应的 pv 相同
  volumeMode: Filesystem
  resources:
    requests:
      storage: 4Gi # 资源可以小于 pv 的,但是不能大于,如果大于就会匹配不到 pv
#  storageClassName: slow # 名字需要与对应的 pv 相同
#  selector: # 使用选择器选择对应的 pv
#  #    matchLabels:
#  #      release: "stable"
#  #    matchExpressions:
#  #      - {key: environment, operator: In, values: [dev]}
资源使用PVC
apiVersion: v1
kind: Pod
metadata:
  name: use-pvc
spec:
 containers:
 - name: test-container
   image: nginx
   volumeMounts:
   - name: v1                  #数据卷的名字,需要在volumes里面申明,相当于使用一个数据卷
     mountPath: /opt/volume          #容器里面的挂载路径
 volumes:
 - name: v1                 #数据卷名字,相当于申明一个数据卷
   persistentVolumeClaim:
    claimName: pvc-volume   # pvc 的名称
查看PV 和PVC
[root@master volume]# kubectl get pvc
NAME         STATUS   VOLUME      CAPACITY   ACCESS MODES   STORAGECLASS   AGE
pvc-volume   Bound    pv-vomelu   5Gi        RWO            slow           14m
[root@master volume]#
[root@master volume]# kubectl get pv
NAME        CAPACITY   ACCESS MODES   RECLAIM POLICY   STATUS   CLAIM                STORAGECLASS   REASON   AGE
pv-volume   5Gi        RWO            Recycle          Bound    default/pvc-volume   slow                    14m
PV,PVC 的自动创建
pv,pvc的自动创建需要 storageClass 和 制备器的支持
创建serviceAccount
apiVersion: v1
kind: ServiceAccount
metadata:
  name: nfs-client-provisioner
  namespace: kube-system
---
kind: ClusterRole
apiVersion: rbac.authorization.k8s.io/v1
metadata:
  name: nfs-client-provisioner-runner
  namespace: kube-system
rules:
  - apiGroups: [""]
    resources: ["persistentvolumes"]
    verbs: ["get", "list", "watch", "create", "delete"]
  - apiGroups: [""]
    resources: ["persistentvolumeclaims"]
    verbs: ["get", "list", "watch", "update"]
  - apiGroups: ["storage.k8s.io"]
    resources: ["storageclasses"]
    verbs: ["get", "list", "watch"]
  - apiGroups: [""]
    resources: ["events"]
    verbs: ["create", "update", "patch"]
---
kind: ClusterRoleBinding
apiVersion: rbac.authorization.k8s.io/v1
metadata:
  name: run-nfs-client-provisioner
  namespace: kube-system
subjects:
  - kind: ServiceAccount
    name: nfs-client-provisioner
    namespace: default
roleRef:
  kind: ClusterRole
  name: nfs-client-provisioner-runner
  apiGroup: rbac.authorization.k8s.io
---
kind: Role
apiVersion: rbac.authorization.k8s.io/v1
metadata:
  name: leader-locking-nfs-client-provisioner
  namespace: kube-system
rules:
  - apiGroups: [""]
    resources: ["endpoints"]
---
kind: RoleBinding
apiVersion: rbac.authorization.k8s.io/v1
metadata:
  name: leader-locking-nfs-client-provisioner
  namespace: kube-system
subjects:
  - kind: ServiceAccount
    name: nfs-client-provisioner
roleRef:
  kind: Role
  name: leader-locking-nfs-client-provisioner
  apiGroup: rbac.authorization.k8s.io
创建Provisioner
apiVersion: apps/v1
kind: Deployment
metadata:
  name: nfs-client-provisioner
  namespace: kube-system
  labels:
    app: nfs-client-provisioner
spec:
  replicas: 1
  strategy:
    type: Recreate
  selector:
    matchLabels:
      app: nfs-client-provisioner
  template:
    metadata:
      labels:
        app: nfs-client-provisioner
    spec:
      serviceAccountName: nfs-client-provisioner
      containers:
        - name: nfs-client-provisioner
          image: registry.cn-beijing.aliyuncs.com/pylixm/nfs-subdir-external-provisioner:v4.0.0
          volumeMounts:
            - name: nfs-client-root
              mountPath: /persistentvolumes
          env:
            - name: PROVISIONER_NAME
              value: fuseim.pri/ifs
            - name: NFS_SERVER
              value: 192.168.100.182
            - name: NFS_PATH
              value: /data/nfs
      volumes:
        - name: nfs-client-root
          nfs:
            server: 192.168.100.182
            path: /data/nfs
创建 StorageClass
apiVersion: storage.k8s.io/v1
kind: StorageClass
metadata:
  name: managed-nfs-storage
  namespace: kube-system
provisioner: fuseim.pri/ifs # 外部制备器提供者,编写为提供者的名称
parameters:
  archiveOnDelete: "false" # 是否存档,false 表示不存档,会删除 oldPath 下面的数据,true 表示存档,会重命名路径
reclaimPolicy: Retain # 回收策略,默认为 Delete 可以配置为 Retain
volumeBindingMode: Immediate # 默认为 Immediate,表示创建 PVC 立即进行绑定,只有 azuredisk 和 AWSelasticblockstore 支持其他值
创建PVC(自动创建PV)
apiVersion: v1
kind: PersistentVolumeClaim
metadata:
  name: auto-pv-test-pvc
spec:
  accessModes:
  - ReadWriteOnce
  resources:
    requests:
      storage: 300Mi
  storageClassName: managed-nfs-storage
使用PVC
apiVersion: v1
kind: Pod
metadata:
  name: use-pvc
spec:
 containers:
 - name: test-container
   image: nginx
   volumeMounts:
   - name: v1                  #数据卷的名字,需要在volumes里面申明,相当于使用一个数据卷
     mountPath: /opt/volume          #容器里面的挂载路径
 volumes:
 - name: v1                 #数据卷名字,相当于申明一个数据卷
   persistentVolumeClaim:
    claimName: auto-pv-test-pvc   # pvc 的名称
metrics指标镜像拉取不下来问题
下面是国内镜像和配置文件
apiVersion: v1
kind: ServiceAccount
metadata:
  labels:
    k8s-app: metrics-server
  name: metrics-server
  namespace: kube-system
---
apiVersion: rbac.authorization.k8s.io/v1
kind: ClusterRole
metadata:
  labels:
    k8s-app: metrics-server
    rbac.authorization.k8s.io/aggregate-to-admin: "true"
    rbac.authorization.k8s.io/aggregate-to-edit: "true"
    rbac.authorization.k8s.io/aggregate-to-view: "true"
  name: system:aggregated-metrics-reader
rules:
- apiGroups:
  - metrics.k8s.io
  resources:
  - pods
  - nodes
  verbs:
  - get
  - list
  - watch
---
apiVersion: rbac.authorization.k8s.io/v1
kind: ClusterRole
metadata:
  labels:
    k8s-app: metrics-server
  name: system:metrics-server
rules:
- apiGroups:
  - ""
  resources:
  - pods
  - nodes
  - nodes/stats
  - namespaces
  - configmaps
  verbs:
  - get
  - list
  - watch
---
apiVersion: rbac.authorization.k8s.io/v1
kind: RoleBinding
metadata:
  labels:
    k8s-app: metrics-server
  name: metrics-server-auth-reader
  namespace: kube-system
roleRef:
  apiGroup: rbac.authorization.k8s.io
  kind: Role
  name: extension-apiserver-authentication-reader
subjects:
- kind: ServiceAccount
  name: metrics-server
  namespace: kube-system
---
apiVersion: rbac.authorization.k8s.io/v1
kind: ClusterRoleBinding
metadata:
  labels:
    k8s-app: metrics-server
  name: metrics-server:system:auth-delegator
roleRef:
  apiGroup: rbac.authorization.k8s.io
  kind: ClusterRole
  name: system:auth-delegator
subjects:
- kind: ServiceAccount
  name: metrics-server
  namespace: kube-system
---
apiVersion: rbac.authorization.k8s.io/v1
kind: ClusterRoleBinding
metadata:
  labels:
    k8s-app: metrics-server
  name: system:metrics-server
roleRef:
  apiGroup: rbac.authorization.k8s.io
  kind: ClusterRole
  name: system:metrics-server
subjects:
- kind: ServiceAccount
  name: metrics-server
  namespace: kube-system
---
apiVersion: v1
kind: Service
metadata:
  labels:
    k8s-app: metrics-server
  name: metrics-server
  namespace: kube-system
spec:
  ports:
  - name: https
    port: 443
    protocol: TCP
    targetPort: https
  selector:
    k8s-app: metrics-server
---
apiVersion: apps/v1
kind: Deployment
metadata:
  labels:
    k8s-app: metrics-server
  name: metrics-server
  namespace: kube-system
spec:
  selector:
    matchLabels:
      k8s-app: metrics-server
  strategy:
    rollingUpdate:
      maxUnavailable: 0
  template:
    metadata:
      labels:
        k8s-app: metrics-server
    spec:
      containers:
      - args:
        - --cert-dir=/tmp
        - --secure-port=4443
        - --kubelet-preferred-address-types=InternalIP,ExternalIP,Hostname
        - --kubelet-use-node-status-port
        - --metric-resolution=15s
        - --kubelet-insecure-tls
        image: registry.cn-shenzhen.aliyuncs.com/zengfengjin/metrics-server:v0.5.0
        imagePullPolicy: IfNotPresent
        livenessProbe:
          failureThreshold: 3
          httpGet:
            path: /livez
            port: https
            scheme: HTTPS
          periodSeconds: 10
        name: metrics-server
        ports:
        - containerPort: 4443
          name: https
          protocol: TCP
        readinessProbe:
          failureThreshold: 3
          httpGet:
            path: /readyz
            port: https
            scheme: HTTPS
          initialDelaySeconds: 20
          periodSeconds: 10
        resources:
          requests:
            cpu: 100m
            memory: 200Mi
        securityContext:
          readOnlyRootFilesystem: true
          runAsNonRoot: true
          runAsUser: 1000
        volumeMounts:
        - mountPath: /tmp
          name: tmp-dir
      nodeSelector:
        kubernetes.io/os: linux
      priorityClassName: system-cluster-critical
      serviceAccountName: metrics-server
      volumes:
      - emptyDir: {}
        name: tmp-dir
---
apiVersion: apiregistration.k8s.io/v1
kind: APIService
metadata:
  labels:
    k8s-app: metrics-server
  name: v1beta1.metrics.k8s.io
spec:
  group: metrics.k8s.io
  groupPriorityMinimum: 100
  insecureSkipTLSVerify: true
  service:
    name: metrics-server
    namespace: kube-system
  version: v1beta1
  versionPriority: 100
查看状态
[root@master metrics]# kubectl get pods -n kube-system| egrep 'NAME|metrics-server'
NAME                                       READY   STATUS    RESTARTS      AGE
metrics-server-566f4dd5dd-tv9dm            1/1     Running   0             3m35s
查看资源指标
[root@master metrics]# kubectl top node
NAME     CPU(cores)   CPU%   MEMORY(bytes)   MEMORY%
master   113m         2%     1219Mi          70%
node1    49m          1%     758Mi           44%
node2    107m         2%     998Mi           58%
[root@master metrics]# kubectl top pod
NAME                               CPU(cores)   MEMORY(bytes)
affinity-deploy-6bd7887fcd-46jkg   0m           1Mi
affinity-deploy-6bd7887fcd-75pcx   0m           1Mi
affinity-deploy-6bd7887fcd-c48dz   0m           1Mi
affinity-deploy-6bd7887fcd-cpmm4   0m           1Mi
affinity-deploy-6bd7887fcd-crx62   0m           1Mi
ingress-nginx-controller-5645l     1m           89Mi
nginx-deploy1-7f9dfb7d57-fdddp     0m           1Mi
nginx-deploy1-7f9dfb7d57-h2nhb     0m           1Mi
nginx-deploy1-7f9dfb7d57-j8sqp     0m           1Mi
nginx-deploy1-7f9dfb7d57-wr5nx     0m           1Mi
nginx-deploy1-7f9dfb7d57-zlcj5     0m           1Mi
nginx-ds-9s4kj                     0m           1Mi
nginx-hpa-758f44b4fd-2jvww         0m           1Mi
nginx-hpa-758f44b4fd-r6kpz         0m           1Mi
sts-web-0                          0m           1Mi
sts-web-1                          0m           1Mi
sts-web-2                          0m           1Mi
能耍的时候就一定要耍,不能耍的时候一定要学。
--天道酬勤,贵在坚持posted on 2023-12-30 20:00 zhangyukun 阅读(134) 评论(0) 收藏 举报


 浙公网安备 33010602011771号