Postgresql流复制+pgpool实现高可用
pgpool
概述
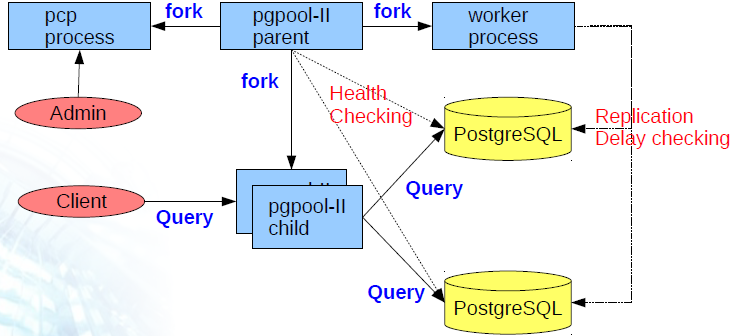
pgpool-II 是一个位于 PostgreSQL 服务器和 PostgreSQL 数据库客户端之间的中间件,它提供以下功能:连接池、复制、负载均衡、限制超过限度的连接以及并行查询。文档在此。
四种模式

O 意味着“可用”, X 意味着“不可用
(1) 并行查询模式需要同时打开复制和负载均衡,但是复制和负载均衡无法用于并行查询模式中的分布式表。
(2) 在线恢复可以和流复制同时使用。
(*3) 客户端仅仅是通过 pgpool-II 连接到 PostgreSQL服务器。这种模式仅仅用于限制到服务器的连接数,或者在多台机器上启用故障恢复。
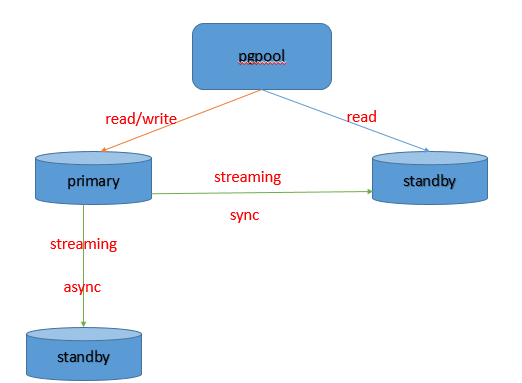
pgpool在不同模式下,提供不同的功能,本文将选择在主备模式下,实现故障恢复,即自动failover的功能。
体系结构
配置文件介绍
pgpool有四个主要的配置文件,分别是
- pcp.conf 用于管理查、看节点信息,如加入新节点。该文件主要是存储用户名及md5形式的密码。
- pgpool.conf 用于设置pgpool的模式,主次数据库的相关信息等。
- pool_hba.conf 用于认证用户登录方式,如客户端IP限制等,类似于postgresql的pg_hba.conf文件。
- pool_passwd 用于保存相应客户端登录帐号名及md5密码。
拓扑结构
安装
postgresql流复制设置
pgpool安装设置
安装
sudo apt-get insatll pgpool2
设置pcp.conf
/usr/sbin/pg_md5 password
将得到md5加上用户名以以下方式写入文件/etc/pgpool2/pcp.conf中,
pgpool:5f4dcc3b5aa765d61d8327deb882cf99
设置pgpool.conf
确保相关配置项设置如下:
listen_addresses = '*'
backend_hostname0 = '10.10.10.104' #主机ip
backend_port0 = 5432
backend_weight0 = 1 #loadbalance不开启,无效
backend_data_directory0 = '/var/lib/postgresql/9.5/main'
backend_flag0 = 'ALLOW_TO_FAILOVER'

backend_hostname1 = '10.10.10.102' #备机ip
backend_port1 = 5432
backend_weight1 = 1
backend_data_directory1 = '/var/lib/postgresql/9.5/main'
backend_flag1 = 'ALLOW_TO_FAILOVER'

enable_pool_hba = on
pool_passwd = 'pool_passwd'

master_slave_mode = on
master_slave_sub_mode = 'stream'
sr_check_user = 'replication' #流复制账号
sr_check_password = 'password'

failover_command = '/var/lib/postgresql/failover.sh %h %H /var/lib/postgresql/state/recovery_trigger' #主机失败后,touch文件使得备机从只读状态变成可读写状态
设置pool_hba.conf
设置可以参考postgresql的hba设置,如
# IPv4 local connections:
host    all               all           127.0.0.1/32    md5
host    all               all           0.0.0.0/0       md5
host    replication     replication     0.0.0.0/0       md5
设置pool_passwd
前提:对应的postgresql实例中,已经建立相应的账号。设置pool_passwd的目的是允许该数据库账号能够通过pgpool登录数据库。
方法一:设置与数据库账号同名的系统账号,然后直接调用pg_md5,该命令会自动产生好pool_passwd文件。例如我有系统账号cloud,密码为cloud
/usr/sbin/pg_md5 -m -u cloud cloud
方法二: 直接访问数据库,将结果以以下方式放入文件/etc/pgpool2/pool_passwd中
cloud:md5313e20fe4ca8bf6751ffd3c5b963a9ad
查询数据库:
select usename,passwd from pg_shadow;
failover.sh
当主机宕机后,pgpool会将链接转至standby,所以需要将standby从只读状态修改为可读写状态,即创建一个trigger文件或者调用promote命令。
#! /bin/sh
# Failover command for streaming replication.
# This script assumes that DB node 0 is primary, and 1 is standby.
#
# If standby goes down, do nothing. If primary goes down, create a
# trigger file so that standby takes over primary node.
#
# Arguments: $1: failed node id. $2: new master hostname. $3: path to
# trigger file.

failed_node=$1
new_master=$2
trigger_file=$3

# Do nothing if standby goes down.
if [ $failed_node = 1 ]; then
	exit 0;
fi

# Create the trigger file.
/usr/bin/ssh -T $new_master /bin/touch $trigger_file

exit 0;
配置主机间的互信
主要用途是使得pgpool所在主机能登录postgresql所在主机,创建trigger文件。
参考命令:
ssh-keygen
ssh-copy-id postgres@IP
测试
连接
psql -h10.10.10.105 -p9999 -Ucloud

cloud=> show pool_nodes;
 node_id |   hostname   | port | status | lb_weight |  role
---------+--------------+------+--------+-----------+---------
 0       | 10.10.10.102 | 5432 | 2      | 0.500000  | primary
 1       | 10.10.10.104 | 5432 | 2      | 0.500000  | standby
(2 rows)
模拟主机宕机
关闭主机的服务。再次连接查看。
server closed the connection unexpectedly
	This probably means the server terminated abnormally
	before or while processing the request.
The connection to the server was lost. Attempting reset: Succeeded.
cloud=> show pool_nodes;
 node_id |   hostname   | port | status | lb_weight |  role
---------+--------------+------+--------+-----------+---------
 0       | 10.10.10.102 | 5432 | 3      | 0.500000  | standby
 1       | 10.10.10.104 | 5432 | 2      | 0.500000  | primary
(2 rows)
可以发现standby已经升级为主,原来的主机status变成了3。status对应的意义为:
Status 由数字 [0 - 3]来表示。
0 - 该状态仅仅用于初始化,PCP从不显示它。
1 - 节点已启动,还没有连接。
2 - 节点已启动,连接被缓冲。
3 - 节点已关闭。
修复及重新加入
原来的主机经过修复,重新提供服务后,可以重新作为新主机的standby加入pgpool。步骤如下:
- 更新ppgpool.conf, host0改为新主机,host1改为原来新standby。pgpool需要重启才能生效该选项的修改,所以这里的修改只是防止pgpool重启而导致指向错误的主机,实际修复不需要重启pgpool。
- 重新建立standby,即流复制。
- 使用pcp命令将修复的standby加入pgpool。
/usr/sbin/pcp_attach_node 10 localhost 9898 pgpool cloud 0

psql -h10.10.10.105 -p9999 -Ucloud

cloud=> show pool_nodes;
 node_id |   hostname   | port | status | lb_weight |  role
---------+--------------+------+--------+-----------+---------
 0       | 10.10.10.102 | 5432 | 2      | 0.500000  | standby
 1       | 10.10.10.104 | 5432 | 2      | 0.500000  | primary
(2 rows)
这样在不停机的情况下,完成了修复工作。

 浙公网安备 33010602011771号