
今天休假在家,测试并搭建了一个replica set shard MongoDB鉴权集群。replica set shard 鉴权集群中文资料比较少,本文是个人笔记,同时也希望对后来者有所帮助。本文仅是搭建步骤和Q&A,用于实际工作中的使用查阅,阅读者需要有分布式集群的理论基础。
关键字:Replica-Set Shard 副本 分片 鉴权 KeyFile auth
MongoDB根据部署的不同,有两种添加鉴权的方式,分别是单实例的鉴权方式和KeyFile的鉴权方式。两种方式的共同点都是,先在没有鉴权的情况下创建超级用户,然后再以鉴权的方式重启实例。下面分别介绍这两种方式。
1 单实例的鉴权部署
这种方式比较简单,步骤如下:
1.1 启动MongoDB
mongod --logpath ./test.log -dbpath ./data --port 8765 --fork
1.2 添加超级用户
use admin
db.createUser({user:"cswuyg",pwd:"abc123",roles:[{role:"userAdminAnyDatabase",db:"admin"}]})
1.3 以auth参数重启MongoDB
mongod --logpath ./test.log -dbpath ./data --port 8765 --auth --fork
1.4 mongodb shell 登陆
#方式1:
mongo --port 8765 -u 'cswuyg' -p 'abc123' --authenticationDatabase 'admin'
#或者
#方式2:
mongo --port 8765
#然后在mongo shell下执行:
use admin
db.auth('cswuyg', 'abc123')
1.5 创建普通用户
MongoDB的账号跟随DB,创建举例:
#以超级用户登陆之后,执行以下mongodb shell命令
use cswuyg
db.createUser({'user':'cswuyg', pwd:'cswuyg', roles:['readWrite', 'dbAdmin']})
2 分布式的鉴权集群部署
我要搭建的集群含有两个shard;shard由replica set组成,replica set含有3个实例;mongodb config含有3个实例。如图所示:
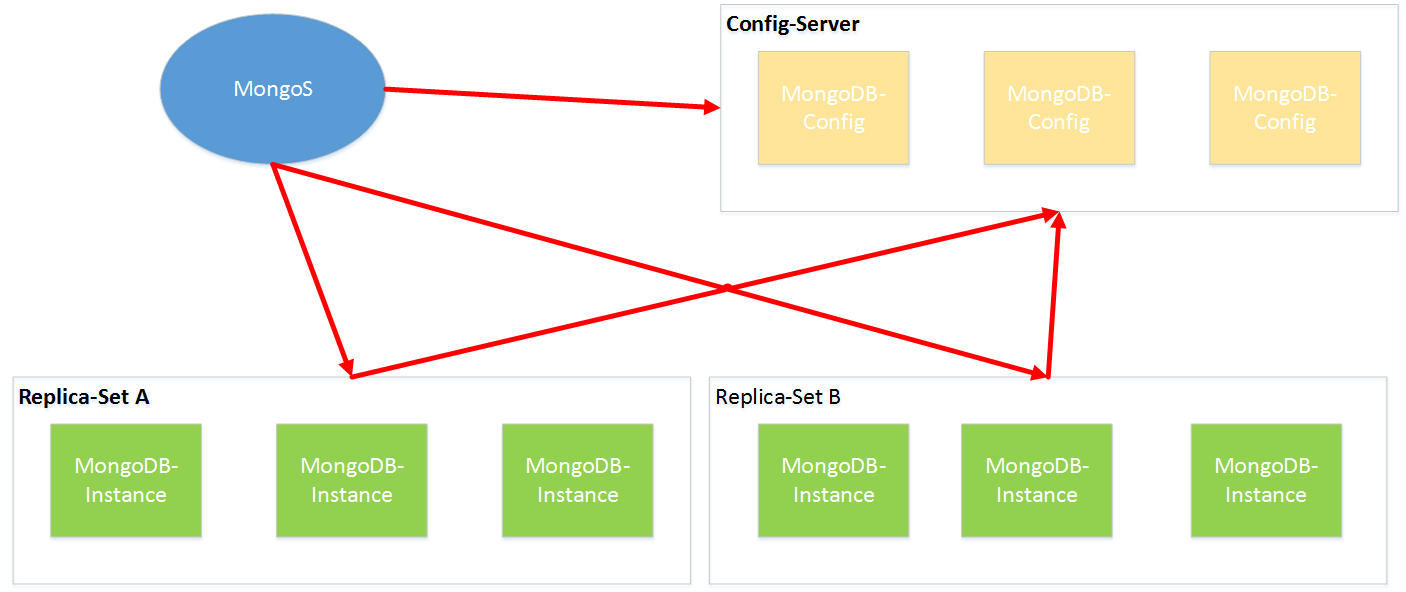
下面介绍搭建步骤,两个副本中的六个mongodb实例的搭建雷同,三个配置实例的搭建也雷同,下面仅介绍不重复的内容:
2.1 安装openssl,使用openssl生成keyfile
openssl rand -base64 755 > mongodb-keyfile
2.2 搭建MongoDB副本
首先以无权限方式启动replica set,然后为replica set设置账号密码。
replica set A 需要启动三个MongoDB实例,下面的mongodb 配置文件以其中一个实例为例。
无鉴权启动配置config(set_one_mongod_17018.conf):
storage:
    dbPath: "/home/ssd2/mongo_data/set_one_mongo17018"
systemLog:
    destination: file
    path: "/home/ssd2/mongo_data/set_one_mongo17018.log"
    logAppend: true
replication:
    oplogSizeMB: 2048
    replSetName: "set_one"
net:
    port: 17018
processManagement:
    fork: true
setParameter:
    cursorTimeoutMillis: 20000
启动命令(start.sh):
/home/ssd2/mongo-3.2.8-release/bin/mongod -f /home/ssd2/set_one_mongod_17018.conf
#/home/ssd2/mongo-3.2.8-release/bin/mongod -f /home/ssd2//set_one_mongod_17018_auth.conf
以同样的方式再启动另外两个实例,然后配置副本集群:进入某个实例的mongo shell执行初始化:
rs.initiate({"_id" : "set_one", "members" : [{_id : 1, host: "host1:17018"}, {"_id": 2, "host": "host2:17018"}, {"_id": 3, "host" : "host3:17018"}]})
接着,mongo shell下创建超级用户:
db.createUser({user: 'cswuyg', pwd: cswuyg@home', roles:[{role:'root', db:'admin'}]})
db.createUser({user: "wuyg", pwd: "wuyg@home", roles: [{role:"userAdminAnyDatabase", db:"admin"}]})
至此 replica set A(副本A)处理完成。
再以同样的方式创建replica set B(副本B)
2.3 搭建config server
我没有使用replica set的方式搭建配置服务,所以各个单实例要独立设置账号密码。
无鉴权的启动配置config(config_27019.conf):
storage:
    dbPath: "/home/work/mongo_data/config27019"
systemLog:
    destination: file
    path: "/home/work/mongo_data/mongo27019.log"
    logAppend: true
sharding:
    clusterRole: "configsvr"
net:
    port: 27019
setParameter:
    cursorTimeoutMillis: 20000
processManagement:
    fork: true
启动命令(start.sh):
#/home/work/mongo/bin/mongod -f /home/work/config_27019_auth.conf
/home/work/mongo/bin/mongod -f /home/work/config_27019.conf
启动之后,创建超级用户,在mongo shell下执行:
db.createUser({user: 'cswuyg', pwd: cswuyg@home', roles:[{role:'root', db:'admin'}]})
db.createUser({user: "wuyg", pwd: "wuyg@home", roles: [{role:"userAdminAnyDatabase", db:"admin"}]})
接着以同样的方式搭建另外两个config server。
2.4 搭建mongos
无鉴权启动配置config(mongos_27032.conf):
sharding:
    configDB: "host1:27019,host2:27019,host3:27019"
systemLog:
    destination: file
    path: "/home/work/mongo_data/mongos27032.log"
net:
    port: 27032
processManagement:
    fork: true
启动命令(start.sh):
#/home/work/mongo/bin/mongod -f /home/work/config_27019_auth.conf
/home/work/mongo/bin/mongod -f /home/work/config_27019.conf
在mongos下创建超级用户,mongo shell下执行:
db.createUser({user: 'cswuyg', pwd: cswuyg@home', roles:[{role:'root', db:'admin'}]})
db.createUser({user: "wuyg", pwd: "wuyg@home", roles: [{role:"userAdminAnyDatabase", db:"admin"}]})
如有多个APP,可以继续以同样的方式创建多个mongos服务。
2.5 所有mongod、mongos都以鉴权方式重启
注:必要的时候在mongod启动时,加上numactl --interleave=all 参数
下面列举下有鉴权的mongodb副本实例、mongodb配置服务实例、mongos实例的启动配置:
副本实例配置举例:
storage:
    dbPath: "/home/ssd2/mongo_data/set_one_mongo17018"
systemLog:
    destination: file
    path: "/home/ssd2/mongo_data/set_one_mongo17018.log"
    logAppend: true
replication:
    oplogSizeMB: 2048
    replSetName: "set_one"
net:
    port: 17018
security:
    keyFile: "/home/ssd2/mongodb-keyfile"
    authorization: "enabled"
processManagement:
    fork: true
setParameter:
    cursorTimeoutMillis: 20000
config server配置举例:
storage:
    dbPath: "/home/work/mongo_data/config27019"
systemLog:
    destination: file
    path: "/home/work/mongo_data/mongo27019.log"
    logAppend: true
sharding:
    clusterRole: "configsvr"
net:
    port: 27019
setParameter:
    cursorTimeoutMillis: 20000
security:
    keyFile: "/home/work/mongodb-keyfile"
    authorization: "enabled"
processManagement:
    fork: true
mongos 配置举例:
sharding:
    configDB: "host1:27019,host2:27019,host3:27019"
systemLog:
    destination: file
    path: "/home/work/mongo_data/mongos27032.log"
net:
    port: 27032
processManagement:
    fork: true
security:
    keyFile: "/home/work/mongodb-keyfile"
    authorization: "enabled"
启动shell,参见上面的start.sh.
2.6 检查鉴权集群效果
#使用超级权限登陆
mongo --port 27031 -u zhangsan -p zhangsan_password

#新建一个collection & 写入数据 & 设置分布式collection
use cswuyg
db.cswuyg.save({'a':'a'})
use admin
db.runCommand({"enablesharding":"cswuyg"})
db.runCommand({"shardcollection":"cswuyg.cswuyg","key":{"_id":1}})

#新建用户
#使用超级用户权限登陆,然后
use cswuyg
db.createUser({'user':'zhangsan', pwd:'zhangsan_password', roles:['readWrite', 'dbAdmin']})

#测试新用户的使用:
mongo --port 27031 -u zhangsan -p zhangsan_password

#测试读写
db.coll.find()
db.coll.save({'a':'1'})
3 Q&A
3.1 为什么副本实例、配置实例也要单独创建账号密码?
答:因为副本实例、配置实例设置的账号密码只是自己的账号密码,存储在本地,而从mongos设置的集群的账号密码存储在config server。如果直接从mongos上设置账号密码,那么副本实例、配置实例将会因为没有账号而无法做任何运维操作。
3.2 权限最大的超级用户是哪个?
答:root,创建方式:db.createUser({user: 'cswuyg', pwd: cswuyg@home', roles:[{role:'root', db:'admin'}]})
3.3 如果config server忘记单独添加权限,怎么办?
答:我们有三个config server,要逐个处理;首先停掉第一个config server,然后使用它的磁盘文件,以非鉴权方式启动,接着创建超级用户,最后再以鉴权方式重启;其它两个config server也以同样的方式逐一处理。另外,如果是 replica set 忘记单独添加权限,可以首先新加一个有单独权限的replica set,然后再把旧的replica set删除掉,在删除过程中可能需要移动DB的Primary所在:db.runCommand( { movePrimary : "monitor_check", to : "set_one" } );然后,再去掉旧的副本 db.runCommand( { removeShard : "old" } )。
4 参考资料
参考资料1,单实例鉴权:https://docs.mongodb.com/manual/tutorial/enable-authentication/
参考资料2,集群鉴权:https://docs.mongodb.com/v3.2/tutorial/enforce-keyfile-access-control-in-existing-replica-set/
搭建无鉴权的replica set shard集群参见:http://www.cnblogs.com/cswuyg/p/4356637.html

 浙公网安备 33010602011771号