
Tornado
Torando基础讲解
- pythonTorando的介绍
- Torando和Django的比较
- Torando入门程序
- Torando快速开始
- 基础工程
- Application的讲解
- 模板引擎
- 静态文件
- Model的讲解
- cookie的设置
- XSRF
- 同步阻塞
- 异步非阻塞
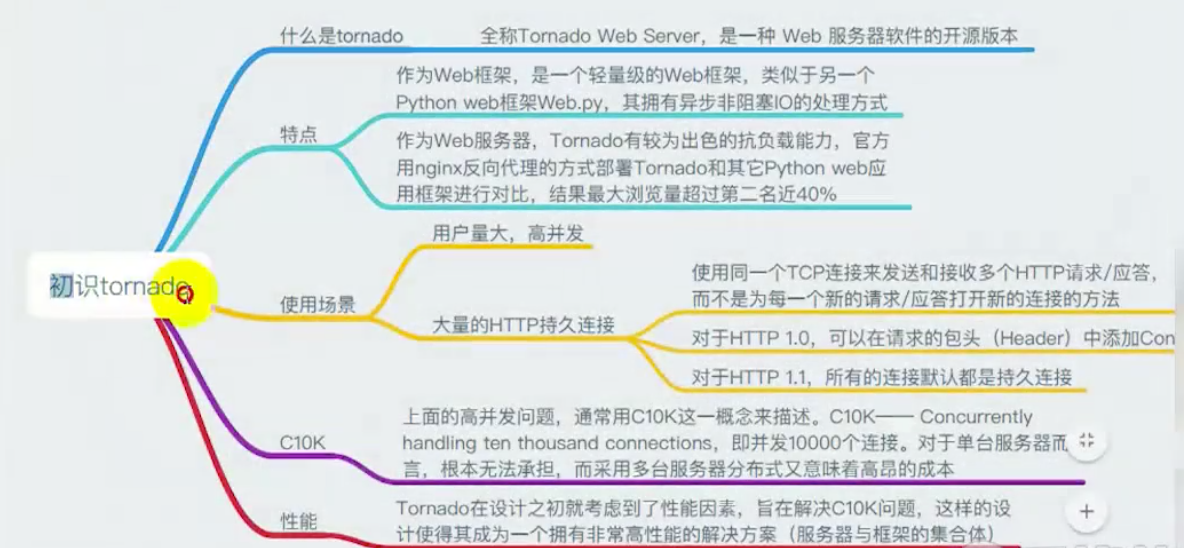
Tornado是一个Python web框架和异步网络库, 通过使用非阻塞网络I/O,Tornado可以支撑上万级的连接,处理长连接, WebSockets,和其他需要与每个用户保持长久连接的应用.
说明:
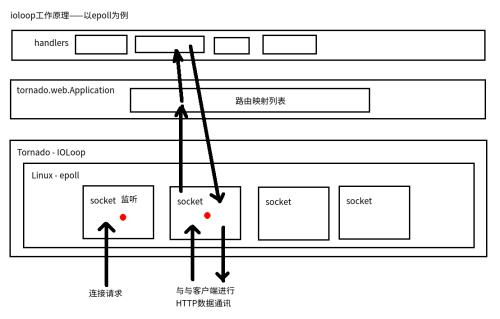
Tornado 应该运行在类 Unix 的平台上, 在线上部署的时候,为了最佳的性能和扩展性,仅推荐 Linux 和 BSD平台,因为需要充分利用linux的epoll和BSD的Kqueue,这个也是Tornado不依靠多进程/多线程达到高性能的原因
| 特性 | Django | Torando |
|---|---|---|
| 路由系统 | 有 | 有 |
| 视图函数 | 有 | 有 |
| 模板引擎 | 有 | 有 |
| ORM操作 | 有 | 无 |
| cookie | 有 | 有 |
| session | 有 | 无 |
| 缓存,信号,Form,Admin | 有 | 无 |
|
1
2
3
4
5
6
7
8
9
10
11
12
13
14
15
16
17
18
19
20
21
22
23
24
25
26
27
28
29
30
31
32
33
34
35
36
37
38
39
40
41
42
43
44
45
46
47
48
49
50
51
52
53
54
55
56
57
58
59
|
'''
tornado 的基础 web 框架模块
'''
import tornado.web
import tornado.options
'''
tornado 的核心 IO 循环模块,封装了 linux 的 epoll 和 BSD 的 Kqueue, 是 Tornado 高效的基础
'''
import tornado.ioloop
'''
类比 Django 中的 CBV 模式
一个业务处理的逻辑类
'''
class IndexHandler(tornado.web.RequestHandler):
'''
处理 get 请求的, 不能处理 post 请求
'''
def get(self):
print('hello world')
'''
将数据返回给 web 的页面,类似于 HttpResponse
'''
self.write('this is web page!')
def post(self, *args, **kwargs):
print(*args, **kwargs)
class StoryHandler(tornado.web.RequestHandler):
def get(self, id, *args, **kwargs):
print(id, args, kwargs)
self.write(id)
if __name__ == '__main__':
'''
实例化一个对象
Application 是 tornado.web 的一个核心类
里面保存了路由映射表,有一个 listen 方法, 创建了一个 socket 服务器,并绑定了一个端口 8001
'''
app = tornado.web.Application([
(r'/', IndexHandler),
(r'/story/([a-zA-Z0-9]+)/', StoryHandler)
])
## 绑定监听端口, 此时我们的服务器并没有开始监听
app.listen(8001)
'''
IOLoop.current:返回当前线程的 IOLoop 实例
IOLoop.start: 启动 IOLoop 实例的 I/O 循环,同时开启了监听
'''
tornado.ioloop.IOLoop.current().start()
|
执行过程:
- 第一步:执行脚本,监听
8888端口 - 第二步:浏览器客户端访问
/ --> http://127.0.0.1:8888/ - 第三步:服务器接受请求,并交由对应的类处理该请求
- 第四步:类接受到请求之后,根据请求方式(
post/get/delete...)的不同调用并执行相应的方法 - 第五步:方法返回值的字符串内容发送浏览器
|
1
2
3
4
5
6
7
8
|
import tornado.httpserver
# 实例化一个httpserver的实例
httpServer = tornado.httpserver.HTTPServer(app)
# 绑定端口
httpServer.listen(8000)
|
但上述 tornado 默认启动的是一个进程
如何启动多个进程?
|
1
2
3
4
5
6
7
8
9
10
|
import tornado.httpserver
# 实例化一个httpserver的实例
httpServer = tornado.httpserver.HTTPServer(app)
# 绑定端口
<!-- httpServer.listen(8000) -->
httpServer.bind(8000) # 将服务器绑定到指定到端口
httpServer.start(5) # num默认开启一个进程, 如果值大于0,创建对应个数的进程
|
但是上面存在三个问题:
- 所有的子进程都是由一个命令启动的,无法做到不停止服务的情况下修改代码。如果我想修改某一个进程中的代码,就必须得停止所有的
- 所有的进程都共享一个端口号,想要分别监控非常困难
由于上面的问题, 我们不建议使用上面的方式开启多个进程, 因此我们以后建议使用 app.listen(8000)
tornado为我们提供了一个便捷的 tornado.options 模块
基础方法与属性:
tornado.options.define() : 用来定义变量的方法
|
1
2
3
4
5
6
7
8
9
|
参数:
name : 变量名, 必须保证其唯一性, 不然会报错
default: 默认值
type : 设置变量的类型, 传入值的时候, 会根据类型进行转换, 转换失败回报错, 可以是 str, int , float, 如果没有设置,则会根据default的值进行转换, 但如果default没有设置, 那么则不会进行转换
help : 提示信息
### 使用示例:
tornado.options.define('port', default = 8000)
tornado.options.define('list', default = [], type=str, mutiple=True)
|
tornado.options.options : 全局的 options 对象, 所有定义的变量, 都可以作为该对象的属性
|
1
|
tornado.options.options.port
|
tornado.options.parse_command_line() : 转换命令行参数, 并将转换的参数值保存在 options对象中
|
1
|
python server.py --port=9000 --list=good,stephen,lxx
|
tornado.options.parse_config_file(path) : 从配置文件导入参数
|
1
2
|
加载在同一级的config文件
tornado.options.parse_config_file("config")
|
缺点:
- 上述的配置文件方式要求我们必须使用 Python 的语法格式去写
- 调用参数的时候,不支持字典类型
因此使用下面的方式:
创建一个 config.py 的文件
|
1
2
3
4
5
6
7
8
9
|
options = {
"port" : 8080,
"names" : ["stephen", 'lxxx', 'xxx']
}
import config
print("list:", config.options.port)
|
由一个简单的Demo来说,MVC的结构框架
从新整理一个基础工程项目代码:
|
1
2
3
4
5
6
7
8
9
|
├── application.py : 管理路由映射关系文件
├── config.py : 所有的配置文件
├── models : 数据库文件夹
├── server.py : 启动服务文件
├── static : 项目静态目录文件
├── template : 项目模板文件
└── views : 项目的视图处理文件夹
├── __init__.py
└── index.py
|
各个文件的代码:
application.py 文件:
|
1
2
3
4
5
6
7
8
9
10
11
12
13
|
#author:shangzekai
import tornado.web
from views import index
import config
class Application(tornado.web.Application):
def __init__(self):
path = [
(r'/', index.IndexHandler),
]
super(Application, self).__init__(path, **config.settings)
|
server.py 文件:
|
1
2
3
4
5
6
7
8
9
10
11
12
13
14
15
16
|
import config
import tornado.ioloop
from application import Application
if __name__ == '__main__':
app = Application()
app.listen(config.options['port'])
'''
IOLoop.current:返回当前线程的 IOLoop 实例
IOLoop.start: 启动 IOLoop 实例的 I/O 循环,同时开启了监听
'''
tornado.ioloop.IOLoop.current().start()
|
config.py 文件:
|
1
2
3
4
5
6
7
8
9
10
11
12
13
14
15
16
17
18
19
20
21
22
|
import os
BASE_DIR = os.path.dirname(__file__)
options = {
'port':8010
}
mysql = {
'dbhost':'localhost',
'dbuser':'root',
'dbpwd':'123qwe',
'dbname':'test',
'dbcharset':'utf8'
}
settings = {
'debug' : True,
'static_path' : os.path.join(BASE_DIR, 'static'),
'template_path' : os.path.join(BASE_DIR, 'template'),
'xsrf_cookies' : True,
'login_url' : 'login'
}
|
|
1
2
|
'static_path' : os.path.join(BASE_DIR, 'static'),
'template_path' : os.path.join(BASE_DIR, 'template'),
|
debug: 设置tornado是否工作在调试模式下,默认为False即工作在生产模式下
如果debug设置为 True , 则会可有如下效果
- 自动重启
|
1
2
3
|
1. tornado应用会监控源代码文件,当有代码改动的时候便会重启服务器, 减少手动重启服务器的次数
2. 如果保存后代码有错误会导致重启失败,修改错误后需要手动重启
3. 也可以通过 autoreload = True 来单独设置自动重启
|
- 取消缓存编译的模板, 开发阶段需要关闭缓存
- 取消缓存静态文件
- 提供错误追踪信息
路由系统其实就是
url和 类 的对应关系,这里不同于其他框架,其他很多框架均是url对应 函数,Tornado中每个url对应的是一个类。
|
1
2
3
4
5
6
7
8
9
10
11
12
13
14
15
16
17
18
19
20
21
22
23
24
25
|
import tornado.ioloop
import tornado.web
class MainHandler(tornado.web.RequestHandler):
def initialize(self, name, age):
self.name = name
self.age = age
def get(self):
self.write("Hello, world")
class StoryHandler(tornado.web.RequestHandler):
def get(self, story_id):
self.write("You requested the story " + story_id)
application = tornado.web.Application([
(r"/index", MainHandler),
(r"/story/([0-9]+)", StoryHandler, {"name":'zhangsan', 'age':12}),
])
if __name__ == "__main__":
application.listen(80)
tornado.ioloop.IOLoop.instance().start()
|
反向路由解析
|
1
|
tornado.web.url(r'/xxx', index.xxHandler, name='xxx')
|
requestHandler
- 获取get请求的参数值:
|
1
2
|
self.get_query_argument(name, default, strip=True) : 返回值
self.get_query_arguments(name, strip=True) : 返回一个列表
|
- 获取post请求的参数值:
|
1
2
|
self.get_body_argument(name, default, strip=True)
self.get_body_arguments(name, strip=True)
|
- 既获取get的又获取post的参数:
|
1
2
|
self.get_argument(name, default, strip=True)
self.get_arguments(name, strip=True)
|
request对象
存储了请求相关的信息
- method : HTTP 请求的方式
- host : 请求的主机名
- query : 请求的参数部分
- version: 请求的Http版本
- headers: 请求的头信息, 字典类型
- remote_ip : 客户端IP
- files : 用户上传的文件
tornado.httputil.HTTPFile 对象
接收到的文件对象
- filename : 文件的实际名字
- body : 文件的数据实体
- content_type : 文件的类型
|
1
2
3
4
5
6
7
8
9
10
|
def post():
filesDict = self.request.files
for inputname in filesDict:
filesArr = filesDict[inputname]
for fileObj in filesArr:
filePath = os.path.join(config.BASE_DIR, 'upfile/'+fileObj.filename)
with open(filepath, 'wb') as fp:
fp.write(fileObj.body)
|
|
1
2
3
4
5
6
7
8
9
10
11
12
13
14
15
16
17
18
19
20
21
22
23
24
25
26
|
self.write() : 刷新缓存区
例子:
info = {
"name" :'zhansgan',
"age" : 16
}
直接以json的格式返回
self.write(info)
使用json.dumps(info)变成字符串
self.write(json.dumps(info))
注意:
自己手动序列化的,content-type的属性是text/html的, 而自动序列化的, content-type的属性是application/json的
self.finish() : 也是刷新缓存区, 但是会关闭当次请求通道, 在finish下面就不能再write了, 没有意义了
self.set_header(name, value): 手动设置一个名为name, 值为value的响应头字段
self.set_status(status_code, reason): 设置响应状态吗
self.redirect(url) : 重定向url
|
Tornao中的模板语言和django中类似,模板引擎将模板文件载入内存,然后将数据嵌入其中,最终获取到一个完整的字符串,再将字符串返回给请求者
Tornado 的模板支持“控制语句”和“表达语句”,控制语句是使用 {%` 和 `%} 包起来的 例如 {% if len(items) > 2 %}。表达语句是使用 {{` 和 `}} 包起来的,例如 {{ items[0] }}。
控制语句和对应的 Python 语句的格式基本完全相同。我们支持 if、for、while 和 try,这些语句逻辑结束的位置需要用 {% end %} 做标记。还通过 extends 和 block 语句实现了模板继承。这些在 template 模块 的代码文档中有着详细的描述。
注:在使用模板前需要在setting中设置模板路径:"template_path" : "tpl"
|
1
2
3
4
5
6
7
8
9
10
11
12
13
14
15
16
17
18
|
<!DOCTYPE html>
<html>
<head>
<meta http-equiv="Content-Type" content="text/html; charset=UTF-8"/>
<title>XXX</title>
<link href="{{static_url("css/common.css")}}" rel="stylesheet" />
</head>
<body>
<div>
<ul>
{% for item in list_info %}
<li>{{item}}</li>
{% end %}
</ul>
</div>
<script src="{{static_url("js/jquery-1.8.2.min.js")}}"></script>
</body>
</html>
|
在模板中默认提供了一些函数、字段、类以供模板使用
|
1
2
3
4
5
6
7
8
9
10
11
|
escape: tornado.escape.xhtml_escape 的別名
xhtml_escape: tornado.escape.xhtml_escape 的別名
url_escape: tornado.escape.url_escape 的別名
json_encode: tornado.escape.json_encode 的別名
squeeze: tornado.escape.squeeze 的別名
linkify: tornado.escape.linkify 的別名
datetime: Python 的 datetime 模组
request: handler.request 的別名
current_user: handler.current_user 的別名
static_url: for handler.static_url 的別名
xsrf_form_html: handler.xsrf_form_html 的別名
|
|
1
2
3
4
5
6
7
8
9
10
11
12
13
14
15
16
17
18
19
20
21
|
<!DOCTYPE html>
<html>
<head>
<meta http-equiv="Content-Type" content="text/html; charset=UTF-8"/>
<title>XXX</title>
<link href="{{static_url("css/common.css")}}" rel="stylesheet" />
{% block CSS %}{% end %}
</head>
<body>
<div class="pg-header">
</div>
{% block RenderBody %}{% end %}
<script src="{{static_url("js/jquery-1.8.2.min.js")}}"></script>
{% block JavaScript %}{% end %}
</body>
</html>
|
index.html
|
1
2
3
4
5
6
7
8
9
10
11
12
13
14
15
16
17
18
19
|
{% extends 'layout.html'%}
{% block CSS %}
<link href="{{static_url("css/index.css")}}" rel="stylesheet" />
{% end %}
{% block RenderBody %}
<h1>Index</h1>
<ul>
{% for item in li %}
<li>{{item}}</li>
{% end %}
</ul>
{% end %}
{% block JavaScript %}
{% end %}
|
tornado 是默认开启转义功能的
如果想使用原生的代码展示,使用如下的代码:
|
1
|
{{ raw xxx }}
|
在配置中添加:
|
1
|
autoescape : None ## 关闭所有的转义功能
|
escape()函数 : 在关闭自动转义之后,对特定的变量进行转义
|
1
2
3
4
5
6
|
<div>
<ul>
<li>1024</li>
<li>42区</li>
</ul>
</div>
|
index.html
|
1
2
3
4
5
6
7
8
9
10
11
12
13
14
15
16
17
|
<!DOCTYPE html>
<html>
<head>
<meta http-equiv="Content-Type" content="text/html; charset=UTF-8"/>
<title>XXX</title>
<link href="{{static_url("css/common.css")}}" rel="stylesheet" />
</head>
<body>
<div class="pg-header">
{% include 'header.html' %}
</div>
<script src="{{static_url("js/jquery-1.8.2.min.js")}}"></script>
</body>
</html>
|
定义
|
1
2
3
4
|
# uimethods.py
def tab(self):
return 'UIMethod'
|
|
1
2
3
4
5
6
|
from tornado.web import UIModule
from tornado import escape
class custom(UIModule):
def render(self, *args, **kwargs):
return escape.xhtml_escape('<h1>helloworld</h1>')
|
注册
|
1
2
3
4
5
6
7
8
9
10
|
import uimodules as md
import uimethods as mt
settings = {
'template_path': 'template',
'static_path': 'static',
'static_url_prefix': '/static/',
'ui_methods': mt,
'ui_modules': md,
}
|
使用
|
1
2
3
4
5
6
7
8
9
10
11
12
|
<!DOCTYPE html>
<html>
<head lang="en">
<meta charset="UTF-8">
<title></title>
<link href="{{static_url("commons.css")}}" rel="stylesheet" />
</head>
<body>
<h1>hello</h1>
{% module custom(123) %}
{{ tab() }}
</body>
|
对于静态文件,可以配置静态文件的目录和前段使用时的前缀,并且Tornaodo还支持静态文件缓存。
app.py
|
1
2
3
4
5
6
7
8
9
10
11
12
13
14
15
16
17
18
19
20
21
22
|
import tornado.ioloop
import tornado.web
class MainHandler(tornado.web.RequestHandler):
def get(self):
self.render('home/index.html')
settings = {
'template_path': 'template',
'static_path': 'static',
'static_url_prefix': '/static/',
}
application = tornado.web.Application([
(r"/index", MainHandler),
], **settings)
if __name__ == "__main__":
application.listen(80)
tornado.ioloop.IOLoop.instance().start()
|
index.html
|
1
2
3
4
5
6
7
8
9
10
11
|
<!DOCTYPE html>
<html>
<head lang="en">
<meta charset="UTF-8">
<title></title>
<link href="{{static_url("commons.css")}}" rel="stylesheet" />
</head>
<body>
<h1>hello</h1>
</body>
</html>
|
静态文件缓存实现
|
1
2
3
4
5
6
7
8
9
10
11
12
13
14
15
16
|
def get_content_version(cls, abspath):
"""Returns a version string for the resource at the given path.
This class method may be overridden by subclasses. The
default implementation is a hash of the file's contents.
.. versionadded:: 3.1
"""
data = cls.get_content(abspath)
hasher = hashlib.md5()
if isinstance(data, bytes):
hasher.update(data)
else:
for chunk in data:
hasher.update(chunk)
return hasher.hexdigest()
|
在
Tornado3.0版本以前提供tornado.database模块用来操作MySQL数据库,而从3.0版本开始,此模块就被独立出来,作为torndb包单独提供。torndb只是对MySQLdb的简单封装,不支持Python 3
user.py
|
1
2
3
4
5
6
7
8
9
10
11
12
13
14
15
16
17
18
19
20
21
22
|
import pymysql
class UserModel():
def __init__(self):
try:
self.db = pymysql.Connection(host='127.0.0.1', database='test', user='root', password='123qwe', charset='utf8',cursorclass=pymysql.cursors.DictCursor)
except Exception as e:
return print(e)
def getInfo(self):
try:
cursor = self.db.cursor()
temp = "select * from admin"
effect_row = cursor.execute(temp)
result = cursor.fetchall()
self.db.commit()
cursor.close()
self.db.close()
return result
except Exception as e:
return print(e)
|
搭建一个登陆的环境
app.py
|
1
2
3
4
5
6
7
8
9
10
11
12
13
14
15
16
17
18
19
20
21
22
23
24
25
26
27
28
29
30
31
32
33
34
35
36
37
38
39
40
41
42
43
44
|
#!/usr/bin/env python3
# -*- coding: utf-8 -*-
import tornado.ioloop
import tornado.web
import pymysql
class LoginHandler(tornado.web.RequestHandler):
def get(self):
self.render('login.html')
def post(self, *args, **kwargs):
username = self.get_argument('username',None)
pwd = self.get_argument('pwd', None)
# 创建数据库连接
conn = pymysql.connect(host='127.0.0.1', port=3306, user='root', passwd='123456', db='shop')
cursor = conn.cursor()
# %s 要加上'' 否则会出现KeyboardInterrupt的错误
temp = "select name from userinfo where name='%s' and password='%s'" % (username, pwd)
effect_row = cursor.execute(temp)
result = cursor.fetchone()
conn.commit()
cursor.close()
conn.close()
if result:
self.write('登录成功!')
else:
self.write('登录失败!')
settings = {
'template_path':'template',
}
application = tornado.web.Application([
(r"/login", LoginHandler),
],**settings)
if __name__ == "__main__":
application.listen(8000)
tornado.ioloop.IOLoop.instance().start()
|
在template文件夹下,放入login.html文件:
|
1
2
3
4
5
6
7
8
9
10
11
12
13
14
|
<!DOCTYPE html>
<html lang="en">
<head>
<meta charset="UTF-8">
<title>Title</title>
</head>
<body>
<form method="post" action="/login">
<input type="text" name="username" placeholder="用户名"/>
<input type="text" name="pwd" placeholder="密码"/>
<input type="submit" value="提交" />
</form>
</body>
</html>
|
至此一个简单的登陆系统就说完了,按照正常的方式都能登陆成功,接下来我们看一下,非法用户的登陆
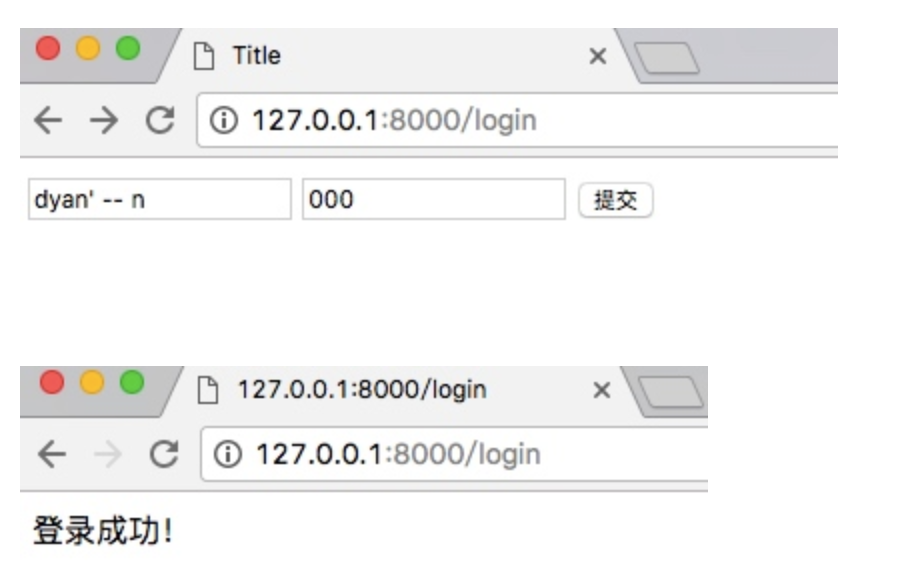
看一下服务端执行的SQL语句,就不难理解了,密码部分被注释掉了:
|
1
2
3
|
select name from userinfo where name='dyan' -- n' and password='000'
select name from userinfo where name='badguy' or 1=1 -- y' and password='000'
|
这种情况就是由于字符串拼接查询,造成注入,因此我们需要使用
pymysql提供的参数化查询
|
1
|
effect_row = cursor.execute("select name from userinfo where name=%s and password=%s", (name,password))
|
这样改完之后,我们再看,会发现报错,但是不会登陆成功了,看看内部执行的语句,主要是对’符号做了转义防止注入
|
1
|
select name from userinfo where name=''dyan\' -- n'' and password=''123''
|
- 执行sql
|
1
2
3
4
5
6
7
8
9
10
11
12
13
14
15
16
17
18
19
20
21
|
import pymysql
# 创建连接
conn = pymysql.connect(host='127.0.0.1', port=3306, user='blog', passwd='123456', db='blog', charset='utf8')
# 创建游标, 查询数据默认为元组类型
cursor = conn.cursor()
# 执行SQL,并返回收影响行数
row1 = cursor.execute("update users set password = '123'")
print(row1)
# 执行SQL,并返回受影响行数
row2 = cursor.execute("update users set password = '456' where id > %s", (1,))
print(row2)
# 执行SQL,并返回受影响行数(使用pymysql的参数化语句防止SQL注入)
row3 = cursor.executemany("insert into users(username, password, email)values(%s, %s, %s)", [("ceshi3", '333', 'ceshi3@11.com'), ("ceshi4", '444', 'ceshi4@qq.com')])
print(row3)
# 提交,不然无法保存新建或者修改的数据
conn.commit()
|
- 获取查询数据
|
1
2
3
4
5
6
7
8
9
10
11
12
13
14
15
|
import pymysql
# 创建连接
conn = pymysql.connect(host='127.0.0.1', port=3306, user='blog', passwd='123456', db='blog', charset='utf8')
# 创建游标, 查询数据默认为元组类型
cursor = conn.cursor()
cursor.execute("select * from users")
# 获取第一行数据
row_1 = cursor.fetchone()
print(row_1)
# 获取前n行数据
row_n = cursor.fetchmany(3)
print(row_n)
|
- 获取新创建数据自增ID
|
1
2
3
4
5
6
7
8
9
10
11
12
13
14
15
16
17
18
|
import pymysql
# 创建连接
conn = pymysql.connect(host='127.0.0.1', port=3306, user='blog', passwd='123456', db='blog', charset='utf8')
# 创建游标, 查询数据默认为元组类型
cursor = conn.cursor()
cursor.executemany("insert into users(username, password, email)values(%s, %s, %s)", [("ceshi3", '333', 'ceshi3@11.com'), ("ceshi4", '444', 'ceshi4@qq.com')])
new_id = cursor.lastrowid
print(new_id)
# 提交,不然无法保存新建或者修改的数据
conn.commit()
# 关闭游标
cursor.close()
conn.close
|
- fetch数据类型
关于默认获取的数据是元组类型,如果想要或者字典类型的数据,即
|
1
2
3
4
5
6
7
8
9
10
11
12
13
14
15
16
17
18
19
20
21
22
|
import pymysql
# 创建连接
conn = pymysql.connect(host='127.0.0.1', port=3306, user='blog', passwd='123456', db='blog', charset='utf8')
# 游标设置为字典类型
cursor = conn.cursor(cursor=pymysql.cursors.DictCursor)
# 左连接查询
r = cursor.execute("select * from users as u left join articles as a on u.id = a.user_id where a.user_id = 2")
result = cursor.fetchall()
print(result)
# 查询一个表的所有字段名
c = cursor.execute("SHOW FULL COLUMNS FROM users FROM blog")
cc = cursor.fetchall()
# 提交,不然无法保存新建或者修改的数据
conn.commit()
# 关闭游标
cursor.close()
# 关闭连接
conn.close()
|
执行结果
|
1
|
[{'user_id': 2, 'id': 2, 'password': '456', 'email': 'xinlei2017@test.com', 'a.id': 2, 'content': '成名之路', 'title': '星光大道', 'username': 'tangtang'}]
|
Tornado中可以对cookie进行操作,并且还可以对cookie进行签名以放置伪造
- 基本操作
|
1
2
3
4
5
6
7
|
class MainHandler(tornado.web.RequestHandler):
def get(self):
if not self.get_cookie("mycookie"):
self.set_cookie("mycookie", "myvalue")
self.write("Your cookie was not set yet!")
else:
self.write("Your cookie was set!")
|
- 清除cookie
|
1
2
3
4
5
6
|
self.clear_cookie(name, path='/', domain=None)
作用: 删除名为name的cookie的值
注意: 执行删除操作之后, 并不是立即清除浏览器端的cookie值, 而是给cookie的值设置为空,并将其有效期改成失效,真正删除cookie是浏览器自己决定的
self.clear_all_cookie(path='/',domain=None)
作用:删除掉path为'/'的所有的cookie的值
|
- 加密cookie(签名)
Cookie很容易被恶意的客户端伪造。加入你想在cookie中保存当前登陆用户的id之类的信息,你需要对cookie作签名以防止伪造。Tornado通过set_secure_cookie和get_secure_cookie方法直接支持了这种功能。 要使用这些方法,你需要在创建应用时提供一个密钥,名字为cookie_secret。 你可以把它作为一个关键词参数传入应用的设置中:
生成秘钥的方法
|
1
2
3
|
import base64
import uuid
base64.b64encode(uuid.uuid4().bytes + uuid.uuid4().bytes)
|
|
1
2
3
4
5
6
7
8
9
10
11
12
13
|
set_secure_cookie: 设置一个带有签名和时间戳的加密cookie值
class MainHandler(tornado.web.RequestHandler):
def get(self):
if not self.get_secure_cookie("mycookie"):
self.set_secure_cookie("mycookie", "myvalue")
self.write("Your cookie was not set yet!")
else:
self.write("Your cookie was set!")
application = tornado.web.Application([
(r"/", MainHandler),
], cookie_secret="61oETzKXQAGaYdkL5gEmGeJJFuYh7EQnp2XdTP1o/Vo=")
|
使用 cookie 记录页面的访问次数
|
1
2
3
4
5
6
7
8
9
10
|
class NumHandler(RequestHandler):
def get(self, *args, **kwargs):
count = self.get_cookie('num', None)
if count:
count = int(count)
count = count + 1
else:
count = 1
self.set_cookie('num', str(count))
self.render('cookienum.html', num = count)
|
跨站请求伪造攻击
配置
|
1
2
3
4
5
6
7
|
settings = {
"xsrf_cookies": True,
}
application = tornado.web.Application([
(r"/", MainHandler),
(r"/login", LoginHandler),
], **settings)
|
使用
|
1
2
3
4
5
6
|
<form action="/new_message" method="post">
{{ xsrf_form_html() }}
{% module xsrf_form_html() %}
<input type="text" name="message"/>
<input type="submit" value="Post"/>
</form>
|
|
1
2
3
4
5
6
7
8
9
10
11
12
13
14
15
16
17
18
19
20
21
22
23
24
25
26
27
28
29
30
31
|
import tornado.httpserver
import tornado.ioloop
import tornado.web
import tornado.httpclient
class MainHandler(tornado.web.RequestHandler):
def get(self):
print('开始')
http_client = tornado.httpclient.HTTPClient()
response = http_client.fetch("http://www.google.com")
self.write('done')
def make_app():
return tornado.web.Application([
(r"/main", MainHandler)
])
if __name__ == "__main__":
tornado.options.parse_command_line()
app = tornado.web.Application(handlers=[
(r"/main", MainHandler)
])
app = make_app()
http_server = tornado.httpserver.HTTPServer(app)
http_server.listen(8002)
tornado.ioloop.IOLoop.instance().start()
|
|
1
2
3
4
5
6
7
8
9
10
11
12
13
14
15
16
17
18
19
20
21
22
23
24
25
26
27
|
import tornado.httpserver
import tornado.ioloop
import tornado.web
import tornado.httpclient
import time
from tornado import gen
class MainHandler(tornado.web.RequestHandler):
def get(self):
print('开始')
http_client = tornado.httpclient.AsyncHTTPClient()
yield http_client.fetch("http://www.google.com",
callback=self.on_fetch)
def on_fetch(self, response):
self.write('done')
self.finish()
if __name__ == "__main__":
app = tornado.web.Application(handlers=[
(r"/", MainHandler)
])
http_server = tornado.httpserver.HTTPServer(app)
http_server.listen(8001)
tornado.ioloop.IOLoop.instance().start()
|
|
1
2
3
4
5
6
7
8
9
10
11
12
13
14
15
16
17
18
19
20
21
22
23
24
25
26
27
28
29
30
31
32
33
34
35
36
37
|
import tornado.httpserver
import tornado.ioloop
import tornado.web
import tornado.httpclient
import tornado.gen
from tornado.concurrent import Future
fu = None
class SleepHandler(tornado.web.RequestHandler):
def get(self):
global fu
fu = Future()
fu.add_done_callback(self.on_fetch)
yield fu
def on_fetch(self, response):
self.write('终于等到你')
self.finish()
class TestHandler(tornado.web.RequestHandler):
def get(self):
fu.set_result('666')
if __name__ == "__main__":
app = tornado.web.Application(handlers=[
(r"/sleep", SleepHandler),
(r"/test", TestHandler)
])
http_server = tornado.httpserver.HTTPServer(app)
http_server.listen(8003)
tornado.ioloop.IOLoop.instance().start()
|

 浙公网安备 33010602011771号