爬取博客园所有文章详情并生成词云
一、网站分析
1、 打开浏览器
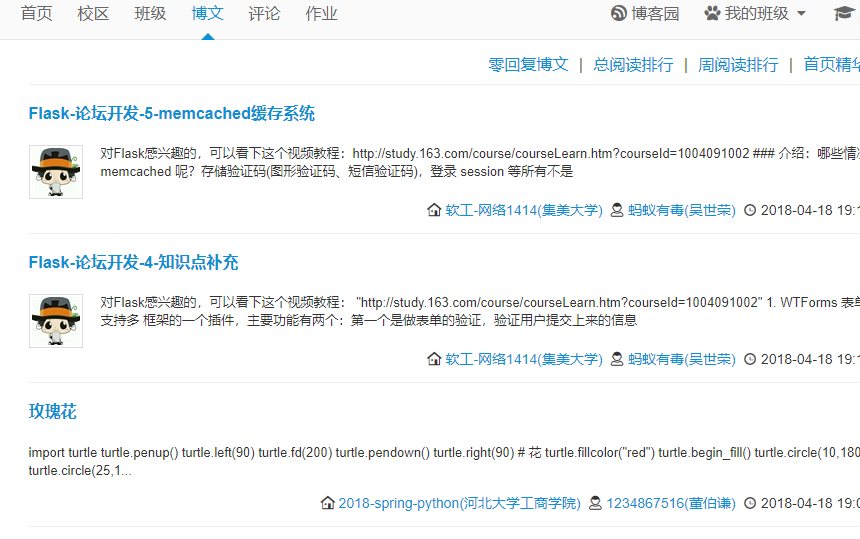
在地址栏输入https://edu.cnblogs.com/posts,浏览器将会返回一页博文列表给我们,如下图:
我们按下F12快捷键,将会打开网页调试工具,点击network,可以看到我们对https://edu.cnblogs.com/posts的请求,以及
https://edu.cnblogs.com/posts的响应信息
简单介绍一下:
Request URl:表示请求的URL
Request Method:表示请求的方法,此处为GET。除此之外,HTTP的请求方法还有OPTION、HEAD、POST、 DELETE、PUT等,而最常用的就是GET和POST方法
POST:向指定资源提交数据,请求服务器进行处理(例如提交表单或者上传文件)。数据被包含在请求本文中。这个请求可能会创建新的资源或修改现有资源,或二者皆有。
GET:向指定的资源发出“显示”请求。
Status Code:显示HTTP请求和状态码,表示HTTP请求的状态,此处为200,表示请求已被服务器接收、理解和处理;
状态代码的第一个数字代表当前响应的类型,HTTP协议中有以下几种响应类型:
1xx消息——请求已被服务器接收,继续处理
2xx成功——请求已成功被服务器接收、理解、并接受
3xx重定向——需要后续操作才能完成这一请求
4xx请求错误——请求含有词法错误或者无法被执行
5xx服务器错误——服务器在处理某个正确请求时发生错误
HTTP请求头
Accept:表示请求的资源类型;
Cookie:为了辨别用户身份、进行 session 跟踪而储存在用户本地终端上的数据;
User-Agent:表示浏览器标识;
Accept-Language:表示浏览器所支持的语言类型;
Accept-Charset:告诉 Web 服务器,浏览器可以接受哪些字符编码;
Accept:表示浏览器支持的 MIME 类型;
Accept-Encoding:表示浏览器有能力解码的编码类型;
Connection:表示客户端与服务连接类型;
2、分析网页结构
如图:
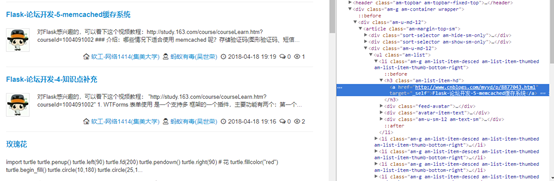
博客园返回一个文章列表给我们,而我们想获取文章详情,通过网页调试工具发现,文章列表在li标签里,而文章标题超链接在h3标签里的a标签,所以我们要做的就是先将所有文章标题超链接里的连接路径保存起来,然后再取获取文章详情。
点击文章超链接进去并分析文章详情的网页结构,如图
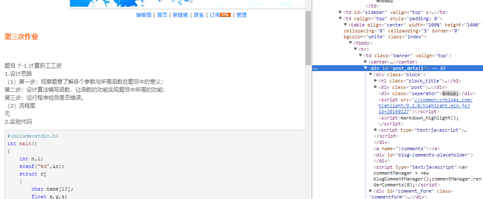
通过上图,我们发现,我们需要的文章正文再id为post_detail的div下,所以接下来我们要做的便是爬取id为post_detail里边的正文。
到这里基本清楚我们需要获取哪些数据了,接下来就进行编码了。
二、开发环境
编程语言:Python3.6
代码运行工具:pycham
数据库:mongodb
依赖库:Requests,BeautifulSoup,pymongo,re等
三、第三方库的安装
在Python有两个著名的包管理工具easy_install.py和pip。在Python2.7的安装包中,easy_install.py是默认安装的,而pip需要我们手动安装。在python3.x中默认使用的是pip,我们使用的是python3.6,所以不用手动安装pip。
在windows上安装python依赖库非常简单,语法如下:
pip install PackageName
PackageName指的是你安装的依赖包名称。
安装BeautifulSoup依赖包可以这样安装,其他类似
pip install BeautifulSoup
也可以在pycharm上安装,如图

数据库使用的是mongodb,安装的话自行安装啦,这里就不说啦,要想是python连接mongodb数据库,就需要安装pymongo,安装方式和上面一样
四、代码编写之基础版
# coding: utf-8
import urllib.request
#import re
from bs4 import BeautifulSoup
import time
#import pymongo
from util.delhtml import filter_tags

class CnBlog(object):
    def __init__(self):
        user_agent = 'Mozilla/5.0 (Windows NT 6.1; WOW64) AppleWebKit/537.36 (KHTML, like Gecko) Chrome/50.0.2661.102 Safari/537.36'
        self.headers = {'Cache-Control': 'max-age=0',
                        'Connection': 'keep-alive',
                        'Accept': 'text/html,application/xhtml+xml,application/xml;q=0.9,image/webp,*/*;q=0.8',
                        'User-Agent': user_agent,
                        }

     # 获得界面
    def getPage(self, url=None):
        request = urllib.request.Request(url, headers=self.headers)
        response = urllib.request.urlopen(request)
        soup = BeautifulSoup(response.read(), "html.parser")
        # print(soup.prettify())
        return soup
    def parsePage(self,url=None,pageNo=None):
        #获取界面
        soup=self.getPage(url+"?page="+pageNo)
        itemBlog=soup.find_all("li",{"class":"am-g am-list-item-desced am-list-item-thumbed am-list-item-thumb-bottom-right"})
        print(itemBlog.__len__())
        blog=CnBlog()
        for i,blogInfo in enumerate(itemBlog):
            blog.num=i
            blog.url=blogInfo.find("h3").find("a").get("href")
            blog.title=blogInfo.find("h3").find("a").string
            blog.grade=blogInfo.find("div","am-fr").find_all("a")[0].text
            blog.author=blogInfo.find("div","am-fr").find_all("a")[1].text
            item = self.getPage(blog.url)
            blog.article = filter_tags(str(item))
            print("博客数量",blog.num,"标题:",blog.title,"作者:",blog.author,"详情:",blog.url)
            dic={
                'num':blog.num,
                'title':blog.title,
                'grade':blog.grade,
                'author':blog.author,
                'url':blog.url,
                'article':blog.article
            }

if __name__ =="__main__":
    #要抓取的网页地址
    url = "https://edu.cnblogs.com/posts"
    cnblog=CnBlog()
    soup=cnblog.getPage(url)
    for i in range(1,500):
        cnblog.parsePage(url,str(i))
        time.sleep(1)
五、问题分析及代码改进
1、在获取文章详情时,由于博客园使用的时TinyMCE和markdown两种编辑器,所以获纯文本,就必须将html标签全部去掉,
解决方法的代码如下:
# -*- coding: utf-8-*- import re ##过滤HTML中的标签 #将HTML中标签等信息去掉 #@param htmlstr HTML字符串. def filter_tags(htmlstr): #先过滤CDATA re_cdata=re.compile('//<!\[CDATA\[[^>]*//\]\]>',re.I) #匹配CDATA re_script=re.compile('<\s*script[^>]*>[^<]*<\s*/\s*script\s*>',re.I)#Script re_style=re.compile('<\s*style[^>]*>[^<]*<\s*/\s*style\s*>',re.I)#style re_br=re.compile('<br\s*?/?>')#处理换行 re_h=re.compile('</?\w+[^>]*>')#HTML标签 re_comment=re.compile('<!--[^>]*-->')#HTML注释 s=re_cdata.sub('',htmlstr)#去掉CDATA s=re_script.sub('',s) #去掉SCRIPT s=re_style.sub('',s)#去掉style s=re_br.sub('\n',s)#将br转换为换行 s=re_h.sub('',s) #去掉HTML 标签 s=re_comment.sub('',s)#去掉HTML注释 #去掉多余的空行 blank_line=re.compile('\n+') s=blank_line.sub('\n',s) s=replaceCharEntity(s)#替换实体 return s ##替换常用HTML字符实体. #使用正常的字符替换HTML中特殊的字符实体. #你可以添加新的实体字符到CHAR_ENTITIES中,处理更多HTML字符实体. #@param htmlstr HTML字符串. def replaceCharEntity(htmlstr): CHAR_ENTITIES={'nbsp':' ','160':' ', 'lt':'<','60':'<', 'gt':'>','62':'>', 'amp':'&','38':'&', 'quot':'"','34':'"',} re_charEntity=re.compile(r'&#?(?P<name>\w+);') sz=re_charEntity.search(htmlstr) while sz: try: global key entity = sz.group() # entity全称,如> key = sz.group('name') # 去除&;后entity,如>为gt htmlstr=re_charEntity.sub(CHAR_ENTITIES[key],htmlstr,1) sz=re_charEntity.search(htmlstr) except KeyError: #以空串代替 htmlstr=re_charEntity.sub('',htmlstr,1) sz=re_charEntity.search(htmlstr) return htmlstr def repalce(s,re_exp,repl_string): return re_exp.sub(repl_string,s)
2、在爬虫的时候,发现爬取两三页后博客园会将我的IP暂封一段时间,因为连续请求被发现了,最简单的解决方法时设置线程延迟,意思就是每个请求隔两三秒才请求,我的解决方法时设置动态代理IP,这样每次请求的IP就会不一样。我去github上找了一个免费的代理IP池,地址为:https://github.com/jhao104/proxy_pool,具体使用方法,github上有将,我在这就不啰嗦啦经过上述操作,成功爬取到博客园500页的博文详细信息。
3、由于爬取的数据量比较多,所以将爬取到的数据存放到mongodb数据库中,方便后面分析
改进的代码如下:
import requests
from bs4 import BeautifulSoup
import time
import pymongo
from util.delhtml import filter_tags

class CnBlog(object):
    def __init__(self):
        user_agent = 'Mozilla/5.0 (Windows NT 6.1; WOW64) AppleWebKit/537.36 (KHTML, like Gecko) Chrome/50.0.2661.102 Safari/537.36'
        self.headers = {'Cache-Control': 'max-age=0',
                        'Connection': 'keep-alive',
                        'Accept': 'text/html,application/xhtml+xml,application/xml;q=0.9,image/webp,*/*;q=0.8',
                        'User-Agent': user_agent,
                        }
    def getConnect(self):
        con = pymongo.MongoClient('localhost', 27017)
        return con.cnblog

     # 获得界面
    def getPage(self, url=None):
        retry_count = 5
        while retry_count > 0:
            try:
                proxy = {"http": self.get_proxy() + ""}
                response = requests.get(url, proxies=proxy, headers=self.headers)
                soup = BeautifulSoup(response.text, "html.parser")
                return soup
            except Exception:
                retry_count -= 1

    def parsePage(self,url=None,pageNo=None,collection=None):
        #获取界面
        soup=self.getPage(url+"?page="+pageNo)
        itemBlog=soup.find_all("li",{"class":"am-g am-list-item-desced am-list-item-thumbed am-list-item-thumb-bottom-right"})
        print(itemBlog.__len__())
        blog=CnBlog()
        for i,blogInfo in enumerate(itemBlog):
            blog.num=i
            blog.url=blogInfo.find("h3").find("a").get("href")
            blog.title=blogInfo.find("h3").find("a").string
            blog.grade=blogInfo.find("div","am-fr").find_all("a")[0].text
            blog.author=blogInfo.find("div","am-fr").find_all("a")[1].text
            item = self.getPage(blog.url)
            blog.article = filter_tags(str(item))
            print("博客数量",blog.num,"标题:",blog.title,"作者:",blog.author,"详情:",blog.url)
            dic={
                'num':blog.num,
                'title':blog.title,
                'grade':blog.grade,
                'author':blog.author,
                'url':blog.url,
                'article':blog.article
            }
            collection.items.insert(dic)

    def get_proxy(self):
        return requests.get("http://127.0.0.1:6068/get/", headers=self.headers).content.decode()
    def delete_proxy(proxy):
        requests.get("http://127.0.0.1:6068/delete/?proxy={}".format(proxy))
if __name__ =="__main__":
    #要抓取的网页地址
    url = "https://edu.cnblogs.com/posts"
    cnblog=CnBlog()
    collection=cnblog.getConnect()
    soup=cnblog.getPage(url)
    for i in range(1,500):
        cnblog.parsePage(url,str(i),collection)
        time.sleep(1)
六、生成词云
1、安装wordcloud依赖库
在windows上安装有wordcloud有两种方法,
一是安装微软Visual C++ Build Tools,但是这个软件比较大,
二是去这个地址:https://www.lfd.uci.edu/~gohlke/pythonlibs/#wordcloud下载whl文件,然后安装。
2、这里将一下第二种安装方式,首先去https://www.lfd.uci.edu/~gohlke/pythonlibs/#wordcloud下载whl文件,如图:
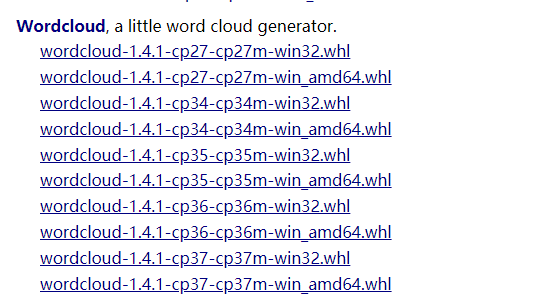
选择合适的版本下载,cp指的是系统上安装的python版本,32表示安装的python版本是32位,不是操作系统
打开cmd运行,切换到指定目录运行
执行以下命令
pip install wordcloud-1.3.3-cp36-cp36m-win32.whl
pip install wordcloud
到此wordcloud就安装成功了,就可以使用了。
3、安装jieba依赖
在这里我是用的是jieba进行分词,然后生成词云,安装jieba依赖库很简单,只需要执行命令 pip install jieba 即可。
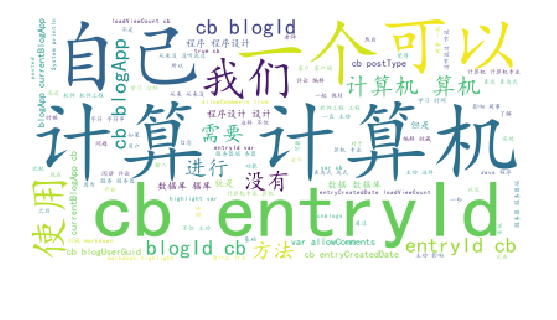
经过jieba分词后生成的原始词云如下图:
4、生成的词云如下图:
5、发现有很多英文,分析发现,有些博客园里面有很多代码,所以会出现很多英文,解决方法就是把那些代码都去掉,只留中文,使用的正则表达式如下:
[A-Za-z0-9\[\`\~\!\@\#\$\^\&\*\(\)\=\|\{\}\'\:\;\'\,\[\]\.\<\>\/\?\~\!\@\#\\\&\*\%]
更改后的效果图如下:

6、来点好玩的,生成自定义的词云形状
来张老乔的照片

生成的词云如下图:

到此,爬取博客园500页博文信息并生成词云的小demo已经完成。
7、词云源码如下
import jieba
import matplotlib.pyplot as plt
from wordcloud import WordCloud, ImageColorGenerator
import codecs
import numpy as np
from PIL import Image
import re
file = codecs.open('ciyun.txt', 'r', 'utf-8')
image=np.array(Image.open('E:/pthonProject/pacong/image/qiao.jpg'))
font=r'C:\Windows\Fonts\simkai.ttf'
word=file.read()
#去掉英文,保留中文
resultword=re.sub("[A-Za-z0-9\[\`\~\!\@\#\$\^\&\*\(\)\=\|\{\}\'\:\;\'\,\[\]\.\<\>\/\?\~\!\@\#\\\&\*\%]", "",word)
wordlist_after_jieba = jieba.cut(resultword, cut_all = True)

wl_space_split = " ".join(wordlist_after_jieba)
print(wl_space_split)
my_wordcloud = WordCloud(font_path=font,mask=image,background_color='white',max_words = 100,max_font_size = 100,random_state=50).generate(wl_space_split)
#根据图片生成词云
iamge_colors = ImageColorGenerator(image)
#my_wordcloud.recolor(color_func = iamge_colors)
#显示生成的词云
plt.imshow(my_wordcloud)
plt.axis("off")
plt.show()
#保存生成的图片,当关闭图片时才会生效,中断程序不会保存
my_wordcloud.to_file('result.jpg')

 浙公网安备 33010602011771号