


28.LNMP架构服务搭建
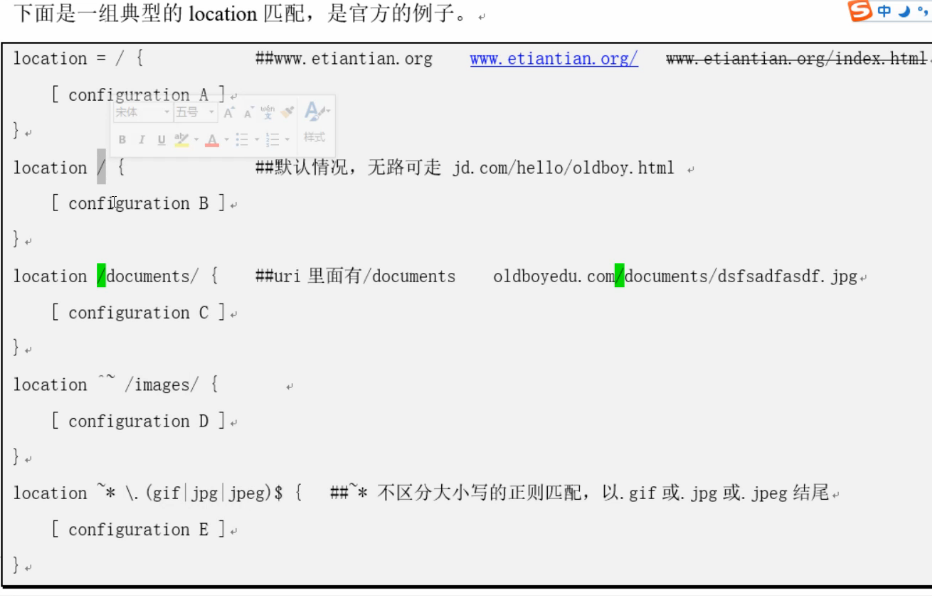
1.nginx下常用工具location简介
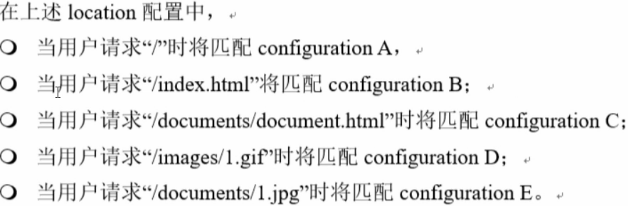
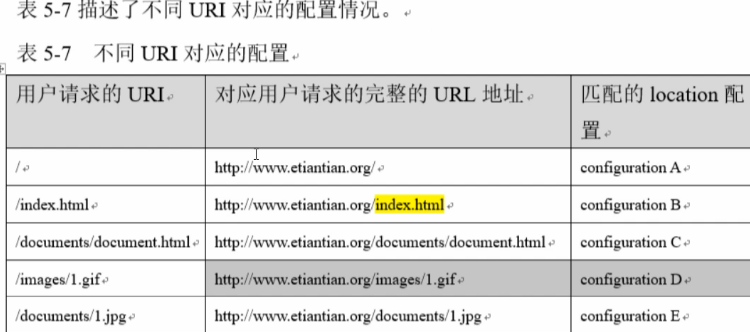
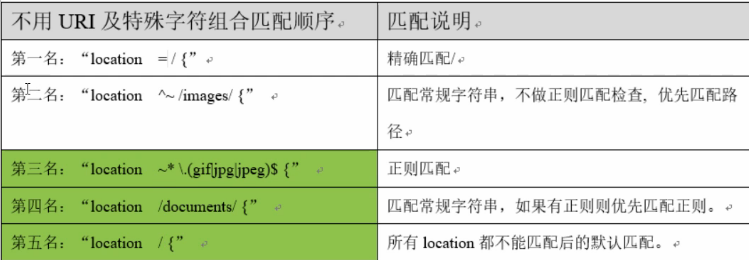
location(位置)指令的作用是可以根据用户请求的URI来执行不同的应用,URI作用就是根据用户请求的网站的地址URI匹配,匹配成功则进行相关操作。
location语法:
location [ = |~ |~* |^~] uri {
...
}
说明:指令;匹配标识;匹配的网站地址;匹配URI后要执行的配置段。
[root@web01 extra]# cat www.conf
server {
listen 80;
server_name www.etiantian.org etiantian.org;
access_log logs/access_www.log main;
location / {    // /意思是什么都不加、匹配的URI
root html/www;
index index.html index.htm;
  }
}

2.nginx下常用工具location应用
[root@web01 extra]# cp www.conf{,.bak.web}
[root@web01 extra]# vim www.conf
[root@web01 extra]# cat www.conf
server {
listen 80;
server_name www.etiantian.org etiantian.org;
root html/www;
location / {    //都找不着了,默认来到这!
return 401;
}

location = / {
return 402;
}

location /documents/ {    //优先级第三
return 403;
}

location ^~ /images/ {    //优先级最高
return 404;
}

location ~* \.(gif|jpg|jpeg)$ {    //优先级次之
return 500;
}
access_log logs/access_www.log main;
}
[root@web01 conf]# /application/nginx/sbin/nginx -t
[root@web01 conf]# /application/nginx/sbin/nginx -s reload
[root@web01 conf]# curl 10.0.0.8
<html>
<head><title>402 Payment Required</title></head>
<body bgcolor="white">
<center><h1>402 Payment Required</h1></center>
<hr><center>nginx/1.12.2</center>
</body>
</html>
[root@web01 conf]# curl -w "%{http_code}\n" 10.0.0.8
<html>
<head><title>402 Payment Required</title></head>
<body bgcolor="white">
<center><h1>402 Payment Required</h1></center>
<hr><center>nginx/1.12.2</center>
</body>
</html>
402
[root@web01 conf]# curl -w "%{http_code}\n" -o /dev/null 10.0.0.8
% Total % Received % Xferd Average Speed Time Time Time Current
Dload Upload Total Spent Left Speed
183 183 183 183 0 0 63016 0 --:--:-- --:--:-- --:--:-- 0
402
[root@web01 conf]# curl -sw "%{http_code}\n" -o /dev/null 10.0.0.8
402
[root@web01 conf]# man curl
小结:
[root@web01 conf]# curl -sw "%{http_code}\n" -o /dev/null http://10.0.0.8/
402
[root@web01 conf]# curl -sw "%{http_code}\n" -o /dev/null http://10.0.0.8/index.html
401
[root@web01 conf]# curl -sw "%{http_code}\n" -o /dev/null http://10.0.0.8/documents/
403
[root@web01 conf]# curl -sw "%{http_code}\n" -o /dev/null http://10.0.0.8/documents/1.jpg
500
[root@web01 conf]# curl -sw "%{http_code}\n" -o /dev/null http://10.0.0.8/images/
404
[root@web01 conf]# curl -sw "%{http_code}\n" -o /dev/null http://10.0.0.8/images/1.jpg
404
3.nginx下rewrite短域名跳转
(1)rewrite功能(perl正则)
有些动态网页的网址不容易被找到,所以要用perl正则表达式做rewrite功能转换以做成假的、静态的网址(伪静态)后容易被网站收录容易被用户找到。
和apache等web服务软件一样,nginx rewrite主要功能也是实现URL地址重写,nginx的rewrite规则需要pcre软件的支持,即通过perl兼容正则表达式语法进行规则匹配。在之前安装nginx软件时就已经安装了这个pcre软件,以及让nginx支持rewrite的功能,默认参数编译nginx就会安装支持rewrite的模块,但是也要pcre软件的支持。
[root@web01 conf]# yum install -y pcre pcre-devel
Package pcre-7.8-7.el6.x86_64 already installed and latest version
Package pcre-devel-7.8-7.el6.x86_64 already installed and latest version
Nothing to do
(2)nginx rewrite语法
指令语法:rewrite regex replacement[flag];
sed s#regex#replacement#g
默认值:none
应用位置:server、location、if
rewrite是实现URL重写的关键指令,根据regex(正则表达式)部分内容,重定向到replacement部分内容,结尾是flag标记。
URL rewrite跳转举例:
etiantian.org ===> www.etiantian.org
[root@web01 extra]# cp www.conf{,.bak.location}
[root@web01 extra]# cat www.conf.bak.web
server {
listen 80;
server_name www.etiantian.org etiantian.org;
access_log logs/access_www.log main;
location / {
root html/www;
index index.html index.htm;
    }
}
[root@web01 extra]# cat www.conf.bak.web >www.conf
[root@web01 extra]# vim www.conf
[root@web01 extra]# cat www.conf
server {
listen 80;
server_name etiantian.org;
rewrite (^.*) http://www.etiantian.org/$1 permanent;
//当用户访问etiantian.org及下面的任意内容时,都会通过这条rewrite跳转到www.etiantian.org对应的地址。
}

server {
listen 80;
server_name www.etiantian.org;
access_log logs/access_www.log main;
location / {
root html/www;
index index.html index.htm;
    }
}
linux下做hosts解析:
[root@web01 extra]# vim /etc/hosts
[root@web01 extra]# tail -1 /etc/hosts
10.0.0.8 etiantian.org www.etiantian.org blog.etiantian.org bbs.etiantian.org
[root@web01 extra]# ping etiantian.org
PING etiantian.org (10.0.0.8) 56(84) bytes of data.
64 bytes from etiantian.org (10.0.0.8): icmp_seq=1 ttl=64 time=0.091 ms
64 bytes from etiantian.org (10.0.0.8): icmp_seq=2 ttl=64 time=0.035 ms
^C
检查语法、重启服务:
[root@web01 extra]# /application/nginx/sbin/nginx -t
[root@web01 extra]# /application/nginx/sbin/nginx -s reload
测试:
[root@web01 extra]# curl 10.0.0.8
[root@web01 extra]# curl etiantian.org
<html>
<head><title>301 Moved Permanently</title></head>
<body bgcolor="white">
<center><h1>301 Moved Permanently</h1></center>
<hr><center>nginx/1.12.2</center>
</body>
</html>
[root@web01 extra]# curl etiantian.org/index.html
[root@web01 extra]# curl -L etiantian.org/index.html
web01:www.etiantian.org
过程:
[root@web01 extra]# curl -Lv etiantian.org/index.html
4.nginx访问认证
Http状态码301和302概念简单区别及企业应用案例
http://blog.51cto.com/oldboy/1774260
[root@web01 ~]# curl -I jd.com baidu.com taobao.com
HTTP/1.1 302 Moved Temporarily //
Server: JengineD/1.7.2.1
Date: Wed, 28 Feb 2018 07:50:31 GMT
Content-Type: text/html
Content-Length: 165
Location: http://www.jd.com
Connection: keep-alive
HTTP/1.1 200 OK //
......
[root@web01 ~]# tail -1 /etc/hosts
10.0.0.8 etiantian.org www.etiantian.org blog.etiantian.org bbs.etiantian.org status.etiantian.org
[root@web01 ~]# ping status.etiantian.org
PING etiantian.org (10.0.0.8) 56(84) bytes of data.
64 bytes from etiantian.org (10.0.0.8): icmp_seq=1 ttl=64 time=0.022 ms
64 bytes from etiantian.org (10.0.0.8): icmp_seq=2 ttl=64 time=0.028 ms
......
设置账号密码的用户才可以访问网站内容:
一般用在企业内部人员访问的地址上,例如:企业网站后台,mysql客户端pmpmyadmin,企业内部的CRM、WIKI等网站平台等。
配置示例:
[root@web01 ~]# curl status.etiantian.org
Active connections: 1
server accepts handled requests
80 80 621
Reading: 0 Writing: 1 Waiting: 0
[root@web01 extra]# vim status.conf
[root@web01 extra]# cat status.conf
#status.conf
server{
listen 80;
server_name status.etiantian.org;
location / {
stub_status on;
access_log off;
#添加两行:
auth_basic    "closed site";
auth_basic_user_file htpasswd;
    }
}
[root@web01 extra]# yum install -y httpd-tools
[root@web01 extra]# rpm -qa httpd-tools
httpd-tools-2.2.15-60.el6.centos.6.x86_64
[root@web01 extra]# rpm -ql httpd-tools
/usr/bin/ab
/usr/bin/htdbm
/usr/bin/htdigest
/usr/bin/htpasswd
[root@web01 extra]# htpasswd -bc /application/nginx/conf/htpasswd oldboy 123456
Adding password for user oldboy
[root@web01 extra]# chmod 400 /application/nginx/conf/htpasswd
[root@web01 extra]# chown www /application/nginx/conf/htpasswd
[root@web01 extra]# ll /application/nginx/conf/htpasswd
-r-------- 1 www root 21 Feb 28 16:06 /application/nginx/conf/htpasswd
[root@web01 extra]# cat /application/nginx/conf/htpasswd
oldboy:EwC/9pkGa9z8U
[root@web01 extra]# /application/nginx/sbin/nginx -t
[root@web01 extra]# /application/nginx/sbin/nginx -s reload
如果遇到错误,访问日志关了可去查看错误日志。
测试法一:
[root@web01 extra]# curl status.etiantian.org
<html>
<head><title>401 Authorization Required</title></head>
<body bgcolor="white">
<center><h1>401 Authorization Required</h1></center>
<hr><center>nginx/1.12.2</center>
</body>
</html>
[root@web01 extra]# curl -u oldboy:123456 status.etiantian.org
Active connections: 1
server accepts handled requests
88 88 629
Reading: 0 Writing: 1 Waiting: 0
测试法二:
http://10.0.0.8/
Active connections: 3
server accepts handled requests
93 93 646
Reading: 0 Writing: 1 Waiting: 2
小结:
Apache select和Nginx epoll模型区别形象比喻(面试常考);
虚拟主机概念及类型分类详解;
Nginx错误及访问日志及访问日志切割;
Nginx location介绍及配置实践;
Nginx Rewrite介绍及配置实践;
Nginx Web访问认证介绍及配置实践
利用nginx搭建网站:
5.LNMP环境原理
(1)LNMP简介:
2010年之前互联网公司常用经典web服务环境组合就是LAMP(linux,apache,mysql,php),随着nginx web服务的逐渐流行又出现了LNMP(linux,nginx,mysql,php),现如今成为国内大中型互联网公司网站的主流组合环境,因此我们必须熟练掌握LNMP的搭建、优化以及维护方法才行。
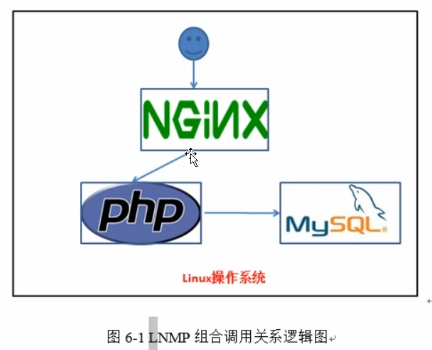
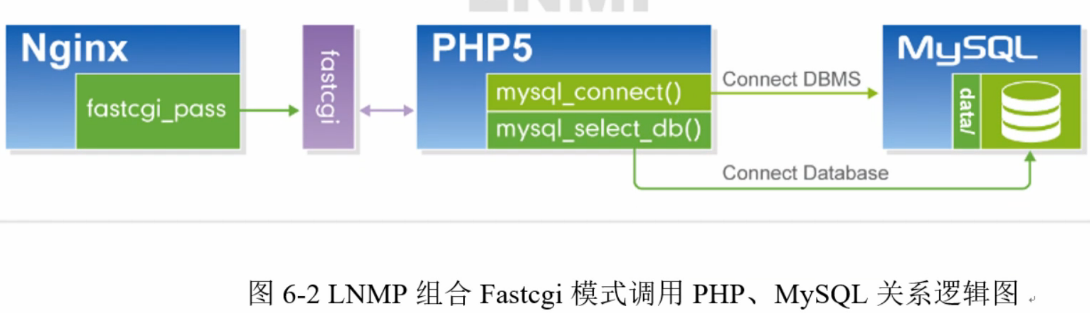
(2)LNMP组合工作流程
当LNMP组合工作时,首先是用户通过浏览器输入域名请求nginx web服务,如果请求是静态资源则由nginx解析返回给用户,如果是动态请求(.php结尾),那么nginx就会把它通过fastcgi接口(生产常用方法)发送给php引擎服务(fastcgi进程php-fpm)进行解析,如果这个动态请求要读取数据库数据,那么php就会继续向后请求mysql数据库以读取需要的数据,并最终通过nginx服务把获取到的数据返回给用户。
动态页面:nginx可以处理(要啥给啥),浏览器解析。
静态页面(服务器端解析):.php,.php5。
6.mysql数据库部署和使用
https://www.mysql.com/
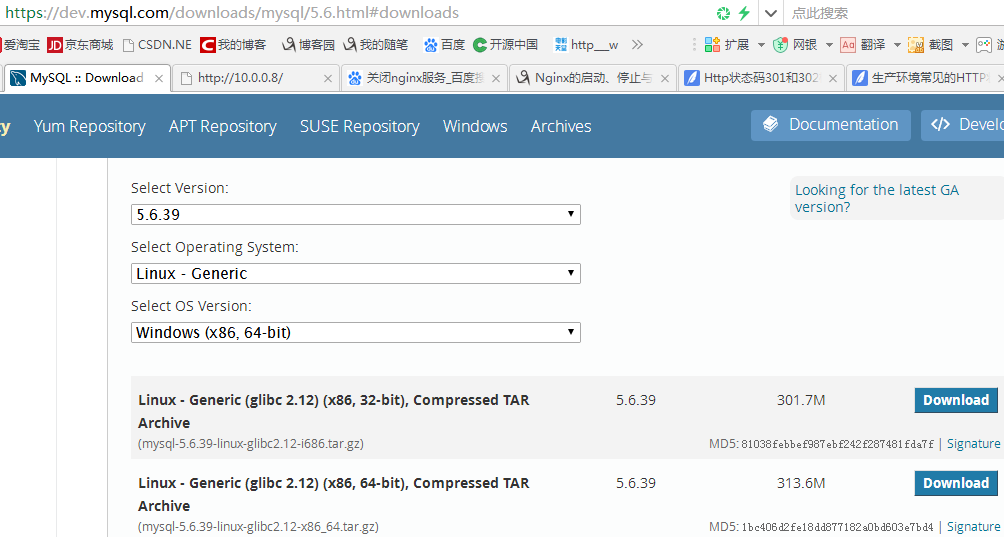
https://dev.mysql.com/get/Downloads/MySQL-5.6/mysql-5.6.39-linux-glibc2.12-x86_64.tar.gz
二进制安装MySQL-5.6.39步骤:
(1)下载、解压mysql二进制包:
[root@web01 opt]# wget https://dev.mysql.com/get/Downloads/MySQL-5.6/mysql-5.6.39-linux-glibc2.12-x86_64.tar.gz
[root@web01 opt]# tar xf mysql-5.6.39-linux-glibc2.12-x86_64.tar.gz
[root@web01 opt]# ll
total 322148
drwxr-xr-x 13 root root 4096 Feb 28 17:07 mysql-5.6.39-linux-glibc2.12-x86_64
-rw-r--r-- 1 root root 328882304 Dec 9 14:59 mysql-5.6.39-linux-glibc2.12-x86_64.tar.gz
(2)添加用户mysql
[root@web01 ~]# useradd -s /sbin/nologin -M mysql
[root@web01 ~]# id mysql
uid=502(mysql) gid=502(mysql) groups=502(mysql)
(3)把mysql目录移动到 指定目录/application/
[root@web01 ~]# mv /opt/mysql-5.6.39-linux-glibc2.12-x86_64/ /application/mysql-5.6.39
(4)创建软连接
[root@web01 ~]# ln -s /application/mysql-5.6.39/ /application/mysql
(5)让mysql用户管理 /application/mysql
[root@web01 ~]# chown -R mysql.mysql /application/mysql/data/
(6)安装这个软件:初始化数据库
#1.软件安装在哪里
#2.数据存放在哪里
#3.MySQL使用的用户谁?
[root@web01 ~]# /application/mysql/scripts/mysql_install_db --user=mysql --basedir=/application/mysql --datadir=/application/mysql/data/
[root@web01 ~]# echo $?
0
(7)复制启动脚本并授权
[root@web01 ~]# cp /application/mysql/support-files/mysql.server /etc/init.d/mysqld
[root@web01 ~]# chmod +x /etc/init.d/mysqld
(8)修改mysql命令和启动脚本中的路径
[root@web01 ~]# sed -i 's#/usr/local/mysql#/application/mysql#g' /application/mysql/bin/mysqld_safe /etc/init.d/mysqld
(9)复制默认的配置文件
[root@web01 ~]# cp /application/mysql/support-files/my-default.cnf /etc/my.cnf
(10)启动mysql服务:
[root@web01 ~]# /etc/init.d/mysqld start
Starting MySQL.Logging to '/application/mysql/data/web01.err'.
........ SUCCESS!
查看mysql服务端口是否启动:
[root@web01 ~]# netstat -lntup|grep 3306
tcp 0 0 :::3306 :::* LISTEN 4258/mysqld
查看mysql进程是否启动:
[root@web01 ~]# ps -ef|grep mysql
root 4151 1 0 18:00 pts/0 00:00:00 /bin/sh /application/mysql/bin/mysqld_safe --datadir=/application/mysql/data --pid-file=/application/mysql/data/web01.pid
mysql 4258 4151 65 18:00 pts/0 00:01:31 /application/mysql/bin/mysqld --basedir=/application/mysql --datadir=/application/mysql/data --plugin-dir=/application/mysql/lib/plugin --user=mysql --log-error=web01.err --pid-file=/application/mysql/data/web01.pid
root 4461 3864 0 18:03 pts/0 00:00:00 grep mysql
[root@web01 ~]# whereis mysql
mysql: /usr/lib64/mysql /usr/share/mysql
[root@web01 ~]# which mysql
/usr/bin/which: no mysql in (/usr/local/sbin:/usr/local/bin:/sbin:/bin:/usr/sbin:/usr/bin:/root/bin)
[root@web01 ~]# /application/mysql/bin/mysql
(11)加入到系统环境变量中:
[root@web01 ~]# echo 'export PATH=/application/mysql/bin:$PATH' >>/etc/profile
[root@web01 ~]# tail -1 /etc/profile
export PATH=/application/mysql/bin:$PATH
[root@web01 ~]# source /etc/profile
(12)加入开机自启动:
[root@web01 ~]# chkconfig mysqld on
[root@web01 ~]# chkconfig |grep mysqld
mysqld 0:off 1:off 2:on 3:on 4:on 5:on 6:off
(13)设置密码登录mysql数据库:
[root@web01 ~]# mysqladmin -u root password 'oldboy123'
[root@web01 ~]# mysql -uroot -poldboy123
Warning: Using a password on the command line interface can be insecure.
Welcome to the MySQL monitor. Commands end with ; or \g.
Your MySQL connection id is 3
Server version: 5.6.39 MySQL Community Server (GPL)
Copyright (c) 2000, 2018, Oracle and/or its affiliates. All rights reserved.
Oracle is a registered trademark of Oracle Corporation and/or its
affiliates. Other names may be trademarks of their respective
owners.
Type 'help;' or '\h' for help. Type '\c' to clear the current input statement.
mysql>
mysql> exit
Bye
[root@web01 ~]#
故障解决:
<1>/tmp权限
[root@web01 ~]# ll -d /tmp/
drwxrwxrwt. 3 root root 4096 Feb 28 18:02 /tmp/
[root@web01 ~]# ll /tmp/
total 0
srwxrwxrwx 1 mysql mysql 0 Feb 28 18:02 mysql.sock
<2>主机名解析 hosts解析 #ping 主机名
<3>一步步执行检查
7.mysql数据库-SQL语句操作与使用
SQL语句:mysql数据库中的命令,单词组合而已。
(1)查询
查看默认的数据库们:
mysql> show databases;
+--------------------+
| Database |
+--------------------+
| information_schema |
| mysql |
| performance_schema |
| test |
+--------------------+
进入名为mysql数据库:
mysql> use mysql; //cd mysql
显示该数据库的数据表们:
mysql> show tables;
查看正在使用哪个数据库:
mysql> select database(); //pwd
+------------+
| database() |
+------------+
| mysql |
+------------+
查看当前用户:
mysql> select user(); //whoami
+----------------+
| user() |
+----------------+
| root@localhost |
+----------------+
当前系统都有哪些用户?它们可以在哪里(主机)登录?
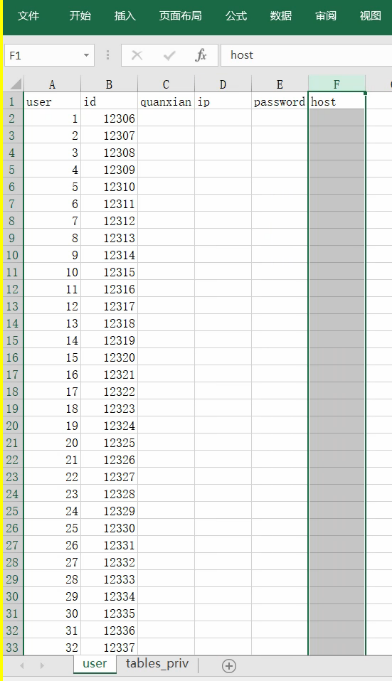
mysql> select user,host from mysql.user;
+------+-----------+
| user | host |
+------+-----------+
| root | 127.0.0.1 |
| root | ::1 |
| | localhost |
| root | localhost |
| | web01 |
| root | web01 |
+------+-----------+
6 rows in set (0.12 sec)
(2)创建数据库wordpress:
mysql> create database wordpress;
mysql> show databases;
+--------------------+
| Database |
+--------------------+
| information_schema |
| mysql |
| performance_schema |
| test |
| wordpress |
(3)删除数据库:
mysql> drop database wordpress;
(4)添加用户wordpress:
mysql> grant all on wordpress.* to 'wordpress'@'172.16.1.0/255.255.255.0' identified by '123456';
记忆:授权所有权限;wordpress数据库包含的所有表;给wordpress主机用户;可以在172.16.1.0/255.255.255.0的网段登录数据库;这个用户的密码是123456.
mysql> select user,host from mysql.user;
+-----------+--------------------------+
| user | host |
+-----------+--------------------------+
| root | 127.0.0.1 |
| wordpress | 172.16.1.0/255.255.255.0 |
更新系统权限表以生效:
mysql> flush privileges;
mysql> ^DBye
以wordpress用户的身份连接到172.16.1.8这台服务器上的数据库:
[root@web01 ~]# mysql -uwordpress -p -h 10.0.0.8
Enter password:
或者:
[root@web01 ~]# mysql -uwordpress -p123456 -h 172.16.1.8
......
mysql>
另外:
#help sql语句。
#mysql 命令行
#-u 指定用户
#-p 指定密码(不要有空格)
#-h 连接到某一台服务器
#跳过授权表(不用密码登录)
#/etc/init.d/mysqld restart --skip-grant-table
更改密码:
[root@web01 ~]# mysqladmin -uroot -poldboy123 password '新的密码'
db01上部署一个mysql5.6.39
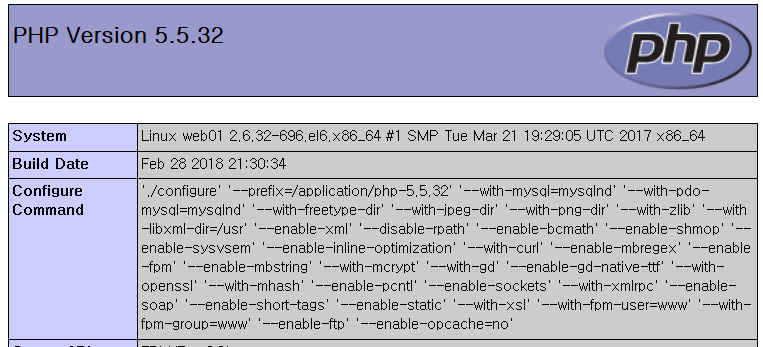
8.php软件部署
官网:http://php.net/
http://php.net/releases/
下载:PHP 5.5.32 (tar.gz)
sha256: 419aa62a68a640192799928a29e5cd4cd5b965458223bea2b3209a68c3e95989
http://php.net/get/php-5.5.32.tar.gz/from/a/mirror 非也!
网址:http://php.net/get/php-5.5.32.tar.gz/from/a/mirror
复制下载链接地址:http://cn2.php.net/get/php-5.5.32.tar.gz/from/this/mirror //选择中国的下载比较快
解压PHP软件,进行编译安装,将程序安装到/application目录中,并且创建软链接
安装依赖软件包:
注意:安装时依赖较多故坑比较多!
[root@web01 ~]# yum install zlib-devel libxml2-devel libjpeg-devel libjpeg-turbo-devel curl-devel -y
[root@web01 ~]# yum install freetype-devel libpng-devel gd-devel libcurl-devel libxslt-devel libxslt-devel -y
[root@web01 ~]# rpm -qa zlib-devel libxml2-devel libjpeg-devel libjpeg-turbo-devel curl-devel freetype-devel libpng-devel gd-devel libcurl-devel libxslt-devel libxslt-devel
[root@web01 ~]# wget -O /etc/yum.repos.d/epel.repo http://mirrors.aliyun.com/repo/epel-6.repo
[root@web01 ~]# yum -y install libmcrypt-devel mhash mcrypt
[root@web01 ~]# rpm -qa libmcrypt-devel mhash mcrypt
(1)下载php软件包:
[root@web01 opt]# wget http://cn2.php.net/get/php-5.5.32.tar.gz/from/this/mirror
[root@web01 opt]# sha256sum mirror.3
419aa62a68a640192799928a29e5cd4cd5b965458223bea2b3209a68c3e95989 mirror.3
[root@web01 opt]# file mirror.3
mirror.3: gzip compressed data, was "php-5.5.32.tar", from Unix, last modified: Tue Feb 2 21:36:42 2016, max compression
[root@web01 opt]# mv mirror.3 php-5.5.32.tar.gz
[root@web01 opt]# sha256sum php-5.5.32.tar.gz
419aa62a68a640192799928a29e5cd4cd5b965458223bea2b3209a68c3e95989 php-5.5.32.tar.gz
解压php软件包:
[root@web01 opt]# tar xf php-5.5.32.tar.gz
[root@web01 opt]# cd php-5.5.32
[root@web01 php-5.5.32]# ls
(2)配置、编译安装:
./configure --prefix=/application/php-5.5.32 \
--with-mysql=mysqlnd \
--with-pdo-mysql=mysqlnd \
--with-freetype-dir \
--with-jpeg-dir \
--with-png-dir \
--with-zlib \
--with-libxml-dir=/usr \
--enable-xml \
--disable-rpath \
--enable-bcmath \
--enable-shmop \
--enable-sysvsem \
--enable-inline-optimization \
--with-curl \
--enable-mbregex \
--enable-fpm \
--enable-mbstring \
--with-mcrypt \
--with-gd \
--enable-gd-native-ttf \
--with-openssl \
--with-mhash \
--enable-pcntl \
--enable-sockets \
--with-xmlrpc \
--enable-soap \
--enable-short-tags \
--enable-static \
--with-xsl \
--with-fpm-user=www \
--with-fpm-group=www \
--enable-ftp \
--enable-opcache=no
显示以下内容则成功:
Generating files
configure: creating ./config.status
creating main/internal_functions.c
creating main/internal_functions_cli.c
+--------------------------------------------------------------------+
| License: |
| This software is subject to the PHP License, available in this |
| distribution in the file LICENSE. By continuing this installation |
| process, you are bound by the terms of this license agreement. |
| If you do not agree with the terms of this license, you must abort |
| the installation process at this point. |
+--------------------------------------------------------------------+
Thank you for using PHP.
config.status: creating php5.spec
config.status: creating main/build-defs.h
config.status: creating scripts/phpize
config.status: creating scripts/man1/phpize.1
config.status: creating scripts/php-config
config.status: creating scripts/man1/php-config.1
config.status: creating sapi/cli/php.1
config.status: creating sapi/fpm/php-fpm.conf
config.status: creating sapi/fpm/init.d.php-fpm
config.status: creating sapi/fpm/php-fpm.service
config.status: creating sapi/fpm/php-fpm.8
config.status: creating sapi/fpm/status.html
config.status: creating sapi/cgi/php-cgi.1
config.status: creating ext/phar/phar.1
config.status: creating ext/phar/phar.phar.1
config.status: creating main/php_config.h
config.status: executing default commands
[root@web01 php-5.5.32]# echo $?
0
可能出现问题提前预防:
[root@web01 php-5.5.32]# ln -s /application/mysql/lib/libmysqlclient.so.18 /usr/lib64/
[root@web01 php-5.5.32]# touch ext/phar/phar.phar
[root@web01 php-5.5.32]# ln -s /application/php-5.5.32/ /application/php
编译、安装:
[root@web01 php-5.5.32]# make && make install
[root@web01 php-5.5.32]# make ;make install //make install本质上是创建一些目录。
[root@web01 php-5.5.32]# echo $?
0
(3)配置部署php程序
[root@web01 php-5.5.32]# ll php.ini-*
-rw-r--r-- 1 1001 1001 69236 Feb 2 2016 php.ini-development //开发人员调试用文件
-rw-r--r-- 1 1001 1001 69266 Feb 2 2016 php.ini-production //生产场景所有配置文件
复制php.ini配置文件:
[root@web01 php-5.5.32]# cp /opt/php-5.5.32/php.ini-production /application/php-5.5.32/lib/php.ini
复制php-fpm(nginx秘书,负责与php打交道)配置文件:
[root@web01 php-5.5.32]# cd /application/php-5.5.32/etc/
[root@web01 etc]# ls
pear.conf php-fpm.conf.default
[root@web01 etc]# cp php-fpm.conf.default php-fpm.conf
[root@web01 etc]# ll
total 52
-rw-r--r-- 1 root root 1332 Feb 28 21:33 pear.conf
-rw-r--r-- 1 root root 22609 Feb 28 21:49 php-fpm.conf
-rw-r--r-- 1 root root 22609 Feb 28 21:33 php-fpm.conf.default
检查语法:
[root@web01 etc]# /application/php/sbin/php-fpm -t
[28-Feb-2018 21:51:11] NOTICE: configuration file /application/php-5.5.32/etc/php-fpm.conf test is successful
(4)启动php(php-fpm)服务
[root@web01 etc]# /application/php/sbin/php-fpm
查看端口:
[root@web01 etc]# ss -lntup|grep 9000
tcp LISTEN 0 16384 127.0.0.1:9000 *:* users:(("php-fpm",115550,7),("php-fpm",115551,0),("php-fpm",115552,0))
9.测试nginx-php-mysql是否联通
LNMP搭建网站前的测试:
测试nginx与php配合是否成功!
测试php与mysql配合是否成功!
然后部署网站。
(1)测试nginx(处理静态的)与php(动态的交给它)配合是否成功!
[root@web01 ~]# cp /application/nginx/conf/extra/blog.conf{,.bak}
[root@web01 ~]# vim /application/nginx/conf/extra/blog.conf
[root@web01 ~]# cat /application/nginx/conf/extra/blog.conf
server {
listen 80;
server_name blog.etiantian.org;
root html/blog;
index index.php index.html index.htm;
location ~ .*\.(php|php5)?$ {
fastcgi_pass 127.0.0.1:9000; //默认将.php结尾的扔给9000端口处理同时加上index.php。
fastcgi_index index.php;
include fastcgi.conf;
}
}
server {
listen 80;
server_name blog.etiantian.org;
root html/blog;
index index.php index.html index.htm;
location ~ .*\.(php|php5)?$ {
fastcgi_pass 127.0.0.1:9000;
fastcgi_index index.php;
include fastcgi.conf;
}
}
[root@web01 ~]# /application/nginx/sbin/nginx -t
[root@web01 ~]# /application/nginx/sbin/nginx -s reload
前提是要启动:/application/nginx/sbin/nginx
[root@web01 ~]# echo '<?php phpinfo();?>' >/application/nginx/html/blog/test_info.php
输入:
http://blog.etiantian.org/test_info.php
502表示nginx是正常的,但是php启动不正常。解决方法是正常启动这两个服务!
注意etc\hosts添加:
10.0.0.8 www.etiantian.org blog.etiantian.org bbs.etiantian.org status.etiantian.org
输入:
http://blog.etiantian.org/test_info.php
显示成功!
cat /etc/hosts
127.0.0.1 localhost localhost.localdomain localhost4 localhost4.localdomain4
::1 localhost localhost.localdomain localhost6 localhost6.localdomain6
172.16.1.5 lb01
172.16.1.6 lb02
172.16.1.7 web02
172.16.1.8 web01
172.16.1.51 db01 db01.etiantian.org
172.16.1.31 nfs01
172.16.1.41 backup
172.16.1.61 m01
05-期中架构-db01-10.0.0.51
D:\vmware_centos\05-期中架构-db01-10.0.0.51
修改IP和主机名:
[root@oldboyedu-mu ~]# sed -i 's#210$#51#g' /etc/sysconfig/network-scripts/ifcfg-eth*
[root@oldboyedu-mu ~]# hostname db01
[root@oldboyedu-mu ~]# hostname
db01
[root@oldboyedu-mu ~]# vim /etc/sysconfig/network
[root@oldboyedu-mu ~]# cat /etc/sysconfig/network
NETWORKING=yes
HOSTNAME=db01
[root@oldboyedu-mu ~]# /etc/init.d/network restart
[root@db01 ~]# ifconfig|grep "inet addr"
inet addr:10.0.0.51 Bcast:10.0.0.255 Mask:255.255.255.0
inet addr:172.16.1.51 Bcast:172.16.1.255 Mask:255.255.255.0
inet addr:127.0.0.1 Mask:255.0.0.0
如法安装mysql并设置:
mysql> create database wordpress;
mysql> grant all on wordpress.* to 'wordpress'@'172.16.1.0/255.255.255.0' identified by '123456';
mysql> select user,host from mysql.user;
+-----------+--------------------------+
| user | host |
+-----------+--------------------------+
| root | 127.0.0.1 |
| wordpress | 172.16.1.0/255.255.255.0 |
(2)测试php与mysql配合是否成功!
[root@web01 ~]# vim /application/nginx/html/blog/test_mysql.php
[root@web01 ~]# cat /application/nginx/html/blog/test_mysql.php
<?php
#$link_id=mysql_connect('主机名','用户','密码');
$link_id=mysql_connect('172.16.1.51','wordpress','123456') or mysql_error();
if($link_id) {
echo "mysql successful by crmn!\n";
}else {
echo mysql_error();
}
?>
测试:输入
http://blog.etiantian.org/test_mysql.php
显示成功!mysql successful by crmn!
10.部署wordpress博客网站
要深入学习php网站知识但可以先找一些开源的php网站!
https://cn.wordpress.org/txt-download/
下载链接:https://cn.wordpress.org/wordpress-4.9.4-zh_CN.tar.gz
[root@web01 opt]# wget https://cn.wordpress.org/wordpress-4.9.4-zh_CN.tar.gz
[root@web01 opt]# tar xf wordpress-4.9.4-zh_CN.tar.gz
[root@web01 opt]# cd wordpress
[root@web01 wordpress]# ls
index.php wp-activate.php wp-comments-post.php wp-cron.php wp-load.php wp-settings.php xmlrpc.php
license.txt wp-admin wp-config-sample.php wp-includes wp-login.php wp-signup.php
readme.html wp-blog-header.php wp-content wp-links-opml.php wp-mail.php wp-trackback.php
[root@web01 wordpress]# mv * /application/nginx/html/blog/
[root@web01 wordpress]# cd /application/nginx/html/blog/
[root@web01 blog]# chown -R www.www *
wp-config.php
[root@web01 html]# chown -R www.www blog/
[root@web01 html]# ls -ld blog/
drwxr-xr-x 5 www www 4096 Mar 1 10:31 blog/
测试:
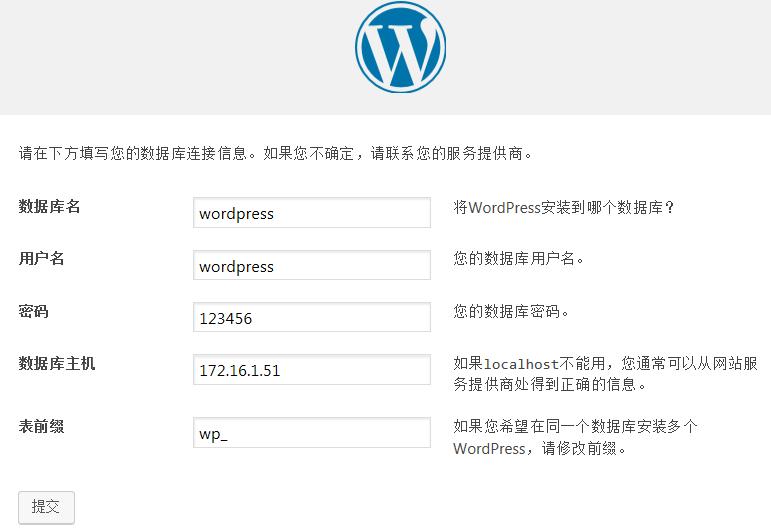
输入:http://blog.etiantian.org/
http://blog.etiantian.org/wp-admin/setup-config.php
显示成功!(若不显示则清除浏览器页面缓存)


 浙公网安备 33010602011771号