spring boot 2.0.3+spring cloud (Finchley)6、配置中心Spring Cloud Config
Spring Cloud Config 是用来为分布式系统中的基础设施和微服务应用提供集中化的外部配置支持,它分为服务端与客户端两个部分。其中服务端也称为分布式配置中心,它是一个独立的微服务应用,用来连接配置仓库并为客户端提供获取配置信息、加密 / 解密信息等访问接口;而客户端则是微服务架构中的各个微服务应用或基础设施,它们通过指定的配置中心来管理应用资源与业务相关的配置内容,并在启动的时候从配置中心获取和加载配置信息。Spring Cloud Config 实现了对服务端和客户端中环境变量和属性配置的抽象映射,所以它除了适用于 Spring 构建的应用程序之外,也可以在任何其他语言运行的应用程序中使用。由于 Spring Cloud Config 实现的配置中心默认采用 Git 来存储配置信息,所以使用 Spring Cloud Config 构建的配置服务器,天然就支持对微服务应用配置信息的版本管理,并且可以通过 Git 客户端工具来方便的管理和访问配置内容。当然它也提供了对其他存储方式的支持,比如:SVN 仓库、本地化文件系统。
Config Server从本地读取配置文件
本地仓库是指将所有的配置文件统一写在Config Server工程目录下。config server暴露Http API接口,config client通过调用config server的Http API接口来读取配置文件。
新建一个主maven项目,指定spring boot版本2.0.3,spring cloud版本 Finchley.RELEASE。
<?xml version="1.0" encoding="UTF-8"?>
<project xmlns="http://maven.apache.org/POM/4.0.0" xmlns:xsi="http://www.w3.org/2001/XMLSchema-instance"
         xsi:schemaLocation="http://maven.apache.org/POM/4.0.0 http://maven.apache.org/xsd/maven-4.0.0.xsd">
    <modelVersion>4.0.0</modelVersion>

    <groupId>com.cralor</groupId>
    <artifactId>chap10-config</artifactId>
    <version>0.0.1-SNAPSHOT</version>
    <packaging>jar</packaging>

    <name>chap10-config</name>
    <description>Demo project for Spring Boot</description>

    <parent>
        <groupId>org.springframework.boot</groupId>
        <artifactId>spring-boot-starter-parent</artifactId>
        <version>2.0.3.RELEASE</version>
        <relativePath/> <!-- lookup parent from repository -->
    </parent>

    <properties>
        <project.build.sourceEncoding>UTF-8</project.build.sourceEncoding>
        <project.reporting.outputEncoding>UTF-8</project.reporting.outputEncoding>
        <java.version>1.8</java.version>
        <spring-cloud.version>Finchley.RELEASE</spring-cloud.version>
    </properties>

    <dependencies>
        <dependency>
            <groupId>org.springframework.boot</groupId>
            <artifactId>spring-boot-starter</artifactId>
        </dependency>
        <dependency>
            <groupId>org.springframework.boot</groupId>
            <artifactId>spring-boot-starter-web</artifactId>
        </dependency>
        <dependency>
            <groupId>org.springframework.boot</groupId>
            <artifactId>spring-boot-starter-test</artifactId>
            <scope>test</scope>
        </dependency>
    </dependencies>

    <dependencyManagement>
        <dependencies>
            <dependency>
                <groupId>org.springframework.cloud</groupId>
                <artifactId>spring-cloud-dependencies</artifactId>
                <version>${spring-cloud.version}</version>
                <type>pom</type>
                <scope>import</scope>
            </dependency>
        </dependencies>
    </dependencyManagement>

    <!--使用aliyun镜像-->
    <repositories>
        <repository>
            <id>alimaven</id>
            <name>Maven Aliyun Mirror</name>
            <url>http://maven.aliyun.com/nexus/content/repositories/central/</url>
            <releases>
                <enabled>true</enabled>
            </releases>
            <snapshots>
                <enabled>false</enabled>
            </snapshots>
        </repository>
    </repositories>

    <build>
        <plugins>
            <plugin>
                <groupId>org.springframework.boot</groupId>
                <artifactId>spring-boot-maven-plugin</artifactId>
            </plugin>
        </plugins>
    </build>

</project>
构建Config Server
在主maven工程下,新建一个module工程config-server,pom文件继承主maven工程的pom文件,引入Config Server的起步依赖。
<?xml version="1.0" encoding="UTF-8"?>
<project xmlns="http://maven.apache.org/POM/4.0.0" xmlns:xsi="http://www.w3.org/2001/XMLSchema-instance"
         xsi:schemaLocation="http://maven.apache.org/POM/4.0.0 http://maven.apache.org/xsd/maven-4.0.0.xsd">
    <modelVersion>4.0.0</modelVersion>

    <groupId>com.cralor</groupId>
    <artifactId>config-server</artifactId>
    <version>0.0.1-SNAPSHOT</version>
    <packaging>jar</packaging>

    <name>config-server</name>
    <description>Demo project for Spring Boot</description>

    <parent>
        <groupId>com.cralor</groupId>
        <artifactId>chap10-config</artifactId>
        <version>0.0.1-SNAPSHOT</version>
        <relativePath/> <!-- lookup parent from repository -->
    </parent>

    <properties>
        <project.build.sourceEncoding>UTF-8</project.build.sourceEncoding>
        <project.reporting.outputEncoding>UTF-8</project.reporting.outputEncoding>
        <java.version>1.8</java.version>
    </properties>

    <dependencies>
        <dependency>
            <groupId>org.springframework.cloud</groupId>
            <artifactId>spring-cloud-config-server</artifactId>
        </dependency>

        <dependency>
            <groupId>org.springframework.boot</groupId>
            <artifactId>spring-boot-starter-test</artifactId>
            <scope>test</scope>
        </dependency>
    </dependencies>

    <build>
        <plugins>
            <plugin>
                <groupId>org.springframework.boot</groupId>
                <artifactId>spring-boot-maven-plugin</artifactId>
            </plugin>
        </plugins>
    </build>

</project>
在启动类加上@EnableConfigServer注解
@EnableConfigServer
@SpringBootApplication
public class ConfigServerApplication {

    public static void main(String[] args) {
        SpringApplication.run(ConfigServerApplication.class, args);
    }
}
配置文件application.yml做相关配置:端口号8769,程序名config-server,spring.profiles.active=native来配置config server从本地读取配置读配置的路径为classpath下的shared目录。
server:
  port: 8769
spring:
  application:
    name: config-server
  profiles:
    active: native
  cloud:
    config:
      server:
        native:
          search-locations: classpath:/shared
在gcresources目录下新建shared文件夹,存放配置文件,新建文件config-client-dev.yml,用作eureka-client工程的dev(开发环境)的配置文件。在config-client-dev.yml配置文件中,指定端口号8762,定义一个变量foo,值为foo version 1。
server:
  port: 8762
foo: foo version 1
构建Config Client
新建工程config-client,该工程作为Config Client从Config Server读取配置文件,pom文件继承主maven工程的pom文件,引入Config的起步依赖,web的起步依赖(已在主maven工程pom中配置)。
<dependency>
     <groupId>org.springframework.cloud</groupId>
     <artifactId>spring-cloud-starter-config</artifactId>
</dependency>
在配置文件bootstrap.yml中做相关配置。注意,这些与 Spring Cloud Config 相关的属性必须配置在 bootstrap.yml 中,config 部分内容才能被正确加载,因为 config 的相关配置会先于 application.yml,而 bootstrap.yml 的加载也是先于 application.yml。指定程序名config-client,向Url地址为http://localhost:8769的Config Server读取配置文件。如果没有读取成功则执行快速失败(fail-fast),读取的是dev文件。配置文件中的变量{spring.application.name}和{spring.profiles.active},两者以 “-” 相连,构成了向Config Server读取的配置文件名,config-client-dev.yml。
spring:
  application:
    name: config-client
  profiles:
    active: dev
  cloud:
    config:
      uri: http://localhost:8769
      fail-fast: true
在config-client工程写一个API测试接口,读取配置文件的foo变量并返回。
@RestController
public class MyController {

    @Value("${foo}")
    String foo;

    @RequestMapping("/foo")
    public String hi(){
        return foo;
    }
}
启动工程config-server,再启动config-client,此时控制台会显示config-client向Url地址为http://localhost:8769的Config Server读取了配置文件,程序的启动端口为8762。
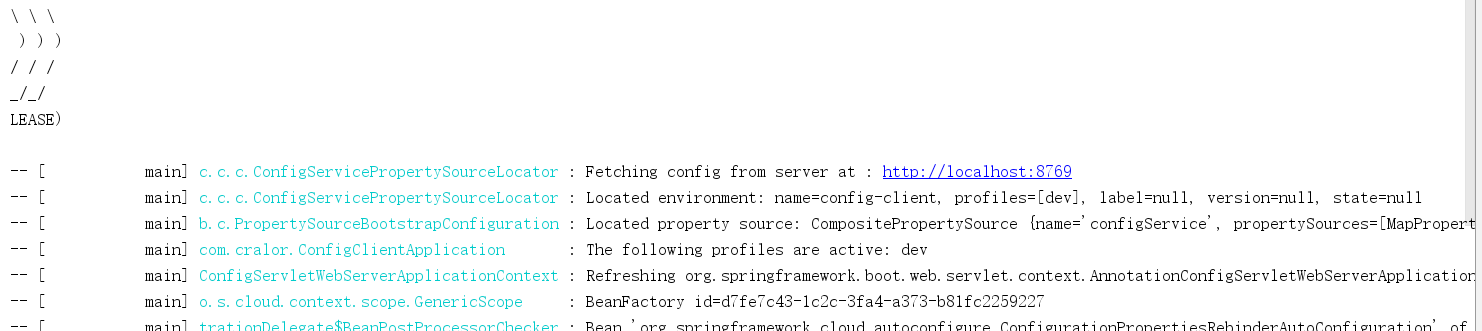
浏览器访问http://localhost:8762/foo,显示
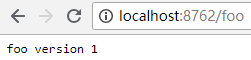
可见,config client成功向config server读取了配置文件。
Config Server从远程Git仓库读取配置文件
Config Server从远程Git仓库读取配置文件,可以将配置统一管理,并且可以通过Spring Cloud Bus在不人工启动程序的情况下对Config Client的配置进行刷新。本例采用的是GitHub作为远程Git仓库。
修改Config Server的配置文件application.yml。
server:
  port: 8769
spring:
  application:
    name: config-server

  cloud:
    config:
      server:
        git:
          uri: https://github.com/cralor7/springcloud
          search-paths: config-repo
        #  username:
        #  password:
          default-label: master
uri为GitHub仓库的地址,search-paths为远程仓库中配置文件所在路径,username和password为GitHub仓库的登录名和密码,如果是私有的仓库登录名和密码是必须的,公开的仓库可以不需要,default-label为仓库的分支,本例是从master读取。
将config-client-dev.yml稍作修改,上传到GitHub仓库中,
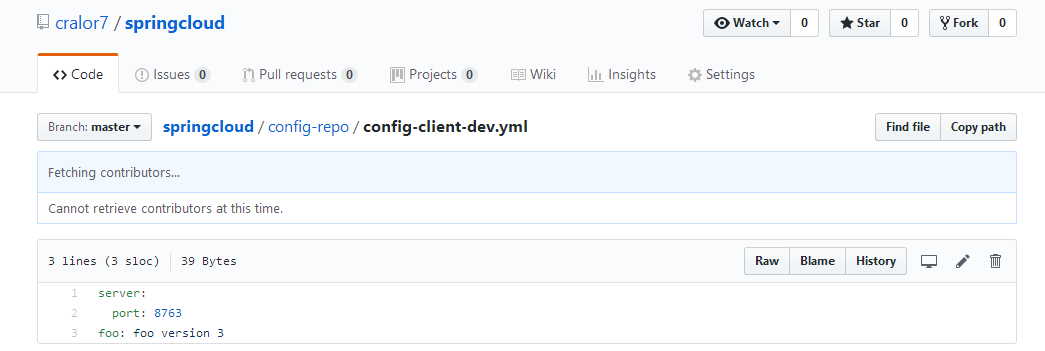
依次重启config-server,config-client,控制台

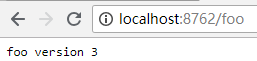
浏览器访问http://localhost:8763/foo

可见,config-server从远程仓库读取了配置文件,config-client从config-sever读取了配置文件。
构建高可用的Config Server
当服务实例很多时,所有的服务实例需要同时从配置中心Config Server读取配置文件,这时可以考虑将配置中心Config Server做成一个微服务,并且将其集群化,从而达到高可用。Config Server和Config Client向Eureka Server注册,且将Config Server多实例部署。
构建Eureka Server
新建eureka-server工程,pom文件继承主maven的pom文件引入Eureka Server和web的起步依赖。
<dependency>
  <groupId>org.springframework.cloud</groupId>
  <artifactId>spring-cloud-starter-netflix-eureka-server</artifactId>
</dependency>
配置文件application.yml做相关配置,指定端口号8761,并不自注册(将register-with-eureka和fetch-registry设置为false)。
server:
  port: 8761
eureka:
  instance:
    hostname: localhost
  client:
    register-with-eureka: false
    fetch-registry: false
    serviceUrl:
      defaultZone: http://${eureka.instance.hostname}:${server.port}/eureka/
启动类加注解@EnableEurekaServer
@EnableEurekaServer
@SpringBootApplication
public class EurekaServerApplication {

    public static void main(String[] args) {
        SpringApplication.run(EurekaServerApplication.class, args);
    }
}
改造Config Server
作为Eureka Client需要在pom文件引入Eureka Client的起步依赖
<dependency>
     <groupId>org.springframework.cloud</groupId>
     <artifactId>spring-cloud-starter-netflix-eureka-client</artifactId>
 </dependency>
在配置文件application.yml指定注册服务注册的地址
server:
  port: 8769
spring:
  application:
    name: config-server

  cloud:
    config:
      server:
        git:
          uri: https://github.com/cralor7/springcloud
          search-paths: config-repo
         # username:
         # password:
          default-label: master
eureka:
  client:
    serviceUrl:
      defaultZone: http://localhost:8761/eureka/
改造Config Client
和Config Server一样加入Eureka Client的起步依赖,配置文件bootstrap.yml中,指定注册服务注册的地址http://localhost:8761/eureka/,向service-id为config-server的配置服务读取配置文件。
spring:
  application:
    name: config-client
  profiles:
    active: dev
  cloud:
    config:
      fail-fast: true
      discovery:
        enabled: true
        service-id: config-server

eureka:
  client:
    serviceUrl:
      defaultZone: http://localhost:8761/eureka/
依次启动eureka-server和config-server(config-server开启两个实例,端口号8768、8769),成功后启动config-client。通过控制台可以看到config-client向地址为http://localhost:8768的config-server读取了配置文件,浏览器访问http://localhost:8763/foo,显示

多次启动config-client工程(我测试的时候重启了4、5次),控制台可以看到它会轮流从http://localhost:8768和http://localhost:8769的Config Server读取配置文件,并做了负载均衡。


使用Spring Cloud Bus刷新配置
Spring Cloud Bus 通过轻量消息代理连接各个分布的节点,可以用于广播配置文件的更改或者服务的监控管理。一个关键的思想就是,消息总线可以为微服务做监控,也可以实现应用程序之间相互通信。Spring Cloud Bus可选的消息代理组件包括RabbitMQ和Kafka等。这里用RabbitMQ作为Spring Cloud的消息组件去刷新更改微服务的配置文件。
为什么用Spring Cloud Bus去刷新配置呢?
如果有几十个微服务,而每一个服务优势多实例,当更改配置时,需要重启多个微服务实例。Spring Cloud Bus的一个功能就是让这个过程变得简单,当远程Git仓库的配置文件更改后,只需要向某一个微服务实例发送一个Post请求,通过消息组件通知其他微服务实例重新去仓库拉取最新的配置文件。

由于使用了RabbitMQ,首先必需安装RabbitMQ。此处略...,(我安装时去官网下载了最新的Erlang和RabbitMQ,结果杯具了...,安装RabbitMQ时,Erlang的环境变量已经配置成功了结果还提示 ERLANG_HOME 找不到,原来Erlang和RabbitMQ还有版本匹配问题,从OTP 21.0一直到OTP 19.3,才终于可以了。附下载地址:Erlang,rabbRabbitMQ )
改造config-server
pom文件添加依赖,这 4 个是必须的,
<dependency>
    <groupId>org.springframework.cloud</groupId>
    <artifactId>spring-cloud-config-server</artifactId>
</dependency>
<dependency>
    <groupId>org.springframework.cloud</groupId>
    <artifactId>spring-cloud-starter-netflix-eureka-client</artifactId>
</dependency>
<dependency>
    <groupId>org.springframework.cloud</groupId>
    <artifactId>spring-cloud-bus</artifactId>
</dependency>
<dependency>
    <groupId>org.springframework.cloud</groupId>
    <artifactId>spring-cloud-stream-binder-rabbit</artifactId>
</dependency>
配置文件application.yml
server:
  port: 8769
spring:
  application:
    name: config-server

  cloud:
    config:
      server:
        git:
          uri: https://github.com/cralor7/springcloud
          search-paths: config-repo
         # username:
         # password:
          default-label: master
    bus:
      trace:
        enabled: true
      enabled: true

eureka:
  client:
    serviceUrl:
      defaultZone: http://localhost:8761/eureka/

management:
  endpoints:
    web:
      exposure:
        include: bus-refresh
改造config-client
pom文件,这5个是必需的,还要加上web的起步依赖(已在主maven工程pom中配置)
<dependency>
            <groupId>org.springframework.cloud</groupId>
            <artifactId>spring-cloud-starter-config</artifactId>
        </dependency>
        <dependency>
            <groupId>org.springframework.cloud</groupId>
            <artifactId>spring-cloud-starter-netflix-eureka-client</artifactId>
        </dependency>
        <dependency>
            <groupId>org.springframework.cloud</groupId>
            <artifactId>spring-cloud-bus</artifactId>
        </dependency>
        <dependency>
            <groupId>org.springframework.cloud</groupId>
            <artifactId>spring-cloud-stream-binder-rabbit</artifactId>
        </dependency>
        <dependency>
            <groupId>org.springframework.boot</groupId>
            <artifactId>spring-boot-starter-actuator</artifactId>
        </dependency>
配置文件bootstrap.yml
server:
  port: 8763
spring:
  application:
    name: config-client
  profiles:
    active: test
  cloud:
    config:
      fail-fast: true
      discovery:
        enabled: true
        service-id: config-server
    bus:
      trace:
        enabled: true
      enabled: true

eureka:
  client:
    serviceUrl:
      defaultZone: http://localhost:8761/eureka/
在需要更新的配置类上加@RefreshScope注解,@RefreshScope必须加,否则客户端会收到服务端的更新消息,但是更新不了,因为不知道更新哪里的。
@RefreshScope
@RestController
public class MyController {

    @Value("${foo}")
    String foo;

    @RequestMapping("/foo")
    public String hi(){
        return foo;
    }
}
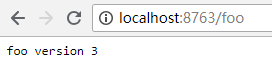
依次启动eureka-server、config-server和config-client(config-client开启两个实例,端口号8762、8763),访问浏览器http://localhost:8762/foo和http://localhost:8763/foo,显示
更改远程仓库配置文件,将foo的值改为”foo: foo version 7“。通过Postman或其他工具发送一个Post请求http://localhost:8769/actuator/bus-refresh/,请求发送成功后,再访问浏览器,显示

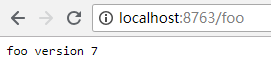
可见,通过向8769端口的服务端发送Post请求刷新配置,由于使用了Spring Cloud Bus,其他服务实例(如两个客户端)也会接收到刷新配置的消息,并刷新配置。
对客户端config-client使用 /actuator/bus-refresh。
首先需要把config-client上的bus-refresh端点给放出来,更改config-client的配置文件。发送Post请求http://localhost:8762/actuator/bus-refresh/。
server:
  port: 8763
spring:
  application:
    name: config-client
  profiles:
    active: test
  cloud:
    config:
      fail-fast: true
      discovery:
        enabled: true
        service-id: config-server
    bus:
      trace:
        enabled: true
      enabled: true

eureka:
  client:
    serviceUrl:
      defaultZone: http://localhost:8761/eureka/

management:
  endpoints:
    web:
      exposure:
        include: bus-refresh
测试后可见8762、8763端口客户端都发生了改变。说明只要开启 Spring Cloud Bus 后,不管是对 config-server 还是 config-client 执行/actuator/bus-refresh都是可以更新配置的。
局部刷新
某些场景下(例如灰度发布),我们可能只想刷新部分微服务的配置,此时可通过/actuator/bus-refresh/{destination}端点的 destination 参数来定位要刷新的应用程序。例如:/actuator/bus-refresh/customers:8000,这样消息总线上的微服务实例就会根据 destination 参数的值来判断是否需要要刷新。其中,customers:8000指的是各个微服务的 ApplicationContext ID。destination 参数也可以用来定位特定的微服务。例如:/actuator/bus-refresh/customers:**,这样就可以触发 customers 微服务所有实例的配置刷新。
参考:Spring Cloud(九):配置中心(消息总线)【Finchley 版】
案例代码地址:https://github.com/cralor7/springcloud


 浙公网安备 33010602011771号