ExtJS-介绍(Introduction to Ext JS)
ExtJS教程汇总:https://www.cnblogs.com/cqpanda/p/16328016.html
ExtJS介绍(Introduction to Ext JS)
ExtJS是什么
Web前端富Internet应用程序(Rich Internet Applications)框架。
ExtJS优点(使用ExtJS的优势)
1.丰富的UI组件(Rich UI components),比如:Grids, pivot grids, forms, charts, trees。
2.开发效率高、降低了开发成本。
3.JavaScript优先,所有的UI组件都是通过JavaScript定义的,而不是HTML+CSS
预定义了多种主题,并且可以自定义化主题。
4.跨平台(Cross-browser support)。
5.支持MVC/MVVM 开发模式,支持双向绑定(Two-way binding)。
6.代码向后兼容性(compatibility)好,代码升级改动小。
7.软件文档详细(和微软类似)。
8.有完善的商业支持。
9.支持客户端路由(Client-Side Routing)。
ExtJS缺点
1.商业使用收费。
2.入门门槛高。
ExtJS的历史版本
Ext JS 7
增加新的UI主题
Ext JS 6
将Ext JS和Sencha Touch合并
Ext JS 5.0
第五个版本在2014年发布
添加了MVVM 开发模式,支持双向绑定
添加了对触屏设备的支持
支持响应式布局
Ext JS 4.0
第四个版本在2011年发布
进行了重构,添加了MVC开发模式,优化了速度
Ext JS 3.0
第三个版本在2009年完成
这个版本添加了图表和列表组件,但性能损耗增加
这个版本与前版本实现了先后兼容
Ext JS 2.0
第二个版本在2007年完成
这个版本添加了许多新的API用于有限的桌面应用开发
这个版本没有与前版本向后兼容
Ext JS 1.1
第一个版本由Jack Slocum在2006年完成
基于YUI进行扩展完成,主要包含一些实用的类
当时叫做YUI-ext
Ext JS框架的组成(主要功能)
概述
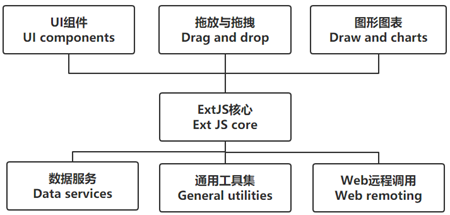
ExtJS核心(Ext JS core)
UI组件(UI components)
拖放与拖拽(Drag and drop)
图形图表(Draw and charts)
数据服务(Data services)
通用工具集(General utilities)
Web远程调用(Web remoting)
ExtJS核心(Ext JS core)
Ext JS 核心主要包括:底层基本架构 和 基本功能
比如:事件、组件、DOM操作、Ajax通信
其他部分功能都依赖于框架的核心,但核心并不依赖于任何部分
UI组件(UI components)
UI组件包含所有与用户有交互的部件
拖放与拖拽(Drag and drop)
为Ext JS组件或者任何HTML 元素赋予拖放功能
图形图表(Draw and charts)
跨浏览器绘图引擎,支持各种图形绘制
数据服务(Data services)
主要包含数据模型、数据通信、数据解析
通用工具集(General utilities)
某些常用任务的工具类
Web远程调用(Web remoting)
Web远程调用是用JavaScript远程执行在服务器上所定义和暴露的方法的一种手段
这些方法调用通常称为远程过程调用(Remote Procedure Call,RPC)
Web远程调用包称为Ext. Direct
ExtJS授权类型
官方说明:http://www.sencha.com/products/extjs/licensing
- 开源协议授权(The open source license)
开发开源软件可以免费使用
协议类型为GNU GPL license v3 (http://www.gnu.org/copyleft/gpl.html) - 商业授权(The commercial license)
闭源商业软件必须购买商业授权 - 商业OEM协议授权(The commercial OEM)
基于ExtJS开发商业使用的SDK
基于ExtJS开发web应用程序生成器(web application builder)
开发界面用于嵌入式设备
自定义协商授权
ExtJS相关工具(Tools)
Sencha CMD
使用ExtJS框架时整个软件生命周期的命令行辅助工具。
IDE插件(Sencha IDE Plugins)
Sencha IDE 插件支持 Visual Studio、Visual Studio Code、IntelliJ、WebStorm等IDE
主要作用是:
提高生产力(Improving Productivity)
代码智能提示(Code Completion)
代码检查(Code Inspection)
代码导航(Code Navigation)
代码生成(Code Generation)
代码重构(Code Refactoring)
模板生成(Template Creation)
拼写检查(Spell-checking)
Sencha调试工具(Sencha Inspector)
Sencha Inspector是一个调试工具(debugging tool)
用于开发阶段调试(debugger)程序使用
Sencha Architect
可视化开发工具,拖着完成界面或者根据数据生成界面。
Sencha Test
测试工具
Sencha Themer
主题定制工具
WebTestIt
UI测试工具
ExtJS版本更新助手(upgradeadviser)
https://www.sencha.com/products/extjs/upgradeadviser/
ExtJS应用模板类型介绍
应用模板类型
经典(Classic)应用 就是原先的ExtJS模板。
现代(Modern)应用 就是原先的Sencha Touch模板。
通用(Universal)应用 就是将经典应用和现代应用进行整合后的模板。
通过URL设定访问的Toolkit类型
访问Modern
http://127.0.0.1:1841/?modern
访问Classic
http://127.0.0.1:1841/?classic
设置默认的模板类型
在index.html中修改profile值。
下载ExtJS(download ExtJS)
开源版本下载地址
https://www.sencha.com/legal/GPL/
ExtJS4到ExtJS5目录变化
1.builds文件夹撤除,改为build文件夹。
2.locale文件夹移动到packages/ext-locale文件夹。
3.resources文件夹撤除,使用packages 文件夹代替。
4.jsbuilder文件夹撤除,使用Sencha Cmd来构建和压缩源代码。
5.ext-dev.js文件撤除,使用ext-debug.js代替。
6.docs文件夹撤除,使用官方文档代替。
基本安装使用-使用Sencha CMD(Creating our application with Sencha Cmd)
安装Sencha CMD
默认路径安装在:C:\Users\Administrator\bin\Sencha\Cmd。
使用Sencha CMD初始化应用
进入应用目录(或者自己新建):
cd D:/www
生成应用:
sencha generate app modern -ext MyApp ./MyApp
应用目录将出现这些文件:
app
build
ext
resources
.gitignore
app.js
app.json
bootstrap.css
bootstrap.js
bootstrap.json
bootstrap.jsonp
build.xml
index.html
Readme.md
workspace.json
现在启动应用
在应用目录下执行:sencha CMD将进行自动编译生成应用
sencha app watch
自动编译完成:显示以下信息表示编译完成
[INF] Waiting for changes...
进入网址查看:
127.0.0.1:1841
应用代码改变时,Sencha CMD会自动编译生成新代码
都可以直接反应在浏览器上,当显示Waiting for changes…表示编译完成
代码结构介绍
Extjs框架是JavaScript优先的框架
Ext JS应用程序的起点是app.js(在app.json中指定)
配置ExtJS SDKs库文件
1.进入senchaCMD的同级路径
2.建立sencha-sdks目录,解压extjs库文件到该目录下
3.设置CMD关联ExtJS库文件
进入Sencha目录下,或将sencha.exe添加到path路径中
转移目录:
cd C:\Users\Administrator\bin\Sencha\Cmd
配置SDK路径:
sencha config --prop sencha.sdk.path=C:..\sencha-sdks --save
以后ExtJS库文件直接放在该目录下就可以关联Sencha CMD
基本安装使用-直接引入JS和CSS
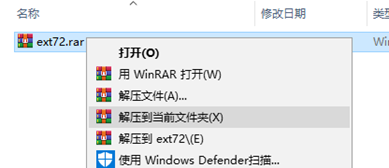
解压下载的ExtJS包
提示:也可以使用公共CDN的ExtJS文件:
http://cdn.bytedance.com/?query=extjs&version=6.2.0
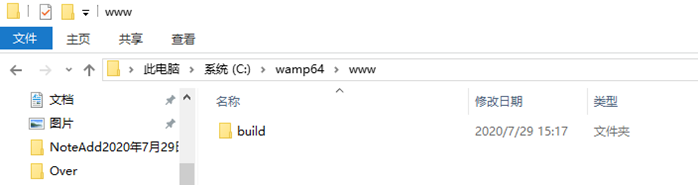
进入Web目录下,将build文件夹复制到你的Web目录下
新建index.html文件

编辑index.html文件并引入CSS和JS文件
注意:生产环境中,使用非debug版本的css和js文件
注意:根据自己需要,引入对应风格的CSS文件和JS文件
<!DOCTYPE html>
<html lang="zh-CN">
<head>
    <meta charset="UTF-8">
    <meta name="viewport" content="width=device-width, initial-scale=1.0">
    <!-- 引入主题 -->
    <link rel="stylesheet" href="/classic/theme-material/resources/theme-material-all-debug.css">
    <title>ExtJS73</title>
</head>
<body>
    <!-- 引入ExtJS -->
    <script src="/ext-all-debug.js"></script>
    <!-- 引入翻译文件 -->
    <script src="/classic/locale/locale-zh_CN-debug.js"></script>
    <!-- 引入主题额外的js文件 -->
    <script src="/classic/theme-material/theme-material-debug.js"></script>
    <script>
        Ext.onReady(function(){

        });
     </script>
</body>
</html>
写入代码到index.html中进行测试1
<!DOCTYPE html>
<html lang="zh-CN">
<head>
    <meta charset="UTF-8">
    <meta name="viewport" content="width=device-width, initial-scale=1.0">
    <!-- 引入主题 -->
    <link rel="stylesheet" href="/classic/theme-material/resources/theme-material-all-debug.css">
    <title>ExtJS73</title>
</head>
<body>
    <!-- 引入ExtJS -->
    <script src="/ext-all-debug.js"></script>
    <!-- 引入翻译文件 -->
    <script src="/classic/locale/locale-zh_CN-debug.js"></script>
    <!-- 引入主题额外的js文件 -->
    <script src="/classic/theme-material/theme-material-debug.js"></script>
    <script>
        Ext.onReady(function(){
            Ext.create('Ext.panel.Panel', {
               renderTo: Ext.getBody(),
               height: 200,
               width: 500,
               closable: true,
               draggable: true,
               closeAction: 'hide',
               title: 'This Is Title',
               html: 'This is Context'
            });
        });
    </script>
</body>
</html>
代码说明:
Ext.onReady()方法将会在ExtJS开始渲染元素时执行
Ext.create() 方法用于创建ExtJS对象,这里创建了Ext.panel.Panel对象
Ext.panel.Panel 是ExtJS的预定义类
每个Ext类都有不同的属性用于执行不同的功能
Ext.panel.Panel中属性的解释:
renderTo属性用于指定类渲染在HTML中的位置
height和width属性用于设置高度和宽度
title属性用于提供Panel的标题
html属性用于设置Panel中的HTML内容
写入代码到index.html中进行测试2
<!DOCTYPE html>
<html lang="zh-CN">
<head>
    <meta charset="UTF-8">
    <meta name="viewport" content="width=device-width, initial-scale=1.0">
    <!-- 引入主题 -->
    <link rel="stylesheet" href="/classic/theme-material/resources/theme-material-all-debug.css">
    <title>ExtJS73</title>
</head>
<body>
    <!-- 引入ExtJS -->
    <script src="/ext-all-debug.js"></script>
    <!-- 引入翻译文件 -->
    <script src="/classic/locale/locale-zh_CN-debug.js"></script>
    <!-- 引入主题额外的js文件 -->
    <script src="/classic/theme-material/theme-material-debug.js"></script>
    <script>
        Ext.application({
            name: 'PandaApplication',
            launch: function(){
                Ext.create('Ext.panel.Panel', {
                   renderTo: Ext.getBody(),
                   height: 200,
                   width: 500,
                   closable: true,
                   draggable: true,
                   closeAction: 'hide',
                   title: 'This Is Title',
                   html: 'This is Context'
                });
            }
        });
    </script>
</body>
</html>
说明:这里使用Ext.application方法创建应用,代码逻辑放在launch方法中。
本文来自博客园,作者:重庆熊猫,转载请注明原文链接:https://www.cnblogs.com/cqpanda/p/16404022.html

 浙公网安备 33010602011771号