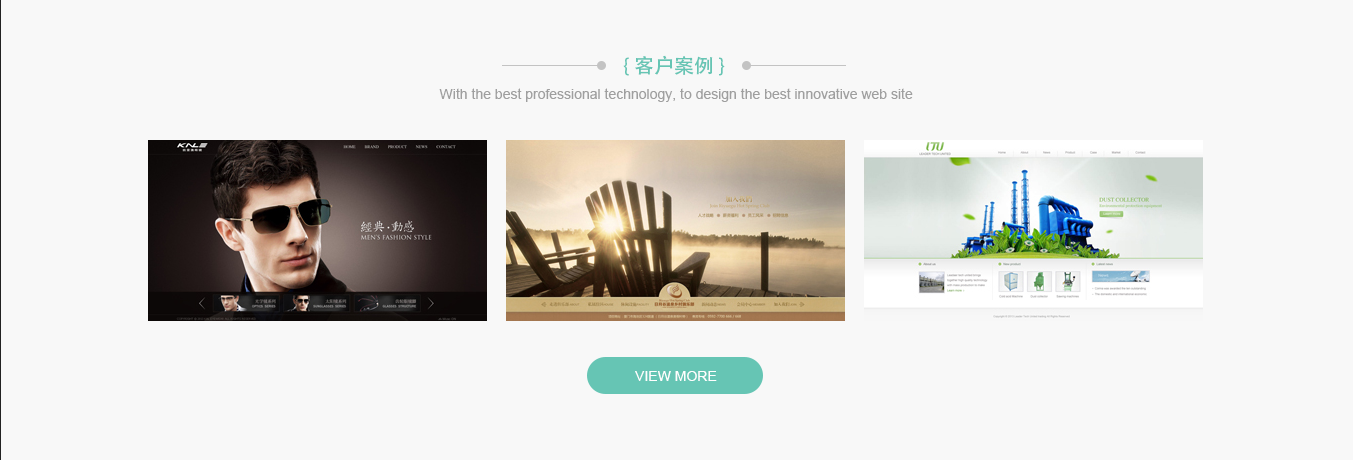
五.客户案例部分的制作

一.客户案例的制作分析
客户案例可以上下分为三部分来制作
第一部分放置客户案例的标题以及标题下的段落文字
第二部分放置三张图片
第三部分放置一个按钮
二.代码的实现
1.HTML代码
    <div class="customer">
        <div class="customer-header">
            <div class="customer-header-box">
                <div class="customer-header-left"></div>
                <div>{ 客户案例 }</div>
                <div class="customer-header-right"></div>
            </div>
            <p>With the best professional technology, to design the best innovative web site</p>
        </div>
        <div class="customer-body">
            <div class="customer-list">
                <img src="./images/section2.png" alt="">
            </div>
            <div class="customer-list">
                <img src="./images/section2.png" alt="">
            </div>
            <div class="customer-list">
                <img src="./images/section2.png" alt="">
            </div>
        </div>
        <div class="customer-foot">
            <a href="" class="more">VIEW MORE</a>
        </div>
    </div>
布局
设置整体div,然后在整体div中添加三个div分别放置标题,内容,按钮
在第一个div中放置标题的第一行(div)和第二行(p)
在第一行中放置三个div,分别是左横线,标题,右横线
在第二个div中放置三个div,分别放置三张图片,将图片分别放在三个div中是为了方便设置
在第三个div中放置一个a标签,因为按钮应该是可以点击的,所以需要用a标签
2.CSS代码
.customer{
    height: 460px;
    background-color: #f8f8f8;
}
.customer-header{
    text-align: center;
    padding: 50px 0;
    color: #999;
}
.customer-header-box{
    width: 360px;
    margin: 0 auto;
    font-size: 20px;
    position: relative;
    color:#66cccc;
    padding-bottom: 12px;
}
.customer-header-left,.customer-header-right{
    width: 100px;
    height: 1px;
    position: absolute;
    top: 15px;
    background: #c3c3c3;
}
.customer-header-right{
    right: 0;
}
.customer-header-left::after,.customer-header-right::after{
    content: "";
    position: absolute;
    width: 9px;
    height: 9px;
    border-radius: 50%;
    background: #c3c3c3;
    top: -4px;
}
.customer-header-left::after{
    right: 0;
}
.customer-header-right::after{
    left: 0;
}
.customer-body{
    padding: 0 210px;
}
.customer-list{
    float: left;
    margin-left: 20px;
}
.customer-list img{
    width: 340px;
}
.customer-foot{
    margin: 220px auto 0px;
    background-color: #66cccc;
    line-height: 37px;
    display: block;
    width: 178px;
    height: 40px;
    text-align: center;
    border-radius: 100px;
    color: #ffffff;
}
客户案例整体部分
设置高度以及背景颜色,设置左右内边距,将内容挤到中间
标题部分与服务范围部分的基本相同,不再累述
内容部分
设置左浮动,使三张图片水平显示,然后设置左外边距,使三张图片中间有一定的距离
设置图片的宽度,这里不设置高度,放置图片拉伸
按钮部分
首先设置背景颜色,方便设置时候看的清楚
设置上下外边距,使按钮与上下有一定的间隔
设置行高,用行高来撑起来.文字会上下居中显示
设置文本左右居中
设置文本颜色
设置为块元素,这样就可以设置宽高了
设置圆角,给100px刚好可以达到图片中的效果,不满意可以打开浏览器编辑者工具来调整


 浙公网安备 33010602011771号