SSH的简单入门体验(Struts2.1+Spring3.1+Hibernate4.1)- 查询系统(上)
所谓SSH,指的是struts+spring+hibernate的一个集成框架,它是目前较流行的一种Web应用程序的开源框架。
集成SSH框架的系统从职责上分为四层:表示层、业务逻辑层、数据持久层和域模块层,以帮助开发人员在短期内搭建结构清晰、可复用性好、维护方便的Web应用程序。其中使用Struts作为系统的整体基础架构,负责MVC的分离,在Struts框架的模型部分,控制业务跳转,利用Hibernate框架对持久层提供支持,Spring做管理,管理struts和hibernate。(摘自百度百科)毕业实习布置了一个利用SSH框架做一个查询系统的作业,结果跟驾校科目三的考试冲突了,很悲剧的没有赶上第一次的检查作业,只能等国庆后再去补交了。我从SSH框架的布置到系统的简单实现一共花了三天的时间,里面的概念还不是很明白,只是知道怎么做而已。写下这篇文章也是为了以后重新入门SSH的时候有个入门介绍,防止以后还要从头开始学起(虽然觉得以后如果要写SSH的项目的话肯定要重新系统的学习一遍,无视无视~)
一、准备工具
- MyEclipse2014GA版本
- MySql5.6 和 其驱动包
- Tomcat 8
我这里提供一下MyEclipse的下载链接吧,正好网盘里有(附带破解),其他的工具请大家自行斟酌,因为MyEclipse已经自带数据库和Tomcat了,大家可以使用自带的工具。我这里是使用了上述的工具。
MyEclipse下载链接:百度网盘
MyEclipse破解文件下载链接:百度网盘
二、新建Web项目,导入SSH
- 首先第一步是新建一个web project的项目
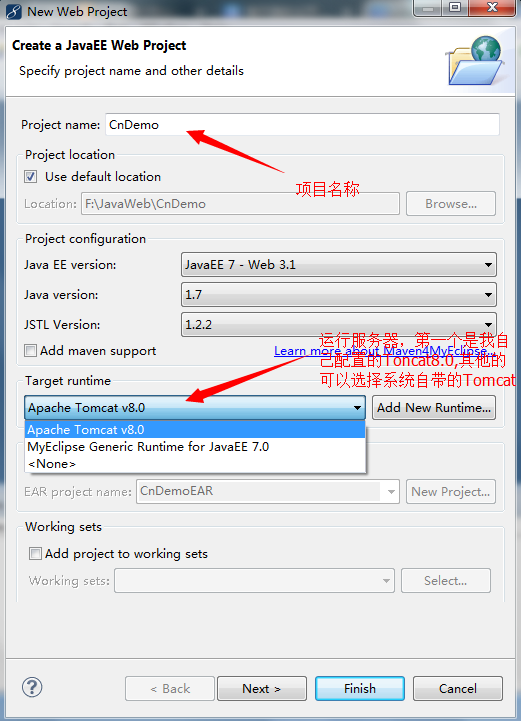
点击next,下一步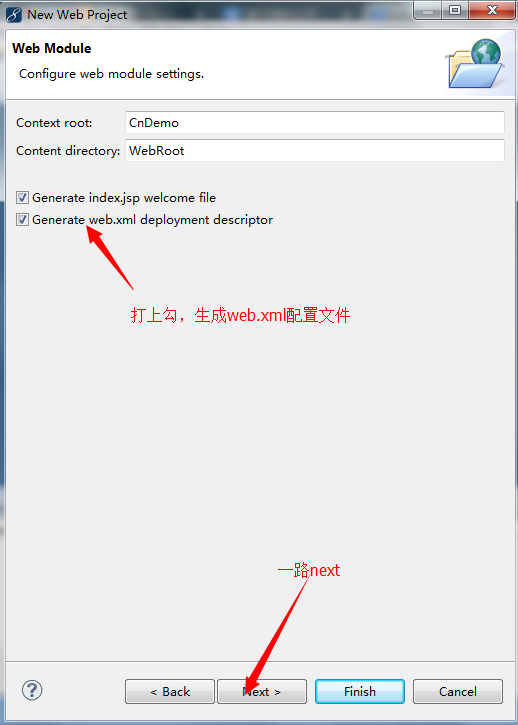
点击finish,完成web project的创建。 - 接下来我们导入SSH框架所需的文件
首先在CnDemo项目根文件夹上右键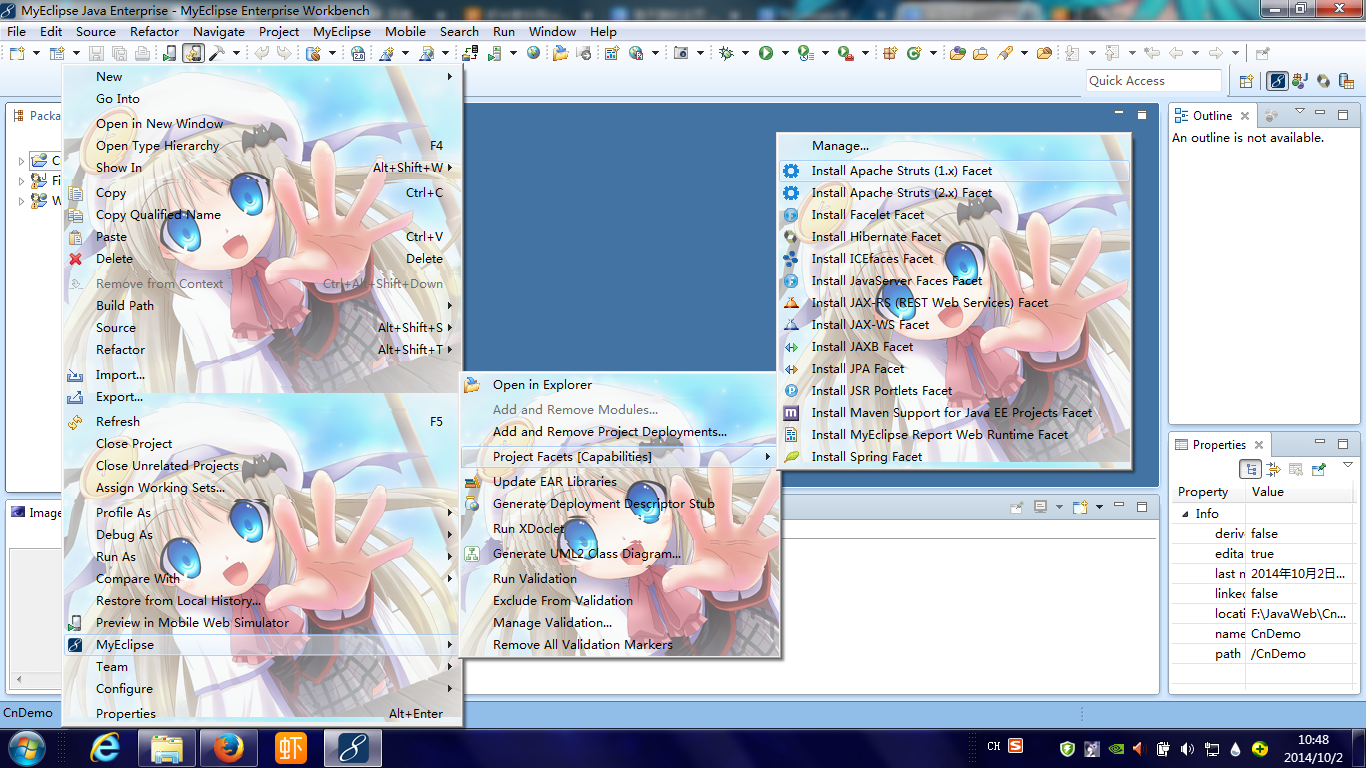
我没记错的话myeclipse早几期的版本菜单是add xxxx的样式,大家对号入座就行了。 - 首先是安装spring框架,选择Install Spring Facet.
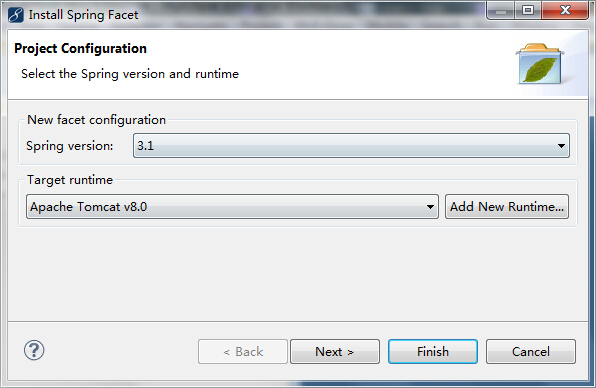

点击finish,这样spring3.1框架就导入进去了。 - 添加Hibernate,不过在此之前你要先建立数据库的链接
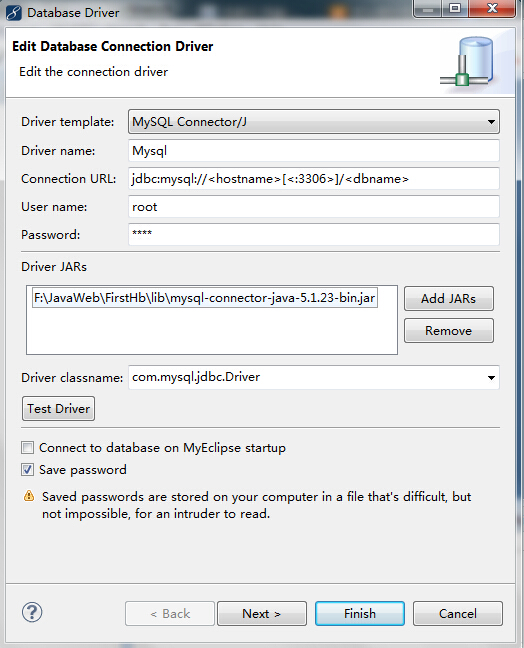
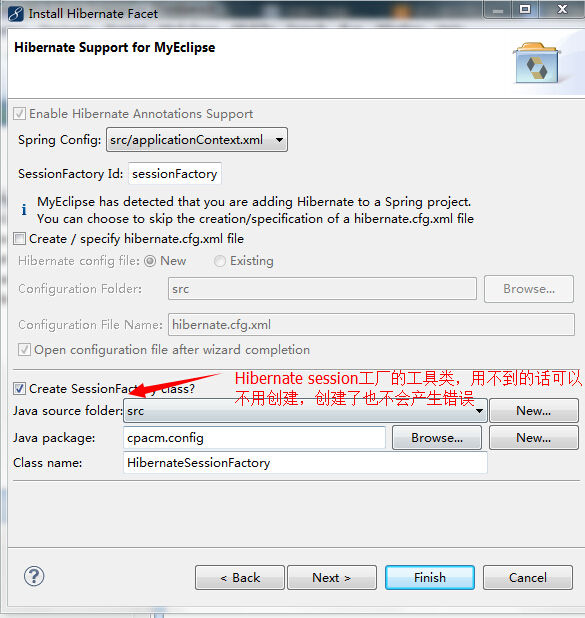
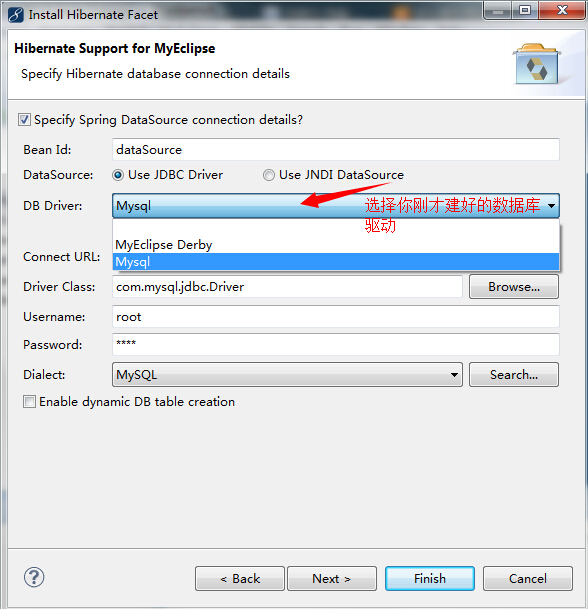
这是我的数据库连接,使用了mysql。在Connection Url这里要填写你要连接的域名和数据库名以及用户名和密码。要导入对应的数据库驱动jar文件才行。最后不要忘记测试一下数据库是否能用。 - 导入Hibernate框架,选择Install Hibernate Facet.
点击完成,创建完毕。 - 最后是导入struts框架,选择Install Apache Struts(2.x) Facet.

点击完成就好了。


以上这样配置,就算基本上把SSH最简单的框架给搭建好了。
三、关于SSH的配置文件
其中最重要的是这两个配置文件
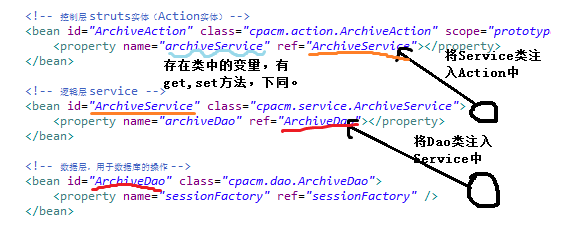
spring配置文件:applicationContext.xml。里面存放实体来控制整个系统。
struts配置文件:struts.xml。里面存放action的映射。
- applicationContext.xml
<?xml version="1.0" encoding="UTF-8"?>
<beans xmlns="http://www.springframework.org/schema/beans"
    xmlns:xsi="http://www.w3.org/2001/XMLSchema-instance" xmlns:p="http://www.springframework.org/schema/p"
    xmlns:aop="http://www.springframework.org/schema/aop"
    xsi:schemaLocation="http://www.springframework.org/schema/beans http://www.springframework.org/schema/beans/spring-beans-3.1.xsd http://www.springframework.org/schema/tx http://www.springframework.org/schema/tx/spring-tx.xsd http://www.springframework.org/schema/aop http://www.springframework.org/schema/aop/spring-aop-3.1.xsd"
    xmlns:tx="http://www.springframework.org/schema/tx">

    <!-- 数据库实体 -->
    <bean id="dataSource" class="org.apache.commons.dbcp.BasicDataSource">
        <property name="driverClassName" value="com.mysql.jdbc.Driver">
        </property>
        <property name="url" value="jdbc:mysql://localhost/querydb"></property>
        <property name="username" value="root"></property>
        <property name="password" value="shen"></property>
    </bean>

    <!-- hibernate实体 -->
    <bean id="sessionFactory"
        class="org.springframework.orm.hibernate4.LocalSessionFactoryBean">
        <property name="dataSource">
            <ref bean="dataSource" />
        </property>
        <property name="hibernateProperties">
            <props>
                <prop key="hibernate.dialect">
                    org.hibernate.dialect.MySQLDialect
                </prop>
                <!-- hibernate 数据的更新方式 -->
                <prop key="hibernate.hbm2ddl.auto">update</prop>
                <!-- 解决no session found -->
                <!--使用getCurrentSession()需要加入如下配置 -->
                <prop key="hibernate.current_session_context_class">thread</prop>
                <!-- hibernate分页出现 ResultSet may only be accessed in a forward direction需要设置hibernate结果集滚动 -->
                <!-- <prop key="jdbc.use_scrollable_resultset">false</prop> -->
            </props>

        </property>

        <!-- 配置实体Hibernate的描述文件 -->
        <property name="mappingResources">
            <list>
                <!-- 实体类列表 -->
                <value>cpacm/pojo/Archive.hbm.xml</value>
            </list>
        </property>
    </bean>

    <!-- 控制层 struts实体(Action实体) -->
    <bean id="ArchiveAction" class="cpacm.action.ArchiveAction" scope="prototype">
        <property name="archiveService" ref="ArchiveService"></property>
    </bean>

    <!-- 逻辑层 service -->
    <bean id="ArchiveService" class="cpacm.service.ArchiveService">
        <property name="archiveDao" ref="ArchiveDao"></property>
    </bean>

    <!-- 数据层,用于数据库的操作 -->
    <bean id="ArchiveDao" class="cpacm.dao.ArchiveDao">
        <property name="sessionFactory" ref="sessionFactory" />
    </bean>


    <!-- spring自带的事物管理 -->
    <bean id="transactionManager"
        class="org.springframework.orm.hibernate4.HibernateTransactionManager">
        <property name="sessionFactory" ref="sessionFactory" />
    </bean>
    <tx:annotation-driven transaction-manager="transactionManager" />

    <bean id="txManager"
        class="org.springframework.jdbc.datasource.DataSourceTransactionManager">
        <property name="dataSource" ref="dataSource" />
    </bean>
    <tx:advice id="txAdvice" transaction-manager="txManager">
        <tx:attributes>
            <tx:method name="save*" propagation="REQUIRED" />
            <tx:method name="add*" propagation="REQUIRED" />
            <tx:method name="create*" propagation="REQUIRED" />
            <tx:method name="insert*" propagation="REQUIRED" />
            <tx:method name="findByQuery*" propagation="REQUIRED" />
            <tx:method name="*" read-only="true" />
        </tx:attributes>
    </tx:advice>

    <aop:config proxy-target-class="true">
        <aop:advisor advice-ref="txAdvice"
            pointcut="execution(* net.noday..service..*.*(..))" />

    </aop:config>


</beans>
其中,bean的注入基本方法为
- struts.xml
<?xml version="1.0" encoding="UTF-8" ?>
<!DOCTYPE struts PUBLIC "-//Apache Software Foundation//DTD Struts Configuration 2.1//EN" "http://struts.apache.org/dtds/struts-2.1.dtd">
<struts>
    <!-- action由spring进行实例化 -->
    <constant name="struts.objectFactory" value="spring" />

    <constant name="struts.devMode" value="true"></constant>

    <package name="MySSH" extends="struts-default">
        <!-- <action name="test" class="cpacm.struts2.demoAction" method="execute">
            <result name="success">/Strut2Test.jsp</result> </action> -->

        <!-- 全局的通用的action -->
        <global-results>
            <result name="error">/error.jsp</result>
            <!-- <result name="success">/success.jsp</result> -->
        </global-results>

        <!-- Action列表,其中class=xxx为spring中的id -->
        <action name="query" class="ArchiveAction" method="Query">
            <result name="Query">/frame/ArcDataGrid.jsp</result>
        </action>
        <action name="tag" class="ArchiveAction" method="toUpdate">
            <result name="toUpdate">/frame/ArcUpdate.jsp</result>
        </action>
        <action name="update" class="ArchiveAction" method="Update">
            <result name="success">/frame/ArcDataGrid.jsp</result>
        </action>
        <action name="delete" class="ArchiveAction" method="Delete">
            <result name="success">/frame/ArcDataGrid.jsp</result>
        </action>
        <action name="queryByclassId" class="ArchiveAction" method="QueryByclassID">
            <result name="success">/frame/ArcDataGrid.jsp</result>
        </action>
        <action name="ArcAdd" class="ArchiveAction" method="Add">
            <result name="success">/frame/ArcAddData.jsp</result>
        </action>
    </package>

</struts>

以上基本就是配置的全部过程了,可能很简单,但也是五脏俱全了。篇幅有限,接下来会在下一篇讲述怎么建一个完整的系统。

 浙公网安备 33010602011771号