D-Link DIR-605L固件仿真
 固件仿真~
固件仿真~
dir605L FW 113.bin
提取文件系统
恢复D-Link DIR-605L(FW_113)固件运行环境的详细踩坑过程 – ba1100n的网安学习随笔
从 D-Link 官方技术支持网站下载固件,下载链接为
fp://fp2.dlink.com/PRODUCTS/DIR-605L/REVA/DIR-605L FIRMWARE 1.13.ZIP
support.dlink.com - /resource/products/dir-605l/REVA/
缩后得到固件 dir605L FW 113.bin。使用 Binwalk将固件中的文件系统提取出来,发现缺少sasquatch。
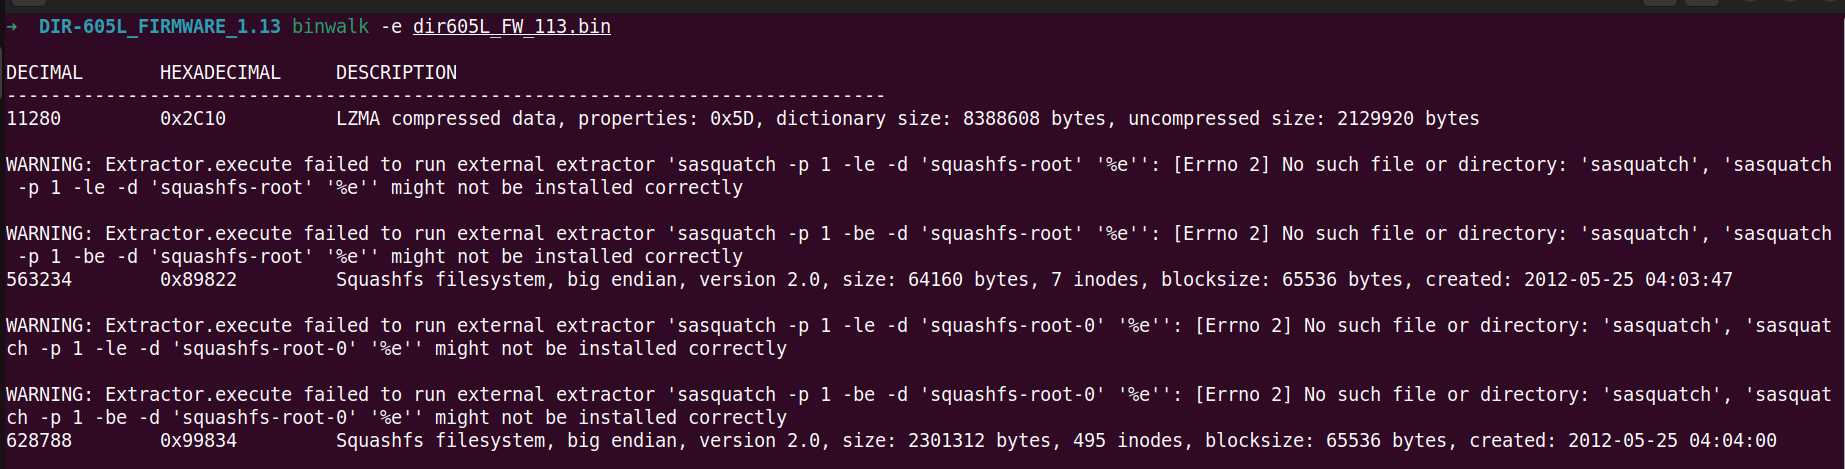
安装sasquatch: devttys0/sasquatch
./build.sh 编译报错:
Hunk #1 succeeded at 32 with fuzz 1.
cc -g -O2  -I. -I./LZMA/lzma465/C -I./LZMA/lzmalt -I./LZMA/lzmadaptive/C/7zip/Compress/LZMA_Lib -D_FILE_OFFSET_BITS=64 -D_LARGEFILE_SOURCE -D_GNU_SOURCE -DCOMP_DEFAULT=\"gzip\" -Wall -Werror  -DGZIP_SUPPORT -DLZMA_SUPPORT -DXZ_SUPPORT -DLZO_SUPPORT -DXATTR_SUPPORT -DXATTR_DEFAULT   -c -o unsquashfs.o unsquashfs.c
unsquashfs.c: In function ‘read_super’:
unsquashfs.c:1835:5: error: this ‘if’ clause does not guard... [-Werror=misleading-indentation]
 1835 |     if(swap)
      |     ^~
unsquashfs.c:1841:9: note: ...this statement, but the latter is misleadingly indented as if it were guarded by the ‘if’
 1841 |         read_fs_bytes(fd, SQUASHFS_START, sizeof(struct squashfs_super_block),
      |         ^~~~~~~~~~~~~
cc1: all warnings being treated as errors
make: *** [<builtin>: unsquashfs.o] Error 1
解决方法如下:
binwalk缺少sasquatch报错_nsquashfs.c:1835:5: error-CSDN博客
git clone --quiet --depth 1 --branch "master" https://github.com/devttys0/sasquatch
cd sasquatch
wget https://github.com/devttys0/sasquatch/pull/51.patch && patch -p1 <51.patch
sudo ./build.sh
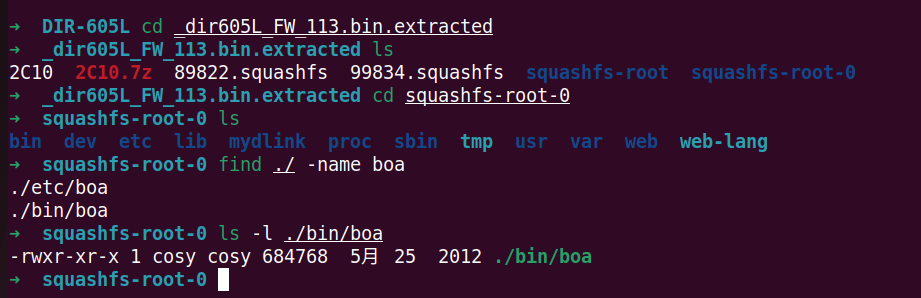
再次Binwalk将固件中的文件系统提取出来,搜索目标Web服务程序boa,命令为“./bin/boa”
劫持函数动态库
按照书上说的运行错误信息,定位异常函数。但是遇到报错:
➜  squashfs-root-0 cp $(which qemu-mips) ./
➜  squashfs-root-0 sudo chroot ./qemu-mips ./bin/boa
chroot: cannot change root directory to './qemu-mips': Not a directory
解决方法:apt-get install qemu binfmt-support qemu-user-static
初次运行boa的错误提示信息如下:
➜ squashfs-root-0 sudo chroot . ./qemu-mips-static ./bin/boa
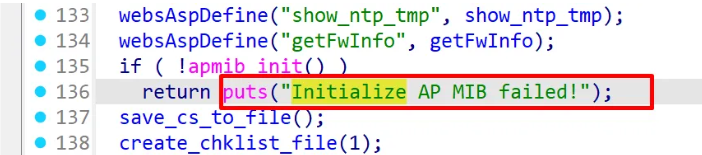
Initialize AP MIB failed!
qemu: uncaught target signal 11 (Segmentation fault) - core dumped
[1] 89697 segmentation fault sudo chroot . ./qemu-mips-static ./bin/boa
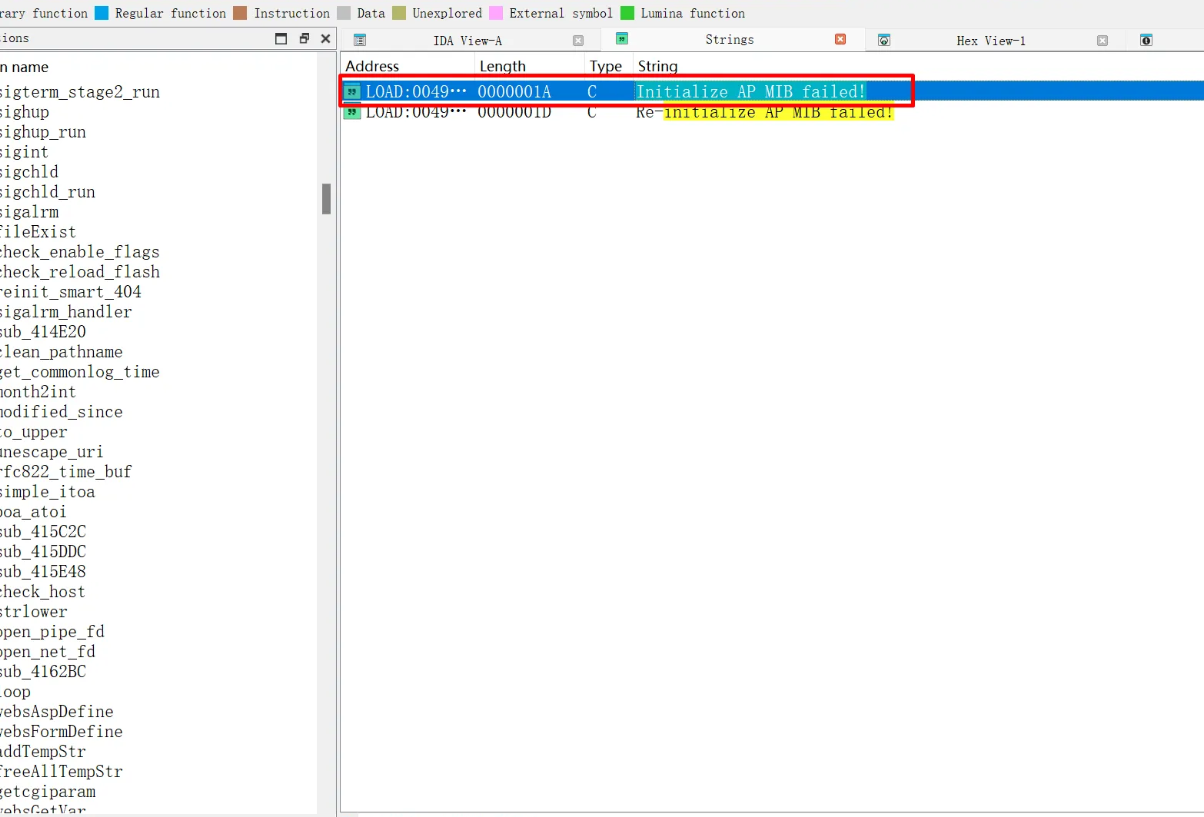
拖进IDA看下这个报错,搜索“Initialize AP MIB failed!”字符串:

八、IDA动态调试MIPS-Linux程序_mips ida-CSDN博客
解包以后,在根目录下执行固件文件系统里的 /bin/boa 这个程序。根据程序输出的报错信息,去定位异常函数
apt-get install qemu binfmt-support qemu-user-static
cp $(which qemu-mips) ./
sudo chroot ./qemu-mips ./bin/boa
初次运行 boa 的错误提示信息如下
Initialize AP MIB failed!
qemu: uncaught target signal 11 (Segmentation fault) - core dumped
[1]    89697 segmentation fault  sudo chroot . ./qemu-mips-static ./bin/boa
拖进 IDA 看下这个报错信息,shift + f12 打开字符串视窗,搜索 Initialize AP MIB failed! 字符串
点进去后 ctrl + x 查看对字符串的引用
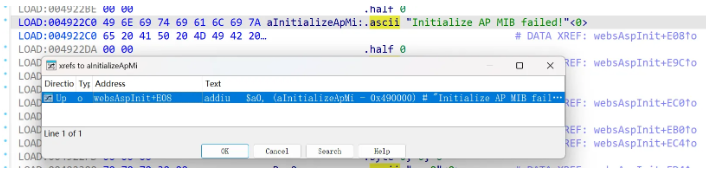
在 websAspInit() 函数中被调用
通过分析程序逻辑,要使得 apmib_init() 函数返回值为 ture,才能使程序继续运行。到 GitHub 看了源码后发现此函数的功能绝大部分与漏洞研究无关,都是进行一系列初始化和相关配置检查,链接如下
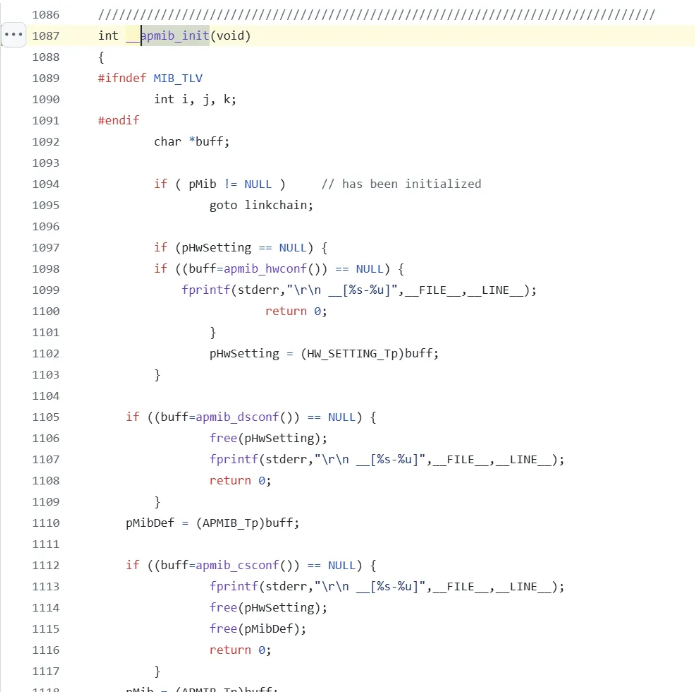
所以在硬件缺失的前提下,我们面对这种对我们”下绊字“的函数,可以直接替换,即重新编写一个新的 apmib_init() 函数去调用,劫持原本的函数
系统调用劫持 apmib.c 的代码如下
#include<stdio.h>
#include<stdlib.h>
int ampib_init(void)
{
     //Fake it.
     return 1;
}
需要安装交叉编译器 gcc-mips-linux-gnu,用于生成 MIPS 架构的 Linux 操作系统可执行文件
sudo apt install gcc-mips-linux-gnu
编译指令如下
通过动态调试定位 Crash
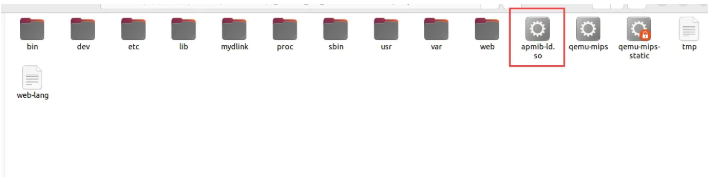
将编译好的 apmib-ld.so 动态链接库复制到 DIR-605L 路由器根文件系统的根目录下
这里需要注意的是使用共享库编译的,所以需要把交叉编译环境下的 libgcc_s.so.1 动态库复制到 DIR-605L 路由器根文件系统的 lib 目录下。复制本机动态库文件到固件文件系统里的命令如下,复现时需要按需修改文件系统的目录
cp /usr/lib/i386-linux-gnu/libgcc_s.so.1 ~/work/IoT/DIR-605L/_dir605L_FW_113.bin.extracted/squashfs-root-0/lib/
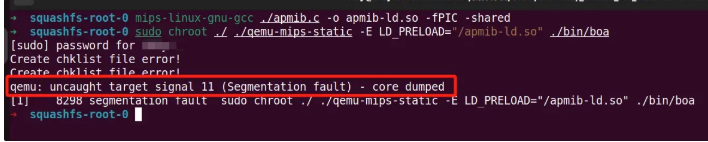
然后使用 LD_PRELOAD 环境变量加载 apmib-ld.so ,劫持 apmib.so 中的 apmib_init() 函数。如下,上述报错已被修复,但是出现了新的报错信息 Create chklist file error!,但无需理会这一个报错,真正需要关注的是后面触发的 Crash 导致的程序退出,所以需要调试程序是运行到哪一步时出现问题
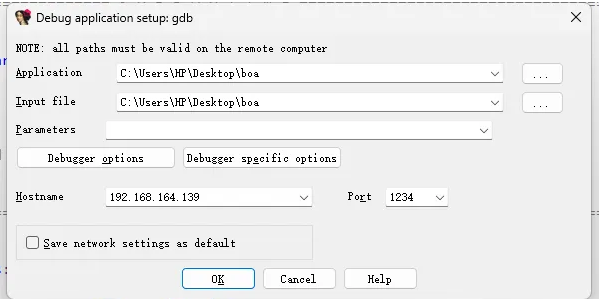
这里可以通过 IDA 进行远程调试,在目标固件仿真运行的机子上执行命令
sudo chroot ./ ./qemu-mips-static -E LD_PRELOAD="/apmib-ld.so" -g 1234 ./bin/boa
将 boa 拖入 IDA 进行反编译
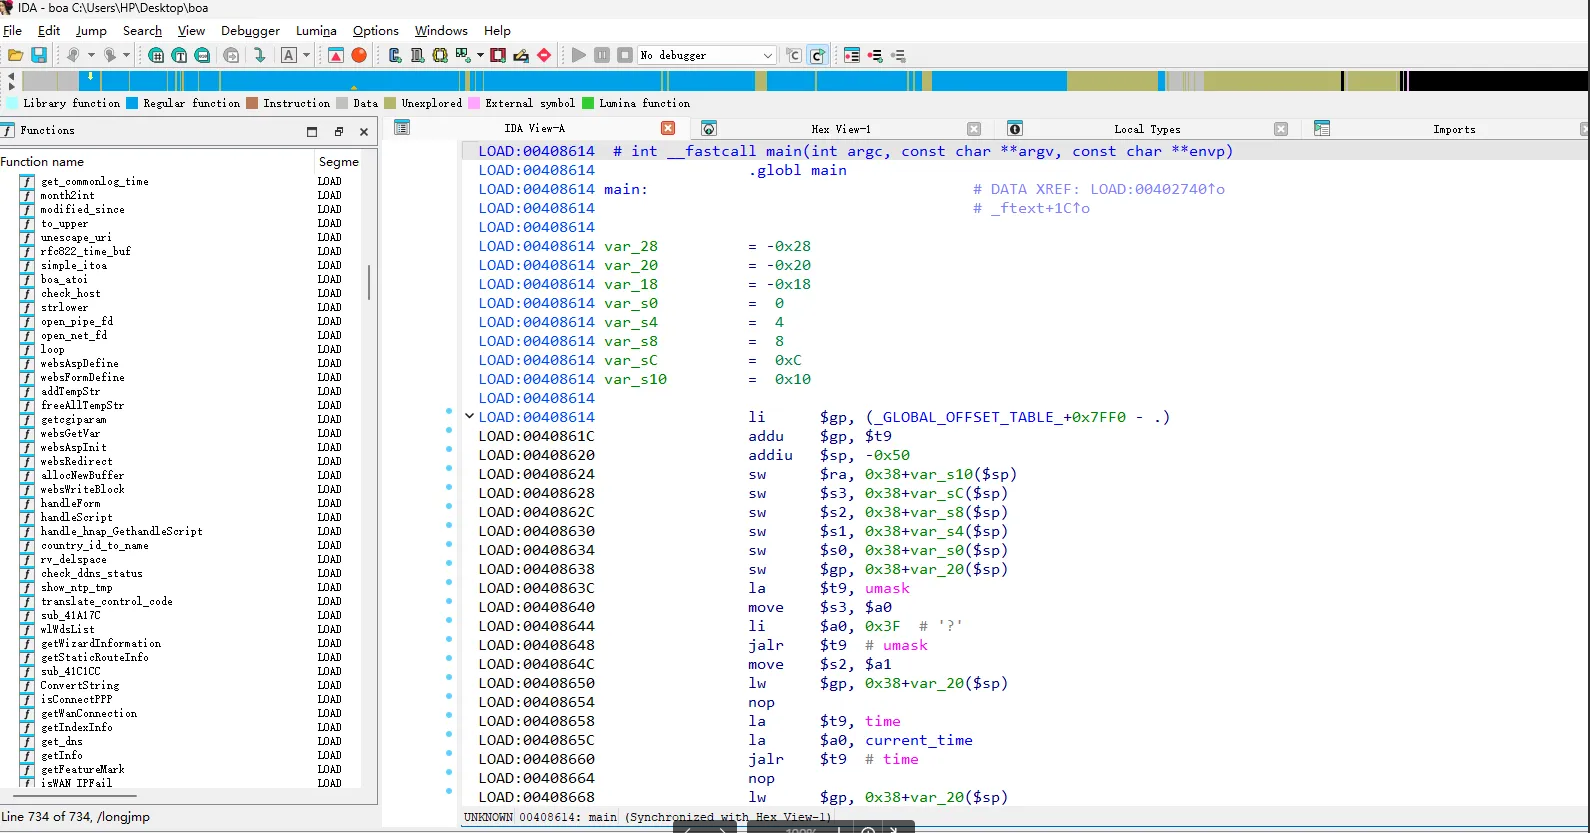
选择 Debugger -> Select debugger…,选择 Remote GDB debugger

然后选择 Debugger -> Process options…,然后填写地址和端口号
在 apmib_init() 函数中断下以后,使用快捷键 F8 进行单步调试,调试到对 apmib_get() 函数时程序崩溃
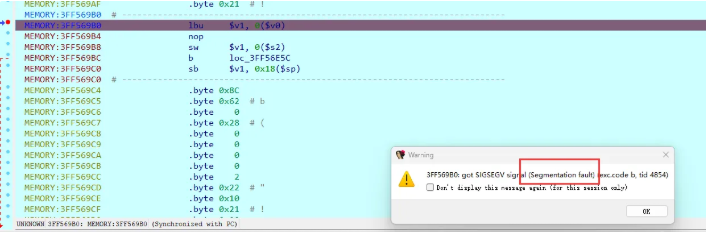
真正触发程序崩溃的是 0x43B1A4 处的指令
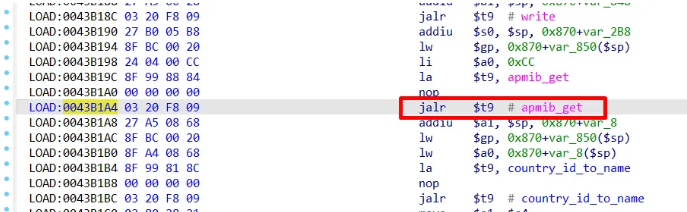
因此,我们还需要劫持 apmib_get() 函数。查看 apmib.so 中 apmib_get() 函数的汇编代码,通过对代码功能的分析,将 boa 中的 fork 函数一并劫持,形成最终的 boa 劫持代码,具体代码如下
#include<stdio.h>
#include<stdlib.h>
#define MIB_IP_ADDR  170
#define MIB_HW_VER   0x250
#define MIB_CAPTCHA  0x2C1

int apmib_init(){
    //Fake it.
    return 1;
}

int fork(void)
{
    return 0;
}

void apmib_get(int code, int *value)
{
    switch(code)
    {
       case MIB_HW_VER:
            *value = 0xF1;
            break;
       case MIB_IP_ADDR:
            *value = 0x7F000001;
             break;
       case MIB_CAPTCHA:
            *value = 1;
            break;
    }
    return;

}
编译最终的 apmib.c,生成 apmib-ld.so,命令如下
mips-linux-gnu-gcc ./apmib.c -o apmib-ld.so -fPIC -shared
将生成的 apmib-ld.so 复制到 DIR-605L 路由器的根文件系统下,然后使用下面的命令运行 boa
squashfs-root-0 sudo chroot ./ ./qemu-mips-static -E LD_PRELOAD="/apmib-ld.so" ./bin/boa
直接访问目标地址发现访问拒绝连接
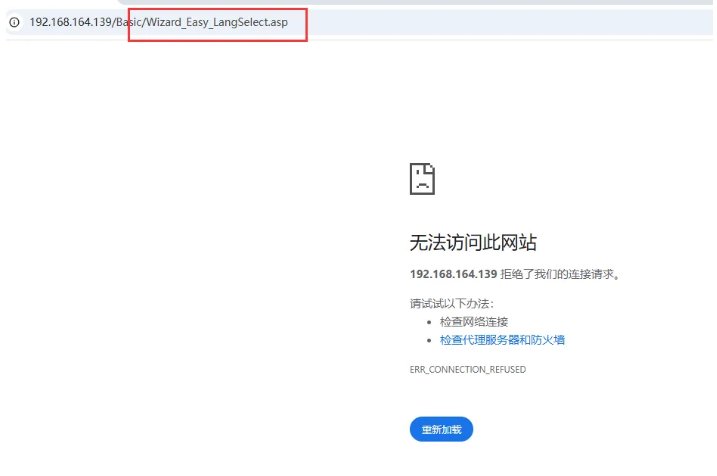
需要改动 web 目录下的 first.asp 文件
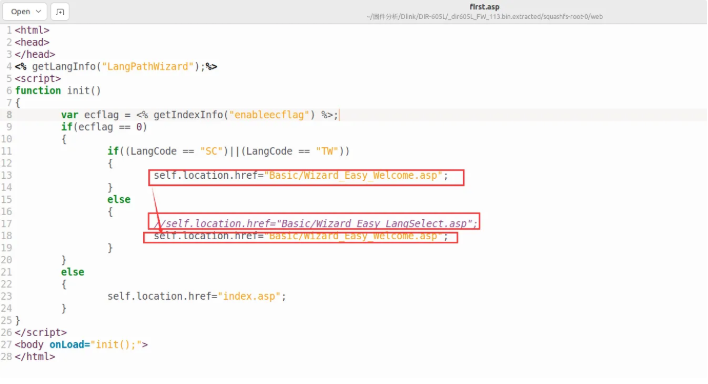
最终代码如下
<html>
<head>
</head>
<% getLangInfo("LangPathWizard");%>
<script>
function init()
{
	var ecflag = <% getIndexInfo("enableecflag") %>;
	if(ecflag == 0)
	{
		if((LangCode == "SC")||(LangCode == "TW"))
		{
			self.location.href="Basic/Wizard_Easy_Welcome.asp";
		}
		else
		{
			// self.location.href="Basic/Wizard_Easy_LangSelect.asp";
			self.location.href="Basic/Wizard_Easy_Welcome.asp";
		}
	}
	else
	{
		self.location.href="index.asp";
	}
}
</script>
<body onLoad="init();">
</html>
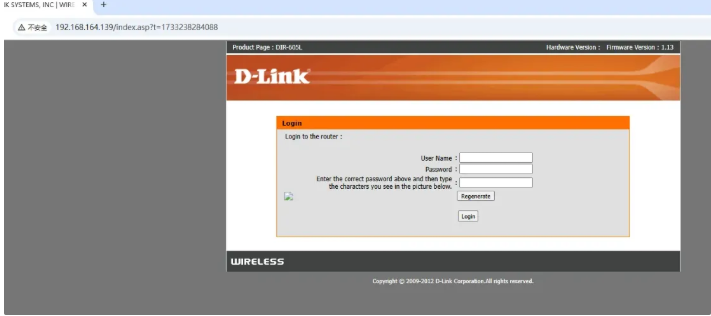
运行 boa 程序
最后再运行命令
sudo chroot ./ ./qemu-mips-static -E LD_PRELOAD="/apmib-ld.so" ./bin/boa
成功将固件的 httpd 服务,即 boa 程序的仿真运行环境搭建起来,效果如下

 浙公网安备 33010602011771号